


6985590000_COUV_UG_DVX160.qxd 23/03/06 16:58 Page 2 |
(Noir/Process Black film) |
User’s Guide
Guide de l’utilisateur Guía del Usuario Guida Utente Gebruikershandleiding
www.packardbell.com
6985590000-DVX-160-UG.book Page 2 Friday, March 24, 2006 6:10 PM
PA C K A R D BEL L DVX 160
ENGLISH . . . . . . . . . . . . . . . . 3 FRANÇAIS . . . . . . . . . . . . . . 15 ESPAÑOL . . . . . . . . . . . . . 28 ITALIANO . . . . . . . . . . . . . 40 NEDERLANDS . . . . . . . . . . 52
2 - DVX 160 User's Guide
6985590000-DVX-160-UG.book Page 3 Friday, March 24, 2006 6:10 PM
PACKARD BELL DVX 160 USER'S GUIDE
Copyright © 2006 Packard Bell B.V. All Rights Reserved. No part of this manual may be reproduced or transmitted, in any form or by any means, whether electronic, chemical, manual or otherwise, including but not limited to photocopying, recording, or information storage and retrieval systems, for any purpose without prior written permission of Packard Bell B.V.
DISCLAIMER
Packard Bell B.V. specifically disclaims all warranties, either express or implied, including, but not limited to, implied warranties of merchantability and fitness for a particular purpose with respect to this product and documentation. Updates to hardware components are made regularly. Therefore some of the instructions, specifications and pictures in this documentation may differ slightly from your particular situation. All items described in this guide are for illustration purposes only and may not apply to your particular situation. No legal rights or entitlements may be obtained from descriptions made in this manual.
Packard Bell B.V. reserves the right to revise or make changes or improvements to this product or documentation at any time without obligation to notify any person of such revisions or improvements. In no event shall Packard Bell B.V. be liable for any consequential or incidental damages, including but not limited to loss of business profits or any other commercial damages, arising out of the use of this product.
TRADEMARKS
Packard Bell is a registered trademark of Packard Bell B.V. All other company or product names are trademarks, registered trademarks or service marks of their respective owners.
DivX®, DivX® Certified, and associated logos are trademarks of DivX®, Inc. and are used under license.
This Product incorporates copyright protection technology that is protected by method claims of certain U.S. Patents and other intellectual property rights owned by Macrovision Corporation and other rights owners. Use of this copyright protection technology must be authorized by Macrovision Corporation, and is intended for home and other limited viewing uses only unless otherwise authorized by Macrovision Corporation. Reverse engineering or disassembly is prohibited.
WARNING
To prevent fire or shock hazard, do not use the plug with an extension cord, receptacle or other outlet unless the plug can be fully inserted, to prevent fire or shock hazard. Do not expose this appliance to rain or moisture.
The lightning flash with arrowhead symbol within an equilateral triangle is intended to alert the user to the presence of uninsulated dangerous voltage within the product's enclosure that may be of sufficient magnitude to constitute a risk of electric shock to persons.
WARNING: TO REDUCE THE RISK OF ELECTRIC SHOCK, DO NOT REMOVE THE COVER (OR BACK). NO USER SERVICEABLE PARTS INSIDE, REFER SERVICING TO QUALIFIED SERVICE PERSONNEL
The exclamation point within an equilateral triangle is intended to alert the user to the presence
of important operating and maintenance (servicing) instructions in the literature accompanying the appliance.
IMPORTANT SAFETY PRECAUTIONS
•Read and keep these instructions.
•Do not use this apparatus near water.
•Do not place anything on top of the device.
•Clean only with a dry cloth.
•Do not block any ventilation openings. Install in accordance with the manufacturer's instructions.
•Do not install near any heat sources such as radiators, heat registers, stoves or other apparatus (including amplifiers) that produce heat.
•Do not defeat the safety purpose of the plug. If the provided plug does not fit into your outlet, consult an electrician for replacement of the obsolete outlet.
•Protect the power cord from being walked on and from pinching.
-3

6985590000-DVX-160-UG.book Page 4 Friday, March 24, 2006 6:10 PM
•Only use attachments/accessories specified by the manufacturer.
•Unplug this apparatus during lightning storms or when unused for long periods of time. Please note that the product warranty does not apply if damage to the product is the result of a lightning strike.
•Refer all servicing to qualified service personnel. Servicing is required when the apparatus has been damaged in any way, has been exposed to rain or moisture, does not operate normally or has been dropped.
•You must unplug the power supply cord to disconnect the apparatus from the power supply. With this in mind, the socket-outlet should be located close to the apparatus and should also be readily accessible.
PRODUCT DISPOSAL
The Waste Electrical and Electronic Equipment (WEEE) Directive requires that the used electrical and electronic products must be disposed of separately from normal households waste in order to promote reuse, recycling and other forms of recovery and to reduce the quantity of waste to be eliminated with a view to reducing landfill. This includes accessories such as a remote control, power cords, etc. When you dispose of such products, please follow the guidance of your municipal authority and/or ask your retailer when purchasing a new product.
Table of Contents |
|
INTRODUCTION................................................................................................................... |
... 4 |
FRONT PANEL ......................................................................................................................... |
5 |
REMOTE CONTROL................................................................................................................. |
5 |
REAR PANEL ............................................................................................................................ |
6 |
CONNECTIONS ....................................................................................................................... |
6 |
GETTING STARTED ................................................................................................................. |
7 |
BASIC SETUP ........................................................................................................................... |
8 |
PLAYING DVD/CD DISCS...................................................................................................... |
10 |
ADVANCED PLAYBACK FUNCTION ..................................................................................... |
11 |
TROUBLESHOOTING............................................................................................................. |
12 |
PACKARD BELL LIMITED WARRANTY.................................................................................. |
14 |
Introduction
Thank you for purchasing a Packard Bell DVX 160 DVD player. The DVX 160 DVD player is a great addition to your home entertainment system and includes the following features:
•Watch your DVD and DivX movies.
•Listen to audio and MP3 CDs.
•Disc Compatibility: DVD-R/RW, DVD+R/RW, CD-R/RW
•File format compatibility: MPEG 2/3/4, DivX®, XviD, JPEG
Box Contents:
•DVD DVX 160.
•1 remote control unit (battery included)
•1 User's Guide and 1 Service Guide
•AV Cable
4 - DVX 160 User's Guide

6985590000-DVX-160-UG.book Page 5 Friday, March 24, 2006 6:10 PM
FRONT PANEL
1.Starts playback or pauses.
2.Stops playback
3.Infrared Receiver Window.
4.Power Indicator.
5.POWER - Switches the DVD player to ON or OFF.
6.(Open/Close) - Open/close the disc tray.
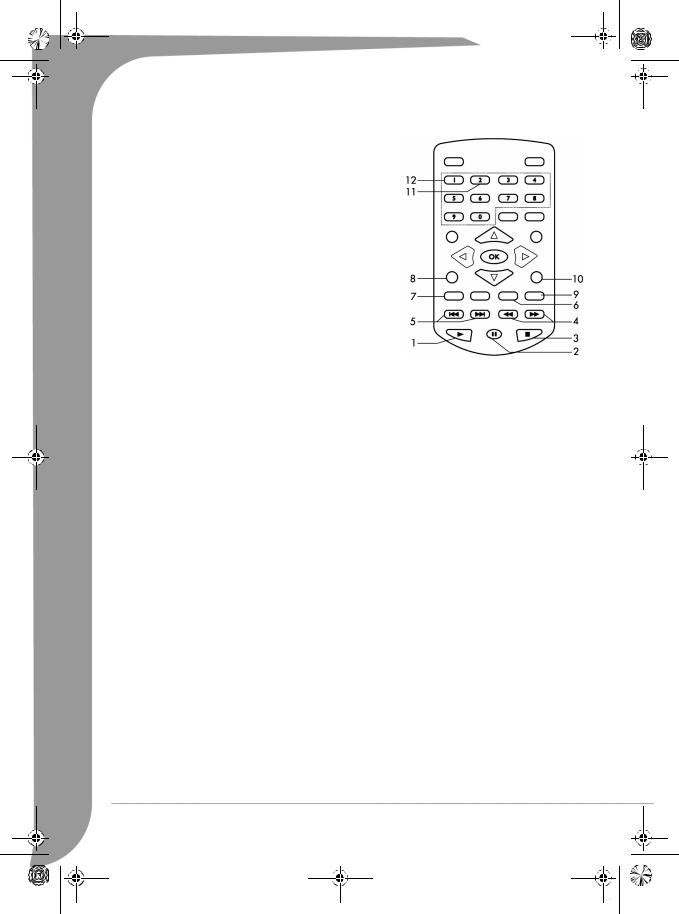
REMOTE CONTROL
1. STANDBY - Switches the player to Standby mode or ON.
2.TITLE - Displays title menu if present on disc.
3.ANGLE - Selects viewing angles if present on disc.
4.INFO - Displays the SETUP screen where you can check or change various settings (This function is only available in stop mode or when there is no disc in disc tray). Displays current setting information of playing disc.
5.Active Navigation Keys - Advance in indicated directions for making selections in menus. Moves pictures frame in zoom status.
6.MENU - Enters the Disc Contents Menu.
7.ZOOM/CLEAR - Selects different zooming sizes while playing a disc by pressing it repeatedly. Clears the information you input in other setup menus.
8.BOOKMARK - Opens bookmark menu.
9. Skip backward/forward to the
previous or next chapter/track.
10.Starts playing.
11. Pauses playback.
12. Stops playback.
13. Starts backward/forward search.
14.AUDIO - Selects one of the audio sound tracks programmed on a DVD.
- 5

6985590000-DVX-160-UG.book Page 6 Friday, March 24, 2006 6:10 PM
15.SUBTITLE - Selects subtitle language.
16.EXIT - Press to Exit menus or info bar on screen.
17.OK - Acknowledge menu selection.
18.PLAYMODE - Displays play mode menu if present on disc.
19.GOTO - Displays INFO Menu. Direct key in the specific location on a DVD/CD disc play.
20.A-B - Repeats playback of a specific section on a disc.
21.0-9 NUMERIC KEYS - 0>9 are used for access of title, chapter, track and time in Goto menu or access of title, chapter, track in program menu or password enter in parental lock.
Note: When a DVD disc is playing, Numeric 1 is used for displaying title menu if present on disc. Numeric 2 is used for selecting viewing angle if present on disc.
22. MUTE - Mutes sound output.
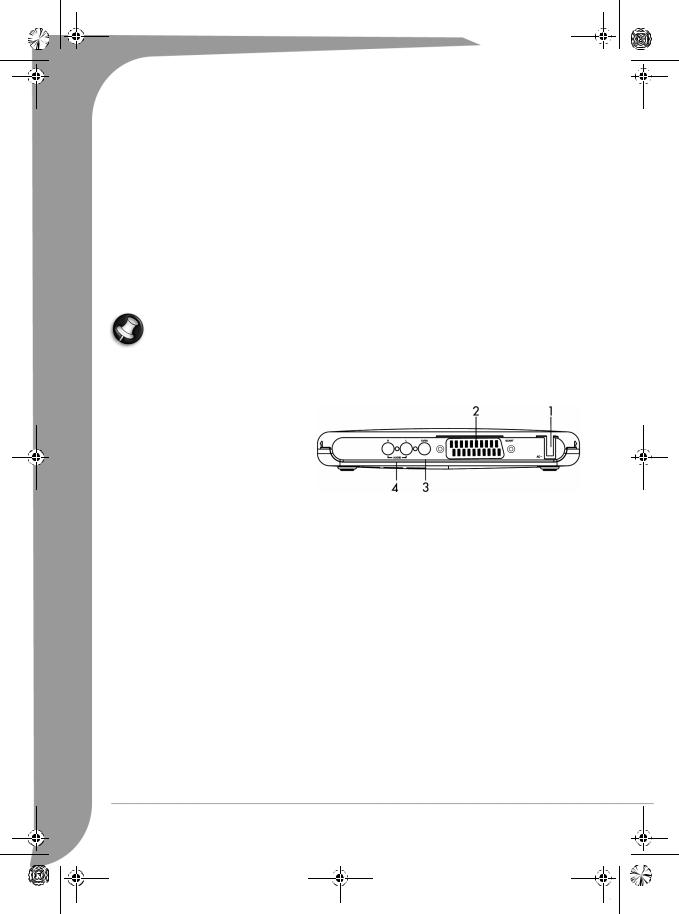
REAR PANEL
1.Power Cord.
2.SCART Output.
3.Composite Video Output.
4.Audio Output - Left and Right.
CONNECTIONS
Video Connections
The way in which you connect your DVD player and the kinds of cabling you use can make a noticeable difference to picture and sound quality. Before you select one of the options, please make sure that your other equipment (e.g. TV, receiver) has the required input/output connector. The following options are available:
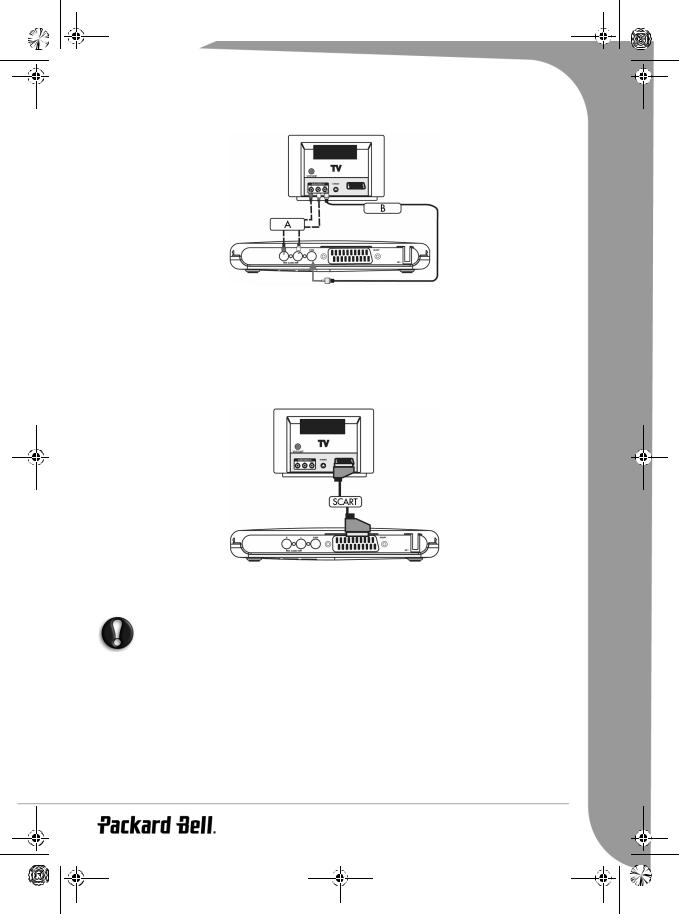
AV CABLE
A.To hear the sound of this DVD Player through your TV, use the audio cables (white/red) to connect the AUDIO (L/R) connectors of the DVD Player to the corresponding AUDIO IN connectors on the TV.
B.Use the composite video cable (yellow) to connect the DVD Player’s CVBS (VIDEO) connector to the video input connector (or labelled as A/V In, Video In, Composite) on the TV.
6 - DVX 160 User's Guide
6985590000-DVX-160-UG.book Page 7 Friday, March 24, 2006 6:10 PM
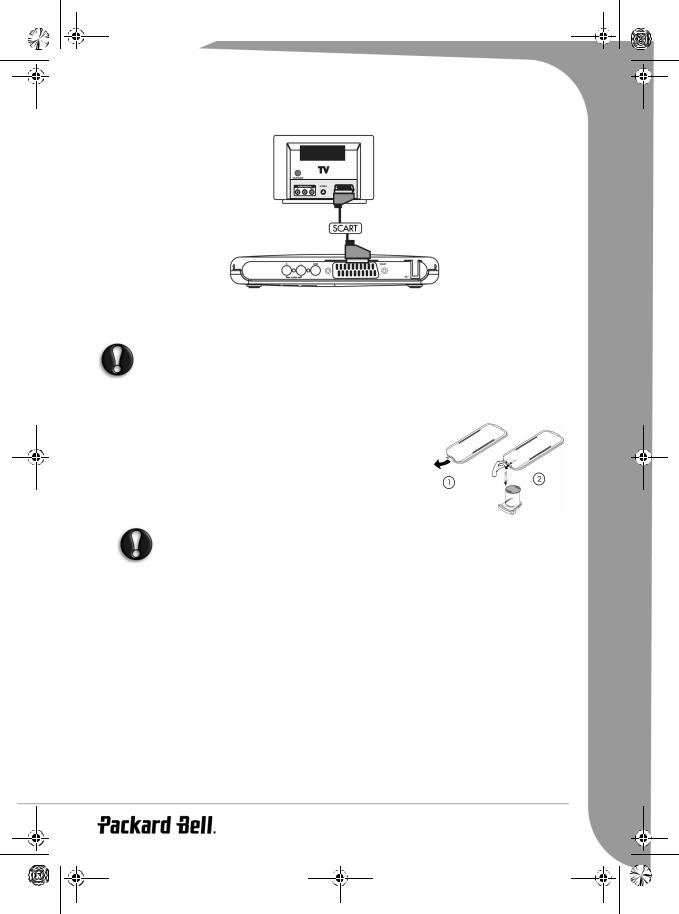
SCART CABLE (NOT INCLUDED)
This is the recommended connection. If your TV has a SCART connector, you can connect the DVD player to the TV with a SCART cable (as shown).
Certain cables can emit electromagnetic interference (EMI) to nearby electrical devices (especially televisions and radios). To help avoid this we recommend that you use a cable equipped with a ferrite core. Please see your retailer for more details.
GETTING STARTED
Using the Remote Control
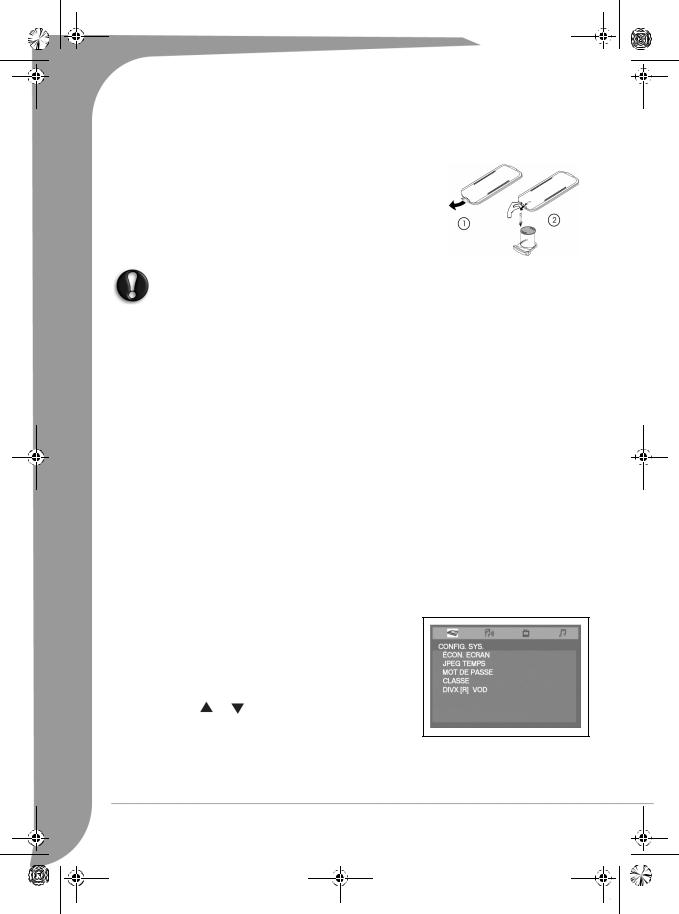
1.Pull out the battery compartment (as shown).
2.Replace battery (Lithium CR2025); Carefully remove the battery from the battery compartment and replace with the new battery.
3.Carefully re-insert the battery compartment into the remote control.
–Remove batteries if they are exhausted or if the Remote Control is not being used for a long time.
–Batteries contain chemical substances, so they should be disposed of properly.
Turning on the unit
Note: Only after all connections are completed, connect the power cord and power on the unit.
1.Plug the standard electrical plug into a wall socket or power strip.
2.Turn on the TV and set to the correct video-in channel.
Inserting a disc
1.Press the POWER button on the front panel. The Power Indicator will turn green. The system is now ready to use. You should see the DVD background screen on the TV.
2.Press the  (Open/Close) button to open the disc door and insert a disc, then press the same button again to close the disc door. Make sure the label side is facing up. For a double-sided disc, load the side you want to play facing up.
3.Playback will start automatically. If a disc menu appears on the TV, use the Navigation Keys to select the item [PLAY MOVIE] and press OK to start the movie playback. If the disc is locked by the parental lock, you must enter your four digit password.
-7
6985590000-DVX-160-UG.book Page 8 Friday, March 24, 2006 6:10 PM
BASIC SETUP
Setup Interface
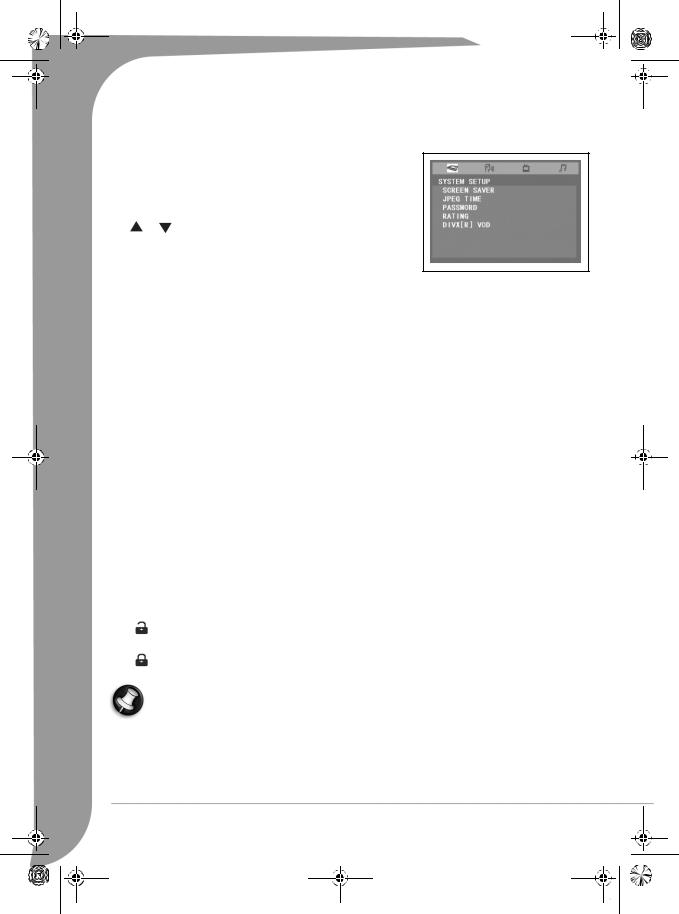
When the unit powers on, press the INFO button to access the SETUP
MENU in NO DISC mode or STOP mode.
-Use  or
or  button to select AUDIO SETUP.
-Use  or
or  button to select setting options and press OK or
  .
.
- Use |
|
or |
|
button to select the option you want to use and press OK |
|
|
|||
to conform. |
|
|
||
|
|
|||
- Press EXIT button to exit setup.
Basic Operation
1. SYSTEM SETUP
[SCREEN SAVER]
Controls the screen saver function, when the Player is in stop mode, the disc door is open, there is no disc in the disc tray or the screen is idle for 3 minutes, the screen saver will start to prevent the screen getting damaged.
On: To run screen saver. Off: To set screen saver off.
[JPEG TIME]
You can select the JPEG slide show speed when playing a picture CD, each picture will stay on screen according to the specified time setting before moving on to the next.
- 5 SEC: To set the slide show interval with 5 seconds. -10 SEC: To set the slide show interval with 10 seconds. -15 SEC: To set the slide show interval with 15 seconds. [PASSWORD] & [RATING]
DVD discs equipped with the password function are rated according to their content. The contents allowed by a parental lock level and the way a DVD disc can be controlled may vary from disc to disc. For example, if the disc allowed, you could edit out violent scenes unsuitable for children and replace them with more suitable scenes, or you could lock out playback of the disc altogether. If you make a mistake before pressing OK, press the CLEAR button and enter your 4 digit security code again. You cannot play DVD discs rated higher than the level you selected unless you cancel the parental lock function.
1.KID SAFE: Suitable for all audiences.
2.G: Suitable for general audiences.
3.PG: Parental guidance suggested.
4.PG-13: Parental guidance suggested, unsuitable for children under 13.
5.PG-R: Parental guidance recommended.
6.R: Restricted, violence, adult language and situation unsuitable for younger viewers.
7.NC-17: Adult theme or content, not suitable for children under 17.
8.ADULT: Adult theme, strong language or nudity.
Indicates Parental lock is NOT active.
The Parental lock is active.
Note: If the Parental lock is active, the rating setting menu will be unavailable.
8 - DVX 160 User's Guide

6985590000-DVX-160-UG.book Page 9 Friday, March 24, 2006 6:10 PM
2. LANGUAGE SETUP
You can select the “Audio” “Subtitle” and “Disc Menu” language if available on the disc.
[OSD LANGUAGE] Selects the initial or playback setting language. [AUDIO] Selects the preferred audio language.
[SUBTITLE] Selects preferred subtitles language. [DISC MENU] Selects the disc menu language.
3. VIDEO SETUP
[TV SYSTEM]
This player supports NTSC and PAL system. You may switch the NTSC/ PAL setting of the unit to match the video signal of your TV.
[TV TYPE]
Select the TV Image option according to your TV type: For a widescreen (16:9) TV, select “16x9 widescreen”.
-for a 16:9 movie, you will have a full screen view.
-for a 4:3 movie, black bars will show on the left and right sides of screen.
For a conventional 4:3 TV, select either “Letterbox” or “Standard”
-if you select 4:3 Letter Box for a 16:9 movie, black bars will show on the top and bottom of the screen.
-if you select 4:3 Standard for a 16:9 movie, the left and right edges of
the screen will be hidden.
- if you select either 4:3 Letterbox or 4:3 Standard for a 4:3 movie, you will have a full screen view.
Note: The displayable picture size is preset on the DVD disc. Therefore the playback picture of some DVD discs may not conform to the picture size you select.
When you play DVD discs recorded in 4:3 picture size only, the playback picture always appears in 4:3 picture size regardless of the TV shape setting.
If you select 16:9 wide-screen mode and you own a 4:3 TV set, the DVD playback picture will be horizontally distorted during playback.
Images could appear to be horizontally compressed. Always be sure that your TV shape conforms to the actual TV in use.
4. AUDIO SETUP [DYNAMIC RANGE]
Controls the dynamic range for quiet (e.g. night time) listening, compresses or reduces sudden load sounds such as explosions.
On: Sudden loud sounds are toned down slightly during playback. Off: No effect.
- 9
6985590000-DVX-160-UG.book Page 10 Friday, March 24, 2006 6:10 PM
PLAYING DVD/CD DISCS
1. Play
•Press to start playback.
2. Pause/Frame-by-Frame Advance
•Press  to pause playback.
•Press  to resume playback.
•Press  repeatedly to move forward frame by frame (not applicable for CD Playback).
3. Stop & Resume Play
•Press once to stop playback; press  to resume playback from the point at which you stopped the disc.
•Press twice to stop playback completely. Pressing  will start playback from the beginning of the disc.
4. Fast Search/Slow Motion
•Press to search forward or backward quickly. Press  to resume normal playback.
•Each time the  buttons are pressed, the speed of the search changes accordingly:
•With playback paused, press to start forward or backward slow motion playback. Press  to resume normal playback.
•Each time the  buttons are pressed, the speed of slow motion playback changes accordingly.
Note: Slow Motion is not applicable to CD Playback.
5. Skip Forward/Backward
•Press to skip forwards or backwards a chapter/track.
6. Audio (DVD)
•Press to show the current audio format number during disc playback.
•Press repeatedly to select the desired audio format.
Notes: If only one audio format is recorded, the number does not change. About two seconds later, playback continues in the new audio format.
7. Zoom/Clear
Press to zoom in pictures during disc playback.
•While an image is zoomed, you can use the navigation keys to shift the view and display the part you want.
•To return to the normal view, press the ZOOM key until the zoom off symbol shows. The screen will return to normal.
•When you reach the edge of the image, the display will not shift any more in that direction.
8. Menu
Menu
•Press to display the disc’s menu.
Note: Playback will be stopped to display the menu.
10 - DVX 160 User's Guide
6985590000-DVX-160-UG.book Page 11 Friday, March 24, 2006 6:10 PM
9. Subtitle (DVD)
•Press to display the current language setting during disc playback.
•Press repeatedly to select the desired subtitle language.
Notes: This function can only be used for discs on which subtitles have been recorded in multiple languages. About two seconds later, playback continues with the new subtitle you selected.
The number of languages recorded will vary depending on the disc.
If no button is pressed within a few seconds, playback continues without changing the current subtitle.
10. Exit
•Press to exit menus or on screen info bar.
11. Angle (DVD)
•Press to view the number of the current angle if available on the disc.
•Press repeatedly to change to the next angle (if available).
Notes:
About two seconds later, playback continues from the new angle you selected.
This function can only be used for discs on which scenes shot from multiple angles have been recorded. If only one angle is recorded, a camera symbol next to “1/1” will be displayed.
12. Title (DVD)
Press to display the Title Menu if present on disc.
Note: The other functions of the Numeric 1 & 2 buttons are the same as all numeric keys in advance playback.
ADVANCED PLAYBACK FUNCTION
1. INFO function
When you press the INFO key, you can check the current settings of playback if present on disc. While the disc is playing, press INFO to display playback information.
1.1 Title info
•The number of the title currently playing and total number of titles on the disc.
1.2 Chapter info
•The number of the chapter currently playing and the total number of chapters in the title currently being
played.
1.3 Time info
Elapsed time from the beginning of the currently playing title.
1.4 Angle setting
•The current angle is displayed. When a disc with only one angle is played back, a camera symbol next to “OFF”
is displayed.
1.5 Audio setting
•The type of audio currently selected is displayed.
1.6 Subtitle setting
•The subtitle number and language currently selected is displayed.
Notes: After checking the settings, press INFO again or EXIT to return to the normal screen.
2.GOTO function
This function allows you to skip directly to any part of the disc while a disc is playing.
•Press GOTO.
• Press the  or
or  buttons to highlight the required field and press the corresponding number button(s) for the part you want.
- 11
6985590000-DVX-160-UG.book Page 12 Friday, March 24, 2006 6:10 PM
•If the number you input is wrong, press “CLEAR” to clear it.
•Press OK. The Unit will start playback from the position you selected.
3. DVD programming
•Press the PLAYMODE button.
•Press the  or
or  buttons to select MODE instead of REPEAT.
•Use  or
or  to transfer options into PROG in MODE and press OK to confirm.
• Enter the title numbers, use  or
or  to move the highlighted cursor to the chapter box and enter the chapter numbers.
•Use the navigation buttons to move to another field.
•Repeat step above.
•Press  or highlight PLAY on the screen and press OK to start the programmed playback.
•Highlight the current input on the screen and Press ZOOM/CLEAR to delete the chapter and Title numbers you input.
PLAYABLE DISCS
While advances have been made to ensure that your disc player is compatible with the largest number of discs possible, it cannot be guaranteed that you will be able to play discs which might not be compliant with audio CD standards. In the case of writable and rewritable discs, compatibility with this player depends on the CD/DVD writer, the right software and the disc used. Playable discs: DVD-Video, DVD+/-R, DVD+/-RW, Audio CDs, CD-R & CD-RW, DivX, XviD, MP3 Files, JPEG Files and MPEG Files.
About DivX®
DivX is a popular media technology created by DivX, Inc. DivX media files contain highly compressed video with high visual quality that maintains a relatively small file size. DivX files can also include advanced media features like menus, subtitles, and alternate audio tracks. Many DivX media files are available for download on-line, and you can create your own using your personal content and easy-to-use tools from DivX.com.
TROUBLESHOOTING
If it appears that your DVD-Video player is faulty, first consult this checklist. It may be that something simple has been overlooked. Under no circumstances should you try to repair the player yourself; as this will invalidate the warranty. Only qualified service personnel can remove the cover or service this player.
NO POWER
•Check if power plug of the mains cord is properly connected.
•Check if there is power at the AC outlet by plugging in another appliance.
NO PICTURE
•Check if the TV is switched on.
•Select the correct AV input on the TV.
•Check the video connection.
•Check if channel selector is set to AV on the TV. (See your TV manual for instructions).
DISTORTED PICTURE
•Check the disc for fingerprints and clean with soft cloth, wiping from centre to edge.
•Sometimes a small amount of picture distortion may appear. This is not a malfunction.
•The disc format does not match the TV used (PAL/NTSC).
•Ensure that ONLY one video output is connected.
NO COLOUR IN PICTURE
•The disc format is not according to the TV used (PAL/NTSC).
•Ensure DVD player is not connected through VCR.
12 - DVX 160 User's Guide
6985590000-DVX-160-UG.book Page 13 Friday, March 24, 2006 6:10 PM
PICTURE SWING
• Relocate the unit further away from possible interference or emission source (e.g. Radio, Power Amplifier, radiator etc.).
NO RETURN TO START-UP SCREEN WHEN DISC IS REMOVED
•Check to see if the program requires another disc to be loaded.
•Reset by unplugging the player from the power, then connect the power again.
THE PLAYER DOES NOT RESPOND TO THE REMOTE CONTROL
•Aim the remote control directly at the sensor on the front of the player.
•Avoid all obstacles which may interfere with the signal path.
•Inspect or replace the batteries.
NO SOUND
•Check audio connections.
•If using a Hi-Fi amplifier, try another sound source.
•Clean the disc.
•Check if the disc is defective by trying another disc.
NO AUDIO AT DIGITAL OUTPUT
•Check the digital connections
•Check the Digital Out menu to make sure that the digital output is correctly set.
•Check if the audio format of the selected audio language matches your unit capabilities.
YOU HAVE FORGOTTEN THE PASSWORD
• Under no disc condition, press Number Key 7, Number Key 6, Number Key 4, Number Key 1 and Number 8 on Remote Control in order.
Specifications
Supply voltage: AC 230V~
Frequency: 50Hz
Power: 15W
- 13

6985590000-DVX-160-UG.book Page 14 Friday, March 24, 2006 6:10 PM
PACKARD BELL LIMITED WARRANTY
Packard Bell warrants that the Packard Bell branded Product is free from defect in material and workmanship for the Warranty Period (starting on the date of purchase or delivery of the Product) and in the Country of Purchase. This contractual/limited warranty is limited to the replacement of the Product or part recognised as defective with an identical or comparable Product or part, new or equivalent to new, or reimbursement in part or full.
Warranty period: |
|
Packard Bell branded Product.................................................................................................... |
1 year |
Peripherals included with certain Products............................................................................ |
6 months |
Software included with certain Products ............................................................................... |
3 months |
Disposable batteries that are included with certain Products are not covered by any contractual/limited warranty.
In the unlikely event of a Product incident, Packard Bell recommends that the Customer performs a rapid technical investigation to resolve the problem with the user documentation or using the support information provided on the Packard Bell Web Site: service.packardbell.com
Would the problem persist, the Customer should call the relevant number mentioned below for more information. If the Customer has performed all troubleshooting steps that are proposed and the issue is not resolved, then the Customer must completely fill out the Service Trigger Application form that can be found on the web site, and print it. The customer should return the Product to the store where it was purchased, together with the completed Service Trigger Application form and a Proof of Purchase.
To contact Packard Bell (24 hours a day, 7 days a week): |
|
|
United Kingdom........................................................................... |
020 79 49 02 79 |
(national call rate) |
Ireland ............................................................................................... |
01 411 8924 |
(national call rate) |
All other countries: Please contact the store where you have purchased the product for more details about the warranty.
Contact information is subject to change, the latest contact information can be found on the Packard Bell web site.
IMPORTANT: Data backup requirement (exclusively for Products that allow data storage)
The customer is responsible to back up data stored in the Product prior to returning it to the store. Packard Bell strongly advises to make regular backup copies on various media (CDs, DVDs, etc.) of any documents, data, files and/or software stored on the Product. Packard Bell and its authorised service providers are not liable for data that is lost or damaged during the support process.
Packard Bell reserves the right to charge parts and labour if Packard Bell discovers no defect or problem in the Product, if the Customer has not complied with one of the conditions set out in this section or if the defect is customer induced (for example a defect caused by neglect or misuse).
This contractual/limited warranty does not apply when:
•Problems are caused by hardware or software, which have not been delivered in the factory packaging of the Product;
•The original identification marks have been altered or removed from the Product;
•Defects or failures are due to accident, neglect or misuse, failure of or defect in electrical power, external electrical circuitry, unusual physical or electrical stress, air conditioning or environmental controls, the effects of weather influences or domestic animals; the use of items not provided by Packard Bell;
•Defects are caused by a virus or another pre-programmed device with similar effect;
•The Customer, any non-authorised third party to Packard Bell or any non-authorised party to its authorised service provider has modified, adjusted, repaired, serviced or installed the Product;
•The use or installation of the Product is not in compliance with Packard Bell's documentation;
•The Product’s defect is due to any reason, which in Packard Bell's sole discretion is not a result of a defect in material or workmanship;
•The Client has not followed the procedures described in this Warranty.
This contractual/limited warranty replaces all other warranties, whether expressed or implied, including but not limited to implied warranty of merchantability and fitness for a particular purpose with respect to the Product and its documentation.
Packard Bell's and its representative's liability hereunder is limited to the reimbursement of the Product or the replacement thereof. In particular, Packard Bell and its representative shall not be liable to credit or repair the Product if the contractual/limited warranty is not applicable due to the reasons set out in this section.
In any event, Packard Bell shall in no circumstances be liable for any other costs, charges, expenses, loss or damage of any nature whatsoever: direct or indirect, consequential or incidental, including but not limited to loss of business profits or any other commercial damages, loss of data, arising out of the use of the Product or of the presence of a virus (or pre-programmed device with a similar effect) on the Product.
Save with regard to death or personal injury caused by the negligence of Packard Bell, its employees or service provider this limited liability represents Packard Bell's entire liability with respect to the Product and with respect to goods or services supplied herein and Packard Bell shall have no other obligation, duty, or liability whatsoever in contract, tort (including liability for negligence) or otherwise to the Customer.
However, this limitation of liability does not in any way affect or limit the Customer's statutory rights under the national legislation governing the sale of consumer goods in the Country.
Packard Bell shall not be liable for any failure or delay in performance due to any cause beyond its control. Such circumstances include, but are not limited to, interrupted telephone service, airport closures that interrupt parts delivery, acts of god, weather conditions, labour strikes, and the inability to contact the Customer to confirm scheduling.
In case of change of ownership of the Product, the remaining period of this contractual/limited warranty is transferable under the condition that the new end-user is in possession of the original proof of purchase of the Product.
Packard Bell is a registered trademark of NEC Computers International BV.
14 - DVX 160 User's Guide
6985590000-DVX-160-UG.book Page 15 Friday, March 24, 2006 6:10 PM
GUIDE DE L'UTILISATEUR DE PACKARD BELL DVX 160
Copyright © 2006 Packard Bell B.V. Tous droits réservés. Aucune partie du présent manuel ne peut être reproduite ou transmise sous quelque forme ou par quelque moyen que ce soit, qu'il soit électronique, chimique, manuel ou autre, y compris, sans que cette liste soit exhaustive, les systèmes de photocopie, d'enregistrement, de stockage ou d'extraction de données, et ce quel qu'en soit le motif, sans l'accord préalable écrit de Packard Bell B.V.
DÉNI DE RESPONSABILITÉ
Packard Bell B.V. n'offre aucune garantie explicite ou implicite, notamment, sans que cette liste soit exhaustive, des garanties implicites sur la valeur marchande ou l'adéquation de ce produit et de sa documentation pour un usage spécifique. Les composants matériels sont régulièrement actualisés. Par conséquent, certaines des instructions, des spécifications et des illustrations fournies dans cette documentation peuvent légèrement différer de votre situation. Tous les éléments décrits dans ce guide ne sont fournis qu'à titre d'illustration et peuvent ne pas vous concerner. Aucun droit statutaire ou autre ne peut être obtenu des descriptions figurant dans ce manuel.
Packard Bell B.V. se réserve le droit de modifier ou d'améliorer ce produit ou sa documentation quand bon lui semble, sans en aviser quiconque. Packard Bell B.V. ne peut en aucun cas être tenu responsable des dommages indirects ou accidentels résultant de l'utilisation de ce produit, y compris (sans que cette liste soit exhaustive) le manque à gagner ou tout autre dommage commercial.
MARQUES COMMERCIALES
Packard Bell est une marque déposée de Packard Bell B.V. Tous les autres noms de société ou de produit cités sont les marques commerciales, les marques déposées ou les marques de service de leurs détenteurs respectifs.
DivX®, DivX® Certified et les logos associés sont des marques commerciales de DivX®, Inc. et sont utilisés sous licence.
Ce produit intègre une technologie de protection des copyrights qui est protégée par certains brevets américains et autres droits de propriété intellectuelle détenus par Macrovision Corporation et d'autres titulaires. L'utilisation de cette technologie de protection des copyrights doit être autorisée par Macrovision Corporation et elle est destinée à un usage domestique et d'autres usages limités, excepté en cas d'autorisation de Macrovision Corporation. Il est interdit d'en effectuer le rétro-ingénierie ou le désassemblage.
AVERTISSEMENT
Pour prévenir les risques d'incendie ou d'électrocution, ne branchez pas la fiche sur une rallonge, une prise électrique ou tout autre connecteur de sortie, excepté si la fiche peut y être entièrement insérée. N'exposez pas cet appareil à la pluie ou à l'humidité.
Le symbole en forme d'éclair fléché placé dans un triangle équilatéral informe l'utilisateur de la présence de tensions dangereuses non isolées au sein du boîtier du produit qui sont susceptibles de l'électrocuter.
AVERTISSEMENT : POUR LIMITER LES RISQUES D'ÉLECTROCUTION, NE RETIREZ PAS LE CAPOT (NI LE PANNEAU ARRIÈRE). LE PRODUIT NE CONTENANT AUCUNE PIÈCE REMPLAÇABLE PAR L'UTILISATEUR, CONFIEZ SA MAINTENANCE À DES TECHNICIENS QUALIFIÉS.
Le point d'exclamation placé dans un triangle équilatéral informe l'utilisateur que des instructions
d'utilisation et de maintenance (entretien) importantes sont fournies dans la documentation qui accompagne le produit.
CONSIGNES DE SÉCURITÉ IMPORTANTES
•Lisez et conservez ces instructions.
•N'utilisez pas cet appareil près d'une source d'humidité.
•Ne posez aucun objet sur le périphérique.
•Nettoyez-le au moyen d'un chiffon sec.
•N'obstruez aucun des orifices d'aération. Installez cet appareil conformément aux instructions du fabricant.
•N'installez pas ce produit près de sources de chaleur, notamment des radiateurs, des bouches de chauffage, des poêles ou d'autres appareils générant de la chaleur (y compris des amplificateurs).
-15
6985590000-DVX-160-UG.book Page 16 Friday, March 24, 2006 6:10 PM
•Ne retirez pas le dispositif de sécurité de la fiche. Si la fiche fournie ne s'insère pas dans votre prise, contactez un électricien pour qu'il remplace la prise obsolète.
•Installez le cordon d'alimentation de sorte que personne ne puisse marcher dessus et qu'il ne soit pas comprimé.
•N'utilisez que les fixations/accessoires spécifiés par le fabricant.
•Débranchez cet appareil en cas d'orage ou lorsque vous ne l'utilisez pas pendant de longues périodes. Veuillez noter que la garantie de ce produit ne couvre pas les dommages résultant de la foudre.
•La maintenance de cet appareil doit être effectuée par des techniciens qualifiés lorsqu'il a été endommagé de quelque façon que ce soit, qu'il a été exposé à la pluie ou à l'humidité, qu'il ne fonctionne pas normalement ou qu'il est tombé.
•Vous devez débrancher le cordon d'alimentation pour couper l'alimentation de l'appareil. Il est donc impératif que la prise de courant soit située tout près de l'appareil et qu'elle soit facilement accessible.
MISE AU REBUT DU PRODUIT
Conformément aux exigences de la directive DEEE (Déchets d'Équipements Électriques et Électroniques), les produits électriques et électroniques usagés doivent être détruits séparément des ordures ménagères normales afin de promouvoir la réutilisation, le recyclage et d'autres formes de récupération, ainsi que de limiter la quantité de déchets devant être éliminés et de réduire du même coup les décharges. Cela comprend des accessoires tels que les télécommandes, les cordons d'alimentation, etc. Lorsque vous vous débarrassez de tels produits, veuillez vous conformer aux consignes des autorités municipales et/ou vous renseigner auprès de votre revendeur lors de l'achat d'un nouveau produit.
Table des matières |
|
INTRODUCTION.................................................................................................................... |
16 |
PANNEAU AVANT ................................................................................................................. |
17 |
TÉLÉCOMMANDE ................................................................................................................. |
17 |
PANNEAU ARRIÈRE ............................................................................................................... |
18 |
BRANCHEMENTS .................................................................................................................. |
18 |
PREMIERS PAS ....................................................................................................................... |
20 |
CONFIGURATION DE BASE................................................................................................... |
20 |
LECTURE DE DVD/CD .......................................................................................................... |
22 |
FONCTION DE LECTURE AVANCÉE ..................................................................................... |
24 |
DÉPANNAGE ......................................................................................................................... |
25 |
GARANTIE : ........................................................................................................................... |
27 |
Introduction
Merci d'avoir acheté un lecteur de DVD Packard Bell DVX 160. Le lecteur de DVD DVX 160 viendra enrichir votre système audiovisuel domestique. Il présente les caractéristiques suivantes :
•Lecture de films sur DVD et DivX
•Lecture de CD audio et MP3
•Disques compatibles : DVD-R/RW, DVD+R/RW et CD-R/RW
•Formats de fichier compatibles : MPEG 2/3/4, DivX®, XviD et JPEG
Contenu de l'emballage :
•Lecteur de DVD DVX 160
•1 télécommande (pile fournies)
•1 Guide de l'utilisateur et 1 Guide de Service Après-Vente
•Câble AV
16 -Guide de l'utilisateur du DVX 160

6985590000-DVX-160-UG.book Page 17 Friday, March 24, 2006 6:10 PM
PANNEAU AVANT
1.Bouton permettant de lancer la lecture ou de la mettre en pause.
2.Bouton permettant d'arrêter la lecture.
3.Fenêtre du récepteur infrarouge.
4.Témoin d'alimentation.
5.BOUTON D'ALIMENTATION – Permet d'ALLUMER ou d'ÉTEINDRE le lecteur de DVD.
6.(Ouverture/fermetur) - Permet d'ouvrir/de fermer le plateau.
TÉLÉCOMMANDE
1. VEILLE - Permet de mettre le lecteur en mode Veille ou de l'ALLUMER.
2.TITLE - Permet d'afficher le menu du titre (le cas échéant).
3.ANGLE - Permet de sélectionner les angles de vue (le cas échéant).
4.INFO - Permet d'ouvrir l'écran de CONFIGURATION dans lequel vous pouvez vérifier ou modifier divers paramètres (cette fonction n'est disponible qu'en mode Arrêt ou lorsqu'aucun disque n'est inséré dans le lecteur). Permet d'afficher les informations de configuration actuelles en matière de lecture de disques.
5.Touches de navigation actives - Permettent de se déplacer dans le sens indiqué en vue d'effectuer des sélections dans les menus. Permettent de déplacer des images en mode Zoom.
6.MENU - Permet d'ouvrir le menu du disque.
7.ZOOM/CLEAR - Permet de sélectionner différents facteurs de grossissement lors de la lecture d'un disque en appuyant plusieurs fois
dessus. Permet de supprimer les informations entrées dans d'autres menus de configuration.
8.BOOKMARK - Permet d'ouvrir le menu dédié aux signets.
9. Boutons permettant de sélectionner le chapitre précédent ou suivant/la piste précédente ou
suivante.
10.Bouton permettant de lancer la lecture.
11. Bouton permettant de mettre la lecture en pause.
12. Bouton permettant d'arrêter la lecture.
- 17
6985590000-DVX-160-UG.book Page 18 Friday, March 24, 2006 6:10 PM
13. Bouton permettant d'effectuer une recherche arrière/avant.
14.AUDIO - Permet de sélectionner l'une des pistes audio programmées sur un DVD.
15.SUBTITLE - Permet de sélectionner la langue des sous-titres.
16.EXIT - Permet de quitter les menus ou la barre d'information.
17.OK - Permet de confirmer toute sélection faite dans un menu.
18.PLAYMODE - Permet d'afficher le menu Mode Lecture, sous réserve qu'un disque soit inséré dans le lecteur.
19.GOTO - Permet d'afficher le menu INFO. Permet d'accéder directement à un emplacement spécifique d'un DVD/CD.
20.A-B - Permet de répéter la lecture d'une section spécifique sur un disque.
21.TOUCHES NUMÉRIQUES 0-9 - Les touches 0>9 sont utilisées pour accéder aux titres, aux chapitres, aux pistes et au temps dans le menu Aller, pour accéder aux titres, aux chapitres et aux pistes dans le menu de programmation ou pour entrer le mot de passe en mode Verrouillage parental.
Remarque : Lors de la lecture d'un DVD, la touche numérique 1 est utilisée pour afficher le menu du titre (le cas échéant) et la touche numérique 2 pour sélectionner un angle de vue (le cas échéant).
22. MUTE - Permet de couper la sortie audio.
PANNEAU ARRIÈRE
1.Cordon d'alimentation.
2.Sortie PÉRITEL.
3.Sortie vidéo composite.
4.Sorties audio - gauche et droite.
BRANCHEMENTS
Branchements vidéo
La façon dont vous branchez le lecteur de DVD et le type de câblage que vous utilisez peuvent avoir un impact significatif sur la qualité d'image et la qualité audio. Avant de sélectionner l'une des options qui vous sont proposées, veuillez vous assurer que vos autres équipements (téléviseur, récepteur, par exemple) sont équipés du connecteur d'entrée/sortie requis. Les options suivantes sont disponibles :
18 -Guide de l'utilisateur du DVX 160
6985590000-DVX-160-UG.book Page 19 Friday, March 24, 2006 6:10 PM
CÂBLE AV
A.Pour que le son émis par le lecteur de DVD passe par votre téléviseur, utilisez des câbles audio (blanc/rouge) pour raccorder les connecteurs AUDIO (G/D) du lecteur de DVD aux connecteurs d'ENTRÉE AUDIO correspondants de votre téléviseur.
B.Utilisez un câble vidéo composite (jaune) pour raccorder le connecteur CVBS (VIDÉO) du lecteur de DVD au connecteur d'entrée vidéo (ou connecteur nommé Entrée A/V In, Entrée vidéo ou Composite) de votre téléviseur.
CÂBLE PÉRITEL (NON FOURNI)
Il s'agit du branchement recommandé. Si votre téléviseur est équipé d'un connecteur PÉRITEL, vous pouvez y brancher le lecteur de DVD au moyen d'un câble PÉRITEL (tel que représenté).
Certains cables peuvent émettre des interférences électromagnétiques (EMI) vers des appareils électriques se trouvant à proximité (en particulier les télévisions et radios). Pour éviter cela, nous vous recommandons d'utiliser un cable équippé d'une ferrite. Veuillez contacter votre revendeur pour de plus amples informations.
- 19
6985590000-DVX-160-UG.book Page 20 Friday, March 24, 2006 6:10 PM
PREMIERS PAS
Utilisation de la télécommande
1.Ouvrez le compartiment de la pile (tel que représenté).
2.Remplacez la pile (lithium CR2025). Retirez délicatement la pile de son compartiment et remplacez-la par une pile neuve.
3.Refermez délicatement le compartiment de la pile.
–Ne retirez la pile que si elle est complètement déchargée ou que vous n'avez pas utilisé la télécommande depuis longtemps.
–Les piles contenant des substances chimiques, vous devez vous en débarrasser de façon appropriée.
Mise sous tension de l'unité
Remarque : Vous ne devez brancher le cordon d'alimentation et allumer l'unité qu'une fois tous les branchements effectués.
1.Branchez la fiche électrique standard dans une prise murale ou un bloc multiprise.
2.Allumez votre téléviseur et sélectionnez le canal d'entrée vidéo approprié.
Insertion d'un disque
1.Appuyez sur le bouton d'ALIMENTATION situé sur la face avant du lecteur. Le témoin d'alimentation vire au vert. Le système est désormais opérationnel. L'écran d'arrière-plan du lecteur de DVD doit s'afficher sur votre téléviseur.
2.Appuyez sur le bouton (Ouverture/fermeture)  pour ouvrir le plateau, placez-y un disque et réappuyez sur le même bouton pour fermer le plateau. Assurez-vous que la face étiquetée du disque est orientée vers le haut. S'il s'agit d'un disque double face, placez la face que vous voulez lire vers le haut.
3.La lecture s'initialise automatiquement. Si un menu s'affiche sur votre téléviseur, utilisez les touches de navigation pour sélectionner l'option [LECTURE DU FILM] et appuyez sur OK pour lancer la lecture du film. Si le disque est bloqué par verrouillage parental, vous devez entrer votre mot de passe de quatre chiffres.
CONFIGURATION DE BASE
Interface de configuration
Lorsque l'unité est allumée, appuyez sur le bouton INFO pour accéder au MENU CONFIGURATION en mode SANS DISQUE ou ARRÊT.
- Utilisez le bouton  ou
ou  pour sélectionner CONF. AUDIO.
- Utilisez le bouton  ou
ou  pour sélectionner des options de configuration et appuyez sur OK ou
  .
.
- Utilisez le bouton |
|
ou |
|
pour sélectionner l'options que vous |
|
|
|||
voulez utiliser et appuyez |
sur |
|
pour confirmer. |
|
OK |
||||
- Appuyez sur le bouton EXIT pour quitter le menu de configuration.
Opérations de base
1. CONFIGURATION DU SYSTÈME [ÉCON. ÉCRAN]
20 -Guide de l'utilisateur du DVX 160
 Loading...