Nissan XTrail T30 2006 User Manual

F BRAKES
SECTION PB
PARKING BRAKE SYSTEM
CONTENTS
A
B
C
D
E
PARKING BRAKE SYSTEM ..................................... |
2 |
On-Vehicle Service .................................................. |
2 |
LEVER STROKE .................................................. |
2 |
INSPECT COMPONENTS ................................... |
2 |
ADJUSTMENT ..................................................... |
2 |
PARKING BRAKE CONTROL .................................. |
3 |
Components ............................................................ |
3 |
Removal and Installation ......................................... |
3 |
REMOVAL ............................................................ |
3 |
INSTALLATION .................................................... |
3 |
..........................................PARKING BRAKE SHOE |
4 |
PB |
|
Components ............................................................ |
4 |
|
|
|
|||
Removal and Installation ......................................... |
4 |
|
|
REMOVAL ............................................................ |
4 |
G |
|
INSPECTION AFTER REMOVAL |
5 |
||
|
|||
INSTALLATION .................................................... |
6 |
|
|
SERVICE DATA AND SPECIFICATIONS (SDS) ....... |
7 |
H |
|
Parking Drum Brake |
7 |
||
|
|||
Parking Brake Control ............................................. |
7 |
|
I
J
K
L
M
Revision: 2006 July |
PB-1 |
2006 X-Trail |

PARKING BRAKE SYSTEM
PARKING BRAKE SYSTEM
On-Vehicle Service
LEVER STROKE
PFP:36010
AFS002LH
●Operate parking brake lever with a force of 196 N (20 kg, 44 lb), make sure lever stroke is within the specified number of notches. (Check it by listening and counting ratchet clicks.)
Lever stroke : 6 - 7 notches
INSPECT COMPONENTS
●Make sure that the mounting conditions (looseness, backlash, etc.) of each component are normal.
●Check the following:
–
–
–
Device assembly for bend, damage and cracks. Replace if there are. Cables and equalizer for wear and damage. Replace if there are. Parking brake warning lamp switch. Replace if it does not work correctly.
ADJUSTMENT
●To perform adjustment operations, remove rear tires from vehicle with a power tool.
1.Insert a deep socket wrench onto adjusting nut. Rotate adjusting nut to fully loosen cable, and then release parking brake lever.
2.Secure disc rotor to hub using wheel nut so as not to tilt disc rotor.
SFIA2453E
3.Remove adjuster hole plug installed on disc rotor. Turn the adjuster in direction “A” using a flat-bladed screwdriver as shown, until disc rotor is locked. Turn the adjuster in the opposite direction by 5 or 6 notches after locking.
4.Rotate disc rotor to make sure that there is no drag. Install the adjuster hole plug.
5.Adjust parking brake cable with the following procedure.
a.Operate parking brake lever 10 or more times with the force 294 N (30 kg, 66 lb).
b.Rotate adjusting nut to adjust parking brake lever stroke using a
SFIA2384E
deep socket wrench.
CAUTION:
Do not reuse the adjusting nut after removing it.
c.Operate parking brake lever with a force of 196 N (20 kg, 44 lb), make sure the lever stroke is within the specified number of notches. (Check it by listening and counting ratchet clicks.)
Lever stroke : 6 - 7 notches
d.Make sure that there is no drag on rear brake with parking brake lever completely released.
Revision: 2006 July |
PB-2 |
2006 X-Trail |

PARKING BRAKE CONTROL
PARKING BRAKE CONTROL |
PFP:36010 |
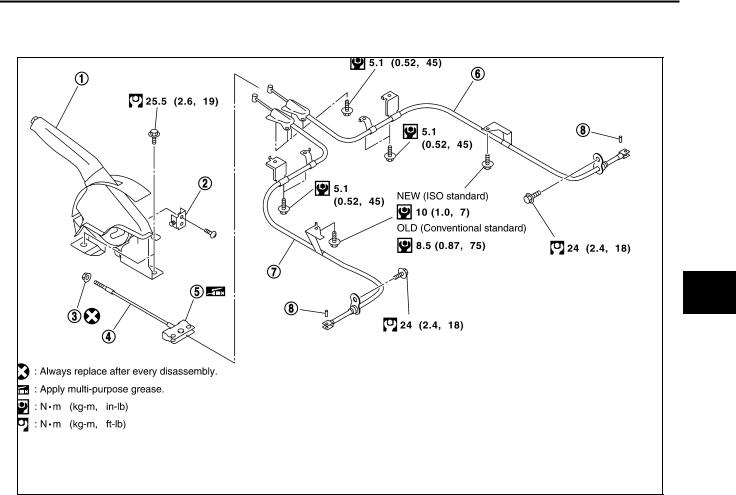
Components |
AFS002LI |
SFIA3165E
1. |
Device assembly |
2. |
Parking brake warning lamp switch |
3. |
Adjusting nut |
4. |
Front cable |
5. |
Equalizer |
6. |
RH rear cable |
7. |
LH rear cable |
8. |
Pin |
|
|
NOTE:
In regard to the notation of torque in the illustration, NEW shows an ISO standard, OLD shows a conventional standard, and the measurements of hexagonal width across flats are in parentheses.
Removal and Installation |
AFS002LJ |
REMOVAL
1.Remove rear tires from vehicle with a power tool.
2.Release parking brake lever.
3.Remove center console. Refer to IP-10, "INSTRUMENT PANEL ASSEMBLY"
4.Disconnect parking brake warning lamp switch connector.
5.Remove adjusting nut and loosen front cable.
6.Remove device assembly mounting bolts and remove device assembly from vehicle.
7.Separate rear cable from front cable, remove front cable from vehicle.
8.Remove heat insulator of the three way catalyst and the exhaust center tube from vehicle.
9.Remove parking brake shoe, and remove rear cable from toggle lever. Refer to PB-4, "PARKING BRAKE SHOE"
10.Remove rear cable mounting bolts, pull out rear cable from vehicle.
INSTALLATION
1.Install in the reverse order of the removal. Refer to PB-3, "Components" for tightening torque.
CAUTION:
Do not reuse adjusting nut.
2.Adjust parking brake. Refer to PB-2, "ADJUSTMENT" .
A
B
C
D
E
PB
G
H
I
J
K
L
M
Revision: 2006 July |
PB-3 |
2006 X-Trail |
 Loading...