


MENU CH GRP 
OK
TLKR T8 Owner’s Manual
Manuel de l’utilisateur TLKR T8
TLKR T8 Benutzerhandbuch
Manual del usuario de TLKR T8
TLKR T8 – Manuale per l’utente
Manual do Propriátrio TLKR T8
TLKR T8 Gebruikershandleiding
Instrukcja obsługi radiotelefonu TLKR T8
TLKR T8 Kullanıcı Kılavuzu
TLKR T8 Руководство владельца
Brugervejledning TLKR T8
Ägarhandbok TLKR T8
Brukerhåndbok TLKR T8
Käyttöohje TLKR T8

CONTENTS
Product Safety and RF Exposure . . . . . . . . . . . . . . . . . . . . . 2 Features. . . . . . . . . . . . . . . . . . . . . . . . . . . . . . . . . . . . . . . . . 2 Control and Functions . . . . . . . . . . . . . . . . . . . . . . . . . . . . . . 3 Display . . . . . . . . . . . . . . . . . . . . . . . . . . . . . . . . . . . . . . . . . . 4 Package Contents . . . . . . . . . . . . . . . . . . . . . . . . . . . . . . . . . 5 Install the Battery . . . . . . . . . . . . . . . . . . . . . . . . . . . . . . . . . . 5 Battery Level and Low Battery Alert. . . . . . . . . . . . . . . . . . . . 5 Charging the Radio . . . . . . . . . . . . . . . . . . . . . . . . . . . . . . . . 5 Direct Charge. . . . . . . . . . . . . . . . . . . . . . . . . . . . . . . . . . . . . 5 Using the Charging Cradle. . . . . . . . . . . . . . . . . . . . . . . . . . . 5 Charging the Battery . . . . . . . . . . . . . . . . . . . . . . . . . . . . . . . 6 Using the Radio . . . . . . . . . . . . . . . . . . . . . . . . . . . . . . . . . . . 6 Turning On the Radio and Volume Adjust . . . . . . . . . . . . . . 6 Talking on your Radio . . . . . . . . . . . . . . . . . . . . . . . . . . . . . . 6 Navigating through the Menu . . . . . . . . . . . . . . . . . . . . . . . . 6 Select Menu . . . . . . . . . . . . . . . . . . . . . . . . . . . . . . . . . . . . . 7 Choosing a Channel . . . . . . . . . . . . . . . . . . . . . . . . . . . . . . . 7 Choosing a Sub-code . . . . . . . . . . . . . . . . . . . . . . . . . . . . . . 7 Dual Watch Mode . . . . . . . . . . . . . . . . . . . . . . . . . . . . . . . . . 8 Stopwatch Activation . . . . . . . . . . . . . . . . . . . . . . . . . . . . . . . 8 Mode Menu . . . . . . . . . . . . . . . . . . . . . . . . . . . . . . . . . . . . . . 9 Clock Feature. . . . . . . . . . . . . . . . . . . . . . . . . . . . . . . . . . . . . 9 Channel Scan Feature. . . . . . . . . . . . . . . . . . . . . . . . . . . . . 10 Monitor Mode Feature . . . . . . . . . . . . . . . . . . . . . . . . . . . . . 10 Voice Operated Transmission . . . . . . . . . . . . . . . . . . . . . . . 10 Transmitting a Ring Tone . . . . . . . . . . . . . . . . . . . . . . . . . . 10 Vibe (Vibration) Mode . . . . . . . . . . . . . . . . . . . . . . . . . . . . . 11 Slnt (Silent) Mode . . . . . . . . . . . . . . . . . . . . . . . . . . . . . . . . 11
Key Tone . . . . . . . . . . . . . . . . . . . . . . . . . . . . . . . . . . . . . . . .11 PTT (Roger Tone) . . . . . . . . . . . . . . . . . . . . . . . . . . . . . . . . .12 Automatic Power Save Feature . . . . . . . . . . . . . . . . . . . . . .12 Auto Power Off . . . . . . . . . . . . . . . . . . . . . . . . . . . . . . . . . . .12 Room Monitor Feature. . . . . . . . . . . . . . . . . . . . . . . . . . . . . .12 Group Menu. . . . . . . . . . . . . . . . . . . . . . . . . . . . . . . . . . . . . .13 Clock Feature in Group Mode . . . . . . . . . . . . . . . . . . . . . . . .13 Set ID Name . . . . . . . . . . . . . . . . . . . . . . . . . . . . . . . . . . . . .14 Set ID Number. . . . . . . . . . . . . . . . . . . . . . . . . . . . . . . . . . . .14 Set Monitor in Group Mode . . . . . . . . . . . . . . . . . . . . . . . . . .14 Set Ring Tone in Group Mode . . . . . . . . . . . . . . . . . . . . . . . .15 Set Key Tone in Group Mode . . . . . . . . . . . . . . . . . . . . . . . .15 Set PTT in Group Mode. . . . . . . . . . . . . . . . . . . . . . . . . . . . .15 Set Auto Power Off in Group Mode . . . . . . . . . . . . . . . . . . . .15 Group Mode. . . . . . . . . . . . . . . . . . . . . . . . . . . . . . . . . . . . . .15 Auto Channel Change Setting . . . . . . . . . . . . . . . . . . . . . . . .16 Manual Channel Change Setting. . . . . . . . . . . . . . . . . . . . . .16 Set All/Direct Call. . . . . . . . . . . . . . . . . . . . . . . . . . . . . . . . . .16 Set All Call . . . . . . . . . . . . . . . . . . . . . . . . . . . . . . . . . . . . . . .16 Set Direct Call . . . . . . . . . . . . . . . . . . . . . . . . . . . . . . . . . . . .17 Key Lock Activation . . . . . . . . . . . . . . . . . . . . . . . . . . . . . . . .17 Battery Low Alert . . . . . . . . . . . . . . . . . . . . . . . . . . . . . . . . . .17 LCD Backlight . . . . . . . . . . . . . . . . . . . . . . . . . . . . . . . . . . . .17 Specifications. . . . . . . . . . . . . . . . . . . . . . . . . . . . . . . . . . . . .17 Frequency Chart . . . . . . . . . . . . . . . . . . . . . . . . . . . . . . . . . .18 CTCSS Chart (Hz) . . . . . . . . . . . . . . . . . . . . . . . . . . . . . . . . .19 DCS Code . . . . . . . . . . . . . . . . . . . . . . . . . . . . . . . . . . . . . . .19 Warranty Information . . . . . . . . . . . . . . . . . . . . . . . . . . . . . . .20 What Is Not Covered by the Warranty . . . . . . . . . . . . . . . . . .20 Copyright Information . . . . . . . . . . . . . . . . . . . . . . . . . . . . . .20
English
1

English
Product Safety and
RF Exposure for Portable
Two-Way Radios
|
Before using this product, read |
! |
the operating instructions for safe |
usage contained in the Product |
|
Safety and RF Exposure booklet |
|
Caution |
enclosed with your radio. |
|
|
ATTENTION!
Before using this product, read the RF energy awareness information and operating instructions in the Product Safety and RF Exposure booklet to ensure compliance with RF energy exposure limits.
Features
8 PMR Channels
121 Sub-Codes (38 CTCSS Codes & 83 DCS) Up to 10 km Range*
LED Torch
Internal VOX Circuitry
10 Selectable Ring Tone Alert Backlight LCD Display
Headset Jack for Optional Headset PTT Roger Beep
Clock timer Room Monitor Channel Scan Dual Watch Keypad Lock
Battery Save Power Silent Mode Battery Low Alert Group Call
Direct Call (Caller ID Call) All Call
Auto Channel Change
* Range may vary depending on environmental and/or topographical conditions.
2
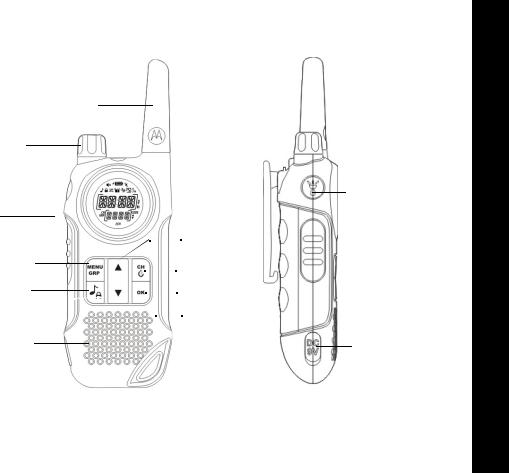
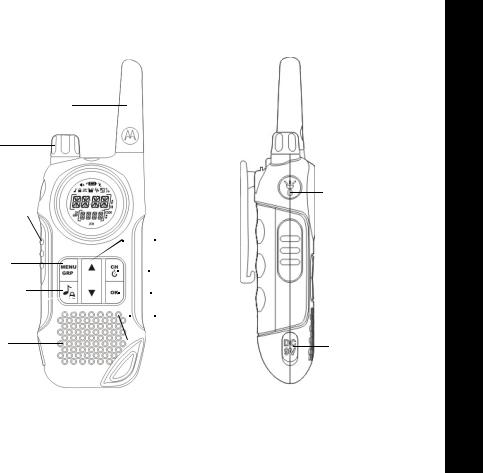
Control and Functions
Volume Knob with
Power switch
PTT (Push-To-Talk) Key
MENU/GRP Key
 /
/  (Call/Lock) Key
Speaker
Antenna
LED Torch button

 (Vol/Channel
Up) Key
 Ch/Stopwatch Key
 OK
OK

 (Vol/Channel
Down)
DC IN 9V Jack
 Microphone
English
3

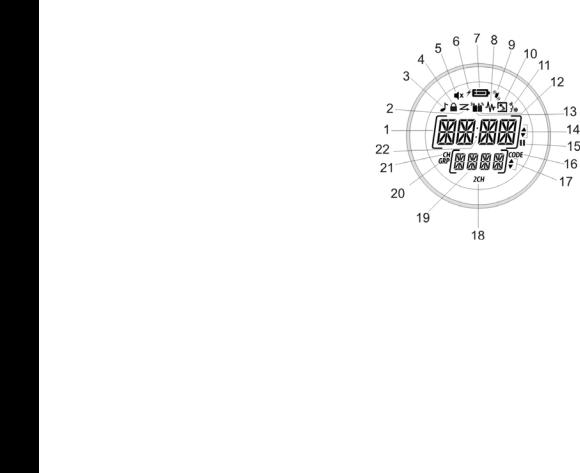
Display
|
1. |
Time/Menu/Group selection indicator |
||
English |
2. |
Scan indicator |
||
3. |
Key tone indicator |
|||
|
||||
|
4. |
Keypad lock indicator |
||
|
5. |
Silent (Ringer Off) indicator |
||
|
6. |
Battery charge indicator |
||
|
7. |
Battery level meter |
||
|
8. |
Monitor indicator |
||
|
9. |
Vibrator indicator |
||
|
10. |
Room monitor indicator |
||
|
11. VOX indicator |
|||
|
12. |
Transmit indicator |
||
|
13. |
Receive indicator |
||
|
14. |
Up/Down (Channel/Menu mode selection) indicator |
||
|
15. |
Pause (Stopwatch) indicator |
||
|
16. |
Code (Sub-code number) indicator |
||
|
17. |
Up/Down (sub-code/group selection number) indicator |
||
|
18. |
2CH (Dual channel) indicator |
||
|
19. |
Sub-code number/Group selection indicator |
||
|
20. |
GRP (Group mode) indicator |
||
|
21. |
CH (Main Channel indicator) |
||
|
22. |
Colon (display in Clock/Stopwatch) indicator |
||
4

Congratulations on your purchase of the TLKR T8 radio. This product is a lightweight, durable radio. Use it at sporting events to stay in contact with family and friends, hiking, skiing, outdoors, for vital communication. This compact, state-of-the-art device is equipped with many features.
Package Contents
Your package contains two TLKR T8 radios, two belt clips, one charging cradle, AC adapter, two battery support brackets, two rechargeable NiMH battery packs and this reference guide. You may operate the unit with 4 AAA alkaline batteries (not included).
Install the Battery
Your TLKR T8 radio uses the NiMH battery pack or 4 AAA alkaline batteries (not included). If alkaline batteries are used, we recommend using high quality alkaline batteries.
To install the NiMH battery pack:
1.Make sure your radio is OFF.
2.Remove the battery compartment door by pressing the tab at the bottom of the compartment door, allowing the door to be removed.
3.Install the NiMH battery pack into the battery compartment. Be certain to follow the + and – symbols in the compartment. Installing the battery pack incorrectly will prevent the unit from operating.
4.Replace the battery compartment door.
Battery Level and Low Battery Alert
This unit has a battery level meter on the display to indicate the status of the batteries. When the battery in the unit is low, the battery level meter icon will flash. Recharge the NiMH rechargeable batteries immediately.
Charging the Radio
If you use the rechargeable NiMH battery, two TLKR T8 radios can be charged directly or by using the supplied charging cradle.
Make sure the radio is turned OFF before placing the radio in the charging cradle. Otherwise the battery level meter icon will not indicate properly.
Direct Charge
1.Connect the DC adapter’s plug to the radio’s DC IN 9V jack and plug the other end to a vehicle's accessory power outlet.
2.Charge the battery pack for 16 hours.
Using the Charging Cradle
1.Connect the AC adapter to DC IN 9V and to a standard electrical outlet.
2.Set the charging cradle on the desk or tabletop, and place the radio in the charging cradle with the keypad facing forward.
3.Make sure that the LED illuminates. Charge the battery pack for 16 hours and remove the radio from the charging cradle after charge.
Note:The charge indicator LEDs will remain on as long as the radios are left in the charger.
English
5

Charging the battery
|
You can charge the NiMH battery pack itself using the |
||
English |
included battery support bracket. |
||
1. Place the battery support bracket into the charging |
|||
|
|||
|
cradle. |
|
|
|
2. Install the NiMH battery pack applying its charging |
||
|
contacts to those of the charging cradle. Installing the |
||
|
batteries incorrectly will prevent the unit from charging. |
||
|
3. Make sure that the LED illuminates. Charge the battery |
||
|
pack for 16 hours. |
|
|
|
Note:The charge indicator LEDs will remain on as long |
||
|
as the battery is left in the charger. |
||
|
Using the Radio |
|
|
|
In order to get the most out of your new radio, read this |
||
|
reference guide completely before attempting to operate |
||
|
the unit. |
|
|
|
Turning the Radio On and Adjusting the Volume |
||
|
1. Turn the rotary knob clockwise to turn the radio ON, and |
||
|
increase the volume by turning the rotary knob. |
||
|
To decrease the volume, turn the rotary knob counter |
||
|
clockwise. |
|
|
|
2. Turn the rotary knob fully counterclockwise to turn the |
||
|
radio OFF. |
|
|
|
Talking on Your Radio |
|
|
|
To talk to others using the radio: |
||
|
1. Press and hold the PTT key and speak in a clear, normal |
||
|
voice about 5-8 cm away from the microphone. While |
||
|
you are transmitting, the |
icon will appear on the |
|
|
display. To avoid cutting off the first part of your |
||
6 |
transmission, pause slightly after pressing the PTT |
||
button before you start talking.
2.When you have finished speaking, release the PTT key.
You can now receive incoming calls. While receiving, the 
 icon will appear on the display.
Note:When you continue to transmit for 60 seconds, the radio emits TX Time Out tone and the 
 icon flashes. The radio will stop transmitting.
Navigating through the Menu
To access the advanced features of the TLKR T8, your radio has two Menu functions.
1.To enter the Menu, press the MENU/GRP key.
2.Additional presses of the MENU/GRP key will advance you through the Menu until exiting to "Normal" operating mode.

Select Menu
Your radio navigates through Select Menu as follows:
|
|
|
|
|
|
|
|
|
|
|
|
|
|
|
|
|
CH/ |
|
|
|
CH |
|
|
CODE |
|
|
2 CH |
|
dual watch |
|
Channel |
|
Sub-code |
Channel |
|
|
|
|
|
|
|
|
|
|
||||||
|
|
|
|
|
|
|
|
|
||||||||
Stopwatch |
|
|
(Channel number) |
|
|
(Code number) |
|
|
(Dual watch) |
|
on |
|
number (1-8) |
|
number (0-121) |
|
|
|
|
|
|
|
|
|
|
|
|
|
|
|
|||
|
|
|
|
|
|
|
|
|
|
|
|
|
|
|
|
|
On/Off
Choosing a Channel
Your radio has 8 channels and 121 Sub-codes you can use to talk to others. In order to speak to someone, each of you must set to the same channel and Sub-code.
To choose a channel:
1.Enter the CH/  Channel "CH" display.
2.Press OK to go to channel settings.
3.Press the  or
or  key to increase or decrease the channel number displayed. If you press and hold the
or  key, the channel number increase or decrease continuously.
4.Press OK to confirm the setting.
Choosing a Sub-code
Allocating a Sub-code to your radio will help to reduce interference but remember that the radios that have different Sub-codes set will not be able to communicate with each other. Each of the channels 1-8 may have any one of the codes from 0 to 121.
1.Enter the CH/  . Advance through the Select Menu until the "CODE" display.
2.Press OK to go to sub-code settings.
3.Press the  or
or  key to increase or decrease the Subcode number displayed. If you press and hold the
  or
or
 key the channel number increase or decrease continuously.
4.Press OK to confirm the setting.
English
7

English
Dual Watch Mode |
Stopwatch Activation |
|
|||
Your radio can scan the current channel and another |
You can use this radio as a Stopwatch timer. It can time up |
||||
channel alternately. You need to set a channel number and |
to 60 minutes and 59 seconds. |
||||
its Sub-code for another channel. |
Note: You can receive incoming signals during this mode. |
||||
To set another channel and start Dual Watch: |
To use the Stopwatch Timer |
|
|||
1. Enter the CH/ . Advance through the select menu until |
|
||||
1. Press and hold the CH/ |
key until Stopwatch timer |
||||
"2CH" display. |
|||||
displays. |
|
||||
|
|
|
|
||
2.Press OK then press the  or
or  key to set the dual channel to ON monitoring. Press OK again to set the dual watch channel number.
3.Press the  key to set the second channel number, press OK then press the
  or
or  key to select second channel. Press OK again to confirm.
4.Press the  key to set the second sub-code, Press OK then press the
  or
or  key to select second sub-code number. Press OK again to confirm.
Note: If you set the same channel number and Sub-code as the current channel, Dual Watch doesn’t work.
To turn the Dual Watch mode OFF:
Enter the CH/  . Advance through the select Menu until "2CH" display. Press OK then press the
  or
or  key to set to OFF mode.
Press OK to confirm the setting.
2.Press the  key to start Stopwatch timer. Pressing the
  key again will Pause the timer.
3.Press the  key to reset the Stopwatch timer.
4.Press and hold the CH/  key to exit the Stopwatch timer function.
8

Mode Menu
Your radio navigates through Select Menu as follows:
Normal |
|
|
|
|
CLCK |
|
|
|
|
SCAN |
|
|
|
|
MON |
|
|
|
VOX |
|
|
RING |
||||
|
|
|
|
|
|
(Clock) |
|
|
|
|
|
|
|
|
|
|
(Monitor) |
|
|
|
|
|
|
|
||
|
|
|
|
|
|
|
|
|
|
|
|
|
|
|
|
|
|
|
|
|
|
|
|
|
||
|
|
|
|
|
|
|
|
|
|
|
|
|
|
|
|
|
|
|
|
|
|
|
|
|||
|
|
|
|
|
|
|
|
|
|
|
|
|
|
|
|
|
|
|
|
|
|
|
|
|||
|
|
|
|
|
|
|
Min |
|
|
|
|
|
|
|
|
|
|
|
|
|
|
|
||||
|
|
|
|
|
|
|
|
|
|
|
|
|
|
|
|
|
|
|
|
|
|
|
|
|
||
|
|
|
|
Hour |
|
|
|
|
|
On/Off |
|
|
|
|
|
On/Off |
|
|
|
On/Off |
|
|
|
|||
|
|
|
|
|
|
|
|
|
|
|
|
|
|
|
|
|
|
|
|
|
|
|
||||
|
|
|
|
|
|
|
|
|
|
|
|
|
|
|
|
|
|
|
||||||||
|
|
|
|
|
|
|
|
|
|
|
|
|
|
|
|
|
|
|||||||||
|
|
|
|
|
|
SLNT |
|
|
KEYS |
|
|
|
PTT |
|
|
|
PWR |
|
|
|
||||||
|
VIBE |
|
|
|
|
|
|
|
|
|||||||||||||||||
|
(Vibration) |
|
|
(Silent) |
|
|
(Key Tone) |
|
|
|
|
|
|
|
(Power) |
|
|
|
||||||||
|
|
|
|
|
|
|
|
|
|
|
|
|
|
|
|
|
|
|
|
|
|
|
|
|
|
|
|
|
|
|
|
|
|
|
|
|
|
|
|
|
|
|
|
|
|
|
|
|
|
|
|
|
|
|
|
|
|
|
|
|
|
|
|
|
|
|
|
|
|
|
|
|
|
|
|
|
|
|
|
|
Clock Feature
You can use your TLKR T8 radio’s clock function as a time display on your radio. When you set the time feature, the time clock in 24 hour format will display on standby mode.
To set the Time clock ON or OFF:
1.Enter the MENU/GRP. Advance through the Menu until the "CLOCK" display. Press OK to set the time clock feature.
2.Press the  or
or  key to set the hour time.
3.Press OK and move on to minutes setting.
4.Press the  or
or  key to set the minute time.
5.Press OK to confirm the time setting.
English
9

English
10
Channel Scan Feature
Your TLKR T8 radio has a channel scan feature that allows you to easily scan all 8 channels. When an active channel is detected, the radio will pause on that channel until the channel is clear. Then after a 2 second pause, the radio will continue scanning. Pressing the PTT key while the scan is paused on a channel will allow you to transmit on that channel and after releasing the PTT in 5 seconds it will continue scanning.
To set the channel scan ON:
1.Enter the MENU/GRP. Advance through the Menu until
"SCAN" display. Press OK then press the  or
or  key to set the Scan On.
2.Press OK to start channel scanning.
To set the channel Scan OFF:
1.Enter the MENU/GRP. Advance through the Menu until
"SCAN" display. Press OK then press the  or
or  key to set the Scan to OFF.
2.Press OK to confirm the setting.
Monitor Mode Feature
Your TLKR T8 radio allows you to listen for weak signals on the current channel at the press of a key. To set the Monitor to ON:
1.Enter the MENU/GRP. Advance through the Menu until
the "MON" display. Press OK then press the  or
or  key to set the Monitor ON.
2.Channel monitoring will start immediately.
To set the Monitor to OFF:
1. Enter the MENU/GRP. Advance through the Menu until
"MON" display. Press OK then press the  or
or  key to set the monitoring to OFF mode.
2. Press OK to confirm the setting.
Voice Operated Transmission
Your TLKR T8 radio is equipped with a user selectable Voice Operated Transmitter (VOX) that can be used for automatic voice transmission. The VOX feature is designed for hands-free purpose. Transmission is initiated by speaking into the microphone of the radio or headset (headset is not included) instead of pushing the PTT key.
To select the VOX level:
1.Enter the MENU/GRP. Advance through the Menu until the "VOX" display. Press OK to select VOX level settings to (L1..L5/Off). Setting Off disables VOX, while level 1-5 set the sensitivity of the VOX circuit.
2.Press the  or
or  key to select the desired VOX sensitivity level. Use Level 1 in quiet environments, and use level 5 in very noisy environments. You can find the
appropriate sensitivity level by speaking into the microphone. If the 
 icon flashes, your voice is accepted.
3.Press OK to confirm the setting.
Note:When you continue to transmit using VOX function for 60 seconds, the radio emits TX Time Out tone and the 
 icon flashes for 5 seconds.
Transmitting a Ring Tone
Your TLKR T8 radio is equipped with 10 selectable call tones that will be transmitted, when the  /
/ key is pressed.

To select a Call tone:
1.Enter the MENU/GRP. Advance through the Menu until the “RING” display. Press OK to select the ring tone from (1-10).
2.Press the  or
or  key to select the desired ring tones. Each tone will be heard every time you press the selected ring tone number.
3.Press OK to confirm the setting.
To transmit the selected ring tone, press the  /
/ key. The selected tone will automatically be transmitted for a fixed length of time. Ring tone will be cancelled when the PTT key is pressed.
Vibe (Vibration) mode
Your TLKR T8 is equipped with a Vibration selection that will alert the user when there is incoming transmission or call tone.
Vibrator mode is disabled for 30 seconds when you transmit, receive or press any other button.
To turn the Vibrator mode ON:
1.Enter the MENU/GRP. Advance through the Menu until
the "VIBE" display. Press OK then press the  or
or  key to set the Vibration to ON mode.
2.Press OK to confirm the setting.
To turn the Vibrator mode OFF:
1.Enter the MENU/GRP. Advance through the Menu until
"VIBE" display. Press OK then press the  or
or  key to set the Vibration OFF.
2.Press OK to confirm the setting.
Slnt (Silent) Mode
When you turn On the silent mode, all incoming calls are muted; the radio blinks the backlight to alert you to an incoming call. If you do not respond to the call, the backlight turns Off, and the CALL icon will blink until there is no signal.
Silent mode is disabled for 30 seconds when you transmit, receive, or press any other button.
To turn the Silent ON:
1.Enter the MENU/GRP. Advance through the Menu until
the "SLNT" display. Press OK then press the  or
or  key to set the Silent to ON mode.
2.Press OK to confirm the setting.
To turn the Silent OFF:
1.Enter the MENU/GRP. Advance through the Menu until
"SLNT" display. Press OK then press the  or
or  key to set the Silent to OFF.
2.Press OK to confirm the setting.
Key Tone
Your radio emits a tone each time one of the keys (except for the PTT key) is pressed.
To turn the Key tone ON:
1.Enter the MENU/GRP. Advance through the Menu until
the "KEYS" display. Press OK then press the  or
or  key to set the Key Beep tone ON mode.
2.Press OK to confirm the setting.
To turn the Key tone OFF:
1.Enter the MENU/GRP. Advance through the Menu until "KEYS" display. Press OK then press the  or
or  key to
English
11

|
|
set the Key tone to OFF. |
|
|
2. |
Press OK to confirm the setting. |
|
English |
PTT (Roger tone) |
|
|
heard through the speaker when Key Beep is On. It is |
|||
|
Roger Beep is a BEEP that is sent to notify the end of |
||
|
transmission (PTT and VOX transmission). Roger can be |
||
|
transmitted even if Key beep is turned Off. However, Roger |
||
|
Beep will not be heard from the speaker. |
|
|
|
To turn the PTT beep ON: |
|
|
|
1. |
Enter the MENU/GRP. Advance through the Menu until |
|
|
|
the "PTT" display. Press OK then press the |
or key |
|
|
to set the PTT Beep tone to ON mode. |
|
|
2. |
Press OK to confirm the setting. |
|
|
To turn the PTT beep OFF: |
|
|
|
1. |
Enter the MENU/GRP. Advance through the Menu until |
|
|
|
"PTT" display. Press OK then press the or |
key to |
|
|
set the PTT tone to OFF. |
|
|
2. |
Press OK to confirm the setting. |
|
Automatic Power Save Feature
Your radio has a unique circuit designed to dramatically extended the life of the batteries. If there is no transmission or an incoming call within 3 seconds, your radio switches to the Power Save Mode. The radio is still able to receive transmissions in this mode.
Auto Power Off
Auto Power Off feature allows you to set the time that the radio turns off automatically.
12 |
1. Enter the MENU/GRP. Advance through the Menu until |
the"PWR"display. Press OK then press the or key |
to select the Auto power off mode. Selection mode can be set to On, 1hr, 2hr or 3 hr.
2. Press OK to confirm the setting.
Room Monitor Feature
You can use one of your TLKR T8 radios as a room monitor and use the other radio to listen to and keep a check on the voice in another room. When you set the room monitor feature, the monitoring radio will detect voice/noises (according to the sensitivity level you set) and transmit back to the listening radio without pushing the PTT key. The monitoring radio is not able to receive any transmissions in this mode.
To turn the Room Monitor ON:
1.Enter the MENU/GRP. Advance through the Menu until
the "ROOM" display. Press OK then press the  or
or  key to select the Room monitor to Off or level L1, L2, L3, L4, L5.
2.Channel monitoring will start immediately.
To set the Room Monitor OFF:
1.Enter the MENU/GRP. Advance through the Menu until
the "ROOM" display. Press OK then press the  or
or  key to set the Room monitor to Off.
2.Press OK to confirm the setting.
Note:
-Pressing the PTT key in Room Monitor mode is invalid and the radio emits PTT Error tone.
-When the voice/noise in another room continues more than 60 seconds, the monitoring radio stops monitoring for 5 seconds, and then resumes.

Group Menu
Press and hold the MENU/GRP key to get into Group Menu.
Clock Feature in Group Mode
You can use your TLKR T8 radio’s clock function as a time display on your radio. When you set the time feature, the time clock in 24 hour format will display on standby mode.
English
To set the Time clock ON:
1.Enter the MENU/GRP. Advance through the Menu until the "CLCK" display. Press OK to set the Time clock feature.
2.Press the  or
or  key to set the hour time.
3.Press OK to move on to minute setting.
4.Press the  or
or  key to set the minute time.
5.Press OK to confirm the time setting.
13

English
Set ID Name
ID name appears on other units’ displays when you make an All Call or Direct Call. This is also the name that appears on other radio displays when someone wants to make a Direct Call to you. When no ID name is set, the unit number appears.
To set the ID Name:
1.Enter the MENU/GRP. Advance through the Menu until "NAME" is displayed. Press OK to enter the Name on the blinking sub-code segments.
2.Press the  or
or  key to input the character on the blinking sub code segments. Press OK to move to the next character until completed the desired characters. The name characters can be selected up to 4 characters.
3.Press OK to confirm the setting.
Note:Whenever the user presses MENU/GRP key, the unit cancels input ID number and entered ID name then it exits from Group menu.
Set ID number
Each radio in your group needs to be set to an ID number from 1 to 16.
The ID number is required to distinguish units of the same Group.
To set the ID number:
1.Enter the MENU/GRP. Advance through the Menu until
"ID" is displayed. Press OK then press the  or
or  key to set the ID number.
2.Press OK to confirm the setting.
Note:The user selects ID number that is displayed on channel segments by pressing the  or
or  key. When the registered ID of All Call is selected by pressing
  or
or  the LCD indicates "USED" at sub-code segments, and if non registered ID is selected it indicates nothing at sub-code segments.
Set Monitor in Group mode
To set the Monitor mode ON:
1.Enter the MENU/GRP. Advance through the Menu until
the "MON" display. Press OK then press the  or
or  key to set the Monitor to ON mode.
2.Channel monitoring will start immediately.
To set the Monitor to OFF:
1.Enter the MENU/GRP. Advance through the Menu until
"MON" display. Press OK then press the  or
or  key to set the Monitor to OFF.
2.Press OK to confirm the setting.
14

Set Ring Tone in Group mode
To select a Ring tone:
1.Enter the MENU/GRP. Advance through the Menu until "RING" displays. Press OK to select the ring tone from (1-10).
2.Press the  or
or  key to select the desired ring tone. Each tone will be heard every time you press the selected ring tone number.
To transmit the selected ring tone, press the corresponding key. The selected tone will automatically be transmitted for a fixed length of time. Ring tone will be cancelled when the PTT key is pressed.
Set Key Tone in Group mode
To set the Key tone ON:
1.Enter the MENU/GRP. Advance through the Menu until
the "KEYS" display. Press OK then press the  or
or  key to set the Key Beep tone to ON.
2.Press OK to confirm the setting.
To set the Key tone OFF:
1.Enter the MENU/GRP. Advance through the Menu until
"KEYS" display. Press OK then press the  or
or  key to set the Key tone to OFF.
2.Press OK to confirm the setting.
Set PTT in Group mode
To set the PTT beep ON:
1.Enter the MENU/GRP. Advance through the Menu until
the "PTT" display. Press OK then press the  or
or  key to select the PTT Beep tone to ON mode.
2.Press OK to confirm the setting.
To set the PTT beep OFF:
1.Enter the MENU/GRP. Advance through the Menu until
"PTT" display. Press OK then press the  or
or  key to set the PTT tone to OFF.
2.Press OK to confirm the setting.
Set Auto power off in Group mode
Auto Power Off feature allows you to set the time that the radio turns off automatically.
1.Enter the MENU/GRP. Advance through the Menu until
the "PWR" display. Press OK then press the  or
or  key to select the Auto power off mode. Selection mode can be set to On, 1hr, 2hr or 3 hr.
2.Press OK to confirm the setting.
Group Mode
Press the CH/  key to get into Group Mode. Press the
  or
or  key to proceed to each menu.
English
15

English
Press the CH/ |
key to enter the channel setting. Press |
Manual Channel setting |
|
|
|
|
|
|||||||||||
OK then press the |
|
|
or |
|
key to select the Auto Channel |
Press the CH/ |
key to enter Group Mode. Press OK to |
|||||||||||
Change settings or Manual Channel Change settings. |
||||||||||||||||||
set the Manual Channel setting and the |
display will show |
|||||||||||||||||
The Display shows the following: |
||||||||||||||||||
"MY". |
|
|
|
|
|
|
||||||||||||
|
|
|
|
|
|
|
|
|
|
|
|
|
|
|
|
|
||
|
|
|
|
|
|
|
|
|
|
|
Press OK then press the |
|
|
key to select the |
||||
|
|
|
|
|
|
|
|
|
|
|
or |
|||||||
|
|
|
|
|
|
|
|
|
|
|
channel. |
|
|
|
|
|
|
|
|
|
|
|
|
|
|
|
|
|
|
Then, Manual channel setting is available. |
|||||||
|
|
|
|
|
|
|
|
|
|
|
Note:Pressing the CH/ |
key will go back to idle |
||||||
|
Auto Channel |
|
|
Manual Channel |
status. |
|
|
|
|
|
|
|||||||
|
Change |
|
|
|
|
Change |
Set All/Direct Call |
|
|
|
|
|
||||||
|
|
|
|
|
|
|
|
|
|
|
Press the / |
key in Group mode to enter All/Direct call |
||||||
Press the CH/ |
key to enter each setting. |
setting. At first the user selects a type of call from All Call |
||||||||||||||||
transmission or Direct Call setting. |
|
|
|
|||||||||||||||
Note:Pressing the CH/ |
|
key will go back to idle |
|
|
|
|
|
|
|
|||||||||
|
status. |
|
|
|
|
|
|
|
|
|
|
|
|
|||||
Auto Channel Change setting |
|
|
|
|
|
|
|
|||||||||||
Press the CH/ |
key |
to enter Group Mode. |
|
|
|
|
|
|
|
|||||||||
Press OK to set the Auto Channel change and the display |
All Call |
|
|
|
Direct Call |
|||||||||||||
will show the current group number. Press OK then press |
Transmission |
|
|
Transmission |
||||||||||||||
the |
or |
|
key to select the group channel number press |
|
|
|
|
|
|
|
||||||||
again the |
|
or |
|
|
key to select the group mode in "ALL". |
|
|
|
|
|
|
|
||||||
|
|
To select the setting, press the |
or |
key to select the |
||||||||||||||
Press OK to confirm and transmit Auto Channel change |
||||||||||||||||||
type of a call. |
|
|
|
|
|
|
||||||||||||
command. |
|
|
|
|
|
|
|
|
|
|
|
|
|
|||||
|
|
|
|
|
|
|
Set All Call |
|
|
|
|
|
|
|||||
Note:Pressing CH/ |
key will go back to idle status. |
|
|
|
|
|
|
|||||||||||
|
|
|
|
|
|
|
|
|
|
|
When All Call Transmission " ZYNC" is selected press the |
|||||||
|
|
|
|
|
|
|
|
|
|
|
/ key to transmit All Call immediately. Then it sounds |
|||||||
|
|
|
|
|
|
|
|
|
|
|
All Call tone to the receiver unit. The display shows TX icon |
|||||||
|
|
|
|
|
|
|
|
|
|
|
and Call icon while transmitting. |
|
|
|
||||
|
|
|
|
|
|
|
|
|
|
|
Note:Pressing the CH/ |
key will go back to idle status. |
||||||
16

Set Direct Call
The display shows ID number on Channel segments and ID name blinks on sub-code segments.
ID number for Direct Call
ID name
Press the  or
or  key to select the ID number. Press OK to transmit Direct Call command. The Direct Call command will only transmit to the selected ID number.
The display shows the TX icon and Call icon while transmitting.
The unit sounds will transmit the selected Call tone when transmitting Direct Call command.
Note:Pressing the CH/  key will go back to All/Direct Call setting.
Key Lock Activation
To Lock the keypad:
Press and hold the  /
/ key. The
  icon appears.
In sub-code segments shows "LOCK" for 2 seconds then it returns to previous screen.
To Unlock the keypad:
Press and hold the  /
/ key again. The
  icon disappears. In sub-code segments shows "UNLK" for 2 seconds then it returns to previous screen.
Note:If any key (except PTT) is pressed while LOCK icon still displayed every press of keys will sound with error tone.
Battery Low Alert
Battery Low alerts when the battery level becomes empty. The alert starts 30 seconds after the Battery Low icon starts blinking. The sub-code segment indicates "BATT" and the Battery Low icon blinks.The alert tone sounds every 5 seconds for 30 seconds then the radio will automatically power off.
LCD Backlight
The LCD backlight will automatically turn ON when any key (except for PTT) is pressed. The LCD display will illuminate for 10 seconds after the last key pressed.
English
17

English
Specifications
Channels |
8 PMR |
Sub-Codes |
121 (38 CTCSS and |
|
83 DCS Codes) |
Operating |
446.00625 - 446.09375 MHz |
Frequency |
|
Power Source |
AAA Ni-MH battery Pack |
|
4 AAA Alkaline Batteries |
|
(not included) |
Range |
Up to 10 km |
Battery Life |
16 Hours typical |
|
Alkaline Batteries |
|
14 Hours typical |
|
NiMH Battery pack |
Frequency Chart (MHz)
Ch. Freq.
1446.00625
2446.01875
3446.03125
4446.04375
5446.05625
6446.06875
7446.08125
8446.09375
Approved Accessories List
Please contact your dealer or retailer to purchase these accessories.
18
CTCSS Chart (Hz)
|
Code No. |
Tone Frequency (Hz) |
Code No. |
Tone Frequency (Hz) |
Code No. |
Tone Frequency (Hz) |
|
0 |
Off |
13 |
103.5 |
26 |
162.2 |
|
1 |
67.0 |
14 |
107.2 |
27 |
167.9 |
|
2 |
71.9 |
15 |
110.9 |
28 |
173.8 |
|
3 |
74.4 |
16 |
114.8 |
29 |
179.9 |
|
4 |
77.0 |
17 |
118.8 |
30 |
186.2 |
|
5 |
79.7 |
18 |
123.0 |
31 |
192.8 |
|
6 |
82.5 |
19 |
127.3 |
32 |
203.5 |
|
7 |
85.4 |
20 |
131.8 |
33 |
210.7 |
|
8 |
88.5 |
21 |
136.5 |
34 |
218.1 |
|
9 |
91.5 |
22 |
141.3 |
35 |
225.7 |
|
10 |
94.8 |
23 |
146.2 |
36 |
233.6 |
|
11 |
97.4 |
24 |
151.4 |
37 |
241.8 |
|
12 |
100.0 |
25 |
156.7 |
38 |
250.3 |
DCS Code |
|
|
|
|
|
|
Code |
Code |
Code |
Code |
Code |
Code |
Code |
Code |
Code |
Code |
Code |
Code |
No. |
|
No. |
|
No. |
|
No. |
|
No. |
|
No. |
|
39 |
023 |
53 |
114 |
67 |
174 |
81 |
315 |
95 |
445 |
109 |
631 |
40 |
025 |
54 |
115 |
68 |
205 |
82 |
331 |
96 |
464 |
110 |
632 |
41 |
026 |
55 |
116 |
69 |
223 |
83 |
343 |
97 |
465 |
111 |
654 |
42 |
031 |
56 |
125 |
70 |
226 |
84 |
346 |
98 |
466 |
112 |
662 |
43 |
032 |
57 |
131 |
71 |
243 |
85 |
351 |
99 |
503 |
113 |
664 |
44 |
043 |
58 |
132 |
72 |
244 |
86 |
364 |
100 |
506 |
114 |
703 |
45 |
047 |
59 |
134 |
73 |
245 |
87 |
365 |
101 |
516 |
115 |
712 |
46 |
051 |
60 |
143 |
74 |
251 |
88 |
371 |
102 |
532 |
116 |
723 |
47 |
054 |
61 |
152 |
75 |
261 |
89 |
411 |
103 |
546 |
117 |
731 |
48 |
065 |
62 |
155 |
76 |
263 |
90 |
412 |
104 |
565 |
118 |
732 |
49 |
071 |
63 |
156 |
77 |
265 |
91 |
413 |
105 |
606 |
119 |
734 |
50 |
072 |
64 |
162 |
78 |
271 |
92 |
423 |
106 |
612 |
120 |
743 |
51 |
073 |
65 |
165 |
79 |
306 |
93 |
431 |
107 |
624 |
121 |
754 |
52 |
074 |
66 |
172 |
80 |
311 |
94 |
432 |
108 |
627 |
|
|
English
19

Warranty Information
The authorized Motorola dealer or retailer where you purchased your Motorola two-way radio and/or original
English accessories will honour a warranty claim and/or provide warranty service. Please return your radio to your dealer or
retailer to claim your warranty service. Do not return your radio to Motorola.
In order to be eligible to receive warranty service, you must present your receipt of purchase or a comparable substitute proof of purchase bearing the date of purchase. The twoway radio should also clearly display the serial number. The warranty will not apply if the type or serial numbers on the product have been altered, deleted, removed, or made illegible.
What Is Not Covered By The Warranty
Defects or damage resulting from use of the Product in other than its normal and customary manner or by not following the instructions in this user manual.
Defects or damage from misuse, accident or neglect. Defects of damage from improper testing, operation, maintenance, adjustment, or any alteration or modification of any kind.
Breakage or damage to aerials unless caused directly by defects in material or workmanship. Products disassembled or repaired in such a manner as to adversely affect performance or prevent adequate inspection and testing to verify any warranty claim.
Defects or damage due to range.
Defects or damage due to moisture, liquid or spills.
All plastic surfaces and all other externally exposed parts that are scratched or damaged due to normal use.
20 Products rented on a temporary basis. Periodic
maintenance and repair or replacement of parts due to normal usage, wear and tear.
Copyright Information
The Motorola products described in this manual may include copyrighted Motorola programs, stored semiconductor memories or other media. Laws in the United States and other countries preserve for Motorola, certain exclusive rights for copyrighted computer programs, including the exclusive right to copy or reproduce in any form, the copyrighted Motorola programs.
Accordingly, any copyrighted Motorola computer programs contained in the Motorola products described in this manual may not be copied or reproduced in any manner without express written permission of Motorola. Furthermore, the purchase of Motorola products shall not be deemed to grant either directly or by implication, estoppel, or otherwise, any license under the copyrights, patents or patent applications of Motorola, except for the normal non-exclusive royalty free license to use that arises by operation of law in the sale of a product.
MOTOROLA, the Stylized M Logo and all other trademarks indicated as such herein are trademarks of Motorola, Inc. ® Reg. U.S. Pat. & Tm. Off.
© Motorola, Inc. 2010

SOMMAIRE
Sécurité et exposition aux fréquences radio . . . . . . . . . . . . . 2 Caractéristiques. . . . . . . . . . . . . . . . . . . . . . . . . . . . . . . . . . . 2 Commandes et fonctions . . . . . . . . . . . . . . . . . . . . . . . . . . . . 3 Ecran . . . . . . . . . . . . . . . . . . . . . . . . . . . . . . . . . . . . . . . . . . . 4 Contenu de l'emballage . . . . . . . . . . . . . . . . . . . . . . . . . . . . . 5 Installation de la batterie . . . . . . . . . . . . . . . . . . . . . . . . . . . . 5 Niveau de charge et avertissement de
batterie faible . . . . . . . . . . . . . . . . . . . . . . . . . . . . . . . . . . . . . 5 Pour charger la radio . . . . . . . . . . . . . . . . . . . . . . . . . . . . . . . 5 Pour effectuer une charge directe . . . . . . . . . . . . . . . . . . . . . 5 Pour effectuer la charge avec le bac chargeur . . . . . . . . . . . 5 Charge de la batterie . . . . . . . . . . . . . . . . . . . . . . . . . . . . . . . 6 Utilisation de la radio . . . . . . . . . . . . . . . . . . . . . . . . . . . . . . . 6 Allumer la radio et régler le volume sonore . . . . . . . . . . . . . . 6 Pour émettre avec votre radio . . . . . . . . . . . . . . . . . . . . . . . . 6 Navigation dans le menu . . . . . . . . . . . . . . . . . . . . . . . . . . . 6 Menu Sélection . . . . . . . . . . . . . . . . . . . . . . . . . . . . . . . . . . . 7 Choisir un canal . . . . . . . . . . . . . . . . . . . . . . . . . . . . . . . . . . 7 Choisir un sous-code . . . . . . . . . . . . . . . . . . . . . . . . . . . . . . 7 Mode Double écoute . . . . . . . . . . . . . . . . . . . . . . . . . . . . . . . 8 Activation Chronomètre . . . . . . . . . . . . . . . . . . . . . . . . . . . . . 8 Mode Menu . . . . . . . . . . . . . . . . . . . . . . . . . . . . . . . . . . . . . . 9 Fonction d’horloge . . . . . . . . . . . . . . . . . . . . . . . . . . . . . . . . . 9 Balayage des canaux . . . . . . . . . . . . . . . . . . . . . . . . . . . . . 10 Mode Écoute . . . . . . . . . . . . . . . . . . . . . . . . . . . . . . . . . . . . 10 Émission avec commande vocale . . . . . . . . . . . . . . . . . . . . 10 Emettre une sonnerie . . . . . . . . . . . . . . . . . . . . . . . . . . . . . 10 Mode de vibration (Vibe) . . . . . . . . . . . . . . . . . . . . . . . . . . . 11 Mode Slnt (Silence) . . . . . . . . . . . . . . . . . . . . . . . . . . . . . . . 11
Tonalité des touches . . . . . . . . . . . . . . . . . . . . . . . . . . . . . . .11 Alternat PTT (Bip de confirmation) . . . . . . . . . . . . . . . . . . . .12 Économiseur automatique d’énergie . . . . . . . . . . . . . . . . . .12 Extinction automatique . . . . . . . . . . . . . . . . . . . . . . . . . . . . .12 Écoute Bébé . . . . . . . . . . . . . . . . . . . . . . . . . . . . . . . . . . . . .12 Menu Groupe. . . . . . . . . . . . . . . . . . . . . . . . . . . . . . . . . . . . .13 Fonction d’horloge dans le mode Groupe . . . . . . . . . . . . . . .13 Définir le nom d’identifiant . . . . . . . . . . . . . . . . . . . . . . . . . . .14 Définir le numéro d’identifiant . . . . . . . . . . . . . . . . . . . . . . . .14 Définir l'écoute dans le mode Groupe . . . . . . . . . . . . . . . . . .14 Définir la sonnerie dans le mode Groupe . . . . . . . . . . . . . . .15 Définir la tonalité des touches dans le mode Groupe . . . . . .15 Définir l'Alternat PTT dans le mode Groupe . . . . . . . . . . . . .15 Définir l’extinction automatique dans le mode Groupe . . . . .15 Mode Groupe. . . . . . . . . . . . . . . . . . . . . . . . . . . . . . . . . . . . .15 Fonction du changement de canal automatique . . . . . . . . . .16 Fonction du changement de canal manuel . . . . . . . . . . . . . .16 Définir Appel direct/général . . . . . . . . . . . . . . . . . . . . . . . . . .16 Définir Appel général . . . . . . . . . . . . . . . . . . . . . . . . . . . . . . .16 Définir Appel Direct . . . . . . . . . . . . . . . . . . . . . . . . . . . . . . . .17 Verrouillage du clavier . . . . . . . . . . . . . . . . . . . . . . . . . . . . . .17 Avertissement de batterie faible . . . . . . . . . . . . . . . . . . . . . .17 Éclairage de l’écran . . . . . . . . . . . . . . . . . . . . . . . . . . . . . . . .17 Spécifications. . . . . . . . . . . . . . . . . . . . . . . . . . . . . . . . . . . . .18 Table des fréquences. . . . . . . . . . . . . . . . . . . . . . . . . . . . . . .18 Table des codes CTCSS (Hz) . . . . . . . . . . . . . . . . . . . . . . . .19 Table des codes DCS . . . . . . . . . . . . . . . . . . . . . . . . . . . . . .19 Informations sur La Garantie . . . . . . . . . . . . . . . . . . . . . . . . .20 Ce Qui N'est Pas Couvert Par La Garantie . . . . . . . . . . . . . .20 Informations sur Les Droits d'Auteur . . . . . . . . . . . . . . . . . . .20
Français
1

Français
Sécurité et exposition aux fréquences radio pour portatifs émetteurs-récepteurs
!
Avertissement
Avant d’utiliser ce produit, lisez les instructions de sécurité présentées dans la brochure « Normes de sécurité et d’exposition à l’énergie de radiofréquence », fournie avec votre radio.
ATTENTION !
Avant d’utiliser ce produit, veuillez lire les informations sur l’exposition à l’énergie électromagnétique et les instructions d’utilisation contenues dans la brochure « Sécurité du produit et exposition à l’énergie électromagnétique » fournie avec votre radio, pour être certain de respecter les limites d’exposition à l’énergie électromagnétique.
Caractéristiques
8 canaux PMR
121 sous-codes (38 codes CTCSS et 83 codes DCS) Jusqu’à 10 km de portée *
Lampe DEL Circuit interne VOX
10 tonalités d’avertissement d’appel sélectionnables Affichage LCD rétroéclairé
Jack pour casque audio optionnel Alternat PTT, Bip de confirmation Horloge programmatrice
Écoute Bébé Balayage des canaux Double écoute Verrouillage du clavier Economie d'énergie Mode silencieux
Avertissement de batterie faible Appel de groupe
Appel direct (ID appelant) Appel général Changement canal auto
* La portée peut varier selon les conditions topographiques et/ou environnementales.
2
Commandes et fonctions
Antenne
Bouton du volume sonore avec interrupteur
Alternat (PTT) 
Touche MENU/GRP
 /
/ Touche (Appel / Verrouillage)
Haut-parleur

 Volume/
Canal suivant
 Canal / Chronomètre
 OK
OK

 Volume / Canal inf.
 Microphone
Français
Bouton lampe DEL
Jack IN 9 V CC
3
Ecran
|
1. |
Indicateur de sélection Heure/Menu/Groupe |
|
Français |
2. |
Indicateur de balayage |
|
3. |
Indicateur de la tonalité des touches |
||
4. |
Indicateur de verrouillage du clavier |
||
5. Indicateur du mode silencieux (sonnerie éteinte) |
|||
|
6. |
Indicateur du niveau de charge |
|
|
7. |
Indicateur du niveau de charger |
|
|
8. |
Icône Mode Écoute |
|
|
9. |
Indicateur du vibrateur |
|
|
10. |
Icône Écoute Bébé |
|
|
11. Icône VOX |
||
|
12. |
Indicateur d’émission |
|
|
13. |
Indicateur de réception |
|
|
14. |
Indicateur haut/bas (sélection du mode Menu/Canal) |
|
|
15. |
Indicateur de pause (Chronomètre) |
|
|
16. |
Indicateur de code (numéro de sous-code) |
|
|
17. |
Indicateur haut/bas (numéro de sélection du Groupe/ |
|
|
|
|
Sous-code) |
|
18. |
Indicateur 2CH (canal double) |
|
|
19. |
Indicateur de sélection du Groupe/Numéro de sous- |
|
|
|
|
code |
|
20. |
Indicateur GRP (mode Groupe) |
|
|
21. |
Indicateur CH (canal principal) |
|
|
22. |
Indicateur des deux-points (affichage de l'heure/ |
|
|
|
|
chronomètre) |
4

Nous vous félicitons d’avoir choisi une radio TLKR T8. Ce modèle se distingue par sa légèreté et sa durabilité. Vous pouvez l’utiliser pour rester en contact avec la famille, les amis, en randonnée, au ski, ou autres activités de plein air. Ce modèle état de l’art est compact, mais offre un grand nombre de fonctions.
Contenu de l'emballage
L’emballage contient deux radios TLKR T8, deux pinces de ceinture, un bac chargeur, un adaptateur CA, deux supports de batterie, deux packs batteries rechargeables NiMH et ce guide d’utilisation. Vous pouvez utiliser votre radio avec quatre piles alcalines AAA (non fournies).
Installation de la batterie
Votre radio TLKR T8 peut être alimentée par un pack batterie NiMH ou par quatre piles alcalines AAA (non fournies). Si vous choisissez cette dernière option, nous vous conseillons d’utiliser des piles alcalines de haute qualité.
Pour installer le pack batterie NiMH :
1.Vérifiez que la radio est éteinte.
2.Retirez la porte du compartiment en appuyant sur l’onglet situé à sa partie inférieure.
3.Installez le pack batterie NiMH dans le compartiment. Vérifiez que les polarités (symboles + et –) sont respectées, comme indiqué dans le compartiment. Si la batterie n’est pas installée correctement, la radio ne peut pas fonctionner.
4.Remettez en place la porte du compartiment.
Niveau de charge et avertissement de batterie faible
Votre radio est équipée d’un indicateur de charge affiché à l’écran qui vous permet de connaître l’état de la batterie. Lorsque le niveau de la batterie est faible,
l’indicateur clignote. Les batteries rechargeables NiMH doivent être immédiatement chargées.
Pour charger la radio
Si vous utilisez la batterie rechargeable NiMH, vous pouvez recharger deux radios TLKR T8 soit directement, soit avec le bac chargeur fourni.
Vérifiez que la radio est éteinte avant de la mettre dans le bac chargeur. L’indicateur de charge ne peut pas fonctionner correctement lorsque la radio n’est pas éteinte avant d’effectuer une recharge.
Pour effectuer une charge directe :
1.Branchez la prise de l’adaptateur CC au jack IN 9 V CC de la radio. Branchez l’autre connecteur à une prise d’alimentation pour accessoires sur le véhicule.
2.Chargez le pack batterie pendant 16 heures.
Pour effectuer la charge avec le bac chargeur :
1.Branchez l’adaptateur CA au jack IN 9 V CC de la radio et à une prise d’alimentation secteur standard.
2.Posez le bac chargeur sur une surface horizontale. Positionnez la radio dans le bac chargeur pour que son clavier soit orienté vers l’avant.
3.Vérifiez que le témoin s’allume. Chargez le pack batterie pendant 16 heures et retirez la radio du bac chargeur dès que l'opération de charge est terminée.
Remarque : Le témoin d’indicateur de charge reste allumé tant que la radio reste dans le chargeur.
Français
5

Français
6
Charge de la batterie
Vous pouvez charger le pack batterie NiMH seul à l’aide du support de batterie fourni.
1.Placez le support de batterie dans le bac chargeur.
2.Installez le pack batterie NiMH dans le bac chargeur en vérifiant que leurs bornes sont en contact. Si le pack batterie n’est pas installé correctement, le chargeur ne pourra pas fonctionner.
3.Vérifiez que le témoin s’allume. Chargez le pack batterie pendant 16 heures.
Remarque : Le témoin d’indicateur de charge reste allumé tant que le pack batterie reste dans le chargeur.
Utilisation de la radio
Pour utiliser votre nouvelle radio de manière optimale, lisez attentivement ce guide dans sa totalité avant d’essayer d’utiliser la radio.
Pour allumer la radio et régler le volume sonore
1.Tournez le bouton rotatif dans le sens horaire pour allumer la radio et augmenter le volume. Pour diminuer le niveau du volume, tournez ce bouton dans le sens antihoraire.
2.Pour éteindre la radio, tournez ce bouton à fond dans le sens anti-horaire.
Pour émettre avec votre radio
Lorsque vous voulez parler à d'autres usagers :
1.Appuyez et maintenez l’Alternat et parlez d’une voix normale dans le microphone placé entre 5 et 8 cm de la
bouche. Chaque émission est signalée par l’apparition de l’icône à l’écran. Pour éviter que le début l’émission
soit tronqué, marquez une courte pause après avoir appuyé sur l’Alternat et avant de parler.
2.Lorsque vous avez terminé de parler, relâchez l’Alternat. Lorsque l’Alternat est relâché, vous pouvez écouter/
recevoir des appels. La réception est signalée par l’affichage de l’icône .
.
Remarque : Lorsque vous parlez sans interruption pendant 60 secondes, une tonalité de limite de temps d’émission retentit et l’icône
 clignote. La radio cesse d’émettre.
Navigation dans le menu
Les fonctions avancées du TLKR T8 sont présentées dans un menu.
1.Pour ouvrir le menu, appuyez sur la touche MENU/GRP.
2.Pour faire défiler les options du menu, appuyez répétitivement sur la touche MENU/GRP. Arrivée à la fin de la liste des options du menu, la radio ferme le menu et revient en mode "Normal".

Menu Sélection
Le menu Sélection propose successivement les fonctions suivantes :
CH/ |
|
|
|
|
|
|
|
|
|
|
|
|
CH |
CODE |
|||
Canal / |
|
|
|
(Canal / Numéro) |
|
|
(Numéro de code) |
|
Chronomètre |
|
|
|
|
|
|||
|
|
|
|
|
|
|
||
|
|
Double Écoute |
2 CH |
|
|
|
|
|
(Double Écoute) |
|
|
|
activée |
|
|
|
|
|
|
|
Marche /
Arrêt
Numéro de |
|
Numéro de sous- |
|
|
canal (1-8) |
|
code (0-121) |
|
|
|
|
|
|
|
|
|
|
|
|
|
|
|
|
|
Choisir un canal
Votre radio vous permet d’utiliser 8 canaux et 121 souscodes pour communiquer. Pour établir une communication entre deux radios, chaque radio doit être réglée sur le même canal et le même sous-code.
Pour choisir un canal :
1.Accédez à l’écran du n° de canal « CH » CH/  .
.
2.Appuyez sur OK pour vous rendre sur les paramètres du canal.
3.Appuyez sur  ou sur
  pour augmenter ou diminuer le numéro du canal affiché. Si vous maintenez la
pression sur la touche  ou
ou  , le numéro du canal défile en continu.
4.Appuyez sur OK pour confirmer la configuration.
Choisir un sous-code
La sélection d’un sous-code permet de réduire les interférences. Les radios doivent être réglées sur le même sous-code pour pouvoir communiquer entre elles. Chacun canal numéroté de 1 à 8 peut utiliser l'un des sous-codes numérotés de 0 à 121.
1.Accédez à CH/  . Parcourez le menu choisi jusqu’à l’affichage de « CODE ».
2.Appuyez sur OK pour parvenir aux paramètres de souscode.
3.Appuyez sur la touche  ou
ou  pour passer au numéro inférieur ou supérieur du canal de sous-code affiché. Le
fait de maintenir la touche  ou
ou  enfoncée fera constamment défiler le numéro du canal en amont ou en aval.
4.Appuyez sur OK pour confirmer la configuration.
Français
7

Français
Mode Double écoute
Votre radio peut balayer alternativement deux canaux. Vous devez, pour cela, sélectionner le numéro de canal et le sous-code du deuxième canal.
Pour sélectionner un deuxième canal et lancer le mode Double écoute :
1.Accédez à CH/  . Parcourez le menu de sélection jusqu’à l’affichage de « 2CH ».
2.Appuyez sur OK puis sur  ou
ou  pour activer le canal de double écoute. Appuyez de nouveau sur OK pour activer le numéro du canal de double écoute.
3.Appuyez sur  pour activer le deuxième numéro de canal, puis sur OK et la touche
  ou
ou  pour sélectionner le second canal. Appuyez encore une fois sur OK pour confirmer.
4.Appuyez sur la touche  pour activer le deuxième sous-code. Appuyez sur OK puis sur
  ou
ou  pour sélectionner le deuxième numéro de sous-code.
Appuyez encore une fois sur OK pour confirmer.
Remarque : Si vous sélectionnez le même numéro de canal et le même sous-code que le canal actif, la fonction Double écoute ne peut pas fonctionner.
Pour désactiver le mode Double écoute :
Accédez à CH/  . Parcourez le menu de sélection jusqu’à l’affichage de « 2CH ». Appuyez sur OK puis sur
  ou
ou  pour activer le mode OFF.
Appuyez sur OK pour confirmer la configuration.
Activation Chronomètre
Votre radio intègre une fonction Chronomètre. Sa durée maximale est de 60 minutes 59 secondes.
Remarque : des appels peuvent être reçus pendant que cette fonction est activée.
Pour utiliser le Chronomètre :
1.Appuyez et maintenez la touche CH/  jusqu’à ce que le Chronomètre soit affiché.
2.Appuyez sur  pour lancer le Chronomètre. Appuyez à nouveau sur la touche
  pour pauser le Chronomètre.
3.Appuyez sur  pour réinitialiser le Chronomètre.
4.Appuyez et maintenez CH/  pour quitter la fonction Chronomètre.
8
 Loading...