


VC5090 Vehicle Computer
Product Reference Guide
VC5090 Vehicle Computer
Product Reference Guide
72E-76347-02
Revision A
August 2007

ii VC5090 Vehicle Computer Product Reference Guide
© 2006-7 by Motorola, Inc. All rights reserved.
No part of this publication may be reproduced or used in any form, or by any electrical or mechanical means, without permission in writing from Motorola. This includes electronic or mechanical means, such as photocopying, recording, or information storage and retrieval systems. The material in this manual is subject to change without notice.
The software is provided strictly on an “as is” basis. All software, including firmware, furnished to the user is on a licensed basis. Motorola grants to the user a non-transferable and non-exclusive license to use each software or firmware program delivered hereunder (licensed program). Except as noted below, such license may not be assigned, sublicensed, or otherwise transferred by the user without prior written consent of Motorola. No right to copy a licensed program in whole or in part is granted, except as permitted under copyright law. The user shall not modify, merge, or incorporate any form or portion of a licensed program with other program material, create a derivative work from a licensed program, or use a licensed program in a network without written permission from Motorola. The user agrees to maintain Motorola’s copyright notice on the licensed programs delivered hereunder, and to include the same on any authorized copies it makes, in whole or in part. The user agrees not to decompile, disassemble, decode, or reverse engineer any licensed program delivered to the user or any portion thereof.
Motorola reserves the right to make changes to any software or product to improve reliability, function, or design.
Motorola does not assume any product liability arising out of, or in connection with, the application or use of any product, circuit, or application described herein.
No license is granted, either expressly or by implication, estoppel, or otherwise under any Motorola, Inc., intellectual property rights. An implied license only exists for equipment, circuits, and subsystems contained in Motorola products.
MOTOROLA and the Stylized M Logo and Symbol and the Symbol logo are registered in the US Patent & Trademark Office. Bluetooth is a registered trademark of Bluetooth SIG. Microsoft, Windows and ActiveSync are either registered trademarks or trademarks of Microsoft Corporation. All other product or service names are the property of their respective owners.
Motorola, Inc.
One Motorola Plaza
Holtsville, New York 11742-1300
http://www.symbol.com
Patents
This product is covered by one or more of the patents listed on the web site: http://www.symbol.com/patents.
Warranty
Subject to the terms of Motorola’s hardware warranty statement, the VC5090 Vehicle Computer products are warranted against defects in workmanship and materials for a period of one year from the date of shipment. For the complete Motorola hardware product warranty statement, go to: http://www.symbol.com/warranty.

iii
Revision History
Changes to the original manual are listed below:
Change |
Date |
Description |
|
|
|
-01 Rev A |
5/31/06 |
Initial release. |
|
|
|
-02 Rev A |
08/10/07 |
Updates including: Fusion 2.5, latest OS, AZERTY keyboard, mounting instructions, |
|
|
SCM and registry settings, maintenance release (BSP26). |
|
|
|
|
|
|
|
|
|
|
|
|

iv VC5090 Vehicle Computer Product Reference Guide

Table of Contents
Patents.................................................................................................................................................. |
ii |
Warranty ............................................................................................................................................... |
ii |
Revision History.................................................................................................................................... |
iii |
About This Guide |
|
Introduction ........................................................................................................................................... |
xiii |
Documentation Set ......................................................................................................................... |
xiii |
Configurations....................................................................................................................................... |
xiv |
Software Versions........................................................................................................................... |
xiv |
Chapter Descriptions ............................................................................................................................ |
xv |
Notational Conventions......................................................................................................................... |
xv |
Related Documents and Software ........................................................................................................ |
xvi |
Service Information............................................................................................................................... |
xvi |
Returning the Vehicle Computer for Service................................................................................... |
xvii |
Chapter 1: Getting Started |
|
Introduction .......................................................................................................................................... |
1-1 |
Unpacking the VC5090 ........................................................................................................................ |
1-1 |
Features ............................................................................................................................................... |
1-2 |
Accessories ......................................................................................................................................... |
1-4 |
Third Party Accessories ....................................................................................................................... |
1-6 |
Getting Started ..................................................................................................................................... |
1-7 |
Installing the Desiccant Bag ........................................................................................................... |
1-7 |
Installing the Vehicle Computer ..................................................................................................... |
1-8 |
Charging the Memory Backup Battery ........................................................................................... |
1-8 |
Starting the Vehicle Computer ....................................................................................................... |
1-8 |
Chapter 2: Installation |
|
Introduction .......................................................................................................................................... |
2-1 |
Installing the Mounting Bracket ............................................................................................................ |
2-2 |
Installing the VC5090 in a Forklift ........................................................................................................ |
2-3 |
Positioning the Vehicle Computer .................................................................................................. |
2-3 |

vi VC5090 Vehicle Computer Product Reference Guide
Mounting the Vehicle Computer ..................................................................................................... |
2-5 |
Mounting Bracket Template ..................................................................................................... |
2-5 |
Mounting onto an Over-Head Cross-Beam Example ............................................................... |
2-6 |
Mounting onto an Over-Head Cage Example .......................................................................... |
2-7 |
Mounting on a Dashboard or Horizontal Surface Example ...................................................... |
2-8 |
Routing Electrical Cables ......................................................................................................... |
2-9 |
12 Volt Propane Forklifts .......................................................................................................... |
2-10 |
Electric Forklifts ........................................................................................................................ |
2-11 |
Removing Power to the Vehicle Computer .................................................................................... |
2-13 |
Installing the VC5090 on a Desktop .................................................................................................... |
2-15 |
Mounting the Bracket on a Desktop ............................................................................................... |
2-15 |
Connecting the Vehicle Computer to AC Power ............................................................................ |
2-16 |
Installing the Optional Keyboard .......................................................................................................... |
2-17 |
Adjusting the Keyboard .................................................................................................................. |
2-18 |
Installing a Scanner ............................................................................................................................. |
2-21 |
Connecting an LS3203 or a DS/LS3408 Serial Scanner ............................................................... |
2-21 |
Connecting an DS/LS3408 USB Scanner ...................................................................................... |
2-22 |
Connecting an DS/LS3478 Serial Scanner .................................................................................... |
2-24 |
Connecting a DS/LS3478 USB Scanner ........................................................................................ |
2-25 |
Connecting an LS3578 Bluetooth Scanner .................................................................................... |
2-26 |
Scanner Setup ............................................................................................................................... |
2-28 |
Enable/Disable the Scanner .......................................................................................................... |
2-30 |
Verifying the Scanner is Working Properly .................................................................................... |
2-31 |
Pairing Bluetooth Scanner and Cradle ........................................................................................... |
2-31 |
Installing the Uninterruptable Power Supply ........................................................................................ |
2-32 |
Installing a Secure Digital Card ........................................................................................................... |
2-34 |
Installing a External Antenna ............................................................................................................... |
2-36 |
Installing the Vehicle In-Motion Detector ............................................................................................. |
2-37 |
Normally Closed Switch ................................................................................................................. |
2-37 |
Normally Open Switch ................................................................................................................... |
2-37 |
Operation ....................................................................................................................................... |
2-37 |
Switches ......................................................................................................................................... |
2-38 |
Cable Installation ........................................................................................................................... |
2-39 |
Over-Ride ....................................................................................................................................... |
2-42 |
Connecting Accessories ...................................................................................................................... |
2-43 |
Connecting an External Speaker to the Vehicle Computer ................................................................. |
2-43 |
Chapter 3: Operating the VC5090 |
|
Introduction .......................................................................................................................................... |
3-1 |
Quick Access Panel ............................................................................................................................. |
3-1 |
Power Button ................................................................................................................................. |
3-1 |
Power LED ..................................................................................................................................... |
3-2 |
COMM LED .................................................................................................................................... |
3-2 |
Backlight Control Button ................................................................................................................ |
3-3 |
Programmable (“P”) Keys .............................................................................................................. |
3-3 |
Launch Application ................................................................................................................... |
3-4 |
Simulate KeyPress ................................................................................................................... |
3-4 |
Play Key Sequence .................................................................................................................. |
3-5 |
Using the Keyboard ............................................................................................................................. |
3-5 |
Table of Contents |
vii |
|
|
Keyboard Functionality .................................................................................................................. |
3-5 |
Soft Keyboards .............................................................................................................................. |
3-6 |
Adjusting the Brightness ...................................................................................................................... |
3-9 |
Controlling Screen Brightness ....................................................................................................... |
3-9 |
Controlling Keyboard Backlight ...................................................................................................... |
3-10 |
Adjusting the Volume ........................................................................................................................... |
3-10 |
Taskbar ................................................................................................................................................ |
3-10 |
Start Button .................................................................................................................................... |
3-12 |
Programs Menu ............................................................................................................................. |
3-13 |
Desktop Button .............................................................................................................................. |
3-13 |
Task Manager and Properties ........................................................................................................ |
3-13 |
Task Manager .......................................................................................................................... |
3-13 |
Properties ................................................................................................................................. |
3-14 |
Using a Headset .................................................................................................................................. |
3-15 |
Resetting the Vehicle Computer .......................................................................................................... |
3-16 |
Performing a Warm Boot ............................................................................................................... |
3-16 |
Performing a Cold Boot .................................................................................................................. |
3-16 |
Methods of Suspension ................................................................................................................. |
3-16 |
Critical Suspension ........................................................................................................................ |
3-16 |
Waking the Vehicle Computer ....................................................................................................... |
3-17 |
Calibrating the Screen ......................................................................................................................... |
3-18 |
Using the Display ........................................................................................................................... |
3-18 |
Using the Keyboard ....................................................................................................................... |
3-19 |
Checking Battery Status ...................................................................................................................... |
3-22 |
Ignition Sensing ................................................................................................................................... |
3-22 |
Chapter 4: Wireless Applications |
|
Introduction .......................................................................................................................................... |
4-1 |
Signal Strength Icon ............................................................................................................................ |
4-2 |
Turning the WLAN Radio On and Off .................................................................................................. |
4-2 |
With Fusion 2.0 .............................................................................................................................. |
4-2 |
With Fusion 2.5 .............................................................................................................................. |
4-3 |
Find WLANs Application ...................................................................................................................... |
4-4 |
Profile Editor Wizard ............................................................................................................................ |
4-5 |
Profile ID ........................................................................................................................................ |
4-5 |
Operating Mode ............................................................................................................................. |
4-6 |
Ad-Hoc ........................................................................................................................................... |
4-7 |
Authentication ................................................................................................................................ |
4-8 |
Tunneled Authentication ................................................................................................................ |
4-9 |
User Certificate Selection .............................................................................................................. |
4-11 |
User Certificate Installation ...................................................................................................... |
4-11 |
Server Certificate Selection ........................................................................................................... |
4-11 |
Credential Cache Options .............................................................................................................. |
4-12 |
User Name ............................................................................................................................... |
4-14 |
Password ....................................................................................................................................... |
4-15 |
Advanced Identity .......................................................................................................................... |
4-15 |
Encryption ...................................................................................................................................... |
4-16 |
Key Entry Page ........................................................................................................................ |
4-17 |
Passkey Dialog ........................................................................................................................ |
4-17 |

viii VC5090 Vehicle Computer Product Reference Guide
IP Mode .......................................................................................................................................... |
4-18 |
IP Address Entry ............................................................................................................................ |
4-18 |
Transmit Power .............................................................................................................................. |
4-19 |
Battery Usage ................................................................................................................................ |
4-21 |
Manage Profiles Application .......................................................................................................... |
4-22 |
Changing Profiles ..................................................................................................................... |
4-23 |
Editing a Profile ........................................................................................................................ |
4-23 |
Creating a New Profile ............................................................................................................. |
4-23 |
Deleting a Profile ...................................................................................................................... |
4-24 |
Ordering Profiles ...................................................................................................................... |
4-24 |
Export a Profile ........................................................................................................................ |
4-24 |
Wireless Status Application ................................................................................................................. |
4-25 |
Signal Strength Window ................................................................................................................. |
4-25 |
Current Profile Window .................................................................................................................. |
4-27 |
IPv4 Status Window ....................................................................................................................... |
4-27 |
Wireless Log Window .................................................................................................................... |
4-29 |
Saving a Log ............................................................................................................................ |
4-29 |
Clearing the Log ....................................................................................................................... |
4-29 |
Versions Window ........................................................................................................................... |
4-29 |
Wireless Diagnostics Application ......................................................................................................... |
4-30 |
ICMP Ping Window ........................................................................................................................ |
4-31 |
Trace Route Window ..................................................................................................................... |
4-31 |
Known APs Window ....................................................................................................................... |
4-32 |
Options ................................................................................................................................................ |
4-33 |
Operating Mode Filtering ............................................................................................................... |
4-33 |
Regulatory Options ........................................................................................................................ |
4-34 |
Band Selection ............................................................................................................................... |
4-34 |
System Options .............................................................................................................................. |
4-35 |
Change Password .......................................................................................................................... |
4-35 |
Export ............................................................................................................................................. |
4-36 |
Cold Boot Persistence ......................................................................................................................... |
4-37 |
Registry Settings .................................................................................................................................. |
4-38 |
Log On/Off Application ......................................................................................................................... |
4-38 |
User Already Logged In ................................................................................................................. |
4-38 |
No User Logged In ......................................................................................................................... |
4-38 |
Chapter 5: Using Bluetooth |
|
Introduction .......................................................................................................................................... |
5-1 |
Adaptive Frequency Hopping .............................................................................................................. |
5-1 |
Security ................................................................................................................................................ |
5-2 |
Turning the Bluetooth Radio Mode On and Off ................................................................................... |
5-2 |
Disabling Bluetooth ........................................................................................................................ |
5-2 |
Enabling Bluetooth ......................................................................................................................... |
5-2 |
Bluetooth Power States ................................................................................................................. |
5-3 |
Cold Boot ................................................................................................................................. |
5-3 |
Warm Boot ............................................................................................................................... |
5-3 |
Suspend ................................................................................................................................... |
5-3 |
Resume .................................................................................................................................... |
5-3 |
Bluetooth Profiles ................................................................................................................................. |
5-3 |
Table of Contents |
ix |
|
|
Modes .................................................................................................................................................. |
5-5 |
Wizard Mode .................................................................................................................................. |
5-5 |
Explorer Mode ................................................................................................................................ |
5-7 |
Discovering Bluetooth Device(s) .......................................................................................................... |
5-8 |
Bonding with Discovered Device(s) ......................................................................................... |
5-9 |
Renaming a Bonded Device .................................................................................................... |
5-10 |
Deleting a Bonded Device ....................................................................................................... |
5-11 |
Accepting a Bond ..................................................................................................................... |
5-12 |
Discovering Services ........................................................................................................................... |
5-13 |
File Transfer Services .................................................................................................................... |
5-14 |
Create New File or Folder ........................................................................................................ |
5-14 |
Delete File ................................................................................................................................ |
5-15 |
Get File .................................................................................................................................... |
5-15 |
Put File ..................................................................................................................................... |
5-15 |
Connect to Internet Using Access Point ........................................................................................ |
5-15 |
OBEX Object Push Services .......................................................................................................... |
5-15 |
Send a Picture ......................................................................................................................... |
5-16 |
Headset Services ........................................................................................................................... |
5-17 |
Serial Port Services ....................................................................................................................... |
5-18 |
Personal Area Network Services ................................................................................................... |
5-18 |
Bluetooth Settings ................................................................................................................................ |
5-19 |
Device Info Tab .............................................................................................................................. |
5-19 |
Services Tab .................................................................................................................................. |
5-19 |
File Transfer Service ................................................................................................................ |
5-20 |
OBEX Object Push Service ..................................................................................................... |
5-21 |
Personal Area Networking Service .......................................................................................... |
5-22 |
Serial Port Service ................................................................................................................... |
5-22 |
Headset Service ....................................................................................................................... |
5-23 |
Security Tab ................................................................................................................................... |
5-23 |
Discovery Tab ................................................................................................................................ |
5-24 |
Virtual COM Port Tab ..................................................................................................................... |
5-24 |
Miscellaneous Tab ......................................................................................................................... |
5-25 |
Chapter 6: ActiveSync |
|
Introduction .......................................................................................................................................... |
6-1 |
Installing ActiveSync ............................................................................................................................ |
6-2 |
Mobile Computer Setup ....................................................................................................................... |
6-2 |
Setting Up an ActiveSync Connection on the Host Computer ............................................................. |
6-3 |
Setting up a Partnership ................................................................................................................ |
6-3 |
Chapter 7: Application Development and Deployment |
|
Introduction .......................................................................................................................................... |
7-1 |
Software Installation on Development PC (Application Development) ................................................ |
7-1 |
Device Configuration Package ....................................................................................................... |
7-1 |
Platform SDK ................................................................................................................................. |
7-2 |
Symbol Mobility Developer Kit ....................................................................................................... |
7-2 |
Installing Other Development Software ......................................................................................... |
7-3 |
Software Installation on Vehicle Computer .......................................................................................... |
7-3 |

x VC5090 Vehicle Computer Product Reference Guide
ActiveSync ..................................................................................................................................... |
7-3 |
SD Card ......................................................................................................................................... |
7-4 |
IPL .................................................................................................................................................. |
7-4 |
Creating and Loading Hex Images ...................................................................................................... |
7-6 |
Starting Terminal Configuration Manager ...................................................................................... |
7-6 |
Defining Script Properties .............................................................................................................. |
7-8 |
Creating the Script for the Hex Image ............................................................................................ |
7-9 |
Opening a New or Existing Script ............................................................................................ |
7-9 |
Updating TCM 1.X Scripts ....................................................................................................... |
7-9 |
Copying Components to the Script .......................................................................................... |
7-10 |
Saving the Script ...................................................................................................................... |
7-10 |
Building the Image ......................................................................................................................... |
7-10 |
Sending the Hex Image ....................................................................................................................... |
7-11 |
Using TCM ..................................................................................................................................... |
7-11 |
Using SD Card ............................................................................................................................... |
7-15 |
TCM Error Messages ........................................................................................................................... |
7-18 |
IPL Error Detection .............................................................................................................................. |
7-20 |
Creating a Splash Screen .................................................................................................................... |
7-22 |
Splash Screen Format ................................................................................................................... |
7-22 |
Flash Storage ...................................................................................................................................... |
7-22 |
FFS Partitions ................................................................................................................................ |
7-22 |
Working with FFS Partitions ........................................................................................................... |
7-23 |
RegMerge.dll ............................................................................................................................ |
7-23 |
CopyFiles ................................................................................................................................. |
7-23 |
Non-FFS Partitions ........................................................................................................................ |
7-24 |
Downloading Partitions to the Vehicle Computer ........................................................................... |
7-24 |
Chapter 8: Staging and Provisioning |
|
Introduction .......................................................................................................................................... |
8-1 |
Staging ................................................................................................................................................. |
8-1 |
RD Client Version 1.9.0 ................................................................................................................. |
8-1 |
Scanning RD Bar Codes .......................................................................................................... |
8-2 |
RD Client Version 3.28 .................................................................................................................. |
8-4 |
Bar Code Scanning ........................................................................................................................ |
8-4 |
On-Demand Staging ...................................................................................................................... |
8-7 |
ActiveSync Connection Mode .................................................................................................. |
8-7 |
Already existing IP Connection Mode ...................................................................................... |
8-7 |
Well-known WLAN Connection Mode ...................................................................................... |
8-8 |
RD Client Main Menu ..................................................................................................................... |
8-10 |
Client Info ................................................................................................................................. |
8-10 |
Log Menu ................................................................................................................................. |
8-11 |
View Log .................................................................................................................................. |
8-11 |
View Job Log ........................................................................................................................... |
8-12 |
Set Log Level ........................................................................................................................... |
8-12 |
Set Job Log Level .................................................................................................................... |
8-13 |
Package List ............................................................................................................................ |
8-13 |
Provisioning ......................................................................................................................................... |
8-15 |
MSP Agent ..................................................................................................................................... |
8-15 |
MSP Agent Main Menu ............................................................................................................ |
8-15 |
Table of Contents |
xi |
|
|
AirBEAM Smart Client .................................................................................................................... |
8-22 |
AirBEAM Package Builder ....................................................................................................... |
8-22 |
AirBEAM Smart Client .............................................................................................................. |
8-22 |
Chapter 9: Maintenance and Troubleshooting |
|
Introduction .......................................................................................................................................... |
9-1 |
Maintaining the Vehicle Computer ....................................................................................................... |
9-1 |
Returning the Vehicle Computer for Service .................................................................................. |
9-2 |
Troubleshooting ................................................................................................................................... |
9-2 |
Appendix A: Specifications |
|
Technical Specifications ...................................................................................................................... |
A-1 |
Vehicle Computer .......................................................................................................................... |
A-1 |
Vehicle Computer Connectors ............................................................................................................. |
A-3 |
Appendix B: Software Configuration |
|
Introduction .......................................................................................................................................... |
B-1 |
Wavelink TelnetCE .............................................................................................................................. |
B-1 |
Citrix ICA Client ................................................................................................................................... |
B-1 |
Setting Up Remote Desktop Client in AppCenter ................................................................................ |
B-2 |
Disabling the VC5090 Heater .............................................................................................................. |
B-3 |
Scanning through Remote Desktop ..................................................................................................... |
B-3 |
Often Used Registry Settings .............................................................................................................. |
B-5 |
AutoHide Task Bar ......................................................................................................................... |
B-5 |
Toggle Function Key ...................................................................................................................... |
B-5 |
Toggle Shift Key ............................................................................................................................. |
B-5 |
Power Suspend .............................................................................................................................. |
B-6 |
External Antenna ........................................................................................................................... |
B-6 |
Ignition Timeout ............................................................................................................................. |
B-7 |
Registry Values for P1/P2/P3 Keys ............................................................................................... |
B-7 |
System Configuration Manager ........................................................................................................... |
B-9 |
File Types ...................................................................................................................................... |
B-9 |
User Interface ................................................................................................................................ |
B-9 |
Menu Functions ....................................................................................................................... |
B-10 |
Parameter State Indicators ...................................................................................................... |
B-11 |
Window Status Bar .................................................................................................................. |
B-12 |
File Deployment ............................................................................................................................. |
B-12 |
Glossary
Index

xii VC5090 Vehicle Computer Product Reference Guide

About This Guide
Introduction
The VC5090 Product Reference Guide provides information about the VC5090 vehicle computer using Microsoft® Windows® CE 5.0 operating system and its accessories.
NOTE Screens and windows pictured in this guide are samples and can differ from actual screens.
Documentation Set
The documentation set for the VC5090 is divided into guides that provide information for specific user needs.
•VC5090 Quick Reference Guide - describes how to install and use the VC5090 vehicle computer.
•VC5090 Product Reference Guide - provides an in-depth description on how to use and setup the VC5090 vehicle computer and its accessories.
•Microsoft Application Guide - describes how to use Microsoft developed applications that reside on the VC5090 vehicle computer.
•Symbol Application Guide - describes how to use Symbol developed applications available for the VC5090 vehicle computer.
•SMDK Help File - provides API information for writing applications.
xiv VC5090 Vehicle Computer Product Reference Guide
Configurations
This guide covers the following configurations:
Configuration |
Radios |
Display |
Memory |
Data |
OS |
Keypad |
|
Capture |
|||||||
|
|
|
|
|
|
||
|
|
|
|
|
|
|
|
VC5090 Full |
WLAN: 802.11a/b/g |
12.1” SVGA |
128 MB SDRAM/ |
Optional |
Windows |
Optional USB |
|
Screen |
WPAN: Bluetooth |
color |
128 MB NAND |
Scanner |
CE 5.0 |
QWERTY or |
|
|
|
|
Flash and 64 MB |
|
Professional |
AZERTY |
|
|
|
|
NOR Flash |
|
|
keyboard |
|
|
|
|
|
|
|
|
|
VC5090 Half |
WLAN: 802.11a/b/g |
10.4” Half |
128 MB SDRAM/ |
Optional |
Windows |
Built-In |
|
Screen |
WPAN: Bluetooth |
SVGA color |
128 MB NAND |
Scanner |
CE 5.0 |
QWERTY or |
|
|
|
|
Flash and 64 MB |
|
Professional |
AZERTY |
|
|
|
|
NOR Flash |
|
|
keyboard |
|
|
|
|
|
|
|
|
Software Versions
This guide covers various software configurations and references are made to operating system or software versions for:
•OEM version
•Fusion version.
OEM Software
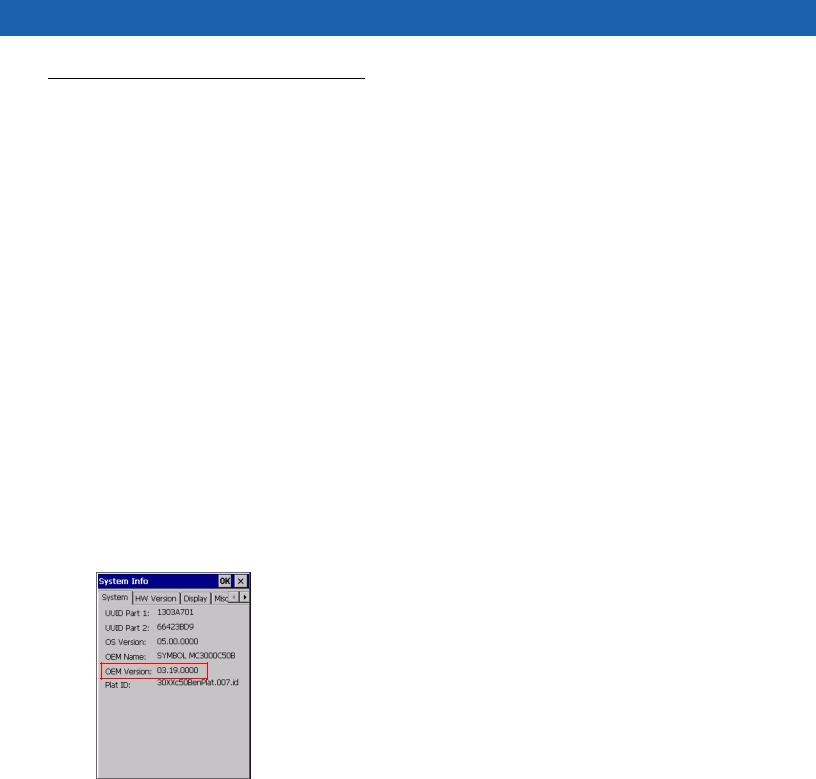
To determine the OEM software version:
Tap Start > Settings > Control Panel > System Information icon > System tab.
Fusion Software
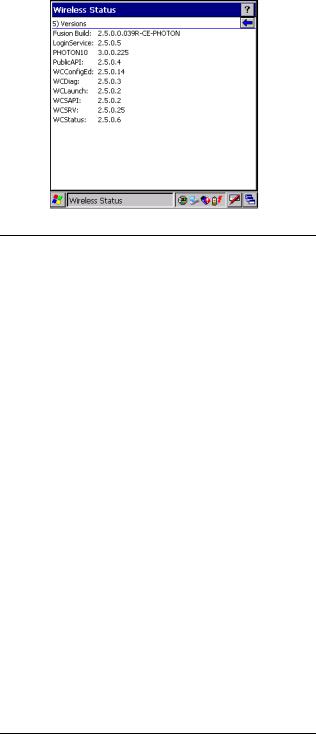
To determine the Fusion software version:
Tap Wireless Strength icon > Wireless Status > Versions.
|
|
About This Guide |
xv |
|
|
|
|
|
|
|
|
|
|
|
|
Chapter Descriptions
Topics covered in this guide are as follows:
•Chapter 1, Getting Started, provides information on getting the vehicle computer up and running for the first time.
•Chapter 2, Installation, provides instructions for installing the vehicle computer in a forklift, on a wall or on a desktop. Provides instructions for installing accessories.
•Chapter 3, Operating the VC5090, explains how to use the vehicle computer. This includes instructions for powering on and resetting the vehicle computer, entering and capturing data.
•Chapter 4, Wireless Applications, provides instructions for using and configuring the mobile computer on a wireless network.
•Chapter 5, Using Bluetooth, explains how to use Bluetooth functionality on the vehicle computer.
•Chapter 6, ActiveSync, provides instructions for installing and configuring ActiveSync.
•Chapter 7, Application Development and Deployment, provides instructions for installing the Device Configuration Package (DCP) for the VC5090 and the SMDK for C on the host computer and downloading software files to the mobile computer.
•Chapter 8, Staging and Provisioning, provides instructions for staging and provisioning the vehicle computer.
•Chapter 9, Maintenance and Troubleshooting, includes instructions on cleaning and storing the vehicle computer, and provides troubleshooting solutions for potential problems during vehicle computer operation.
•Appendix A, Specifications, includes a table listing the technical specifications for the vehicle computer.
•Appendix B, Software Configuration, includes special configuration instruction for third party software used with the vehicle computer.
Notational Conventions
The following conventions are used in this document:
• “Vehicle computer” refers to the VC5090 series of vehicle computers.

xviVC5090 Vehicle Computer Product Reference Guide
•Italics are used to highlight the following:
•Chapters and sections in this and related documents.
•Bold text is used to highlight the following:
•Key names on a keyboard
•Button names on a screen
•Dialog box, window and screen names
•Drop-down list and text box names
•Check box and radio button names
•Icons on a screen.
•Bullets (•) indicate:
•Action items
•Lists of alternatives
•Lists of required steps that are not necessarily sequential.
•Sequential lists (e.g., those that describe step-by-step procedures) appear as numbered lists.
Related Documents and Software
The following documents provide more information about the VC5090 vehicle computers.
•VC5090 Quick Reference Guide, p/n 72-76346-xx
•Symbol Application Guide, p/n 72E-68197-xx
•Microsoft Application Guide for Mobile and CE 5.0 User Guide, p/n 72E-78456-xx
•MSP 2.9 user’s Guide, p/n 72E-91844-xx
•MSP 3.X User’s Guide, p/n 72E-100158-xx
•Symbol Mobility Developer Kit (SMDK) Help File, p/n 72E-38880-03
•Symbol Mobility Developer Kits, available at: http://support.symbol.com
•Device Configuration Package for VC5090 (DCP for VC5090), available at: http://support.symbol.com.
•ActiveSync software, available at: http://www.microsoft.com.
For the latest version of this guide and all guides, go to: http://support.symbol.com.
Service Information
If you have a problem with your equipment, contact Motorola Enterprise Mobility support for your region. Contact information is available at: http://www.symbol.com/contactsupport.
When contacting Enterprise Mobility support, please have the following information available:
•Serial number of the unit
•Model number or product name
•Software type and version number.

About This Guide |
xvii |
|
|
Motorola responds to calls by email, telephone or fax within the time limits set forth in support agreements.
If your problem cannot be solved by Motorola Enterprise Mobility Support, you may need to return your equipment for servicing and will be given specific directions. Motorola is not responsible for any damages incurred during shipment if the approved shipping container is not used. Shipping the units improperly can possibly void the warranty.
If you purchased your Enterprise Mobility business product from a Motorola business partner, contact that business partner for support.
Returning the Vehicle Computer for Service
NOTE Motorola has taken great care to ensure environmental conditions such as humidity will not affect the stability of the vehicle computer. This is accomplished my means of desiccant bags which can be inserted by the user upon receipt of the vehicle computer. In the event, the vehicle computer needs to be shipped by air carrier to Motorola for repair or maintenance, it is essential that the user remove the desiccant door cover before the vehicle computer is packaged for shipment. The reason for this step is to avoid compromising the vehicle computer as a result of pressurization during air transit. The user must simply remove the screws associated with the desiccant door on the back of the unit. Discard the used desiccant bags. Upon receipt of the repaired vehicle computer, the user should insert new desiccant bags (if used) and reseal the doors using new screws.

xviii VC5090 Vehicle Computer Product Reference Guide
Chapter 1 Getting Started
Introduction
The VC5090 vehicle-mounted mobile computer is a rugged device for use on heavy equipment, especially forklifts. Designed for distribution centers, factory floors and warehouses, the VC5090 supports real-time receiving, tracking, put-away, picking and shipping applications. Sealed to IP66 standards for protection against dust and water and shock-tested, the VC5090 offers reliable performance in the most extreme temperatures and environmental conditions. It tolerates sub-zero freezers, as well as the vibration and shock of forklift operations, increasing the reach of your enterprise mobility solution.
Unpacking the VC5090
When you remove the vehicle computer from its box, save the box and shipping material in case you need to ship or store the vehicle computer. Check the contents of the box against the invoice for completeness and contact your local Motorola service representative if there is a problem.
The VC5090 shipping box contains:
•vehicle computer
•mounting bracket
•vehicle power cable
•desiccant kit
•desiccant package
•screws
•desiccant door
•hardware kit
•hardware
•two cap screws
•two lock washers
•two flat washers
•two friction pads
•mounting bracket hardware
1 - 2 VC5090 Vehicle Computer Product Reference Guide
•four cap screws
•eight flat washers
•eight lock washers
•four hex nuts
•three fuses and three fuse holders
•VC5090 Quick Reference Guide
•Wavelink Information sheet.
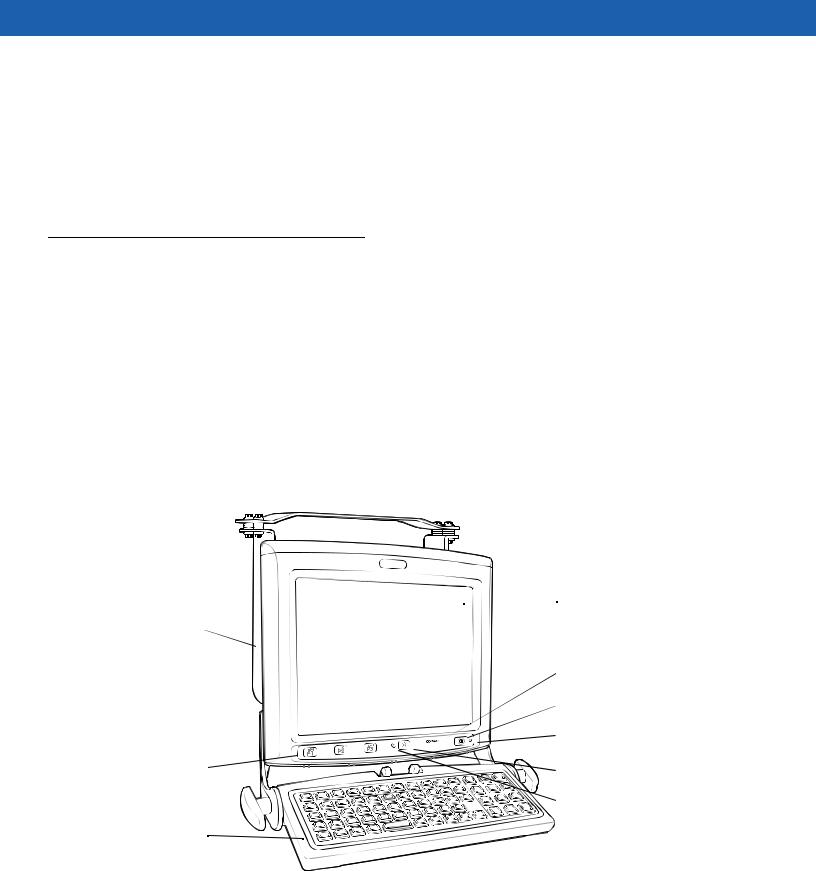
Features
The VC5090 has the following features:
•integrated 802.11a/b/g wireless LAN radio
•Windows® CE 5.0 Professional Operating System
•Intel® PXA270 624 MHz CPU
•128 MB SDRAM, 192 MB Flash (128 MB NAND Flash and 64 MB NOR Flash)
•10.4” half-SVGA (800 x 320) or 12.1” full-SVGA (800 x600) color display
•wireless and wired printing
•integrated antennas
•integrated speakers.
 Display
Mounting Bracket
 COMM LED
 Power Button
 Power LED
Quick Access Panel |
Backlight Control Button |
|
Backlight Control LED |
Keyboard (optional) |
|
Figure 1-1 VC5090 (Full Screen) Front View
Getting Started |
1 - 3 |
|
|
|
|
Display |
|
Quick Access |
|
|
|
Panel |
|
|
|
|
|
|
Power LED |
|
|
|
|
|
|
|
Power Button |
|
|
|
COMM LED |
|
|
|
Backlight Control Button |
Keyboard |
|
|
Backlight Control LED |
|
|
|
|
|
|
|
|
Figure 1-2 VC5090 (Half Screen) Front View
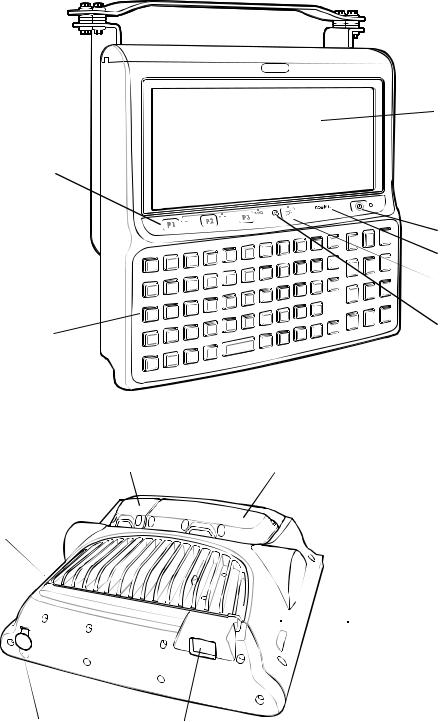
|
UPS/Memory |
Desiccant Door |
Card Door |
Speaker

 Speaker
Antenna Port for |
MainPower |
Optional External |
Switch |
Antenna |
|
Figure 1-3 VC5090 Back View
1 - 4 VC5090 Vehicle Computer Product Reference Guide
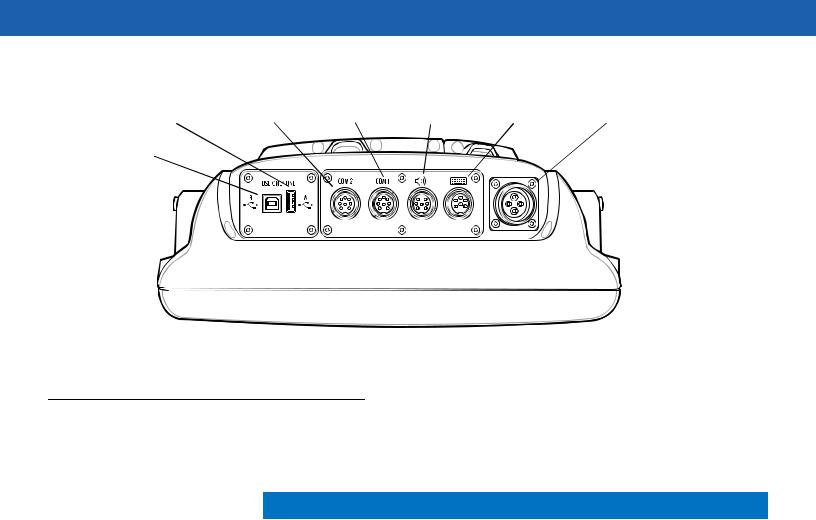
USB A |
COM2 Port |
|
COM1 Port |
Audio |
USB/Keyboard |
Power |
||||||
Connector (Host) |
Connector |
|
Connector |
Connector |
Connector |
Connector |
||||||
USB B |
|
|
|
|
|
|
|
|
|
|
|
|
Connector |
|
|
|
|
|
|
|
|
|
|
|
|
(Client) |
|
|
|
|
|
|
|
|
|
|
|
|
|
|
|
|
|
|
|
|
|
|
|
|
|
|
|
|
|
|
|
|
|
|
|
|
|
|
|
|
|
|
|
|
|
|
|
|
|
|
|
|
|
|
|
|
|
|
|
|
|
|
|
|
Figure 1-4 VC5090 Bottom View
Accessories
Table 1-2 lists the accessories available from Motorola for the VC5090:
Table 1-1 VC5090 Accessories
Accessory |
Description |
|
|
External Keyboard |
Optional USB keyboard for full-screen configuration. |
|
|
Keyboard Cover |
Provides added protection for external keyboard (pkg 5). Part Number: 90500125-R. |
|
|
Screen Protector |
Replacement screen protector film for either the full screen or half screen |
|
configurations. |
|
Screen Protector for full screen (pkg 5); Part number: S01-69211106-R. |
|
Screen Protector for half screen (pkg 5); Part number: S01-69211107-R. |
|
|
Uninterruptable Power |
Battery used to maintain operation, for at least 15 minutes, when power is |
Supply Kit |
temporarily interrupted (for example: vehicle battery changes and poor power |
|
conditions). Part Number: BTRY-VC50IAB00. |
|
|
Desiccant Kit |
Replacement desiccant bags. Part Number: KT-84524-01. |
|
|
In-Motion Detector Cable |
Cable that connects the VC5090 and the vehicle accelerator pedal that detects when |
|
the vehicle is moving and blanks the screen so that the operator is not distracted |
|
while driving. Part Number: 25-82420-01R. |
|
|
Vehicle Power Cable |
Replacement power cable for connecting the VC5090 to a power vehicle power |
|
source. Part number: 25-71919-01R. |
|
Replacement filtered power cable for connecting the VC5090 to a power vehicle |
|
power source. Part Number: 25-71919-02R. |
|
|

Getting Started |
1 - 5 |
|
|
Table 1-1 VC5090 Accessories (Continued)
Accessory |
|
Description |
|
|
|
Secure Digital Card |
Provides secondary non-volatile storage. Recommended secure digital (SD) cards: |
|
|
• |
128 MB |
|
|
• ATP part number AF128SDI-AG |
|
|
• SimpleTech part number SYMNYSD128AE |
|
• |
256 MB |
|
|
• ATP part number AF256SDI-AG |
|
|
• SimpleTech part number SYMNYSD256AE |
|
• |
512 MB |
|
|
• ATP part number AF512SDI-AG |
|
|
• SimpleTech part number SYMNYSD512AE |
|
• |
1 GB |
|
|
• ATP part number AF1GBSDI-AG |
|
|
• SimpleTech part number SYMNYSD1GBAE |
|
|
|
Angle Adjustment |
Optional handles for adjusting position of VC5090 in mounting bracket. Part Number: |
|
Handles |
90500115-R |
|
|
|
|
Scanners |
LS3203 serial laser scanner |
|
|
LS3408 serial/USB laser scanner |
|
|
DS3408 serial/USB imager |
|
|
LS3478 Bluetooth serial/USB laser scanner (with cradle) |
|
|
DS3478 Bluetooth serial/USB imager (with cradle). |
|
|
LS3578 Bluetooth laser scanner. |
|
|
|
|
Serial ActiveSync Cable |
Cable to connect the VC5090 to a host computer to perform serial ActiveSync |
|
|
communication. Rugged connector to 9-pin RS-232 connector. Part number |
|
|
25-71914-01R. |
|
|
|
|
USB ActiveSync Cable |
Cable to connect the VC5090 to a host computer to perform USB ActiveSync |
|
|
communication. Standard USB B connector to USB A connector. Part number |
|
|
25-64396-01R. |
|
|
|
|
USB Host Cable |
Cable to connect the VC5090 as a host device. Rugged connector to USB A jack |
|
|
connector. Part number 25-71915-01R. |
|
|
|
|
LS3203 Scanner Serial |
Cable to connect the Symbol LS3203 serial scanner to the VC5090 serial port. Part |
|
Cable |
number 25-71916-01R. |
|
|
|
|
LS3408 Scanner Serial |
Cable to connect the following Symbol serial scanners to the VC5090 serial port. Part |
|
Cable |
number 25-71917-02R. |
|
|
• |
LS3408 laser scanner |
|
• |
DS3408 imager |
|
• LS3478 Bluetooth laser scanner (with cradle) |
|
|
• DS3478 Bluetooth imager (with cradle). |
|
|
|
|
LS3408 Scanner USB |
Cable to connect the following Symbol laser scanners or imagers to the VC5090 |
|
Cable |
USB/Keyboard port. Part number 25-71918-01R. |
|
|
• |
LS3408 laser scanner |
|
• |
DS3408 imager |
|
• LS3478 Bluetooth laser scanner (with cradle) |
|
|
• DS3478 Bluetooth imager (with cradle). |
|
|
|
|

1 - 6 VC5090 Vehicle Computer Product Reference Guide
Table 1-1 VC5090 Accessories (Continued)
Accessory |
Description |
|
|
RS232 Cable |
Cable to connect the VC5090 to a serial device. Part number 25-71924-01R. |
|
|
AC Power Supply |
Power supply for use in wall or desktop mounted applications. Part number |
|
50-14001-004 or 50-14001-004R. |
|
|
DC Power Cable |
Power cable for use in wall or desktop mounted applications that connects the AC |
|
power supply to the VC5090. Part number 25-71920-01 or 25-71920-01R. |
|
|
Software |
Symbol Mobility Developer Kits, available at: http://support.symbol.com. |
|
Device Configuration Package for VC5090c (DCP for VC5090c), available at: |
|
http://support.symbol.com. |
|
|
Third Party Accessories
Table 1-2 lists the accessories available for the VC5090 from third party vendors:
Table 1-2 VC5090 Third Party Accessories
Peripheral |
Manufacturer |
Description |
Vendor |
|
|
|
|
CB Mode Handset |
Sinbon |
Provides handset communication for |
Sinbon Technologies |
with Adapter Cable |
|
audio applications. |
http://www.sinbon.com |
|
|
|
|
Headset and |
Sinbon |
Provides voice communication for |
Sinbon Technologies |
Adapter Cable |
|
audio applications. |
http://www.sinbon.com |
|
|
|
|
External Antenna |
Centurion™ |
Provides external antenna for remote |
Arcadian Inc. |
|
WTS2450-RPSMA |
mounting. |
1-888-925-5967 |
|
|
|
|
Zebra Road Warrior |
Zebra |
Provides connection between vehicle |
Zebra Technologies |
Printer Cable |
|
computer and printer. |
Corporation |
|
|
|
|
Zebra |
Zebra |
Provides connection between vehicle |
Zebra Technologies |
QL-220/320/420 |
|
computer and printer. |
Corporation |
Printer Cable |
|
|
|
|
|
|
|
O’Neill MF-2T/4T |
O’Neill |
Provides connection between vehicle |
O'Neil Product |
Printer Cable |
|
computer and printer. |
Development, Inc. |
|
|
|
|
Mobility USB |
Cradlepoint, Inc. |
Provides wired Ethernet network |
Cradlepoint, Inc. |
Peripheral Ethernet |
|
connection for fixed mount |
|
Adapter |
|
applications. |
|
|
|
|
|
Getting Started |
1 - 7 |
|
|
Getting Started
In order to start using the vehicle computer for the first time:
•install the desiccant bags and desiccant door or
install only desiccant door
•install the vehicle computer in a vehicle or on a wall or desktop
•start the vehicle computer.
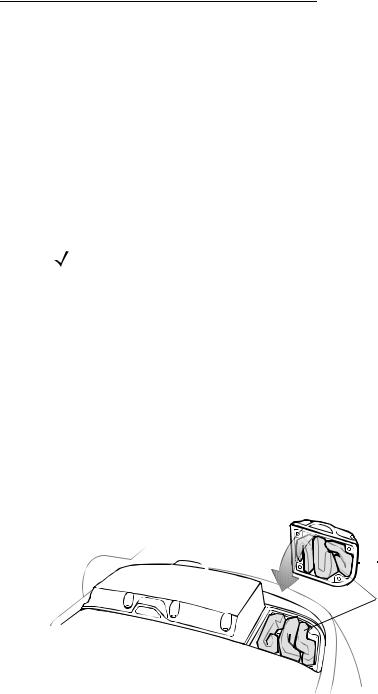
Installing the Desiccant Bag
NOTE Motorola recommends installing the desiccant bags in environments where extreme temperature changes occur, such as applications where the device may be continuously moved between a freezer and a hot / humid area. Desiccant bags should be replaced more often in the hot / humid months of summer and less frequently in dry/cold months of winter. If desiccant is not used, the desiccant door must still be installed and secured. Replacement Desiccant Kits are available from Motorola, Part Number: KT-84524-01.
1.Open the desiccant kit and remove all items:
•desiccant package
•desiccant door
•screws.
2.Open the desiccant package and remove the six desiccant bags.
3.Place three desiccant bags in the desiccant well.
4.Place the other three desiccant bags in the back of the desiccant door.
 Desiccant Door
 Desiccant Bags


 Desiccant Well
Figure 1-5 Installing Desiccant Bags
5.Ensure that the door seal is in place.
6.Carefully place the desiccant door onto the back housing. Ensure that the desiccant bags do not interfere with door seal.
7.Secure the door to the back housing using the four screws.

1 - 8 VC5090 Vehicle Computer Product Reference Guide
CAUTION Ensure that you torque the screws to seal the device properly. Otherwise, sealing can be compromised.
8. Torque the screws to 9 ± 0.5 kgf/cm (7.8 ± 0.4 in-lbs).
Installing the Vehicle Computer
Refer to Chapter 2, Installation for information on installing the vehicle computer onto a vehicle or to a fixed mount, as well as installing accessories.
Charging the Memory Backup Battery
The vehicle computer is equipped with a memory backup battery which automatically charges from the input power whether its operating or is in suspend mode. The memory backup battery retains data in memory for at least 72 hours when power is removed or the UPS is fully discharged. When the vehicle computer is used for the first time, the backup battery requires approximately 15 hours to fully charge. Do not remove power from the vehicle computer for 15 hours to ensure that the backup battery fully charges. The Main Power switch on top of the vehicle computer must be set to the on position. If power is removed from the vehicle computer and the UPS is fully discharged, the backup battery completely discharges in several hours. The backup battery retains data in memory for at least 72 hours when power is removed.
NOTE Do not remove power to the vehicle computer within the first 15 hours of use. If the power is removed before the backup battery is fully charged, data may be lost. The Main Power switch on top of the vehicle computer must be set to the on position.
Starting the Vehicle Computer
To power on the VC5090, place the Main Power switch, located on the top of the VC5090, to the on (|) position. The VC5090 initializes and the splash screen appears followed by the calibration screen. Follow the instructions for calibrating the screen. If the vehicle computer does not power on, See Troubleshooting on page 9-2.
To suspend the VC5090’s operation, press the Power button on the Quick Access Panel. All data is preserved, so the applications running continue after suspension. Press the Power button again to resume normal operation.
NOTE The power is applied at all times if the VC5090 is hard wired to the vehicle battery. If using the Ignition Sense cable and the vehicle ignition is off, then power is not applied to the vehicle computer.

Chapter 2 Installation
Introduction
This chapter describes how to install the vehicle computer in a vehicle or on a desktop and connecting the vehicle computer to a power source. There are different installation options depending on the type of vehicle. This chapter also describes how to install the various accessories for the vehicle computer. Read all of the following instructions before you begin.
WARNING! The vehicle computer and bracket must be firmly secured to a surface that can support the vehicle computer’s weight.
CAUTION A competent engineer must perform the installation in a vehicle. Improper installation can damage your vehicle and/or the VC5090.
Do not install the vehicle computer in a location that will affect vehicle safety, driveability, or visibility.
2 - 2 VC5090 Vehicle Computer Product Reference Guide
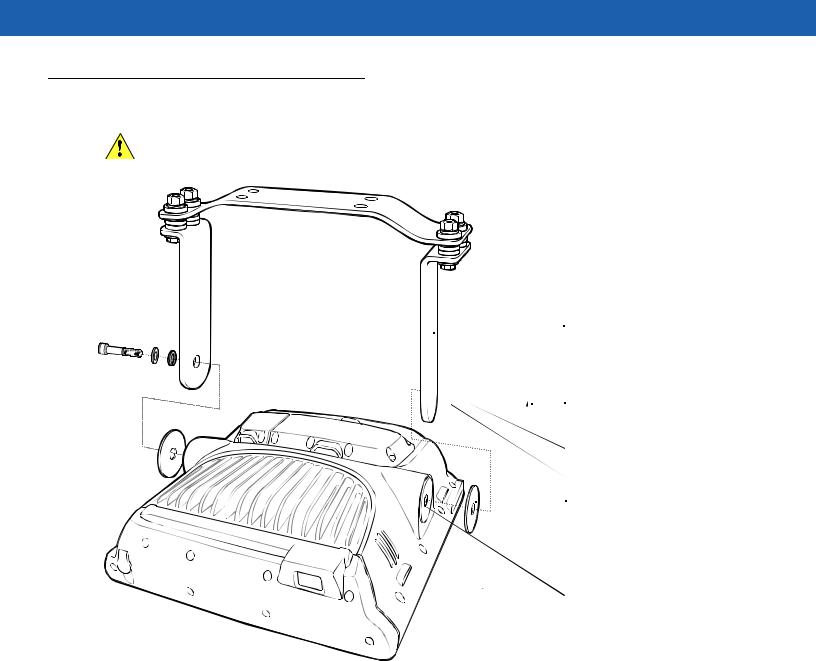
Installing the Mounting Bracket
CAUTION It is required to use the Motorola provided mounting bracket.
 Mounting Bracket


 Cap Screw
 Flat Washer
 Lock Washer
 Friction Pad
Friction Pad Mounting
Area
Figure 2-1 Mounting Bracket Installation
1.Position the friction pads in the friction pad mounting area.
2.Position the mounting bracket over the mounting holes.
3.Place washers onto cap screws.
4.Screw cap screws into mounting holes and tighten. Torque the cap screws to 276 ± 8.7 kgf/cm (239.6 ± 7.6 in-lbs).
 Loading...