


st211_en.bk : qkref.fm5 Page 1 Monday, August 23, 1999 10:24 AM
|
Options Menu |
Quick Access Menu ‡ |
|
|
|
Quick Reference
English
st211_en.bk : qkref.fm5 Page 2 Monday, August 23, 1999 10:24 AM

 Quick Reference
Special Keys
SPress to turn phone on and off.
OPress to accept call, setting, option,...
CPress to reject call, setting, option,...
EPress to enter the Quick Access features.
$Press to access the options or phone book menus.
<> Press to select entries and menu options.
,Press to add a phone book entry.
fPress to call Voicemail.
Making a Call
Enter CO.
Receiving a Call
Open the phone, or press O, <or >.
Ending a Call
Press O, Cor close the phone.
Making an Emergency Call
Enter 112O. The call will be directed to a central emergency operator.
Quick Access Features
Press Efollowed by the appropriate key, or press E, scroll to the feature and press Oto select.
Redialling the Last Number Called
1Press Oto display the last number dialled.
2Press Oto call the number.
One-Touch Dialling
Press and hold the appropriate digit key 1to 9.
Storing Numbers in the Phone Book
1Press ,to access the Phone Book.
2Press Oto select phone memory, or <Oto select SIM card memory.
3Enter CO, then HO, then
GO.
Dialling Phone Book Numbers
Enter G>O.
Stopping a Call Alert
Press either of the volume buttons when the phone is ringing or vibrating. This will stop the alert but not answer the call.
English
st211_en.bk : intro.fm5 Page 1 Monday, August 23, 1999 10:24 AM
Introduction
Welcome
Congratulations on your purchase of a phone from Motorola, the world leader in cellular technology. The phones are packed with features that put you in control and give you unrivalled power, whilst remaining discrete.
Control
•Customisable Quick Access Menu E- Place nine of your most frequently used features in your own personal menu so that they can be accessed with just two key presses. Icons make each feature easy to identify.
Discretion
•VibraCall™ L- In locations where you don’t want your phone to ring, or which are too noisy to hear your phone ring, your phone can vibrate to alert you of a call.
•Wearable Holster - Wear your phone in a stylish holster on your belt. It is small enough and light enough to keep with you almost anywhere.
•Stop Call Alert - Press either of the volume buttons when the phone is ringing or vibrating. This will stop the alert but not answer the call.
Power
•Superb battery performance G- Each phone is capable of several hours conversation or several days standby, but is still small and light.
•Dual Band  - versions of the phone include the powerful dual band feature which means that they can use both 900 and 1800 MHz bands for greater call success and allow wider roaming opportunities.
!Before you use your phone, please see the ‘Your Battery’ section for important information on charging a new battery.
Personality™
This cellular telephone incorporates Personality™. Unique to Motorola, Personality™ removes the complexity of cellular communications by guiding you through the features and presenting you with simple choices every step of the way. Personality™ also allows you to personalise the way you use your phone - for example, different ringer tones, a phone book and network selection preferences - all presented with clarity and simplicity. In this manual, each of the Personality™ features is identified with an jsymbol to indicate that it is customisable to meet your requirements.
Introduction 1 |
English |
|
||||
|
|
|
|
|
|
|
|
|
|
|
|
|
|
|
|
|
|
|
|
|
|
|
|
|
|
|
|
|
|
|
|
|
|
|

st211_en.bk : intro.fm5 Page 2 Monday, August 23, 1999 10:24 AM
Understanding this Manual
Many of your phone options are accessed by a simple menu system. A full description of the menus and how to move around them is covered in the next section Menu Navigation. When the manual describes the use of each menu item, it will be assumed that you are familiar with the menu system.
Key Presses
Key presses are represented in this manual using symbols so that you may locate and use the required sequence quickly. A sequence of key presses may be shown as follows:
$OC
This means that you should press the $key followed by the Okey and then the Ckey, in sequence, not simultaneously.
|
|
|
|
|
English |
2 |
Introduction |
|
|
|
|
|
|
|
|
|
|
|
|
|
|
|
|
|
|
|
|
|
|
|
|
|
|
|
|
|
|
|
|
|
|
|
|
|
|
|
|
Entering Information
When you are requested to enter information, such as the number of the phone you wish to call, this is represented in bold type. For example:
C- enter the required telephone number.
A- enter your Personal Identification Number.
B- enter your unlock code.
G- enter the Phone Book location number.
Prompts and Messages
Your phone responds to key presses by displaying either easy to understand prompts that guide you to the next action, or simple messages confirming that your action is complete. Prompts and messages are represented in this manual in LCD style, for example:
Enter PIN or Completed.
Other Symbols
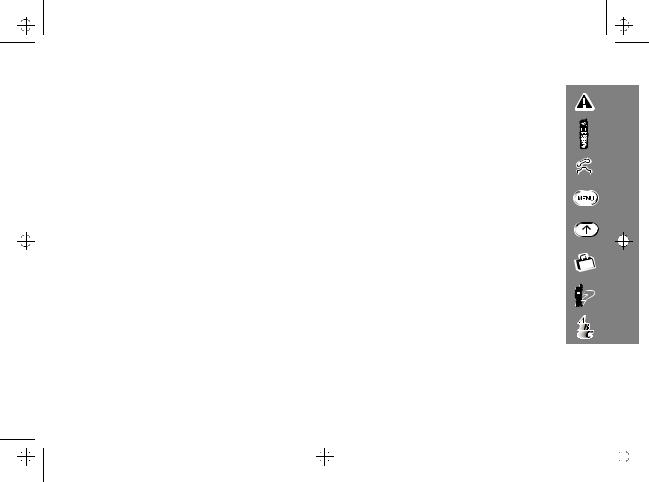
You will find the following symbols used throughout this manual:
AA Note contains additional information which is relevant to the feature/item.
!A Caution contains important additional information which is relevant to the efficient and/or safe usage of your phone.
jThis symbol indicates that the feature is a Personality™ feature that can be customised to meet your requirements.
iThis symbol indicates a short key sequence for the feature.

st211_en.bk : intro.fm5 Page 3 Monday, August 23, 1999 10:24 AM
Menu Navigation
A large number of your phone's options are accessed by using menus which use a common approach for selection, change and cancellation.
Please read this section carefully before attempting to access a menu option. When you understand the common approach to menu navigation and how the menus are shown on the page, you will be able to access and change options with ease.
Entering the Menus
Two different keys (three on flip phones) are used to access the menus:
$enters the Options menu whilst in standby mode; enters the In-call menu during a call.
Eenters the Quick Access menu.
Once entered, the menus use the $, <, >, Oand Ckeys in a common manner to access, select and change individual options.
Leaving the Menus
To leave any of the menus, you can either press and hold the Ckey or repeatedly press the Ckey. Both of these actions will return your phone to the standby mode.
iAlternatively, a quicker way to leave the menus is to press
EC.
Menus and Sub-menus
A menu is a simple list of options. Some of these options provide access to a further list of options called a sub-menu. When navigating through the menus you may find it is helpful to think in terms of menu levels - the ‘parent’ menu being on one level and its sub-menus being on a lower level.
Moving To and Selecting a Menu Option
To move from one option to another on the same level, use the scroll keys: the >key scrolls forwards and the <key scrolls backwards. When you find the option you want, press the O key to select it.
Depending on the option you select, one of three things will happen:
•either a brief message will be displayed confirming an action, for example Completed.
•or a prompt will be displayed requesting you to enter
information, for example Enter PIN or Enter Name.
•or the first option of a sub-menu will be displayed. You can select this option using the Okey or browse through the other options using the scroll keys.
To leave an option or sub-menu, press the Ckey. This will take you back to the parent menu item.
Menu Options with Security Codes
Some options are protected from misuse by requiring you to entry one of the security codes. To use these options, you must enter the requested code before proceeding.
Introduction 3 |
English |
|
||||
|
|
|
|
|
|
|
|
|
|
|
|
|
|
|
|
|
|
|
|
|
|
|
|
|
|
|
|
|
|
|
|
|
|
|

st211_en.bk : intro.fm5 Page 4 Monday, August 23, 1999 10:24 AM
jShort, Extended and Personalised Menus
With Personality™ you can personalise the menus by choosing which features you want readily available. The features that are less frequently used can be stored out of sight.
The menu diagrams in this manual show the condition of the menu settings when you first receive your phone. Some features are in the Short Menu and are shown in bold type. Other features are in the Extended Menu and appear in italics.
You can change which features appear in the Short and Extended Menus, and therefore personalise the menus, to suit your requirements.
If you want to move a feature from the Short Menu to the Extended Menu (or from the Extended Menu to the Short Menu), go to the feature and then hold down the Okey until a prompt appears offering the following choices:
•Add the current feature to the Short Menu/Extended Menu.
•Leave the current feature in the Short/Extended Menu. Select the option you want by pressing the Okey. The settings for some menu features cannot be changed.
|
|
|
|
|
English |
4 |
Introduction |
|
|
|
|
|
|
|
|
|
|
|
|
|
|
|
|
|
|
|
|
|
|
|
|
|
|
|
|
|
|
|
|
|
|
|
|
|
|
|
|

st211_en.bk : intro.fm5 Page 5 Monday, August 23, 1999 10:24 AM
Total Customer Satisfaction
At Motorola, Total Customer Satisfaction is a top priority. If you have a question, a suggestion or a concern about your Motorola Cellular Phone, Motorola wants to hear from you.
Please contact the Motorola Cellular Response Centre by fax on: +44 (0) 131 458 6732, or use one of the local phone numbers in the following countries:
Austria |
0660 7246 |
Belgium |
0800 72 370 |
Czech Republic |
00420 2 21 85 21 01 |
Denmark |
4348 8005 |
Egypt |
02 3411800 |
Eire |
01 402 6887 |
Finland |
0800 117 036 |
France |
0 803 303 302 |
Germany |
0180 35050 |
Greece |
00800 441 28150 |
Italy |
02 696 333 16 |
Jordan |
06 863750 |
Kuwait |
484 2000 Ext 1177 |
Lebanon |
01 744156 |
Luxembourg |
0800 21 99 |
Netherlands |
0800 022 27 43 |
Norway |
22 55 10 04 |
Oman |
790925 |
Portugal |
01 318 0051 |
Qatar |
418999 |
Saudi Arabia |
01 2303294 |
South Africa |
0800 11 48 49 |
Spain |
902 100 077 |
Sweden |
08 445 1210 |
Switzerland |
0800 553 109 |
Turkey |
0212 425 9090 |
UK |
0500 55 55 55 |
United Arab Emirates |
04 32 11 66 |
Hong Kong |
852 25063888 |
People’s Republic of China 86 10 68466060
Singapore |
65 4855 333 |
Taiwan |
886 2 87731746 |
United States of America |
1 800 331 6456 |
Canada |
1 800 461 4575 |
For e-mail queries contact:mcrc@ei.css.mot.com
For Internet queries contact:http://www.mot.com
Introduction 5 |
English |
|
||||
|
|
|
|
|
|
|
|
|
|
|
|
|
|
|
|
|
|
|
|
|
|
|
|
|
|
|
|
|
|
|
|
|
|
|

st211_en.bk : intro.fm5 Page 6 Monday, August 23, 1999 10:24 AM
Motorola’s Warranty
Your Cellular Phone is warranted by Motorola to be of satisfactory quality, fit for its purpose and comply with applicable Motorola specifications for a period of twelve (12) months from the date you bought it (verified by reference to your proof of purchase).
This warranty does not apply if the phone has:
1been mishandled, misused, wilfully damaged, neglected, improperly tested, repaired, altered or defaced in any way.
2a defect arising as a result of any failure to follow instructions either in the manual or product specification.
3a defect which has arisen from the use of non-Motorola approved accessories or ancillary items attached to or in connection with the telephone.
This warranty does not affect your statutory rights as a consumer.
Warranty conditions may vary depending on the country in which you bought the phone.
|
|
|
|
|
English |
6 |
Introduction |
|
|
|
|
|
|
|
|
|
|
|
|
|
|
|
|
|
|
|
|
|
|
|
|
|
|
|
|
|
|
|
|
|
|
|
|
|
|
|
|
st211_en.bk : toc.fm5 Page 7 Monday, August 23, 1999 10:24 AM |
|
Contents |
|
Safety |
|
Important information for the efficient and safe operation of your phone ................................................................................ |
9 |
About Your Phone, Battery and SIM Card |
|
Introduces your phone, explains how to charge and maintain batteries, explains about your SIM Card............................... |
13 |
Making and Receiving Phone Calls |
|
Explains how to make single or conference calls, how to redial, how to transfer a call, and how to end a call.................... |
21 |
Using The Options Menu |
|
Provides an explanation of the Options Menu and how to use it .............................................................................................. |
31 |
Using the Quick Access Menu |
|
Provides an explanation of the Quick Access Menu and how to use it...................................................................................... |
67 |
Accessories |
|
Details the accessories available for use with your phone.......................................................................................................... |
71 |
What To Do If... |
|
Helps you to solve any problems that may occur......................................................................................................................... |
73 |
Index |
|
A comprehensive Index .................................................................................................................................................................. |
75 |
The Manufacturer reserves the right to make changes in technical and product specifications without prior notice.
Contents 7 |
English |
|
|
|
|
|
|
|
|
|
|
|
|
|
|
|
|
|
|
|
|
|
|
|
|
|
|
|
|
|
|
|
|
|
|
|
|
|
|
|
|

st211_en.bk : toc.fm5 Page 8 Monday, August 23, 1999 10:24 AM
|
|
|
|
|
English |
8 |
Contents |
|
|
|
|
|
|
|
|
|
|
|
|
|
|
|
|
|
|
|
|
|
|
|
|
|
|
|
|
|
|
|
|
|
|
|
|
|
|
|
|
st211_en.bk : safety.fm5 Page 9 Monday, August 23, 1999 10:24 AM
Safety
IMPORTANT
For the efficient and safe operation of your wireless handheld portable telephone, observe these guidelines.
Exposure To Radio Frequency Signals
Your wireless handheld portable telephone is a low power radio transmitter and receiver. When it is ON, it receives and also sends out radio frequency (RF) signals.
European and International agencies have set standards and recommendations for the protection of public exposure to RF electromagnetic energy.
•International Commission on Non-Ionizing Radiation Protection (ICNIRP) 1996
•Verband Deutscher Elektringenieure (VDE) DIN-0848
•Directives of the European Community, Directorate General V in Matters of Radio Frequency Electromagnetic Energy
•National Radiological Protection Board of the United Kingdom, GS 11, 1988
•American National Standards Institute (ANSI) IEEE.C95.1-1992
•National Council on Radiation Protection and Measurements (NCRP). Report 86
•Department of Health and Welfare Canada. Safety Code 6
These standards are based on extensive scientific review. For example, over 120 scientists, engineers and physicians from universities, government health agencies and industry reviewed the available body of research to develop the updated ANSI Standard.
The design of your phone complies with these standards when used normally.
Antenna Care
Use only the supplied or approved replacement antenna. Unauthorised antennas, modifications or attachments could damage the phone and may violate FCC regulations.
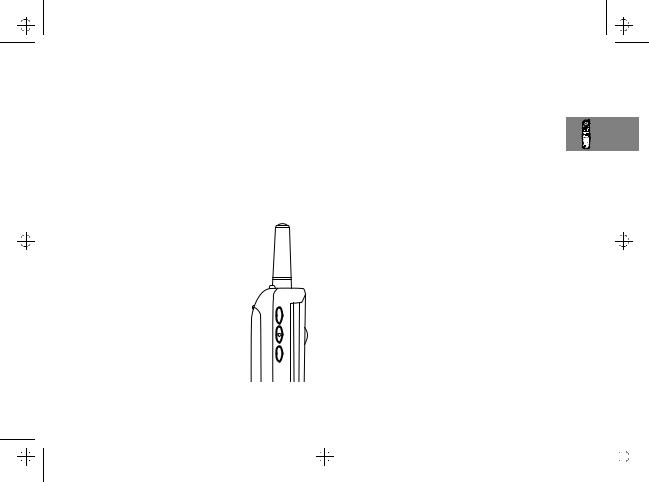
Phone Operation
Normal Position: Hold the phone as you would any other telephone with the antenna pointed up and over your shoulder.
Tips on Efficient Operation: For your phone to operate most efficiently:
•Extend your antenna fully (if applicable).
•Do not touch the antenna unnecessarily when the phone is in use. Contact with the antenna affects call quality and may cause the phone to operate at a higher power level than otherwise needed.
Safety 9 |
English |
|
|
|
|
|
|
|
|
|
|
|
|
|
|
|
|
|
|
|
|
|
|
|
|
|
|
|
|
|
|
|
|
|
|
|
|
|
|
|
|

st211_en.bk : safety.fm5 Page 10 Monday, August 23, 1999 10:24 AM
Batteries
!All batteries can cause property damage, injury or burns if a conductive material such as jewellery, keys or beaded chains touches exposed terminals. The material may complete an electrical circuit and become quite hot. To protect against such unwanted current drain, exercise care in handling any charged battery, particularly when placing it inside your pocket, purse or other container with metal objects. When the battery is detached from the phone, your batteries are packed with a protective battery cover; please use this cover for storing your batteries when not in use.
Driving
Check the laws and regulations on the use of wireless telephones in the areas where you drive. Always obey them. Also, if using your phone while driving, please:
•give full attention to driving - driving safely is your first responsibility
•use hands-free operation, if available
•pull off the road and park before making or answering a call if driving conditions so require.
Electronic Devices
Most modern electronic equipment is shielded from RF signals. However, certain electronic equipment may not be shielded against the RF signals from your wireless phone.
|
|
|
|
|
English |
10 Safety |
|
|
|
|
|
|
|
|
|
|
|
|
|
|
|
|
|
|
|
|
|
|
|
|
|
|
|
|
|
|
|
|
|
|
|
Pacemakers
The Health Industry Manufacturers Association recommends that a minimum separation of six (6”) inches be maintained between a handheld wireless phone and a pacemaker to avoid potential interference with the pacemaker. These recommendations are consistent with the independent research by and recommendations of Wireless Technology Research.
Persons with pacemakers:
•Should ALWAYS keep the phone more than six inches from their pacemaker when the phone is turned on.
•Should not carry the phone in a breast pocket.
•Should use the ear opposite the pacemaker to minimise the potential for interference.
If you have any reason to suspect that interference is taking place, turn your phone OFF immediately.
Hearing Aids
Some digital wireless phones may interfere with some hearing aids. In the event of such interference you may want to consult your hearing aid manufacturer to discuss alternatives.
Other Medical Devices
If you use any other personal medical device, consult the manufacturer of your device to determine if they are adequately shielded from external RF energy. Your physician may be able to assist you in obtaining this information.
Turn your phone OFF in health care facilities when any regulations posted in these areas instruct you to do so. Hospitals or health care facilities may be using equipment that could be sensitive to external RF energy.

st211_en.bk : safety.fm5 Page 11 Monday, August 23, 1999 10:24 AM
Vehicles
RF signals may affect improperly installed or inadequately shielded electronic systems in motor vehicles. Check with the manufacturer or its representative regarding your vehicle. You should also consult the manufacturer of any equipment that has been added to your vehicle.
Posted Facilities
Turn your phone OFF in any facility where posted notices so require.
Aircraft
FCC regulations prohibit using your phone while in the air. Switch OFF your phone before boarding an aircraft.
Blasting Areas
To avoid interfering with blasting operations, turn your phone OFF when in a “blasting area” or in areas posted: “turn off twoway radio”. Obey all signs and instructions.
Potentially Explosive Atmospheres
Turn your phone OFF and do not remove the battery when in any area with a potentially explosive atmosphere and obey all signs and instructions. Sparks, from your battery, in such areas could cause an explosion or fire resulting in bodily injury or even death.
Areas with a potentially explosive atmosphere are often, but not always clearly marked. They include fueling areas such as gasoline stations; below deck on boats; fuel or chemical transfer or storage facilities; areas where fuel odors are present, i.e. if a gas/propane leak occurs in a car or home; areas where the air contains chemicals or particles, such as grain, dust, or metal powders; and any other area where you would normally be advised to turn off your vehicle engine.
For Vehicles Equipped with an Air Bag
An air bag inflates with great force. DO NOT place objects, including both installed or portable wireless equipment, in the area over the air bag or in the air bag deployment area. If invehicle wireless equipment is improperly installed and the air bag inflates, serious injury could result.
Safety 11 |
English |
|
|
|
|
|
|
|
|
|
|
|
|
|
|
|
|
|
|
|
|
|
|
|
|
|
|
|
|
|
|
|
|
|
|
|
|
|
|
|
|
st211_en.bk : safety.fm5 Page 12 Monday, August 23, 1999 10:24 AM
European Union Directives
 Conformance Statement
This product is in conformance with the
requirements of the applicable EU Council
Directives.
Declarations of Conformance with the requirements are located at:
Motorola Ltd.
European Cellular Subscriber Division
Midpoint, Alençon Link
Basingstoke, Hampshire RG21 7PL
United Kingdom
APPROVED for connection to telecommunications systems specified in the instructions for use subject to
the conditions set out in them.
S/1357/4/V/503894
|
|
|
|
|
English |
12 Safety |
|
|
|
|
|
|
|
|
|
|
|
|
|
|
|
|
|
|
|
|
|
|
|
|
|
|
|
|
|
|
|
|
|
|
|
st211_en.bk : abtphone.fm5 Page 13 Monday, August 23, 1999 10:24 AM
About Your Phone, Battery and SIM Card
Special Keys
STurns the phone on and off.
OAccept call, setting, option.
CReject call, setting, option.
EEnter the Quick Access menu.
$Press to access the Options and Phone Book menus.
<> Press to select entries and menu options .
,Press to add a phone book entry.
fPress to call Voicemail.
The Smart Button
The Smart button (=) is on the left hand side of your phone in-between the two volume keys. Press it to quickly access all your Phone Book entries, and then either scroll through the entries using the volume buttons or press one of the alphanumeric keys to search for a specific name - for example, press 7to search for the name Pam, or press 7four times to search for the name Sam.
AIf a Phone Book entry does not have a name, it will not be displayed.
If you are using the optional headset, you can also use the Smart button to make, answer and end calls as follows:
•To answer a call, press =for 1.5 seconds.
•To end a call, press =for 1.5 seconds and then quickly press =again.
•To make a call, enter or recall a number and then press and hold =for 1.5 seconds.
Volume Buttons
The Volume buttons are on the left-hand side of your phone, above and below the Smart button. The buttons are used for adjusting the keypad, earpiece and ringer volume. A volume meter will display the current volume setting. The meter will disappear after a short time, or if you press Oor C.
•To adjust the keypad and earpiece volume, press the buttons with no other features selected.
•To adjust the ringer volume, first select the ‘Adjust Ring Volume’ option in the Phone Setup Menu and then use the buttons to set the required volume.
The volume buttons can also be used to scroll though the Phone Book entries after pressing the Smart button.
AIf you receive a call and you do not want to answer it immediately, you can press either of the volume buttons to stop the phone from ringing or vibrating. This will not answer the call.
Mute Button
The Mute button is located on the top of the phone, next to the antenna. Press it to mute the phone during a call.
About Your Phone, Battery and SIM Card 13 |
English |
|
|
|
|
|
|
|
|
|
|
|
|
|
|
|
|
|
|
|
|
|
|
|
|
|
|
|
|
|
|
|
|
|
|
|
|
|
|
|
|
st211_en.bk : abtphone.fm5 Page 14 Monday, August 23, 1999 10:24 AM
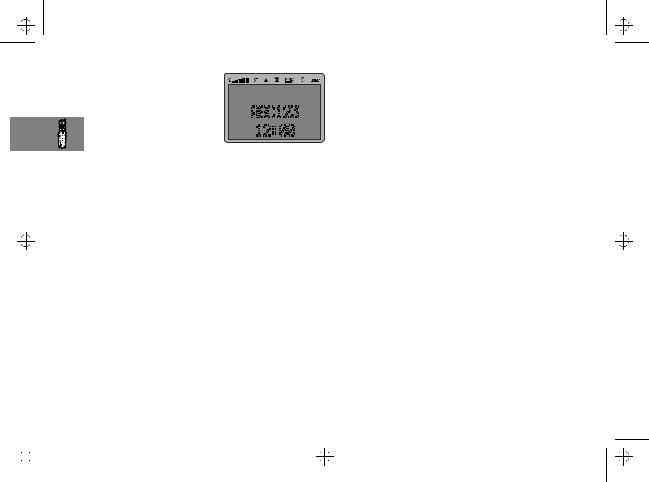
The Display
The display on your phone can show alphanumeric characters as well as useful information symbols.The various elements of the display are as follows:
ABC123 |
Characters are used to display messages and |
|
telephone numbers. |
rx Signal Strength. The more segments displayed in the bar graph, the better the signal strength.
kIn Use. Displayed when a call is in progress.
lRoam. Displayed when you are registered on a system other than your home system.
nHome Zone. Availability depends on your service provider.
oShort Message Service. Displayed when the phone has received a message. The symbol will flash when your message storage area is full.
pVoicemail Waiting Indicator. Displayed when you have a voice message waiting. The availability of this feature depends on your service provider.
hRinger On. Displayed when the call ringer is selected. If you select the No Ring or Vibrate or the Vibrate Only options this symbol will not be displayed.
qBattery Charge Indicator. The more segments displayed, the greater the battery charge.
|
|
|
|
|
English |
14 About Your Phone, Battery and SIM Card |
|
|
|
|
|
|
|
|
|
|
|
|
|
|
|
|
|
|
|
|
|
|
|
|
|
|
|
|
|
|
|
|
|
|
|
B...K Icons are displayed when you are in the Quick Access menu.
zIndicates that a menu item is currently selected.
12:00 |
Real Time Clock. The real time clock can display |
|
the time in either a 12-hour or 24-hour format. |
In addition, when you are expected to press the Okey, a prompt will appear in the display, for example Completed.
Low Temperature Use
The liquid crystal display used in your phone will behave differently at extremely low temperatures. You may notice that the display responds slowly to key presses; this is to be expected and does not affect the phone operation in any way.

st211_en.bk : abtphone.fm5 Page 15 Monday, August 23, 1999 10:24 AM
Looking After Your Phone
•Never leave your phone or battery in extreme temperatures (over 60°C), for example behind glass in very hot, direct sunlight.
•To clean your phone, use a moistened or antistatic cloth. Do not use a dry or electrostatically charged cloth.
The Status Indicator
The status indicator on the top of the phone provides you with the following information:
Incoming Call |
Alternate Red/Green |
In Service |
Flashing Green |
No Service |
Flashing Red |
Roaming |
Flashing Yellow |
Your Battery
Charging a New Battery
New batteries are supplied in a totally uncharged state.
To ensure maximum battery performance, a new battery (or battery that has not been used for several months) should be charged for at least 14 hours before use.
AA new battery will require several full charge/discharge cycles in order to achieve its optimum performance.
AA new battery, or a battery that has not been used for several months, may cause a premature fully charged indication. Ignore this indication and let the battery charge for several more hours, remove and re-insert the battery into the charger, and charge for an additional 14 hours.
Important Battery Information
!Always treat your batteries with care. See ‘Batteries’, at the beginning of this manual.
!Never leave your battery in extremely high temperatures (over 60°C), for example behind glass in very hot, direct sunlight.
!Only Motorola Original Accessory batteries can be charged in the phone or the optional desktop charger. This is to protect you and your phone from the risks of incorrect charging.
ADo not use lithium ion batteries at extremely low temperatures as the maximum standby/talk time will not be available when cold.
About Your Phone, Battery and SIM Card 15 |
English |
|
|
|
|
|
|
|
|
|
|
|
|
|
|
|
|
|
|
|
|
|
|
|
|
|
|
|
|
|
|
|
|
|
|
|
|
|
|
|
|
st211_en.bk : abtphone.fm5 Page 16 Monday, August 23, 1999 10:24 AM
To ensure that you enjoy maximum battery life and use your battery to its fullest capacity:
•The battery should be at or near room temperature when charging.
Battery Performance and Maintenance
•Best battery performance will be achieved when you regularly charge and discharge batteries as instructed in this manual.
•Battery performance is greatly affected by network coverage.
•Set Battery Saving Mode to On (see ‘Phone Setup Menu’) and/or Frequency of Search to Slow or Medium (see ‘Network Selection Menu’).
•If left unused, a fully charged battery will discharge itself in approximately one month.
•When not in use, store your battery uncharged in a cool, dark and dry place.
Low Battery Warning
When the battery level is low and only a few minutes of talk time remain, a warning signal (two double beeps) will sound, the border of the battery symbol will begin to flash, and Low Battery will be displayed.
When the battery is completely discharged, your phone will turn off.
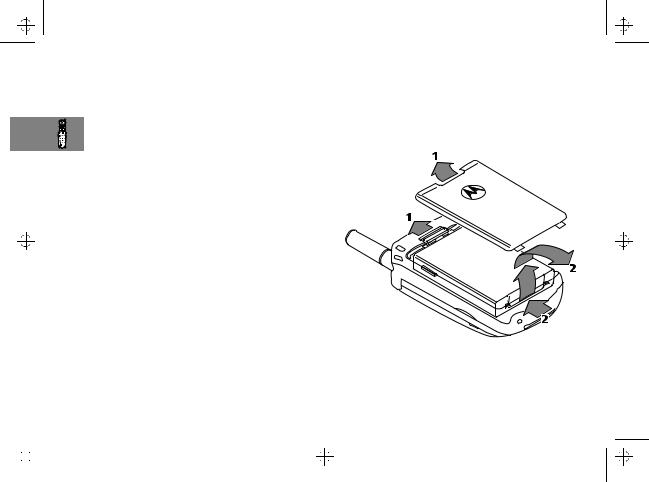
Removing Your Battery
!Switch off your phone before removing the battery. Failure to do so may damage your phone memory.
1Press the release catch on the battery compartment and lift off the cover.
2Push the battery towards the top of the phone and lift the battery out from the bottom end.
|
|
|
|
|
English |
16 About Your Phone, Battery and SIM Card |
|
|
|
|
|
|
|
|
|
|
|
|
|
|
|
|
|
|
|
|
|
|
|
|
|
|
|
|
|
|
|
|
|
|
|
st211_en.bk : abtphone.fm5 Page 17 Monday, August 23, 1999 10:24 AM
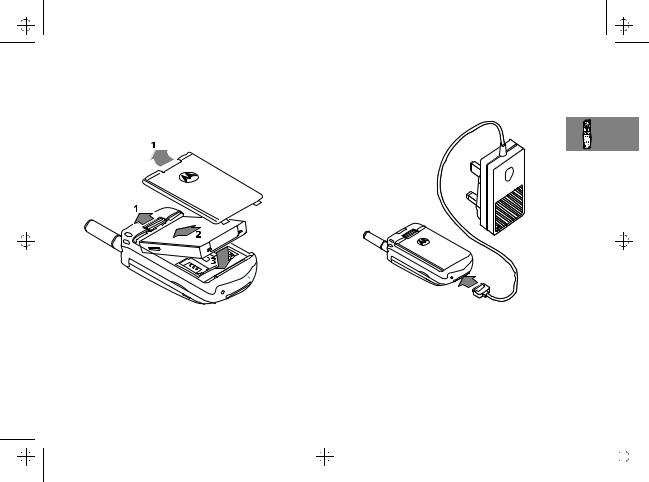
Fitting Your Battery
1Remove the battery compartment cover.
2Align the connections on the battery with the connections on the phone.
3Press the battery towards the connections and push it downwards until it clicks into place. Replace the cover.
Charging Your Battery Using the Travel
Charger
The travel charger can power the phone and charge a fitted
battery.
!Ensure that the local mains voltage at your location matches that of your travel charger.
Fit a battery onto your phone.
To charge your battery:
1Attach the correct adapter plug to the travel charger.
2Connect the travel charger to the phone.
AThe connector is keyed and can only be inserted one way.
3Insert the travel charger plug into a suitable mains power socket.
A beep-tone is heard and the battery icon flashes when charging begins.
AYour phone can be either on or off during charging.
The state of charging is monitored and displayed by your phone.
See ‘Battery Meter Indicators’ later in this section for details.
About Your Phone, Battery and SIM Card 17 |
English |
|
|
|
|
|
|
|
|
|
|
|
|
|
|
|
|
|
|
|
|
|
|
|
|
|
|
|
|
|
|
|
|
|
|
|
|
|
|
|
|
st211_en.bk : abtphone.fm5 Page 18 Monday, August 23, 1999 10:24 AM
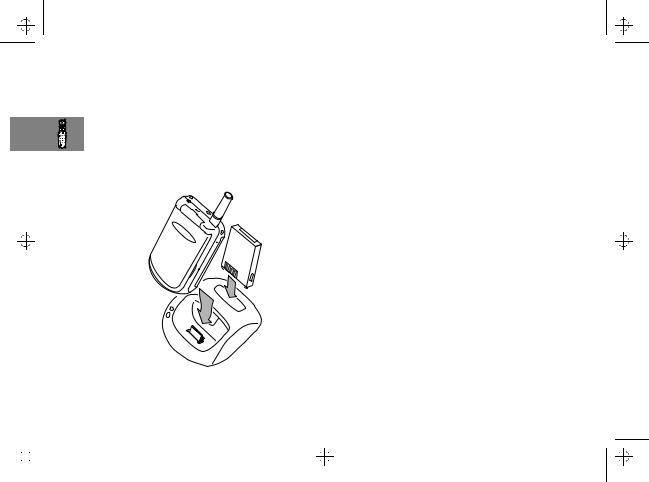
Desktop Charging Your Battery
AThe Desktop Charger is an optional accessory that allows you to charge both the battery fitted in your phone and a spare battery at the same time.
Batteries charge in about 2 to 3 hours, depending on the battery.
AIt is normal for batteries to become warm during charging.
1 Connect the travel charger to the desktop charger socket. (The connector is keyed and can only be inserted one way.)
2Plug the travel charger into a standard mains socket.
3Insert your phone into the desktop charger as shown.
A spare battery can be charged on its own or at the same time as your phone. Insert the battery into the desktop charger as shown.
AFor maximum NiMH battery charging, you should double the charge time.
ACharge times will increase if you make or receive phone calls while charging.
|
|
|
|
|
English |
18 About Your Phone, Battery and SIM Card |
|
|
|
|
|
|
|
|
|
|
|
|
|
|
|
|
|
|
|
|
|
|
|
|
|
|
|
|
|
|
|
|
|
|
|
st211_en.bk : abtphone.fm5 Page 19 Monday, August 23, 1999 10:24 AM
Battery Indicators
Your Motorola cellular phone includes the Motorola Expert Performance (¢) charging system. This enables the charging circuits in both the phone and the optional (¢) desktop charger to communicate directly with the battery. Based on this communication, the charger can implement the optimum charging cycle for best performance and determine the level of charge.
Your phone monitors and displays information about your battery. The following message will appear on the display, as the condition occurs:
Low Battery |
The battery charge is low. The battery should |
|
be recharged. |
Insert |
No battery fitted; external power connected |
Battery |
|
Invalid |
This message is accompanied by a single beep. |
Battery |
Your phone is alerting you that you do not |
|
have charging capabilities with this battery |
|
even though the battery may be able to power |
|
the phone. |
|
The most likely reason why your charging |
|
system does not recognise the battery is that |
|
the battery you have purchased is not a |
|
Motorola original battery and therefore does |
|
not have the communications technology built |
|
into it. All Motorola original batteries include |
|
this communications technology. |
|
It is recommended that you use only Motorola |
|
original batteries, chargers and other |
|
accessories. |
Battery Meter Indicators
The battery meter displays different messages depending on the batteries attached, and whether or not there is an external power source. The battery meter is found in the Call Related Features part of the Options Menu.
Charging |
The battery is being charged. |
Battery |
|
Fast Charge |
Fast charging is complete. |
Complete |
|
Invalid |
Battery may be defective, or may not be a |
Battery |
Motorola original battery. |
About Your Phone, Battery and SIM Card 19 |
English |
|
|
|
|
|
|
|
|
|
|
|
|
|
|
|
|
|
|
|
|
|
|
|
|
|
|
|
|
|
|
|
|
|
|
|
|
|
|
|
|
st211_en.bk : abtphone.fm5 Page 20 Monday, August 23, 1999 10:24 AM
Your SIM Card
Your SIM (Subscriber Identity Module) card was supplied by your Cellular Service Provider when you bought your phone. You will not be able to make or receive calls if you do not have a SIM card inserted in your phone.
ASome networks allow you to make emergency calls without a SIM card inserted.
The SIM card is a ‘Smart Card’ that contains your phone number, service details and memory for storing Phone Book numbers and messages. You can therefore use your SIM card in someone else’s GSM phone and you will be charged for the call.
Like a bank or credit card, you should keep your SIM card secure. Do not bend or scratch your card and avoid exposure to static electricity or water.
!Switch off your phone before inserting or removing the SIM card. Failure to do so may damage the memory on your SIM card.
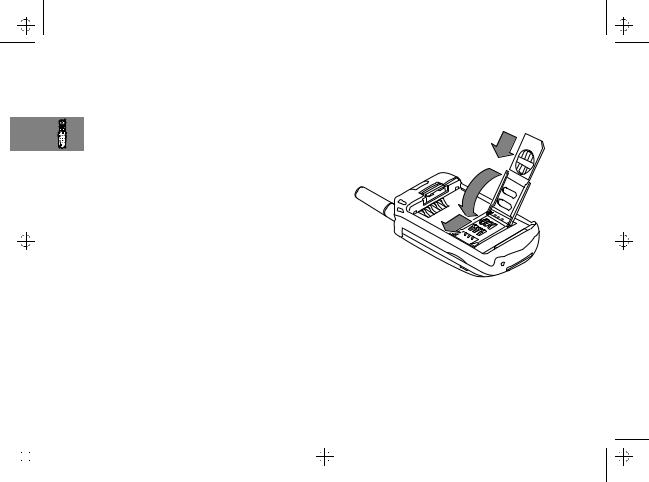
SIM Card Insertion/Removal
1Switch off your phone by pressing and holding the Skey, remove the battery cover and the battery.
2Slide the SIM holder towards the right and lift up the left side of the holder.
3Remove the SIM card from the holder if necessary.
|
|
|
|
|
English |
20 About Your Phone, Battery and SIM Card |
|
|
|
|
|
|
|
|
|
|
|
|
|
|
|
|
|
|
|
|
|
|
|
|
|
|
|
|
|
|
|
|
|
|
|
4Insert the SIM card into the holder as shown. The SIM card should be inserted with the notch at the top and facing towards the base of the phone.
5Replace the holder and press and slide it to the left to lock it into place.
6Replace the battery and battery cover.
If the SIM card is inserted the wrong way round, or damaged, the Check Card message may be displayed. Remove the SIM card, check that it is the right way round and then re-insert it into the phone.
If either of the Bad Card See Supplier or Blocked See Supplier messages are displayed, then you will need to contact your Cellular Service Provider.

st211_en.bk : usephone.fm5 Page 21 Monday, August 23, 1999 10:24 AM
Making and Receiving Phone Calls
Switching the Phone On and Off
To switch the phone on or off, press and hold the Skey. If VibraCall™ is selected, the phone will vibrate when it is switched on.
If you switch the phone on and there is no SIM card inserted, you will be asked to insert one. Once inserted, the phone will check that the SIM card is valid.
A number of messages will then be displayed:
•Enter PIN - a request to enter the SIM card PIN code (if required).
•Enter Phone Unlock Code - a request to enter the phone unlock code (if required).
•Searching... followed by a network name - as the phone searches and then finds a suitable network to connect to.
Entering Your SIM Card PIN Code
To enter the PIN code, enter AO.
As you type in each digit of the PIN code a * character will be displayed.
If you make a mistake, press and release the Ckey to remove the last digit. Holding the Ckey down will remove the entire entry.
When the PIN code is complete press the Okey.
If the PIN code entered is incorrect, the warning message Wrong PIN will be displayed, followed by Enter PIN.
!If the PIN number is entered incorrectly three times in a row, your phone will automatically lock-up and the Blocked message will be displayed. See ‘Unblocking
Your Phone’ for details on unblocking your phone.
The PIN code can be changed, see ‘Change SIM PIN Code’ in the Phone Setup Menu section for more details.
jEntering Your Unlock Code
If your phone displays the message Enter Phone Unlock Code you must enter your unlocking code by entering
BO.
The unlock code is a four digit number which is set at manufacture to 1234. The code can be changed, see ‘Change Unlock Code’ in the Phone Setup Menu section for more details.
If you forget your unlock code, press the $key. This will display the ‘Change Unlock Code’ option. Enter O D, enter a new unlock code, and press O.
Making and Receiving Phone Calls 21 |
English |

st211_en.bk : usephone.fm5 Page 22 Monday, August 23, 1999 10:24 AM
Making a Phone Call
To make a phone call, your phone must be switched on and unlocked.
It will not be possible to make a phone call unless you are in an area where there is a GSM900 or GSM1800 service. When a service has been found, a series of rising bars, x, will show the signal strength.
There are a number of different ways to make a phone call:
•Using the digit keys.
•Using automatic redial.
•Redialling the last number called.
•One-touch dialling a Phone Book entry*.
•Dialling a Phone Book entry*.
•Calling an embedded number in a message.
•Using the Smart button (=).
A*Your phone contains a 'phone book' that can be used to store names and telephone numbers. See ‘What is the Phone Book?’ for further details.
The simplest method of making a phone call is to enter the number using the digit keys then press O.
AIf you make a mistake, press and release the Ckey to remove the last digit. Holding the Ckey down will remove the entire number.
Your phone will then attempt to make the phone call. The display will show Calling to show the call attempt is being made. If the call is not answered, pressing O, or closing the flip (models with flip only), at this point will end the attempt.
When the phone call is answered, the display will change to Connected for a few seconds, followed by End Call?.
To end your call press O, or close the phone.
Automatic Redial
If your call attempt does not succeed, the message Redial? will be displayed for five seconds. Pressing Oat this point will automatically redial the phone number.
When the call is answered, you will hear a short ring tone.
The maximum number of redial attempts is set by your Cellular Service Provider. If the phone call cannot be connected within this maximum, the message Redial Failed will be shown.
English |
22 Making and Receiving Phone Calls |
st211_en.bk : usephone.fm5 Page 23 Monday, August 23, 1999 10:24 AM
Redialling the Last Number Called
i When in standby mode, press OO.
Alternatively, you can retrieve the last number dialled using the ‘Last Ten Calls’ feature in the Phone Book menu.
jOne-Touch Dialling Phone Book Numbers
To quickly retrieve and dial a number stored in the first nine locations of your Phone Book1, press and hold the appropriate digit key. For example, pressing and holding 2will dial the phone number stored in location 2 of your Phone Book.
AYou do not need to press Oto call the number.
jDialling Phone Book Numbers
i Press the Smart button (=) and use the volume buttons to scroll to the stored number, or press the appropriate digit key to skip to a particular letter. To make the call, either hold down =for 1.5 seconds or press O.
Alternatively, enter the phone book location number followed by >O.
Calling an Embedded Number in a Message
Details on how to call a number embedded in a message are given in the Messages Menu section.
1.The Phone Book entries that you are able to access will depend on the One-Touch Dial Setting option in the Phone Book menu.
International Phone Calls
To make an international phone call press and hold the 0key. After a couple of seconds the international dialling prefix + will appear in the display, this allows you to call from any country without knowing the local international access code.
Now enter the country code, followed by the phone number. The country code follows the conventional format, 49 for Germany, 44 for the UK, 46 for Sweden, etc.
Just like a conventional international call, remove the leading '0' of the area code when you dial.
Inserting Pauses Into Phone Numbers
To obtain a three second 'pause' character in a phone number, press and hold the <key for a couple of seconds, the pause symbol Ü will appear.
The pause character produces a three second delay whenever it is used. However, the first pause character in a phone number is a special case, it will not begin its delay until the call is answered.
Pause - A Working Example.
If, for example, you have a tone-based voicemail system on 555-6911, with a mailbox number 1066 and password 2001. Then you may dial the following number:
5556911Ü1066Ü2001O.
The first part of the number would be used to call the voicemail system.
When the call is answered the first pause will produce a delay of three seconds before the tones for 1066 are sent to select the mailbox.
There will be a second pause of three seconds before the tones for 2001 are sent as the password.
Making and Receiving Phone Calls 23 |
English |
 Loading...