


|
|
|
|
|
|
|
ContentsofTable |
|
|
RadioNewYour |
Features |
Radio Diagram |
2-3 |
Batteries |
4 |
Rechargeable NiMH Battery |
|
Using Rechargeable NiMH Battery 4 |
|
ChargersNiMH |
|
Tri-Color LED Charger |
6 |
Charging the NiMH Battery |
6 |
Charging Status Chart |
6 |
Single Color LED Charger |
7 |
Charging the NiMH Battery |
7 |
Auto Power Off |
16 |
Display Light |
16 |
Keypad Lock |
17 |
Reset |
17 |
Time-out Timer |
17 |
Channel Scan |
18 |
Scan List |
19 |
Call Tone |
19 |
UseFreeHands |
|
Using VOX Feature |
20 |
Enabling iVOX-T289 Only |
20 |
Setting VOX/iVOX Sensitivity |
21 |
BatteriesAlkalineAA |
8 |
Installing Alkaline Battery Tray |
|
Replacing Alkaline Batteries |
9 |
Battery Meter |
10 |
Low Battery Alert |
10 |
CommunicationImproving |
22 |
Talk Range |
|
Care and Safety |
22 |
Accessories |
23 |
HolsterBelt
Using Radio With Holster
TalkCanYouBefore
Power Button
Setting the Channel
Setting the Code
Custom Codes-T289 Only
CommunicateTo
Monitor Button
Channel Busy Indicator-T289
Volume Control
Push-To-Talk Button
Alert Tones
11 |
Troubleshooting |
24-25 |
|
Safety Information |
26-27 |
||
|
|||
|
Charging Safety Instructions |
28-29 |
|
12 |
Channel Chart |
30 |
|
12 |
Code Chart |
31 |
|
13 |
Warranty |
32-33 |
|
13 |
Copyrights |
34-35 |
|
14 |
SummaryOperationQuick |
36 |
|
Menu Button |
|||
14 |
Call Tone |
37 |
|
14 |
Light/lock Button |
37 |
|
15 |
Monitor Button |
37 |
|
15 |
Scan Button |
37 |
|
|
|
1 |
RadioNewYour
Motorola Talkabout radios operate on Family Radio Service (FRS) designated frequencies. This license-free, short range, two-way radio service was established specifically for family and individual recreational use. You can use your radios anywhere within the United States and other areas listed by the FCC.
at:informationmoreforFCCtheContact
1-888-CALL-FCC (1-888-225-5322)
Or:
http://www.fcc.gov |
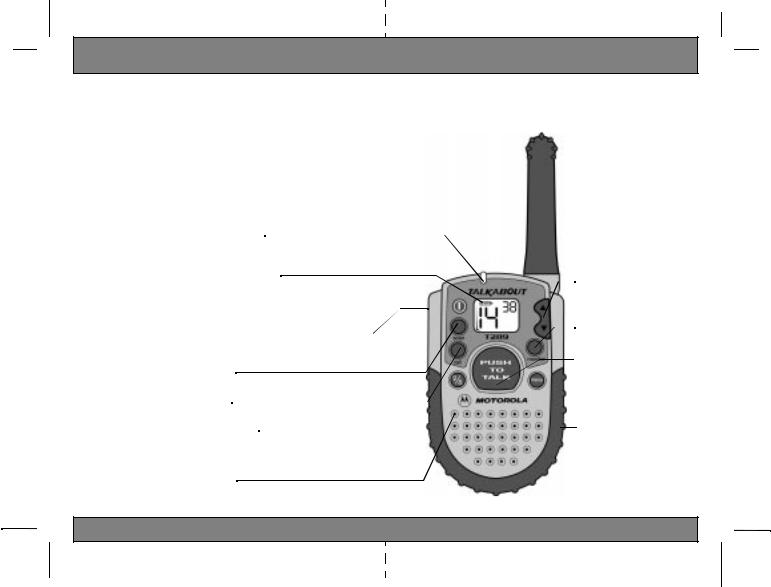
LightIndicatorLED |
||||
Indicates radio is on; will be steady |
|||||
|
|||||
|
red when transmitting. |
||||
|
IndicatorMeterBattery |
||||
|
Indicates how much battery charge is left. |
||||
|
ButtonPower |
|
|
|
|
|
|
|
|
||
|
Turn radio on or off. |
||||
|
ConnectorAccessory |
|
|
||
|
Used for plugging in optional audio |
||||
|
accessories. |
||||
|
ButtonScan |
||||
|
Scans frequencies for activity. |
||||
|
ButtonCall |
||||
|
Calls other radio users. |
||||
|
ButtonLight/Lock |
||||
|
Illuminates display for 5 seconds. |
||||
|
Locks radio to prevent accidental |
||||
|
change of settings. |
||||
|
Microphone |
||||
|
Picks up audible transmissions. |
||||
2 |
|
|
|
|
|
 Scroll Buttons Changes volume and radio
settings.
ButtonMonitor
Monitors frequency activity.
Button(PTT)Talk-To-Push
Used to transmit messages.
ButtonMenu
Changes function mode.
Connector*Charging
Used for charging battery.
*NiMH Battery Use Only
Figure 1.
3

Batteries
Your Talkabout radio operates with either a Nickel-Metal Hydride (NiMH) rechargeable battery or 3 AA alkaline batteries (battery tray required).
The NiMH rechargeable battery will provide approximately 11 hours of operation with normal use. Normal use for the rechargeable battery is approximately 0.5 hour transmitting, 0.5 hour receiving and 10 hours of standby or monitoring time.
BatteryNiMHRechargeable
Battery:NiMHRechargeableUsing
1.Grasp radio firmly at top and slide radio back down to remove. Make sure you are not holding battery door (sides) onto the radio body. Figure 5.
2.Place the NiMH battery inside the radio with battery contacts facing down. Figure 6.
3.Replace the radio’s back by sliding up and onto radio body.
4.Push up until secure.
Stop Sign: The NiMH battery has a stop sign symbol to remind you to turn the battery over and align holes with pegs before inserting battery into the radio. Figure 7.
4
Figure 5.
Figure 6.
Figure 7.
The NiMH battery kit, alkaline battery kit, and spare NiMH battery are available as accessories (sold separately).
For information, call 1-800-353-2729.
5
ChargersNiMH
Your radio will use one of the following types of chargers. Follow the instructions below for the charger that shipped with your radio.
To get maximum use from the battery, charge it for at least five hours before you use it for the first time. After initial charging, your battery will fully charge in about three hours.
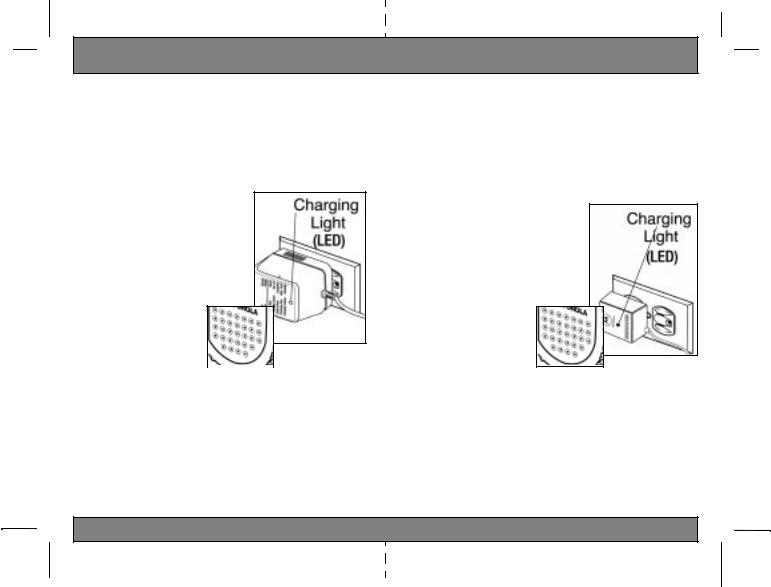
ChargerLEDColor-Tri
Battery:NiMHtheCharging
1.Turn the radio off.
2.Plug charger into an AC wall outlet. Figure 2.
3.Lift charging connector cover on radio (not detachable) and plug charger connector
into jack. Figure 3.
4.LED Indicator on Battery Charger will flash. (See chart below for complete charging status).
ChargerLEDColor-Tri |
|
|
|
Figure 2. |
|
|
|
|
|
|
|
ChartStatusCharging |
|
Figure 3. |
|
|
|
|
|
|
|
|
|
|
|
|
|
|
|
|
|
|
|
|
|
ColorLED |
StatusCharging |
Completion |
|||
Solid Red |
Rapid |
Up to 90% |
|||
Flashing Green |
Top-off |
90% to 100% |
|||
Solid Green |
Complete |
100% |
|
||
Flashing Red |
Battery Fault |
______ |
|
||
Flashing Yellow* |
Standby |
______ |
|
||
|
|
|
|
|
|
|
|
|
|
|
|
*Battery is not receiving correct voltage. Battery charging temperature must remain between 00 to 400 C / 320 F to 1040 F.
6
ChargerLEDColorSingle
Battery:NiMHtheCharging
1.Turn the radio off.
2.Plug charger into an AC wall outlet. Figure 4.
3. Lift charging connector cover on radio (not detachable) and plug charger connector into jack. Figure 3.
4.The red LED on charger will flash while battery charges. LED will glow
continuously when battery is fully charged.
Figure 4.
Figure 3.
Notes:
•The NiMH battery may be charged outside the radio by plugging the adapter directly into the battery.
•For optimum battery life, battery should not be left charging for extended periods.
•Turn radio off when charging. If radio is on while charging, additional time is required to charge the battery.
7

BatteriesAlkalineAA
To operate Talkabout radios with alkaline batteries you’ll need to install the alkaline battery tray. Alkaline batteries will last about 30 hours with normal use. Normal use for alkaline batteries is approximately 1.5 hours transmitting, 1.5 hours receiving and 27 hours of standby or monitoring time.
Tray:BatteryAlkalineInstalling
1.Grasp radio firmly at top and slide radio back down to remove. Make sure you are not holding battery door (sides) onto the
radio body.
2.Insert 3 AA batteries into alkaline tray. Make sure you align plus and minus signs on batteries with markings on battery tray. Figure 6.
3.Align tabs at top of battery tray with slots on radio before pressing tray
into place. Figure 5.
4. Replace radio back by |
Figure 5. |
|
sliding up and onto radio body. |
||
|
||
5. Push up until secure. |
|
Batteries:AlkalineReplacing
1.Insert 3 AA batteries into alkaline tray. Make sure you align plus and minus signs on batteries with markings on bat-
tery tray. Figure 6.
2.Replace radio back by sliding up and onto radio body.
3.Push up until secure.
Figure 6.
Note: When batteries are low, as indicated by battery meter or low battery alert, replace the alkaline batteries immediately to avoid interrupted use.
8
The NiMH battery kit, alkaline battery kit, and spare NiMH battery are available as accessories (sold separately).
For information, call 1-800-353-2729.
9

MeterBattery
The Battery Meter, located on the front display, is divided into three bars. As power is used, the bars will disappear. Figure 7.
Note: To ensure proper functioning of the
battery meter use only the Motorola NiMH rechargeable battery or three AA alkaline batteries. The meter will not work accurately
with Nickel Cadmium (NiCad) or rechargeable alkaline AA batteries.
Low Battery Alert When the battery is low, the radio will beep:
•3 to 4 seconds after turning power on
•every 10 minutes in standby mode
•after releasing Push-To-Talk button
•after releasing the Call button
Note: Remove batteries before storing your radio for extended periods. Batteries may corrode over time and cause permanent damage to your radio.
HolsterBelt
Talkabout radios come with a belt holster which can be used with both the NiMH and AA battery doors.
Holster:WithRadioUsing
1.Position the base of the radio in bottom portion of holster.
2.Push the radio towards the holster until it latches into place. Figure 8.
3.To remove radio from holster, pull the top tab on holster away from radio.
Figure 9.
Note: You may find it easier to clip the holster onto your belt before you insert radio into the holster. Figure 10.
Figure 10.
10
Figure 8.
Figure 9.
11
 Loading...