


CK-31304
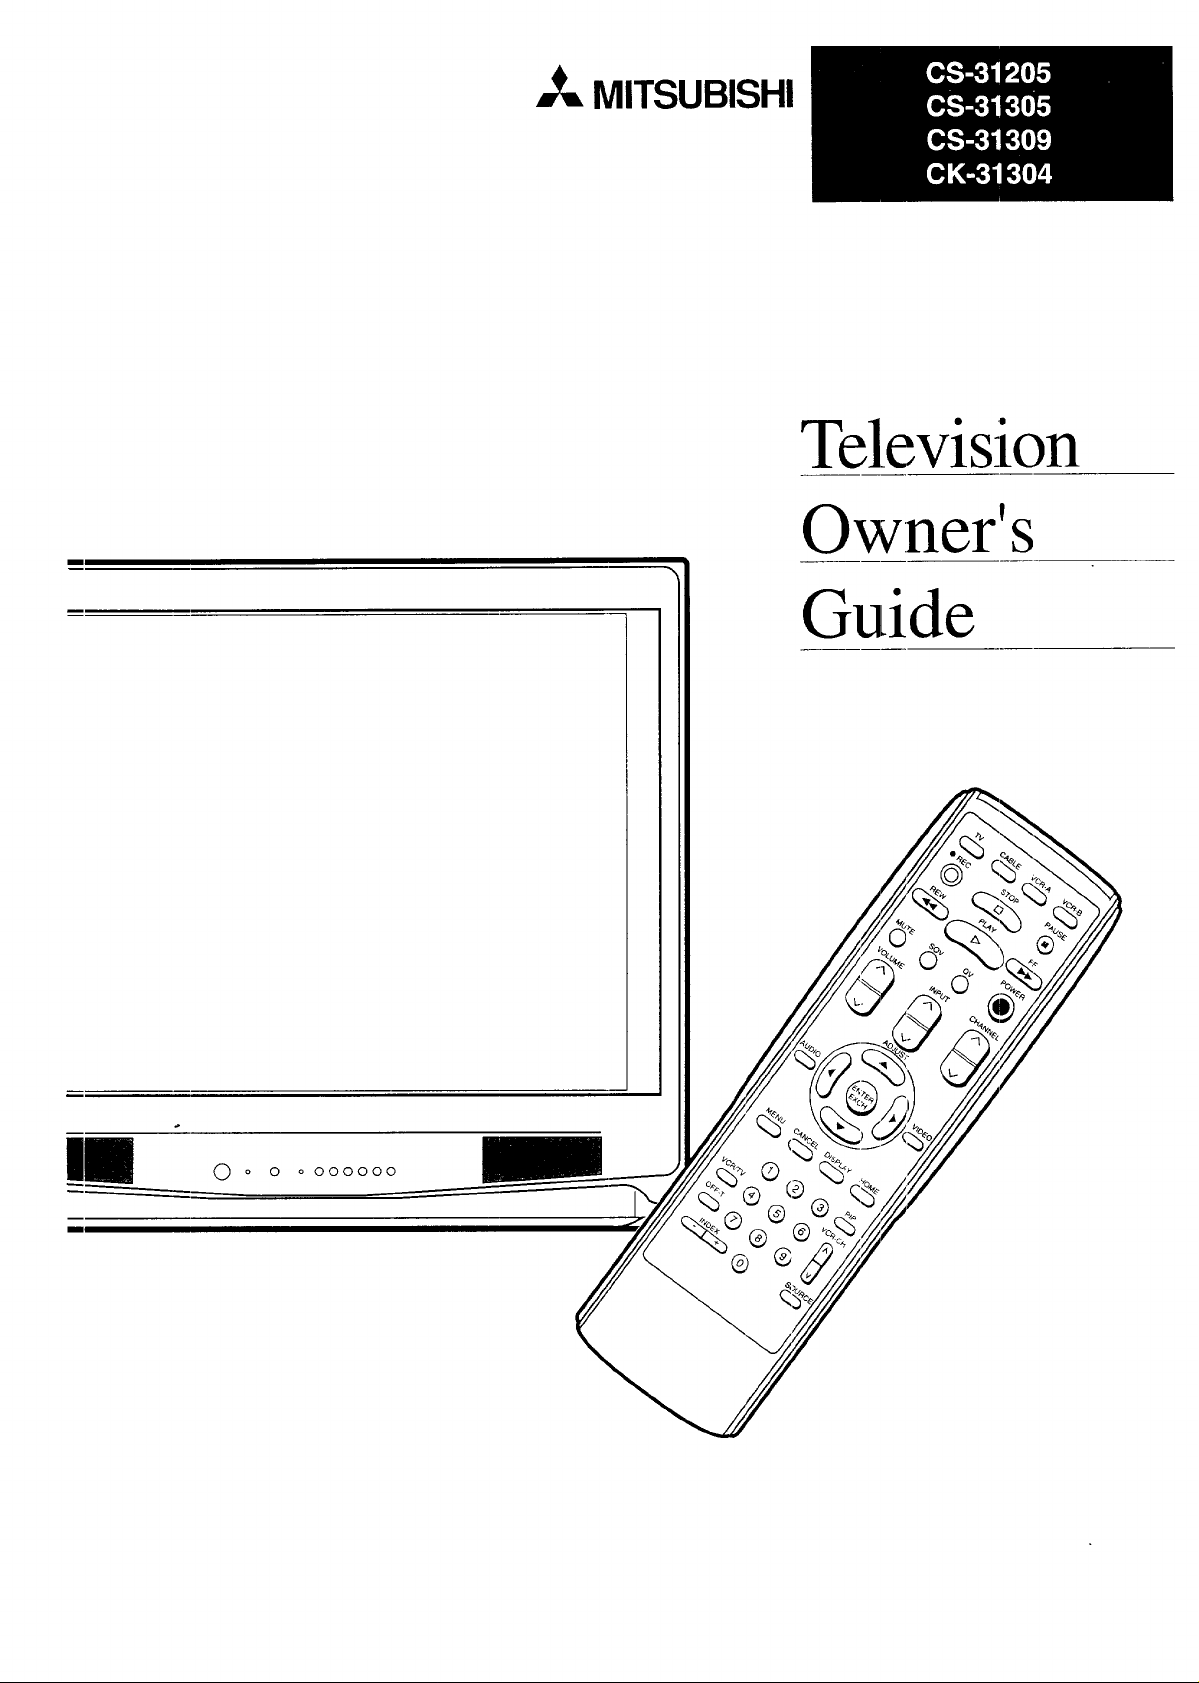
_,_ MITSUBISHI
Television
Owner's
Guide
0 o 0 o 000000
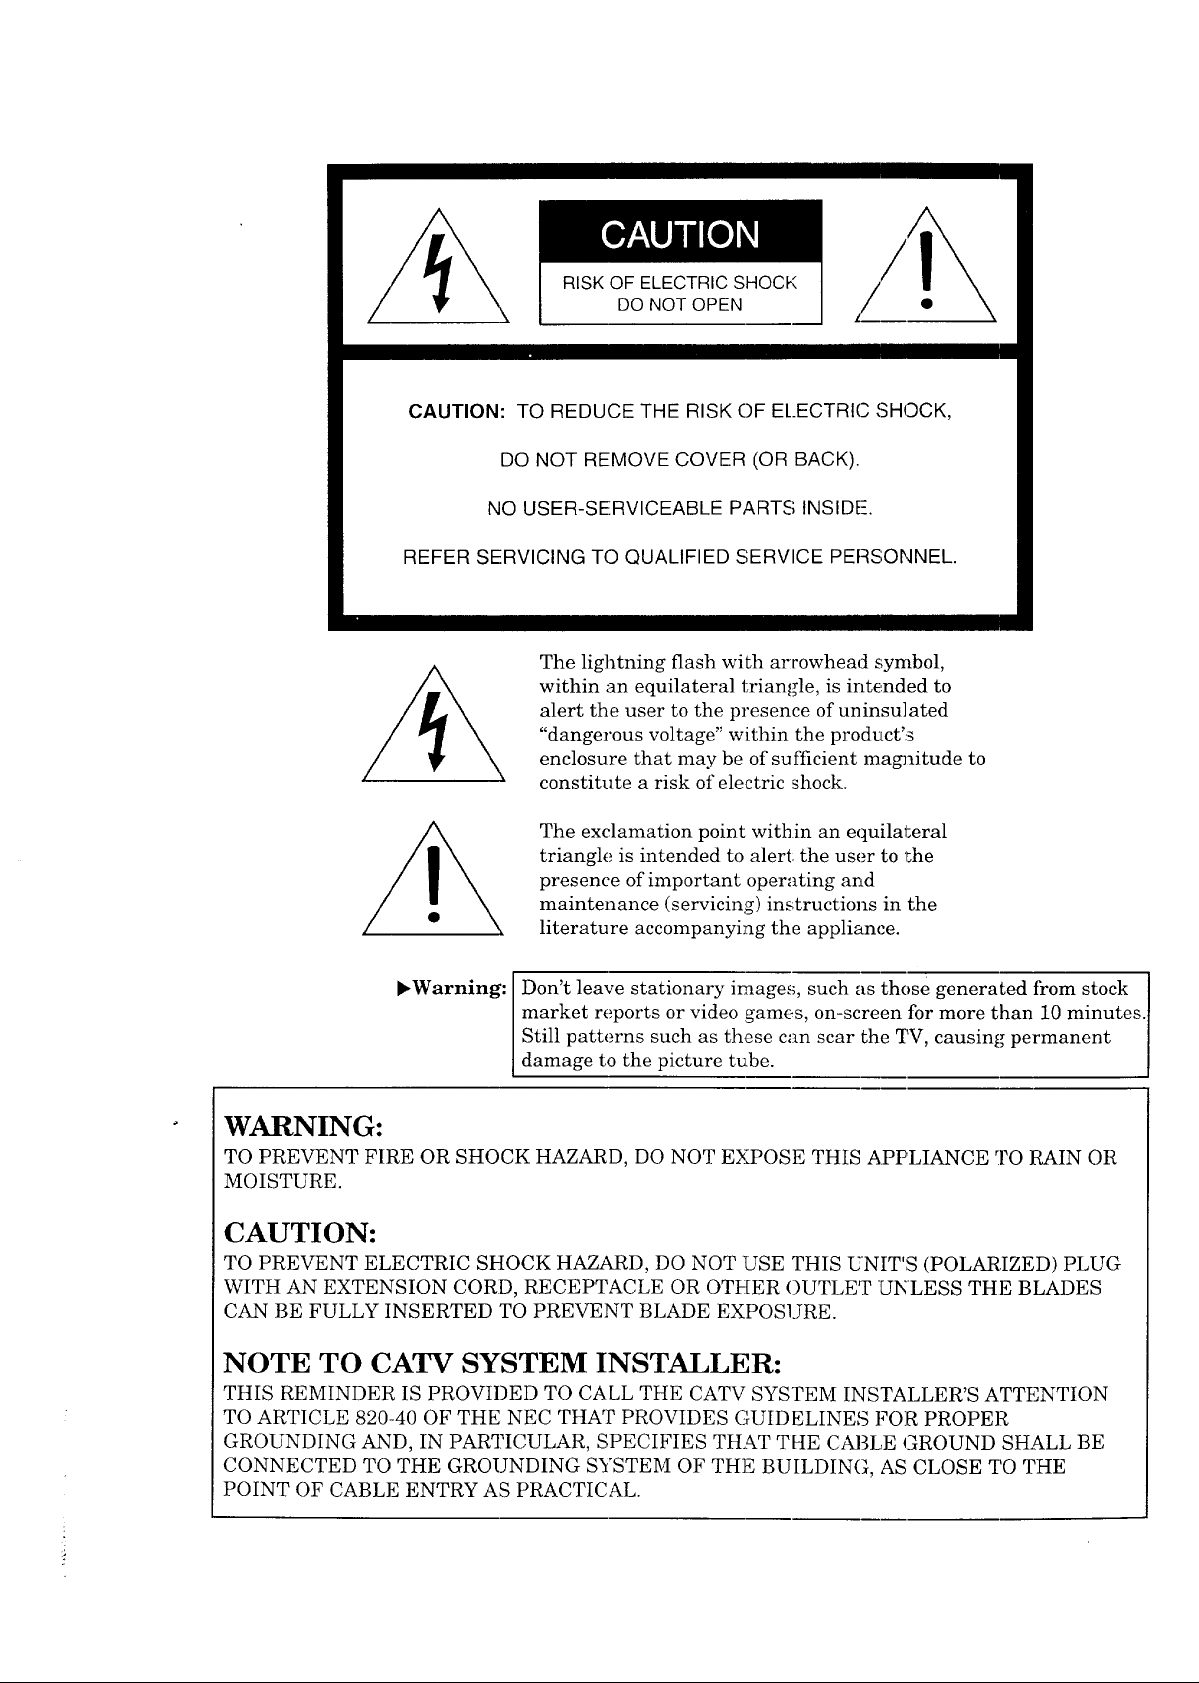
RISK OF ELECTRIC SHOCK
DO NOT OPEN
CAUTION: TO REDUCE THE RISK OF E/.ECTRIC SHOCK,
DO NOT REMOVE COVER (OR BACK).
NO USER-SERVICEABLE PARTS INSIDE.
REFER SERVICING TO QUALIFIED SERVICE PERSONNEL
The lightning flash with arrowhead symbol,
within an equilateral triangle, is intended to
alert the user to the presence of uninsulated
"dangerous voltage" within the product's
enclosure that may be of sufficient mas_itude to
constitute a risk of electric shock.
The exclamation point within an equilateral
triangle is intended to alert: the user to the
presence of important operating and
maintenance (servicing) instructions in the
literature accompanying the appliance.
_Warning: Don't leave stationary images, such as those generated from stock
market reports or video games, on-screen for more than 10 minutes.
Still patterns such as these can scar the TV, causing permanent
damage to the picture tube.
WARNING:
TO PREVENT FIRE OR SHOCK HAZARD, DO NOT EXPOSE THIS APPLIANCE TO RAIN OR
MOISTURE.
CAUTION:
TO PREVENT ELECTRIC SHOCK HAZARD, DO NOT USE THIS UNIT'S (POLARIZED) PLUG
WITH AN EXTENSION CORD, RECEPTACLE OR OTHER OUTLET UNLESS THE BLADES
CAN BE FULLY INSERTED TO PREVENT BLADE EXPOSURE.
NOTE TO CATV SYSTEM INSTALLER:
THIS REMINDER IS PROVIDED TO CALL THE CATV SYSTEM INSTALLER'S ATTENTION
TO ARTICLE 820-40 OF THE NEC THAT PROVIDES GUIDELINES FOR PROPER
GROUNDING AND, IN PARTICULAR, SPECIFIES THAT THE CABLE GROUND SHALL BE
CONNECTED TO THE GROUNDING SYSTEM OF THE BUILDING, AS CLOSE TO THE
POINT OF CABLE ENTRY AS PRACTICAL.
!

_ MITSUBISHI OWNER'S GUIDE
Table of Contents
Important Safeguards ................................................................. 3
Preface: Welcome to Mitsubishi ............................................. 5
Summary of Special Features ............................................ 6
Unpacking Your TV ............................................................ 7
What's in Each Chapter ....................................................... 8
Some Conventions Used in this Guide ............................... 9
Chapter 1: Getting to Know Your TV .................................... 11
Overview of the Control Panel ........................................ 12
Overview of the Remote Control ..................................... 14
Getting ready to use the remote control .................... 14
Remote control buttons and functions ....................... 16
Chapter 2: Connecting Your TV ........................................... 21
Overview of the Back Panel .............................................. 22
Basic Connections ............................................................. 24
TV + antenna or cable without a
decoder box ................................................................ 25
TV + cable with a decoder box ..................................... 26
TV + separate UHF and VHF antennas .................... 27
TV + VCR + antenna or cable without
a decoder box ............................................................ 28
TV + VCR + cable with a decoder box ........................ 31
TV + audio system ....................................................... 34
Chapter 3: Operating Your TV ............................................. 35
Getting Started ................................................................. 36
Using the remote control to operate cable boxes
and other brands of VCRs ...................................... 37
Turning the TV on/off .................................................. 41
Selecting the input source .......................................... 42
Changing channels ....................................................... 43
Understanding the on-screen menus ......................... 46
Setting the clock ........................................................... 47
Memorizing channels ................................................... 49
Adding and deleting channels .................................... 50
Renaming the input ..................................................... 51
Selecting the menu language ....................................... 52
Using video mute .......................................................... 53
Adjusting the sound ...................................................... 54
Adjusting the picture ................................................... 56
Using the closed caption decoder ............................... 57
UsingtheAdvancedFeatures.........................................59
Settingthetimer..........................................................60
Usingtheparentallock...............................................61
UsingtheSuperQuickViewtuning..........................65
SelectinganadvancedPIPfunction
(CS-31305,CS-31309,andCK-31304only)..........66
Chapter 4: Using the Special Features .............................. 67
Understanding the On-Screen Displays ......................... 68
Using the Off-Timer .......................................................... 69
Setting the off-timer. ................................................... 70
Changing or canceliag the off--timer ............................. 71
Using the Advanced Picture-in-Picture (PIP) Modes
(CS-31305, CS--31309, and CI_:o31304 only) ............... 72
Selecting the PIP image ............................................... 73
Selecting the PIP source ............................................... 74
Changing channels while using the PIP modes ........ 74
Exchanging the PIP image and the main image ....... 75
Moving the PIP image ................................................. 75
Freezing the PIP image ............................................... 76
Using the Snap-shot feature ........................................ 77
Using the Replay feature .............................................. 78
Chapter 5: Troubleshooting ................................................... 79
Caution and Care .............................................................. 82
Calling for Service ............................................................. 83
Appendix: Procedure for Bypassing the
Parental Lock ............................................................................. 85
Index ............................................................................................ 87
Warranty ...................................................... Inside Back Cover
2 Table of Contents
IMPORTANT SAFEGUARDS
PLEASE READ ALL THESE INSTRUCTIONS REGARDING YOUR TV RF, CEIVER AND RETAIN
FOR FUTURE REFERENCE. FOLLOW ALL WARNINGS AND INSTRUCTIONS MARKED ON
THE TV RECEIVER.
Ventilation
1. Read Instructions
All the safety and operating instructions should be
read before the appliance is operated.
2. Retain Instructions
The safety and operating instructions should be
retained for future reference.
3. Heed Warnings
All warnings on the appliance and in the operating
instructions should be adhered to.
4. Follow Instructions
All operating and use instructions should be followed.
5. Cleaning
Unplug this TV receiver from the wall outlet before
cleaning. Use a damp cloth for cleaning.
l"Warning: r
Do not use liquid or aerosol cleaners to clean you
TV. Cleaners may permanently damage your screen.
6. Attachments
Do not use attachments not recommended by the TV
receiver manufacturer as they may cause hazards.
7. Water and Moisture
Do not use this TV receiver near water -- for ex-
ample, near a bath tub, wash bowl, kitchen sink, or
laundry tub, in a wet basement, or near a swimming
pool, and the like.
8. Accessories
Do not place this TV receiver on an unstable cart,
stand, tripod, bracket, or table. The TV receiver may
fall, causing serious injury to a child or adult, and
serious damage to the appliance. Use only with a
cart, stand, tripod, bracket, or table recommended by
the manufacturer, or sold with the TV receiver. Any
mounting of the appliance should follow the manu-
facturer's instructions, and should use a mounting
accessory recommended by the manufacturer.
9.
Slots and openings inthe cabinet are provided
for ventilation and to ensure reliable operation
of the TV receiver and to protect it from over-
heating, and these openings must no_: be
blocked or covered. The openings should never
be blocked by placing the TV receiver on a bed,
sofa, rug, or other similar surface. This TV
receiver should never be placed near or over a
radiator or heat regi ster. This TV receiver
should not be placed in a built-in insl:allation
such as a bookcase or rack unless proper
ventilation is provided or the manufacturer's
instructions have beer_ adhered to.
10. Power Sources
This TV receiver shou!:d be operated only from
the type of power source indicated on the
marking label. If you are not sure of the type of
power supplied to you_: home, consulL your
appliance dealer or local power company. For
TV receivers intended to operate from battery
power, or o_her sources, refer to the operating
instructions.
11. Grounding or Polarization
This TV receiver is equipped with a polarized
alternating-current line plug (a plug having one
blade wider than the other). This plug will fit
into the power outlet only one way. This is a
safety feature. If you are unable to insert the
plug fully into the outlet, try reversing the plug.
If the plug should still fail to fit, contact your
electrician to replace youc obsolete outlet. Do
not defeat the safety purpose of the polarized
plug.
12. Power-Cord Protection
Power-supply cords should be routed so that
they are not likely to be walked on or pinched
by items placed upon or against them, paying
particular attention to cords at plugs, conve-
nience receptacles, and the point where they
exit from the appliance.
An appliance and cart
combination should be
moved with care. Quick
stops, excessive force,
and uneven surfaces
may cause the appliance
and cart combination to
overturn.
13. Lightning
For added protection for this TV receiver during
a lightning storm, or when it is left unattended
and unused for long periods of time, unplug it
from the wall outle_ and disconnect l:he antenna
or cable sy:_tem. This will prevent damage to the
TV receiver due to ightning and power-line
surgc's.
3

14. Power Lines
An outside antenna system should not be located
in the vicinity of overhead power lines or other
electric light or power circuits, or where it can fall
into such power lines or circuits. When installing
an outside antenna system, extreme care should
be taken to keep from touching such power lines
or circuits as contact with them might be fatal.
15. Overloading
Do not overload wall outlets and extension cords
as this can result in a risk of fire or electric shock.
16. Object and Liquid Entry
Never push objects of any kind into this TV
receiver through openings as they may touch
dangerous voltage points or short-out parts that
could result in a fire or electric shock. Never spill
liquid of any kind on the TV receiver.
17. Outdoor Antenna Grounding
If an outside antenna or cable system is connected
to the TV receiver, be sure the antenna or cable
system is grounded so as to provide some protec-
tion against voltage surges and built-up static
charges.
Section 810 of the National Electrical Code, ANSI/
NFPA No.70, provides information with regard to
proper grounding of the mast and supporting
structure, grounding of the lead-in wire to an
antenna discharge unit, size of grounding conduc-
tors, location of antenna discharge unit, connec-
tion to grounding electrodes, and requirements for
the grounding electrode.
EXAMPLE OF ANTENNA GROUNDING
18. Servicing
Do not attempt to service this TV receiver
yourself as opening or removing covers may
expose you to dangerous voltage or other
hazards. Refer all servicing to qualified service
personnel.
19. Damage Requiring Service
Unplug this TV receiver from the wall outlet
and refer servicing to qualified service person-
nel under the fol:Lowing conditions:
(a) When the power-supply cord or plug is
damaged.
(b) If).iquid has been spilled, or objects have
fallen into the TV receiver.
(c) If the TV receiw_r has been exposed to rain
or water.
(d) If the TV receiw_r does not operate normally
by following the operating instructions.
Adjust only those controls that are covered
by the operating instructions as an improper
adjustment of other controls may result in
damage and will often require extensive
work by a qualified technician 1:orestore the
TV receiver to its normal operation.
(e) If the TV receiver has been dropped or the
cabinet has been damaged.
(f) When the TV receiver exhibits a distinct
change in perfo]:'mance -- this indicates a
need for service.
20.
Replacement Pa.rts
When replacement parts are required, be sure
the service technician has used replacement
parts specified by the manufacturer or have the
same, characteristics as the or:iginal part.
Unauthorized s_bstitutions may result in fire,
electric shock or other hazards.
_ANTENNA
--__kI LEAD IN WIRE
_1 _ _ANTENNA
/ ]-'_ y DISCHARGE UNIT
I /FI (NEC SECTION 810-20)
I EQUIPMENT-.-..I-- / /_ J GROUNDING
"_--__'_ CONDUCTORS
"_ POWER SERVICE GROUNDING
ELECTRODE SYSTEM
NEC -- NATIONAL ELECTRICAL CODE (NEC ART 250, PART H)
21.
Safety Check
Upon completion of any service or repairs to this
TV receiver, ask the service technician to
perform safety checks to determine that the TV
receiver is in safe operating condition.
l, Warning:
Do not leave stationary images, such as stock
market reports or video games, on-screen for
more than 10 minutes. Still patterns such as
these can scar the TV, causing permanent
damage to the picture tube.

A PREFACE
Welcome to Mitsubishi
Congratulations on your purchase of this Mitsubishi TV. Your TV
is designed for superb viewing pleasure as well as continuLed
reliability.
To familiarize you with your TV and owner's guide, we suggest that
you read through the preface, which provide,_ the following impor-
tant information:
0 Summary of Special Features
0 Unpacking Your TV
What's in Each Chapter
0 Some Conventions Used in this Guide
Mitsubishi has strived to create your TV so that it will bring you
years of viewing enjoyment. Similarly, your owner's guide is
designed with a "user friendly" philosophy that will help/you take
advantage of all of your equipment's features.
Once again, thank you for selecting our product and welcome to
Mitsubishi!
:i
!:!
Summary of Special Features
Your top rated Mitsubishi _i'v"delivers:
• 181-Channel Capacity --- programs up to 181 channels,
ensuring your continued viewing pleasure as cable services
continue to expand.
• Two-Speaker Sound System --- a :special speaker system that
produces clear stereo sound.
• Expanded Sound Capability --- allows you to connect the TV
to an external audio system for enhanced listening pleasure.
In addition to the standard features found on most advanced TVs,
Mitsubishi is proud to offer the following distinctive features:
Remote Control with TV/VCRICABLE Function .... uses a
single remote control transmitter for the television, certain
Mitsubishi VCRs, and also some VCRs and cable boxes from
other manufacturers.
• On-Screen Displays --- appear whenever you adjust your TV,
showing you the status of your TV's various functions.
• On-Screen Menu --- simplifies the r,elevision's features with
easy to follow instructions.
• Closed Caption Decoder --- decodes hidden text information
included with TV shows and displays the text on-screen.
Extended Data Services --- (also known as '_[DS,") allows
broadcasters to supply you with channel information, program
information, and the time of day. You (:an display this informa-
tion on-screen.
• Picture-in-Picture Mode .... allows you to view two different
sources at the same time. (CS-31305, CS-31309, and CK-31304
only.)
Each of these features will be explained in more detail in
Chapter 3, "Operating Your TV," and Chapter 4, "Using the Special
Features."
6 Preface: Welcome to Mitsubishi

€ Unoacking Your TV
What you will find
As you unpack your new TV, please check to be sure that along
with the TV, the following ite.ms are included:
• an owner's guide containing a warranty,
• a registration card,
• a remote control transmitter, and
• a set of two AA size batteries for the remote control.
A few suggestions
Before you hook up your new TV, please take a few minutes to:
O
Complete the registration card. The registration card asks for
the TV's serial number, which you'll find on the back of the
unit.
O
Keep the box and packing materials for future use.
O
File your sales receipt.
0
Place the TV on a stable surface with sufficient lighting to do
the hook-up.
Unpacking Your TV 7

What's in Each Chapter
Here's what you will find in this owner','; guide:
Chapter 1, "Getting to Know Your TV.," introduces you to the
location and functions of the buttons and controls of your TV.
Chapter 2, "Connecting Your TV," explains how to connect a
VCR, antenna, decoder box and other equipment to your TV.
Chapter 3, "Operating Your TV," provides the step-by-step
instructions you need in order to use your TV.
Chapter 4, "Using the Special Features," explains how to use
some of the special features of the TV.
Chapter 5, "Troubleshooting," summarizes the problems you
may have along with suggestions for remedying these problems.
The appendix explains a procedure that allows you to bypass the
parental lock.
You'll also find a detailed index at the back of the book.
8 Preface: Welcome to Mitsubishi
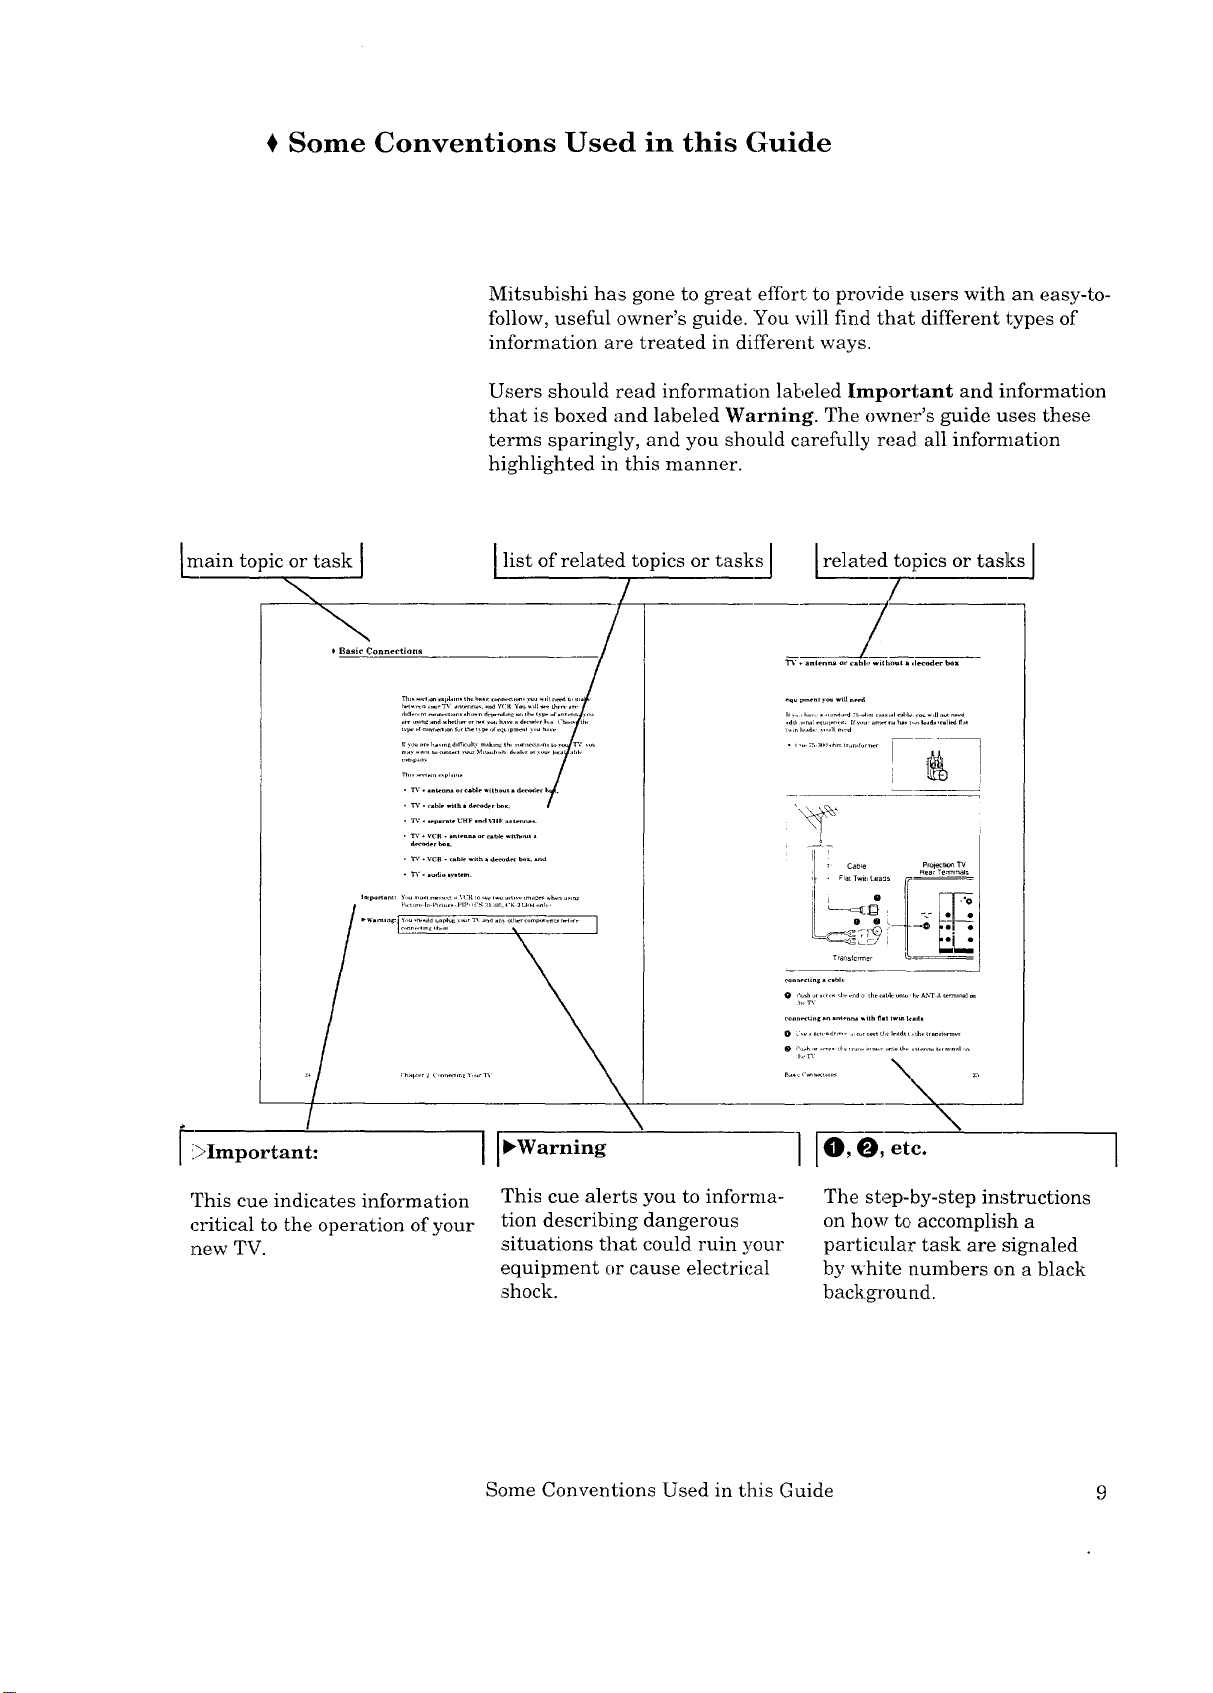
Some Conventions Used in this Guide
Mitsubishi has gone to great effort to provide users with an easy-to-
follow, useful owner's guide. You will find that different types of
information are treated in different ways.
Users should read information labeled Important and information
that is boxed and labeled Warning• The owner's guide uses these
terms sparingly, and you should carefully read all information
highlighted in this manner•
[main topic or task I
* Basic Connections
I list of related topics or tasks J related topics or tasks ]
7 7
l
! i •
0 ,'u_hor,,,_ ,l_,.ndo _he_abN_u, he_NWA_m_l_
_1,Tt
h. la
IJ
This cue indicates information
critical to the operation of your
new TV.
Ile,O,eto.
This cue alerts you to informa-
tion describing dangerous
situations that could ruin your
equipment or cause electrical
shock.
Some Conventions Used in this Guide 9
The step-by-step instructions
on how tc_accomplish a
particular task are signaled
by white numbers on a black
background.
1

_lL CHAPTER ONE
Getting to Know Your TV
Now that you've unpacked your TV, read through the safel_y infor-
mation, and glanced at the overview explaining how this owner's
guide is organized, it's time to become familiar with the buttons
and controls you'll be using when you operate the TV. This chapter
will introduce the range of options available when using the but-
tons on the remote control or on the control panel of the TV. It also
offers some general guidelines for using the remote control.
Most functions can be controlled by using either the control panel
or the remote control, but certain specialized functions require the
use of one or the other. This chapter, which will familiarize you
with the full range of button functions, contai ns the following
sections:
Overview of the Control Panel[
0 Overview of the Remote Control
11
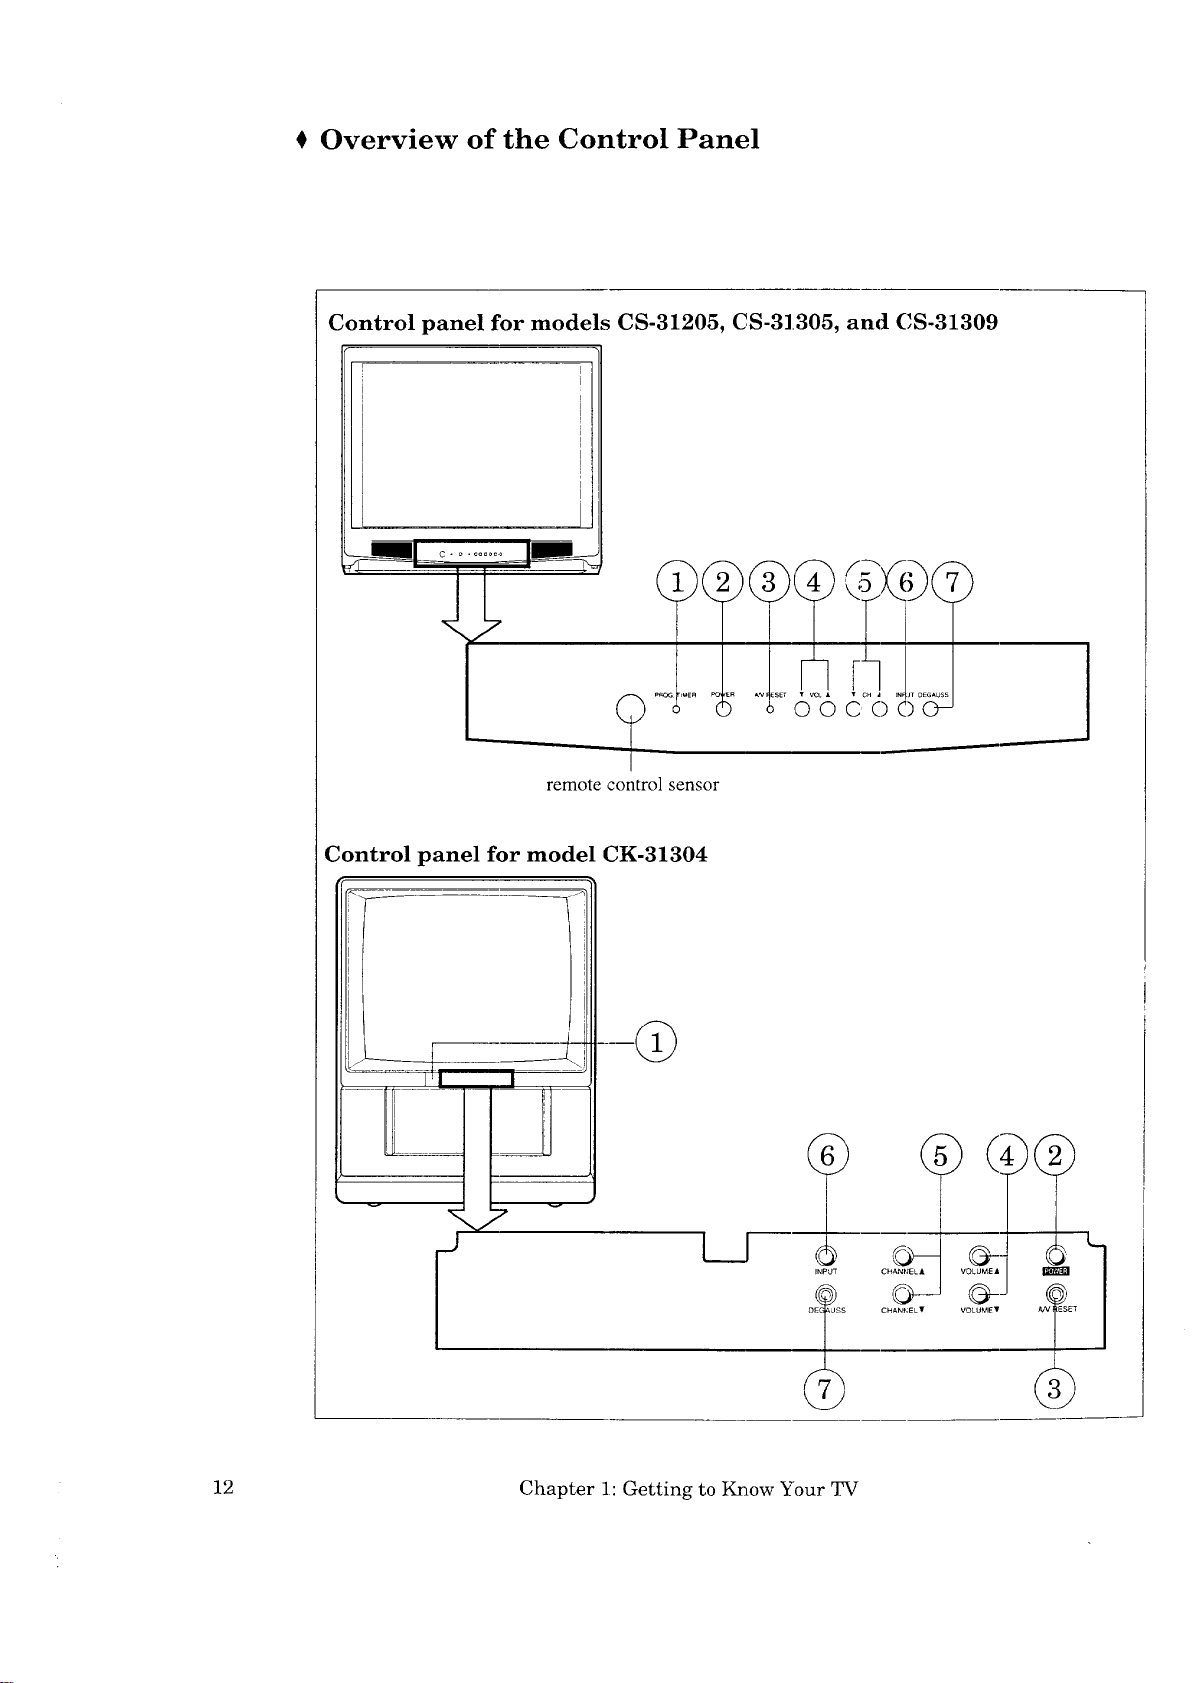
* Overview of the Control Panel
Control panel for models CS-31205, CS-31305, and CS-31309
1
o
remote control sensor
Control panel for model CK-31304
,t,
J
I
_U
v
I I
INPUT
12 Chapter 1: Getting to Know Your TV

power / program timer indicator
This indicator lights up in green when you turn the TV on; it
lights up in red when the timer is set and the TV's power is off;
it lights in orange if the timer is set and the TV's power is on.
®
power button (POWER)
Use this button to turn the TV on or off. When you turn the TV
on, the power indicator will light in green.
A/V reset button (A/V RESET)
Press this button to reset all audio and video functions to their
normal level or setting, except: volume, reception mode,
speaker, and closed captioning.
volume controls (VOL)
Press the • button to turn up the volume and the 'V button to
turn down the volume.
®
channel controls (CH)
Use the • button to switch to a channel 'with a higher number
and the V button to switch to a channel with a lower number.
®
input button (INPUT)
Use this button to select the input so_rce you want to view:
• TV, or
• Input.
(3
degauss button (DEGAUSS)
If there is color impurity in .your T¥'s pic.ture, press this button.
Overview of the Control Panel 13
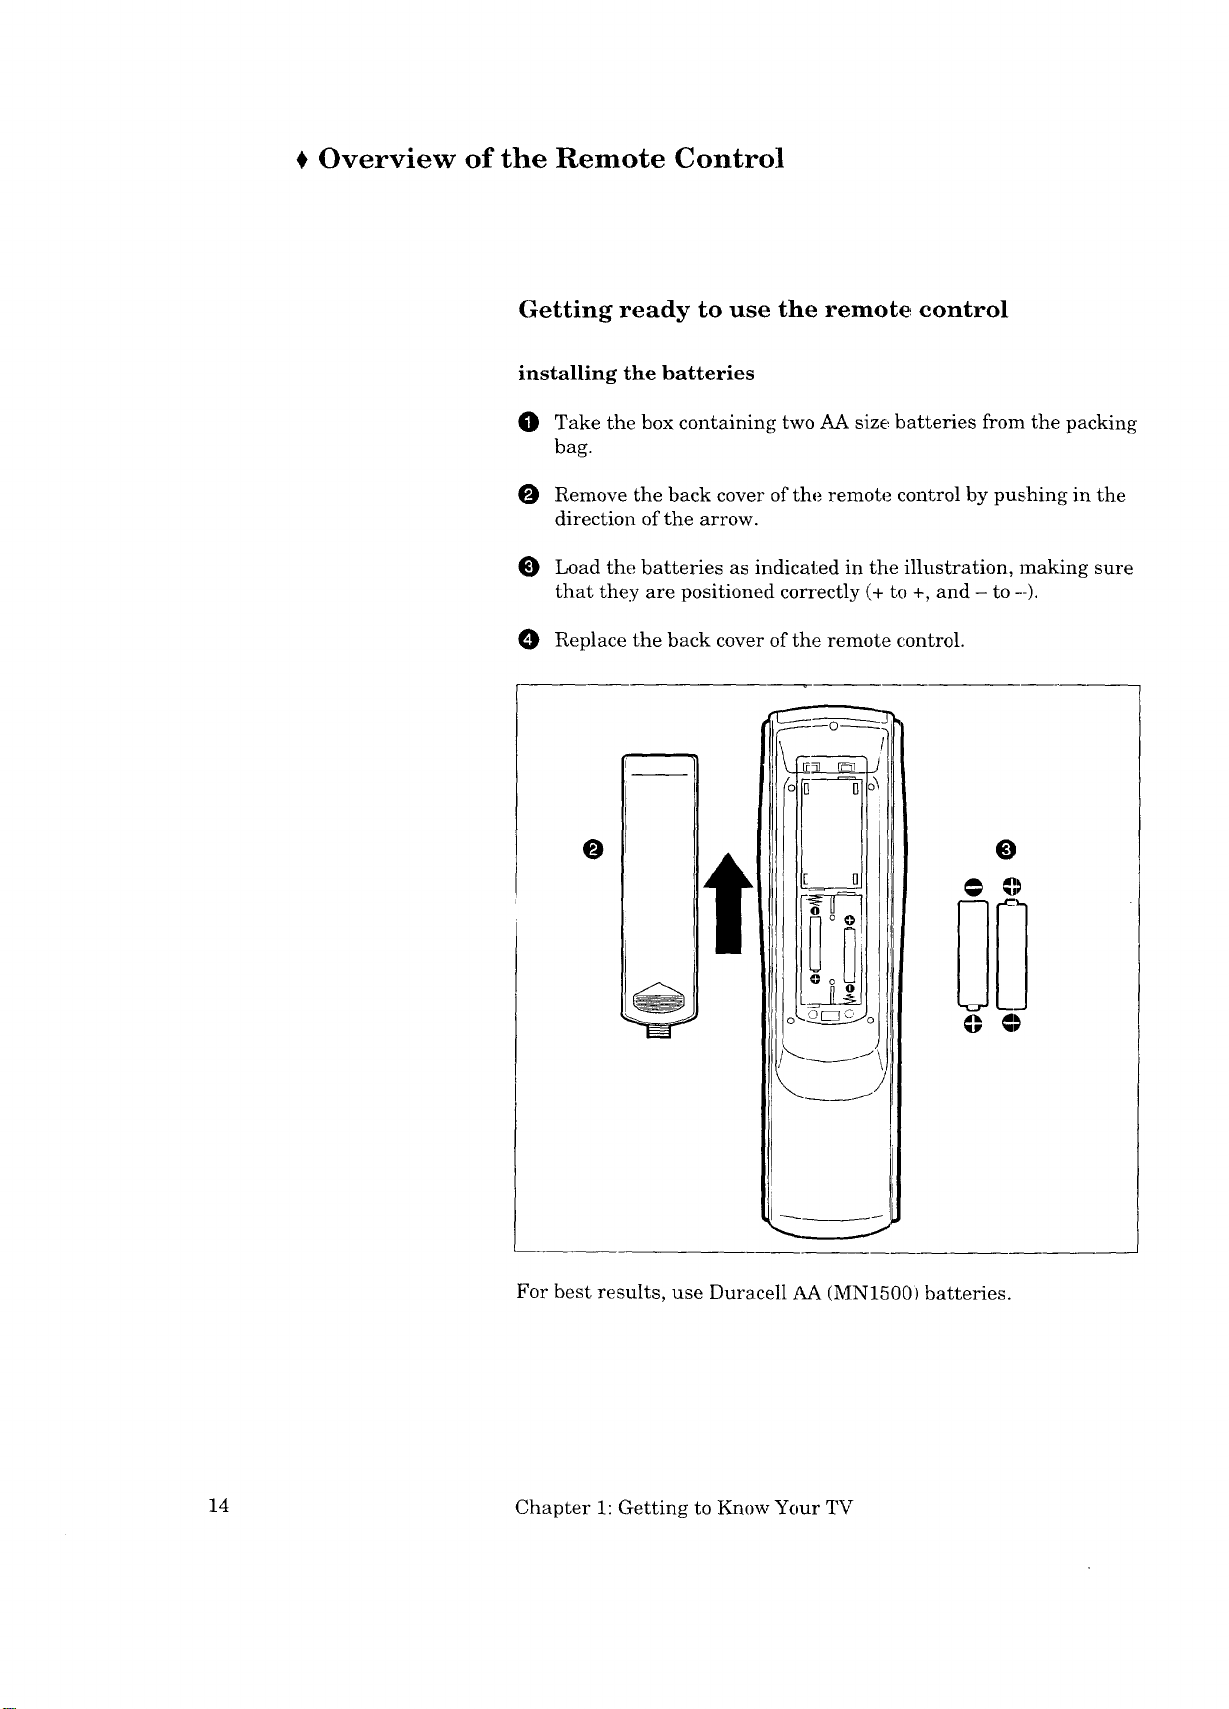
Overview of the Remote Control
Getting ready to use the remote, control
installing the batteries
O Take the box containing two AA size batteries from the packing
bag.
Remove the back cover of the remote control by pushing in the
direction of the arrow.
Load the batteries as indicated in the illustration, making sure
that they are positioned correctly (+ to +, and - to --).
0 Replace the back cover of the remote control.
0 0
For best results, use Duracell AA (MN15001 batteries.
14 Chapter 1: Getting to Know Your TV

some do's and don'ts
To ensure that your remote control will continue working properly,
follow these g_aidelines:
• Don't press two or more butto:ns at the same time, unless
specifically instructed to do so in this owner's guide.
• Don't allow the remote control to get wet or become heated.
• Avoid dropping the remote control on a hard surface.
• When cleaning the remote control, don't use any harsh chemi-
cals. Use only a soft, slightly moistened cloth.
general instructions
When using the remote control to operate the TV, VCR, or cable
box, follow these procedures:
O Be within 20 feet of the desired equipment.
O Point the top of the remote control toward the equipment.
Press the appropriate button or sequence of buttons.
guidelines for using batteries
• Don't use a new battery with an old one.
• Don't heat, take apart, or throw batteries into a fire.
The following section explains more about the range of options
available when using the remote control.
Overview of the Remote Control 15
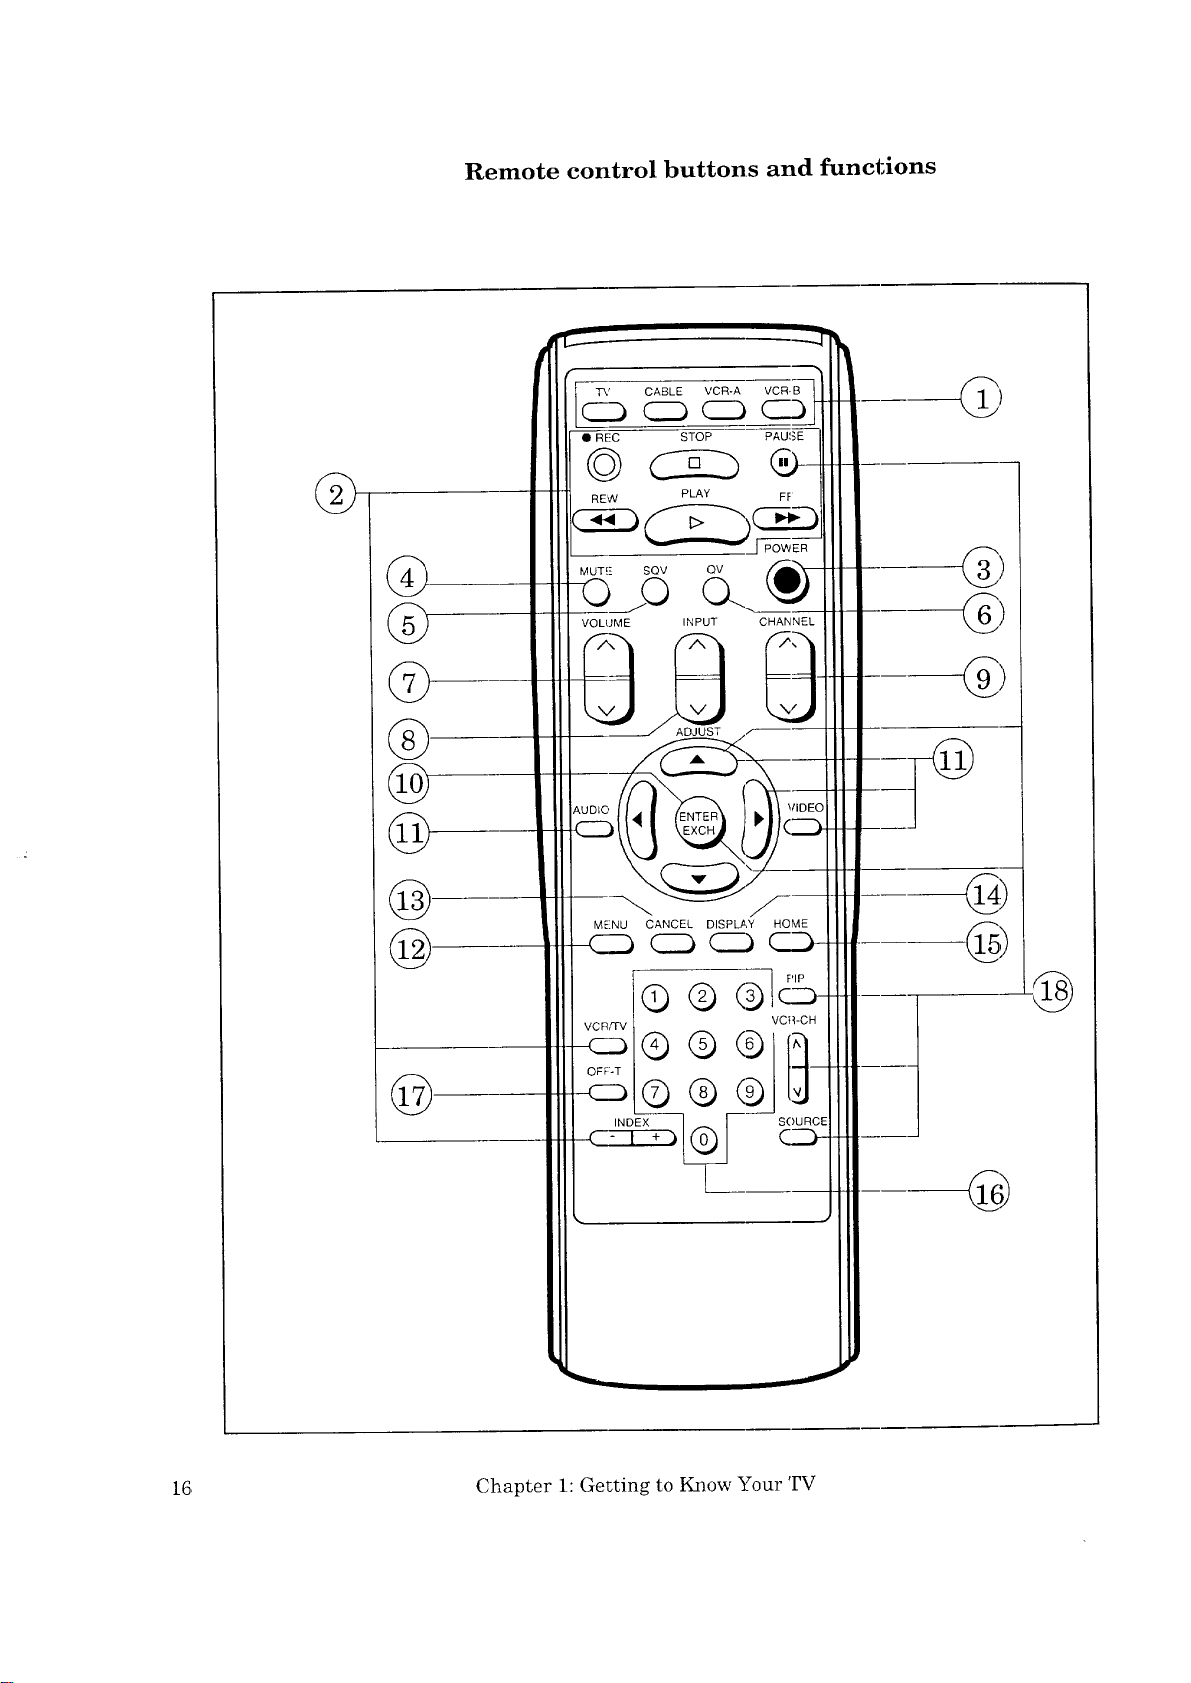
Remote control buttons and functions
"B-
TV CABLE VCR-A VCR. B
(C;5 CiC) (::Z:) (__..5
• REC STOP PAUSE
@
@
©
®
®
®
@
@
REW PLAY FF
MUTE-: SOV OV ,_b,"X,
OjO 0..
VOLUME INPUT CHANNEL
8 O"
MENU CANCEL DISPLAY HOME
CC) CZ) _ C._..-_
VCR/TV
_Q
OFF-T
@
INDEX
16 Chapter 1: Getting to Know Your 'PV
@

select buttons
Use these buttons to select the component you wish to operate:
the TV, a cable decoder box, or a VCR. These buttons are also
used to set up your remote control for your particular brand of
cable box or VCR.
VCR buttons
®
These buttons can be used to control VCRs. The remote control
is pre-set to operate Mitsubishi VCRs, and it can be pro-
grammed to operate VCRs from other manufacturers. (The CS-
31205 remote control does not have index buttons.)
®
power button (POWER)
Use this button to turn the TV on or off. When you turn the TV
on, the power indicator lights in green
mute control (MUTE)
Use this button to turn the sound off completely or to restore it
to its original volume.
®
super quick view button (SQV)
Press this button to view the channels that you have pro-
grammed into super quick view memory. (See page 45.)
®
quick view button (QV)
Press this button to instantly switch to the channel that you
memorized as the quick view channel. (See page 45.)
Q
volume control (VOLUME)
Press the top part of the button to turn up the volume; press
the bottom part of the button to turn down the volume.
®
input button (INPUT)
Use this button to select the input source you wish to view:
• TV, or
• Input.
(9
channel control (CHANNEL)
Press the top part of this button to change to a channel with a
higher number; press the bottom part to change to a channel
with a lower number.
enter and exchange button (ENTERiEXCH)
Use this button after selecting a chanael number or after
selecting an item from the on-screen menu system. You will
also use this button with the PIP modes (CS-31305, CS-31309,
and CK-31304 only).
Overview of the Remote Control 17

Remote control buttons and functions (cont.)
audio and video controls
These buttons are used together to adjust audio and video
functions (other than wvlume) with a two-step process: you use
the audio or video button to select a function, then you use the
adjust up/down button_,; or right!left buttons to adjust it.
audio function button (AUDIO) --- Use this button to
select one of the following audio fu:nctions:
- stereo/SAP/mono,
- bass,
- treble,
- balance,
- surround off/simulate/hall, or
- speaker on/off.
video function button (VIDEO) --- Use this button to
select one of the following video functions:
- tint,
- color,
- contrast,
- brightness,
- sharpness,
- color temperature higtVmiddle/low, or
- closed captioning.
adjust buttons (ADJUST • •), right/left buttons (_>')
After selecting the audio or video function, use the ADJUST
buttons (• • ) or right/left button,; (41") to adjust the
function you've selected. These buttons can be used to:
- turn the function on or off (e.g.: speaker),
- increase or decrease the function (e.g., color),
- shift from one end of a scale to the other (e.g., balance), or
- select a position (e.g., stereo).
You will also use the adjust buttons with the Picture-in-Picture
features (CS-31305, CS-31309, and CK-31304 only) and to
select items on the on-,_creen menus. (The CS-31205 remote
control does not have right/left buttor_s.)
@
menu button (MENU)
Use this button to display the on-screen menu system, which
gives you access to your TV's features.
cancel button (CANCEL)
@
This button is used to cancel a channel number, to clear a
channel from super quick view memory, and to clear the
settings of on-screen menus.
18 Chapter 1: Getting to Know Your TV

@
display button (DISPLAY)
Use this button to view an on-screen summary of the current
TV settings and the displays :related to Extended Data Services
(XDS).
home button (HOME)
®
Press this button to return to regular TV viewing from the on-
screen displays and menus. This button can also be used to
turn off captions.
number buttons (0-9)
®
Use these buttons to select a channel number and to enter the
parental lock code.
off-timer button (OFF-T)
©
Use this button to program the TV to turn off automatically at
a later time.
picture-in-picture controls (CS-31305, CS-31309, and
®
CK-31304 only)
Use these buttons to control the spec.ial picture-in-picture (PIP)
modes. (For more information, see pages 72-78.)
• PIP button (PIP) .... Press this button to begin displaying
the PIP image, to change the image's size, or to cancel it.
• VCR channel button (VCR-CH) .... If you use a VCR as
the source for the PIP image, use this button to change the
channel of the PIP irnage.
• source button (SOURCE) --- Press this button to switch
the source of the PIP image between tlhe TV and the exter-
nal input.
• pause button (PAUSE) --- Press this button to freeze the
PIP image or to return the image to a "live" picture. You can
also use this button with the Snap-shot and Replay features.
• enter and exchange button (ENTERJEXCH) .... Press
this button to exchange the contents of the PIP image and
the main image.
• adjust (up/down) buttons, right/left buttons --- Press
these buttons to move the PIP image on the screen.
Overview of the Remote Control 19

A CHAPTER. TWO
Connecting Your TV
This chapter offers step-by--step instructions for completing the
most common hook-ups. It contains the following sections:
€ Overview of the Back Panel.
Basic Connections
21
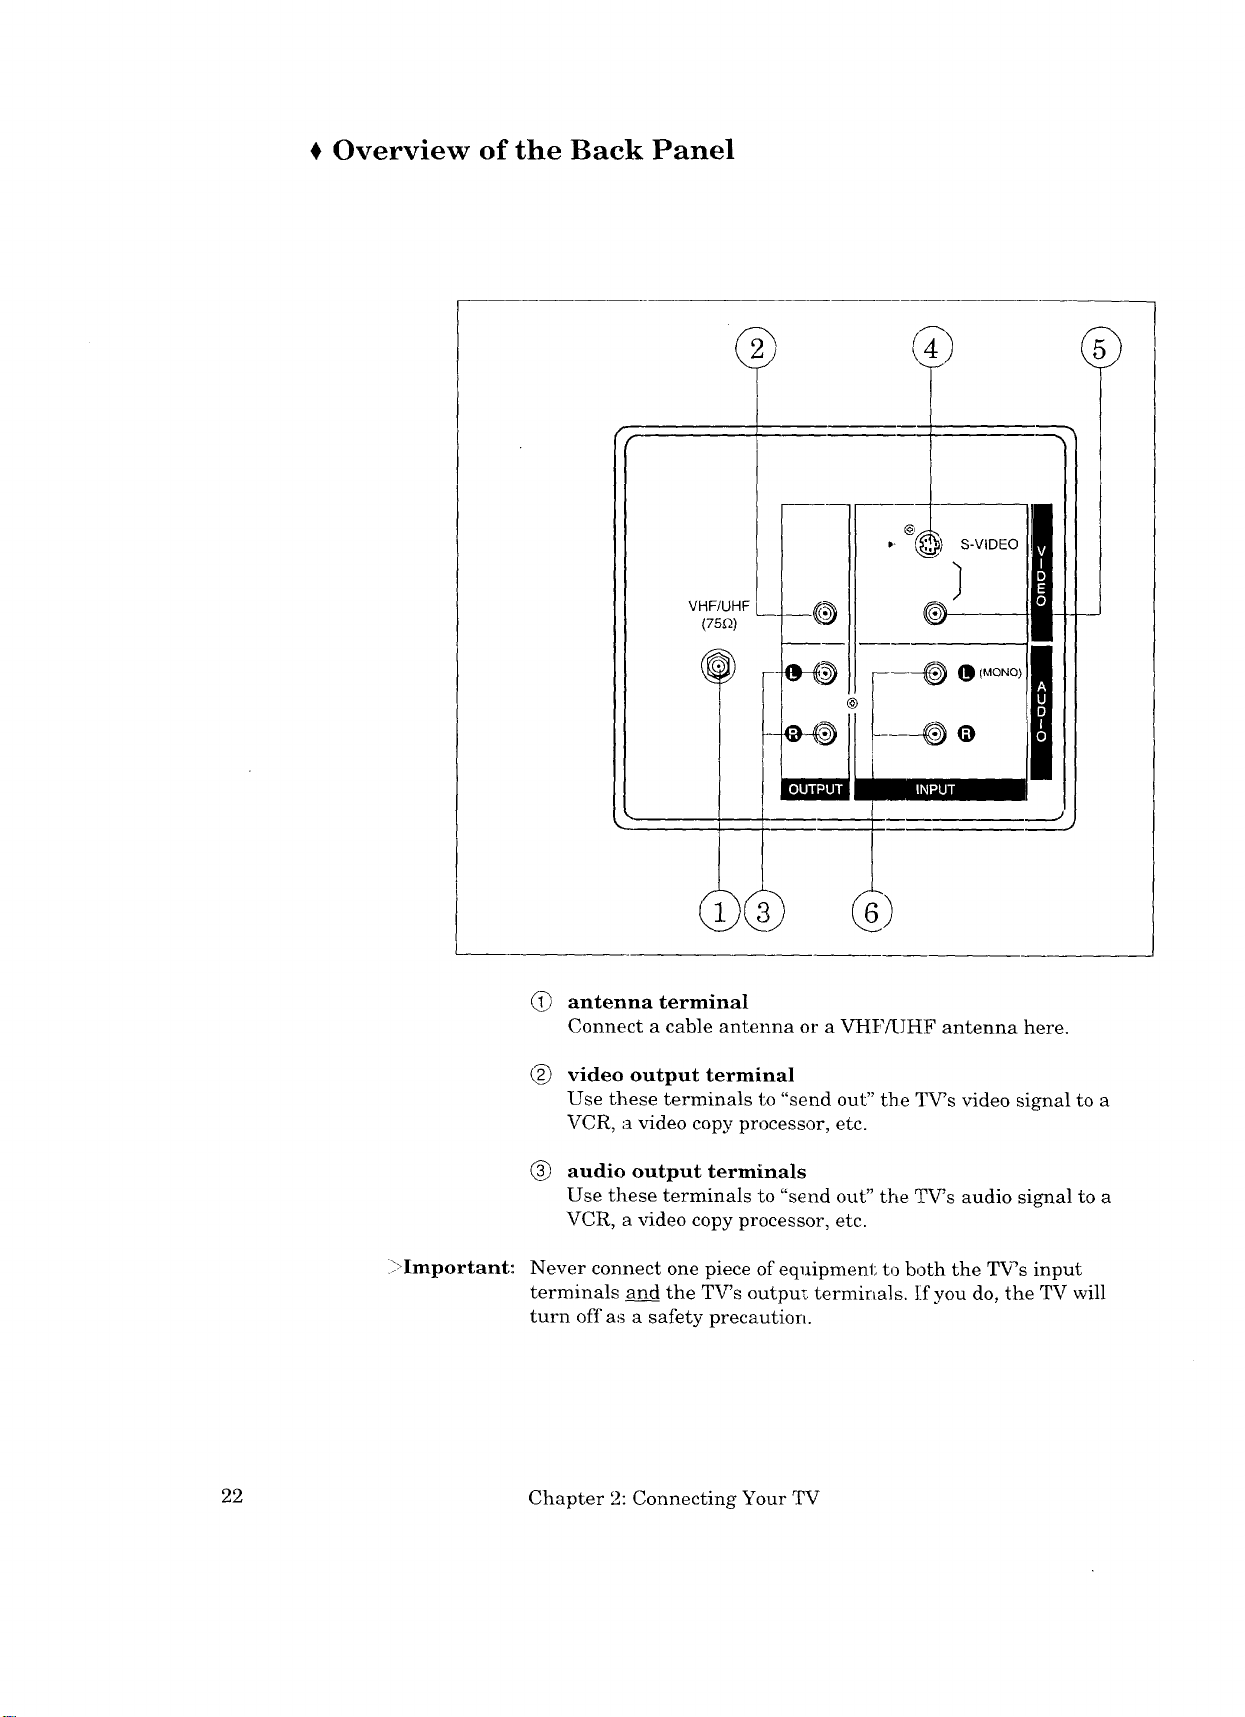
Overview of the Back Panel
VHF/UHF
(75_)
(_ antenna terminal
Connect a cable antenna or a VHF/UHF antenna here.
video output terminal
Use these terminals to "send out" the TV_s video signal to a
VCR, a video cop), processor, etc.
(_) audio output terminals
Use these terminals to "send out" the TV's audio signal to a
VCR, a video copy processor, etc.
i_>Important:
Never connect one piece of equipment to both the T¥'s input
terminals and the TV's output terminals. If you do, the TV will
turn off as a safety precaution.
22 Chapter 2: Connecting Your TV
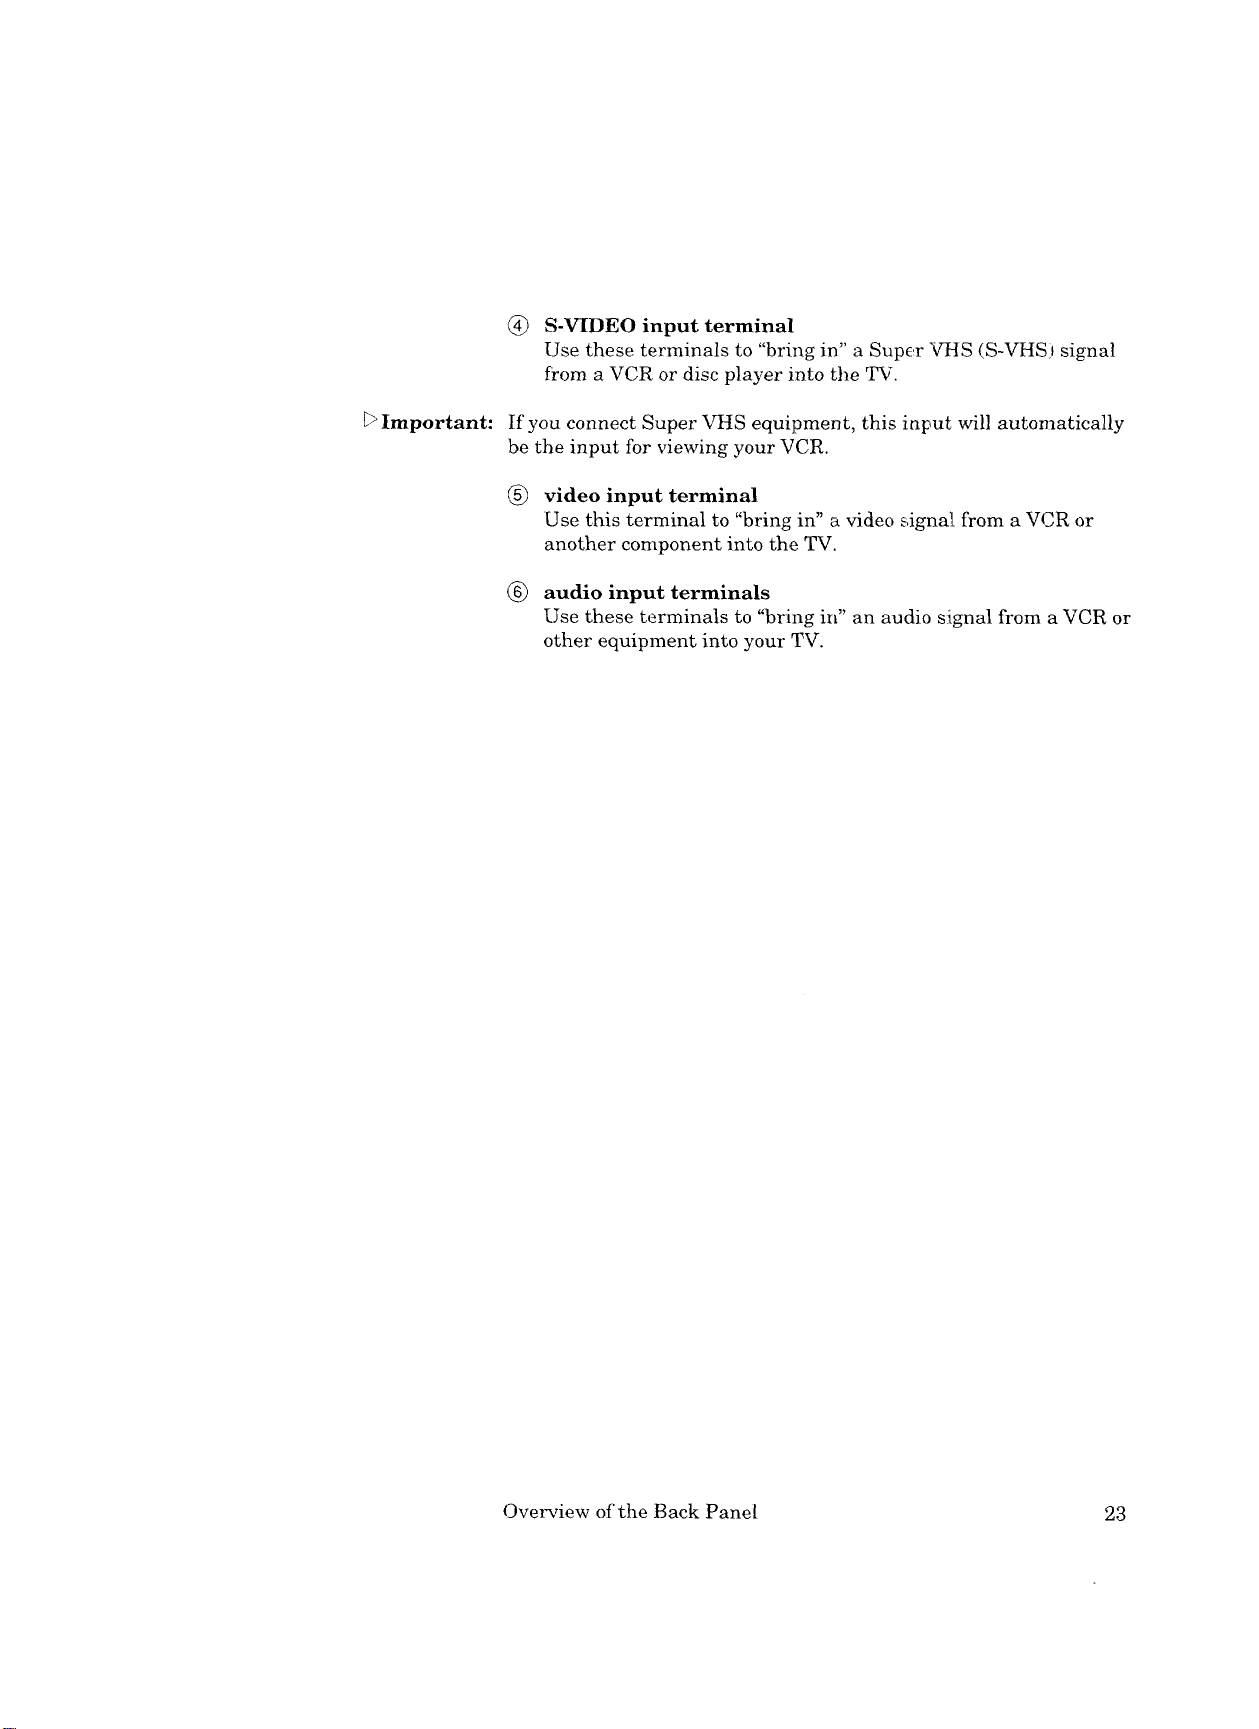
(_) S-VIDEO input terminal
Use these terminals to "bring in" a Supc_r VHS (S-VHS _signal
from a VCR or disc player into the TV.
Important:
If you connect Super VHS equipment, this ia_ut will automatically
be the input for viewing your VCR.
video input terminal
Use this terminal to "bring in" a video _igna[ from a VCR or
another component into the TV.
(_) audio input terminals
Use these terminals to "bring in" an audio signal from a VCR or
other equipment into your TV.
Overview of the Back Panel 23

Basic Connections
This section explains the basic connection_ you will need to make
between your TV, antennas, and VCR. You will see there are
different connections shown depending on the type of alatenna you
are using and whether or not you have a decoder box. Choose the
type of connection for the type of equipment you have.
If you are having difficulty making the cormections to your TV, you
may want to contact your Mitsubishi dealer or your local cable
company.
This section explains:
• TV + antenna or cable without a decoder box,
• TV + cable with a decoder box,
• TV + separate UHF and VHF antennas,
Important:
Warning:
• TV + VCR + antenna or cable without a
decoder box,
• TV + VCR + cable with a decoder box, and
• TV + audio system.
You must connect a VCR to see two active images when using
Picture-In-Picture (PIP) (CS-31305, CS-31309, and CK-31304 only).
You should unplug your TV and any other components before
connecting them.
24 Chapter 2: Connecting Your TV
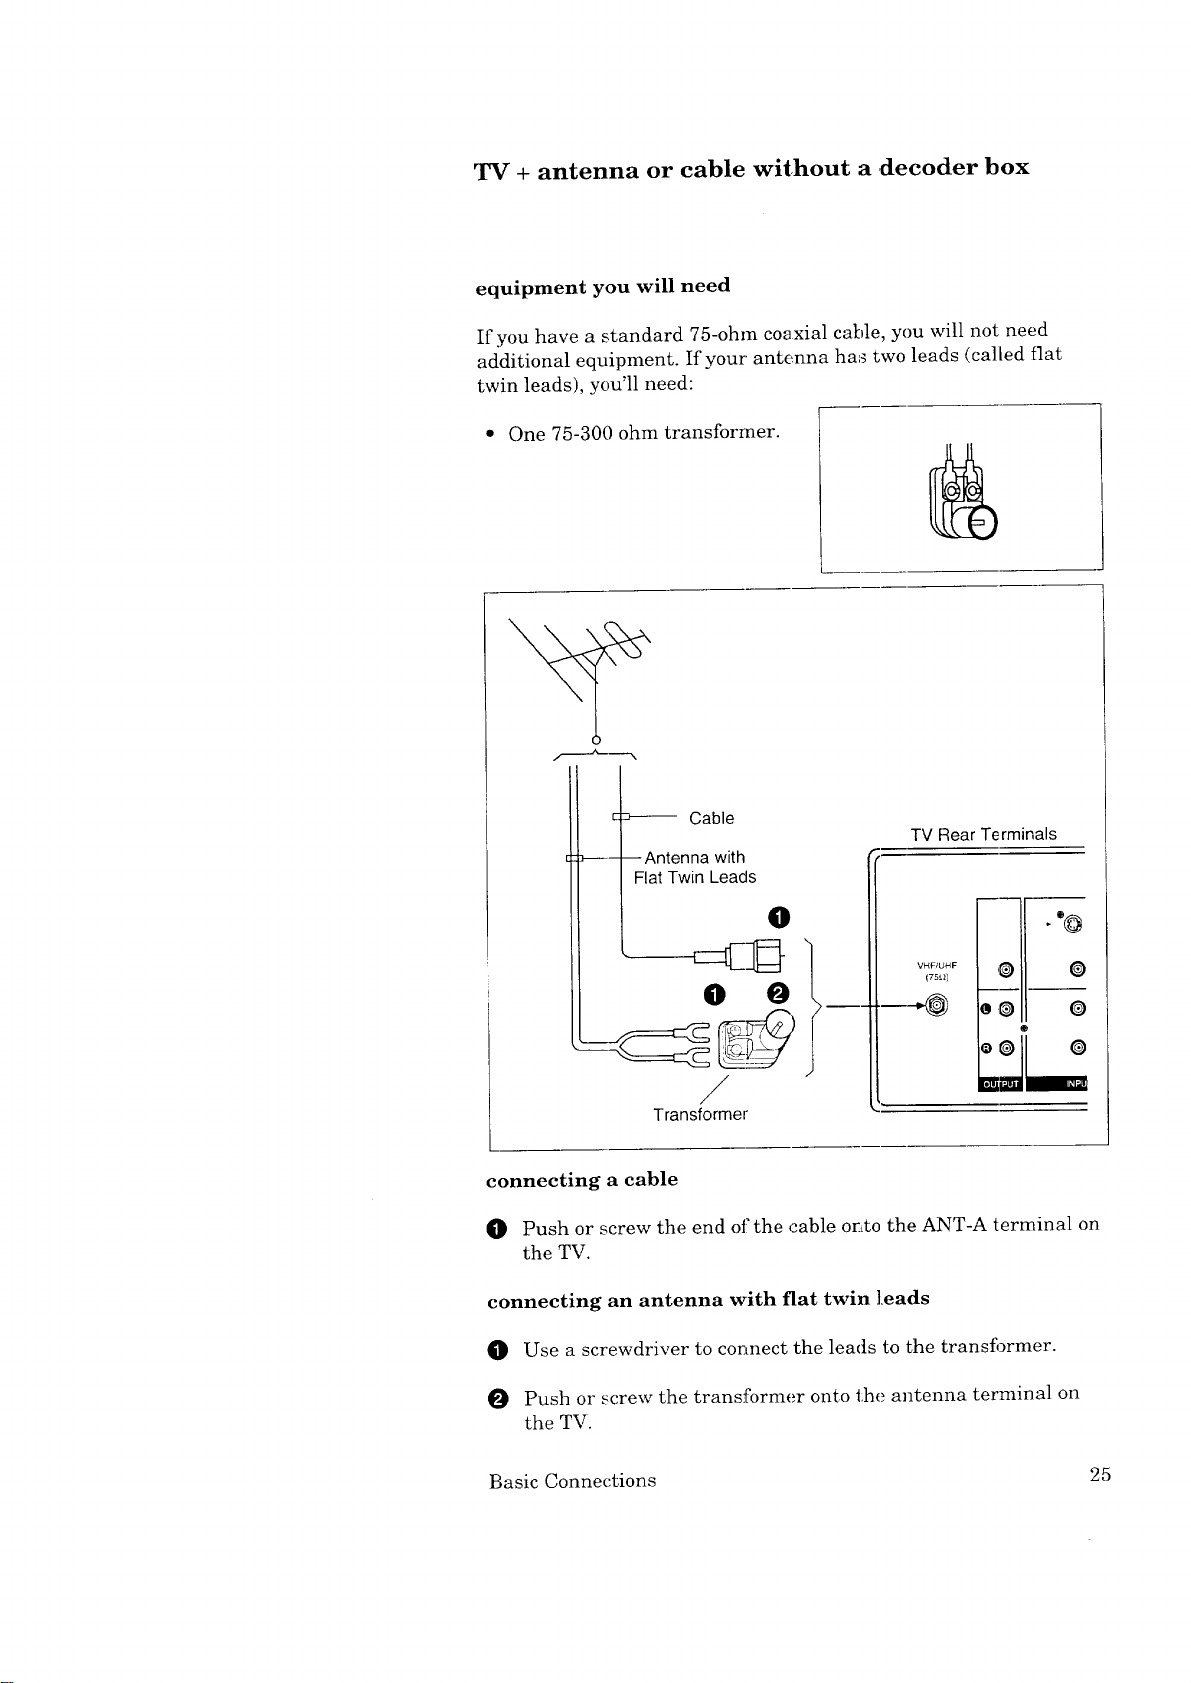
TV + antenna or cable without a ,decoder box
equipment you will need
If you have a standard 75-ohm coaxial cable, you will not need
additional equipment. If your' antenna has two leads (called fiat
twin leads), you'll need:
One 75-300 ohm transformer.
Cable
TV Rear Terminals
}---- --Antenna with
Flat Twin Leads
O
VHF/UHF
(75_2)
O O
oO 0
/
Transformer
connecting a cable
O Push or screw the end of the cable onto the ANT-A terminal on
the TV.
connecting an antenna with flat twin leads
O Use a screwdriver to connect the leads to the transformer.
O Push or screw the transformer onto the antenna terminal on
the TV.
mW
. o@
0 0
o
o
Basic Connections 25

TV + cable with a decoder box
equipment you will need
Use this hook-up if you need a decoder box to descramble cable
channels. When you complete this hook-up, you should set up your
remote control to operate your cable box (see page 37).
To complete the hook-up, you'll need:
• One length of 75 ohm coaxial
cable.
procedure
O Connect the incoming cable to
the IN terminal on the decoder
box.
O Connect the coaxial cable to the OUT terminal on the back of
the decoder box; connect the other end of this cable to the
antenna terminal on the back of the TV.
Incoming Cable
I
Rear Terminals
O Cable Decoder Box
<)
-[-V Rear Terminals
0
VHFfJH_
(75_)
----. @)
26 Chapter 2: Connecting Your TV

TV + separate UHF and VHF antennas
equipment you will need
If UHF and VItF signals are brought into your home with two
separate antennas, you'll need to combine the antennas in order to
connect them to the TV. To do this you wi]l need a UHF/VHF
combiner. (There are different combiners tbr different kinds of
leads. Check with your local electronics store for the kind of com-
biner you need.)
Pictured to the right is a
standard combiner.
To connect separate UHF and VHF antennas to your TV:
O Connect the UHF and VHF antenna leads to the appropriate
terminals on the UHF/VHF combiner.
Press the combiner onto the antenna terminal on the rear of
the TV.
VHF Antenna UHF Antenna
(Channels 2-13) (Channels 14-69)
\\ \\_
nil/ ....
\\ \\\l
y//
i
--1--- Flat Twin Lead
External
Antenna
or Cable
Flat Twin Lead--
]V Rear Terminals
300 Ohm to
75 Ohm
_) Combiner
Back Side
Basic Connections 27
 Loading...