

Page 1

HALOGEN RECESSED SPOTLIGHTS
HALOGEN RECESSED SPOTLIGHTS
Operation and Safety Notes
HALOGEN-EINBAULEUCHTEN-SET
Bedienungs- und Sicherheitshinweise
IAN 91133
HALOGENOVÁ SADA SVÍTIDEL
Pokyny pro obsluhu a bezpečnostní pokyny
Page 2

GB Operation and Safety Notes Page 4
CZ Pokyny pro obsluhu a bezpečnostní pokyny Strana 8
DE / AT / CH Bedienungs- und Sicherheitshinweise Seite 12
Page 3
A
1 2 3 4
B
1
C
E
G
41
2 4
4
D
5
6
9
10
7
F
9
8
4
4
H
4 4
approx.
10 cm
approx.
approx.
10 cm
10 cm
3
Page 4
Halogen recessed spotlights
General safety
instructions
Intended use
This light set is only suitable for indoor use, in dry
and enclosed rooms. This product is intended
for private household use only.
Parts description
1
Lamp housing
2
Bulb
3
Spring ring
4
Retaining spring
5
Cover
6
Cable holder
7
Terminal block
8
Fitting (socket)
9
Mains socket
10
Tube
Technical Data
Operating voltage: 230V∼, 50 Hz
Bulb: 230 V, GU10, 40 W
Power consumption: 1 x 40 W
Dimensions of each light: ø 85 mm
Installation opening: ø 68 mm
Protection category:
Model-No.: Z31669A (shiny),
Z31669B (matt)
Scope of delivery
6 Recessed spot lights with pre-installed bulbs
6 Mains connectors
12 Retaining springs
12 Tubes
1 Operating instructions
PLEASE READ THE INSTRUCTIONS FOR USE PRIOR TO USE!
PLEASE KEEP THE INSTRUCTIONS FOR USE IN A SAFE
PLACE!
Check the product for damage
before use. Never use a damaged
product.
DANGER TO LIFE
AND RISK OF ACCIDENTS
FOR INFANTS AND CHILDREN! This appliance can be
used by children aged from
8 years and above and persons with reduced physical,
sensory or mental capabilities
or lack of experience and
knowledge if they have been
given supervision or instruction
concerning use of the appliance in a safe way and understand the hazards involved.
Children shall not play with
the appliance. Cleaning and
user maintenance shall not be
made by children without
supervision.
4 GB
Page 5
Avoid the danger of
death from electric
shock!
Ensure that a qualified electrician,
or a person trained to carry
out
electrical installations, performs
the electrical installation.
Always check the light, power
supply, and mains cable for
damage before plugging it in.
Never use the light if it shows
any signs of damage.
Prior to installation, remove the
fuse or switch off the circuit
breaker (0 setting) in the fuse
box.
Before assembly, ensure that
the available mains voltage
corresponds to the operating
voltage necessary for the light
(230V ∼).
Ensure that the light does not
come into contact with water
or other liquids under any
circumstances.
Do not install the light on damp
or conductive surfaces.
Prevent fire and
injury hazards
damage immediately after unpacking. Do not fit the light if
the bulbs and / or lampshades
are faulty.
RISK OF BURNS! Ensure
that the light has been switched
off and has cooled before
touching it, to avoid burn injuries. Lamps develop a lot of
heat in the area of the lamp
head.
FIRE HAZARD! Fit
0.5 m
the light so that it is at
least 0.5 m away from the
material to be illuminated.
CAUTION! RISK
OF FIRE! Under no
circumstances should you cover
the halogen recessed lights
with heat insulating material
or similar.
Make sure you have adequate
ventilation. The maximum temperature of 90 °C in the area
of fitting may not be exceeded.
Only use the recessed light set
with the accessories that were
delivered with it! Do not connect recessed light sets in a row!
Do not use bulbs with
cool beam reflectors.
RISK OF INJURY! Check
each bulb and lamp glass for
5 GB
Page 6
Proper procedure
and handling!
Install the light so that it is pro-
tected from moisture, dirt and
excessive heating. Avoid fitting
the lights in bathrooms or similar rooms.
Use only 230 V ∼ bulbs with a
GU10 socket and a maximum
power of 40 watt.
The distance between two
recessed light spots must be at
least 20 cm. The fitting area
over the lamp fitting must be
at least 10 cm and to the side
at least 10 cm (see Fig. H).
Prior to installation
Important: The electrical connection must be
established by a qualified electrician or a person
trained to perform electrical installations. This
person must be familiar with the properties of
the light and the connection regulations. The
cables leading to the lights must be according
to the local regulations.
Before installation, ensure that the circuit to which
the light will be connected, is not live. To do so,
remove the fuse or switch off the circuit breaker
at the fuse box. To check the power is off, use a
circuit tester.
the minimum distance between two recessed
light spots. This must be at least 20 cm.
Insert the retaining springs 4 into the spot-
lights (see Fig. B and C). The small lug of
the retaining springs must lie on the inside
of the housing of the lamp
retaining springs are tensioned.
Open the mains socket 9 by unscrewing
the cover
Undo the cable holder 6 using a screw-
driver.
Install the power lines into the tubes 10 and
then connect the power line to the terminal
block
holder using a screwdriver.
Hint: Make sure the power lines are completely covered by the tubes inside the
mains socket.
Close the mains socket, by tightening the
cover using a screwdriver.
Place the fitting 8 of the mains socket onto
the bulb
turn the bulb until tight with a ¼ turn in a
clockwise direction (see Fig. E).
Before fitting the recessed light spot, remove
possibly present insulating material from the
vicinity of the mains socket and the spots.
Fold the two retaining springs upwards and
guide the recessed light spots with the connection cable into the installation opening
(see Fig. F).
After you have pushed the spot into the open-
ing, the retaining springs unfold and fix the
recessed spot in place (see Fig. G).
Proceed in the same way with the other five
recessed light spots.
The recessed light spots are now ready for
use.
Now switch the power back on.
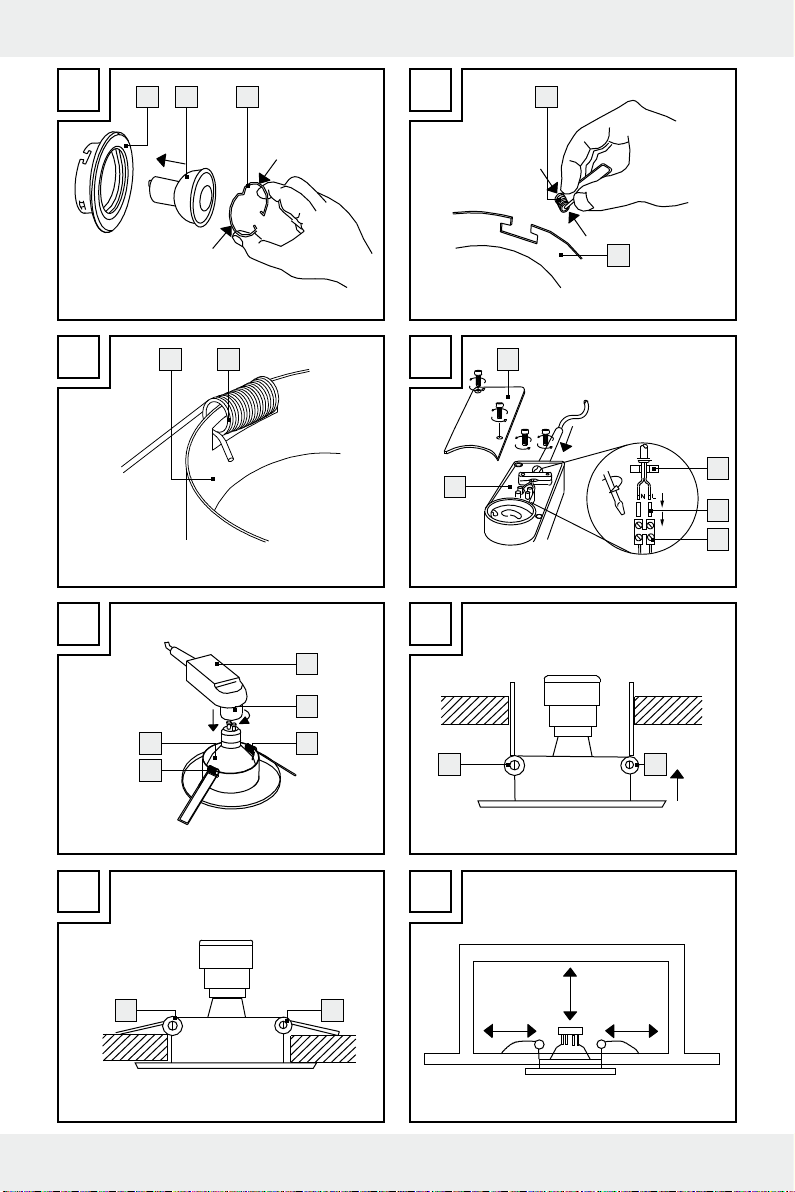
Replacing a bulb
5
with a screwdriver (see Fig. D).
7
(see Fig. D) and tighten the cable
2
including the lamp housing and
1
so that the
Start-up
Using a hollow drill (ø 68 mm), drill the 6 holes
at the installation point. Take care to observe
6 GB
CAUTION! RISK OF ELECTRIC
SHOCK! To replace the bulb, first
disconnect the light from the mains
Page 7

circuit. To do so, remove the fuse or switch off
the circuit breaker in the fuse box (0 position).
Allow the light to cool completely.
Loosen the spring ring 3 from the lamp
housing
1
.
Withdraw the defective bulb 2 and bulb
8
holder
a little from the lamp housing.
Use a clean, lint-free cloth to replace a bulb.
Never touch the glass of the halogen lamp
with bare fingers, even when cold, as the
glass can become matt through contact with
the sweat on the skin. In doubt, use a little bit
of alcohol to clean the surface of the glass.
Keep hold of the fitting and turn the bulb
with a ¼ turn anti-clockwise out of the fitting.
Use only 230 V ~bulbs with a GU10 socket
and a maximum power of 40 watts.
Do not use cool beam bulbs.
Risk of overheating!
Fit the new bulb. Insert the bulb carefully
into the socket and tighten it with a ¼ turn
in a clockwise direction.
Secure the bulb to the lamp housing, using
the spring ring. Check for correct fitting (see
Fig. A).
Disposal
The packaging is made of environmentally friendly materials, which may
be disposed through your local recycling facilities.
Contact your local authorities for information on
how to dispose of the product at the end of
product life.
Never dispose of the product and
the bulb in your regular household
rubbish.
Dispose of the product and light bulb through
an authorised waste management company or
your municipal disposal facilities.
Observe the applicable regulations. When in
doubt please contact your waste disposal centre.
Cleaning and care
CAUTION! RISK OF ELECTRIC
SHOCK! Disconnect the light from
the mains circuit before cleaning. To
do so, remove the fuse or switch off the circuit
breaker in the fuse box (0 position).
CAUTION! RISK OF ELECTRIC
SHOCK! For reasons of electrical
safety, never clean the light with water
or other fluids, or immerse it in water. Only use
a dry, lint-free cloth for cleaning.
7 GB
Page 8

Halogenová sada svítidel
Použití ke
stanovenému účelu
Toto svítidlo se výhradně hodí pro provoz ve vnitřní
oblasti, v suchých a uzavřených místnostech. Tento
přístroj je určen pouze pro soukromé použití.
Všeobecná
bezpečnostní
upozornění
PŘED POUŽITÍM SI PŘEČTĚTE
NÁVOD K OBSLUZE! NÁVOD
K OBSLUZE SI PEČLIVĚ
USCHOVEJTE!
Popis dílů
1
Pouzdro svítidla
2
Svíticí prostředek
3
Pérová podložka
4
Haltefeder
5
Kryt
6
Držák kabelu
7
Svorkovnice
8
Objímka
9
Dóza síťové přípojky
10
Ochraná hadička
Technické údaje
Provozní napětí: 230 V ∼, 50 Hz
Osvětlovací prostředek: 230 V, GU10, 40 W
Příkon: 1 x 40 W
Rozměr každého světla: ø 85 mm
Otvor k vestavění: ø 68 mm
Třída ochrany:
Model č.: Z31669A (lesklý),
Obsah dodávky
6 bodových světel s předmontovanými
osvětlovacími prostředky
6 dóz pro síťové přípojky
12 přídržných pružin
12 ochranných hadiček
1 návod k obsluze
Z31669B (matný)
Před uvedením do provozu
zkontrolujte výrobek, jestli není
poškozený. Poškozený výrobek
neuvádějte do provozu.
NEBEZPEČÍ OHRO-
ŽENÍ ŽIVOTA A ZRANĚNÍ
MALÝCH A VELKÝCH
DĚTÍ! Tento přístroj mohou
používat děti starší než 8 let,
osoby se sníženými fyzickými,
senzorickými nebo duševními
schopnosti nebo s nedostatečnými zkušenostmi a znalostmi
o používání přístroje jen
tehdy, jestliže byly poučeny o
jeho bezpečném používání a
porozuměly možným ohrožením. Děti si nesmí s přístrojem
hrát. Děti nesmí provádět čištění a údržbu bez dohledu.
8 CZ
Page 9

Zamezte nebezpečí
ohrožení života elektrickým proudem!
Elektrickou instalaci nechte
provádět jen vyučeného elek-
trikáře nebo osobu s odpoví-
dajícími zkušenostmi.
Před každým připojením na
přívod elektrického proudu
kontrolujte svítidlo a připojo-
vací kabel, jestli nejsou poško-
zené. Nikdy nepoužívejte
svítidlo, pokud jste zjistili, že je
poškozené.
Před montáží odstraňte pojistku
nebo vypněte jistič v pojiskové
skříňce (poloha 0).
Před montáží se ujistěte, že
místní síťové napětí se shoduje
sprovozním napětím svítidla
(230 V ∼).
Bezpodmínečně zabraňte
kontaktu světla svodou nebo
jinými kapalinami.
Svítidlo neinstalujte na vlhkých
nebo vodivých podkladech.
Vyvarujte se
nebezpečí požáru
a poranění
NEBEZPEČÍ PORANĚNÍ!
Okamžitě po vybalení
přezkoušejte každý svíticí prostředek a sklo lampy jestli nejsou poškozené. Nemontujte
světlo s vadnými skly lampy
nebo svíticími prostředky.
NEBEZPEČÍ POPÁLENÍ!
Před dotykem se světlem
zajistěte, aby bylo vypnuté a
ochladlé, aby se zabránilo
popáleninám. Svíticí prostředky
vyvinou v oblasti hlavy lampy
silné horko.
NEBEZPEČÍ PO-
0,5 m
ŽÁRU! Svítidlo
namontujte ve vzdálenosti ale-
spoň 0,5m od ozařovaných
materiálů.
POZOR! NEBEZ-
PEČÍ POŽÁRU! V
žádném případě nepřikrývejte
bodová světla materiály izolujícími teplo nebo podobnými
předměty.
Zajistěte dostatečné chlazení.
Maximální přípustná teplota
90 °C v prostoru vestavění
nesmí být překročena.
Soupravu bodových světel po-
užívejte jen s dodaným příslušenstvím! Nespojujte soupravy
k vestavění do série!
Nepoužívejte osvětlo-
vací prostředky s
9 CZ
Page 10

reflektory pro studené světlo
(cool beam).
Takto se chováte
správně!
Světlo instalujte tak, aby bylo
chráněné před vlhkostí, větrem
a znečištěním.
Nemontujte soupravu v kou-
pelně nebo v podobných
místnostech.
Používejte jen svíticí prostředky
jen pro napětí 230 V ∼ s ob-
jímkou GU10 a maximálním
příkonem 40 W.
Odstup dvou vestavěných
bodových světel musí být nej-
méně 20 cm. V prostoru, ve
kterém je výrobek vestavěný
musí být na stranách objímek
a nad objímkami světel odstup
od stěn nebo materiálů nej-
méně 10 cm (viz obr. H).
Před instalací
Důležité: Připojení na elektrický rozvod musí
provést vyučený elektrikář nebo osoba zaškolená pro práce na elektrických rozvodech. Tato
osoba musí být seznámena svlastnostmi svítidla
a spředpisy pro připojení. Přívod elektrického
proudu k soupravě musí odpovídat místním
předpisům.
Před instalací zajistěte, aby byl přívod elektrického proudu k soupravě bez napětí. Proto odstraňte pojistku nebo vypněte jistič v pojistkové
skříňce.
Zkontrolujte zkoušečkou, jestli je vypnutý proud.
Uvedení do provozu
Vyvrtejte kruhovou frézkou (ø 68 mm) 6 ot-
vorů v místě montáže. Dbejte na minimální,
předepsaný odstup bodových světel. Bodová světla musí mít minimální odstup 20 cm.
Nasaďte přídržné pružiny 4 do bodových
světel (viz obr. B a C). Malý výčnělek
přídržné pružiny se musí nacházet na vnitřní
straně tělesa světla
pnula.
Otevřete dózu přípojky 9, odšroubování
5
krytu
šroubovákem (viz obr. D).
Odšroubujte držák kabelu 6 šroubovákem.
Prostrčte vodiče přívodního kabelu ochran-
nými hadičkami
7
nice
(viz obr. D) a přišroubujte zase
šroubovákem držák kabelu.
Tip: Dbejte na to, aby byly přívodní vodiče
uvnitř připojovací dózy kompletně chráněné
hadičkami.
Uzavřete dózu přípojky přišroubováním krytu.
Nasaďte objímku 8 přípojkové dózy na
osvětlovací prostředek
světla a nasaďtě svítící prostředek pootoče-
ním o ¼ otáčky ve směru chodu hodinových
ručiček (viz obr. E).
Při nasazování bodového světla odstraňte
případně izolační materiál v jeho blízkosti a
v blízkosti přípojkové dózy.
Vyklopte obě přídržné pružiny nahoru a
nasuňte bodové světlo s přívodním kabelem
do montážního otvoru (viz obr. F).
Po vsunutí vyklopte přídržné pružiny a zafi-
xujte tím bodové světlo (viz obr. G).
U zbývajících pěti bodových světel postupuje
stejným způsobem.
Nyní jsou bodová světla připravena k pro-
vozu.
Zapněte přívod elektrického proudu.
1
, aby se pružina na-
10
, zapojte je do svorkov-
2
včetně tělesa
10 CZ
Page 11

Výměna osvětlovacího
prostředku
POZOR! NEBEZPEČÍ ZÁSAHU
ELEKTRICKÝM PROUDEM! Při
výměně žárovek nejprve svítidlo
odpojte od elektrické sítě. K tomu vyšroubujte
pojistku nebo vypněte jistič v pojistkové skříňce.
(poloha 0).
POZOR! NEBEZPEČÍ ZÁSAHU
ELEKTRICKÝM PROUDEM! Z
důvodu elektrické bezpečnosti se svítidlo nikdy nesmí čistit vodou nebo jinými kapalinami či dokonce do vody ponořovat. Používejte
kčištění suchý hadřík bez nitek.
Odstranění do odpadu
Nechte světlo úplně vychladnout.
Vyjměte pérovou podložku 3 z tělesa
1
světla
.
Povytáhněte vadný osvětlovací prostředek 2
s objímkou
8
z tělesa světla.
Při výměně osvětlovacího prostředku pou-
žijte čistý hadr, který nepouští vlákna. Při
výměně se nedotýkejte skla halogenového
osvětlovacího prostředku prsty, pot z pokožky může způsobit jeho zmatnění. V případě pochybnosti vyčistěte sklo alkoholem.
Přidržte pevně objímku a pootočte osvětlo-
vací prostředek o ¼ otáčky proti směru
chodu hodinových ručiček.
Používejte jen osvětlovací prostředky pro
napětí 230 V ~ s objímkou GU10 a maximálním příkonem 40 W.
Nepoužívejte osvětlovací pro-
středky s reflektorem pro studené
světlo. Nebezpečí přehřátí!
Namontujte nový osvětlovací prostředek.
Nasaďte osvětlovací prostředek opatrně do
objímky a pootočte ho o ¼ otáčky ve
směru chodu hodinových ručiček.
Zafixujte osvětlovací prostředek v tělese
pérovou podložkou. Zkontrolujte správné
usazení (viz obr. A).
Balení je vyrobeno z ekologických
materiálů, které můžete odstranit do
odpadu v místních sběrnách třídě-
ného odpadu.
O možnostech odstranění nepotřebného výrobku do odpadu se informujte u Vaší obecní
nebo městské správy.
Přístroj/výrobek a světelný zdroj v
žádném případě nevyhazujte do
běžného domovního odpadu.
Výrobek a osvětlovací prostředek odstraňujte
do odpadu u odpovídajícího, připuštěného
provozu nebo u Vaší komunální sběrny.
Dbejte na platné předpisy. V případě pochybností kontaktujte pro Vás příslušnou sběrnu.
Čistění a ošetřování
POZOR! NEBEZPEČÍ ZÁSAHU
ELEKTRICKÝM PROUDEM! Při
čištění nejprve svítidlo odpojte od
elektrické sítě. K tomu vyšroubujte pojistku nebo
vypněte jistič v pojistkové skříňce. (poloha 0).
11 CZ
Page 12

Halogen-Einbauleuchten-Set
Allgemeine
Sicherheitshinweise
Bestimmungsgemäße
Verwendung
Diese Leuchte ist ausschließlich für den Betrieb
im Innenbereich, in trockenen und geschlossenen
Räumen geeignet. Dieses Gerät ist nur für den
Einsatz in privaten Haushalten vorgesehen.
Teilebeschreibung
1
Leuchtengehäuse
2
Leuchtmittel
3
Federring
4
Haltefeder
5
Abdeckung
6
Kabelhalter
7
Lüsterklemme
8
Fassung
9
Netzanschlussdose
10
Schutzschlauch
Technische Daten
Betriebsspannung: 230 V ∼, 50 Hz
Leuchtmittel: 230 V, GU10, 40 W
Leistungsaufnahme: 1 x 40 W
Abmessungen je Leuchte: ø 85 mm
Einbauöffnung: ø 68 mm
Schutzklasse:
Modell-Nr.:
Lieferumfang
6 Einbauspots mit vormontierten Leuchtmitteln
6 Netzanschlussdosen
12 Haltefedern
12 Schutzschläuche
1 Bedienungsanleitung
Z31669A (glänzend),
Z31669B (matt)
VOR GEBRAUCH BITTE DIE
BEDIENUNGSANLEITUNG
LESEN! BEDIENUNGSANLEITUNG BITTE SORGFÄLTIG
AUFBEWAHREN!
Kontrollieren Sie das Produkt vor
der Inbetriebnahme auf Beschädigungen. Nehmen Sie ein
beschädigtes Produkt nicht in
Betrieb.
LEBENS- UND UN-
FALLGEFAHR FÜR KLEIN-
KINDER UND KINDER!
Dieses Gerät kann von Kindern
ab 8 Jahren und darüber sowie
von Personen mit verringerten
physischen, sensorischen oder
mentalen Fähigkeiten oder
Mangel an Erfahrung und
Wissen benutzt werden, wenn
sie beaufsichtigt oder bezüglich
des sicheren Gebrauchs des
Gerätes unterwiesen wurden
und die daraus resultierenden
Gefahren verstehen. Kinder
dürfen nicht mit dem Gerät
spielen. Reinigung und Benutzerwartung dürfen nicht von
12 DE/AT/CH
Page 13

Kindern ohne Beaufsichtigung
durchgeführt werden.
Vermeiden Sie Lebens-
gefahr durch elektri-
schen Schlag!
Installieren Sie die Leuchte nicht
auf feuchten oder leitenden
Unterlagen.
Vermeiden Sie Brandund Verletzungsgefahr
Lassen Sie die Elektroinstallation
durch einen ausgebildeten
Elektriker oder eine für Elektroinstallationen eingewiesene
Person durchführen.
Überprüfen Sie vor jedem Netz-
anschluss die Leuchte und das
Netzanschlusskabel auf etwaige
Beschädigungen. Benutzen
Sie Ihre Leuchte niemals, wenn
Sie irgendwelche Beschädigungen feststellen.
Entfernen Sie vor der Montage
die Sicherung oder schalten
Sie den Leitungsschutzschalter
im Sicherungskasten aus
(0-Stellung).
Vergewissern Sie sich vor der
Montage, dass die vorhandene
Netzspannung mit der benötigten
Betriebsspannung der Leuchte
übereinstimmt (230 V ∼).
Vermeiden Sie unbedingt die
Berührung der Leuchte mit
Wasser oder anderen Flüssigkeiten.
VERLETZUNGSGEFAHR!
Überprüfen Sie unmittelbar
nach dem Auspacken jedes
Leuchtmittel und Lampenglas
auf Beschädigungen. Montieren
Sie die Leuchte nicht mit defekten
Leuchtmitteln und / oder Lampenglas
.
VERBRENNUNGSGEFAHR
Stellen Sie sicher, dass die
Leuchte ausgeschaltet und
abgekühlt ist, bevor Sie diese
berühren, um Verbrennungen
zu vermeiden. Leuchtmittel entwickeln im Bereich des Lampenkopfes eine starke Hitze.
BRANDGEFAHR!
0,5 m
Montieren Sie die Leuchte
mit einer Entfernung von mindestens 0,5 m zu angestrahlten
Materialien.
VORSICHT!
BRANDGEFAHR!
Decken Sie die Einbauspots
auf keinen Fall mit wärmedämmenden Materialien oder
ähnlichem ab.
!
13 DE/AT/CH
Page 14

Sorgen Sie für eine ausreichende
Kühlung. Die maximale Temperatur von 90 °C im Einbaubereich darf nicht überschritten
werden.
Verwenden Sie das Einbau-
spots-Set nur mit dem mitgelieferten Zubehör! Nehmen Sie
keine Aneinanderschaltung
von Einbauspots-Sets vor!
Verwenden Sie keine
Leuchtmittel mit Kalt
lichtreflektor (cool beam).
So verhalten Sie
sich richtig!
seitliche Abstand mind. 10 cm
betragen (siehe Abb. H).
Vor der Installation
Wichtig: Der elektrische Anschluss muss durch
einen ausgebildeten Elektriker oder eine für
Elektroinstallationen eingewiesene Person erfolgen.
Diese muss Kenntnis über die Eigenschaften der
Leuchte und Anschlussbestimmungen haben. Die
Zuleitung zu den Leuchten muss den örtlichen
Bestimmungen entsprechen.
Stellen Sie vor der Installation sicher, dass an
der Leitung, an der die Leuchte angeschlossen
werden soll, keine Spannung vorliegt. Entfernen
Sie hierfür die Sicherung oder schalten Sie den
Leitungsschutzschalter im Sicherungskasten aus.
Überprüfen Sie die Spannungsfreiheit mittels
Spannungsprüfer.
Montieren Sie die Leuchte so,
dass sie vor Feuchtigkeit,
Verschmutzung und zu starker
Erwärmung geschützt ist.
Vermeiden Sie den Einbau in
Badezimmern oder ähnlichen
Räumen.
Verwenden Sie nur 230 V ∼
Leuchtmittel mit einem GU10Sockel und einer Höchstleistung
von 40 Watt.
Der Abstand zwischen zwei
Einbauspots muss mindestens
20 cm betragen. Der Einbaubereich über der Lampenfassung
muss mind. 10 cm und der
14 DE/AT/CH
Inbetriebnahme
Bohren Sie mit einem Dosenbohrer (ø 68 mm)
die 6 Löcher in die Montagestelle. Beachten
Sie dabei den Mindestabstand zwischen
zwei Einbauspots. Dieser muss mindestens
20 cm betragen.
Setzen Sie die Haltefedern 4 in die Spots
ein (siehe Abb. B und C). Die kleine Nase
der Haltefedern muss dabei auf der Innenseite des Leuchtengehäuses
mit die Haltefedern auf Spannung gebracht
werden.
Öffnen Sie die Netzanschlussdose 9,
indem Sie die Abdeckung
Schraubendrehers abschrauben (siehe
Abb. D).
Lösen Sie den Kabelhalter 6 mittels eines
Schraubendrehers.
Schieben Sie die Netzleitung durch die
Schutzschläuche
der Lüsterklemme
10
7
1
liegen, da-
5
mittels eines
, verbinden Sie sie mit
(siehe Abb. D) und
Page 15

schrauben Sie den Kabelhalter mittels eines
Schraubendrehers fest.
Tipp: Achten Sie darauf, dass die Netzei-
tungen komplett durch die Schutzschläuche
im Inneren der Netzanschlussdose abgedeckt sind.
Verschließen Sie die Netzanschlussdose
wieder, indem Sie die Abdeckung mittels
eines Schraubendrehers festschrauben.
Setzen Sie die Fassung 8 der Netzanschluss-
dose auf das Leuchtmittel
2
inkl. Leuchtengehäuse auf und drehen Sie das Leuchtmittel
mit einer ¼-Umdrehung im Uhrzeigersinn
fest (siehe Abb. E).
Entfernen Sie vor dem Einsetzen der Einbau-
spots eventuell vorhandenes Dämmmaterial
in der Nähe der Netzanschlussdose und
der Einbauspots.
Klappen Sie die beiden Haltefedern nach
oben und führen Sie den Einbauspot mit dem
Anschlusskabel in die Montageöffnung
(siehe Abb. F).
Nach dem Einschieben klappen die Haltefe-
dern auf und fixieren somit die Einbauleuchte
(siehe Abb. G).
Verfahren Sie ebenso mit den fünf anderen
Einbauspots.
Die Einbauspots sind jetzt betriebsbereit.
Schalten Sie jetzt die Stromversorgung an.
Leuchtmittel auswechseln
VORSICHT! STROMSCHLAGGEFAHR! Trennen Sie zum Auswechseln
von Leuchtmitteln die Leuchte zuerst
vom Stromnetz. Entfernen Sie hierfür die Sicherung
oder schalten Sie den Leitungsschutzschalter im
Sicherungskasten aus (0-Stellung).
Lassen Sie die Leuchte vollständig abkühlen.
Lösen Sie den Federring 3 aus dem Leuchten-
gehäuse
1.
Ziehen Sie das defekte Leuchtmittel 2 mit
der Fassung
8
etwas aus dem Leuchtenge-
häuse.
Benutzen Sie zum Auswechseln ein sauberes,
fusselfreies Tuch. Berühren Sie das Glas der
Halogenlampen auch im abgekühlten Zustand
niemals mit bloßen Fingern, weil das Glas
durch Hautschweiß matt werden kann. Im
Zweifelsfall reinigen Sie die Glasoberfläche
mit etwas Alkohol.
Halten Sie die Fassung fest und drehen Sie
das Leuchtmittel durch eine ¼-Umdrehung
entgegen dem Uhrzeigersinn aus der Fassung.
Verwenden Sie nur 230 V ∼ Leuchtmittel mit
einem GU10-Sockel und einer Höchstleistung
von 40 Watt.
Verwenden Sie keine Leuchmittel
mit Kaltlichreflektor. Überhitzungsgefahr!
Montieren Sie das neue Leuchtmittel. Stecken
Sie es vorsichtig in die Fassung und drehen
Sie es mit einer ¼-Umdrehung im Uhrzeigersinn fest.
Fixieren Sie das Leuchtmittel mit dem
Federring im Leuchtengehäuse. Überprüfen
Sie den richtigen Sitz (siehe Abb. A).
Reinigung und Pflege
VORSICHT! STROMSCHLAGGEFAHR! Trennen Sie zur Reinigung die
Leuchte zuerst vom Stromnetz. Entfernen
Sie
hierfür die Sicherung oder schalten Sie den
Leitungsschutzschalter im Sicherungskasten aus
(0-Stellung).
VORSICHT! STROMSCHLAGGEFAHR! Aus Gründen der elektri-
schen Sicherheit darf die Leuchte
niemals mit Wasser oder anderen Flüssigkeiten
gereinigt oder gar in Wasser getaucht werden.
Verwenden Sie zur Reinigung nur ein trockenes,
fusselfreies Tuch.
15 DE/AT/CH
Page 16

Entsorgung
Die Verpackung besteht aus umweltfreundlichen Materialien, die Sie über
die örtlichen Recyclingstellen entsorgen
können.
Möglichkeiten zur Entsorgung des ausgedienten
Produktes erfahren Sie bei Ihrer Gemeindeoder Stadtverwaltung.
Entsorgen Sie das Gerät / den Artikel
und Leuchtmittel keinesfalls in den
normalen Hausmüll.
Das Gerät / Den Artikel und Leuchtmittel über
einen zugelassenen Entsorgungsbetrieb oder
über Ihre kommunale Entsorgungseinrichtung
entsorgen.
Beachten Sie die gültigen Vorschriften. Setzen
Sie sich im Zweifelsfall mit Ihrer Entsorgungseinrichtung in Verbindung.
16 DE/AT/CH
Page 17

OWIM GmbH & Co. KG
Stiftsbergstraße 1
D-74167 Neckarsulm
Model-No.: Z31669A / Z31669B
Version: 07 / 2013
Last Information Update · Stav informací
Stand der Informationen: 07 / 2013
Ident.-No.: Z31669A /B072013-CZ
IAN 91133
 Loading...