


KitchenAid 5KHB2569AAC, 5KHB2569AER, 5KHB2569AOB, 5KHB2569ASX, 5KHB2569CAC Use & Care Guide
...
5KHB2569,
KEB25

2

Table of Contents |
|
HAND BLENDER SAFETY |
|
Important Safeguards................................................................................................. |
4 |
Electrical Requirements............................................................................................. |
5 |
PARTS AND FEATURES |
|
Hand Blender Parts.................................................................................................... |
6 |
Hand Bender Features............................................................................................... |
7 |
OPERATING YOUR HAND BLENDER |
|
Assembling Hand Bender....................................................................................... |
8 |
Twist-Lock Blending Arm....................................................................................... |
9 |
Whisk Attachment............................................................................................... |
10 |
Chopper Attachment........................................................................................... |
11 |
Operating Tips..................................................................................................... |
12 |
Attachment Guide................................................................................................ |
13 |
CARE AND CLEANING................................................................................................ |
14 |
Hand Blender Safety
<![endif]>English
3

Hand Blender Safety
IMPORTANT SAFEGUARDS
When using electrical appliances, basic safety precautions should always be followed, including the following:
1.Read all instructions. Misuse of appliance may result in personal injury.
2.To protect against risk of electrical shock do not put motor body, cord, or electrical plug of this Hand Blender in water or other liquid.
3.This appliance is not intended for use by persons (including children) with reduced physical sensory or mental capabilities, or lack of experience and knowledge, unless they have been given supervision or instruction concerning use of the appliance in a safe way by a person responsible for their safety and if they understand the hazards involved.
4.This appliance shall not be used by children.
5.Unplug from outlet when not in use, before putting on or taking off parts, and before cleaning.
6.Avoid contact with moving parts.
7.Do not operate any appliance with a damaged cord or plug or after the appliance malfunctions, or is dropped or damaged in any manner. Return appliance to the nearest Authorized Service Facility for examination, repair, or electrical or mechanical adjustment, in order to avoid a hazard.
8.The use of attachments not recommended or sold by the manufacturer may cause fire, electric shock or injury.
9.Be certain Chopper Adapter is securely locked in place before operating appliance.
10.Do not use outdoors.
11.Do not let cord hang over edge of table or counter. Keep the appliance and its cord out of reach of children.
12.Do not let cord contact hot surfaces, including the stove.
13.When mixing liquids, especially hot liquids, use a tall container or make small quantities at a time to reduce spillage.
4

Hand Blender Safety
14. |
Keep hands and utensils out of the container while blending |
|
|
to prevent the possibility of severe injury to persons or |
|
|
damage to the unit. A scraper may be used, but must be |
|
|
used only when the unit is not running. |
|
|
|
|
15. |
Blade is sharp, handle carefully. Care shall be taken |
|
|
when handling sharp cutting blades, emptying the bowl |
<![if ! IE]> <![endif]>English |
|
and during cleaning. |
|
|
|
|
16. |
To disconnect, turn any control to “OFF,” then remove plug |
|
|
from wall outlet. |
|
|
|
|
17. |
This appliance is intended to be used in household and |
|
|
similar applications such as: |
|
|
-staff kitchen areas in shops, offices, and other working |
|
|
environments. |
|
|
-farm houses. |
|
|
-by clients in hotels, motels, and other residential type |
|
|
environments. |
|
|
-bed and breakfast type environments. |
|
SAVE THESE INSTRUCTIONS
This product is designed for household use only.
Electrical Requirements
Volts: 220-240 V.A.C. Hertz: 50/60 Hz
A short power-supply cord is provided to reduce the risk resulting from becoming entangled in or tripping over a longer cord. If a long extension cord is used:
•The marked electrical rating of the extension cord should be at least as great as the electrical rating of the appliance.
•The cord should be arranged so it will not drape over the counter top or tabletop where it can be pulled by children or tripped over unintentionally.
5
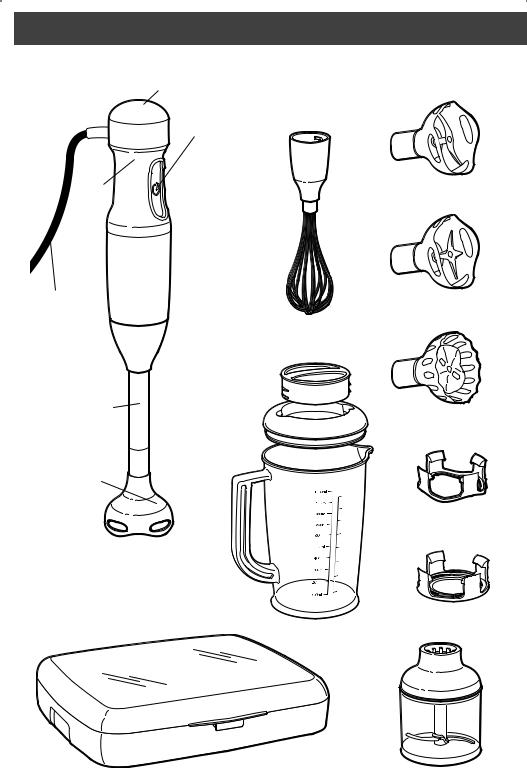
Parts and Features Guide
Hand Blender Parts
Speed Control Dial
One-Touch
Power Button
Motor
Body
1.5 m (5 ft.) Power Cord
Whisk Attachment
20 cm (8") Stainless Steel
Blending Arm
* Shown with S-Blade attached
4 Cup |
||
3 1/2 |
Cup |
|
3 Cup |
||
2 1/2 |
Cup |
|
2 Cup |
|
|
1 1/2 |
Cup |
|
|
|
|
1 Cup |
|
|
1/2 Cu |
p |
|
|
|
|
Blending Pitcher
Bell Blades
S-Blade
Multi-Purpose
Blade
Frother/Beater
Pan Guard
Bell Guard
Storage Case |
Chopper Attachment |
6

Parts and Features Guide
Hand Blender Features
Speed Control Dial
Variable speeds provide greater processing control that adjusts to handle a variety of foods, beverages and soups.
One-Touch Power Button
Activate the Hand Blender by pressing and holding the POWER button during blending. To stop blending, simply release the power button.
Motor Body
Designed for a comfortable, non-slip grip.
Powerful DC Motor (not shown)
Provides a powerful blending action and is designed for quiet, long-life operation.
1.5 m (5-ft.) Power Cord
Long enough to take the Hand Blender to the cooktop or work area, the Power Cord is rounded with no grooves for easy clean up. A silicone cord strap is included for convenient cord storage.
Twist-Lock Stainless Steel Blending Arm
Attaches onto the Motor Body with a simple twist and rotate motion to lock into place. Attach the Bell Blades for blending. All attachments utilize the same twist and lock mounting system.
Whisk Attachment
Optimized for whipping egg whites and whipping cream.
Chopper Attachment
Perfect for small chopping jobs like herbs, nuts, and vegetables. Chopper includes
a bowl, blade, and chopper adapter. The Chopper bowl has a non-slip base to prevent movement during the chopping process.
Blending Pitcher
1 L (4 cup) BPA Free Pitcher with convenient handle and no splash lid.
Bell Blades
With the three interchangeable Bell Blades, you will always have the right tool for a multitude of tasks. From crushing ice, to chopping cooked meats, and frothing milk, the KitchenAid Hand Blender has you covered.
Pan Guard
Protects your cookware by snapping on the Bell Blades.
Bell Guard
Protects the Bell blades while not in use.
Storage Case
Keeps accessories organized, protected, and clean.
<![endif]>English
7
Operating Your Hand Blender
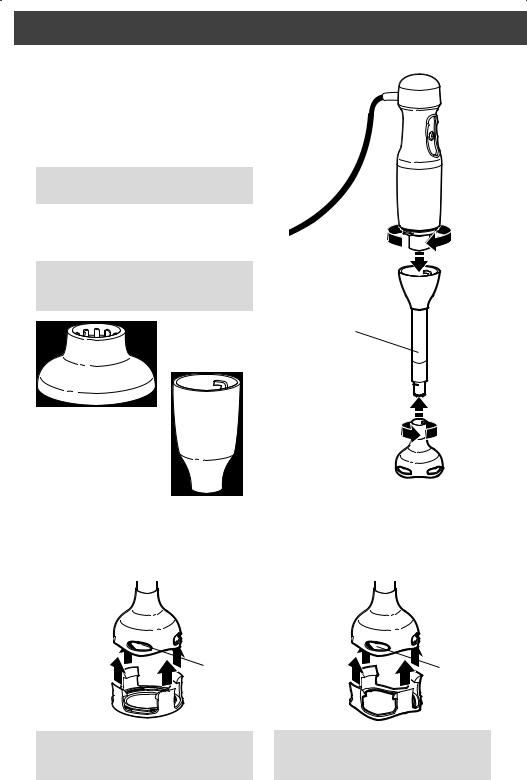
Assembling Hand Blender
Before using the KitchenAid Hand Blender for the first time, wipe the motor body and attachment adapters with a clean, damp cloth to remove any dirt or dust. Mild dish soap may be used, but do not use abrasive cleansers.
NOTE: Do not immerse the motor body or the adapters in water.
Dry with a soft cloth. Wash all the attachments and accessories by hand or in the dishwasher. Dry thoroughly.
NOTE: Always be sure to unplug the power cord from the wall socket before installing or removing attachments.
Blending Arm
Attachment
Chopper Adapter
Whisk Adapter
Bell Guard
Easily snaps onto Bell Blade and provides protection to blades while the Hand Blender is not in use.
Pan Guard
The Pan Guard snaps onto any of the included Bell Blades and provides protection to the Hand Blender and your cookware.
Port |
Port |
NOTE: Ensure Bell Guard is installed with the mounting clips positioned between the ports on the Bell Blades.
NOTE: Ensure Pan Guard is installed with the mounting clips positioned between the ports on the Bell Blades.
8
Operating Your Hand Blender
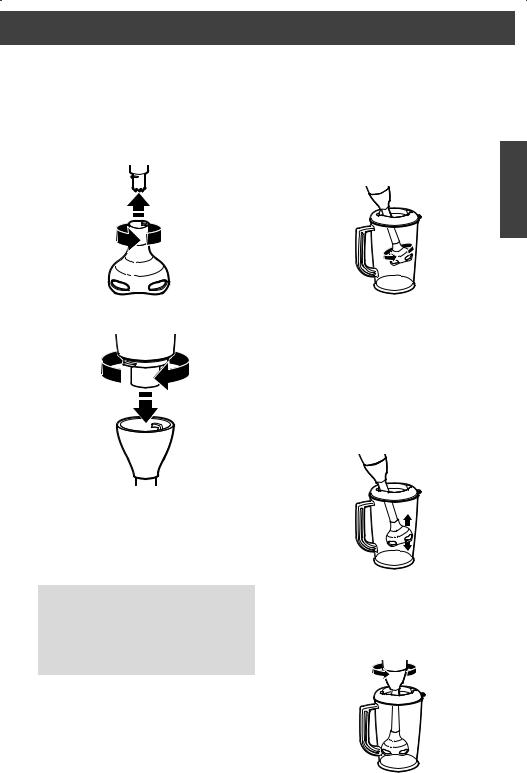
Twist-Lock Blending Arm
Use the Blending Arm attachment for smoothies, milk shakes, soup, cooked vegetables, frosting, or baby food.
1.Insert Blending Arm into Bell Blade (see “Attachment Guide”) and twist to lock until it clicks.
Insert Hand Blender with Blending Arm attached into the Blending Pitcher containing ingredients at an angle. Use your free hand to cover the top of the Blending Pitcher for better stability and
avoid splattering. Remember to stop the Hand Blender before removing it from the pitcher to avoid splashing.
Blending
<![endif]>English
2.Insert Blending Arm into Motor Body and twist to lock until it clicks.
Rest the Hand Blender on the bottom of the Blending Pitcher momentarily then hold at an angle and slowly draw it upwards against the side of the Pitcher. As the Hand Blender is drawn up you will notice the ingredients from the bottom of the Pitcher being drawn up. When the ingredients are no longer being drawn up from the bottom, return the Hand Blender to the bottom of the Pitcher and repeat the process until the ingredients are at the desired consistency.
3.Plug the electrical cord into an electrical wall socket.
4.Set Hand Blender on Speed 1. Adjust the speed by turning the Speed Control Dial on top of the Hand Blender.
5.Insert the Hand Blender into the mixture.
NOTE: Hand Blender should only be immersed in liquids the length of the attachment. Do not submerge beyond the seam of the blending attachment. Do not immerse the motor body into liquids or other mixtures.
6.Press the Power button to activate the Hand Blender.
7.When blending is complete, release the power button before removing Hand Blender from the mixture.
8.Unplug immediately after use, before removing or changing attachments.
Drawing up
Using a light circular motion from your wrist, draw the Hand Blender up slightly and let it fall again into the ingredients. Allow your wrist motion and the weight of the Hand Blender to do the work.
Wrist movement
9
Operating Your Hand Blender
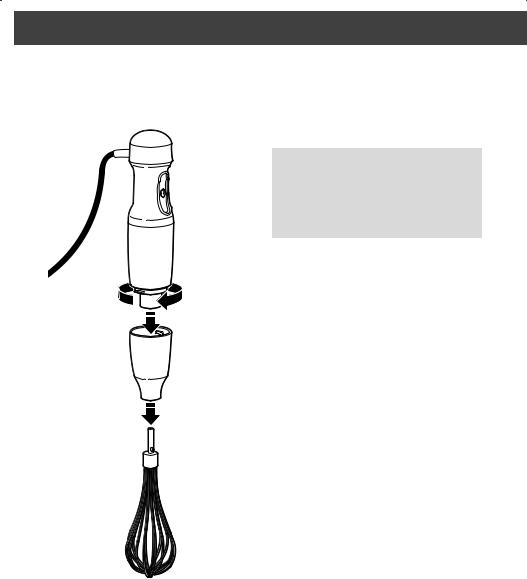
Whisk Attachment
Use the Whisk to whip cream, beat egg whites, mix instant puddings, vinaigrettes, mousse, or for making mayonnaise.
1.Insert the Whisk into the Whisk Adapter.
2.Insert the Whisk Adapter into the motor body and twist to lock until it clicks. Adapter automatically adjusts the whisk to the proper range of speeds appropriate for whipping.
3.Plug the electrical cord into an electrical wall socket.
4.Start Hand Blender on Speed 1. Adjust the speed by rotating the Speed Control Dial on top of the Hand Blender.
5.Insert the Hand Blender into the mixture.
The stainless steel Whisk may scratch or mar non-stick coatings; avoid using the Whisk in non-stick cookware.
NOTE: Hand Blender should only be immersed in liquids the length of the attachment. Do not submerge beyond the seam of the whisk adapter. Do not immerse the motor body into liquids or other mixtures.
To prevent splattering and splash-out, use the Whisk Attachment in deep containers or pans.
6.Press the Power button to activate the Hand Blender.
7.When whisking process is complete, release the Power button before removing Hand Blender from the mixture.
8.Unplug immediately after use, before removing or changing attachments.
10
Operating Your Hand Blender
Chopper Attachment
Use the Chopper attachment to chop small amounts of food such as cooked meat, cheese, vegetables, herbs, crackers, bread, and nuts.
1.Insert the Chopper blade into the Chopper bowl.
2.Add small pieces of foods to the bowl.
3.Insert the Chopper attachment into the Chopper bowl.
4.Align the Chopper bowl with the motor body and press together.
5.Hold the motor body with one hand and the Chopper bowl with the other while processing.
6.Press the POWER button to activate Hand Blender. For best results, “pulse” the power by pressing and releasing the Power button until ingredients reach the desired consistency.
7.When chopping is complete, release the Power button.
8.Remove Motor Body from Chopper attachment.
9.Unplug immediately after use, before removing or changing attachments.
<![endif]>English
11

Operating Your Hand Blender
Chopper Attachment (cont.)
Chopper Processing Guide
Food |
Quantity |
Preparation |
|
Speed |
Time* |
|
|
|
|
|
|
Meats |
200 g / 7 oz |
Cut into 2 cm / 3/ |
" Cubes |
5 |
15 Seconds |
|
|
4 |
|
|
|
Almonds/Nuts |
200 g / 7 oz |
Place in Whole Nuts |
3 |
25 Seconds |
|
|
|
|
|
|
|
Garlic |
10–12 Cloves |
Place in Whole Cloves |
3 |
15 Seconds |
|
|
|
|
|
|
|
Onions |
100 g / 3.5 oz |
Cut into Quarters |
3 |
15 Seconds |
|
|
|
|
|
|
|
Cheese |
100 g / 3.5 oz |
Cut into 1 cm / 3/ |
" Cubes |
5 |
30 Seconds |
|
|
8 |
|
|
|
Hard Boiled Eggs |
2 |
Place in Whole Eggs |
4 |
3 Pulses |
|
|
|
|
|
|
|
Carrots |
200 g / 7 oz |
Cut Average Carrot |
3 |
15 Seconds |
|
|
|
into Quarters |
|
|
|
|
|
|
|
|
|
Herbs |
50 g / 2 oz |
Remove Stalks |
|
4 |
15 Seconds |
|
|
|
|
|
|
* Processing times and speeds are approximate.
Actual usage may vary depending on quality of food and desired chop size.
Operating Tips
•Cut solid foods into small pieces for easier blending or chopping.
•The Hand Blender is equipped with thermal protection from high operating temperatures. Should the Hand Blender suddenly stop during use, unplug it and allow 10 minutes to automatically reset.
•To avoid splashing, insert the Hand Blender into the mixture before pressing the power button, and release the power button before pulling the Hand Blender out of the mixture.
•When blending in a saucepan on a cooktop, remove the pan from the heating element to protect the Hand Blender from overheating.
•For best blending, hold the Hand Blender at an angle and gently move up and down within the container. Do not pound down on the mixture with the Hand Blender.
•To prevent overflow, allow room in the container for the mixture to rise when using the Hand Blender.
•Be sure the extra long cord of the Hand Blender is not extending over a hot heating element.
•Do not let the Hand Blender sit in a hot pan on the cooktop while not in use.
•Remove hard items, such as fruit pits or bones, from the mixture before blending or chopping to help prevent damage to the blades.
•Do not use your Hand Blender to process coffee beans or hard spices such as nutmegs. Processing these foods could damage the blades of the Hand Blender.
•Do not use the pitcher or the chopper bowl in the microwave oven.
•The stainless steel whisk may scratch or mar non-stick coatings; avoid using the whisk in non-stick cookware.
•To prevent splattering, use the whisk attachment in deep containers or pans.
12

Operating Your Hand Blender
Attachment Guide
Attachment |
Best used for |
S-Blade |
Blend, Crush, Puree |
|
Smoothies, Milk Shakes, Cooked Veggies, |
|
Soups, Sauces, Ice, Baby Food, Frosting, |
|
Crushed Ice |
<![endif]>English
Multi-Purpose |
Shred |
|
Cooked Meats, Beef Gravy, |
|
Liquidize Fruits, Minces, Crushed Ice |
Frother/Beater |
Froth and Mix |
|
Milk Latte, Frappes, Cappuccino, |
|
Cake Batter, Pancake Batter, Muffin Mix, |
|
Milk, Muffin Batter |
Whisk |
Whip, Emulsify, Aerate |
|
Pudding, Egg Whites, Mayonnaise, |
|
Vinaigrette, Mousse, Hollandaise Sauce, |
|
Whipping Cream |
Chopper |
Chopping |
|
Graham Cracker Crumbs, Vegetables, |
|
Parmesan Cheese, Peanuts, Salsa, |
|
Hard Boiled Eggs, Bread Crumbs, Herbs, |
|
Cooked Meats, Beef Gravy, |
|
Liquidize Fruits, Minces |
13

Care and Cleaning
Hand Blender
1.Unplug Hand Blender before cleaning.
2.Remove the Adapters and Attachments by twisting (see “Operating Your Hand Blender” section).
3.Wipe the Motor Body and Adapters with a damp cloth. Mild dish soap may be used, but do not use abrasive cleansers.
4.Wipe power cord with warm, sudsy cloth, then wipe clean with damp cloth. Dry with soft cloth.
5.Wash Chopper Adapter and Whisk Adapter by hand in hot, soapy water.
6.Dry Blending Arm and Bell Blade with soft cloth.
NOTE: Do not immerse the Motor Body or the adapters in water.
Hand Blender Accessories and Attachments
Wash Blending Attachment, Pitcher and Lid, Whisk, Chopper Bowl, Blade, and non-skid Base in hot, soapy water, or
in the top rack of the dishwasher. Dry thoroughly.
NOTE: Do not put whisk or chopper adapters in dishwasher.
14

ÍNDICE |
|
Avisos de Segurança |
|
Instruções importantes de segurança................................................... |
16 |
Condições elétricas............................................................................... |
18 |
Por Onde Começo? |
|
Rede elétrica da residência................................................................... |
18 |
Conexão à tomada ............................................................................... |
18 |
Acessórios e Funções do Mixer ................................................................... |
19 |
Preparando o Mixer para Uso |
|
Antes do primeiro uso......................................................................... |
22 |
Usando O Mixer |
|
Braço de mistura com giro-trava.......................................................... |
23 |
Batedor (acessório de mistura)............................................................. |
24 |
Processador (acessório de corte) .......................................................... |
25 |
Guia de processamento do processador .............................................. |
26 |
Dicas de Operação ....................................................................................... |
26 |
Guia de Acessórios ....................................................................................... |
27 |
Cuidados e Limpeza ..................................................................................... |
28 |
Dados Técnicos............................................................................................. |
29 |
Questões Ambientais ................................................................................... |
29 |
Assistência Técnica ou de Manutenção ...................................................... |
30 |
<![endif]>Português
15

Avisos de Segurança
A sua segurança e a de terceiros é muito importante.
Este manual e o seu produto têm muitas mensagens importantes de segurança. Sempre leia e siga as mensagens de segurança.
Este é o símbolo de alerta de segurança.
Este símbolo alerta sobre situações que podem trazer risco a sua vida, ferimentos a você ou a terceiros.
Todas as mensagens de segurança virão após o símbolo de alerta de segurança e a palavra “PERIGO” ou “ADVERTÊNCIA”. Estas palavras significam:
Existe risco de você perder a vida ou de ocorrerem danos graves se as instruções não forem seguidas imediatamente.
Existe risco de você perder a vida ou de ocorrerem danos graves se as instruções não forem seguidas.
Todas as mensagens de segurança mencionam qual é o risco em potencial, como reduzir a chance de se ferir e o que pode acontecer se as instruções não forem seguidas.
INSTRUÇÕES IMPORTANTES DE
SEGURANÇA
Quando utilizar um aparelho elétrico, precauções básicas de segurança sempre devem ser seguidas, incluindo as que se seguem:
1. Leia todas as instruções. O uso incorreto pode resultar em acidentes.
2. Para evitar o risco de choque elétrico, não coloque o mixer, o cabo de alimentação ou o plugue dentro da água ou outros líquidos.
3. Este produto não está destinado para ser utilizado por pessoas (incluindo crianças) com capacidades mentais, sensoriais ou físicas reduzidas ou com falta de experiência e conhecimento, a menos que sejam supervisionadas
ou instruídas por um adulto responsável pela sua segurança.
16

Avisos de Segurança
4. Este produto não pode ser utilizado por crianças. Tome muito cuidado quando usar qualquer aparelho elétrico próximo de crianças.
Recomenda-se que as crianças sejam vigiadas para assegurar que elas não estejam brincando com o produto.
5. Retire o plugue da tomada quando o produto não estiver em uso, antes de colocar ou retirar peças e antes de limpar.
Nunca ligue o mixer sem que todos os componentes estejam montados corretamente.
6. Nunca toque em nenhuma peça em movimento, pois pode causar ferimentos e/ou danificar o seu produto.
7. Não opere qualquer aparelho elétrico com o cabo de alimentação danificado, após mau funcionamento ou após uma queda ou se, de alguma forma, estiver danificado. Leve o aparelho elétrico à Assistência Técnica Autorizada mais próxima para que seja examinado, consertado ou para ajustes elétricos ou mecânicos, a fim de evitar algum possível risco.
Se o cabo de alimentação estiver danificado, ele deve ser substituído. Entre em contato com a Central de Relacionamento KitchenAid.
8. O uso de acessórios não recomendados ou não vendidos pela KitchenAid pode causar incêndio, choque elétrico ou ferimentos.
9. Certifique-se de que o processador (acessório de corte) esteja preso com segurança antes de operar o mixer.
10. Não use o produto em ambientes externos.
11. Não deixe o cabo de alimentação pender da borda da mesa ou do balcão.
Nunca deixe o cabo de alimentação em locais de circulação, pois pode derrubar o produto e/ou causar acidentes.
12. Não deixe que o cabo de alimentação entre em contato com superfícies quentes, incluindo o fogão.
<![endif]>Português
17
 Loading...