

Page 1
5KFP0933
INSTRUCTIONS
INSTRUCTIONS
INSTRUCCIONES
Page 2
FOOD PROCESSOR INSTRUCTIONS
TABLE OF CONTENTS
FOOD PROCESSOR SAFETY
Important safeguards .......................................................................................... 3
Electrical requirements ...................................................................................... 4
PARTS AND FEATURES
Parts and accessories .......................................................................................... 5
Accessories selection guide ................................................................................ 6
ASSEMBLING THE FOOD PROCESSOR
Attaching the work bowl .................................................................................... 7
Attaching the work bowl cover .......................................................................... 7
Installing the adjustable slicing disc ..................................................................... 8
Adjusting the slicing thickness............................................................................. 8
Installing the reversible shredding disc ............................................................... 9
Installing the multipurpose blade ...................................................................... 10
OPERATING THE FOOD PROCESSOR
Using the Food Processor ................................................................................ 11
Using the 3-in-1 feed tube ................................................................................ 12
Removing processed foods ............................................................................... 13
TIPS FOR GREAT RESULTS
Using the multipurpose blade ........................................................................... 14
Using a slicing or shredding disc ....................................................................... 15
Helpful hints ..................................................................................................... 16
CARE AND CLEANING ....................................................................................... 17
TROUBLESHOOTING ......................................................................................... 18
For more information, visit our website at: KitchenAid.com.au
FOOD PROCESSOR SAFETY
2
Page 3

FOOD PROCESSOR SAFETYFOOD PROCESSOR INSTRUCTIONS
IMPORTANT SAFEGUARDS
When using electrical appliances, basic safety precautions
should always be followed, including the following:
1. Read all instructions. Misuse of appliance may result in
personal injury.
2. To protect against risk of electrical shock, do not put Food
Processor in water or other liquid.
3. Children must be supervised to ensure that they not play
with, reach, or use the appliance and its cord.
4. Unplug from the outlet when not in use, before putting
on or taking off parts, and before cleaning.
5. Avoid contacting moving parts.
6. Do not operate any appliance with a damaged cord or
plug, or after the appliance malfunctions, or is dropped or
damaged in any manner. Return appliance to the nearest
Authorized Service Facility for examination, repair, or
electrical or mechanical adjustment.
7. The use of attachments not recommended or sold by
KitchenAid may cause re, electric shock, or injury.
8. Do not use outdoors.
9. Do not let cord hang over edge of table or counter.
10. Keep hands and utensils away from moving blades or discs
while processing food to reduce the risk of severe injury to
persons or damage to the Food Processor. A scraper may
be used but must be used only when the Food Processor
is not running.
11. Blades are sharp. Care should be taken when handling
the sharp cutting blades, emptying the bowl and during
cleaning.
12. To reduce the risk of injury, never place cutting blade or
discs on base without rst putting bowl properly in place.
13. Be certain cover is securely locked in place before
operating appliance.
14. Never feed food by hand. Always use the food pusher.
15. Do not attempt to defeat the cover interlock mechanism.
16. This product is designed for household use only.
17. To disconnect, turn any control to “OFF,” then remove plug
from wall outlet.
English
3
Page 4

18. This appliance is not intended for use by persons with
reduced physical, sensory, or mental capabilities, or lack of
experience and knowledge, unless they have been given
supervision or instruction concerning use of the appliance
in a safe way by a person responsible for their safety, and if
they understand the hazards involved.
19. This appliance is intended to be used in household and
similar applications such as:
-staff kitchen areas in shops, ofces, and other working
environments
-farm houses
-by clients in hotels, motels, and other residential type
environments
-bed and breakfast type environments.
20. Be careful if hot liquid is poured into the food processor or
blender as it can be ejected out of the appliance due to a
sudden steaming.
SAVE THESE INSTRUCTIONS
Electrical requirements
Voltage: 220-240 VAC
Frequency: 50/60 Hz
Wattage: 240 Watts
4
Page 5
PARTS AND FEATURESFOOD PROCESSOR SAFETY
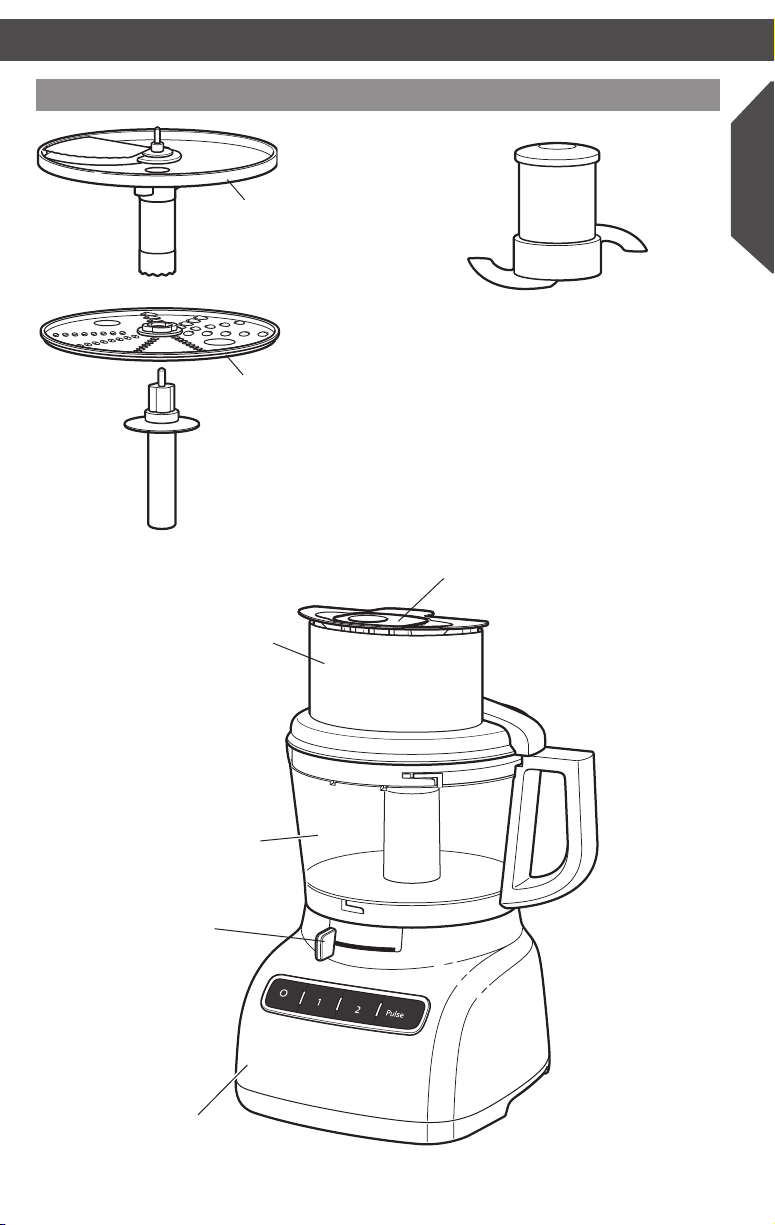
Parts and accessories
Disc adapter
Work bowl
cover with
3-in-1 feed
tube
Externally
adjustable slicing
disc (thin to thick)
Reversible
(2 mm and 4 mm)
shredding disc
English
Multipurpose
stainless steel
blade
3-piece
food pusher
2.0 L (9-cup)
work bowl
Externally
adjustable
slicing control
Heavy-duty
base
5
Page 6
PARTS AND FEATURES ASSEMBLING THE FOOD PROCESSOR
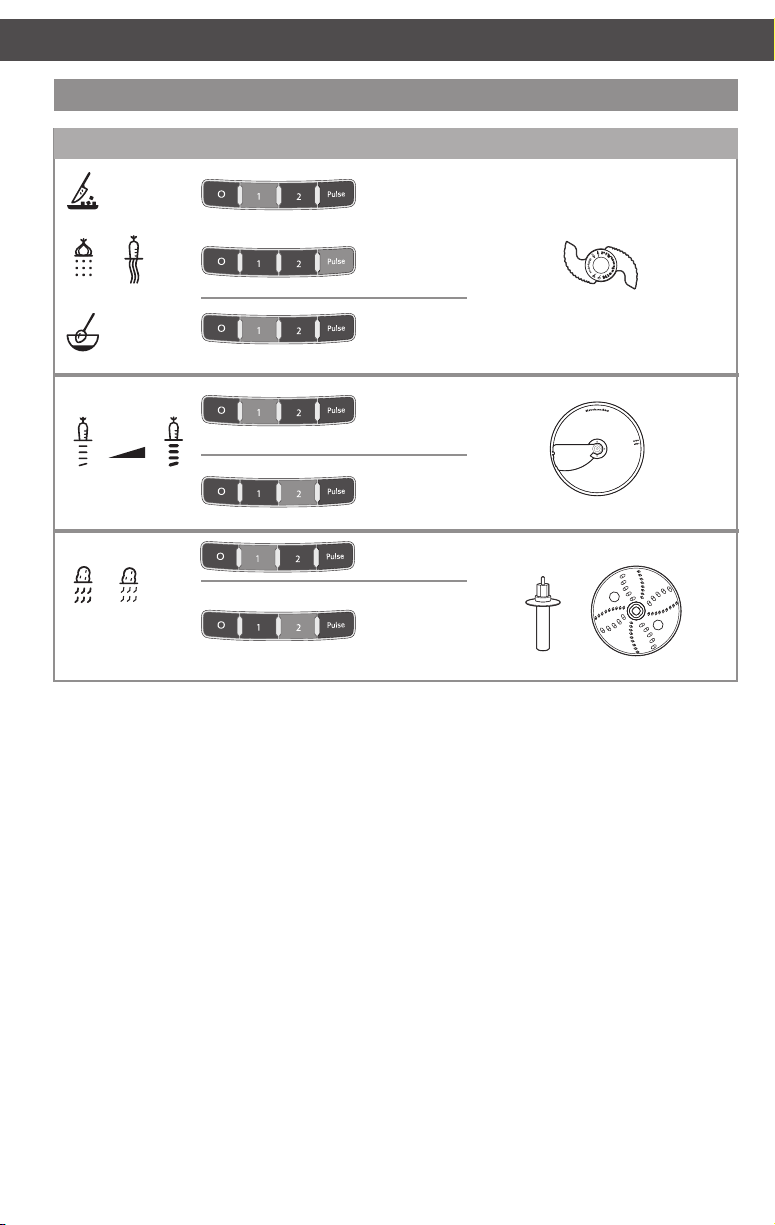
Accessories selection guide
Action Setting Food Accessory
Cheese Multipurpose stainless steel blade
Chocolate
Fruit
Chop
Fresh herbs
Nuts
Tofu
Vegetables
Pesto
Salsa
Sauces
Fruit (soft) Externally adjustable slicing disc
Potatoes
Tomatoes
Vegetables (soft)
Cheese
Chocolate
Fruit (hard)
Vegetables (hard)
Potatoes Reversible shredding disc
Vegetables (soft)
Cabbage
Cheese
Chocolate
Fruit (hard)
Vegetables (hard)
Mince
Mix
Slice
thin
Shred
medium
Puree
Shred
ne
Slice
thick
Pasta Sauce
A
d
j
u
s
t
a
b
l
e
S
l
i
c
i
n
g
(
t
h
i
n
t
o
t
h
i
c
k
)
+
6
Page 7
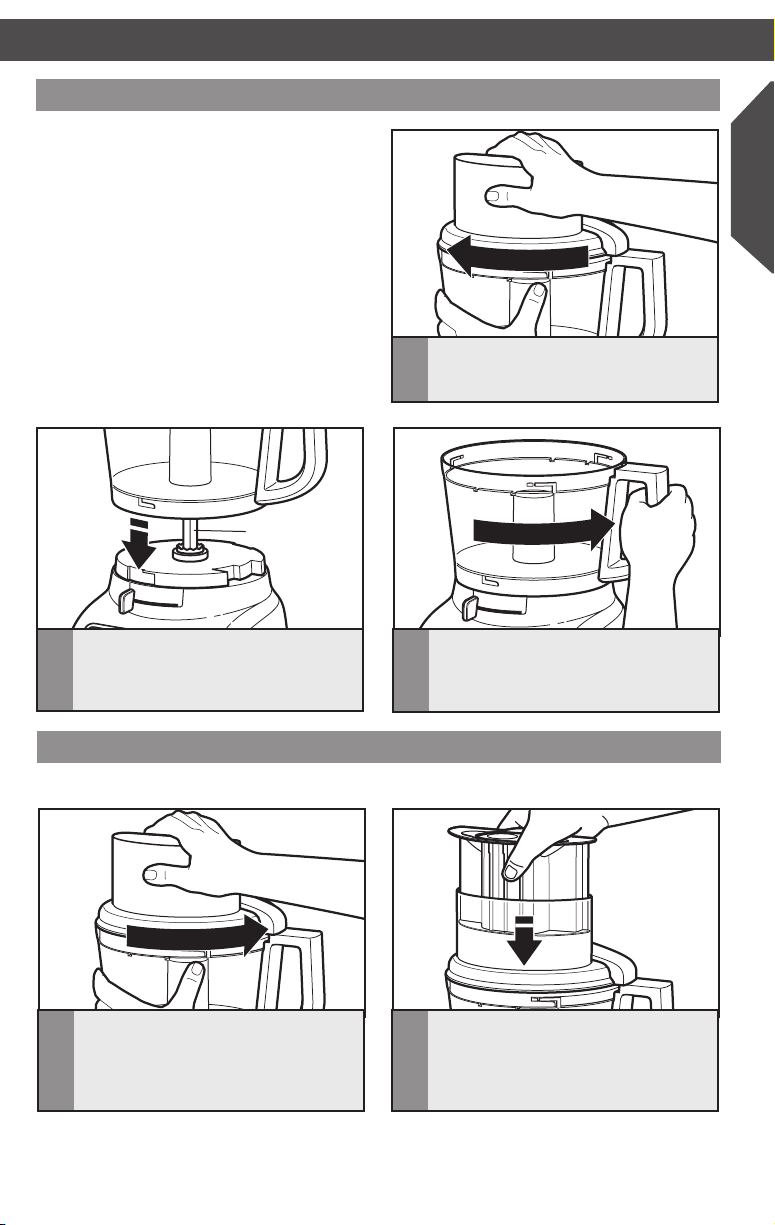
Attaching the work bowl
Before First Use
Before using your Food Processor for the
first time, wash all parts and accessories
either by hand or in the dishwasher (see
“Cleaning the Food Processor” section).
NOTE: Your Food Processor is shipped
with the work bowl cover installed on
the work bowl.
IMPORTANT: Place the Food Processor
on a dry, level countertop with the
controls facing forward. Do not plug
in the Food Processor until it is
completely assembled.
Power Shaft
Grasp the feed tube on the work bowl
1
cover and turn it clockwise to remove
it from the work bowl.
English
Place the work bowl on the base,
2
aligning the raised portion with the
indentation on the base. The center
hole should fit over the power shaft.
Grasp the work bowl handle and turn
3
the bowl counterclockwise to lock it
on the base.
Attaching the work bowl cover
NOTE: Be sure to install the desired accessory before attaching the work bowl cover.
Place the work bowl cover on the work
1
bowl with the feed tube just to the left
of the work bowl handle. Grasp the feed
tube and turn the cover to the right until
it locks into place.
NOTE: Your Food Processor will not operate unless the work bowl and work bowl cover
are properly locked on the base, and the large pusher is inserted to the maximum fill line
on the feed tube (approximately halfway down).
Fit the food pusher into the 3-in-1
2
feed tube. See “Using the 3-in-1 Feed
Tube” for details on working with
different sized foods.
7
Page 8
ASSEMBLING THE FOOD PROCESSOR ASSEMBLING THE FOOD PROCESSOR
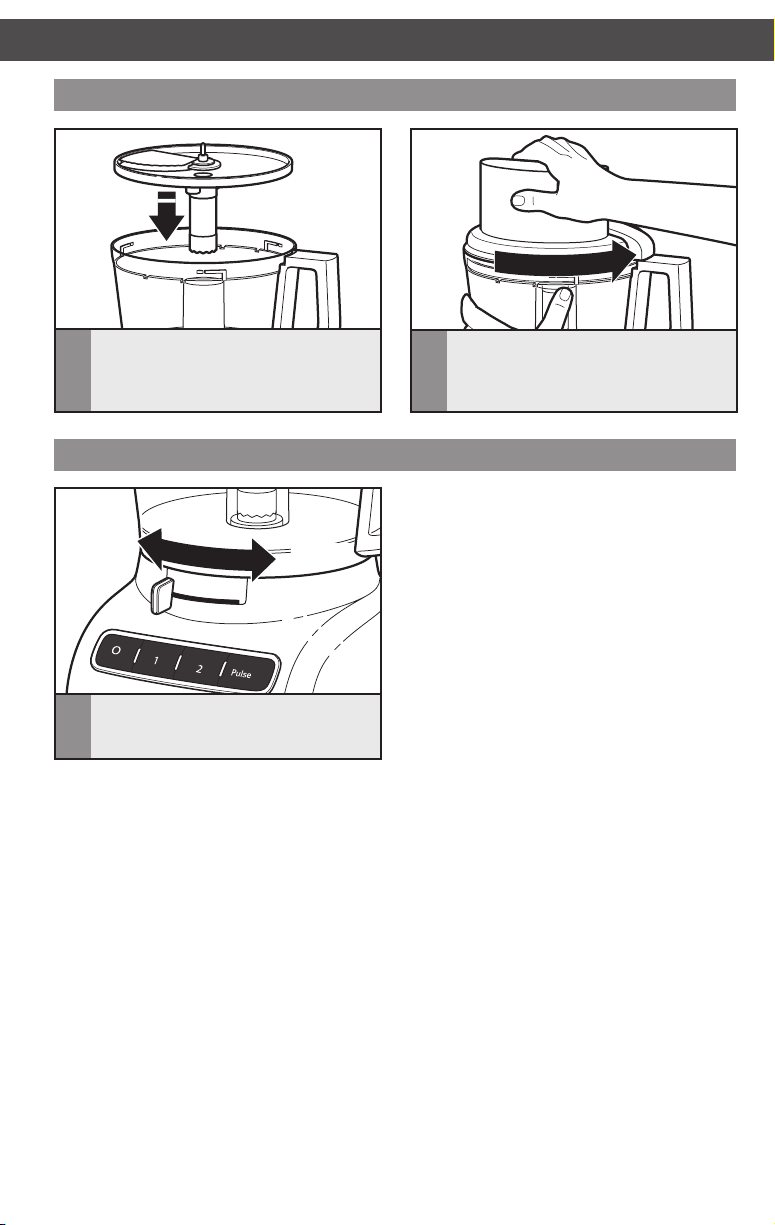
Installing the adjustable slicing disc
Hold the slicing disc by the finger grips
1
and lower it onto the drive adapter.
You may need to turn the disc/drive
adapter until it drops down into place.
Adjusting the slicing thickness
Thinner
Set the desired slicing thickness by
1
moving the lever to the left for thinner
slices or to the right for thicker slices.
Thicker
Install the work bowl cover, being sure
2
it locks into place.
NOTE: The lever only works with the
adjustable slicing disc. Changing thickness
settings with other discs or blades installed
will have no effect on operation.
8
Page 9
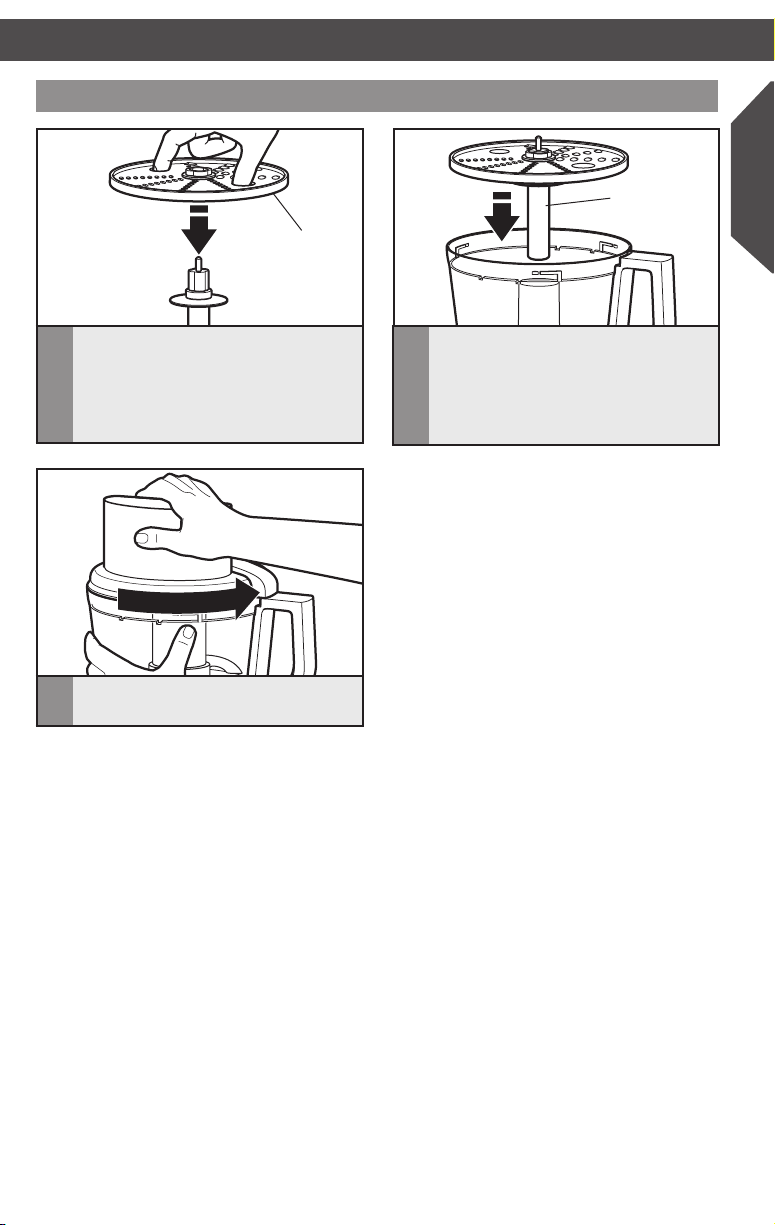
Installing the reversible shredding disc
Finger grip
Hold the reversible shredding disc
1
by the 2 finger grips with the desired
shredding side facing UP. Insert the disc
adapter into the hole in the bottom of
the disc.
Install the work bowl cover, being sure
3
it locks into place.
Drive
adapter
With the work bowl installed, slide the
2
drive adapter onto the power shaft.
Then install the work bowl cover, being
sure it locks into place. You may need
to turn the disc/adapter until it drops
into place.
English
9
Page 10
ASSEMBLING THE FOOD PROCESSOR OPERATING THE FOOD PROCESSOR
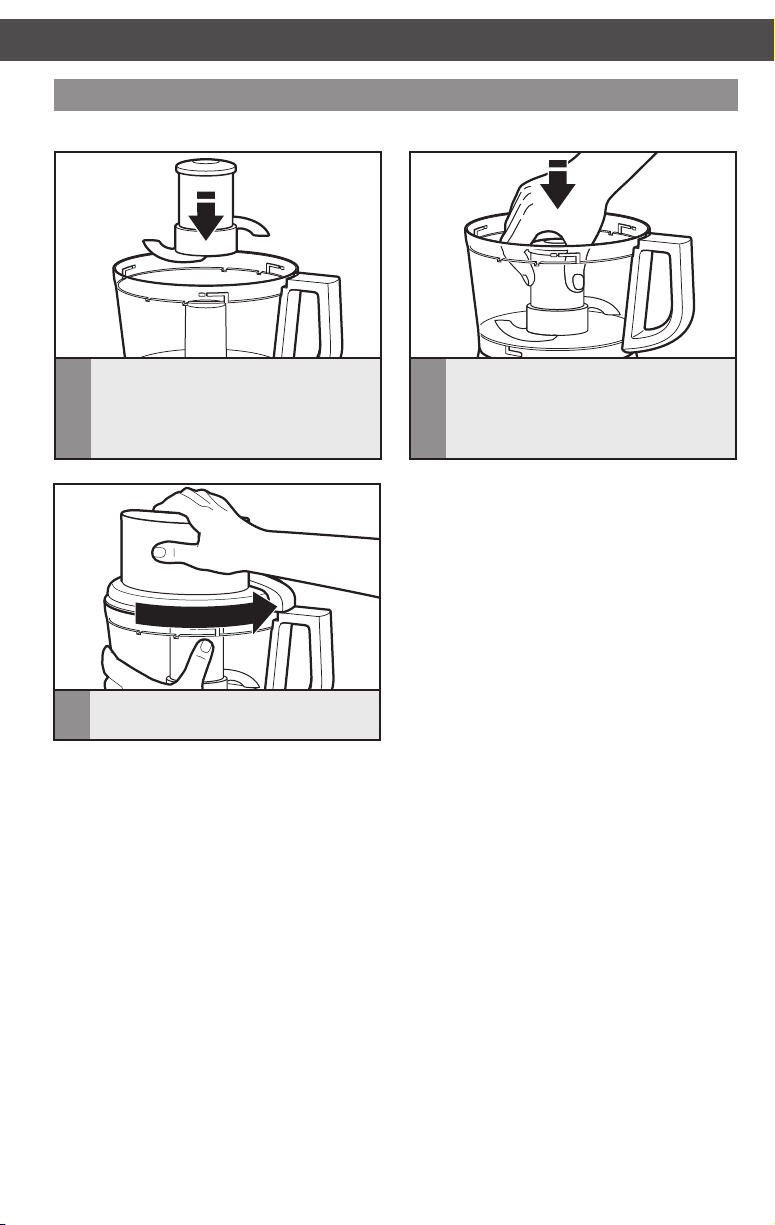
Installing the multipurpose blade
IMPORTANT: The multipurpose blade can only be used with the work bowl.
Place the blade on the power shaft.
1
Rotate the blade so it falls into place
on the power shaft.
Install the work bowl cover, being sure
3
it locks into place.
Push to lock: Press down firmly on the
2
multipurpose blade until it is down as
far as it will go. The multipurpose blade
features an internal seal that fits tightly
over the center of the work bowl.
10
Page 11
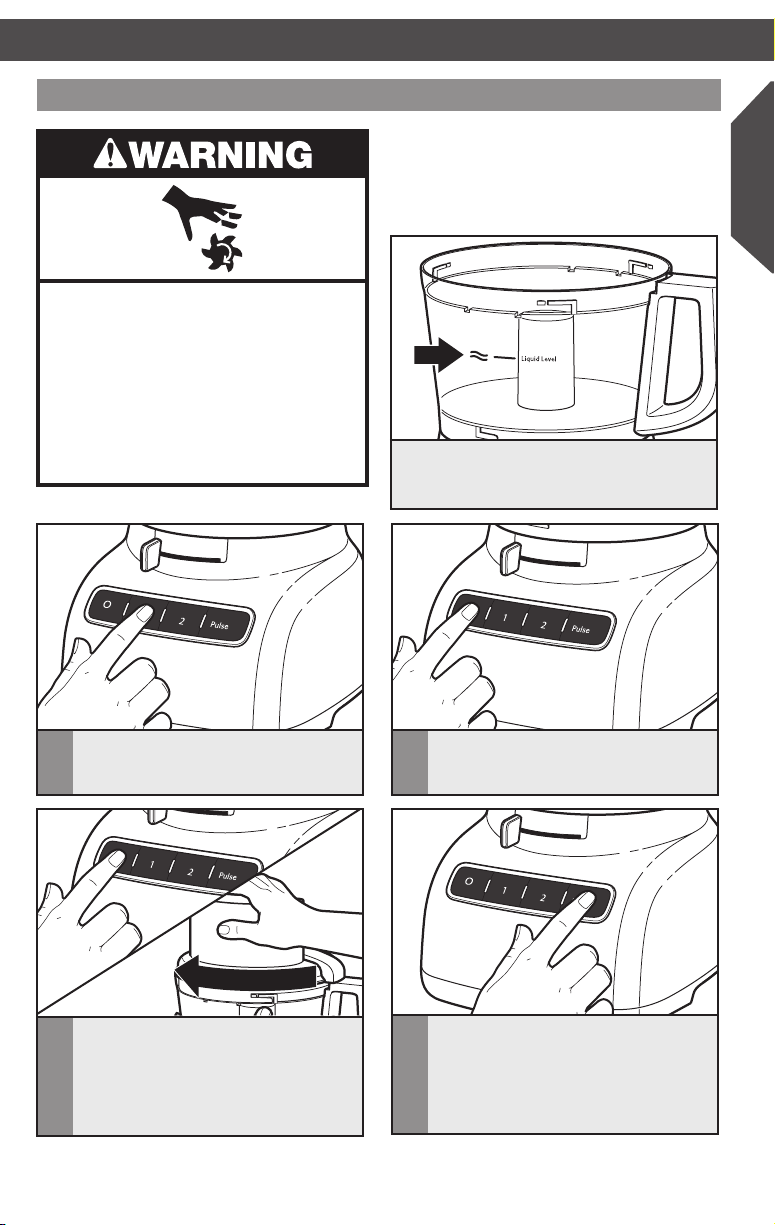
Using the Food Processor
Rotating Blade Hazard
Always use food pusher.
Keep ngers out of openings.
Keep away from children.
Failure to do so can result in
amputation or cuts.
Before operating the Food Processor, be
sure the work bowl, blades, and work bowl
cover are properly assembled on the Food
Processor base (see “Assembling the Food
Processor” section).
This line on the work bowl indicates
the maximum level of liquid that can be
processed by the Food Processor.
English
To turn on, press 1(low) or 2 (high). The
1
Food Processor will run continuously
and the indicator light will glow.
Wait until the blade or disc comes to
3
a complete stop before removing the
work bowl cover. Be sure to turn off the
Food Processor before removing the
work bowl cover, or before unplugging
the Food Processor.
NOTE: If the Food Processor fails to operate, make sure the work bowl and cover are
properly locked on the base (see “Assembling the Food Processor” section).
When finished, press the “O” (Off)
2
button. The indicator light will go out
and the blade or disc will slow to a stop.
The pulse control allows precise
4
control of the duration and frequency
of processing. It’s great for jobs which
require a light touch. Just press and hold
the PULSE Button to start processing at
high speed, and release it to stop.
11
Page 12
OPERATING THE FOOD PROCESSOR OPERATING THE FOOD PROCESSOR
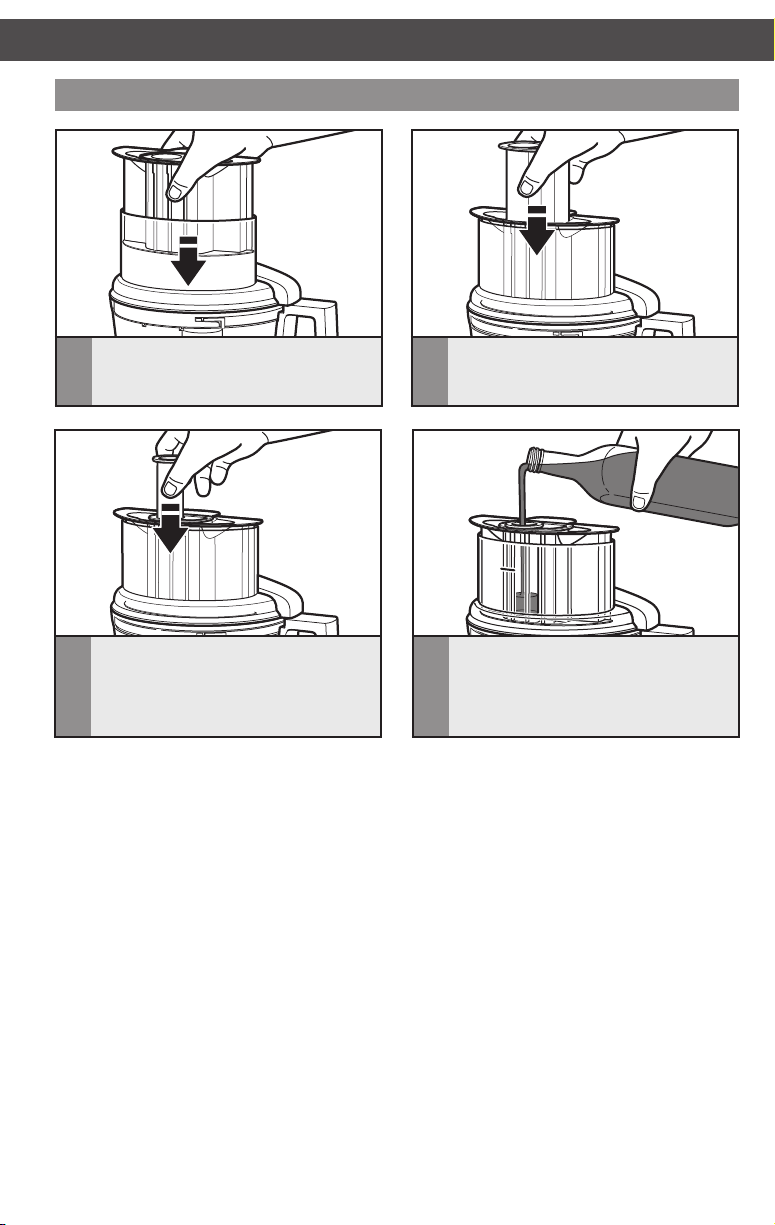
Using the 3-in-1 feed tube
Use the entire feed tube and the large
1
food pusher to process large items.
Use the small food pusher to slice or
3
shred the smallest, thinnest items.
Use the medium food pusher in the
2
feed tube to process smaller items.
Use the drizzle hole in the small food
4
pusher to slowly drizzle oil or other
liquid ingredients into the work bowl.
The drizzle hole flow rate is ideal for
making mayonnaise.
12
Page 13
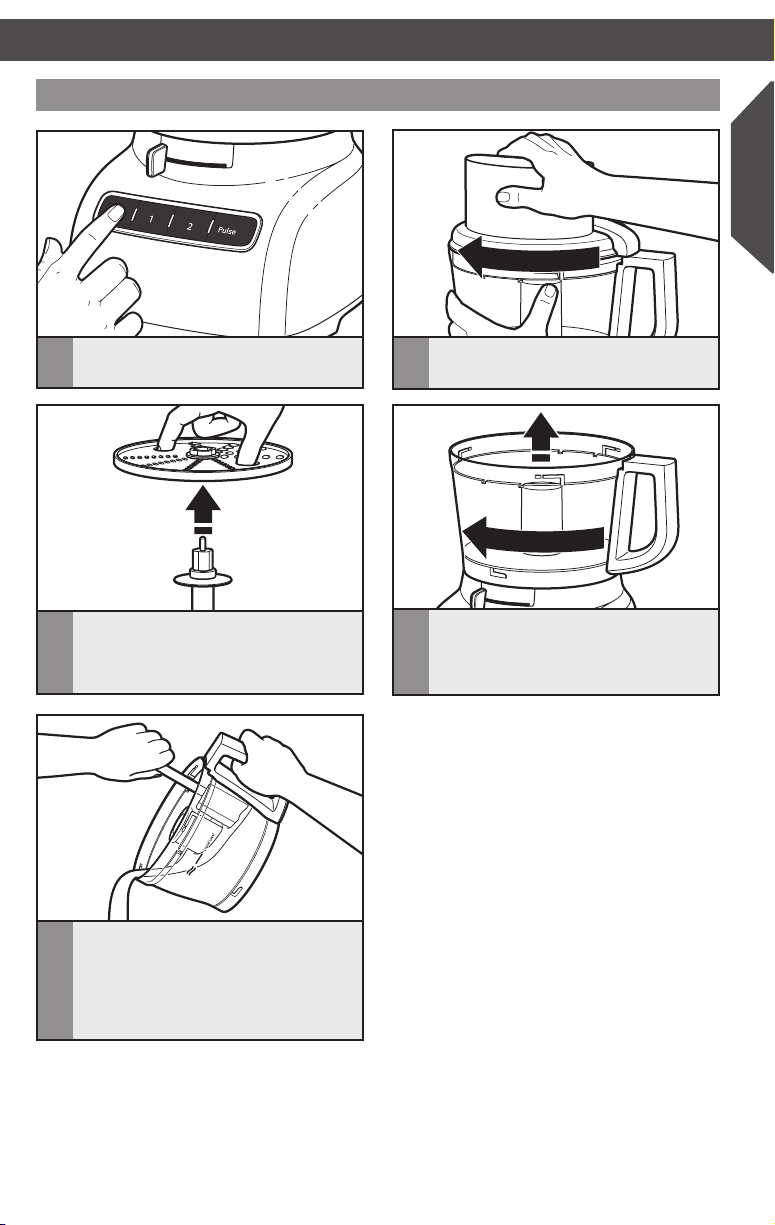
Removing processed foods
English
Press the “O” (Off) button and unplug
1
before disassembling.
If using a disc, remove it before
3
removing the bowl. Holding the disc
by the 2 finger grips, lift it straight up,
then remove the adapter.
Turn the work bowl cover to the left
2
and remove.
Turn the work bowl to the left to unlock
4
it from the base. Lift to remove.
The multipurpose blade can be
5
removed from the work bowl before
the contents are emptied. You may also
leave the blade locked in place. Then
remove food from the bowl and blade
with a spatula.
13
Page 14

Using the multipurpose blade
To chop fresh fruits or
vegetables:
Peel, core, and/or remove seeds.
Cut food in 2.5-3.75 cm (1 to
1
/2-inch) pieces. Process food
1
to desired size, using Speed 1 (low). Scrape
sides of bowl, if necessary.
To puree cooked fruits and vegetables
(except potatoes):
Add 60 ml (1/4 cup) liquid from recipe per
235 ml (1 cup) of food. Process food, using
short pulses, until nely chopped. Then
process continuously until reaching desired
texture. Scrape sides of bowl, if necessary.
To prepare mashed potatoes:
Shred hot cooked potatoes using the
shredding disc. Exchange shredding disc
for multipurpose blade. Add softened butter,
milk, and seasonings. Pulse 3 to 4 times,
2 to 3 seconds each time, until smooth
and milk is absorbed. Do not over process.
To chop dried (or sticky) fruits:
The food should be cold. Add 60 ml
(1/4 cup) our from recipe per 120 ml
(1/2 cup) dried fruit. Process fruit, using
short pulses, until reaching desired texture.
To nely chop citrus peel:
With sharp knife, peel colored portion
(without white membrane) from citrus.
Cut peel in small strips. Process until
nely chopped.
To mince garlic or to chop fresh herbs
or small quantities of vegetables:
With Food Processor running, add food
through the feed tube. Process until
chopped. For best results, make sure
work bowl and herbs are very dry before
chopping.
To chop nuts or make nut butters:
Process up to 710 ml (3 cups) of nuts to
desired texture, using short pulses, 1 to
2 seconds each time. For a coarser texture,
process smaller batches, pulsing 1 or
2 times, 1 to 2 seconds each time. Pulse
more often for ner texture. For nut butters,
process continuously until smooth. Store
in refrigerator.
NOTE: Processing nuts and other hard
foods may scratch the surface finish on the
inside of the bowl.
To chop cooked or raw meat, poultry,
or seafood:
The food should be very cold. Cut in
2.5 cm (1-inch) pieces. Process up to
455 g (1 pound) at a time to desired size,
using short pulses, 1 to 2 seconds each time.
Scrape sides of bowl, if necessary.
To make bread, cookie, or
cracker crumbs:
Break food into 3.75-5 cm (1
1
/2 to 2-inch)
pieces. Process until ne. For larger pieces,
pulse 2 to 3 times, 1 to 2 seconds each time.
Then process until ne.
To melt chocolate in a recipe:
Combine chocolate and sugar from recipe
in work bowl. Process until nely chopped.
Heat liquid from recipe. With Food
Processor running, pour hot liquid through
the feed tube. Process until smooth.
To grate hard cheeses, such as Parmesan
and Romano:
Never attempt to process cheese that
cannot be pierced with the tip of a sharp
knife. You can use the multi-purpose blade
to grate hard cheeses. Cut cheese in 2.5 cm
(1-inch) pieces. Place in work bowl. Process,
using short pulses, until coarsely chopped.
Process continuously until nely grated. Pieces
of cheese can also be added through the feed
tube while the Food Processor is running.
14
Page 15
TIPS FOR GREAT RESULTSTIPS FOR GREAT RESULTS
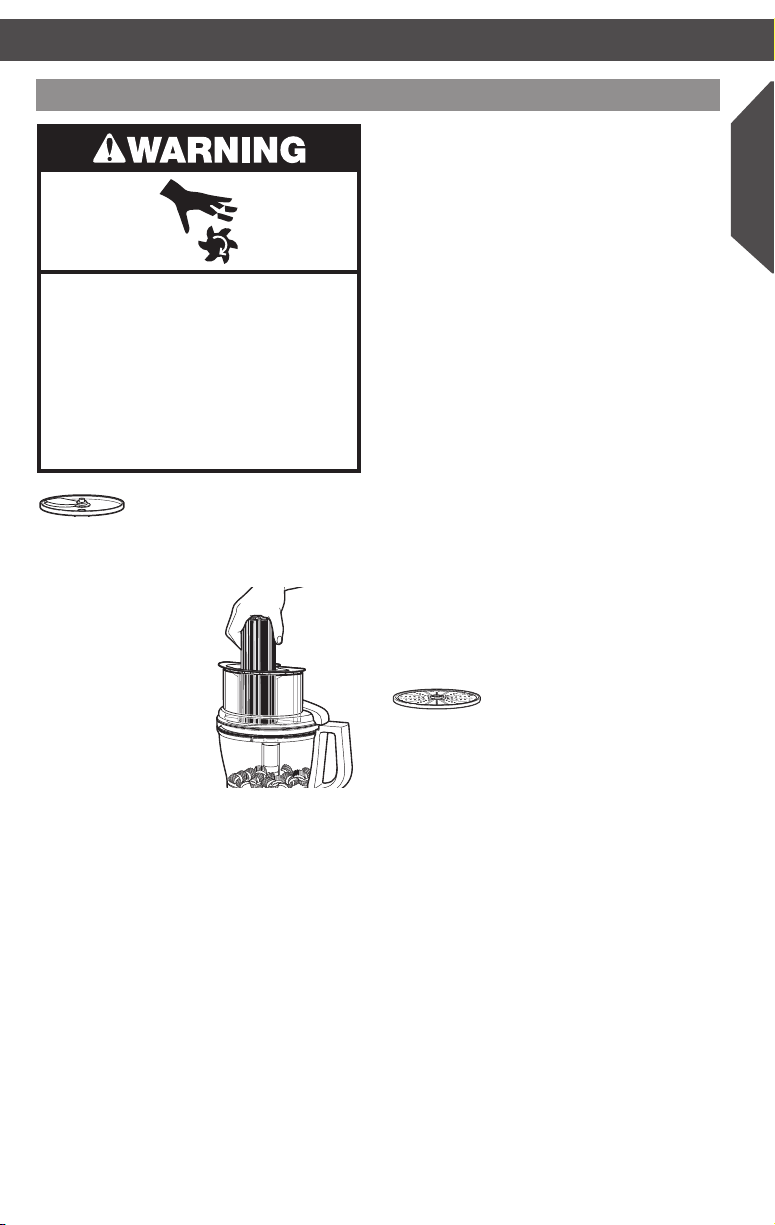
Using a slicing or shredding disc
Rotating Blade Hazard
Always use food pusher.
Keep ngers out of openings.
Keep away from children.
Failure to do so can result in
amputation or cuts.
To slice or shred fruits or
vegetables that are long
and relatively small in
diameter, such as celery, carrots,
and bananas:
Cut food to t
wide mouth feed
tube vertically or
horizontally, and
pack feed tube
securely to keep
food positioned
properly. Do not
exceed the Max
Fill line. Process
using even
pressure with wide food pusher.
Or use the small feed tube in the 3-piece
food pusher. Position food vertically in
the tube and use the small food pusher to
process food.
To slice or shred fruits and vegetables
that are round, such as onions, apples,
and green peppers:
Peel, core, and remove seeds. Cut in halves
or quarters to t feed tube. Position in feed
tube. Process using even pressure with
food pusher.
To slice or shred fruits and vegetables
that are small, such as strawberries,
mushrooms, and radishes:
Position food vertically or horizontally in
layers within the feed tube. Fill feed tube
in order to keep food positioned properly.
Process, using even pressure. Or use the
small feed tube in the 3-piece food pusher.
Position food vertically in the tube and use
the small food pusher to process food.
To slice uncooked meat or poultry, such
as stir-fry meats:
Cut or roll food to t feed tube. Wrap and
freeze food until hard to the touch, 30
minutes to 2 hours, depending on thickness
of food. Check to be sure you can still pierce
food with the tip of a sharp knife. If not,
allow to thaw slightly. Process using even
pressure with food pusher.
To slice cooked meat or poultry,
including salami, pepperoni, etc.:
Food should be very cold. Cut in pieces to
t feed tube. Process food using rm, even
pressure with food pusher.
To shred spinach and other leaves:
Stack leaves. Roll up and stand up in feed
tube.Process using even pressure with
food pusher.
To shred rm and soft
cheeses:
Firm cheese should be very
cold. For best results with soft cheeses,
such as mozzarella, freeze 10 to 15 minutes
before processing. Cut to t feed tube.
Process using even pressure with food
pusher.
English
15
Page 16
TIPS FOR GREAT RESULTS
Helpful hints
• To avoid damage to the blade or motor,
do not process food that is so hard or
rmly frozen that it cannot be pierced
with the tip of a sharp knife. If a piece
of hard food, such as a carrot, becomes
wedged or stuck on the blade, stop the
Food Processor and remove the blade.
Gently remove food from the blade.
• Do not overll work bowl. For thin
mixtures, ll work bowl up to 1/2 to 2/3
full. For thicker mixtures, ll work bowl
up to 3/4 full. For liquids, ll up to the
maximum level as described in “Using the
Food Processor” section. When chopping,
the work bowl should be no more than
1/3 to 1/2 full.
• Position slicing discs so the cutting surface
is just to the right of the feed tube. This
allows the blade a full rotation before
contacting the food.
• To capitalize on the speed of the Food
Processor, drop ingredients to be chopped
through the feed tube while the Food
Processor is running.
• Different foods require varying degrees
of pressure for best shredding and slicing
results. In general, use light pressure
for soft, delicate foods (strawberries,
tomatoes, etc.), moderate pressure for
medium foods (zucchini, potatoes, etc.),
and rmer pressure for harder foods
(carrots, apples, hard cheeses, partially
frozen meats, etc.).
• Soft and medium-hard cheese may spread
out or roll up on the shredding disc. To
avoid this, shred only well-chilled cheese.
• Sometimes slender foods, such as carrots
or celery, fall over in the feed tube,
resulting in an uneven slice. To minimize
this, cut food in several pieces and
pack the feed tube with the food. For
processing small or slender items, the
small feed tube in the 3-piece food pusher
will prove especially convenient.
• When preparing a cake or cookie batter
or quick bread, use the multipurpose
blade to cream fat and sugar rst. Add dry
ingredients last. Place nuts and fruit on top
of our mixture to prevent overchopping.
Process nuts and fruits, using short pulses,
until blended with other ingredients. Do
not overprocess.
• When shredded or sliced food piles up
on one side of the bowl, stop the Food
Processor and redistribute the food using
a spatula.
• When food quantity reaches the bottom
of a slicing or shredding disc, remove
the food.
• A few larger pieces of food may remain
on top of the disc after slicing or
shredding. If desired, cut these by
hand and add to mixture.
• Use a spatula to remove ingredients
from the work bowl.
• Organize processing tasks to minimize
bowl cleanup. Process dry or rm
ingredients before liquid ingredients.
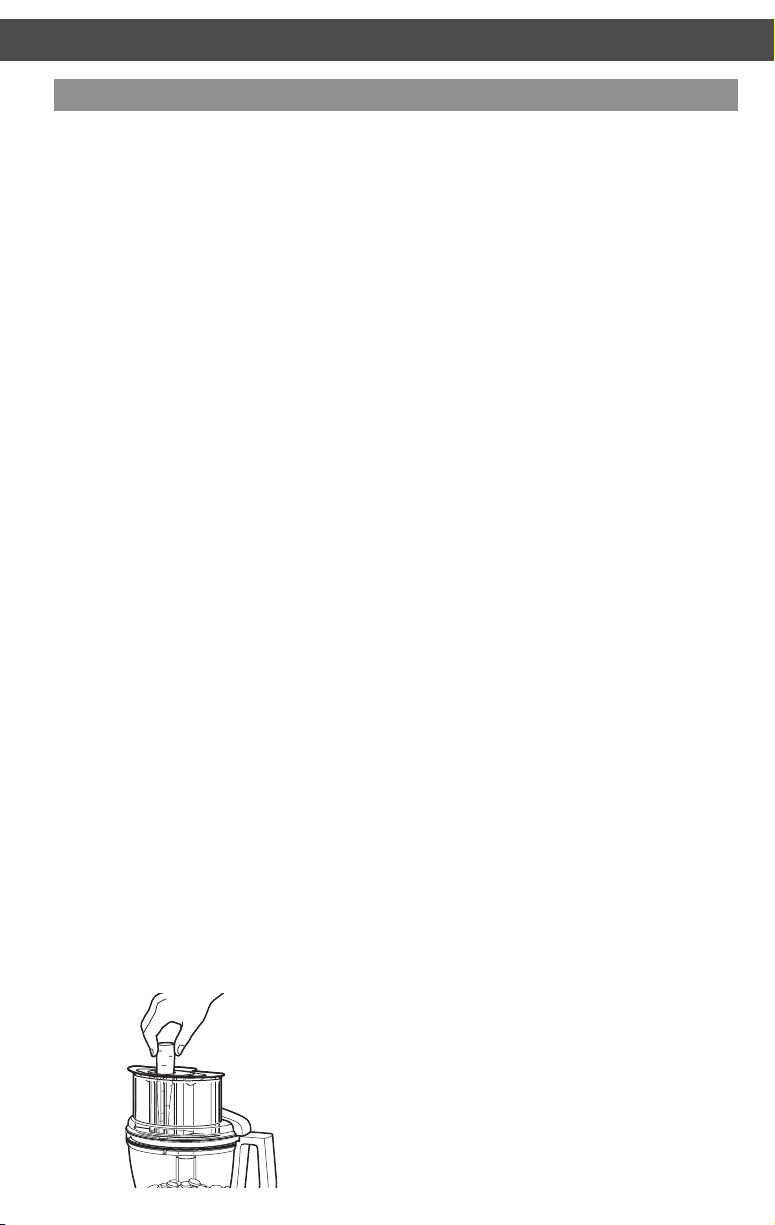
• To clean ingredients from the
multipurpose blade easily, just empty
the work bowl, replace the lid, and
pulse 1 to 2 seconds to spin the
blade clean.
• After removing the work bowl cover,
place it upside down on the counter.
This will help keep the counter clean.
• Your Food Processor is not designed to
perform the following functions:
- Grind coffee beans, grains, or
hard spices
- Grind bones or other inedible
parts of food
- Liquefy raw fruits or vegetables
- Slice hard-cooked eggs or unchilled
meats.
• If any plastic parts should discolor due to
the types of food processed, clean them
with lemon juice.
16
Page 17
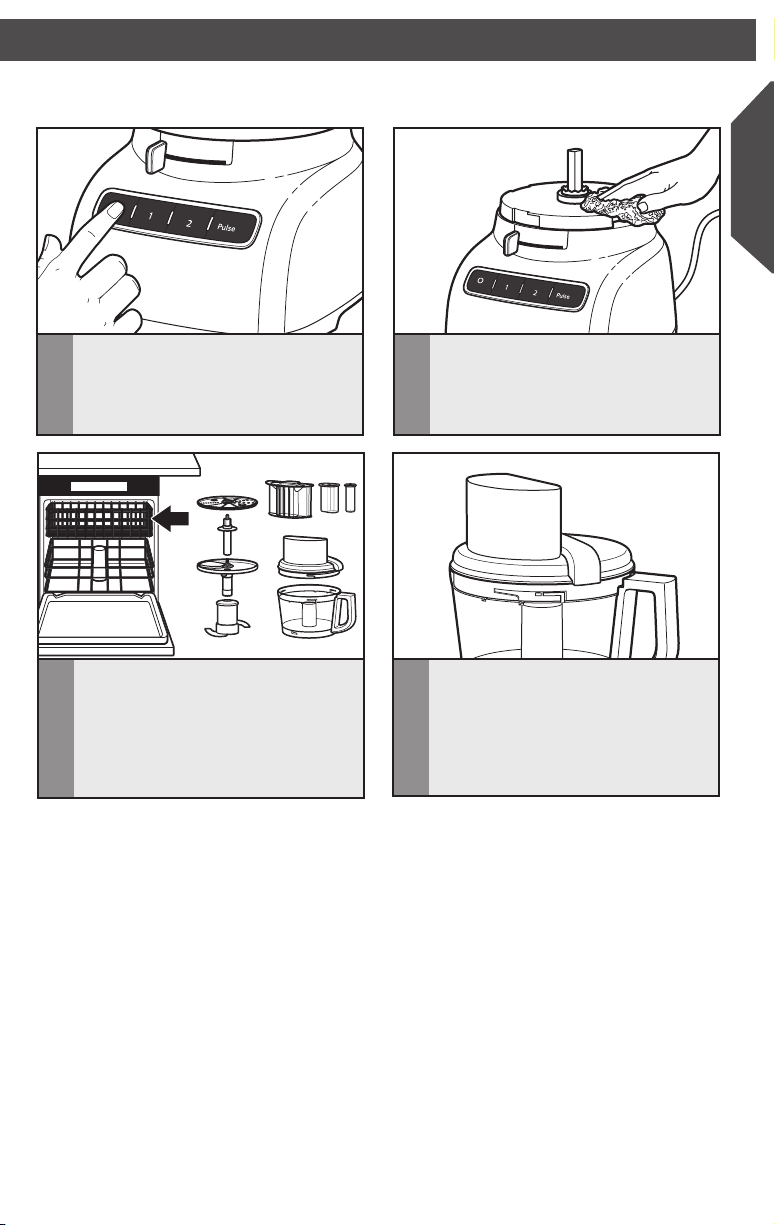
IMPORTANT: These BPA-free bowls require special handling. If you choose to use
a dishwasher instead of hand washing, please follow these guidelines.
English
Press the “O” (Off) button, then unplug
1
the Food Processor before cleaning.
All parts are top rack dishwasher
3
safe. Avoid laying the bowl on its side.
Thoroughly dry all parts after washing.
Use gentle dishwashing cycles such as
normal. Avoid high temperature cycles.
NOTE: If washing the Food Processor parts by hand, avoid the use of abrasive cleansers or
scouring pads. They may scratch or cloud the work bowl and cover.
Wipe the base and cord with a warm,
2
sudsy cloth, and wipe clean with a
damp cloth. Thoroughly dry with a soft
cloth. Do not use abrasive cleaners or
scouring pads.
To prevent damage to the locking
4
system, always store the work bowl
and work bowl cover in the unlocked
position when not in use. Wrap the
power cord around the work bowl,
then secure the plug by clipping it
to the cord.
17
Page 18

TROUBLESHOOTING
If your Food Processor should malfunction or fail to operate, check the following:
Food Processor doesn’t run:
• Make sure that the bowl and lid are
properly aligned and locked in place and
the large food pusher is inserted in the
feed tube.
• When using the large feed tube opening,
make sure that food is not above the Max.
Fill line on the feed tube.
• Press only one button at a time. The Food
Processor will not operate if more than
one button is pressed at the same time.
• Is the Food Processor plugged in?
• Is the fuse in the circuit to the Food
Processor in working order? If you have
a circuit breaker box, be sure the circuit
is closed.
• Unplug the Food Processor, then plug it
back into the outlet.
• If the Food Processor is not at room
temperature, wait until it reaches room
temperature and retry.
Food Processor not shredding or slicing
properly:
• Make sure the raised-blade side of the
disc is positioned face up on the common
adapter.
• If using the adjustable slicing blade, make
sure it is set to the correct thickness.
• Make sure ingredients are suitable for
slicing or shredding. See “Tips for Great
Results” section.
If the work bowl cover won’t close
when using the disc:
• Make sure the disc is installed correctly,
with the raised nub on top, and is
positioned properly on the drive adapter.
Do not return the Food Processor to the
retailer. Retailers do not provide service.
18
Page 19

Page 20

© 2014 KitchenAid. All rights reserved.
Specications subject to change without notice.
W10693732B 06/14
 Loading...