


5KSB1585

CMDBLENDER+ SHIFTINSTRUCTICLICK TONSCHANGE COPY
TABLE OF CONTENTS
BLENDER SAFETY
Important safeguards 3 Electrical requirements 4
PARTS AND FEATURES 5
ASSEMBLING THE BLENDER
Preparing the Blender for use 6
OPERATING THE BLENDER
Using the Blender 7 Using the Hot Foods function 8 Using the Crush Ice function 9 Using the Pulse function 10 Using the Blender pitcher ingredient cup and Soft Start blending feature 11 Speed control guide 11
TIPS FOR GREAT RESULTS
Quick tips 12 How to... 12
CARE AND CLEANING
Cleaning the Blender 13
TROUBLESHOOTING
Blender does not operate when a setting is selected 14 Blender stops while blending 14
2

BLENDER SAFETY
| <![if ! IE]> <![endif]>English |
IMPORTANT SAFEGUARDS
When using electrical appliances, basic safety precautions should always be followed, including the following:
1.Read all instructions.
2.To protect against risk of electrical shock, do not put Blender in water or other liquid.
3.This appliance can be used by children aged from 8 years and above and persons with reduced physical, sensory or mental capabilities or lack of experience and knowledge if they have been given supervision or instruction concerning use of the appliance in a safe way and understand hazards involved. Children shall not play with the appliance. Cleaning and user maintenance shall not be made by children without supervision.
4.Unplug from outlet when not in use, before putting on or taking off parts, and before cleaning.
5.Avoid contact with moving parts.
6.Do not operate the Blender with a damaged cord or plug or after appliance malfunctions, or is dropped or damaged in any manner. Return appliance to the nearest Authorized Service Center for examination, repair or electrical or mechanical adjustment.
3

BLENDER SAFETY
7.Do not use outdoors.
8.Do not let cord hang over edge of table or counter.
9.Keep hands and utensils out of container while blending to reduce the risk of severe injury to persons or damage to the Blender. A scraper may be used but must be used only when the Blender is not running.
10.Blades are sharp. Handle carefully.
11.Always operate Blender with cover in place.
12.The use of attachments not recommended by KitchenAid may cause a risk of injury to persons.
13.Always operate Blender with cover securely in place and be sure to use only the Hot Foods function when blending hot foods.
14.Flashing light indicates ready to operate - avoid any contact with blades or moveable parts.
15.This product is designed for household use only.
SAVE THESE INSTRUCTIONS
Electrical requirements
Wattage: 550 Watts Voltage: 220-240 Volts Frequency: 50/60 Hz
NOTE: If the plug does not fit in the outlet, contact a qualified electrician. Do not modify the plug in any way. Do not use an adapter.
Do not use an extension cord. If the power supply cord is too short, have a qualified electrician or serviceman install an outlet near the appliance.
4

PARTSCMD +ANDSHIFTFEATURESCLICK TO CHANGE COPY
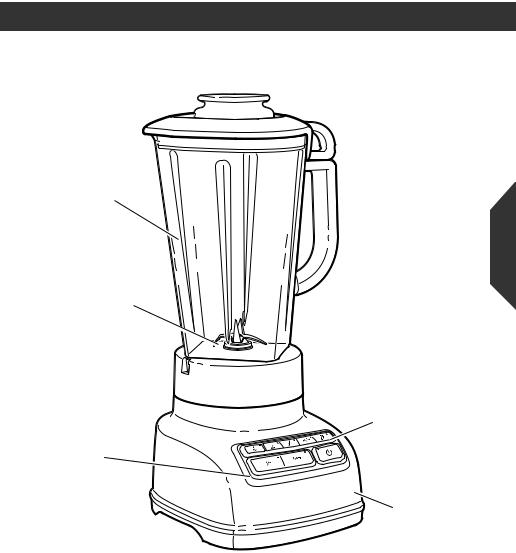
 Lid with ingredient cup
BPA Free
pitcher
Stainless steel blade
<![endif]>English
Speed selection Clean touch 


 buttons
control pad
 Die-cast
metal base
5
ASSEMBLING THE BLENDER
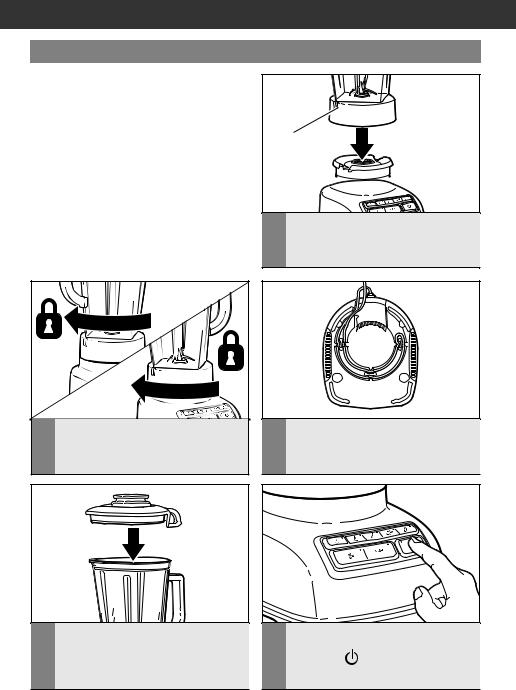
Preparing the Blender for use
Before First Use
Before using your Blender for the first time, wipe Blender base with a warm damp cloth, then wipe clean with a damp cloth. Dry with a soft cloth. Wash pitcher, lid, and ingredient cup in warm, sudsy water (see “Care and Cleaning” section). Rinse parts and wipe dry.
|
|
2 |
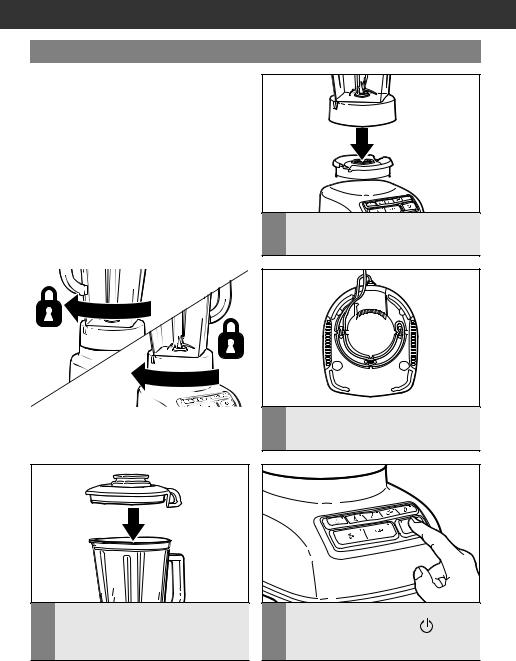
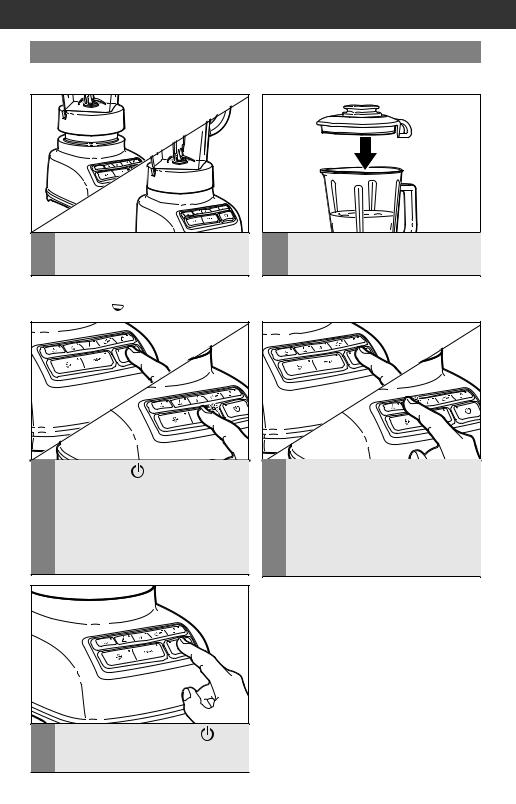
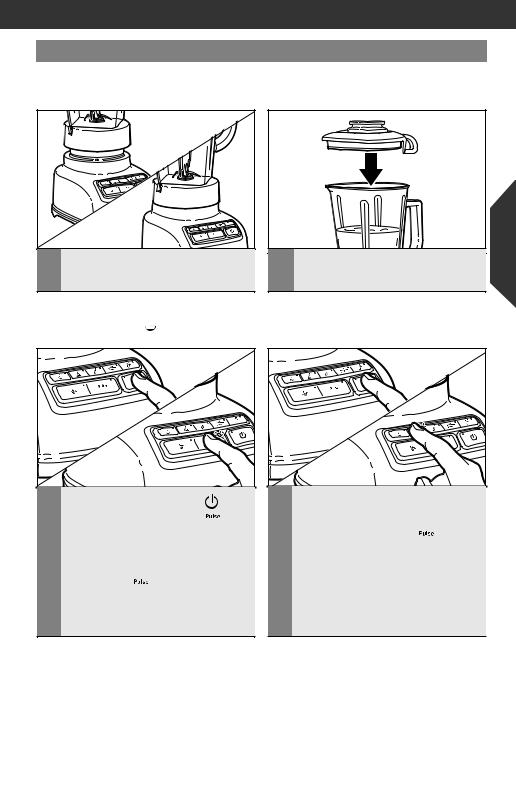
Rotate pitcher clockwise, approximately |
1/8 turn until pitcher clicks into place. |
|
|
|
Tab
Slot 
1 |
Align the pitcher tabs with the slots on |
the base. The pitcher handle may be on |
the right or left side of the blender base.
3 Adjustcord. the length of the Blender power
4 |
Securely attach lid to pitcher, making |
5 |
Before removing the pitcher from the |
sure the handle on the lid aligns with the |
base, always press POWER ( ) to stop |
||
|
handle on the pitcher, as shown. |
|
the flashing lights and unplug the power |
|
|
|
cord. |
NOTE: When properly positioned, pitcher will rest completely on Blender base. If not, repeat steps 1 and 2.
6
OPERATING THE BLENDER
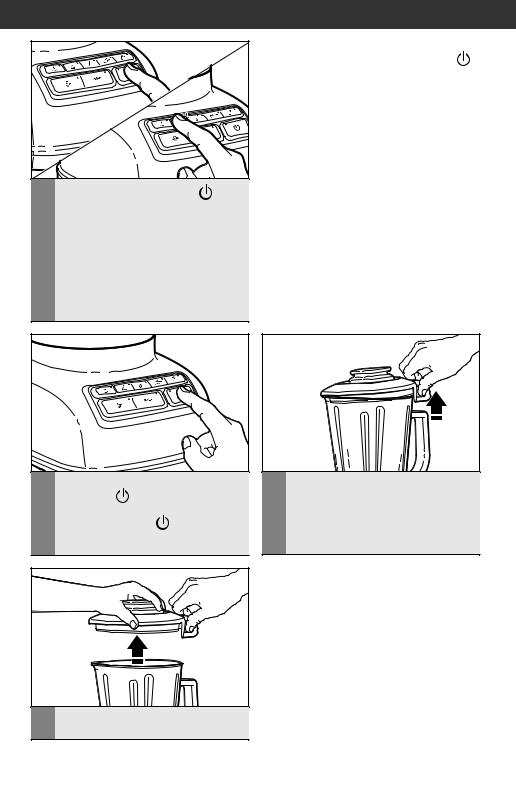
Using the Blender
Before Use
While the Blender Power indicator light or the PULSE (
 ) mode indicator light is on:
-Do not interfere with blade movement.
-Do not remove pitcher lid.
Before operating the Blender, make sure the pitcher is properly locked onto the Blender base.
1 |
Before using the Blender, plug into a |
grounded outlet, and press POWER |
( ). The Power indicator light will flash when ready.
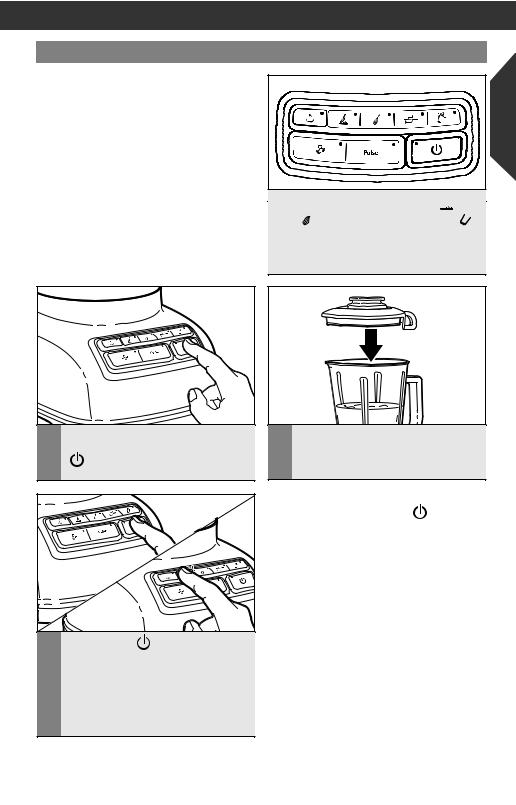
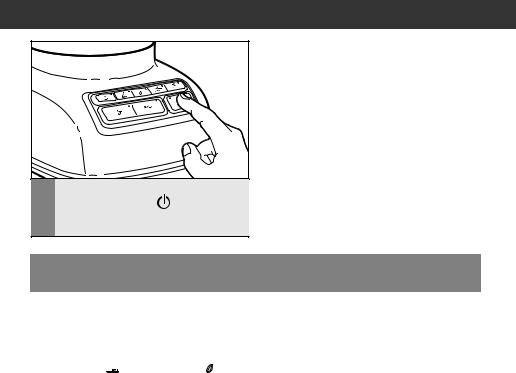
3 Press POWER |
. The Power |
indicator light will flash when ready. Then press desired speed button for continuous operation at that speed.
The white indicator light by the selected speed will stay lit. You may change settings without stopping by pressing
a new speed button.
<![endif]>English
The Blender has four speeds: CHOP (  ), MIX (
  ), PUREE (
 ), and LIQUEFY (
  ). It also features 3 special functions: HOT FOODS (
  ) CRUSH ICE (
 ) and
) and
PULSE (
 ) mode.
2 |
Put ingredients in pitcher and firmly |
secure lid around the entire opening |
of the pitcher.
NOTE: The Blender will operate only when pressing the POWER ( ) button (Power LED will flash) before selecting the desired speed.
7
OPERATING THE BLENDER
4 |
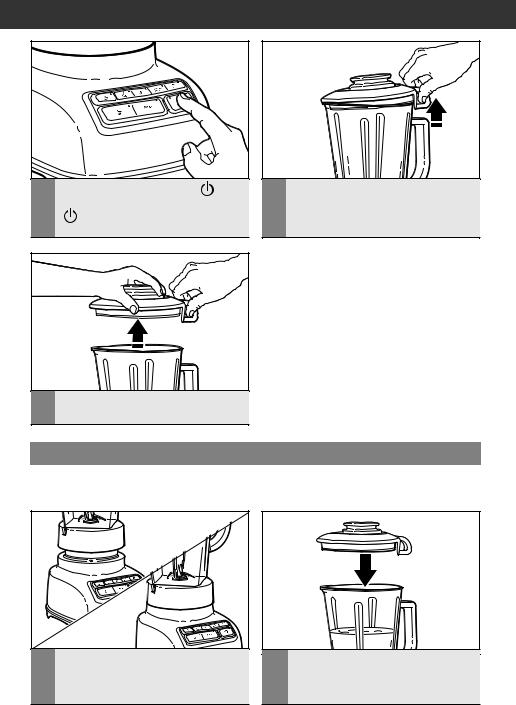
When finished, press POWER |
|
to stop the Blender, then press POWER |
a second time to turn off. Unplug Blender before removing the pitcher.
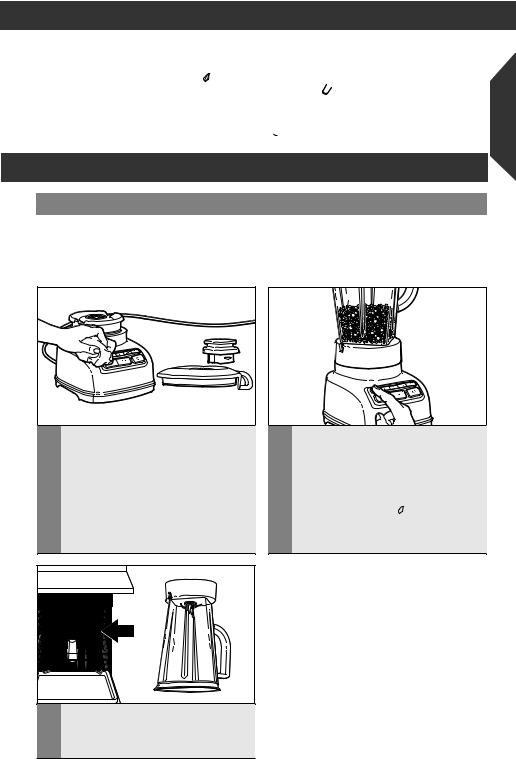
5 |
To remove the lid, first use the loop |
on the back of the lid to lift the lid and |
break the seal.
6 |
Then lift the lid from the side to remove |
completely from the pitcher. |
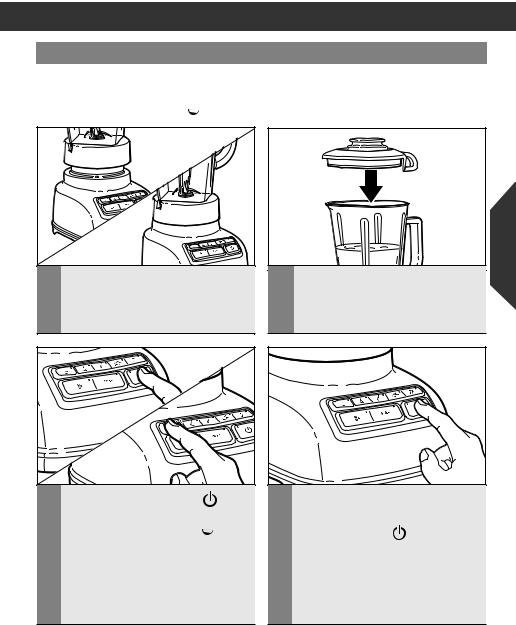
Using the Hot Foods function
IMPORTANT: If blending hot foods or liquids – such as soups or sauces – be sure that the lid is securely in place and use only the HOT FOODS (  ) function.
1 |
Before operating the Blender, make sure |
the pitcher is properly positioned on |
the base.
2 |
Put ingredients into the pitcher, and |
securely attach lid to pitcher, making |
sure the handle on the lid aligns with the handle on the pitcher, as shown.
8
OPERATING THE BLENDER
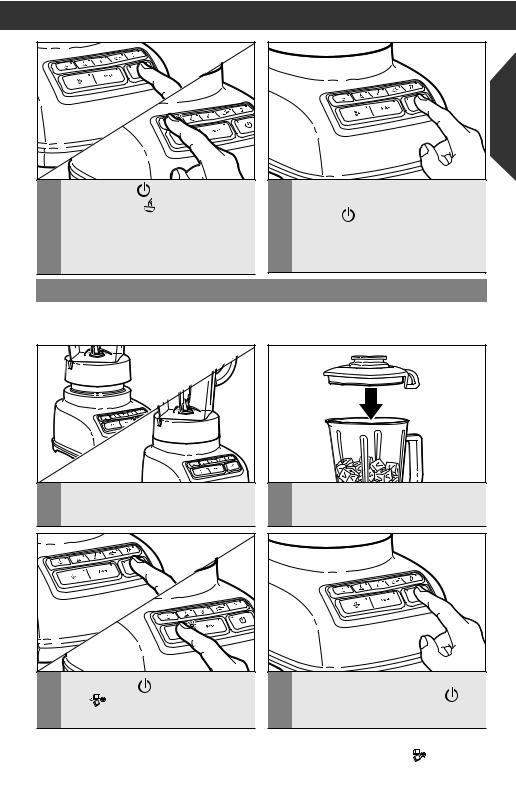
3 |
Press POWER |
, then press the |
|
HOT FOODS ( |
) button. The |
indicator light above the Hot Foods button will light up. The Hot Foods feature starts at a low speed and slowly ramps up to higher speeds over 90 seconds to avoid splashing of hot liquids.
|
<![if ! IE]> <![endif]>English |
4 |
When the Hot Foods function is |
finished, the Blender will stop. Press the |
POWER button to turn off. Unplug Blender before removing the pitcher.
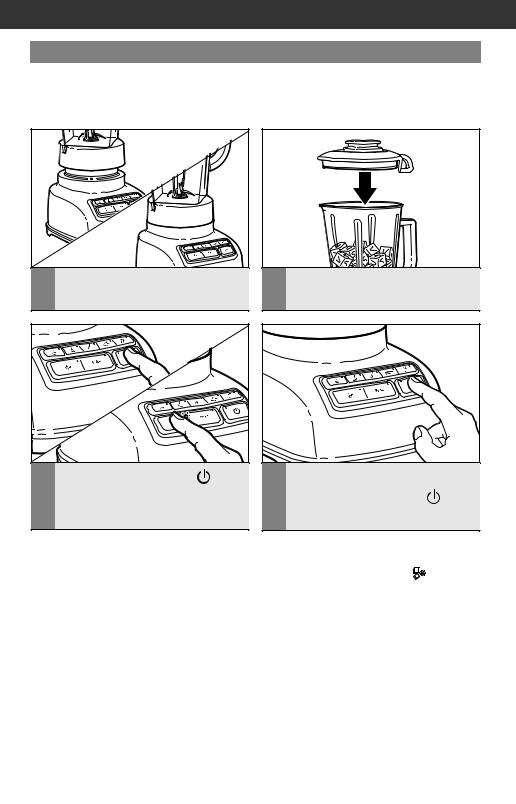
Using the Crush Ice function
Your Blender offers a CRUSH ICE (
 ) function. When selected, the Blender will automatically pulse for 30 seconds at staggered intervals at the optimal speed for crushing ice or other ingredients.
1 |
Before operating the Blender, make sure |
the pitcher is properly positioned on |
the base.
2 |
Put ingredients into the pitcher and |
firmly place lid. Use up to 1/2 tray |
of cubed ice.
3 Press POWER ( ), then press CRUSH |
4 |
When the timed function is finished, the |
ICE ( ). The CRUSH ICE function is |
|
Blender will stop. Press POWER |
|
to turn off. Unplug Blender before |
|
a timed function. |
|
|
|
removing the pitcher. |
|
|
|
TIP: Process up to 1/2 standard ice cube tray or 6 to 7 standard ice cubes at a time. Occasional stirring with a spatula will be helpful only when Blender is off. The CRUSH ICE ( ) feature has been optimized to crush and chop ice without adding any liquid ingredients.
9
OPERATINGCMD + SHIFTHECLICKBLENDERTO CHANGE COPY
Using the Pulse function
Your Blender offers a PULSE (

 ) function, which allows a “Pulse-at-any-speed” feature.
1 |
Before operating the Blender, make sure |
the pitcher is properly positioned on |
the base.
2 |
Put ingredients into the pitcher and |
firmly place lid. |
NOTE: PULSE (

 )mode will not work with the HOT FOODS (
  ) or CRUSH ICE (
 ) modes.
3 Press POWER |
, then press |
PULSE (
 ). The indicator lights above the Pulse button and all four speeds will blink to indicate that all four speeds are
in the PULSE (
 ) mode.
4 |
Press and hold a speed button for |
the desired length of time. Both the |
speed button and PULSE (
 ) mode indicators will stay lit when pulsing. Blending will stop when Pulse button is released and the Pulse indicator will resume blinking. To pulse again at another speed, just press and hold the desired speed button.
5 |
When finished, press POWER |
to turn off. Unplug Blender before |
removing the pitcher.
10
OPERATING THE BLENDER
Using the Blender pitcher ingredient cup and Soft Start blending feature
•The Blender pitcher ingredient cup can be used to measure and add ingredients. Remove cup and add ingredients at
CHOP (  ) or MIX (
  ) speeds. When operating at higher speeds with a full pitcher or with hot contents, stop the Blender and then add ingredients.
IMPORTANT: If blending hot foods or liquids, be sure that the lid is securely in place and use only the HOT FOODS (  ) function.
•The Soft Start blending feature automatically starts the Blender at a lower speed to draw ingredients into the blades, then quickly increases to the selected speed for optimal performance. The Soft Start blending feature only works when a speed is selected and
does not work with the PULSE (

 ) mode or CRUSH ICE (
 ) features.
Speed control guide
Speed |
Item |
|
|
|
|
Soup |
|
|
|
|
Hot sauces (gravy, |
|
|
|
HOT FOODS |
white sauce) |
|
|
|
Hot Drinks |
|
|
|
|
|
|
|
|
|
|
|
|
|
|
|
Chopped fruits |
Meat salad for |
Pesto |
Savory crumb |
|
Chopped vegetables |
sandwich filling |
Dips |
topping |
|
|
Sweet crumb topping |
||
CHOP |
|
|
Cold fruit or vegetable |
|
|
|
|
|
|
|
|
|
sauce |
|
|
|
|
|
|
|
Fruit juice from |
Gravy |
Pancake batter |
Smooth ricotta or |
|
frozen concentrate |
|
Waffle batter |
cottage cheese |
MIX |
Salad dressing |
|
|
|
|
|
|
||
|
|
|
|
|
|
|
|
|
|
|
Oatmeal |
Pureed fruit/Baby food |
|
|
|
|
Pureed meat/Baby |
|
|
PUREE |
|
food meat |
|
|
|
Pureed vegetables/ |
|
|
|
|
|
|
|
|
|
|
Baby food vegetables |
|
|
|
|
|
|
|
|
Blended ice drink |
Fluffy gelatin for |
Grated hard cheese |
|
|
Frozen yogurt- |
pie/desserts |
|
|
|
|
|
|
|
|
based drink |
Cheesecake |
|
|
LIQUIFY |
Fruit-based drink (thin) |
Mousse |
|
|
Ice milk-based drink |
|
|
|
|
|
|
|
|
|
|
Sherbet-based drink |
|
|
|
|
|
|
|
|
|
Crushed Ice |
Finely chopped |
Frozen chopped fruit |
|
|
|
fresh fruits |
(defrost slightly until it |
|
CRUSH ICE |
|
Finely chopped |
can be probed with a |
|
|
knife tip) |
|
||
|
|
fresh vegetables |
|
|
|
|
|
|
|
|
|
|
|
|
|
Chopped fruits |
Meat salad for |
Savory crumb topping |
|
|
Chopped vegetables |
sandwich filling |
Sweet crumb topping |
|
PULSE |
|
|
||
|
|
|
|
|
|
|
|
|
|
<![endif]>English
11

TIPS FOR GREAT RESULTS
Quick tips
•If you’re making beverages using ice,
start with CRUSH ICE ( ), then finish with LIQUIFY (
  ) in order to produce a smoother texture.
•Ice directly from the freezer will crush better than partially melted ice for snow.
•Smaller ice cubes can be chopped or crushed faster than large ones.
•For many ingredient mixtures, start
the blending process at CHOP (  ) to thoroughly combine the ingredients. Then increase to a higher speed, as desired.
•If desired, remove center ingredient cup of pitcher lid to add liquids or ice cubes while the Blender is operating at
CHOP (  ) or MIX (
  ) speeds.
•Stop the Blender before using utensils
in the pitcher. Use a rubber spatula to mix ingredients only when the Blender is off. Never use any utensil, including spatulas, in the pitcher while the motor is running.
How to...
Dissolve flavored gelatin: Pour boiling water into the pitcher; add gelatin. Blend on HOT FOODS (  ) until gelatin is dissolved, about 10 to 30 seconds. Add other ingredients.
Make cookie, cracker, or bread crumbs:
Break cookies, crackers, or bread into pieces about 4 cm in diameter. Place in pitcher. In
PULSE (

 ) mode, cover and pulse a few times, about 3 seconds each time, until reaching desired consistency.
Make finer crumbs for pie and dessert crusts: Break cookies, crackers, or bread into pieces about 4 cm in diameter and place
in the pitcher. In PULSE (

 ) mode, cover and pulse a few times until reaching desired consistency, about 20 to 30 seconds.
Chop fruits and vegetables: Put 2 cups (475 mL) of fruit or vegetable chunks in
pitcher. In PULSE (

 ) mode, cover and blend
at LIQUIFY(  ) pulsing a few times, about 2 to 3 seconds each time, until reaching desired consistency.
Puree fruits: Place 2 cups (475 mL) canned or cooked fruit in pitcher. Add 2 to 4 tablespoons (30 to 60 mL) fruit juice or water per cup (240 mL) of fruit. Cover and blend at PUREE ( ) about 5 to
10 seconds.
Puree vegetables: Place 2 cups (475 mL) canned or cooked vegetables in pitcher. Add 2 to 4 tablespoons (30 to 60 ml) broth, water, or milk per cup (240 mL) of vegetables. Cover and blend at PUREE ( ) about 10 to 20 seconds.
Puree meats: Place cooked, cubed, tender meat in pitcher. Add 3 to 4 tablespoons
(45 to 60 mL) broth, water, or milk per cup (240 mL) of meat. Cover and blend on
CHOP (  ) 10 seconds. Stop the Blender and scrape sides of pitcher. Cover and blend on PUREE (
 ) 10 to 20 seconds longer.
Take lumps out of gravy: If sauce or gravy becomes lumpy, place in the pitcher.
Cover and blend at MIX (  ) until smooth, about 5 to 10 seconds.
Combine flour and liquid for thickening:
Place flour and liquid in pitcher. Cover and
blend at MIX (  ) until smooth, about 5 to 10 seconds.
Prepare white sauce: Place milk, flour, and salt, if desired, in pitcher. Cover, and blend
at MIX (  ) until well-mixed, about 5 to 10 seconds. Pour into saucepan and cook as usual.
Make smoothies: Place liquids and frozen ingredients in pitcher first, then add other ingredients on top. Cover and blend on
CRUSH ICE ( ) for 10 to 15 seconds,
then LIQUIFY (  ) for 10 to 15 seconds, as desired.
12
TIPS FOR GREAT RESULTS
Prepare pancake or waffle batter from mix: Place mix and other ingredients in
pitcher. Cover and blend at MIX (  ) until well-mixed, 10 to 20 seconds. Stop the Blender and scrape sides of the pitcher
as needed.
Grate cheese: Cut very cold cheese into 1.5 cm cubes. Place up to 1/2 cup (120 mL) cheese in the pitcher. Cover, and blend at
LIQUIFY (  ) about 5 to 10 seconds. For hard cheeses, such as Parmesan, bring
to room temperature then blend at LIQUIFY ( ) for 10 to 15 seconds.
<![endif]>English
CARE AND CLEANING
Cleaning the Blender
The Blender pitcher can be easily cleaned while still attached to the base, or individually.
•Clean the Blender thoroughly after every use.
•Do not immerse the Blender base or cord in water.
•Do not use abrasive cleansers or scouring pads.
1 |
To clean the Blender base, control |
band, cord, lid, and ingredient cup: |
Unplug the Blender before cleaning. Wipe with a warm, damp cloth; wipe clean with a damp cloth, and dry with a soft cloth.
2 |
To clean the pitcher while attached |
to the base: With the pitcher off of |
the base, fill half full with warm (not hot) water, and add 1 or 2 drops of dishwashing liquid. Put the lid on the pitcher and attach the pitcher to the
base, press the MIX (  )speed setting, and run the Blender for 5 to 10 seconds. Remove the pitcher and rinse with warm water.
IMPORTANT: Hand wash the lid and ingredient cup for best results.
3 |
To clean pitcher individually: Wash |
pitcher in dishwasher flipped upside |
down. Or handwash with soapy water, rinse, and wipe dry.
13
TROUBLESHOOTING
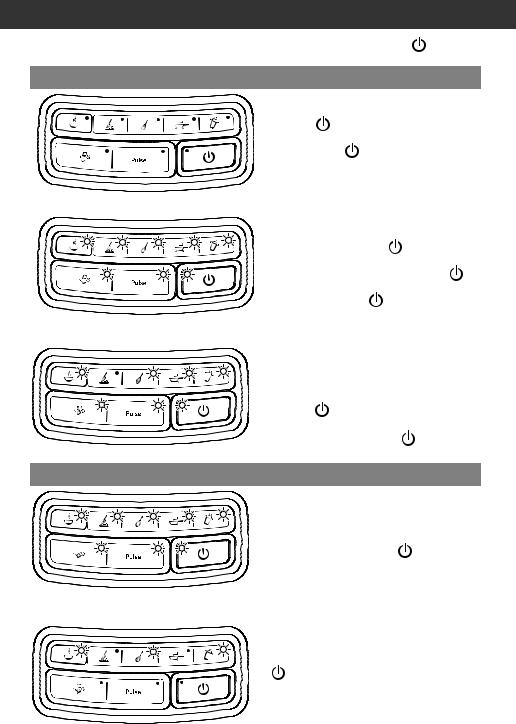
IMPORTANT: The Blender will not operate at any speed unless the POWER ( ) button is pressed first.
Blender does not operate when a setting is selected
No indicator lights are lit.
All indicator lights are flashing at the same time.
One indicator light is flashing alternately.
Check to see if the Blender is plugged into a grounded outlet. If it is, press POWER ( ); then unplug the Blender. Plug it back in to the same outlet, and Press POWER ( ). If the Blender still does not work, check the fuse or circuit breaker on the electrical circuit the Blender is connected to and make sure the circuit is closed.
If Blender is plugged in, but nothing happens when POWER ( ) is pressed, and all indicator lights are flashing, the motor rotor may be locked. Press POWER ( ); then unplug the Blender. Plug it back in; then press POWER ( ) and select the desired speed.
If the Blender is plugged in, but will not start and one light is flashing alternately from all the other indicator lights, the Blender may have a stuck key. Press
POWER ( ) to turn off the Blender; then unplug the Blender. Plug the Blender
back in and press POWER ( ) to turn back on to reset the stuck key.
Blender stops while blending
All indicator lights are flashing at the same time.
All indicator lights are flashing alternately.
The Blender may be overloaded. If the Blender becomes overloaded when blending heavy ingredients, it will automatically shut off to avoid damage to the motor. Press POWER ( ) to reset the Blender and unplug the power cord. Remove the pitcher assembly from the base and divide contents into smaller batches. Adding liquid to the pitcher may also reduce the load on the Blender.
The Blender may be jammed. If it is jammed, the Blender will stop running to avoid damage to the motor. Press POWER ( ) to reset the Blender and unplug the power cord. Remove the pitcher assembly from the base and, with a scraper, free
the blades by breaking-up or removing the contents at the bottom of the pitcher.
If the problem cannot be fixed with the steps provided in this section, contact an authorized service center.
14


CMDINSTRUCCIONES+ SHIFT CLICKDETOLACHANGELICUADORACOPY
ÍNDICE
SEGURIDAD DE LA LICUADORA
Salvaguardias importantes 17 Requisitos eléctricos 18
PIEZAS Y CARACTERÍSTICAS 19
CÓMO ENSAMBLAR LA LICUADORA
Preparación de la licuadora para su uso 20
FUNCIONAMIENTO DE LA LICUADORA
Uso de la licuadora 21 Uso de la función Hot Foods (Alimentos calientes) 23 Uso de la función Crush Ice (Triturar hielo) 24 Uso de la función Pulse (Pulsar) 25 Uso de la taza para ingredientes de la jarra de la licuadora y
la característica de licuado Soft Start (Inicio gradual) 26 Guía para el control de velocidad 27
CONSEJOS PARA OBTENER RESULTADOS IDEALES
Consejos rápidos 28 Cómo... 28
CUIDADO Y LIMPIEZA
Limpieza de la licuadora 29
SOLUCIÓN DE PROBLEMAS
La licuadora no funciona cuando se selecciona un ajuste 30 La licuadora se detiene al estar funcionando 31
16

SEGURIDADCMD + SHIFTDECLICKLA LICUADORATO CHANGE COPY
Su seguridad y la seguridad de los demás es muy importante.
En este manual y en el mismo aparato encontrará muchos mensajes de seguridad importantes. Lea y obedezca siempre todos los mensajes de seguridad.
Este es el símbolo de alerta de seguridad.
Este símbolo le avisa de los peligros potenciales que pueden matarle o herirle a usted y a los demás.
Todos los mensajes de seguridad irán acompañados del símbolo de alerta y la palabra “PELIGRO” o “ADVERTENCIA”. Estas palabras signi„can:
PELIGRO |
Puede fallecer o herirse de gravedad si |
|
no sigue las instrucciones de inmediato. |
||
|
Puede fallecer o herirse de gravedad si |
|
ADVERTENCIA |
||
no sigue las instrucciones. |
||
|
|
Todos los mensajes de seguridad le indicarán cuáles son los peligros potenciales, cómo reducir la probabilidad de lesiones y qué puede pasar si no sigue las instrucciones.
<![endif]>Español
SALVAGUARDIAS IMPORTANTES
Al utilizar aparatos eléctricos, se deben seguir las precauciones básicas de seguridad, entre las que se incluyen las siguientes:
1.Lea todas las instrucciones.
2.Para protegerse contra el riesgo de choque eléctrico, no sumerja la licuadora en agua ni en ningún otro líquido.
3.Este aparato puede ser utilizado por niños a partir de los 8 años de edad y por personas con capacidades físicas, sensoriales o mentales reducidas, o falta de experiencia y conocimiento si lo hacen bajo supervisión o siguiendo las instrucciones relativas al uso del aparato de una manera segura y comprenden los riesgos involucrados. Los niños
no deben jugar con el aparato. Los niños no pueden realizar tareas de limpieza y mantenimiento sin supervisión.
4.Desenchufe del tomacorriente de pared cuando no se esté en uso, antes de colocar o quitar piezas y antes de la limpieza.
5.Evite tocar las piezas que estén en movimiento.
6.No utilice la licuadora con un cable o enchufe dañado, si el aparato no ha funcionado correctamente, si se ha caído o si está dañado de alguna forma. Devuelva el aparato al Centro de servicio técnico autorizado más cercano para su inspección, reparación o ajuste eléctrico o mecánico.
17

SEGURIDAD DE LA LICUADORA
7.No lo use al aire libre.
8.No deje que el cable cuelgue del borde de la mesa o de la mesada.
9.Mantenga las manos y los utensilios fuera del recipiente mientras licúa para evitar el riesgo de lesiones graves a personas o daños a la licuadora. Puede usarse un raspador, pero se debe utilizar
10.solamente cuando la licuadora no esté funcionando.
11.Las cuchillas son filosas. Manipúlelas con cuidado.
12.Siempre use la licuadora con la tapa en su lugar.
13.KitchenAid no recomienda el uso de accesorios, ya que pueden crear un riesgo de lesiones a personas.
14.Siempre use la licuadora con la tapa asegurada en su lugar y asegúrese de usar solo la función Hot Foods (Alimentos calientes) cuando esté licuando alimentos calientes.
15.La luz que destella indica que está lista para ser usada; evite entrar en contacto con las cuchillas o piezas
en movimiento.
16.Este producto ha sido diseñado únicamente para uso doméstico.
GUARDE ESTAS INSTRUCCIONES
Requisitos eléctricos
 ADVERTENCIA
Peligro de descarga eléctrica
Enchúfela en una salida con toma de tierra.
No extraiga la clavija de conexión a tierra.
No utilice un adaptador.
No utilice un cable alargador.
El incumplimiento de estas instrucciones podría provocar la muerte, un incendio o una descarga eléctrica.
Vatiaje: 550 vatios Voltaje: 220-240 voltios Frecuencia: 50/60 Hz
NOTA: Si el enchufe no encaja en el tomacorriente de pared, póngase en contacto con un electricista calificado. No modifique el enchufe de ninguna manera. No use un adaptador.
No use un cable prolongador. Si el cable de suministro eléctrico es demasiado corto, haga que un electricista o técnico de servicio capacitado instale un tomacorriente de pared cerca del aparato.
.
18
PIEZASCMD + YSHIFTCARACTERÍSTICASCLICK TO HANGE COPY
 Tapa con taza para ingredientes
Jarra sin BPA
<![if ! IE]><![endif]>Español
Cuchilla de acero inoxidable
|
Botones de |
Botón de |
selección de |
control Clean |
velocidad |
Touch |
|
|
Base de metal |
|
fundido |
19
CÓMO ENSAMBLAR LA LICUADORA
Preparación de la licuadora para su uso
Antes del primer uso
Antes de usar la licuadora por primera vez, limpie la base de ésta con un paño humedecido con agua tibia; luego pásele un paño húmedo. Seque con un paño suave. Lave la jarra, la tapa y la taza para ingredientes en agua tibia con jabón (consulte la sección “Cuidado y limpieza”). Enjuague las piezas y séquelas.
2 |
Gire la jarra hacia la derecha, |
aproximadamente 1/8 de giro hasta |
que la jarra encaje con un chasquido en su lugar.
4 |
Fije con firmeza la tapa a la jarra, |
asegurándose de que el mango de la tapa |
se alinee con el mango de la jarra como se muestra a continuación.
NOTA: Cuando la jarra se coloca correctamente, ésta estará completamente apoyada sobre la base de la licuadora. De lo contrario, repita los pasos 1 y 2.
Lengüeta
Ranura
1 |
Alinee las lengüetas de la jarra con las |
ranuras de la base. El mango de la jarra |
puede estar ubicado en el lado derecho o izquierdo de la base de la licuadora.
3 |
Regule el largo del cable de suministro |
eléctrico de la licuadora. |
5 |
Antes de quitar la jarra de |
|
la base, presione siempre POWER |
||
|
(Encendido |
) para detener las luces |
que destellan y desenchufe el cable de suministro eléctrico.
20
FUNCIONAMIENTOCMD + SHIFT CLICKDETOLACHANGELICUADORACOPY
Uso de la licuadora
Antes de usar
Mientras la luz indicadora de Encendido de la licuadora o la luz indicadora del modo PULSE (Pulsar) esté encendida:
-No interfiera con el movimiento de la cuchilla.
-No quite la tapa de la jarra.
Antes de poner a funcionar la licuadora, asegúrese de que la jarra esté bien asegurada sobre la base de la licuadora.
La licuadora tiene cuatro velocidades: CHOP (Picar  ), MIX (Mezclar
  ), PUREE (Hacer
  ), y LIQUEFY (Licuar
  ). También cuenta con 3 funciones especiales: HOT FOODS (Alimentos calientes
  ), CRUSH ICE (Triturar hielo
  ), y modo PULSE (Pulsar
 ).
).
1 |
Antes de usar la licuadora, enchúfela |
2 |
Coloque los ingredientes en la jarra y |
|
en un tomacorriente de pared con |
asegure con firmeza la tapa en toda la |
|||
|
conexión a tierra y presione POWER |
|
apertura de la jarra. |
|
|
(Encendido |
). La luz indicadora de |
|
|
|
Encendido destellará cuando esté lista. |
|
|
|
<![endif]>Español
21
FUNCIONAMIENTO DE LA LICUADORA
3 Presione POWER (Encendido ). La luz indicadora de Encendido destellará cuando esté lista. Luego, presione el botón de la velocidad deseada para un funcionamiento continuo a esa velocidad. La luz indicadora blanca al lado de la velocidad seleccionada permanecerá encendida. Puede cambiar los ajustes sin detener la unidad presionando
el botón de otra velocidad.
NOTA: La licuadora sólo funcionará al presionar el botón POWER (Encendido ) (la luz LED de Encendido destellará) antes de seleccionar la velocidad deseada
4 |
Cuando termine, presione POWER |
||
(Encendido |
) para detener la |
||
|
licuadora y luego vuelva a presionar |
||
|
POWER (Encendido |
) para apagarla. |
|
|
Desenchufe la licuadora antes de quitar |
||
|
la jarra. |
|
|
5 |
Para quitar la tapa, primero use el |
pestillo en la parte posterior de la tapa |
para levantarla y abrir el sello.
6 |
Luego levante la tapa desde el costado |
para quitarla por completo de la jarra. |
22
FUNCIONAMIENTOCMD + SHIFT CLICKDETOLACHANGELICUADORACOPY
Uso de la función Hot Foods (Alimentos calientes)
IMPORTANTE: Si va a licuar alimentos o líquidos calientes, como sopa o salsa, cerciórese de que la tapa esté asegurada en su lugar y use solamente la función HOT FOODS (Alimentos Calientes  ).
).
1 |
Antes de poner a funcionar la licuadora, |
asegúrese de que la jarra esté colocada |
correctamente sobre la base.
2 |
Coloque los ingredientes en la jarra |
y fije la tapa con firmeza a la jarra, |
asegurándose de que el mango de la tapa esté alineado con el mango de la jarra como se muestra a continuación.
<![endif]>Español
3 |
Presione POWER (Encendido ), |
|
y luego presione el botón HOT |
FOODS (Alimentos Calientes  ). La luz indicadora sobre el botón
Alimentos calientes se encenderá. La función de Alimentos calientes comienza en una velocidad baja y lentamente aumenta a velocidades mayores en 90 segundos para evitar que los líquidos calientes salpiquen.
4 |
Cuando la función Alimentos calientes |
haya finalizado, la licuadora se |
detendrá. Presione el botón POWER (Encendido ) para apagarla. Desenchufe la licuadora antes de quitar la jarra.
23
FUNCIONAMIENTOCMD + SHIFT CLICKDETOLACHANGELICUADORACOPY
Uso de la función Crush Ice (Triturar hielo)
Su licuadora tiene una función TRITURAR HIELO (
 ). Cuando ésta se selecciona, la licuadora automáticamente se activará en pulsos alternadamente durante 30 segundos, a la velocidad óptima para triturar hielo u otros ingredientes.
1 |
Antes de poner a funcionar la licuadora, |
asegúrese de que la jarra esté colocada |
correctamente sobre la base.
3 Presione POWER (Encendido ), y, luego, presione CRUSH ICE (Triturar Hielo  ). La función CRUSH ICE es una función programada.
2 |
Coloque los ingredientes en la jarra y |
coloque la tapa con firmeza. Use hasta |
1/2 bandeja de hielo en cubos.
4 |
Cuando la función programada haya |
|
finalizado, la licuadora se detendrá. |
||
|
Presione POWER (Encendido |
) para |
apagarla. Desenchufe la licuadora antes de quitar la jarra.
CONSEJO: Procese hasta 1/2 bandeja de cubos de hielo estándar o 6 a 7 cubos de hielo estándar al mismo tiempo. Revolver ocasionalmente con una espátula será útil cuando la licuadora esté en posición de apagado. La función CRUSH ICE (Triturar Hielo  ) ha sido optimizada para triturar y picar hielo sin agregar ningún ingrediente líquido.
24
FUNCIONAMIENTOCMD + SHIFT CLICKDETOLACHANGELICUADORACOPY
Uso de la función Pulse (Pulsar)
La licuadora presenta un modo PULSE (Pulsar 

 ), el cual permite la característica de “pulsar a cualquier velocidad”.
1 |
Antes de poner a funcionar la licuadora, |
2 |
Coloque los ingredientes en la jarra y |
asegúrese de que la jarra esté colocada |
coloque la tapa con firmeza. |
||
|
correctamente sobre la base. |
|
|
NOTA: El modo PULSE (Pulsar 

 ) no funcionará con los modos HOT FOODS (Alimentos Calientes
  ) o CRUSH ICE (Triturar Hielo
  ).
).
<![endif]>Español
3 |
Presione POWER (Encendido |
), y, |
|
|
luego, presione PULSE (Pulsar |
). |
|
|
Las luces indicadoras encima del |
|
|
|
botón Pulsar y las cuatro velocidades |
||
|
destellarán para indicar que las cuatro |
||
|
velocidades se encuentran en modo |
||
|
PULSE (Pulsar |
). |
|
4 |
Presione y sostenga el botón de |
|
velocidad durante el tiempo deseado. |
||
|
Los indicadores del botón de velocidad |
|
|
y del modo PULSE (Pulsar |
) |
permanecerán encendidos cuando pulse. El licuado se detendrá cuando suelte el botón Pulse (Pulsar) y el indicador Pulse (Pulsar) volverá a destellar. Para volver a pulsar a otra velocidad, simplemente presione y mantenga presionado el botón de la velocidad deseada.
25
FUNCIONAMIENTO DE LA LICUADORA
5 |
Cuando haya terminado, presione |
|
POWER (Encendido ) para apagar el |
aparato. Desenchufe la licuadora antes de quitar la jarra.
Uso de la taza para ingredientes de la jarra de la licuadora y la característica de licuado Soft Start (Inicio gradual)
•La taza para ingredientes de la jarra de la licuadora se puede usar para medir y agregar ingredientes. Quite la tapa y
agregue los ingredientes a la velocidad de
CHOP (Picar  ) o MIX (Mezclar
  ). Cuando use la licuadora a velocidades más altas, con la jarra llena o con ingredientes calientes, detenga la licuadora y luego agregue los ingredientes.
IMPORTANTE: Si va a licuar alimentos o líquidos calientes, cerciórese de que la tapa esté asegurada en su lugar y use solamente la función HOT FOODS (Alimentos
Calientes  ).
).
•La característica de licuado Soft Start pone en marcha la licuadora automáticamente a una velocidad más baja para llevar
los ingredientes a las cuchillas. Luego, aumenta rápidamente hasta la velocidad seleccionada para un desempeño óptimo. La característica de licuado Soft Start funciona únicamente cuando se selecciona una velocidad y no funciona con el modo PULSE (Pulsar 

 ) o la función CRUSH ICE (Triturar Hielo
  ).
).
26

CMDFUNCIONAMIENTO+ SHIFT CLICK TODE LACHANGELICUADORAPY
Guía para el control de velocidad
Velocidad |
Artículo |
|
|
|
|
Sopa |
|
|
|
HOT FOODS |
Salsas calientes (salsa |
|
|
|
de carne, salsa blanca) |
|
|
|
|
(Alimentos |
|
|
|
|
Bebidas calientes |
|
|
|
|
Calientes) |
|
|
|
|
|
Frutas picadas |
Relleno para sándwich |
Pesto |
Sabrosa |
|
Verduras picadas |
de ensalada de carne |
Salsas para acompañar |
cobertura de |
|
|
migas |
||
CHOP (Picar) |
|
|
Salsa de verduras o |
|
|
|
Cobertura dulce |
||
|
|
|
||
|
|
|
frutas frías |
|
|
|
|
de migas |
|
|
|
|
|
|
|
|
|
|
|
|
Jugo de frutas |
Salsa de carne |
Masa para panqueque |
Queso ricota o |
|
de concentrado |
|
Masa para wafles |
queso de cabaña |
MIX (Mezclar) |
congelado |
|
|
|
|
|
|
||
|
Aderezo para ensalada |
|
|
|
|
|
|
|
|
|
Avena |
Puré de frutas/Comida |
|
|
|
|
para bebé |
|
|
PUREE |
|
Puré de carne/Comida |
|
|
|
de carne para bebé |
|
|
|
(Hacer Puré) |
|
Puré de verduras/ |
|
|
|
|
|
|
|
|
|
Comida de verduras |
|
|
|
|
para bebé |
|
|
|
|
|
|
|
|
Bebida helada licuada |
Gelatina ligera para |
Queso duro rallado |
|
|
Bebida a base de |
tartas/postres |
|
|
|
|
|
|
|
|
yogurt congelado |
Tarta de queso |
|
|
|
Bebida a base de frutas |
Mousse |
|
|
LIQUEFY (Licuar) |
(liviana) |
|
|
|
Bebida helada a base |
|
|
|
|
|
|
|
|
|
|
de leche |
|
|
|
|
Bebida a base de |
|
|
|
|
sorbete |
|
|
|
|
|
|
|
|
|
Hielo triturado |
Frutas frescas picadas |
Fruta picada congelada |
|
|
|
finas |
(descongélela un |
|
CRUSH ICE |
|
Verduras frescas |
poco, hasta que pueda |
|
(Triturar Hielo |
|
picadas finas |
introducir la punta de |
|
|
|
|
un cuchillo) |
|
|
Frutas picadas |
Ensalada de carne para |
Cobertura salada de |
|
|
Verduras picadas |
relleno de sándwich |
migas |
|
PULSE (Pulsar) |
|
Cobertura dulce de |
|
|
|
|
|
||
|
|
|
migas |
|
|
|
|
|
|
<![endif]>Español
27
 Loading...