


DNX 573 S
Table of contents
 Loading...
im391_Ref_K_En_01 (K/R)© 2016 JVC KENWOOD Corporation
DNX893S
DNX773S
DNX693S
DNX573S
DNX7160BTS
DNX5160BTS
GPS NAVIGATION SYSTEM
INSTRUCTION MANUAL
Take the time to read through this instruction manual.
Familiarity with installation and operation procedures will help you obtain the best performance from your new
GPS Navigation System.
For your records
Record the serial number, found on the back of the unit, in the spaces designated on the warranty card, and in the space
provided below. Refer to the model and serial numbers whenever you call upon your KENWOOD dealer for information or
service on the product.
Model DNX893S/ DNX773S/ DNX693S/ DNX573S/ DNX7160BTS/ DNX5160BTS Serial number
US Residence Only
Register Online
Register your KENWOOD product at www.kenwoodusa.com
Before reading this manual, click the button below to check the latest edition and the
modified pages.
http://manual.kenwood.com/edition/im391/
Check the latest edition
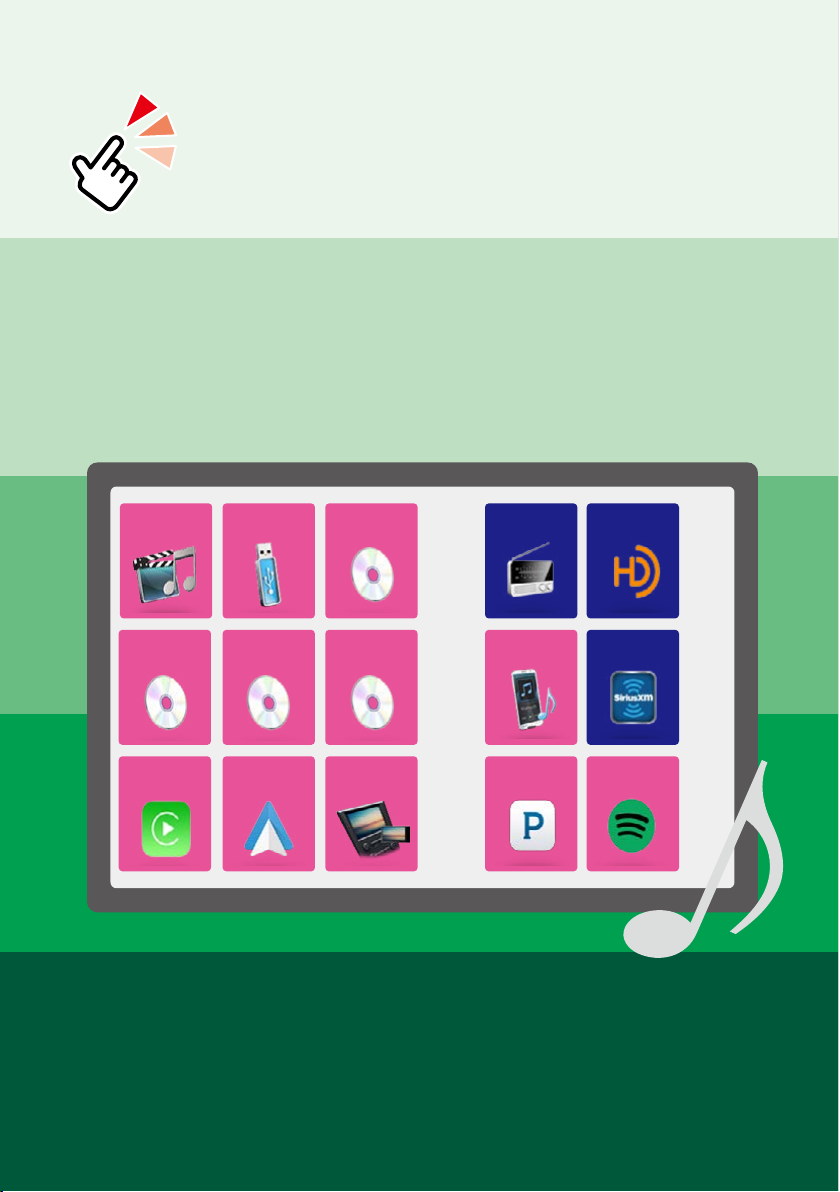
What Do You Want To Do?
1
What Do You Want To Do?
Thank you for purchasing the KENWOOD GPS NAVIGATION SYSTEM.
In this manual, you will learn various convenient functions of the system.
Click the icon of the media you want to play.
With one-click, you can jump to the section of each media!
iPod
USB
VCD
HD Radio
SiriusXM
DVD VIDEO
Music CD
Disc Media
Android
Auto
Mirroring
Apple
CarPlay
Radio
Pandora
Spotify
BT Audio

Contents
22
Before Use 4
# WARNING _______________________ 4
How to Read this Manual 5
Basic Operations 6
Functions of the Buttons
on the Front Panel __________________ 6
Turning on the Unit _________________ 10
How to Play Media __________________ 13
Operating with the HOME Screen ______ 16
Common Operations ________________ 18
Navigation Operation ________________ 20
OEM Features Operation _____________ 22
DVD/Video CD (VCD) 24
DVD/VCD Basic Operation ____________ 24
DVD Disc Menu Operation ____________ 27
DVD Setup ________________________ 28
CD/Audio and Visual Files/
iPod/APPS 30
APP/iPod settings ___________________ 31
Music/Video Basic Operation __________ 32
Search Operation ___________________ 36
Pandora® Operation _________________ 39
Spotify Operation ___________________ 42
Mirroring Operation _________________ 44
Apple CarPlay Operation _____________ 46
Android Auto™ Operation ____________ 48
Radio and HD Radio™ Tuner 50
Radio/HD Radio Tuner Basic Operation __ 50
Memory Operation __________________ 53
Selecting Operation _________________ 54
Traffic Information __________________ 56
Receive Mode
(HD Radio tuner only) ________________ 57
Bookmark
(HD Radio tuner only) ________________ 57
Alert Message
(HD Radio tuner only) ________________ 59
SiriusXM® 60
SiriusXM® Basic Operation ____________ 60
Storing Channels in Preset Memory ____ 63
Preset select _______________________ 63
Direct search _______________________ 64
Category/Channel search ____________ 64
Content Alerts _____________________ 66
SportsFlash™ _______________________ 66
Replay ____________________________ 67
SmartFavorites, TuneStart™ ___________ 68
TuneMix™ _________________________ 68
Traffic & Weather Now™ ______________ 69
TuneScan™ ________________________ 69
SiriusXM Setup _____________________ 70
Contents

Contents
3
Bluetooth Control 76
Registering and Connecting
Bluetooth Unit _____________________ 76
Playing Bluetooth Audio Device _______ 80
Using Hands-Free Unit _______________ 82
Hands-Free Setup ___________________ 86
Setting Up 88
Monitor Screen Setup _______________ 88
Monitor Angle Control ______________ 89
View Camera Control ________________ 89
System Setup ______________________ 90
User Interface Setup _________________ 90
Special Setup ______________________ 92
Security Setup _____________________ 93
Display Setup ______________________ 94
Camera Setup ______________________ 96
Navigation Setup ___________________ 98
AV Setup __________________________ 98
Controlling Audio 100
Speaker/ X’over setup ________________ 100
Controlling General Audio ____________ 103
Equalizer Control ___________________ 104
Volume Offset ______________________ 105
Zone Control _______________________ 106
Sound Effect _______________________ 107
Listening Position/ DTA ______________ 108
Remote control 112
Battery Installation __________________ 112
Functions of the Remote control Buttons 113
Troubleshooting 116
Problems and Solutions ______________ 116
Error Messages _____________________ 117
Appendix 120
Playable Media and Files _____________ 120
Status Bar Indicator Items ____________ 124
Region Codes in the World ____________ 126
DVD Language Codes _______________ 127
Specifications ______________________ 128
About this Unit _____________________ 131
Before Use
44
# WARNING
To prevent injury or fire, take
the following precautions:
• To prevent a short circuit, never put or
leave any metallic objects (such as coins or
metal tools) inside the unit.
• Do not watch or fix your eyes on the unit’s
display when you are driving for any
extended period.
• If you experience problems during
installation, consult your KENWOOD dealer.
Precautions on using this unit
• When you purchase optional accessories,
check with your KENWOOD dealer to make
sure that they work with your model and in
your area.
• You can select language to display menus,
audio file tags, etc. See User Interface Setup
(P.90).
• The Radio Data System or Radio Broadcast
Data System feature won’t work where
the service is not supported by any
broadcasting station.
Protecting the monitor
To protect the monitor from damage, do not
operate the monitor using a ball point pen or
similar tool with the sharp tip.
Cleaning the unit
If the faceplate of this unit is stained, wipe it
with a dry soft cloth such as a silicon cloth.
If the faceplate is stained badly, wipe the
stain off with a cloth moistened with neutral
cleaner, then wipe it again with a clean soft
dry cloth.
¤
• Applying spray cleaner directly to the unit
may affect its mechanical parts. Wiping the
faceplate with a hard cloth or using a volatile
liquid such as thinner or alcohol may scratch
the surface or erase screened print.
Lens fogging
When you turn on the car heater in cold
weather, dew or condensation may form
on the lens in the disc player of the unit.
Called lens fogging, this condensation on
the lens may not allow discs to play. In such
a situation, remove the disc and wait for the
condensation to evaporate. If the unit still
does not operate normally after a while,
consult your KENWOOD dealer.
Precautions on handling discs
• Do not touch the recording surface of the
disc.
• Do not stick tape etc. on the disc, or use a
disc with tape stuck on it.
• Do not use disc type accessories.
• Clean from the center of the disc and move
outward.
• When removing discs from this unit, pull
them out horizontally.
• If the disc center hole or outside rim has
burrs, use the disc only after removing the
burrs with a ballpoint pen etc.
• Discs that are not round cannot be used.
• 8-cm (3 inch) discs cannot be used.
• Discs with coloring on the recording
surface or discs that are dirty cannot be
used.
• This unit can only play the CDs with
.
This unit may not correctly play discs which
do not have the mark.
• You cannot play a disc that has not been
finalized. (For the finalization process see
your writing software, and your recorder
instruction manual.)
Before Use

How to Read this Manual
5
How to Read this Manual
NOTE
• The screens and panels shown in this
manual are examples used to provide clear
explanations of the operations.
For this reason, they may be different from the
actual screens or panels used, or some display
patterns may be different.
Reference mark
Displayed in blue notes.
With one-click, you can jump to the
article related to the current section.
Screen shot
Shows some screen shots displayed during
operation for reference.
The area or keys to touch are surrounded
with a red frame.
Operation procedure
Explains necessary procedures to
achieve the operation.
< >: Indicates the name of panel
buttons.
[ ]: Indicates the name of touch
keys.
Operation title
Introduces the function.
NOTE
Introduces some tips, notes, etc.
3030
CD/Audio and Visual Files/iPod/APPS
Search Operation
You can search music, video or picture files
by the following operations.
NOTE
• If you use a remote control, you can jump directly
to the desired track/file with entering the track/
folder/file number, play time, etc. For details, see
Direct search mode (P.103).
List search
You can search tracks, folders, and files
according to hierarchy.
1 Touch [1].
Category List screen appears.
2 Touch [ S ].
3 Touch [Category List].
4 Touch the desired category.
5 The list is sorted by selected category.
6 Touch desired item.
Playback starts.

Basic Operations
66
Functions of the Buttons on the Front Panel
DNX893S/ DNX773S/ DNX7160BTS
1
3
4
5
6
7
9
8
2
NOTE
• The panels shown in this guide are examples used to provide clear explanations of the operations. For this reason,
they may be different from the actual panels.
• In this manual, each model name is abbreviated as follows.
DNX893S:
DNX773S, DNX7160BTS:
If above icon is showed, read the article applicable to the unit you use.
How to insert an SD Card
1) Press
7
<G> button.
2) Touch [OPEN] to the panel fully opens.
3) Hold the SD card as the illustration in the
right and insert it into the slot until it clicks.
4) Press
7
<G> button.
ö To eject the card:
1) Press
7
<G> button.
2) Touch [OPEN].
3) Push the card until it clicks and then remove your finger from the card. The card
pops up so that you can pull it out with your fingers.
4) Press
7
<G> button.
Basic Operations
Labelled side

Basic Operations
7
Number Name Motion
1
s
• This indicator flashes when the vehicle ignition is off (P.93).
2
S, R
(Volume)
• Adjusts volume.
The volume will go up until 15 when you keep pressing [ R ].
3
NAV • Displays the navigation screen.
4
MENU • Displays the popup menu screen.
• Pressing for 1 second switches view camera display on/off.
5
HOME • Displays the HOME screen (P.16).
• Pressing for 1 second turns the power off.
• When the power off, turns the power on.
6
• Displays the APP (CarPlay/ Android Auto/ Mirroring) screen.
• Pressing for 1 second displays the Voice Recognition screen. (P.85)
7
G
• Displays the Angle Adjust screen.
–[DISC EJECT ]: Ejects the disc.
–[OPEN]: Fully opens the panel to the location of the SD card slot.
• When the panel is opened, pressing closes the panel.
• To forcibly eject the disc, press it for 2 seconds and touch [DISC EJECT]
after the message is displayed.
8
Disc insert
slot
• A slot to insert a disc media.
9
SD card slot • A slot to insert an SD card.
• You can play audio/visual file in the card. * (Only for DNX893S, DNX773S)
• An SD card slot for upgrading the map. For how to upgrade the map,
refer to the instruction manual of the navigation system.
* If the map update file remains in the SD card, you cannot play audio/visual file.

Basic Operations
88
DNX693S/DNX573S/DNX5160BTS
4
3
1
2
5
6
7
8
NOTE
• The panels shown in this guide are examples used to provide clear explanations of the operations. For this reason,
they may be different from the actual panels.
• In this manual, each model name is abbreviated as follows.
DNX693S:
DNX573S, DNX5160BTS:
If above icons are showed, read the article applicable to the unit you use.
How to insert a microSD Card
NOTE
• A dummy microSD card is inserted as the slot cover. Remove it before using and keep it in an appropriate place.
1) Hold the microSD card with the label
side facing right and the notched section
down, and insert it into the
8
slot until it
clicks.
ö To eject the card:
Push the card until it clicks and then remove your
finger from the card.
The card pops up so that you can pull it out with
your fingers.
Basic Operations
9
Number Name Motion
1
Disc insert
slot
• A slot to insert a disc media.
2
G (Eject) • Ejects the disc.
• To forcibly eject the disc, press it for 2 seconds and touch [Yes] after the
message is displayed.
3
s
• This indicator flashes when the vehicle ignition is off (P.93).
4
HOME • Displays the HOME screen (P.16).
• Pressing for 1 second turns the power off.
• When the power off, turns the power on.
5
NAV • Displays the navigation screen.
6
• Displays the APP (CarPlay/ Mirroring) screen.
• Pressing for 1 second displays the Voice Recognition screen. (P.85)
7
Volume Knob • Turning adjusts volume up or down.
• Displays the popup menu screen.
• Pressing for 1 second switches view camera display on/off.
8
microSD
card slot
• A slot to insert a microSD card.
• You can play audio/visual file in the card. * (Only for DNX693S, DNX573S)
• A microSD card slot for upgrading the map. For how to upgrade the
map, refer to the instruction manual of the navigation system.
* If the map update file remains in the microSD card, you cannot play audio/visual file.
Basic Operations
1010
Turning on the Unit
The method of turning on is different depending on the model.
Press the <HOME> button.
The unit is turned on.
● To turn off the unit:
Press the <HOME> button for 1 second.
If it is your first time turning the unit on after installation, it will be necessary to perform
Initial setup (P.11).
1
Basic Operations
11
Initial setup
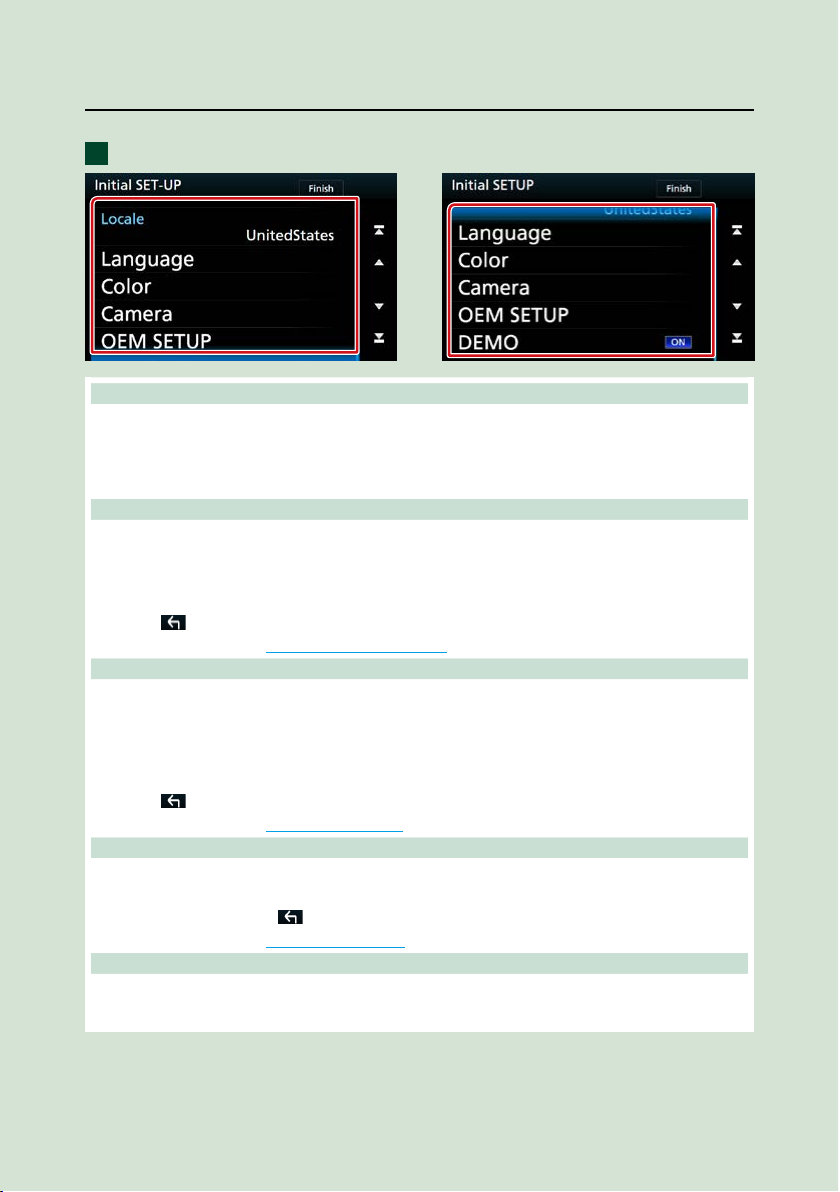
Perform this setup when you use this unit first time.
Set each item as follows.
Locale
Select the country for the navigation system.
The language, the distance unit, and the gasoline unit are set.
1 Touch [Locale].
2 Select the desired country.
Language
Select the language used for the control screen and setting items. Default is “American English (en)”.
1 Touch [Language].
2 Touch [Language Select].
3 Select the desired language.
4 Touch [
].
For detailed operation, see User Interface Setup (P.90).
Color
Set the screen and button illumination color. You can select whether to allow color scan operation or
select a fixed color for operation.
1 Touch [Color].
2 Touch [Panel Color].
3 Select the desired color.
4 Touch [
] twice.
For detailed operation, see Display Setup (P.94).
Camera
Set the parameters for the camera.
1 Touch [Camera].
2 Set each item and touch [
].
For detailed operation, see Camera Setup (P.96).
OEM SETUP (North America Sales area only)
This function requires a commercial adaptor.
Consult your KENWOOD dealer for details.
1
Continued
Basic Operations
1212
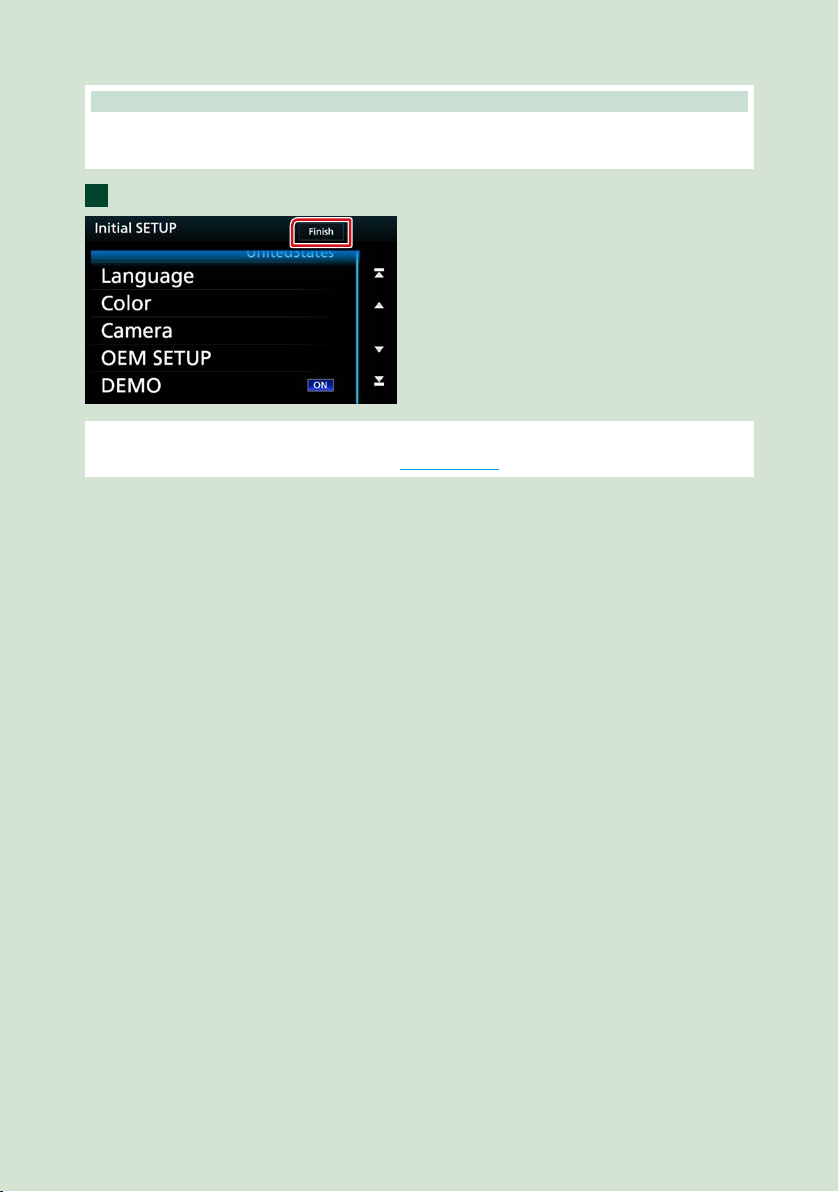
DEMO
Set the demonstration mode. Default is “ON”.
1 Touch [DEMO] and set ON or OFF.
Touch [Finish].
NOTE
• These settings can be set from the SETUP menu. See Setting Up (P.88).
2
Basic Operations
13
How to Play Media
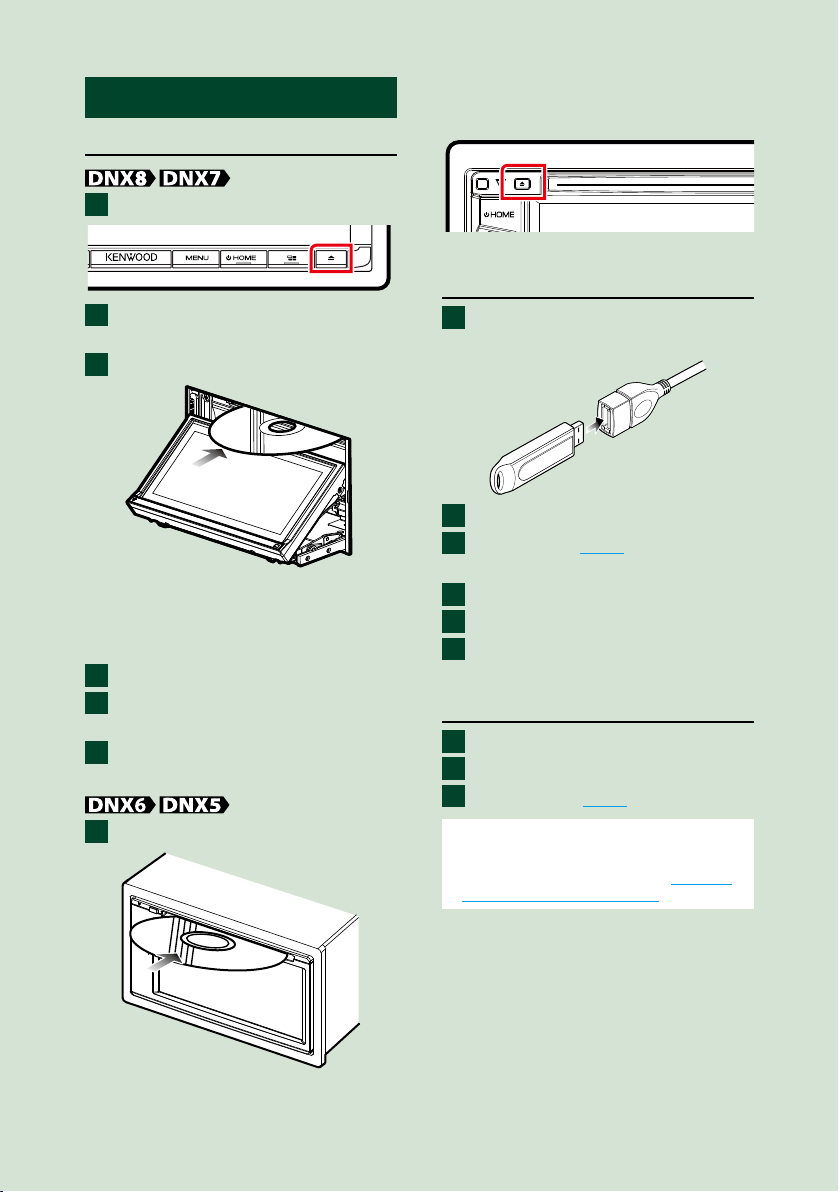
Music CD and disc media
Press the <G> button.
Touch [DISC EJECT].
The panel opens.
Insert the disc into the slot.
The panel closes automatically.
The unit loads the disc and playback
starts.
● To eject the disc:
Press the <G> button.
Touch [DISC EJECT].
When removing a disc, pull it horizontally.
Press the <G> button.
Insert the disc into the slot.
The unit loads the disc and playback
starts.
● To eject the disc:
Press the <G> button.
USB device
Connect the USB device with the
USB cable.
Press the <HOME> button.
Touch [USB]. (P.16)
● To disconnect the device:
Press the <HOME> button.
Touch a source other than [USB].
Detach the USB device.
iPod
Connect the iPod.
Press the <HOME> button.
Touch [iPod]. (P.16)
NOTE
• For the details of the necessary cable and adapter
to connect with iPod/iPhone, refer to CD/Audio
and Visual Files/iPod/APPS (P.30).
● To disconnect the iPod/iPhone
connected with the cable:
Detach the iPod/iPhone.
1
2
3
1
2
3
1
1
2
3
1
2
3
1
2
3
Basic Operations
1414
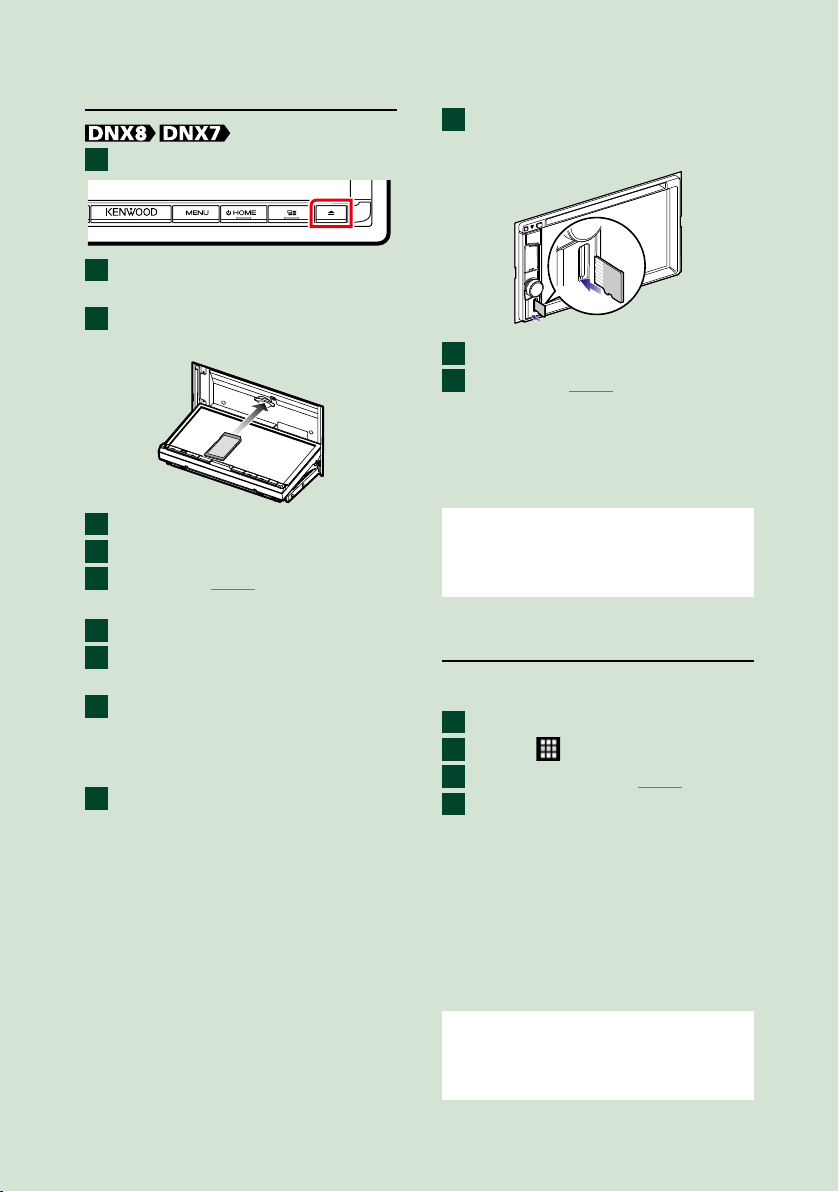
SD card
Press the <G> button.
Touch [OPEN] to the panel fully
opens.
Insert the SD card into the slot
until it clicks.
Press the <G> button.
Press the <HOME> button.
Touch [SD]. (P.16)
● To remove:
Press the <G> button.
Touch [OPEN] to the panel fully
opens.
Push the SD card until it clicks and
then remove your finger from the
card. The card pops up so that you
can pull it out with your fingers.
Press the <G> button.
DNX693S/ DNX573S
Insert the microSD card into the
slot until it clicks.
Press the <HOME> button.
Touch [SD]. (P.16)
● To remove:
Push the microSD card until it clicks and
then remove your finger from the card. The
card pops up so that you can pull it out
with your fingers.
NOTE
• A dummy microSD card is inserted as the slot
cover. Remove it before using and keep it in an
appropriate place.
HDMI/ MHL source
You can display the screen of smartphones
connected via the HDMI/MHL input terminal.
Press the <HOME> button.
Touch [
].
Touch [HDMI/ MHL]. (P.16)
Start an application or playback
on your smartphone.
● About Wireless Display Adapter:
This unit is compatible with Wireless
Display Adapter. Connecting a Wireless
Display Adapter (KCA-WL100:optional
accessory) to the HDMI/MHL input
terminal enables you to enjoy listening
to music, watching videos, or viewing
pictures over a wireless connection.
NOTE
• For details about Wireless Display Adapter
settings, etc., refer to the instructions supplied
with the Wireless Display Adapter.
1
2
3
4
5
6
1
2
3
4
1
2
3
1
2
3
4
Basic Operations
15
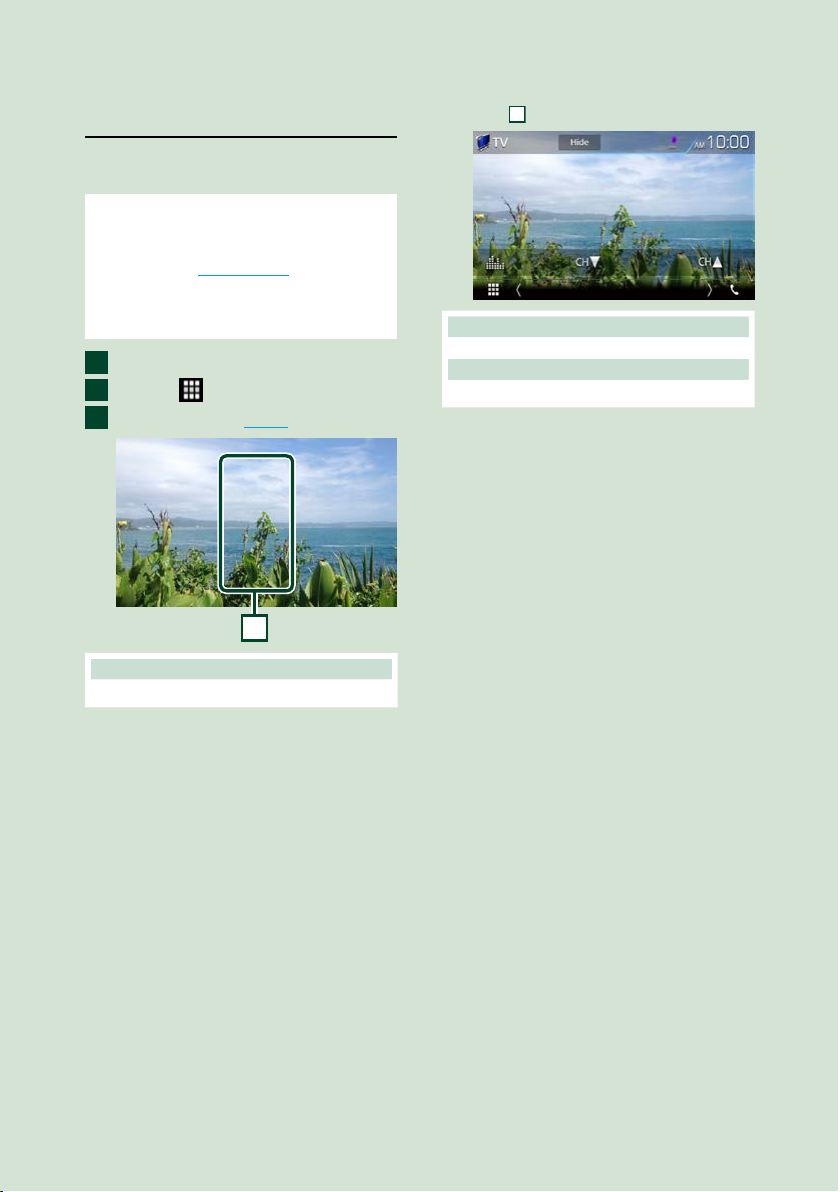
TV tuner (DNX7160BTS/
DNX5160BTS)
You can connect the TV tuner (commercially
available) with this unit and watch TV.
Before use
• When you use TV control function, connect the TV
tuner (commercially available) and set 3rd Party TV
Tuner Control in AV Setup (P.98) to ON.
• The TV tuner can be controlled with its supplied
remote control through the remote sensor on the
front panel of this unit.
Press the <HOME> button.
Touch [
].
Touch [AV-IN1]. (P.16)
1
1 Key display area
Touch to display the control screen.
Menu control screen:
Touch
1
Key display area.
Hides the indicators and buttons.
Touch [Hide].
Change the channel.
Touch [CHR], [CHS].
1
2
3
Basic Operations
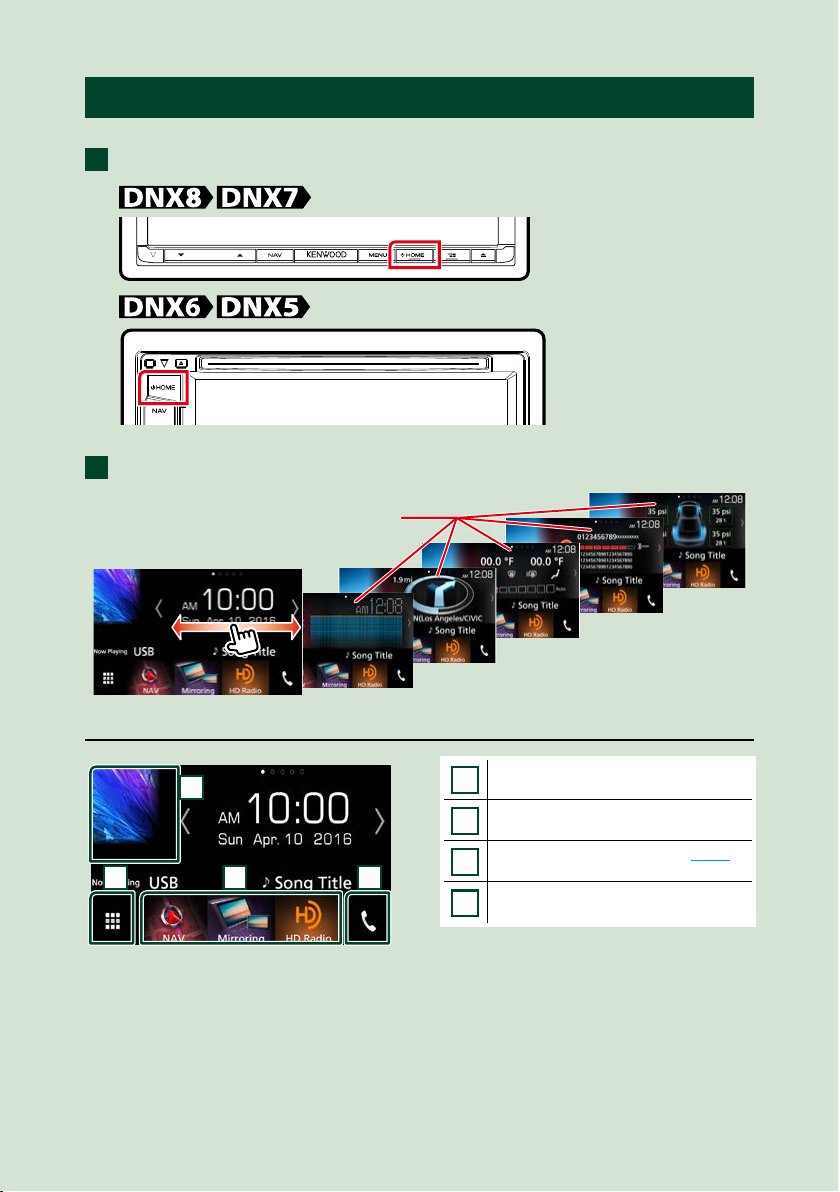
1616
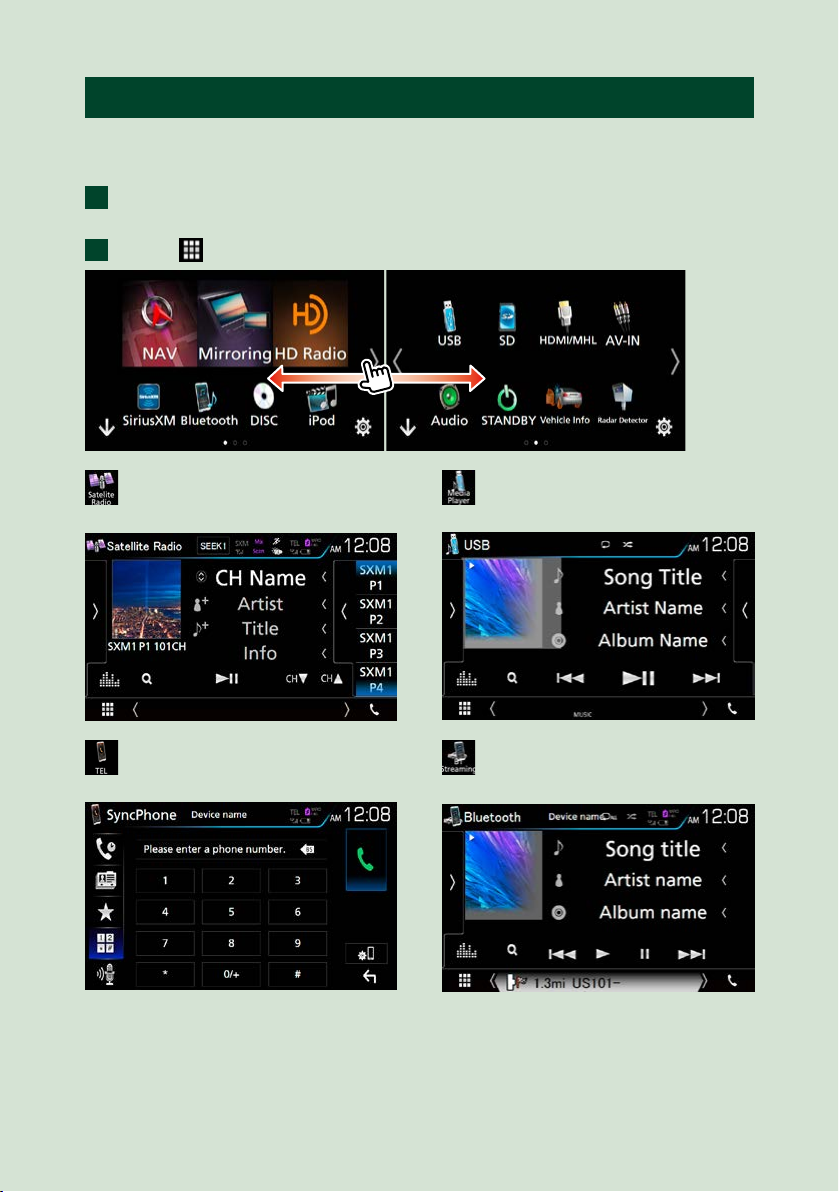
Operating with the HOME Screen
Most functions can be performed from the HOME screen.
Press the <HOME> button.
HOME screen appears.
Flick the screen left or right to select the widget.
Touch the widget to display the
detailed screen.
Selecting the playback source on the HOME screen
4
3
1
2
1
Displays the source selection screen.
2
Short-cut buttons.
3
Displays the Hands Free screen (P.82).
4
Displays the control screen of current
source.
1
2
Basic Operations
17
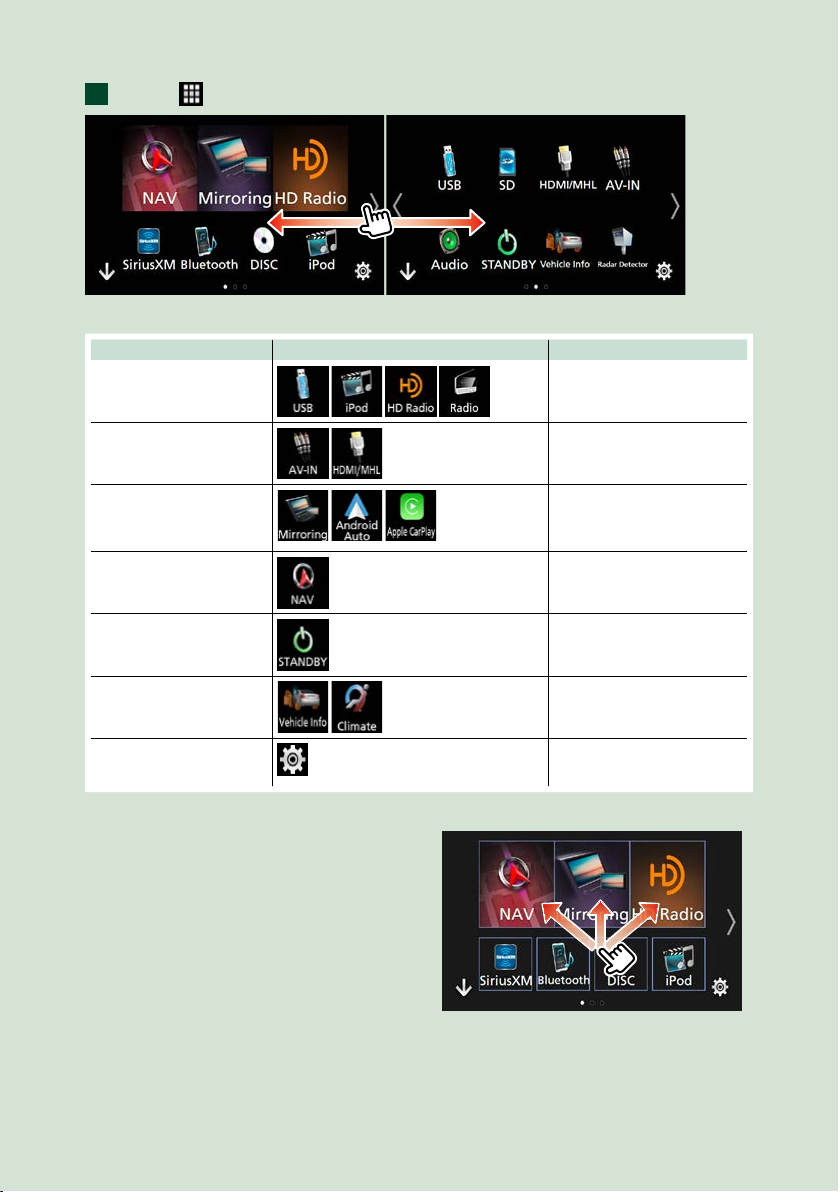
Touch [ ].
From this screen, you can perform the following functions.
Function Icon Operation
Switch the audio source
etc.
Touch the icon of the desired
source.
Switch the video source
etc.
Touch the icon of the desired
video source.
Switch the application
installed in the iPhone/
iPod or Android.
etc.
Touch the icon of the desired
application.
Display navigation screen
Touch [NAV].
Turn off all audio function
Touch [STANDBY].
Vehicle information
display
etc.
Touch the icon of the desired
vehicle information
Enter setup mode
Touch the icon of the desired
setup function.
● Customizing Short-cut buttons on
HOME screen
You can arrange the position of the source
icons as you like.
1. Touch and hold the icon which you want
to move to go into the customizing
mode.
2. Drag it where you want to move.
Customizing mode screen
1

Basic Operations
1818
Common Operations
Introduces the common operations.
Popup menu
Press the <MENU> button.
Press the volume knob.
Popup menu appears.
Touch to display the popup menu. The
contents of the menu are as follows.
: Displays the Screen Adjustment screen.
: Turns the display off.
: Displays the view camera.
: Displays the SETUP Menu screen.
: Displays the Audio Control Menu screen.
: Displays the control screen of current
source. Icon feature differs depending on
the source.
Source control screen
descriptions
There are some functions which can be
operated from most screens.
4
5
3
1
2
Indicators
Navigation information
Short-cut buttons
1
Connected Bluetooth device information.
: Lights up when quick charging
battery of the connected iPod/ iPhone/
Smartphone.
2
Displays the function panel (other operation
button window).
3
All sources icon
Displays all sources.
4
Secondary screen
[<] [>] : The Secondary screen changes every
time you touch it.
• Indicators: Displays the current source
condition and so on.
• Navigation information: Displays the
current location and the direction. The
screen changes to the navigation screen
when you touch here.
• Short-cut buttons: The source changes
to the one you have set as a short-cut. For
the short-cut setting, refer to Customizing
Short-cut buttons on HOME screen
(P.17).
1
1
Basic Operations
19
5
[Û]
Touch to display the Hands Free screen.
(P.82)
When connecting as Apple CarPlay or
Android Auto, it works as a phone provided
in Apple CarPlay or Android Auto.
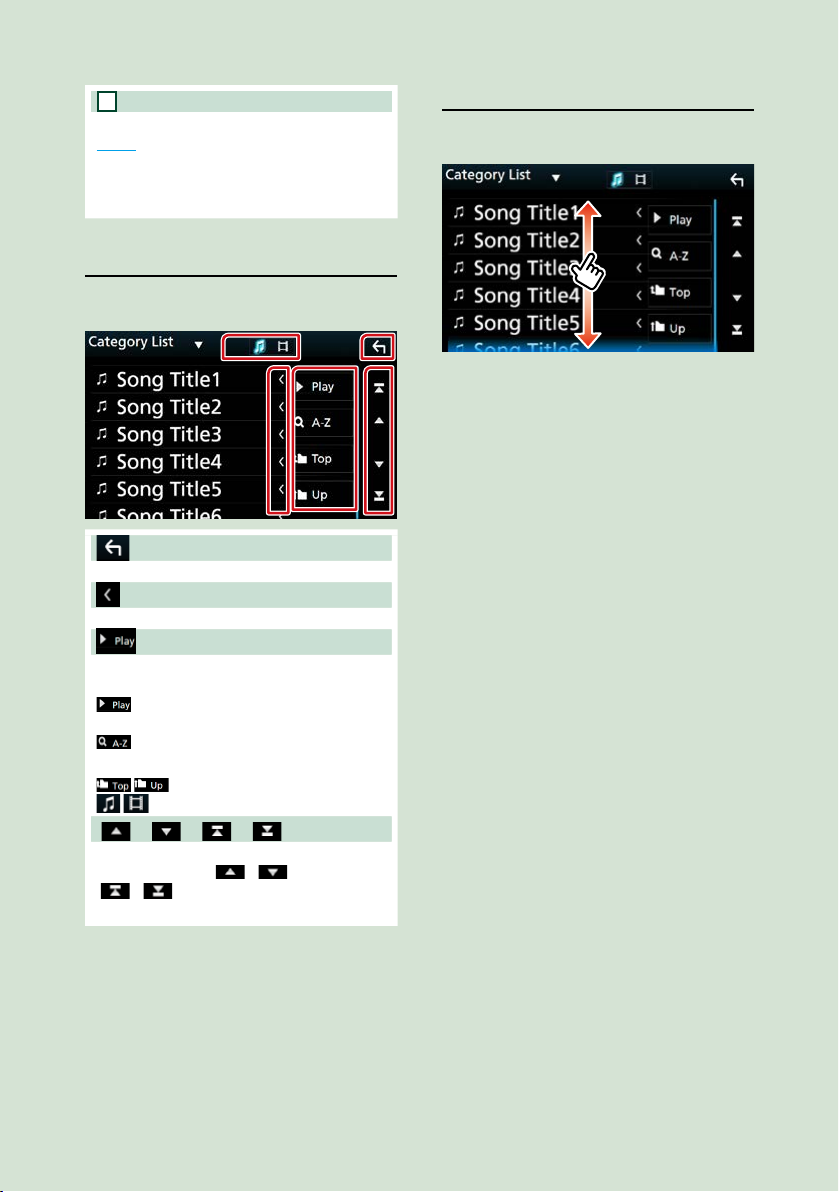
List screen
There are some common function keys in the
list screens of most sources.
Return
Returns to previous screen.
Tex t scroll
Scrolls the displayed text.
etc.
Keys with various functions are displayed
here.
: Plays all tracks in the folder containing
the current track.
: Jump to the letter you entered
(alphabet search).
: Moves to the upper hierarchy.
: Displays music/movie file list.
[
] / [ ] / [ ] / [ ] Page scroll
You can change the page to display more
items by pressing [
]/[ ].
[ ]/[ ] : Displays the top or bottom
page.
Flick scrolling
You can scroll the list screen by flicking the
screen up/down.
Basic Operations
2020
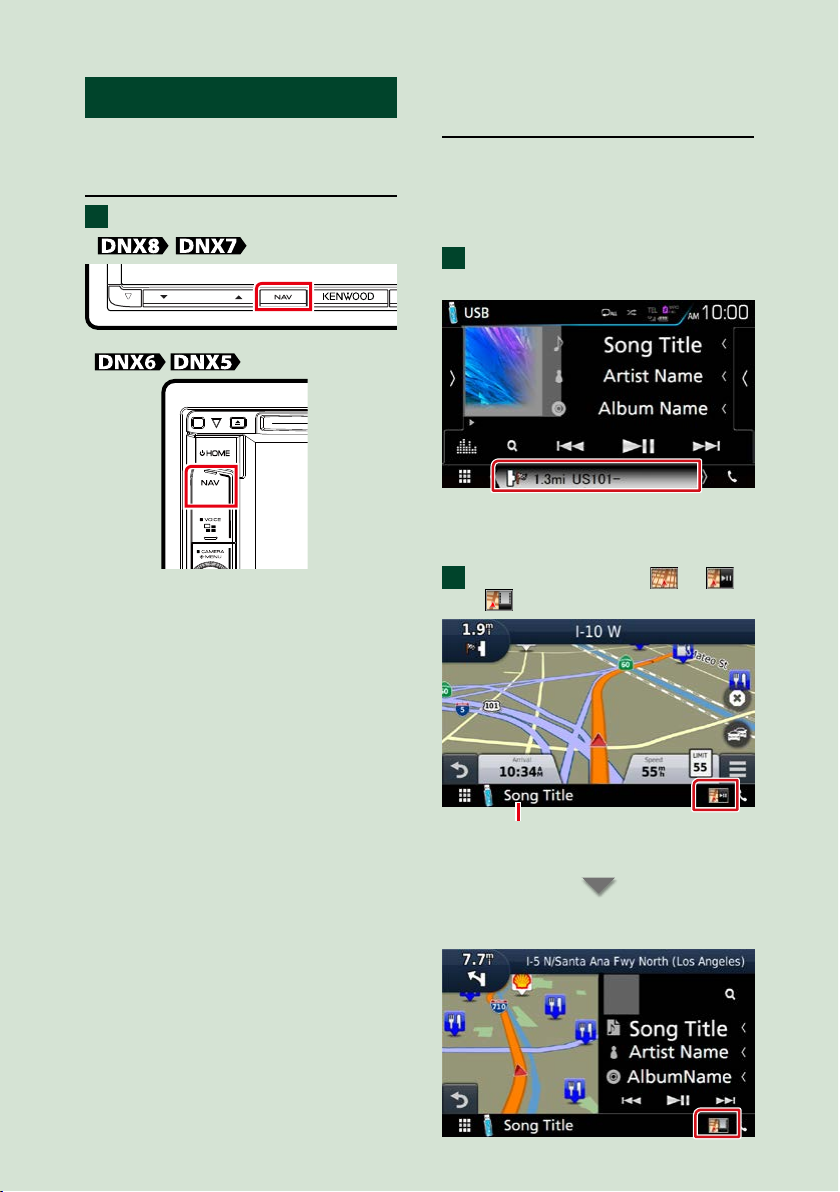
Navigation Operation
For details on the navigation function, please
refer to the Navigation Instruction Manual.
Display the navigation screen
Press the <NAV> button.
The navigation screen appears.
Control audio from the
navigation screen
You can control audio sources while the
navigation screen is displayed.
Also, you can view the navigation
information while the source control screen
is displayed.
Touch the Navigation information
of Secondary screen.
The navigation screen with audio
information appears.
Each time you touch [ ]/ [ ]/
[ ] in the navigation screen,
Touching this area displays
the audio screen.
Displays the navigation and control keys of
the current source.
1
1
2
Basic Operations
21
Displays the navigation and current video/
picture playback display.
NOTE
• The screen switches between playback screen
and view camera each time the viewing area is
touched.
To return to the full navigation screen:
NOTE
• For details on control keys, refer to the instructions
in each section.
• [
] : It does not appear if the control keys like
AV-IN, HDMI/MHL, etc. are not exist.
• Touching the source icon in the bottom of the
screen displays the full audio screen.
KENWOOD Traffic Powered By
INRIX (North America Sales
area only)
You can receive INRIX traffic information
and weather forecast by connecting your
iPhone or Android smartphone in which
the “KENWOOD Traffic Powered By INRIX”
application is installed to this unit.
Preparation
• Install the latest version of the KENWOOD Traffic
Powered By INRIX application on your iPhone or
Android.
–iPhone: Search for "KENWOOD Traffic Powered
By INRIX" in the Apple App Store to find and
install the most current version.
–Android: Search for "KENWOOD Traffic Powered
By INRIX" in Google play to find and install the
most current version.
• For details, see “KENWOOD Traffic Powered By
INRIX” application.
Register the Smartphone.
See APP/iPod settings (P.31).
Press the <NAV> button.
Navigation screen appears.
Touch [Apps] on the Main Menu screen
and then an icon of your desired content
For details, see Navigation system manual.
1
2
Basic Operations
2222
OEM Features Operation
By connecting this unit to the bus system of the vehicle using an iDataLink (commercially
available), this unit can access the satellite radio source provided for the vehicle and vehicle
information can be displayed on this unit.
Press the <HOME> button.
HOME screen appears.
Touch [ ] icon
: Displays the control screen of the
satellite radio source provided for the
vehicle.
: Displays the control screen of the
media player source provided for the
vehicle.
: Displays the control screen of the
Bluetooth Hands Free function
provided for the vehicle.
: Displays the control screen of the
Bluetooth streaming source provided
for the vehicle.
1
2
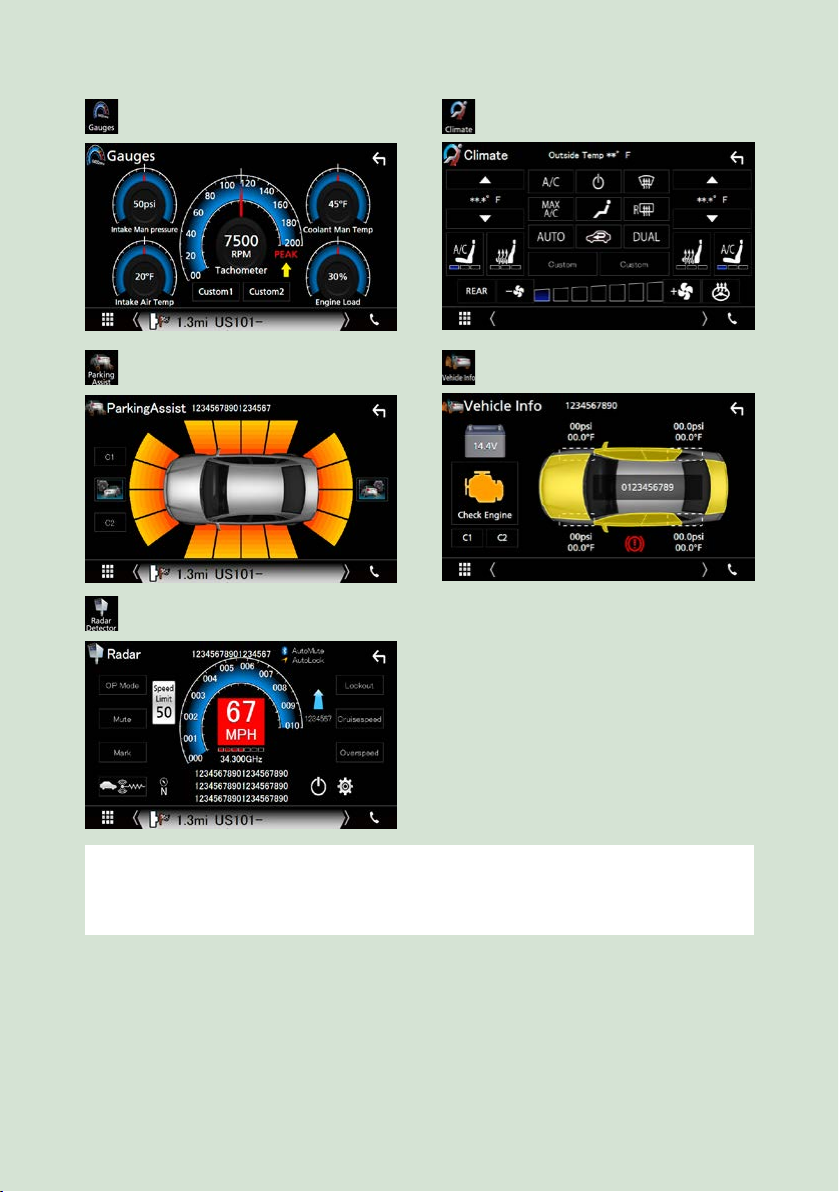
Basic Operations
23
: Displays information about the
instruments such as a speedometer.
: Displays information about the air
conditioner of the vehicle.
: Displays information about the
Parking Distance Sensor of the vehicle.
: Displays information about the tire
pressures of the vehicle.
: Displays information about the Radar
Detector.
NOTE
• Displayable screens, button names, and screen names vary depending on the type of the connected iDataLink
and the model of the vehicle. For more details, access the following URL:
www.idatalink.com/
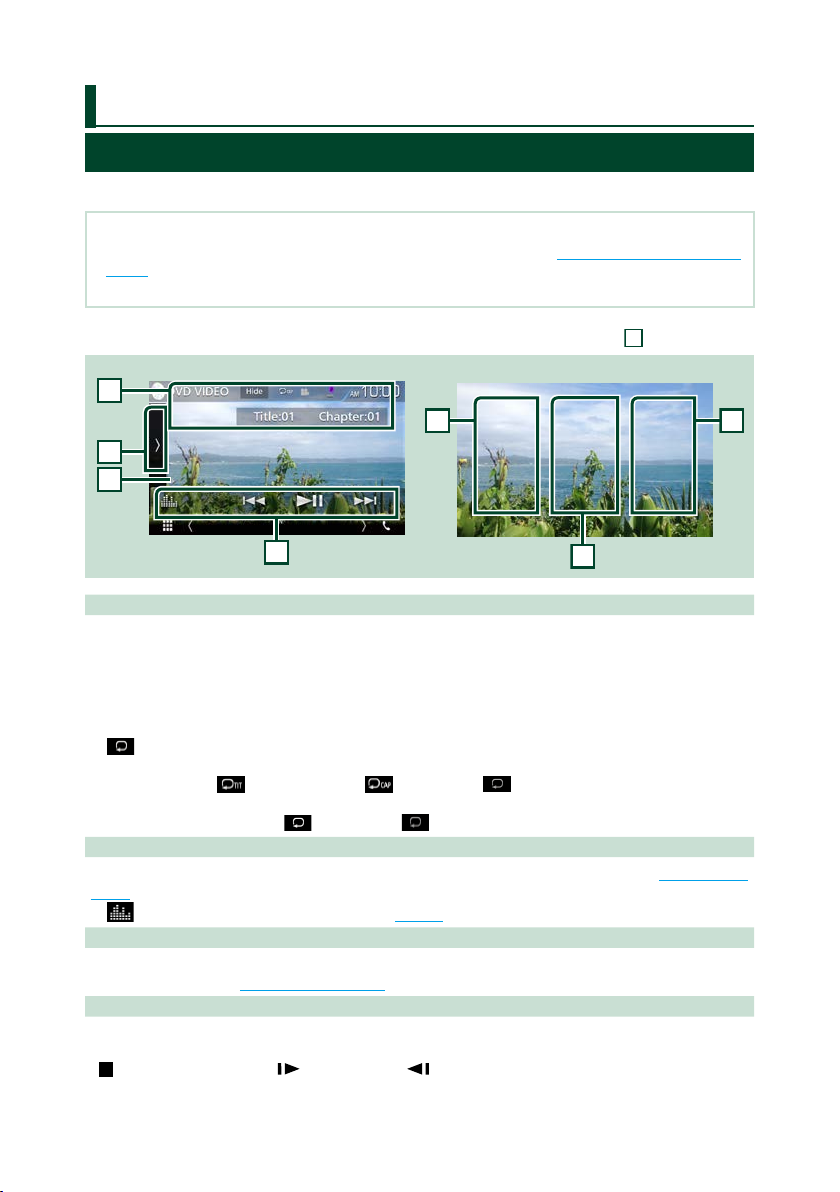
DVD/Video CD (VCD)
2424
DVD/VCD Basic Operation
Most functions can be controlled from the source control screen and playback screen.
NOTE
• Set the remote control mode switch to DVD mode before starting operation, see Switching the operation mode
(P.113).
• The screen shot below is for DVD. It may be different from the one for VCD.
1 When the operation buttons are not displayed on the screen, touch the
6
area.
2
1
4
3
Video screenControl screen
5
5
6
1 Information display
Displays the following information.
• Title #, Chap #: DVD title and chapter number display
• Tr ack #/Scene #: VCD track or scene number display
Scene # is displayed only when Playback control (PBC) is on.
• [Hide]: Hides the control screen.
• [
] : Repeats the current content. Each time you touch the key, repeat mode switches in the
following sequence;
DVD: Title repeat ( ), Chapter repeat ( ), Repeat off ( )
VCD (PBC On): Does not repeat
VCD (PBC Off ): Track repeat ( ), Repeat off ( )
2 Function bar
Various functions can be performed by using keys in this area. For details on the keys, see Function bar
(P.25).
• [
] : Displays the Graphic Equalizer screen. (P.104)
3 Function panel
Touch on the left side of the screen to display the function panel. Touch again to close the panel. For
details on the keys, see Function panel (P.26).
4 Play mode indicator
• D, B, I, etc.: Current play mode indicator
The meanings of each icon are as follows; D (play), B (fast forward), A (fast backward), I (stop),
R
(resume stop), H (pause), (slow playback), (slow reverse playback).
DVD/Video CD (VCD)

DVD/Video CD (VCD)
25
5 Searching area
Touch to search the next/previous content.
6 Key display area
Touch to display the control screen.
NOTE
• The control screen disappears when no operation is done for 5 seconds.
• If you use a remote control, you can jump directly to the desired image with entering the chapter number, scene
number, play time, etc (P.113).
Function bar
DVD VCD
The functions of each key are as follows.
[E] [F]
Searches the previous/next content.
Touch and hold to fast forward or fast backward. (It will be cancelled automatically after about 50
seconds.)
[DH]
Plays or pauses.
DVD/Video CD (VCD)
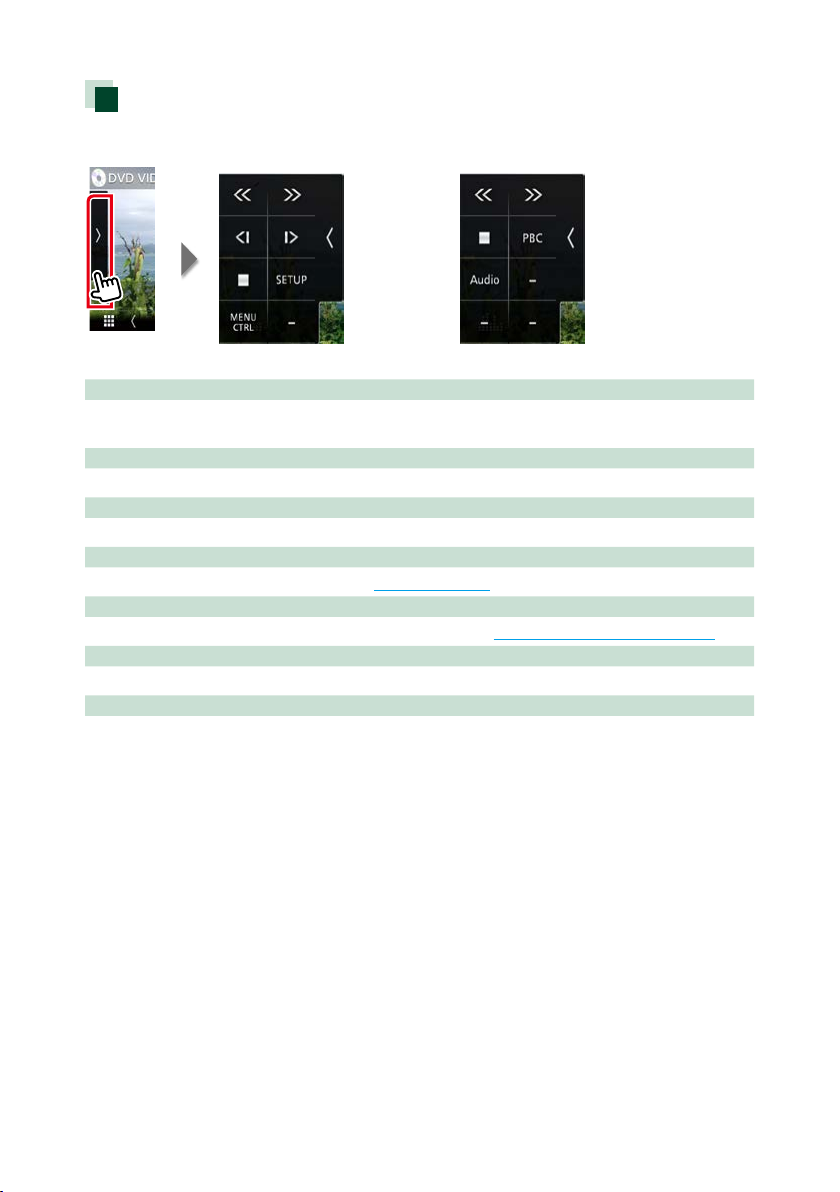
2626
Function panel
1 Touch on the left side of the screen.
DVD VCD
The functions of each key are as follows.
[I]
Stops playback. When touched twice, the disc is played from the beginning when you play it the next
time.
[<<] [>>]
Fast forward or fast backward. Each time you touch the key, the speed changes; 2 times, 8 times.
[<|] or [|>] (DVD only)
Plays in slow motion forward or backward.
[SETUP] (DVD only)
Touch to display the DVD SETUP screen. See DVD Setup (P.28).
[MENU CTRL] (DVD only)
Touch to display the DVD-VIDEO disc manu control screen. See DVD Disc Menu Operation (P.27).
[PBC] (VCD only)
Turn Playback control (PBC) on or off.
[Audio] (VCD only)
Change the audio output channel.
DVD/Video CD (VCD)
27
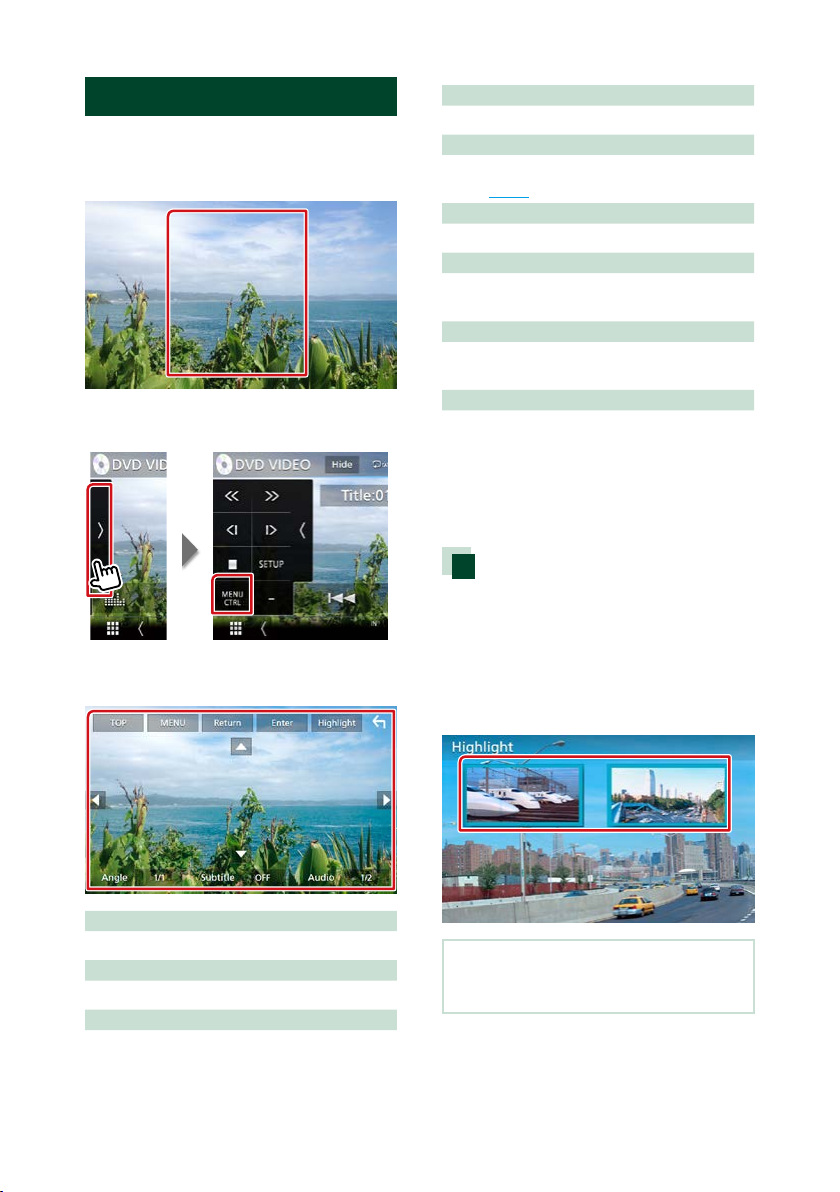
DVD Disc Menu Operation
You can set up some items in the DVD-VIDEO
disc menu.
1 Touch illustrated area during playback.
2 Touch on the left side of the screen.
Touch [MENU CTRL].
Menu Control screen appears.
3 Perform desired operation as follows.
Displays the top menu
Touch [TOP].*
Displays the menu
Touch [MENU].*
Displays the previous menu
Touch [Return].*
Enters selected item
Touch [Enter].
Enables direct operation
Touch [Highlight] to enter the highlight control
mode (P.27).
Moves the cursor
Touch [R], [S], [C], [D].
Switches the subtitle language
Touch [Subtitle]. Each time you touch this key,
language is switched.
Switches the audio language
Touch [Audio]. Each time you touch this key,
language is switched.
Switches the picture angle
Touch [Angle]. Each time you touch this key,
picture angle is switched.
* These keys may not function depending on
the disc.
Highlight control
Highlight control lets you control the DVD
menu by touching the menu key directly on
the screen.
1 Touch [Highlight] in the Menu Control
screen.
2 Touch desired item on the screen.
NOTE
• The highlight control is cleared automatically if
you do not operate for a constant time.
DVD/Video CD (VCD)
2828
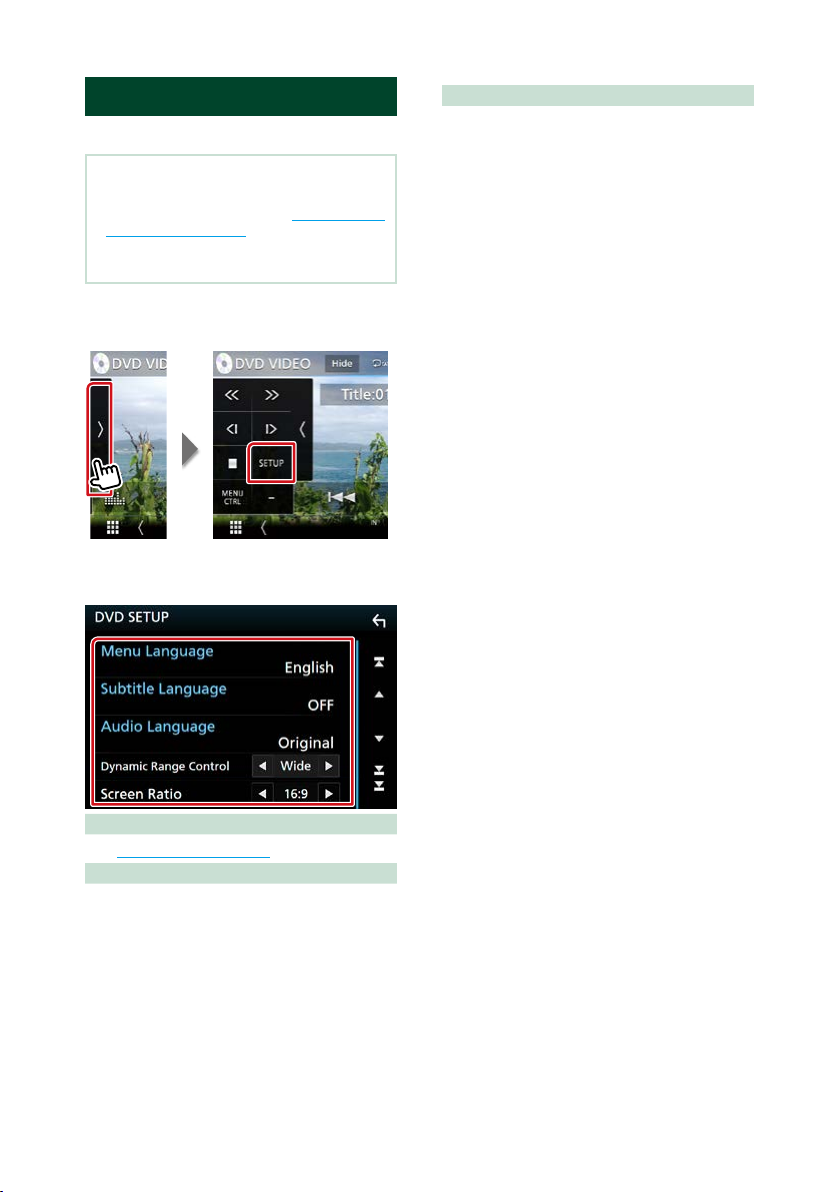
DVD Setup
You can set up the DVD playback functions.
NOTE
• Each operation in this section can be started from
the HOME screen. For details, see Operating with
the HOME Screen (P.16).
• Some setup items can only be set in standby
mode.
1 Touch on the left side of the screen.
Touch [SETUP].
DVD SETUP screen appears.
2 Set each item as follows.
Menu/Subtitle/Audio Language
See Language setup (P.29).
Dynamic Range Control
Sets the dynamic range.
Wide: The dynamic range is wide.
Normal: The dynamic range is normal.
Dialog (Default): Makes the total sound
volume larger than other modes. This is
effective only when you are using Dolby
Digital software.
Screen Ratio
Sets the screen display mode.
16:9 (Default): Displays wide pictures.
4:3 LB: Displays wide pictures in the Letter Box
format (having black stripes at the top and
bottom of screen).
4:3 PS: Displays wide pictures in the Pan &
Scan format (showing pictures cut at the
right and left ends).
DVD/Video CD (VCD)
29
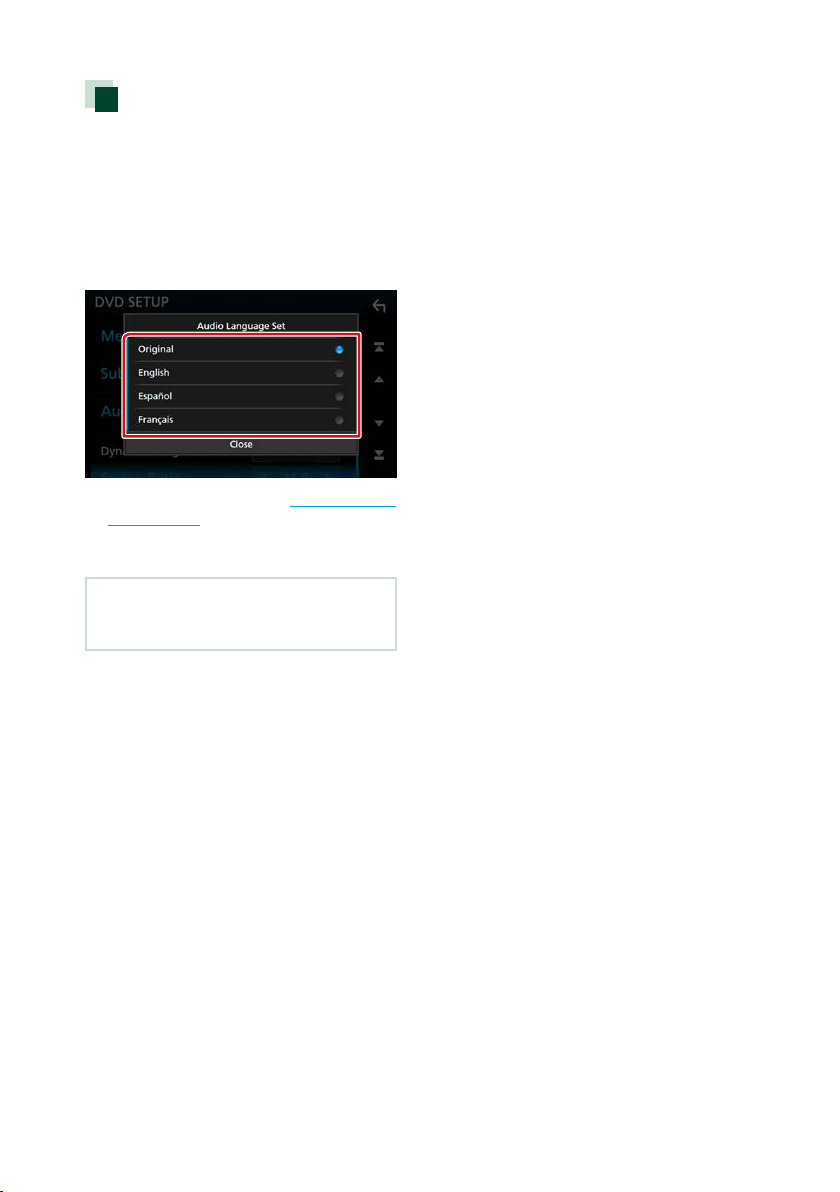
Language setup
This setting is for the language used in the
menu, subtitle, and voice.
1 Touch the desired item;
[Menu Language], [Subtitle Language],
[Audio Language].
Language Set screen appears.
2 Select a language.
For language code, refer to DVD Language
Codes (P.127).
Sets the entered language and returns to
the DVD Setting screen.
NOTE
• To set the DVD’s original language for audio
language, touch [Original].
Loading...