


DMX4707S
DMX47S
DMX5020S
MONITOR WITH RECEIVER
INSTRUCTION MANUAL
•Updated information (the latest Instruction Manual, system updates, new functions, etc.) is available from <https://www.kenwood.com/cs/ce/>.
Take the time to read through this instruction manual.
Familiarity with installation and operation procedures will help you obtain the best performance from your new receiver.
For your records
Record the serial number, found on the back of the unit, in the spaces designated on the warranty card, and in the space provided below. Refer to the model and serial numbers whenever you call upon your KENWOOD dealer for information or service on the product.
Model DMX4707S / DMX47S / DMX5020S Serial number
US Residence Only
Register Online
Register your KENWOOD product at www.kenwood.com/usa/
© 2020 JVCKENWOOD Corporation |
B5H-0358-00 EN (K/R) |

 Contents
Before Use |
4 |
Precautions................................................................... |
4 |
How to read this manual ......................................... |
4 |
Basic Operations |
5 |
Functions of the Buttons on the Front Panel ... |
5 |
Turning on the Unit ................................................... |
5 |
Getting Started............................................................ |
6 |
Adjusting the volume ............................................... |
7 |
Touch screen operations ......................................... |
7 |
HOME screen descriptions...................................... |
8 |
Source selection screen descriptions.................. |
8 |
Source control screen descriptions ................... |
10 |
MENU screen.............................................................. |
11 |
List screen ................................................................... |
11 |
Radio |
18 |
Radio Basic Operation ............................................ |
18 |
Memory Operation .................................................. |
19 |
Selecting Operation ................................................ |
19 |
Traffic Information ................................................... |
20 |
Radio Setup ................................................................ |
20 |
SiriusXM® |
21 |
SiriusXM® Basic Operation .................................... |
21 |
Storing Channels in Preset Memory.................. |
22 |
Preset select ............................................................... |
22 |
Direct search .............................................................. |
23 |
Category/Channel search...................................... |
23 |
Replay........................................................................... |
24 |
SiriusXM Setup .......................................................... |
24 |
APPS |
12 |
|
Bluetooth Control |
27 |
|
|
|
|
|
Apple CarPlay Operation ....................................... |
12 |
Android Auto Operation........................................ |
13 |
USB Mirroring Operation....................................... |
14 |
USB |
15 |
Connecting a USB device ...................................... |
15 |
USB Basic Operation................................................ |
15 |
Search Operation...................................................... |
17 |
Information for using Bluetooth® devices |
.......27 |
Register from the Bluetooth device................... |
28 |
Bluetooth Setup........................................................ |
28 |
Playing Bluetooth Audio Device......................... |
29 |
Using Hands-Free Unit............................................ |
31 |
Other External Components |
35 |
View Camera .............................................................. |
35 |
External audio/video players—AV-IN ............... |
36 |
2

Setting Up |
37 |
Monitor Screen Setup............................................. |
37 |
System Setup ............................................................. |
37 |
User Interface Setup................................................ |
38 |
Special Setup ............................................................. |
39 |
Display Setup............................................................. |
39 |
AV Setup ...................................................................... |
40 |
Controlling Audio |
41 |
Speaker/ X’over setup............................................. |
41 |
Controlling General Audio.................................... |
42 |
Equalizer Control ...................................................... |
43 |
Volume Offset............................................................ |
44 |
Sound Effect............................................................... |
44 |
Listening Position/ DTA.......................................... |
45 |
Remote control |
46 |
Functions of the Remote control Buttons ....... |
46 |
Connection/Installation |
47 |
Before Installation .................................................... |
47 |
Installing the unit ..................................................... |
48 |
Troubleshooting |
52 |
Problems and Solutions......................................... |
52 |
Error Messages .......................................................... |
52 |
Appendix |
54 |
Playable Media and Files........................................ |
54 |
Specifications............................................................. |
55 |
About this Unit.......................................................... |
57 |
English 3

Before Use
|
Before Use |
|
|
|
|
|
|
|
|
|
|
|
|
|
|
|
|
Ñ How To Reset Your Unit |
|||||
Precautions |
|
||||||
# WARNINGS |
|
|
• If the unit or the connected unit fails to |
||||
|
|
operate properly, reset the unit. Press the |
|||||
|
|
<Reset> button.The unit returns to factory |
|||||
Ñ To prevent injury or |
|
|
|||||
f re, takesettings. |
|||||||
|
the following precautions: |
|
|
|
|
|
|
• To prevent a short circuit, never put or leave |
|
|
|
|
|
||
any metallic objects (such as coins or metal |
|
|
|
|
|
||
tools) inside the unit. |
|
|
|
|
|
|
|
|
|
|
|
|
|
||
• Do not watch or fix your eyes on the unit’s |
|
|
|
|
|
|
|
|
|
|
|
|
|
||
|
|
|
|
|
|
||
display when you are driving for any extended |
|
|
|
|
|
||
period. |
|
|
Reset button |
||||
• If you experience problems during installation, |
|
|
|
|
|
||
consult your KENWOOD dealer. |
|
|
NOTE |
||||
Ñ Precautions on using this unit |
|
• Disconnect the USB device before pressing the |
|||||
|
<Reset> button. Pressing the <Reset> button |
||||||
• When you purchase optional accessories, |
|
|
with the USB device connected can damage |
||||
check with your KENWOOD dealer to make |
|
the data stored in the USB device. For how to |
|||||
sure that they work with your model and in |
|
disconnect the USB device, see Disconnect the |
|||||
your area. |
|
|
USB device (P.15). |
||||
• You can select language to display menus, |
|
|
• When the unit is turned on af ter resetting, the |
||||
|
audio file tags, etc. See User Interface Setup |
|
Initial SETUP screen appears. See Initial setup |
||||
|
(P.38). |
|
|
(P.6). |
|||
• The Radio Data System or Radio Broadcast |
|
|
|
|
|
|
|
|
|
|
|
|
|
||
Data System feature won’t work where the |
|
How to read this manual |
|||||
service is not supported by any broadcasting |
|
||||||
station.
Ñ Protecting the monitor
•To protect the monitor from damage, do not operate the monitor using a ball point pen or similar tool with the sharp tip.
Ñ Cleaning the unit
•If the faceplate of this unit is stained, wipe it with a dry sof t cloth such as a silicon cloth. If the faceplate is stained badly, wipe the
stain o with a cloth moistened with neutral cleaner, then wipe it again with a clean sof t
dry cloth.
NOTE
•Applying spray cleaner directly to the unit may a ect its mechanical parts. Wiping the faceplate with a hard cloth or using a volatile liquid such as thinner or alcohol may scratch the sur face or erase screened print.
•The screens and panels shown in this manual are examples used to provide clear explanations of the
operations.
For this reason, they may be di erent from the actual screens or panels used, or some display patterns may
be di erent.
•Indication language: English indications are used for the purpose of explanation. You can select the indication language from the [SETUP] menu. See
User Interface Setup (P.38).
4
Basic Operations
 Basic Operations
Functions of the Buttons on |
|
Turning on the Unit |
|
|
|
the Front Panel |
|
|
|
|
|
The method of turning on is di |
erent |
||||
|
|||||
|
depending on the model. |
|
|
||
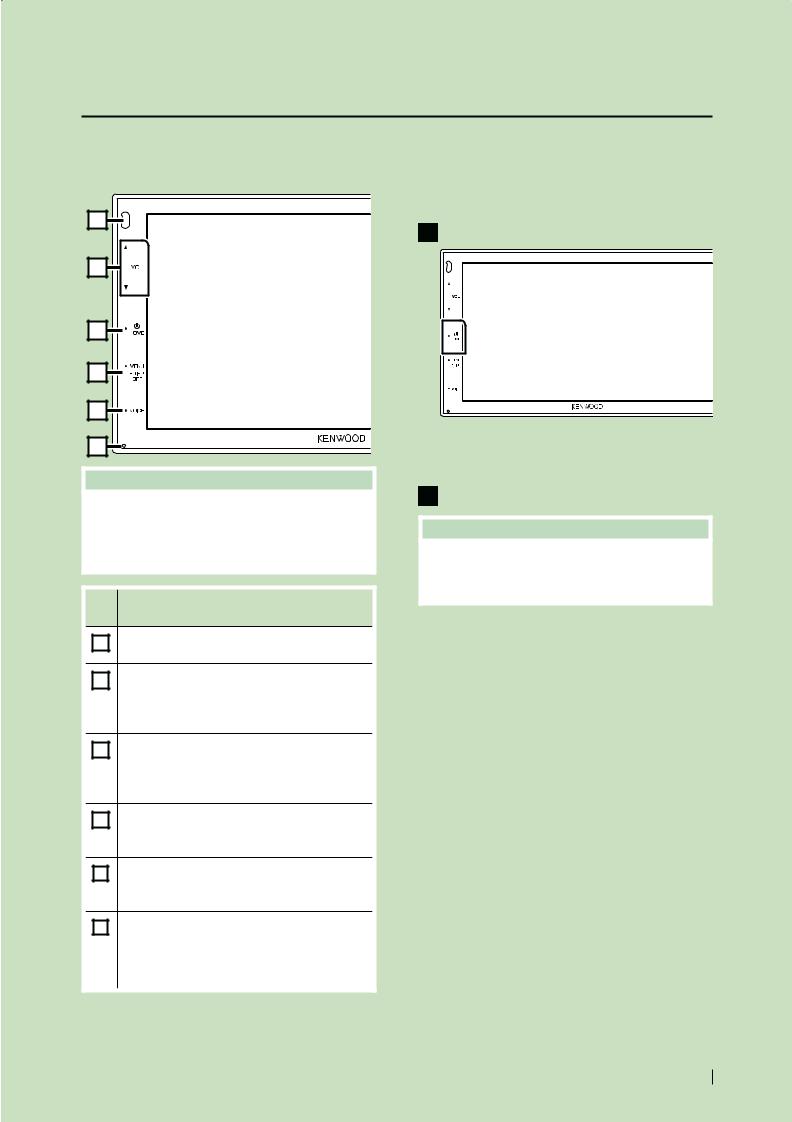
1 |
1 Press the [HOME] button. |
|
2 |
3 |
|
|
4 |
|
|
5 |
|
|
6 |
hThe unit is turned on. |
|
● To turn off the unit: |
||
NOTE |
||
1 Press the [HOME] button for 1 second. |
||
• The panels shown in this guide are examples |
||
|
used to provide clear explanations of the |
NOTE |
|
|
||
operations. For this reason, they may be di |
erent |
|
from the actual panels. |
• If it is your first time turning the unit on af ter |
|
installation, it will be necessar y to per form Initial |
||
|
||
Name |
setup (P.6). |
|
|
||
• Motion |
|
1 |
Remote Sensor |
|
• Receives the remote control signal. |
2 |
[S], [R] ([VOL]) |
|
• Adjusts volume. |
|
The volume will go up until 15 when you |
|
keep pressing [R]. |
3 |
[HOME] |
|
• Displays the HOME screen (P.8). |
|
• Pressing for 1 second turns the power off. |
|
• When the power off, turns the power on. |
4 |
[MENU] |
|
• Displays the MENU screen. |
|
• Pressing for 1 second turns the screen off. |
5 |
[VOICE] |
|
• Displays the Voice Recognition screen |
|
(P.32). |
6 |
Reset |
|
• If the unit or the connected unit fails to |
|
operate properly, the unit returns to initial |
|
settings when this button is pressed. |
English 5
Basic Operations
Getting Started
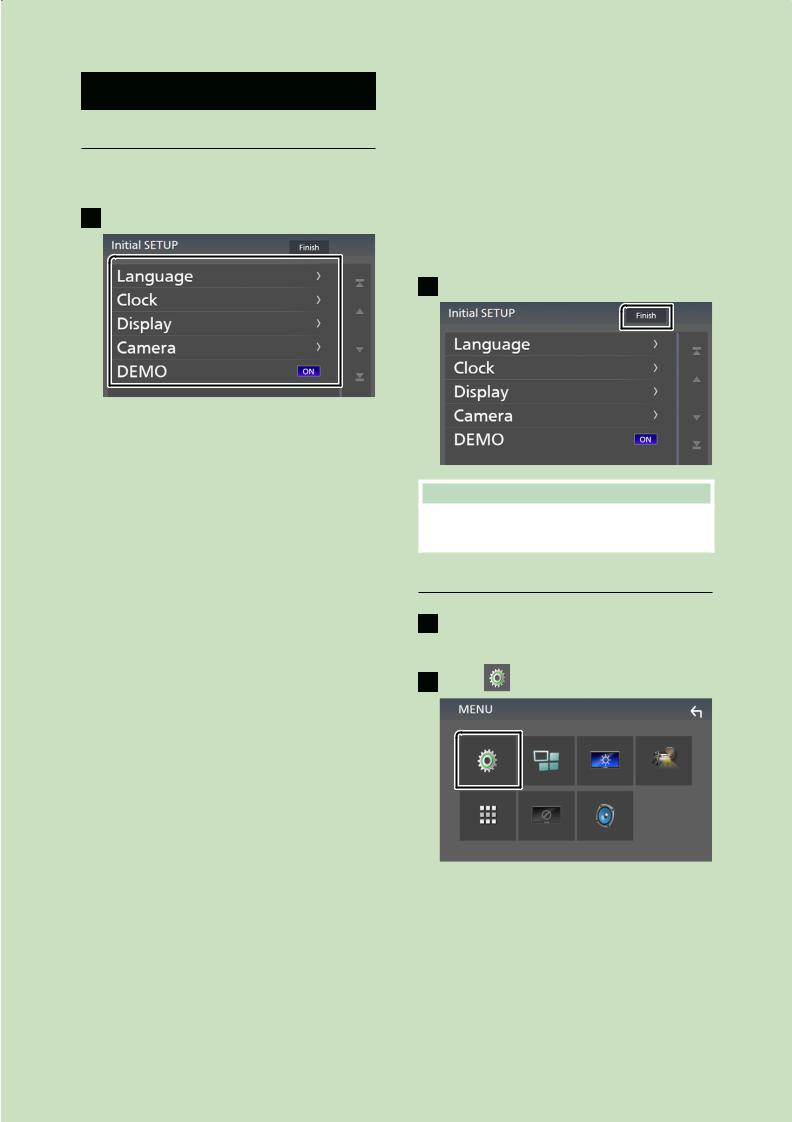
Initial setup
Perform this setup when you use this unit first time.
1 Set each item as follows.
■ [Language]
Select the language used for the control screen and setting items. Default is “[American English(en)]”.
1Touch [Language]. 2Touch [Language Select].
3Select the desired language. 4Touch [ ].
].
■ [Clock]
Adjusts clock.
For detailed operation, see Calendar/clock settings (P.6).
■ [Display]
Set the image on the screen.
1Touch [Display]. 2Touch [Background].
3Select the image. 4Touch [ ].
].
For detailed operation, see Display Setup (P.39).
■ [Camera]
Set the parameters for the camera. 1Touch [Camera].
2Set each item and touch [ ].
].
For detailed operation, see Camera Setup (P.35).
■ [DEMO]
Set the demonstration mode. Default is “ON”. 1Touch [DEMO] and set [ON] or [OFF].
2 Touch [Finish].
NOTE
•These settings can be set from the SETUP menu. See Setting Up (P.37).
Calendar/clock settings
1 Press the [MENU] button. hhMENU screen appears.
2 Touch [ ].
hhSETUP Menu screen appears.
6

3 Touch [User Interface].
hhUser Interface screen appears.
4 Touch [Clock Adjust].
5 Adjust the date, then adjust the time.
6 Touch [Set].
NOTE
•Deactivate [RDS CT] before adjusting the clock. See Radio Setup (P.20).
Basic Operations
Adjusting the volume
To adjust the volume (0 to 40),
Press [R] to increase, and press [S] to decrease.
Holding [R] increases the volume continuously to level 15.
Touch screen operations
To perform operations on the screen, you need to touch, touch and hold, flick or swipe to select an item, display setting menu screen or to change the page, etc.
● Touch
Touch the screen gently to select an item on the screen.
● Touch and hold
Touch the screen and keep your finger in place until the display changes or a message is displayed.
● Flick
Slide your finger quickly to the lef t or right on the screen to change the page.
You can scroll the list screen by flicking the screen up/ down.
● Swipe
Slide your finger up or down on the screen to scroll the screen.
English 7
Basic Operations
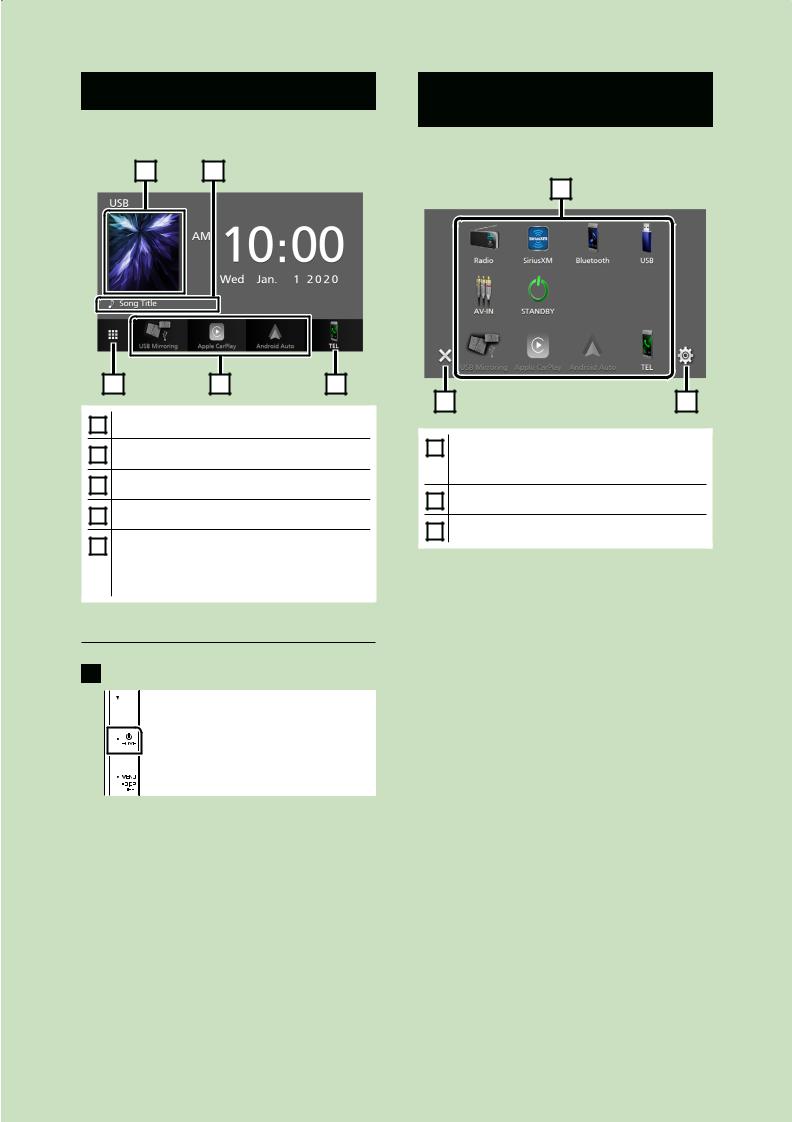
HOME screen descriptions
Most functions can be performed from the HOME screen.
1 |
2 |
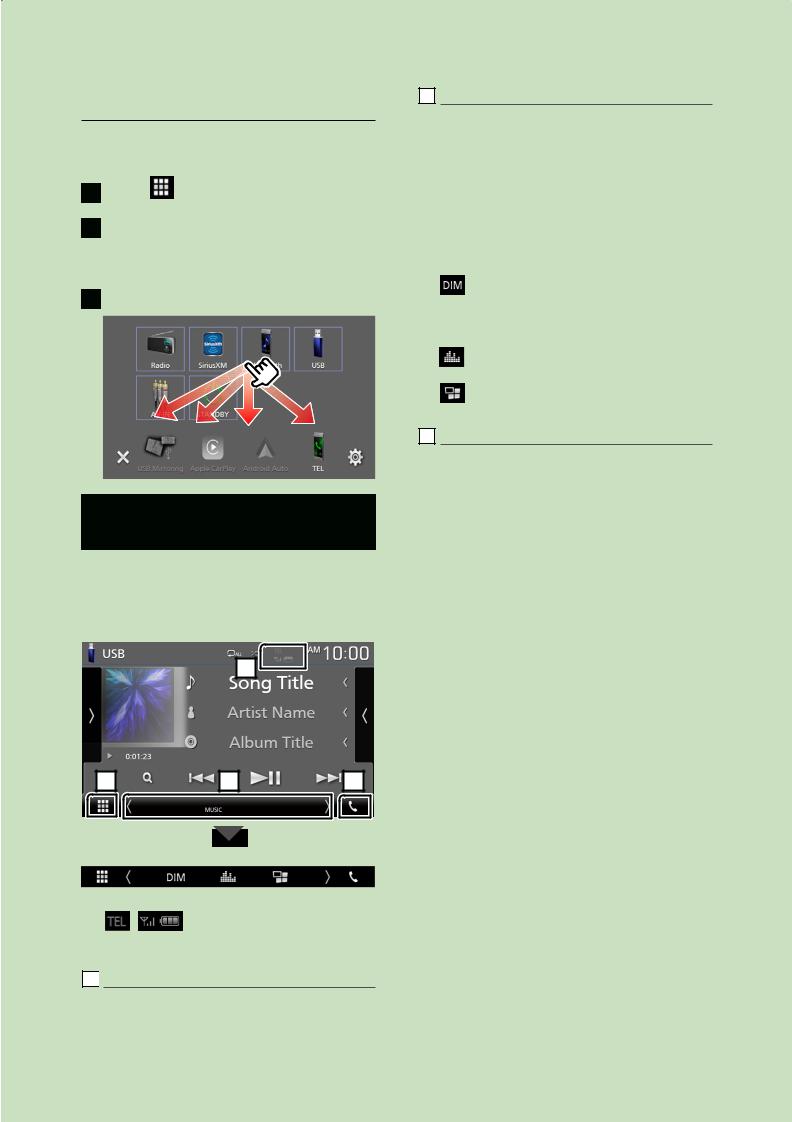
Source selection screen descriptions
You can display all playback sources and options on the source selection screen.
1 |
3 |
4 |
5 |
1 |
• Displays the control screen of current source. |
2 |
• Current source information |
3 |
• Displays the source selection screen. (P.9) |
|
|
4 |
• Short-cut playback source icons (P.9) |
|
5 |
• Displays the Hands Free screen. (P.31) |
|
• When connecting as Apple CarPlay or |
||
|
||
|
Android Auto, it works as a phone provided |
|
|
in Apple CarPlay or Android Auto. |
Display the HOME screen
1 Press the [HOME] button.
hhHOME screen appears.
2 |
3 |
1 |
• Changes the playback source. |
|
For playback sources, see Select the |
|
playback source (P.9). |
2 |
• Returns to previous screen. |
3 |
• Displays the SETUP Menu screen. (P.37) |
|
8
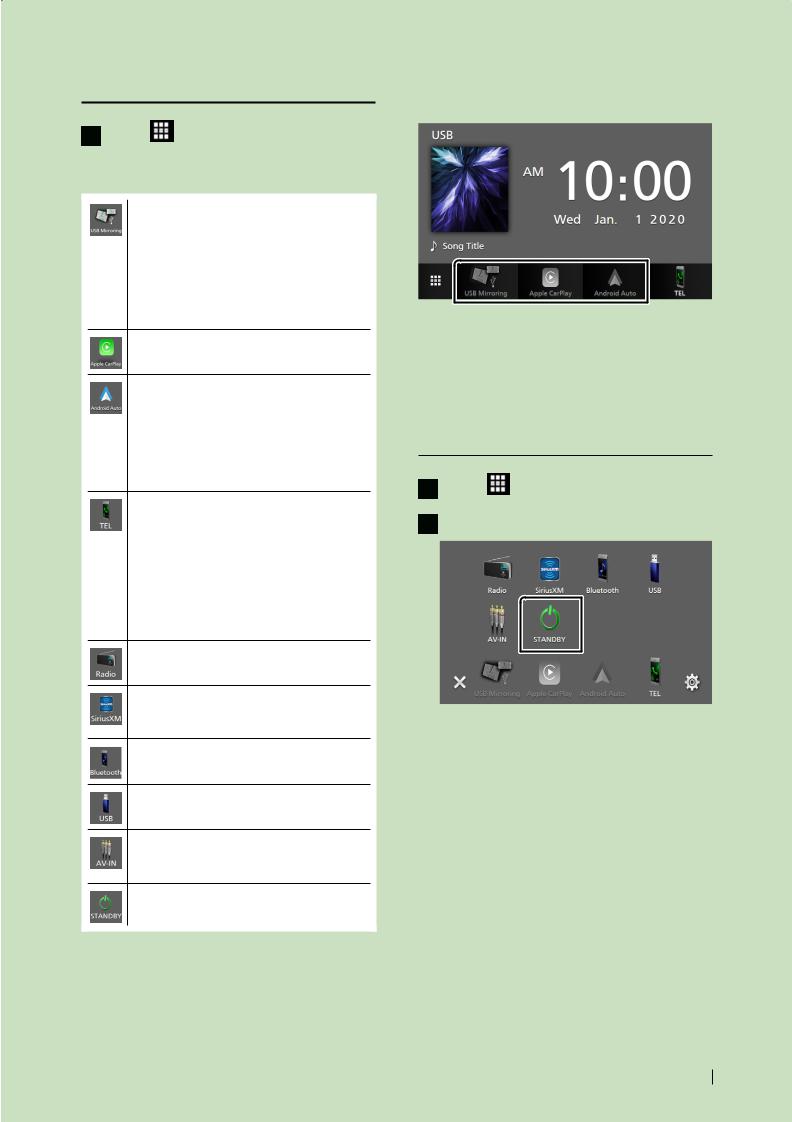
Select the playback source
1 Touch [ ] on the HOME screen.
From the screen, you can select the following sources and functions.
•Switches to the USB Mirroring screen from the connected Android smartphone.
(P.14)
It is necessary to connect Android smartphone with “Mirroring OA for KENWOOD” application installed and to set [Mode] to [Mirroring for Android™].
(P.14)
•Switches to the Apple CarPlay screen from the connected iPhone. (P.12)
•Switches to the Android Auto screen from the connected Android smartphone.
(P.13)
It is necessary to connect Android smartphone compatible with Android Auto and to set [Mode] to
[Android Auto]. (P.14)
•Displays the Hands Free screen. (P.31) When neither Apple CarPlay, Android Auto, nor a Bluetooth Hands-Free phone is connected, displays "[Disconnected]" message in the TEL screen.
When connecting as Apple CarPlay or Android Auto, it works as a phone provided in Apple CarPlay or Android Auto.
• Switches to the Radio broadcast. (P.18)
• Switches to the SiriusXM® satellite radio broadcast. (P.21)
(Except DMX5020S)
• Plays a Bluetooth audio player. (P.27)
• Plays files on a USB device. (P.15)
•Switches to an external component connected to the AV-IN input terminal.
(P.36)
• Puts the unit in standby. (P.9)
Basic Operations
To select the playback source on the HOME screen
The 3 items displayed on the source selection screen as the large icons are shown on the HOME screen.
You can change items displayed on this area
by customizing the source selection screen.
(P.10)
Put the unit in standby
1 Touch [ ] on the HOME screen.
2 Touch [STANDBY].
English 9
Basic Operations
Customize Short-cut buttons on HOME screen
You can arrange the position of the source icons as you like.
1 Touch [ ] on the HOME screen.
2Touch and hold the icon which you want to move to go into the customizing mode.
3Drag it where you want to move.
Source control screen descriptions
There are some functions which can be operated from most screens.
Indicators
1 |
2 |
3 |
4 |
Sub menu
|
|
]/[ |
] |
|
1 |
|
[ |
||
Connected Bluetooth device information.
2 
 All sources icon
Displays all sources.
3Secondary screen
•[ ]/[
]/[ ] : The Secondary screen changes every time you touch it. You can also change the Secondary screen by flicking lef t or right on the screen.
•Indicators: Displays the current source condition and so on.
–[MUTE]: The mute function is active.
–[LOUD]: The loudness control function is on.
•Sub menu
– [ |
]: Operation when the icon is touched: |
The first touch darkens the screen, the second |
|
touch darkens the screen further, and the third touch restores the screen to its original brightness.
– [ |
]: Displays the Graphic Equalizer screen. |
(P.43) |
|
– [ |
]: Displays the APP (Apple CarPlay/ Android |
Auto) screen (P.12).
4 [Û]
Touch to display the Hands Free screen.
(P.31)
When connecting as Apple CarPlay or Android Auto, it works as a phone provided in Apple CarPlay or Android Auto.
10

MENU screen
1 Press the [MENU] button.
hhMENU screen appears.
2 Touch to display the MENU screen.
The contents of the menu are as follows.
• Displays the SETUP Menu screen. (P.37)
•Displays the APP (Apple CarPlay/ Android Auto) screen. (P.12)
•Displays the Screen Adjustment screen.
(P.37)
• Displays the view camera. (P.35)
•Displays the source selection screen.
(P.9)
• Turns the display off. (P.11)
•Displays the Audio Control Menu screen.
(P.41)
• Close the MENU screen.
Turn o f the screen
1Select [ ] on the MENU screen.
●To turn on the screen
1Touch the display.
Basic Operations
List screen
There are some common function keys in the list screens of most sources.
1 |
1 |
2 |
6 |
3 |
4 |
5 |
Displays list type selection window.
2 


Displays music/movie file list.
3 
 Text scroll
Scrolls the displayed text.
4 
 etc.
etc.
Keys with various functions are displayed here.
•[ ] : Plays all tracks in the folder containing the current track.
•[ ] [
] [ ] : Moves to the upper hierarchy.
5 [ ] / [
] / [ ] / [
] / [ ] / [
] / [ ] Page scroll
You can change the page to display more items by pressing [ ]/[
]/[ ].
].
• [ ]/[
]/[ ] : Displays the top or bottom page.
6 
 Return
Returns to previous screen.
NOTE
•Buttons which cannot be activated from the list screen are not displayed.
English 11
APPS
 APPS
APPS
Apple CarPlay Operation
Apple CarPlay is a smarter, safer way to use your iPhone in the car. Apple CarPlay takes the things you want to do with iPhone while driving and displays them on the screen of the product. You can get directions, make calls, send and receive messages, and listen to the music from iPhone while driving. You can also use Siri voice control to make it easier to operate iPhone.
For details about Apple CarPlay, visit https://www.apple.com/ios/carplay/.
Compatible iPhone devices
You can use Apple CarPlay with the following iPhone models.
• iPhone 11 Pro Max |
• iPhone 7 Plus |
• iPhone 11 Pro |
• iPhone 7 |
• iPhone 11 |
• iPhone SE |
• iPhone XR |
• iPhone 6s Plus |
• iPhone XS Max |
• iPhone 6s |
• iPhone XS |
• iPhone 6 Plus |
• iPhone X |
• iPhone 6 |
• iPhone 8 Plus |
• iPhone 5s |
• iPhone 8 |
• iPhone 5c |
|
• iPhone 5 |
Ñ Preparation
1 Connect iPhone using KCA-iP103 via USB terminal. (P.51)
When iPhone compatible with Apple CarPlay is connected to the USB terminal, the Bluetooth smartphone currently connected is disconnected.
2 Unlock your iPhone.
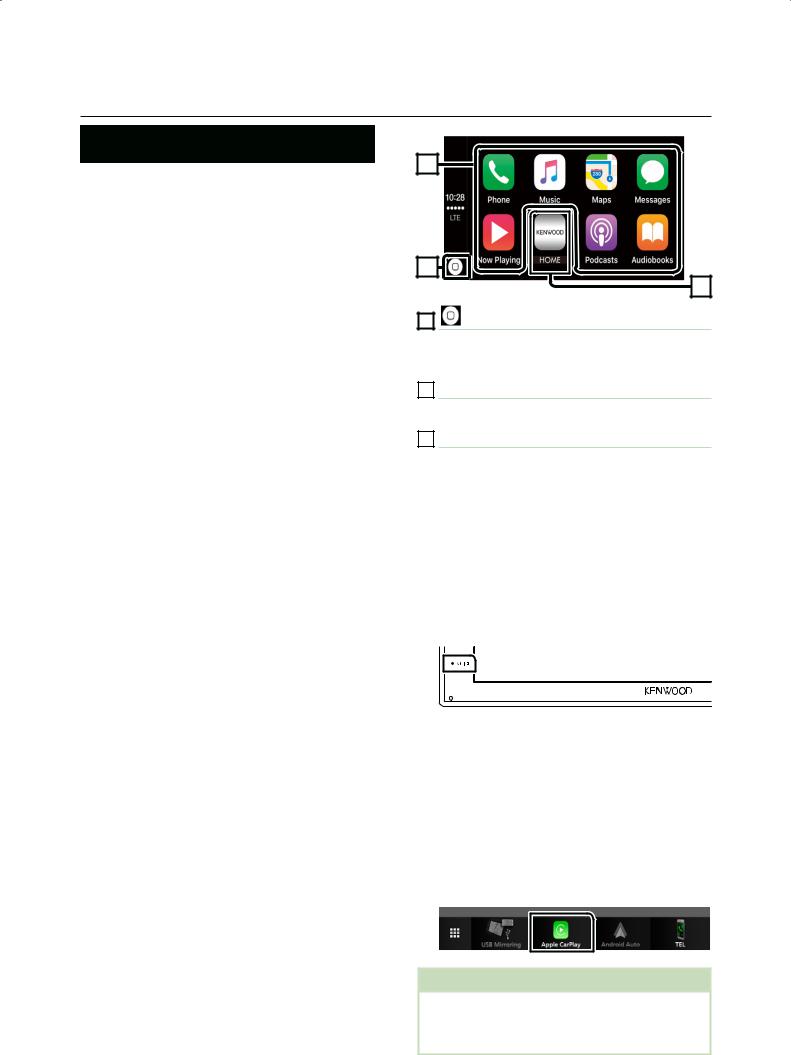
ÑOperation buttons and available Apps on the home screen of Apple CarPlay
You can use the Apps of the connected iPhone.
The items displayed and the language used on
the screen di er among the connected devices.
To enter Apple CarPlay mode, touch
[Apple CarPlay] icon in the source selection screen. (P.9)
2 |
1 |
|
3 |
|
|
|
1 |
[ |
] |
•Displays the home screen of Apple CarPlay.
•Touch and hold to activates Siri.
2Application buttons
Starts the application.
3[HOME]
Exits the Apple CarPlay screen and displays the Home screen.
To exit the Apple CarPlay screen
1 Press the [HOME] button.
Ñ Use Siri
You can activate Siri.
1 Press the [VOICE] button.
2 Talk to Siri.
ÑSwitch to the Apple CarPlay screen while listening to another source
1 Press the [HOME] button. hhHOME screen appears.
2 Touch [Apple CarPlay].
NOTE
•If sound is output using Apple CarPlay when the Apple CarPlay screen is displayed, the source is switched to Apple CarPlay.
12

Android Auto™ Operation
Android Auto enables you to use functions of your Android smartphone convenient for driving. You can easily access route guidance, make calls, listen to music, and
access convenient functions on the Android smartphone while driving.
For details about Android Auto, visit https://www.android.com/auto/ and https://support.google.com/androidauto.
Compatible Android smartphone
You can use Android Auto with Android smartphone of Android version 5.0 or later.
NOTE
•Android Auto may not be available on all devices and is not available in all countries or regions.
Ñ Preparation
1 Connect an Android smartphone via USB terminal. (P.51)
To use the hands-free function, connect the Android smartphone via Bluetooth.
When an Android smartphone compatible with Android Auto is connected to the USB terminal, the device is connected via Bluetooth automatically, and the Bluetooth smartphone currently connected is disconnected.
2 Unlock your Android smartphone.
NOTE
•To use the Android Auto, It is necessar y to set
[Mode] to [Android Auto]. (P.14)
ÑOperation buttons and available Apps on the Android Auto screen
You can perform the operations of the Apps of the connected Android smartphone.
The items displayed on the screen di the connected Android smartphone.
APPS
To enter Android Auto mode, touch [Android Auto] icon in the source selection screen. (P.9)
1 |
1 Application/information buttons
Starts the application or displays information.
To exit the Android Auto screen
1 Press the [HOME] button.
Ñ Using voice control
1 Press the [VOICE] button.
To cancel
1 Press the [VOICE] button.
ÑSwitch to the Android Auto screen while listening to another source
1 Press the [HOME] button. hhHOME screen appears.
2 Touch [Android Auto].
NOTE
•If sound is output using Android Auto when the Android Auto screen is displayed, the source is switched to Android Auto.
er among
English 13

APPS
USB Mirroring Operation (Android only)
You can display and control the App on the unit while your smartphone is connected to the USB terminal.
Ñ Preparation
1 Download Mirroring App from the Google Play.
Install the latest version of the Mirroring application “Mirroring OA for KENWOOD” on your Android.
2 Pair your smartphone with the unit via Bluetooth.
See Register from the Bluetooth device (P.28) and Connect the Bluetooth device
(P.29).
Ñ Select a Device Mode
1 |
Press the [MENU] button. |
|
hhMENU screen appears. |
2 |
Touch [ ]. |
|
hhSETUP screen appears. |
3 |
Touch [Device]. |
4 Touch [Mode].
5 Touch [Mirroring for Android™].
ÑCompatible Android smartphone
•Android version 7.0 or later
•Linux Kernel version 3.5 or later
•Bluetooth support
NOTE
•This unit may not work for some Android smartphone's.
ÑConnecting an Android smartphone
1 Connect an Android smartphone via the USB terminal.
2 Launch Mirroring App on your Android Smartphone.
Touch [OK] to start Mirroring App.
Touch [Start now] to start capturing your Android screen.
3 Start to enjoy Mirroring.
Ñ Mirroring OA Operation
1 Operate your smartphone to activate Mirroring App, then connect to this unit.
2 Press the [HOME] button.
3 Touch USB Mirroring.
•You can display the same screen of the Android smartphone on the monitor of the unit.
14
USB
 USB
USB
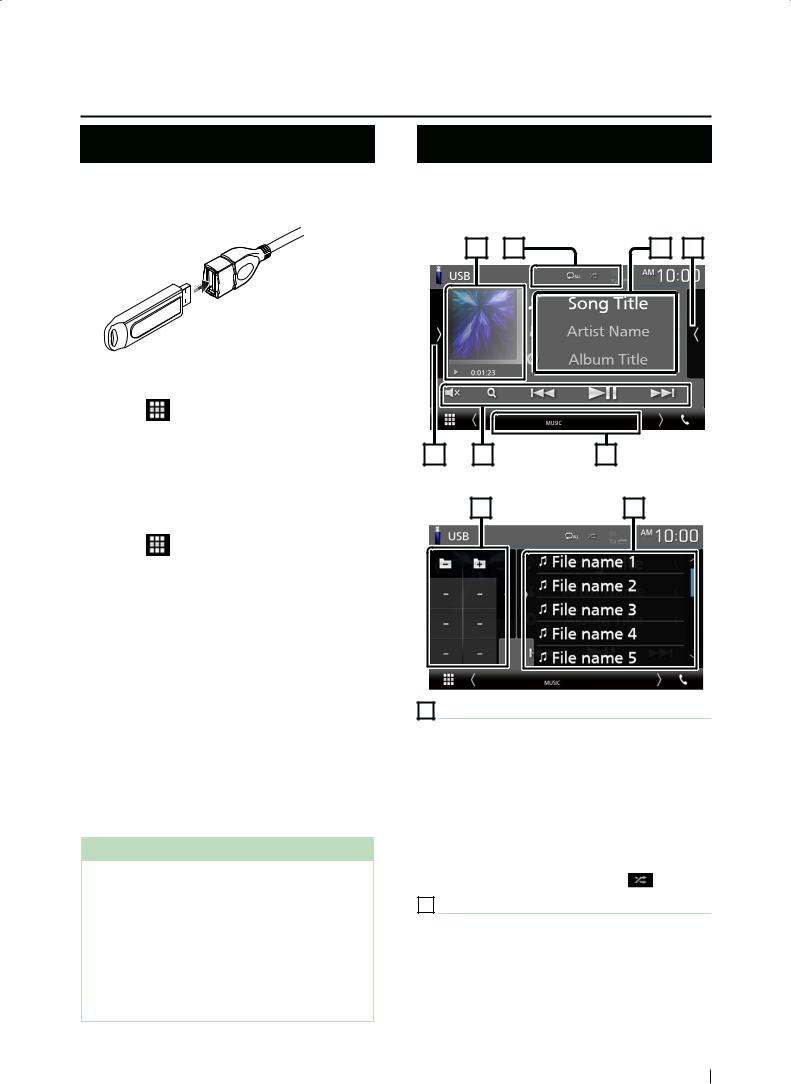
Connecting a USB device USB Basic Operation
1 Connect the USB device with the USB cable. (P.50)
Most functions can be controlled from the source control screen and playback screen.
|
Control screen |
|
|
7 |
1 |
2 |
5 |
2 Press the [HOME] button.
3 Touch [ ].
4 Touch [USB]. (P.9)
Ñ Disconnect the USB device
1 |
Press the [HOME] button. |
2 |
Touch [ ]. |
3 |
Touch a source other than [USB]. |
4 |
Detach the USB device. |
Ñ Usable USB device
You can use a mass-storage-class USB device on this unit.
The word “USB device” appearing in this manual indicates a flash memory device.
● About file system
The file system should be the one of the following.
• FAT16 |
• FAT32 |
• exFAT |
NOTE
•Install the USB device in the place where it will not a ect safe driving.
•You cannot connect a USB device via a USB hub and Multi Card Reader.
•Take backups of the audio files used with this unit. The files can be erased depending on the operating conditions of the USB device.
We shall have no compensation for any damage arising from any erased data.
4 |
3 |
6 |
Open the drawer
4 |
5 |
1[ ] / [
] / [ ]
]
•[ ] : Repeats the current track /folder. Each time you touch the key, repeat mode switches in the following sequence;
File repeat ([ ]), Folder repeat ([
 ]), Repeat all ([
 ])
])
•[ ] : Randomly plays all tracks in current folder. Each time you touch the key, random mode switches in the following sequence;
File random ([ ]), Random o [ ]()
2 Track information
Displays the information of the current file.
Only a file name and a folder name are displayed if there is no tag information.
English 15

USB
3[Operation keys
•[1] : Searches track /file. For details on search operation, see Search Operation (P.17).
•[E] [F] : Searches the previous/next track / file.
Touch and hold to fast forward or fast backward.
•[D]H] : Plays or pauses.
•[ ] : Touch to mute or not to mute.
4Function panel
Touch on the lef t side of the screen to display the function panel. Touch again to close the panel.
• [ |
] [ |
] : Searches previous/next folder. |
•[ASPECT](Only during video playback): Select screen mode.
[Full] : Changes the aspect ratio of video and displays fully on the screen.
[Normal] : Display with 4:3 ratio.
[Auto] : Displays video fully on vertical or horizontal with no ratio change.
5 Content list
Touch on the right side of the screen to display the Content list. Touch again to close the list.
Displays the playing list. When you touch a track /file name on the list, playback will start.
6Indicator Items
•[VIDEO]: Identifies the video file.
•[MUSIC]: Identifies the music file.
7Artwork/ Play mode indicator/ Playing time
The jacket of the currently playing file is displayed.
•[D], [B], etc.: Current play mode indicator
The meanings of each icon are as follows; [D] (play), [B] (fast forward), [A] (fast backward), [H] (pause).
Video screen
8 |
8 |
9 |
8Searching file area (Video file only)
Touch to search the next/previous file.
9Key display area (Video file only)
Touch to display the control screen.
16

Search Operation
You can search music or video files by the following operations.
1 Touch [1].
2 Touch [S].
3 Select the list type.
NOTE
•For operations in the list screen, see List screen (P.11).
Ñ Category search
You can search a file by selecting category.
1 |
Touch [Category List]. |
2 |
Select whether you search by audio files |
|
[ ]. |
3 |
Touch the desired category. |
hThe list corresponding to your selection appears.
4 Touch to select desired item in the list. Repeat this step until you find the desired file.
USB
Ñ Link search
You can search a file of same artist/album/genre as the current track.
1 Touch [Link Search].
2 Touch the desired tag type. You can select from artist, album and genre.
hThe list corresponding to your selection appears.
3 Touch desired item from the content list.
Ñ Folder search
You can search a file according to hierarchy.
1 Touch [Folder List].
2 Touch the desired folder.
When you touch a folder its contents are displayed.
3 Touch to select desired item in the list. Repeat this step until you find the desired file.
English 17

Radio
 Radio
Radio
Radio Basic Operation
Most functions can be controlled from the source control screen.
To enter Radio source, touch [Radio] icon in the source selection screen. (P.9)
Control screen
1 |
4 |
2 |
|
5 |
6 |
3 |
Open the drawer
5 |
4 |
7 |
1 Information display
Displays the information of the current station: Frequency
3Operation keys
•[E] [F] : Tunes in a station. The method of frequency switching can be changed (see 2 in table).
•[ ] : Touch to mute or not to mute.
4Preset list
•Touch on the right side of the screen to display the Preset list. Touch again to close the list.
•Recalls the memorized station.
•When touched for 2 seconds, stores the current receiving station in memory.
5Function panel
Touch on the lef t side of the screen to display the function panel. Touch again to close the panel.
• [TI] (FM only): Sets the tra |
c information |
mode on. For details, see Tra |
f c Information |
(P.20). |
|
•[SETUP (FM only): Displays the Radio SETUP screen. For details, see Radio Setup (P.20).
•[AME]: Presets stations automatically. For details, see Auto memory (P.19).
•[PTY] (FM only): Searches a program by setting program type. For details, see Search by program type (P.19).
•[MONO] (FM only): Select the Monaural reception.
Touching [ ] allows you to switch between Content A and Content B.
–Content A: PS name, Radio Text, PTY Genre
–Content B: Radio Text plus, Title Artist
[Preset#]: Preset number
2 Seek mode
Switches the seek mode in the following sequence; [AUTO1], [AUTO2], [MANUAL].
•[AUTO1]: Tunes in a station with good reception automatically.
•[AUTO2]: Tunes in stations in memory one af ter another.
•[MANUAL]: Switches to the next frequency manually.
6[FM] [AM]
Switches the band.
7Indicator Items
•[ST]: A stereo broadcast is being received.
•[MONO]: The forced monaural function is on.
• [TI]: Indicates the reception state of tra |
c |
information. |
|
White: TP is being received. |
|
Orange: TP is not being received. |
|
18
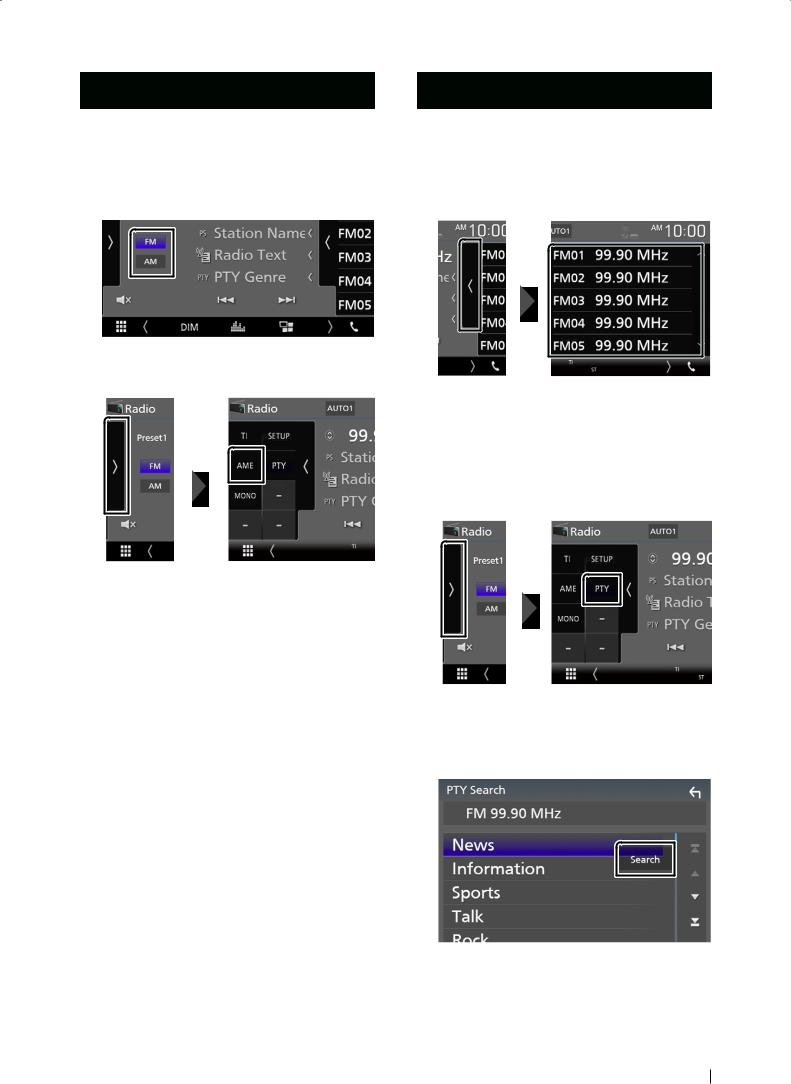
Memory Operation
Ñ Auto memory
You can store stations with good reception in memory automatically.
1 Touch desired band key.
2 Touch [ ] on the left side of the screen. Touch [AME].
hhA confirmation screen appears.
3 Touch [Yes].
hhAuto memory starts.
Ñ Manual memory
You can store the current receiving station in memory.
1 Select a station you wish to store in memory.
2 Touch [FM#] (#: 1-24) or [AM#] (#: 1-12) in which you want to store the station for 2 seconds.
Radio
Selecting Operation
Ñ Preset select
You can list and select memorized station.
1 Touch [ ] on the right side of the screen. Select a station from the list.
ÑSearch by program type (FM only)
You can tune to a station with a specific program type when listening to FM.
1 Touch [ ] on the left side of the screen. Touch [PTY].
hhPTY Search screen appears.
2 Select a program type from the list.
3 Touch [Search].
You can search a station of the selected program type.
English 19
 Loading...