


DNX7310BT
DNX7310BTM
DNX5310BT
DNX5310BTM
DDX7031BT
GPS NAVIGATION SYSTEM
MONITOR WITH DVD RECEIVER
INSTRUCTION MANUAL
Before reading this manual, click the button below to check the latest edition and the modified pages.
Check the latest edition
 What Do You Want To Do?
Thank you for purchasing the KENWOOD GPS NAVIGATION SYSTEM/ MONITOR WITH DVD RECEIVER.
In this manual, you will learn various convenient functions of the system.
Click the icon of the media you want to play.
With one-click, you can jump to the section of each media!
iPod |
USB |
VCD |
Tuner |
TV |
Disc Media Music CD DVD VIDEO
BT Audio |
SD |
© 2011 JVC KENWOOD Corporation |
12DNXMid_IM345_Ref_M_En_02 |
(M/M2) |
1 |
|
|||
|
|
|
|

 Contents
Before Use |
|
4 |
|
How To Read This Manual |
|
5 |
|
Basic Operations |
|
6 |
|
Functions Of The Buttons |
|
On The Front Panel_ ________________ |
6 |
Turning On The Unit__________________ |
10 |
How To Play Media___________________ |
13 |
Detaching The Front Panel____________ |
14 |
Operating With The Top Menu Screen___ |
16 |
Common Operations_________________ |
18 |
Navigation Operation________________ |
20 |
DVD/Video CD (VCD) |
|
Operation |
|
22 |
|
DVD/VCD Basic Operation_____________ |
22 |
DVD Disc Menu Operation_____________ |
25 |
Zoom Control For DVD And VCD________ |
26 |
DVD Setup_ ________________________ |
27 |
CD/Audio And Visual Files/ |
|
iPod Operation |
|
30 |
|
Music/Video/Picture Basic Operation____ |
30 |
Search Operation____________________ |
36 |
Movie Control_______________________ |
41 |
USB/SD/iPod/DivX Setup______________ |
42 |
Bluetooth Control |
|
54 |
Registering And Connecting
Bluetooth Unit_____________________ 54 Playing Bluetooth Audio Device_ _______ 57 Using Hands-Free Unit________________ 58 Bluetooth Setup_____________________ 61 Hands-Free Control_ _________________ 62
Setting Up |
|
68 |
|
Monitor Screen Setup_ _______________ |
68 |
System Setup_______________________ |
69 |
Display Setup_______________________ |
75 |
Navigation Setup____________________ |
78 |
Camera Setup_______________________ |
79 |
Software Information_________________ |
80 |
AV Input Setup______________________ |
80 |
AV Output Interface Setup____________ |
81 |
External Device Control_ ______________ |
81 |
Controlling Audio |
|
82 |
|
Setting Audio_______________________ |
82 |
Controlling General Audio_____________ |
87 |
Equalizer Control_ ___________________ |
88 |
Zone Control_______________________ |
90 |
Space Enhancer_ ____________________ |
90 |
Listening Position____________________ |
92 |
Radio and TV Operation |
|
44 |
|
Radio Basic Operation_ _______________ |
44 |
TV Basic Operation___________________ |
46 |
Memory Operation__________________ |
49 |
Selecting Operation__________________ |
50 |
Traffic Information___________________ |
51 |
Tuner Setup_ _______________________ |
52 |
TV Setup___________________________ |
53 |
Remote Controller |
|
94 |
Battery Installation___________________ 94
Functions Of The
Remote Controller Buttons___________ 95
Troubleshooting |
|
98 |
Problems And Solutions______________ 98 Error Messages______________________ 99 Resetting The Unit_ __________________ 101
Appendix |
|
102 |
Playable Media And Files______________ 102 Status Bar Indicator Items_ ____________ 105 Region Codes In The World_ ___________ 107 DVD Language Codes_ _______________ 108 Specifications_______________________ 109 About This Unit_____________________ 112
2 |
3 |
Return to the Top page Before Use
 Before Use
2WARNING
 To prevent injury or fire, take the following precautions:
•To prevent a short circuit, never put or leave any metallic objects (such as coins or metal tools) inside the unit.
•Do not watch or fix your eyes on the unit’s display when you are driving for any extended period.
•If you experience problems during installation, consult your Kenwood dealer.
 Precautions on using this unit
•When you purchase optional accessories, check with your Kenwood dealer to make sure that they work with your model and in your area.
•You can select language to display menus, audio file tags, etc. See Language setup (P.71).
•The Radio Data System or Radio Broadcast Data System feature won’t work where the service is not supported by any broadcasting station.
 Protecting the monitor
To protect the monitor from damage, do not operate the monitor using a ball point pen or similar tool with the sharp tip.
 Cleaning the unit
If the faceplate of this unit is stained, wipe it with a dry soft cloth such as a silicon cloth. If the faceplate is stained badly, wipe the stain off with a cloth moistened with neutral cleaner, then wipe it again with a clean soft dry cloth.
¤
•Applying spray cleaner directly to the unit may affect its mechanical parts. Wiping the faceplate with a hard cloth or using a volatile liquid such as thinner or alcohol may scratch the surface or erase screened print.
 Lens fogging
When you turn on the car heater in cold weather, dew or condensation may form on the lens in the disc player of the unit. Called lens fogging, this condensation on the lens may not allow discs to play. In such a situation, remove the disc and wait for the condensation to evaporate. If the unit still does not operate normally after a while, consult your Kenwood dealer.
 Precautions on handling discs
•Do not touch the recording surface of the disc.
•Do not stick tape etc. on the disc, or use a disc with tape stuck on it.
•Do not use disc type accessories.
•Clean from the center of the disc and move outward.
•When removing discs from this unit, pull them out horizontally.
•If the disc center hole or outside rim has burrs, use the disc only after removing the burrs with a ballpoint pen etc.
•Discs that are not round cannot be used.
•8-cm (3 inch) discs cannot be used.
•Discs with coloring on the recording surface or discs that are dirty cannot be used.
•This unit can only play the CDs with


 .
.
This unit may not correctly play discs which do not have the mark.
•You cannot play a disc that has not been finalized. (For the finalization process see your writing software, and your recorder instruction manual.)
Return to the Top page
How To Read This Manual
 How To Read This Manual
Return to the Top page
CD, Disc, iPod, USB device
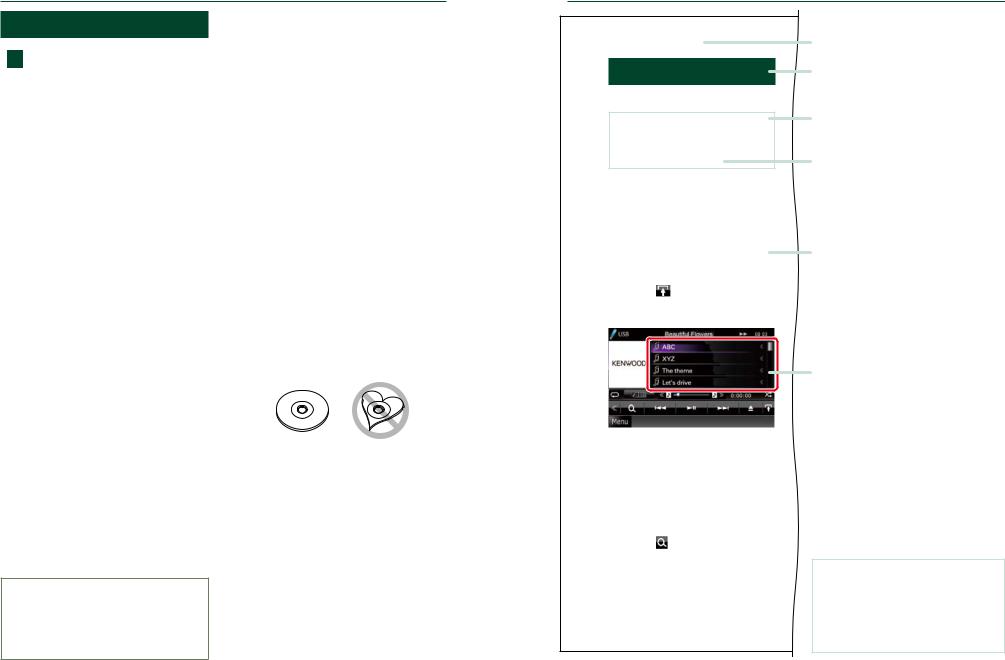
Search Operation
You can search the music, video, or picture
file by some operations.
NOTE
•If you use a remote controller, you can jump directly to the desired track/file with entering the track/folder/file number, play time, etc. For details, see “Direct search mode” (p.81).
 List search
You can search tracks, folders, and files according to hierarchy.
For USB devices and iPods, you can list and search files in the device by using playlist.
1 |
|
Press the <MENU> button during |
|
|
|||
|
|
playback. |
|
|
|
Simple Control screen appears. |
|
2 |
|
Touch [ |
]. |
|
|||
|
|
List Control screen appears. |
|
3 |
|
Touch desired track/file. |
|
|
|||
Playback starts.
 Other search
When you want to narrow the list down, there are other search ways.
1 |
|
Press the <MENU> button during |
|
||
|
|
playback. |
|
|
Simple Control screen appears. |
2 |
|
Touch [ ]. |
|
The search type screen appears.
27
Link header
You can refer each section or top page with one-click.
Operation title
Introduces the function.
NOTE
Introduces some tips, notes, etc.
Reference mark
Displayed in blue notes.
With one-click, you can jump to the article related to the current section.
Operation procedure
Explains necessary procedures to achieve the operation.
< >: Indicates the name of panel buttons.
[ ]: Indicates the name of touch keys.
Screen shot
Shows some screen shots displayed during operation for reference.
The area or keys to touch are surrounded with a red frame.
NOTE
•The screens and panels shown in this manual are examples used to provide clear explanations of the operations.
For this reason, they may be different from the actual screens or panels used, or some display patterns may be different.
4 |
5 |
Return to the Top page
Basic Operations
 Basic Operations
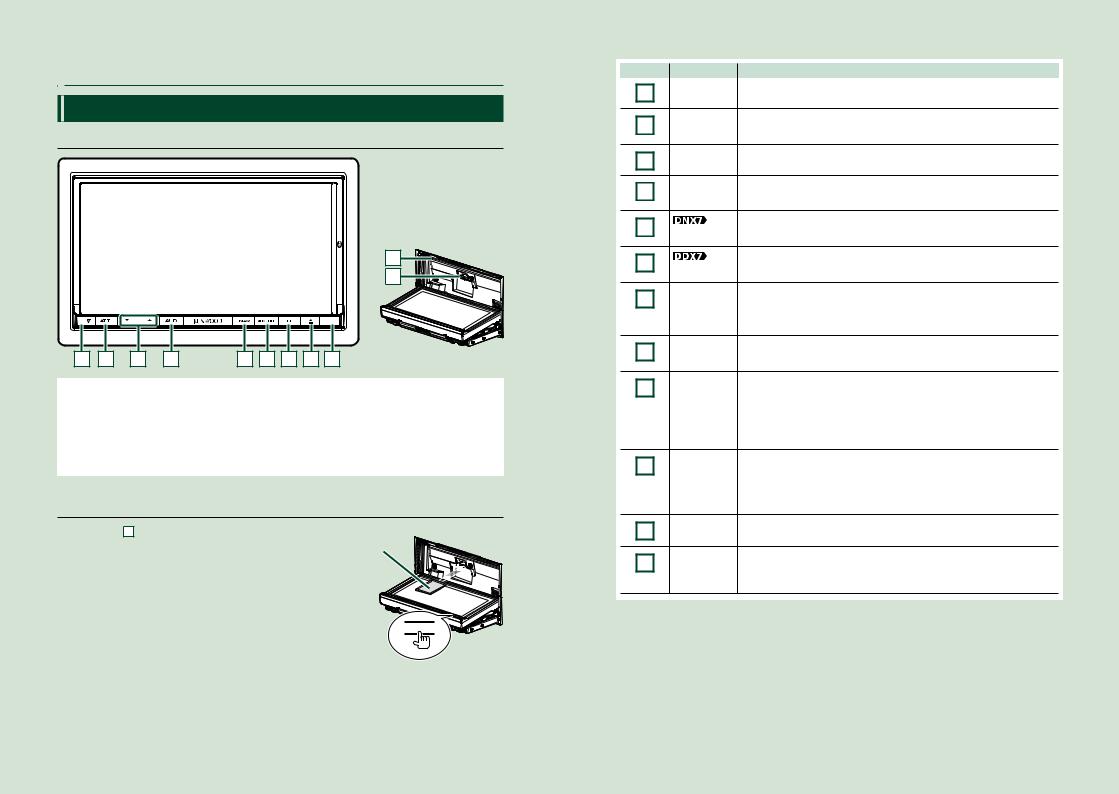
Functions Of The Buttons On The Front Panel
DNX7310BT/DNX7310BTM/DDX7031BT
10 |
11 |
1 |
2 |
3 |
4 |
5 |
6 |
7 |
8 |
9 |
NOTE
•The panels shown in this guide are examples used to provide clear explanations of the operations. For this reason, they may be different from the actual panels.
•In this manual, each model name is abbreviated as follows.
DNX7310BT and DNX7310BTM:
DDX7031BT:
If above icon is showed, read the article applicable to the unit you use.
How To Insert An SD Card

1)Press 8 <0> button for 1 second.
The panel fully opens.
2)Hold the SD card as the diagram in the right and insert it into the slot until it clicks.
●To eject the card:
Push the card until it clicks and then remove your finger from the card.
The card pops up so that you can pull it out with your fingers.
Labelled side
0
|
|
Return to the Top page |
|
|
|
Basic Operations |
|
Number |
Name |
Motion |
|
1 |
fi(Reset) |
• If the unit or the connected unit fails to operate properly, the unit |
|
|
returns to factory settings when this button is pressed (P.101). |
||
|
|
||
2 |
ATT |
• Switches attenuation of the volume on/off. |
|
|
• Pressing for 1 second turns the screen off. |
||
|
|
||
3 |
∞, 5(Vol) |
Adjusts volume. |
|
|
|
||
4 |
AUD |
• Displays Graphic Equalizer screen (P.88).* |
|
|
• Pressing for 1 second switches camera view display on/off. |
||
|
|
||
5 |
|
• Displays the navigation screen. |
|
NAV |
• Pressing for 1 second switches AV out sources. |
||
|
|||
5 |
|
• Displays the source control screen. |
|
AV |
• Pressing for 1 second switches AV out sources. |
||
|
|||
6 |
MENU |
• Displays theTop Menu screen (P.16). |
|
|
• Pressing for 1 second turns the power off. |
||
|
|
||
|
|
• When the power off, turns the power on. |
|
7 |
TEL |
• Displays the Hands Free screen (P.54). |
|
|
• Pressing for 1 second displays the Screen Control screen. |
||
|
|
||
8 |
0(Eject) |
• Ejects the disc. |
|
|
• When the panel is opened, pressing closes the panel and pressing for 1 |
||
|
|
||
|
|
second ejects the disc forcibly. |
|
|
|
• When the panel is closed, pressing for 1 second fully opens the panel to |
|
|
|
the location of the SD card slot. |
|
9 |
Remote |
• Receives the remote control signal. |
|
Sensor |
• You can enable or disable this feature by Remote Sensor (P.70). |
||
|
|||
|
|
•If [Remote Sensor] is set to off, the remote control ofTV reception is rejected.
10 |
Disc insert |
A slot to insert a disc media. |
slot |
|
|
|
|
|
11 |
SD card slot |
An SD card slot for upgrading the map. For how to upgrade the map, refer |
|
to the instruction manual of the navigation system. |
|
|
|
|
|
|
For DDX7031BT, you can play audio/visual file in the card. |
*The display may not switch to the Graphic Equalizer screen in some conditions.
6 |
7 |
Return to the Top page
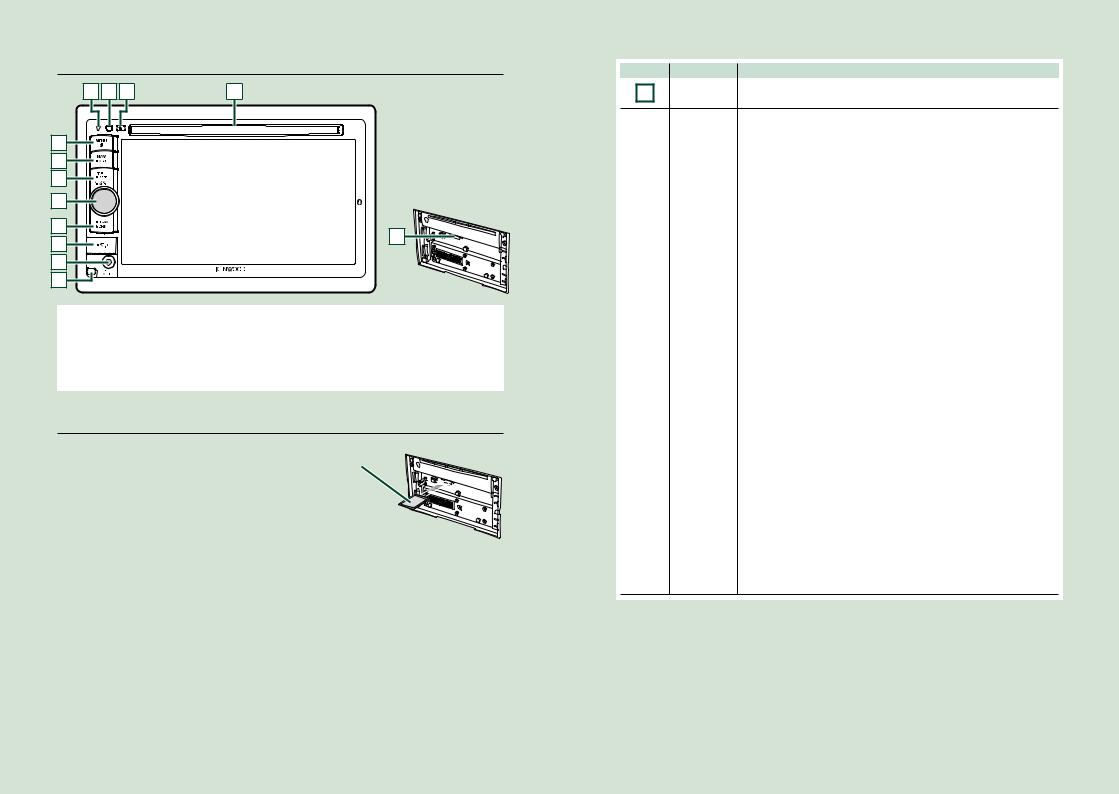
Basic Operations
DNX5310BT/DNX5310BTM
1 |
7 |
8 |
2 |
3 |
4 |
5 |
6 |
10 |
11 |
12 |
9 |
13 |
NOTE
•The panels shown in this guide are examples used to provide clear explanations of the operations. For this reason, they may be different from the actual panels.
•In this manual, each model name is abbreviated as follows.
DNX5310BT and DNX5310BTM:
If above icons are showed, read the article applicable to the unit you use.
How To Insert An SD Card
1) |
Detach the front panel following the |
Labelled |
|
procedures in Detaching The Front Panel |
side |
|
(P.14). |
|
2) |
Hold the SD card as the diagram in the right |
|
|
and insert it into the slot until it clicks. |
|
● To eject the card:
Push the card until it clicks and then remove your finger from the card.
The card pops up so that you can pull it out with your fingers.
|
|
Return to the Top page |
|
|
Basic Operations |
Number |
Name |
Motion |
1 |
fi(Reset) |
• If the unit or the connected unit fails to operate properly, the unit |
|
returns to factory settings when this button is pressed (P.101). |
|
|
|
|
|
MENU |
• Displays theTop Menu screen (P.16). |
|
2 |
||
|
|
• Pressing for 1 second turns the power off. |
|
|
|
|
|
|
|
|
• When the power off, turns the power on. |
|
|
|
|
|
|
NAV |
• Displays the navigation screen. |
|
3 |
||
|
|
• Pressing for 1 second switches AV out sources. |
|
|
|
|
|
|
|
|
|
|
|
TEL |
• Displays the Hands Free screen (P.54). |
|
4 |
||
|
|
• Pressing for 1 second turns off the display. |
|
|
|
|
|
|
|
|
|
|
|
Volume Knob |
• Pressing switches attenuation of the volume on/off. |
|
5 |
||
|
|
• Turning adjusts volume up or down. |
|
|
|
|
|
|
|
|
• Pressing for 1 second displaysTone Control screen (P.89).* |
|
|
|
|
|
|
SCRN |
• Displays the Screen Control screen. |
|
6 |
||
|
|
• Pressing for 1 second displays rear view camera display. |
|
|
|
|
|
|
|
|
|
|
|
Remote |
• Receives the remote control signal. |
|
7 |
||
|
Sensor |
• You can enable or disable this feature by Remote Sensor (P.70). |
|
|
|
|
|
|
|
|
• If [Remote Sensor] is set to off, the remote control ofTV reception is |
|
|
|
rejected. |
|
|
|
|
|
|
0(Eject) |
• Ejects the disc. |
|
8 |
||
|
|
• Pressing for 1 second ejects the disc forcibly. |
|
|
|
|
|
|
|
|
|
|
|
Disc insert |
A slot to insert a disc media. |
|
9 |
||
|
slot |
|
|
|
|
|
|
|
|
USB terminal |
A USB terminal for USB storage device and iPod. |
|
10 |
||
|
|
The CA-U1EX or KCA-iP102 (optional accessories) is recommended to |
|
|
|
|
|
|
|
|
connect a USB device or iPod. |
|
|
|
|
|
|
Input jack |
An input jack for external device. |
|
11 |
||
|
|
|
|
|
|
|
|
|
|
Release key |
Detaches the front panel. |
|
12 |
||
|
|
|
|
|
|
|
|
|
|
SD card slot |
An SD card slot for upgrading the map. For how to upgrade the map, refer |
|
13 |
||
|
|
to the instruction manual of the navigation system. |
*The display may not switch to theTone Control screen in some conditions.
8 |
9 |
Return to the Top page
Basic Operations
Turning On The Unit
The method of turning on is different depending on the model.
1 Press the <MENU> button.
The unit is turned on.
●●To turn off the unit:
Press the <MENU> button for 1 second.
1 Press the <MENU> button.
The unit is turned on.
●●To turn off the unit:
Press the <MENU> button for 1 second.
If it is your first time turning the unit on after installation, it will be necessary to perform
Initial setup (P.11).
Return to the Top page
Basic Operations
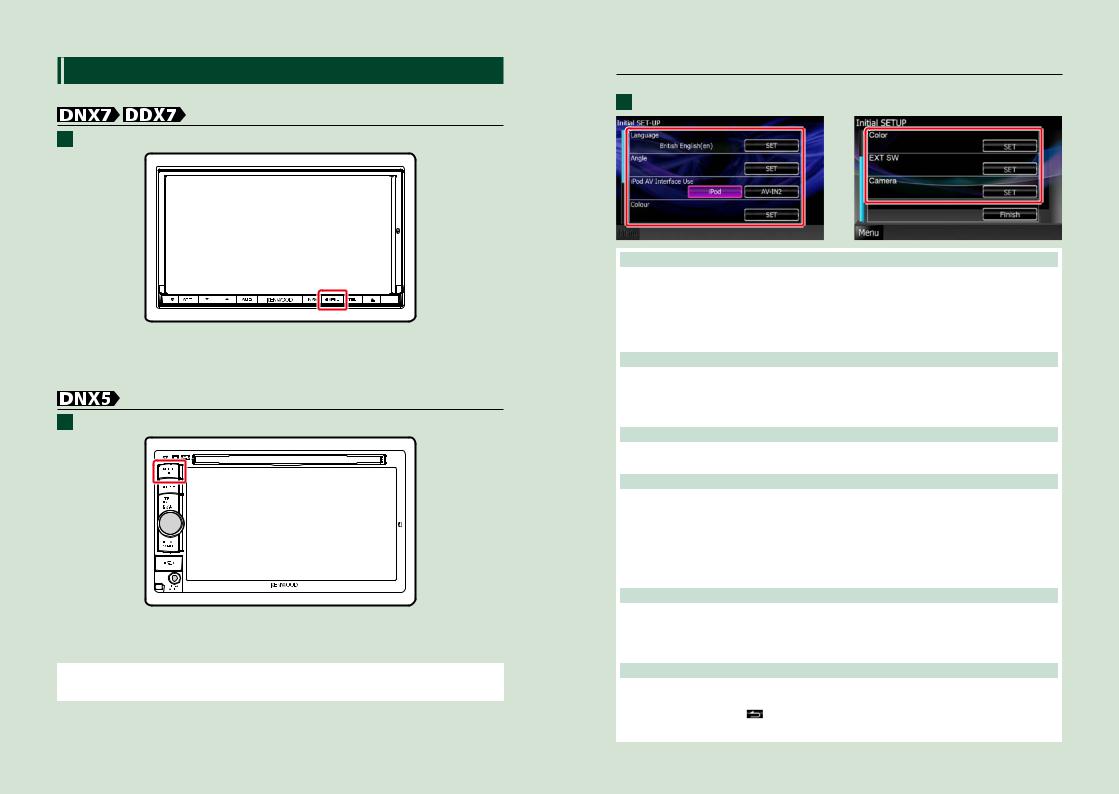
Initial setup
Perform this setup when you use this unit first time or when you reset the unit (P.101).
1 Set each item as follows.
Language
Select the language used for the control screen and setting items. Default is“British English (en)”for models with region code 2/3/4 and“Chinese“ for model with region code 6.
1Touch [SET].
2Touch [2] or [3] to select the desired language. 3Touch [Enter].
For detailed operation, see Language setup (P.71).
Angle


Adjust the position of the monitor. Default is“0”. 1Touch [SET].
2Touch desired angle number and [  ].
].
For detailed operation, see Monitor angle control (P.75). iPod AV Interface Use
Set the terminal which your iPod is connected to. Default is“iPod”. 1Touch [iPod] or [AV-IN2].
Color
Set the screen and button illumination color.You can select whether to allow color scan operation or select a fixed color for operation.
1Touch [SET].
2Touch [ON] or [OFF] of [Panel Color Scan].
3If you want to change color, touch [SET] of [Panel Color Coordinate]. 4Touch your desired color and [  ].
].
For detailed operation, see Panel color coordinate (P.76).
EXT SW


Control the external devices. 1Touch [SET].
2Set device name, output pattern, and pulse set for each device.Then, touch [  ]. For detailed operation, see EXT SW setup (P.73).
Camera
Set the parameters for the camera.
1Touch [SET]. |
|
|
2Set each item and touch [ |
]. |
Continued |
For detailed operation, see Camera Setup (P.79). |
||
10 |
11 |
Return to the Top page
Basic Operations
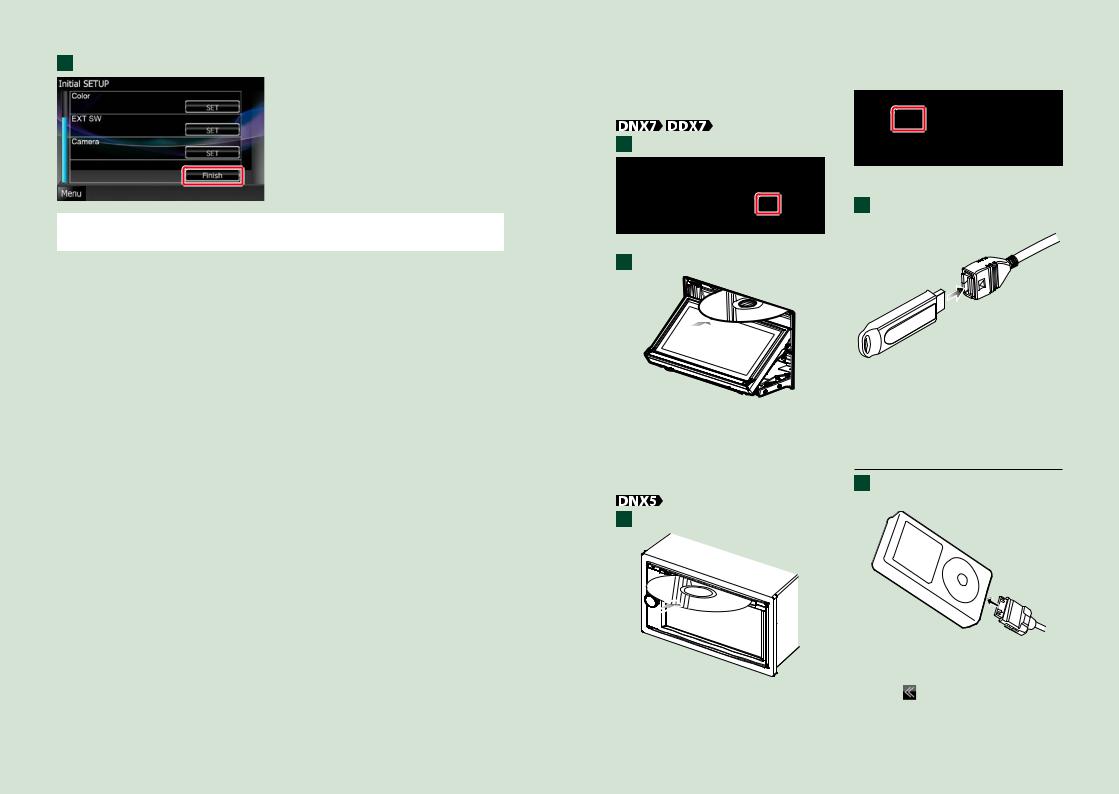
2 Touch [Finish].
NOTE
• These settings can be set from the SETUP menu. See Setting Up (P.68).
How To Play Media
Music CD and disc media
1 Press the <0> button.
The panel opens.
2 Insert the disc into the slot.
The panel closes automatically.
The unit loads the disc and playback starts.
●●To eject the disc:
Press the <0> button.
1 Insert the disc into the slot.
The unit loads the disc and playback starts.
Return to the Top page
Basic Operations
●●To eject the disc:
Press the <0> button.
USB device
1Connect the USB device with the USB cable.
The unit reads the device and playback starts.
●●To disconnect the device:
Touch [0] for 1 second on the screen and disconnect the device from the cable.
iPod
1Connect the iPod with the iPod cable.
The unit reads the iPod and playback starts.
●●To disconnect the device:
Touch [ ] on the screen and then touch
[0] for 1 second. Disconnect the iPod from the cable.
12 |
13 |
Return to the Top page
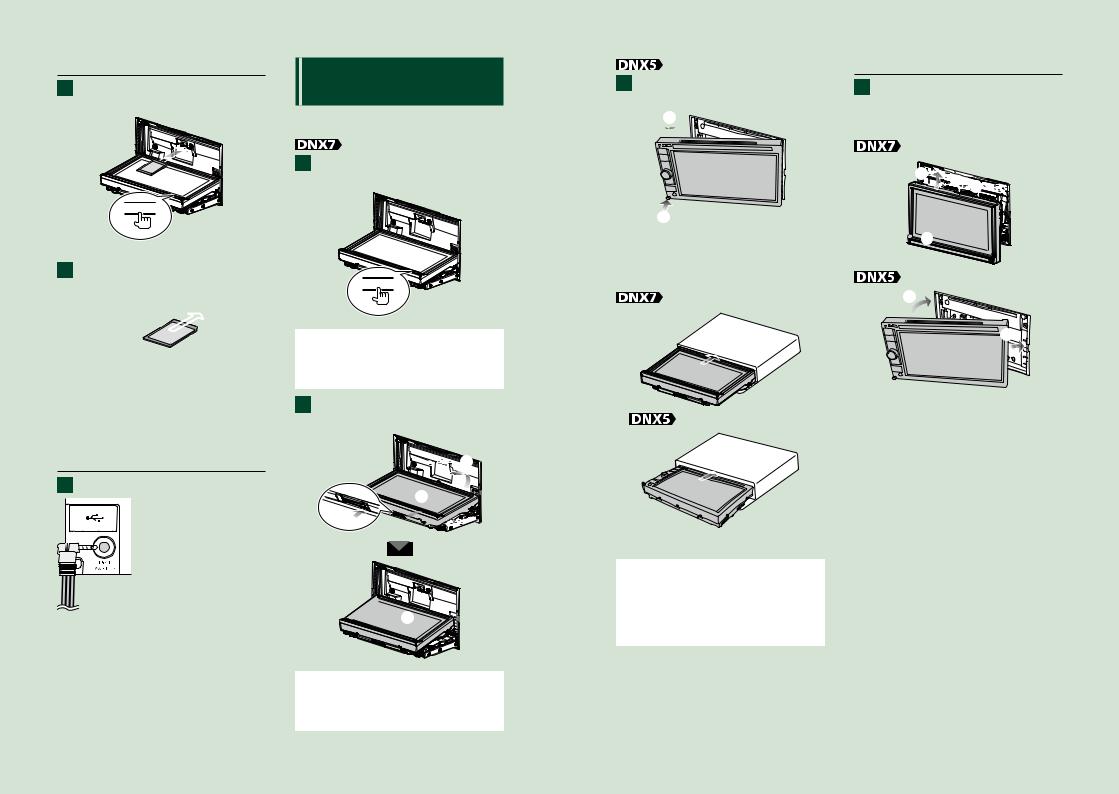
Basic Operations
SD card
1Press the <0> button for 1 second to open the front panel.
0
The panel fully opens.
2Hold the SD card as the diagram below and insert it into the slot until it clicks.
Notched section 

 Labeled side
The unit loads the card and playback starts.
●●To remove:
Push the SD card until it clicks and then remove your finger from the card. The card pops up so that you can pull it out with your fingers.
External device
1 Insert the plug into the AV-IN jack.
Detaching The Front
Panel
You can detach the front panel to prevent theft.
1Press the <0> button for 1 second to open the front panel.
0
NOTE
•You can set the front panel to open automatically when the ignition is turned off. See Monitor angle control (P.75).
2Detach the panel as the diagrams below.


 3
3 


 2
2


 1
1 


 4
4 


NOTE
•The attaching plate closes automatically in about 10 seconds after the front panel is released. Remove the panel before this happens.
1Detach the panel as the diagrams below.
2
1
●●After detaching:
Put the panel in the protective bag supplied with the unit.
NOTE
•To prevent deterioration, do not touch the terminals of the unit and faceplate with your fingers.
•If the terminals on the unit or faceplate get dirty, wipe them with a clean soft dry cloth.
Return to the Top page
Basic Operations
Attaching the front panel
1Hold the panel securely so as not to drop it accidentally, and fit it onto the attaching plate until it is firmly locked.
1


 1
1


 2
2
2
1 

14 |
15 |
Return to the Top page
Basic Operations
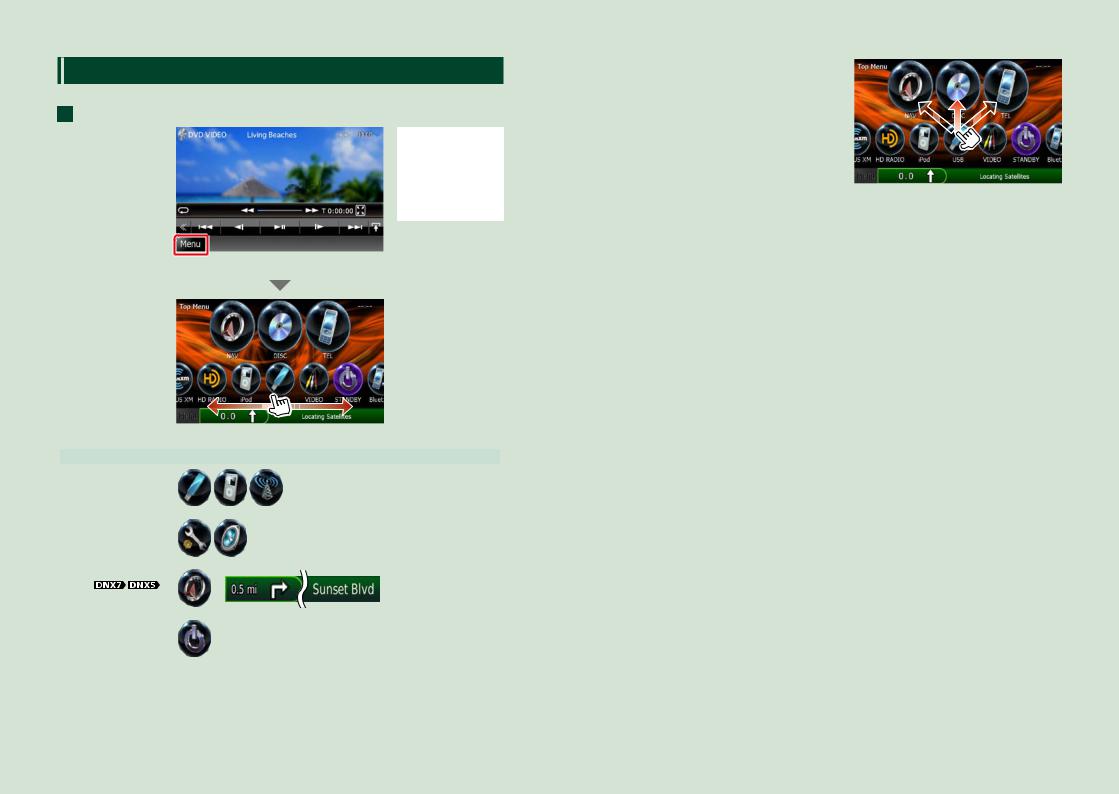
Operating With The Top Menu Screen
Most functions can be performed from theTop Menu screen.
1 Touch [Menu] on any screen.
NOTE
• If [Menu] is not displayed during video/picture playback, press the <MENU> button.
(P.6, P.8)
Top Menu screen appears.
|
|
|
|
|
|
|
|
|
|
|
|
|
|
|
|
|
|
|
|
|
|
NOTE |
|
|
|
|
|
|
|
• You can select the |
|
|
|
|
|
|
|
hiding icon by |
|
|
|
|
|
|
|
scrolling the screen |
|
|
|
|
|
|
|
left or right. |
|
From this screen, you can perform the following functions. |
|
|
|
||||
|
|
|
|||||
|
Function |
|
Icon |
|
Operation |
||
|
|
|
|||||
|
Switch the audio source |
|
|
|
Touch the icon of the |
||
|
|
|
|
|
desired source. |
||
|
|
|
etc. |
|
|
|
|
|
|
|
|
|
|
|
|
|
Enter setup mode |
|
|
|
Touch the icon of the |
||
|
|
|
|
|
desired setup function. |
||
|
|
etc. |
|
|
|
||
|
|
|
|
|
|
|
|
|
Display navigation |
|
|
|
Touch [NAV] or |
||
|
screen |
|
|
|
navigation information. |
||
|
|
or |
|
|
|
||
|
|
|
|
|
|
|
|
|
Turn off all audio |
|
|
|
Touch [STANDBY]. |
||
|
function |
|
|
|
|
|
|
|
|
|
|
|
|
|
|
|
|
|
|
|
|
|
|
Return to the Top page
Basic Operations
●●Customizing Top Menu screen
Drag the icon you want to register to the upper line.
You can move up to three icons.
16 |
17 |
Return to the Top page
Basic Operations
Common Operations
Introduces the common operations.
General
There are some functions which can be operated from most screens.
[Menu]
Returns to theTop Menu screen.
 (RETURN)
Returns to previous screen.
 (common menu key)
Touch to display the common menu.The contents of the menu are as follows.
 :
:

 Displays the EXT SW Control screen.
 : Displays the SETUP Menu screen.
 : Displays the Audio Control Menu screen.
 : Displays the control screen of current source. Icon feature differs depending on the source.
 : Closes the menu.
List screen
There are some common function keys in the list screens of most sources.
 (Scroll)
Scrolls the displayed text.  etc.
etc.
|
|
|
Touch keys with various functions are |
||
|
|
|
displayed here. |
||
|
|
|
Displayed keys differ depending on the |
||
|
|
|
current audio source, status, etc. |
||
|
|
|
For examples of functions of each key, refer |
||
|
|
|
to the table below. |
||
|
|
|
|
|
|
|
Key |
|
Function |
|
|
|
|
|
|||
|
|
|
Lists all the music in the lower hierarchy. |
|
|
|
|
|
|
|
|
|
|
|
Moves to the upper hierarchy. |
|
|
|
|
|
|
|
|
|
|
|
Displays current category folder. |
|
|
|
|
|
|
|
|
|
|
|
Displays music/picture/movie file list. |
|
|
|
|
|
|
|
|
|
|
|
|
|
|
Return to the Top page
Basic Operations
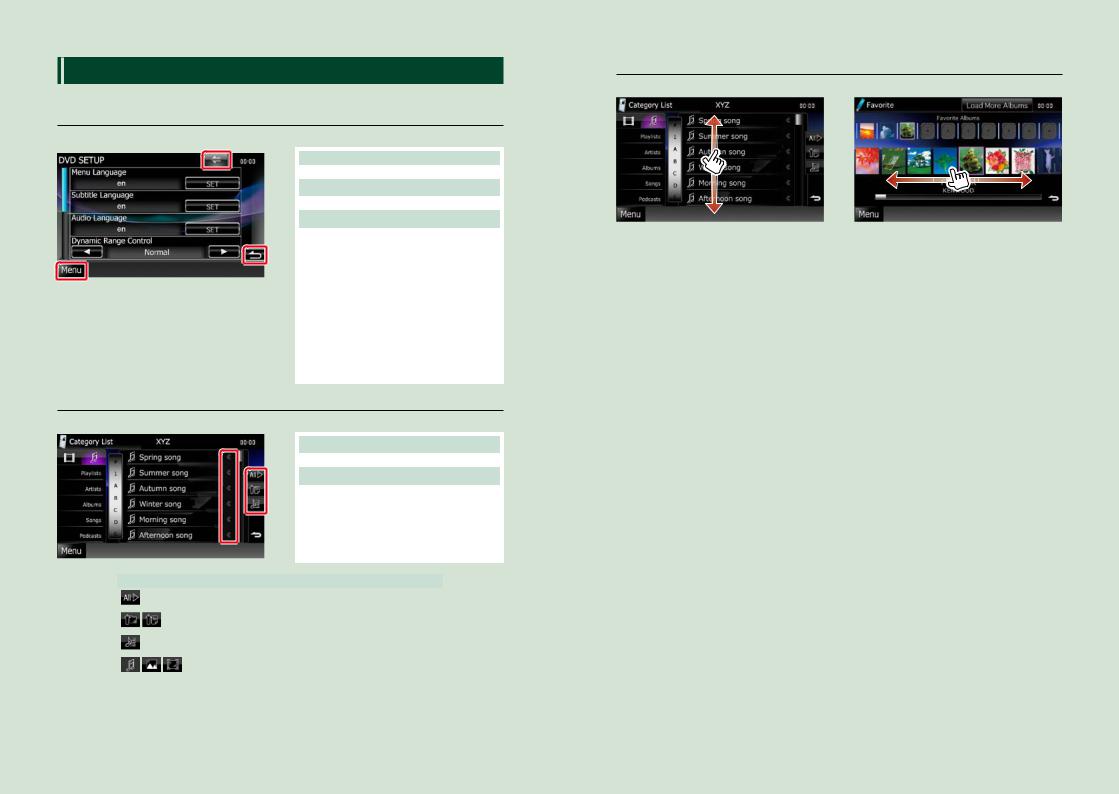
Flick scrolling
You can scroll the list screen by flicking the screen up/down or right/left.
18 |
19 |
Return to the Top page
Basic Operations
Navigation Operation 

For details on the navigation function, please refer to the Navigation Instruction Manual.
Display the navigation screen
1 Press the <NAV> button.
The navigation screen appears.
Control audio from the navigation screen
You can control audio sources while the navigation screen is displayed.
Also, you can view the navigation information while the source control screen is displayed.
1 Touch the information bar.
The navigation screen with audio information appears.
Return to the Top page
Basic Operations
2 Touch [  ] or [
  ] in the navigation screen.
Touching this area displays the audio screen.
: Displays the navigation and control |
: Displays the navigation and current |
keys of the current source. |
video/picture playback display. |
NOTE
• The screen switches between playback screen and camera view each time the viewing area is touched.
• Touching the source icon in the bottom of the screen displays the full audio screen.
●●To return to the full navigation screen:
Touch [  ].
].
NOTE
• For details on control keys, refer to the instructions in each section.
20 |
21 |
Return to the Top page
DVD, VCD
 DVD/Video CD (VCD) Operation
DVD/VCD Basic Operation
Most functions can be controlled from the source control screen and playback screen.
NOTE
•Set the remote controller mode switch to DVD mode before starting operation, see Switching the operation mode (P.95).
•The screen shot below is for DVD. It may be different from the one forVCD.
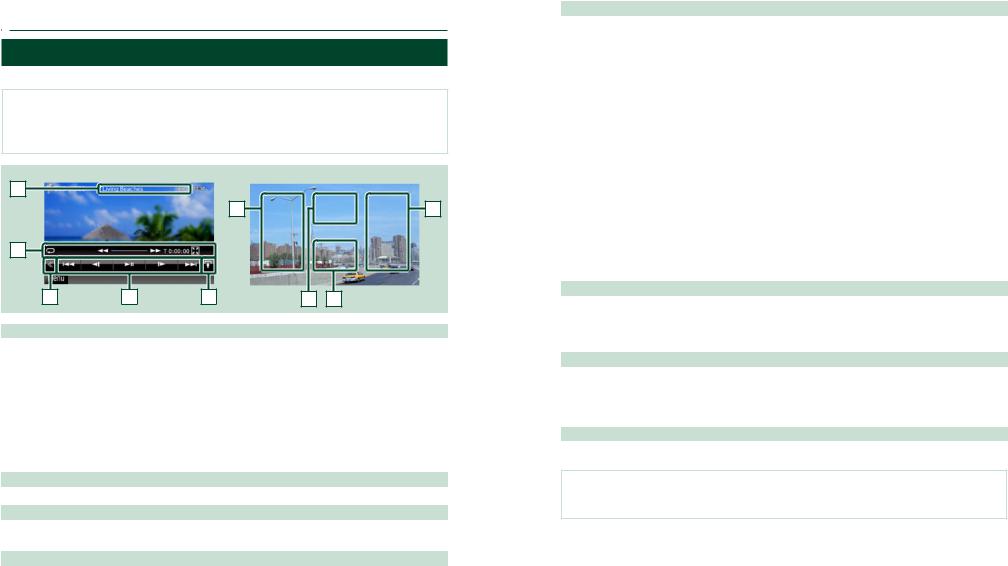
Control screen
1 |
6 |
5 |
2 |
3 |
4 |
Video screen
6 |
7 |
8 |
1 Information display
Displays the following information.
•Title #, Chap #: DVD title and chapter number display
•Track #/Scene #:VCD track or scene number display *Scene # is displayed only when PBC is on.
•3, ¡, ¢, 7, etc.: Current play mode display
The meanings of each icon are as follows; 3(play), ¡(fast forward), 1(fast backward),
¢(search up), 4(search down), 7(stop), 7R (resume stop), 8(pause), (slow playback),
  (slow reverse playback).
Touch this area to display the disc lable name.
2 Multi function key
Touch to switch the multi function menu. For details on the menu, see Multi function menu (P.24).
3 Multi function menu
Various functions can be performed by using keys in this area. For details on the keys, see Multi function menu (P.24).
4 Control switching key
Unavailable in DVD/VCD source.
Return to the Top page
DVD, VCD
5 Sub function menu
The following functions can be performed by using keys in this area.
• Repeats the current content:Touch [  ]. Each time you touch the key, repeat mode switches in the following sequence;
DVD: "title repeat"  , "chapter repeat"
  , "function off" VCD (PBC On): Does not repeat
VCD (PBC Off): "track repeat"  , "function off"
•Hides all keys:Touch [  ].
].
•Fast forward or fast backward:Touch [1] or [¡]. Each time you touch the key, the speed
changes; standard, 2 times, 3 times.
• Confirms play time: See #:##:##.
DVD:You can switch the time display between title play time, chapter play time, and title remaining time. Each time you touch, the display switches between“T #:##:##”(title play time display),“C #:##:##”(chapter play time display), and“R #:##:##”(title remaining time display).
As well as the time display, the bar indicating current location appears.
VCD (PBC off):You can also confirm disc remaining time by touching time display. Each time you touch, the display switches between“P ##:##”(play time display) and“R ##:##”(disc remaining time).
• Confirms the current location: See the bar in center (DVD only).The bar does not appear when the time display is remaining time display.
6 Searching area
Touch to search the next/previous content.
Scrolling from center of display to left or right performs fast backward or fast forward. Each time you touch each area, the speed changes; standard, 2 times, 3 times.To stop fast backward/forward, touch center of the display.
7 Menu display area
This area functions differently depending on the current status.
• During DVD playback: Displays the DVD menu. During the menu display, displays the highlight control screen.
• During VCD playback: Displays the Zoom Control screen (P.26).
8 Key display area
Touch to display the last control screen.
NOTE
•If you use a remote controller, you can jump directly to the desired image with entering the chapter number, scene number, play time, etc (P.95).
22 |
23 |
Return to the Top page
DVD, VCD
|
Multi function menu |
DVD |
VCD |
The functions of each key are as follows.
[4] [¢]
Searches the previous/next content.
[38]
Plays or pauses.
[ ] or [
 ] (DVD only)
Plays in slow motion forward or backward.
[7]
Stops playback.When touched twice, the disc is played from the beginning when you play it the next time.
[PBC] (VCD only)
Turn PBC on or off.
[  SETUP]
Touch to display the SETUP Menu screen. See Setting Up (P.68).
[  AUDIO]
Touch to display the Audio Control screen. See Controlling Audio (P.82).
[  EXT SW]


Touch to control the external device power supply. For details, see External Device Control (P.81).
[ REAR  ]
]
Touch to mute the rear speaker.
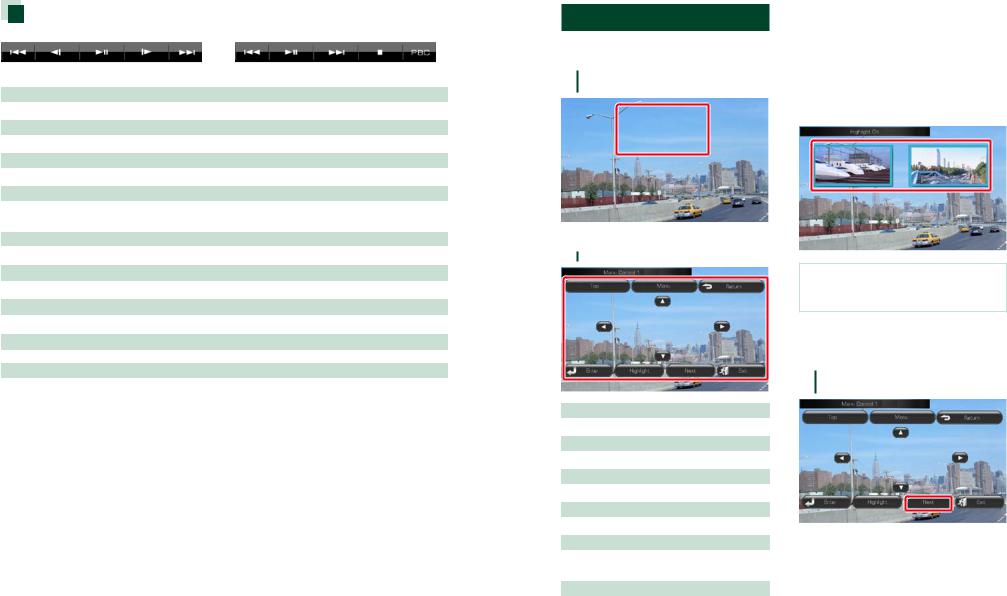
DVD Disc Menu Operation
You can set up some items in the DVD-VIDEO disc menu.
1 Touch illustrated area during playback.
Return to the Top page
DVD, VCD
 Highlight control
Highlight control lets you control the DVD menu by touching the menu key directly on the screen.
1 |
|
Touch [Highlight] in the Menu Control |
|
||
|
|
screen. |
2 |
|
Touch desired item on the screen. |
|
||
|
Menu Control screen appears.
2 Perform desired operation as follows.
Displays the top menu
Touch [Top].*
Displays the menu
Touch [Menu].*
Displays the previous menu
Touch [Return].*
Enters selected item
Touch [Enter].
Enables direct operation
Touch [Highlight] to enter the highlight control mode (P.25).
Moves the cursor
Touch [5], [∞], [2], [3].
*These keys may not function depending on the disc.
NOTE
•The highlight control is cleared automatically if you do not operate for a constant time.
 DVD Play Mode Setting
You can select DVD play mode.
1 Touch [Next] in the Menu Control
screen.
Menu Control 2 screen appears.
Continued
24 |
25 |

Return to the Top page
DVD, VCD
2 Touch the key which corresponds to desired setting item.
NOTE
•For DVD, please refer to DVD Play Mode Setting (P.25) to display the Zoom Control screen.
2 Perform desired operation as follows.
Switches the subtitle language
Touch [Subtitle]. Each time you touch this key, language is switched.
Switches the audio language
Touch [Audio]. Each time you touch this key, language is switched.
Controls zoom ratio
Touch [Zoom]. For details, see step2 in Zoom Control For DVD And VCD (P.26).
Switches the picture angle
Touch [Angle]. Each time you touch this key, picture angle is switched.
Exits menu control
Touch [Exit].
Displays the Menu Control 1 screen
Touch [Previous].
Zoom Control For DVD And VCD
You can enlarge Playback screen for DVD and VCD.
1 For VCD, touch illustrated area during playback.
Zoom Control screen appears.
Switches zoom ratio
Touch [Zoom].
For DVD, changes the zoom ratio at 4 levels; Off, 2 times, 3 times, 4 times.
ForVCD, changes the zoom ratio at 2 levels; Off, 2 times.
Scrolls the screen
Touch [5], [∞], [2], or [3] to scroll the screen in the direction you touch.
Exits menu control
Touch [Exit].
Displays the previous menu*
Touch [Return].
*This function may not be performed depending on the disc.
NOTE
•You cannot touch the menu keys directly on the screen when zooming.
DVD Setup
You can set up the DVD playback functions.
NOTE
•Each operation in this section can be started from theTop Menu screen. For details, see Operating With The Top Menu Screen (P.16).
1Touch [  ] in the control screen.
Multi function menu appears.
2Touch [SETUP].
SETUP Menu screen appears.
3Touch [Source].
|
|
Source SETUP Menu screen appears. |
4 |
|
Touch [DVD SETUP] in the list. |
|
||
|
||
|
|
DVD SETUP screen appears. |
5 |
|
Set each item as follows. |
|
||
|
Return to the Top page
DVD, VCD
Menu/Subtitle/Audio Language*
See Language setup (P.28).
Dynamic Range Control*
Sets the dynamic range.
Wide:The dynamic range is wide. Normal:The dynamic range is normal.
Dialog (Default): Makes the total sound volume larger than other modes.This is effective only when you are using Dolby Digital software.
Angle Mark
Sets an angle mark display.
ON (Default): An angle mark appears. OFF: An angle mark does not appear.
Screen Ratio*
Sets the screen display mode.
16:9 (Default): Displays wide pictures.
4:3 LB: Displays wide pictures in the Letter Box format (having black stripes at the top and bottom of screen).
4:3 PS: Displays wide pictures in the Pan & Scan format (showing pictures cut at the right and left ends).
Parental Level*
See Parental level (P.28).
DISC SETUP
See Disc setup (P.29).
Stream Information
Displays the present source information.
The stream (Dolby Digital, dts, Linear PCM, MPEG,WMA or AAC) appears.
*These items are disabled when a DVD is being played.
26 |
27 |

Return to the Top page
DVD, VCD
 Language setup
This setting is for the language used in the menu, subtitle, and voice.You cannot setup these items during DVD playback.
1 |
|
Touch [SET] of the desired |
|
||
|
|
item; [Menu Language], |
|
|
[Subtitle Language], |
|
|
[Audio Language]. |
|
|
Language Set screen appears. |
2 |
|
Enter the desired language code and |
|
||
|
|
touch [Enter]. |
Sets the entered language and returns to the DVD SETUP screen.
NOTE
•To cancel the setup and return to the previous screen, touch [Cancel].
•To clear the entered code, touch [Clear].
•To set the DVD’s original language for audio language, touch [Original].
 Parental level
Sets a parental level.You cannot setup this item during DVD playback.
1 |
|
Touch [SET] of [Parental Level]. |
|
||
|
||
|
|
Parental Pass screen appears. |
2 |
|
Enter the parental code and touch |
|
||
|
|
[Enter]. |
|
|
Parental Level screen appears. |
NOTE
•To cancel the setup and return to the previous screen, touch [Cancel].
•To clear the entered code, touch [Clear].
•Current parental level appears as [Level#].
3 Touch [2] or [3] to select a parental level.
NOTE
•If a disc has higher parental lock level, you need to enter the code number.
•The parental lock level varies depending on a loaded disc.
•If a disc has no parental lock, anybody can play it back even when you have set the parental lock.
Return to the Top page
DVD, VCD
 Disc setup
Performs setup when using disc media.
1 |
|
Touch [SET] of [DISC SETUP]. |
|
||
|
||
|
|
DISC SETUP screen appears. |
2 |
|
Select an option as follows. |
|
||
|
CD Read
Sets the motion of this unit when a music CD is played.
1 (Default): Automatically recognizes and plays back an audio file disc, a DVD or a music CD.
2: Forcibly plays back a disc as a music CD. Select [2] if you wish to play a music CD having a special format or if you cannot play a disc in [1] position.
On Screen DVD
Sets an on-screen display.
Auto:When updated, information appears for 5 seconds.
OFF (Default): Information does not appear.
NOTE
•[CD Read] is not available when a disc is in the unit.
•You cannot play an audio file/VCD disc in the [2] position. Also, you may not play some music CDs in the [2] position.
28 |
29 |
Return to the Top page
CD, Disc, iPod, USB device, SD Card
 CD/Audio And Visual Files/iPod Operation
Music/Video/Picture Basic Operation
Most functions can be controlled from the source control screen and playback screen.
NOTE
•Set the remote controller mode switch to AUD mode before starting operation, see Switching the operation mode (P.95).
•To connect iPod to this unit, optional accessory KCA-iP202/KCA-iP22F is necessary.
See the following sections for each source operation. |
|
|
• Music CD (P.30) |
• USB device (P.32) |
|
• Disc media (P.30) |
• SD Card |
(P.32) |
|
• iPod (P.32) |
|
 Music CD and disc media
NOTE
•In this manual,“Music CD”will be referred to as the general CDs which include music tracks in. “Disc media”will be referred to as CD/DVD disc which includes audio, picture or video files.
•The screen shot below is for CD. It may be different from the one for disc media.
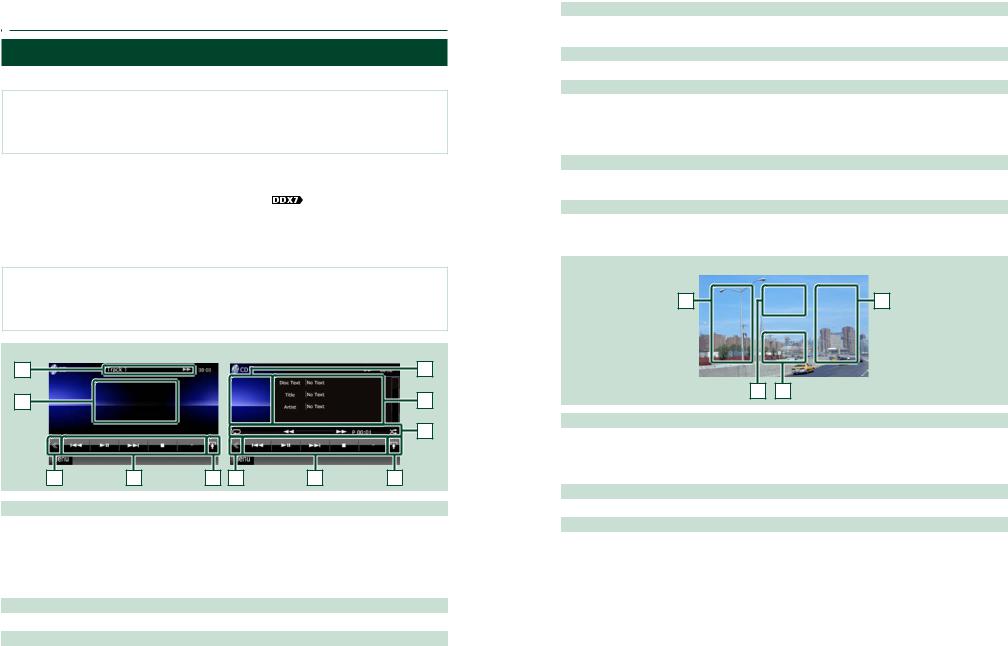
Simple Control screen
1 |
2 |
3 |
4 |
5 |
3 |
List Control screen
2 |
6 |
7 |
4 |
8 |
1 Information display
Displays the following information.
•Track #: Each time you touch this area, display switches between current track number, text, etc.
•3, ¡, ¢, 7, etc.: Current play mode display
The meanings of each icon are as follows; 3(play), ¡(fast forward), 1(fast backward), ¢(search up), 4(search down), 7(stop), 7R (resume stop), 8 (pause).
2 Movie display area/Control switching area
Touch to switch between the Simple Control and List Control screen.
3 Multi function key
Touch to switch the multi function menu. For details on the menu, see Multi function menu (P.34).
Return to the Top page
CD, Disc, iPod, USB device, SD Card
4 Multi function menu
Various functions can be performed by using keys in this area. For details on the menu, see Multi function menu (P.34).
5 Sub function key
Touch to display“Sub function menu”(7 in this table).
6 Track information
Displays the information of the current track.
For music CD and disc media, you can switch the current track information and the current folder list by touching the list switching key (8 in this table).
However, only "No Information" is displayed for music CD.
7 Sub function menu
Various functions can be performed by using keys in this area. For details on the keys, see Sub function menu (P.35).
8 List switching key
Touch to switch between the track list and the CD-TEXT display (CD)/ID3 tag information (disc media only).
Video screen (disc media only)
9 |
9 |
10 |
11 |
9Searching file area (disc media only)
Touch to search the next/previous file.
Scrolling from center of display to left or right performs fast backward or fast forward. Each time you touch each area, the speed changes; standard, 2 times, 3 times.To stop fast backward/forward, touch center of the display.
10Menu display area (disc media only)
Touch to display the disc menu. For details, see Movie Control (P.41).
11 Key display area (disc media only)
Touch to display the last control screen.
30 |
31 |
Return to the Top page
CD, Disc, iPod, USB device, SD Card
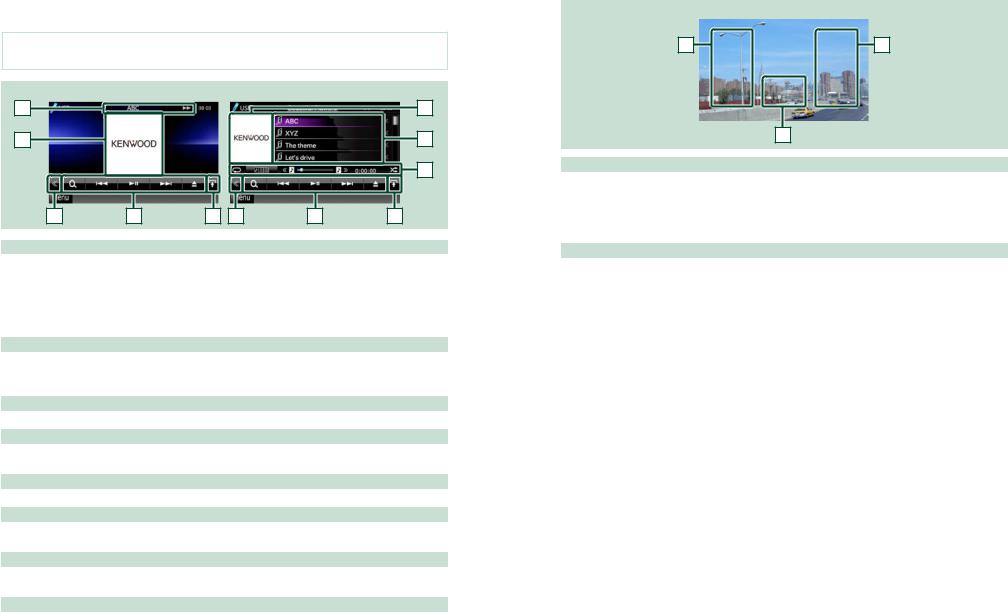
 USB device, iPod, and SD Card
NOTE
• The screen shot below is for USB device. It may be different from the one for iPod.
Simple Control screen
1 |
2 |
3 |
4 |
5 |
3 |
List Control screen
2 |
6 |
7 |
4 |
8 |
1 Information display
Displays the following information.
•Current file name: Each time you touch this area, display switches between file number/folder number and file name.
•3, ¡, etc.: Current play mode display
The meanings of each icon are as follows; 3(play, searching), 8(pause), ¡(forward manual search), 1(reverse manual search).
2 Artwork/Control switching area
The picture data is displayed if available from the current file.When the picture is not available,“No Photo”is displayed.
Touch to switch between the Simple Control and List Control screen.
3 Multi function key
Touch to switch the multi function menu. For details on the menu, see Multi function menu (P.34).
4 Multi function menu
Various functions can be performed by using keys in this area. For details on the keys, see Multi function menu (P.34).
5 Sub function key
Touch to display“Sub function menu”(7 in this table).
6 Contents list
Displays the list and contents.The contents of the list differ depending on the playback status and source.
7 Sub function menu
Various functions can be performed by using keys in this area. For details on the keys, see Sub function menu (P.35).
8 List switching key
Touch to switch between the file list and the current file information.
Return to the Top page
CD, Disc, iPod, USB device, SD Card
Picture/video screen
9 |
9 |
10 |
9Searching file area (picture/video file only)
• Touch to search the next/previous file.
• During slide show in USB mode, touching each area searches the next/previous music file.
• Scrolling from center of display to left or right performs fast backward or fast forward.To stop fast backward/forward, touch center of the display.This function is not available when there is no music file in the current folder.
10Key display area (picture/video file only)
Touch to display the last control screen.
32 |
33 |

Return to the Top page
CD, Disc, iPod, USB device, SD Card
 Multi function menu
Music CD |
Disc media |
iPod |
USB device and SD Card |
The following functions can be performed by using keys in this area.
[  ] (Disc media, iPod, USB device, and SD Card only)
Searches track/file. For details on search operation, see Search Operation (P.36).
[4] [¢]
Searches the previous/next track/file.
[3] [8] (iPod only) / [38]
Plays or pauses.
[7] (music CD and disc media only)
Stops playback.
[0] (iPod, USB device, and SD Card only)
Touch for 1 second to disconnect the device. For details, see How To Play Media (P.13).
[  ] (iPod only)
Touch to switch among the App mode and Normal mode cyclically.
App mode: Allows this unit to output the sounds and images produced by the application running on your iPod touch or iPhone.
In the App mode, you can control only the“Pause and play”and“Selecting a song”functions from this unit.
[ ] [
] [ ] (disc media, USB device, and SD Card only)
Searches previous/next folder.
[  ] (picture files in USB device and SD Card only)
During picture playback, switches to picture display.
[  SETUP]
Touch to display the SETUP Menu screen. See Setting Up (P.68).
[  AUDIO]
Touch to display the Audio Control screen. See Controlling Audio (P.82).
[  EXT SW]


Touch to control the external device power supply. For details, see External Device Control (P.81).
[ REAR  ]
]
Touch to mute the rear speaker.
|
|
|
|
Return to the Top page |
|
|
|
|
CD, Disc, iPod, USB device, SD Card |
|
|
|
Sub function menu |
|
|
|
|
|
|
|
|
|
|
|
Music CD |
Disc media |
|||
iPod |
USB device and SD Card |
|||
The following functions can be performed by using keys in this area.
[  ]
]
Repeats the current track/folder. Each time you touch the key, repeat mode switches in the following sequence;
CD, iPod: "track repeat"  , "repeat off"
Disc media, USB device, SD Card: "file repeat"  , "folder repeat"
  , "repeat off"
[  ] (USB device, SD Card, and iPod only)
Searches track from the album artwork list. For details on search operation, see Search from album artwork (P.39).
[  ] (During video file playback only)
Hides all keys.
[1] [¡] (Music CD and disc media only)
Fast forward or fast backward.
[  ] [
] [  ] (USB device and iPod only)
Plays the previous or next album in Favorite list (P.40).
#:##:## or ##:##
Confirms play time.
During music CD playback, you can also confirm disc remaining time by touching time display.
Each time you touch, the display switches between“P ##:##”(track play time display) and“R ##:##”(disc remaining time).
[  ]
]
Randomly plays all tracks in current folder/disc or in current playlist in the connected iPod. Each time you touch the key, random mode switches in the following sequence;
CD: "track random"  , "random off"
Disc media, USB device, SD Card: "file random"  , "random off" iPod: "track random"
  , "album random"
  , "random off"
Status bar in center (USB device, SD Card ,and iPod only)
Confirms the current location.
During USB device, SD Card, and iPod playback, you can drag the circle left or right to change the playing position.
34 |
35 |
 Loading...