


TYPE KVC50 (Chef)
TYPE KVL60 (Chef XL)
instructions

English |
3 |
- 11 |
Nederlands |
12 |
- 21 |
Français |
22 |
- 31 |
Deutsch |
32 |
- 41 |
Italiano |
42 |
- 51 |
Português |
52 |
- 61 |
Español |
62 |
- 71 |
Dansk |
72 |
- 81 |
Svenska |
82 |
- 91 |
Norsk |
92 |
- 101 |
Suomi |
102 |
- 111 |
Türkçe |
112 |
- 121 |
Ïesky |
122 |
- 131 |
Magyar |
132 |
- 141 |
Polski |
142 |
- 152 |
Ekkgmij |
153 |
- 164 |
Slovenčina |
165 |
- 175 |
Українська |
176 |
- 187 |
´¸∂w |
881-591 |
|
|
||
2 bm
2
bl


bk
bn 3 bo 
bp
bq
4
1
5

 6
6
7
8
9
br

 bs
bs
1


 (2
(2
(1

English
Know your Kenwood Kitchen Machine
Congratulations on buying a Kenwood. With such a wide range of attachments available, it’s more than just a mixer. It’s a state-of-the-art Kitchen Machine. We hope you’ll enjoy it.
Robust. Reliable. Versatile. Kenwood.
Safety
λRead these instructions carefully and retain for future reference.
λRemove all packaging and any labels.
λTurn the speed control to ‘O’ OFF position and unplug before fitting or removing tools/attachments, after use and before cleaning.
λKeep your fingers away from moving parts and fitted attachments.
λNever leave the Kitchen Machine unattended when it is operating.
λNever use a damaged appliance. Get it checked or repaired: see ‘service and customer care’ section.
λNever operate the Kitchen Machine with the head in the raised position.
λNever let the cord hang down where a child could grab it.
λNever let the power unit, cord or plug get wet.
λNever use an unauthorised attachment or more than one attachment at once.
λNever exceed the quantities stated in the maximum capacity chart.
λWhen using an attachment, read and follow the safety instructions that are supplied with it.
λTake care when lifting this appliance as it is heavy. Ensure the head is correctly latched in the down position and that the bowl, tools, outlet covers and cord are secure before lifting.
3
λEnsure the cord is fully unfolded from the cord storage compartment bm before using the Kitchen Machine.
λChildren should be supervised to ensure that they do not play with the appliance.
λDo not move or raise the mixer head with an attachment fitted as the Kitchen Machine could become unstable.
λDo not operate your appliance near the edge of a work surface.
λAppliances can be used by persons with reduced physical, sensory or mental capabilities or lack of experience and knowledge if they have been given supervision or instruction concerning use of the appliance in a safe way and if they understand the hazards involved.
λMisuse of your appliance can result in injury.
λThis appliance shall not be used by children. Keep the appliance and its cord out of reach of children.
λOnly use the appliance for its intended domestic use. Kenwood will not accept any liability if the appliance is subject to improper use, or failure to comply with these instructions.
Before plugging in
•Make sure your electricity supply is the same as the one shown on the underside of your machine.
•This appliance conforms to EC Regulation 1935/2004 on materials and articles intended to come into contact with food.
Before using for the first time
•Wash the parts: see ‘care and cleaning’ section.
4
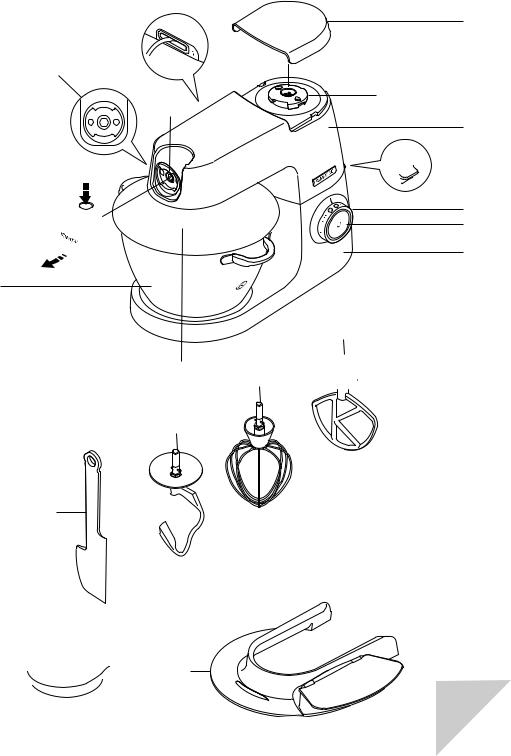
Know your Kitchen Machine
Key
1high-speed outlet
2slow-speed outlet
3bowl tool socketAttachment outlets
Optional attachments
There are a range of optional attachments available to use with your Kitchen Machine. See the attachment leaflet included in your pack or visit www.kenwoodworld.com to see the full range and how to buy an attachment not included in your pack.
Mixer
4 high speed outlet cover
5 mixer head
6 head release lever
7 speed and pulse control
8 standby button
9 power unit bk bowl
bl slow speed outlet cover
bm cord storage compartment bn K-beater
bo whisk
bp dough hook bq spatula
br head shield bs splashguard
Note: Spanner bl shown is for illustration purposes only and is not supplied in pack.
Note: Slow Speed outlet attachments
The slow speed outlet on your Kitchen Machine model features the Twist Connection System. It is designed to accept Twist Connection System attachments.
When purchasing new attachments for the slow speed outlet you should check compatibility with your Kitchen Machine. All Twist Connection System attachments can be identified by the product code which starts with KAX and also by the Twist logo  which is visible on packaging. For more information visit www.kenwoodworld.com/twist.
If you own attachments featuring the Bar Connection System  you will need to use the KAT002ME adaptor to connect these to the Twist Connection System
  on your Kitchen Machine.
For more information visit www.kenwoodworld.com/twist.
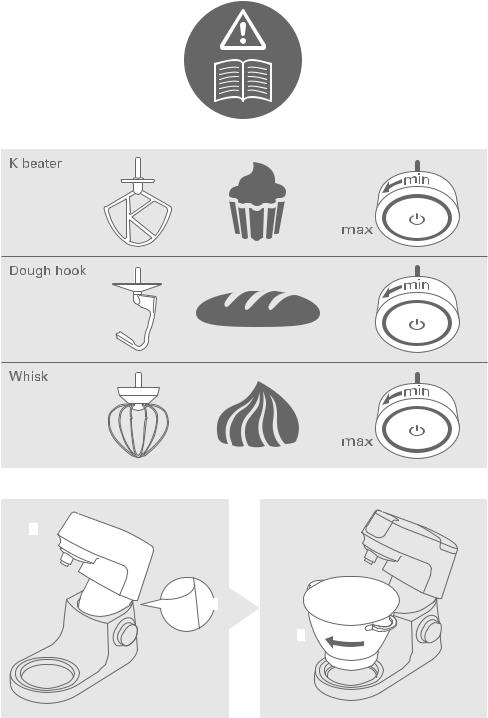
The bowl tools and some of their uses
K-beater
For making cakes, biscuits, pastry, icing, fillings, éclairs and mashed potato.
Whisk
For eggs, cream, batters, fatless sponges,
meringues, cheesecakes, mousses, soufflés. Don’t use the whisk for heavy mixtures (e.g. creaming fat and sugar) - you could damage it.
Dough Hook
For yeast mixtures only.
5
To use your bowl tools
Ensure the cord is fully unfolded from the cord storage compartment bm before
1Plug in and the Standby Button 8 will
light up.
Note: The standby button light 8 will flash and the Kitchen Machine will not operate if the mixer head is in the raised position or the speed control is not in the ‘O’ position.
Before operating, check that the mixer head is correctly latched down and the speed control is in the ‘O’ position. If the light continues to flash refer to the ‘troubleshooting guide’.
2Push the head-lift lever 1 down and raise the mixer head until it locks 2.
3Fit the bowl on the base and turn clockwise 3 to secure in position .
4Place the required tool into the socket. Then push up 4 and turn 5 the tool to lock into position.
Note: If the K-beater or Whisk are not picking up ingredients from the bottom of the bowl refer to the “Tool Adjustment” section.
5Lower the mixer head by pushing the head release lever down 6 and lower the mixer head until it locks 7.
6Start the machine by turning the speed control 7 to the desired speed setting. Use the pulse (P) position for short
bursts of maximum speed.
7After use, return the speed control to ‘O’ OFF position and unplug your Kitchen Machine.
8Release the tool by turning clockwise to
unlock from the tool socket and then remove.using the Kitchen Machine.
Hints
•To fully incorporate the ingredients stop mixing and scrape down the bowl with the spatula frequently.
•For best results when whisking use eggs at room temperature.
•Before whisking egg whites, make sure there is no grease or egg yolk on the whisk or bowl.
•Use cold ingredients for pastry unless your recipe says otherwise.
Points for bread making
Important
•Never exceed the maximum capacities stated - you may overload the machine.
•If you hear the machine labouring, switch off, remove half the dough and do each half separately.
•The ingredients mix best if you put the liquid in first.
Yeast
•Dried yeast (the type that needs reconstituting): pour the warm water into the bowl. Then add the yeast and the sugar and leave to stand for about 10 minutes until frothy.
•Fresh yeast: crumble into the flour.
•Other types of yeast: follow the manufacturer’s instructions.
•Put the dough into a greased polythene bag or a bowl covered with a tea towel. Then leave somewhere warm until doubled in size.
Important
Ensure that no bowl tools are fitted or stored in the bowl when using other outlets.
6
Maximum capacities |
|
Chef |
Chef XL |
Shortcrust pastry |
Flour weight |
680g/1lb 8oz |
910g/2lb |
|
|
|
|
Bread dough |
Flour weight |
1.36kg/3lb |
1.6kg/3lb 8oz |
|
|
|
|
(stiff yeasted) |
Total weight |
2.18kg/4lb 3oz |
2.5kg/5lb 8oz |
|
|
|
|
Soft yeasted dough |
Flour weight |
1.3kg/2lb 14oz |
2.6kg/5lb 12oz |
|
|
|
|
(enriched with butter and eggs) |
Total weight |
2.5kg/5lb 8oz |
5kg/11lb |
|
|
|
|
Fruit cake mix |
Total weight |
2.72kg/6lb |
4.55kg/10lb |
(Creaming fat and sugar method) |
|
(9 Egg mix) |
(15 Egg mix) |
|
|
|
|
Egg whites |
Number |
12 |
16 |
|
Weight |
(455g) |
(605g) |
* Eggs sizes used = medium sized (Weight 53 – 63g)
Tool |
Recipe/Process |
Recommended Speed |
|
|
|
|
|
K-beater |
Creaming butter/margarine |
Start on ‘Min’ and gradually |
|
|
and sugar |
increase to ‘Max’ |
|
|
|
|
|
|
Beating eggs into cake mixes |
‘4’ to ‘Max’ |
|
|
|
|
|
|
Folding in flour, fruit etc |
‘Fold’ to ‘1’ |
|
|
|
|
|
|
All In one cake mixes |
Start on ‘Min’ and gradually |
|
|
|
|
increase to ‘Max’ |
|
|
|
|
|
Pastry & Biscuits – rubbing fat |
‘Min’ to’ 2’ |
|
|
into flour |
|
|
|
|
|
|
|
Royal Icing |
‘Min’ to ‘1’ |
|
|
|
|
|
|
Mashed Potatoes |
Start on ‘Min’ and gradually |
|
|
|
|
increase to ‘Max’ |
|
|
|
|
Whisk |
Egg Whites |
|
|
|
|
|
|
|
Fatless sponges |
Gradually increase to ‘Max’ |
|
|
|
|
|
|
Cream |
|
|
Dough Hook |
For Yeasted dough mixes |
‘Min’ speed for 45 - 60 secs. |
|
|
|
|
Then increase to speed 1 for |
|
|
|
approx. 3 – 4minutes. |
|
|
|
|
|
|
|
Re-knead on speed 1 |
|
|
|
|
7
To fit and use your Splashguard
To assemble
The splashguard assembly consists of 2 pieces: the head shield br and the splashguard bs.
The splashguard cannot be fitted to the bowl unless the shield is fitted.
1 Raise the mixer head until it locks.
2 Clip the head shield upwards onto the underside of the mixer head 8 until fully located.
3 Fit the bowl onto the base.
4 Lower the mixer head.
5 Rest the splashguard on the bowl rim
and then slide forward until fully located
9.
• During mixing, ingredients can be added directly to the bowl via the feed chute.
6To remove the splashguard simply slide it away from the mixer bowl.
7To remove the head shield, raise the mixer head until it locks. Remove the tool if fitted, then pull the head shield downwards from the underside of the mixer head.
Note: Only fit or remove the splashguard when the mixer head is in the locked
position.
We recommend that the head shield is removed regularly from the mixer head for cleaning.
Tool Adjustment
K-beater & Whisk
The tools are set to the correct height for the bowl supplied in the factory and should not require adjustment.
However, if you wish to adjust the tool use a suitable sized spanner:
TYPE KVC50 = 15mm
TYPE KVL60 = 19mm
Then follow the instructions below:
1 Unplug the appliance.
2 Raise the mixer head and insert the whisk or beater.
3 Lower the mixer head. If the clearance needs to be adjusted, raise the mixer
head and remove the tool. Ideally the whisk and K-beater should be almost
touching the bottom of the bowl bk.
4 Using a suitable spanner loosen the nut sufficiently to allow adjustment of the shaft bl. To lower the tool closer to the bottom of the bowl, turn the shaft anticlockwise. To raise the tool away from the bottom of the bowl turn the shaft clockwise.
5 Re-tighten the nut.
6 Fit the tool to the mixer and lower the mixer head. (Check its position see points above).
7 Repeat the above steps as necessary until the tool is set correctly. Once this is achieved tighten the nut securely.
• Note: Spanner bl shown is for illustration purpose only.
Dough Hook
This tool is set at the factory and should require no adjustment.
8
Care & Cleaning
•Always switch off and unplug before cleaning.
•A little grease may appear at the slow speed outlet 2 when you first use it. This is normal – just wipe it off.
Power Unit And Outlet Covers
•Wipe with a damp cloth, then dry.
•Never use abrasives or immerse in water.
•Store excess cord into the cord storage compartment bm at the back of the machine.
Bowl
•Wash by hand, then dry thoroughly or wash in the dishwasher.
•Never use a wire brush, steel wool or bleach to clean your stainless steel bowl. Use vinegar to remove limescale.
•Keep away from heat (cooker tops, ovens, microwaves).
Tools & Splashguard
•Wash by hand, then dry thoroughly.
•Alternatively they are dishwasher safe and can be washed on the top rack of your dishwasher. Avoid placing items on the bottom rack directly over the heating element. A short low temperature (Maximum 50°C) programme is recommended.
Service and
Customer Care
•If the cord is damaged it must, for safety reasons, be replaced by KENWOOD or an authorised KENWOOD repairer.
•If you experience any problems with the operation of your appliance, before requesting assistance refer to the “troubleshooting guide” section in the manual or visit www.kenwoodworld.com.
•Please note that your product is covered by a warranty, which complies with all legal provisions concerning any existing warranty and consumer rights in the country where the product was purchased.
•If your Kenwood product malfunctions or you find any defects, please send it or bring it to an authorised KENWOOD Service Centre. To find up to date details of your nearest authorised KENWOOD Service centre visit www.kenwoodworld.com or the website specific to your Country.
•Designed and engineered by Kenwood in the UK.
•Made in China.
9

IMPORTANT INFORMATION FOR CORRECT DISPOSAL OF THE PRODUCT IN ACCORDANCE WITH THE EUROPEAN DIRECTIVE ON WASTE ELECTRICAL AND ELECTRONIC EQUIPMENT (WEEE)
At the end of its working life, the product must not be disposed of as urban waste. It must be taken to a special local authority differentiated waste collection centre or to a dealer providing this service.
Disposing of a household appliance separately avoids possible negative consequences for the environment and health deriving from inappropriate disposal and enables the constituent materials to be recovered to obtain significant savings in energy and resources. As a reminder of the need to dispose of household appliances separately, the product is marked with a crossed-out wheeled dustbin.
10

Troubleshooting guide
Problem |
Cause |
Solution |
|
|
|
|
|
The whisk or K-beater |
Tool at the wrong |
Adjust the height using a suitable |
|
knocks against the bottom |
height and needs |
spanner – see “Tool Adjustment” |
|
of the bowl or not reaching |
adjusting. |
section. |
|
the ingredients in the |
|
|
|
bottom of the bowl. |
|
|
|
Slow speed attachment |
Check your attachment |
Attachment must have the KAX |
|
cannot be fitted. |
is compatible for |
twist connection system |
to fit |
|
use with your model. |
the outlet. |
|
|
Twist connection |
If you own attachments featuring |
|
|
system required |
the Bar Connection System |
|
|
(Model KAX) |
you will need to use the |
|
|
|
KAT002ME adaptor to connect |
|
|
|
these to the Twist Connection |
|
|
|
System on your Kitchen Machine. |
|
|
|
For more information visit |
|
|
|
www.kenwoodworld.com/twist |
|
Standby light flashing |
Speed control not |
Check and turn speed control |
|
when Kitchen Machine |
in the ‘O’ position. |
to the ‘O’ position. |
|
first plugged in. |
|
|
|
|
Mixer head in the raised |
Check Kitchen Machine head |
|
|
position or not locked |
is locked down correctly. |
|
|
down correctly. |
|
|
The Kitchen Machine |
Overload protection or |
Unplug and check for |
|
stops during operation. |
overheat system |
obstruction or overloading. |
|
Standby light flashing |
activated. |
Turn the speed control to “O” |
|
rapidly. |
Maximum capacity |
and then restart. |
|
|
exceeded. |
If the machine will not operate, |
|
|
|
remove some of the ingredients to |
|
|
|
reduce the load and restart. |
|
|
|
If this still does not resolve the |
|
|
|
problem, unplug and allow to |
|
|
|
stand for 15 minutes. Plug in and |
|
|
|
reselect the speed. |
|
|
|
If the machine does not restart |
|
|
|
following the above procedure |
|
|
|
contact “customer care” for further |
|
|
|
advice. |
|
Standby light off whilst |
Kitchen machine has been |
Press the Standby button |
|
machine plugged in. |
left plugged in for more |
once to reset. |
|
|
than 30 minutes without |
|
|
|
being operated and has |
|
|
|
gone into Standby mode. |
|
|
|
|
|
|
11

Nederlands
Kennismaking met de Kenwood keukenmachine
U bent de gelukkige eigenaar van een Kenwood. Dankzij het grote assortiment beschikbare hulpstukken, is deze machine veel meer dan zomaar een mixer. Het is een geavanceerde keukenmachine. We hopen dat u er veel plezier van zult hebben.
Robuust. Betrouwbaar. Veelzijdig. Kenwood.
Veiligheid
λLees deze instructies zorgvuldig door en bewaar ze voor toekomstig gebruik.
λVerwijder alle verpakking en labels.
λZet de snelheidsregeling op 'O' (uit) en haal de stekker uit het stopcontact voordat u hulpstukken monteert of verwijdert, zowel na het gebruik als voor de reiniging.
λHoud uw vingers uit de buurt van bewegende onderdelen en aangebrachte hulpstukken.
λLaat de keukenmachine nooit onbeheerd aan staan.
λGebruik nooit een machine die beschadigd is. Laat de machine controleren of repareren: raadpleeg het deel 'onderhoud en klantenservice'.
λZet de keukenmachine nooit aan als de kop omhoog staat.
λLaat het snoer nooit overhangen, zodat een kind erbij kan.
λZorg ervoor dat het motorgedeelte, het snoer en de stekker nooit nat worden.
λGebruik nooit een hulpstuk dat niet goedgekeurd is en gebruik nooit meer dan één hulpstuk per keer.
λOverschrijd nooit de hoeveelheden die staan vermeld op de tabel met de maximumcapaciteiten.
λAls u een hulpstuk gebruikt, dient u de meegeleverde veiligheidsinstructies te lezen en op te volgen.
12
λWees voorzichtig wanneer u de machine optilt. Hij is zwaar. Zorg ervoor dat de kop omlaag staat en vergrendeld is, en dat de kom, de hulpstukken, de contactdeksels en het snoer vast zitten, voordat u de machine optilt.
λZorg ervoor dat u het hele snoer uit het opbergvak bm hebt gehaald, voordat u de keukenmachine gebruikt.
λKinderen mogen de machine alleen onder toezicht gebruiken, om te voorkomen dat ze ermee spelen.
λVerplaats de machine niet en haal de kop niet omhoog als een hulpstuk aangebracht is, omdat de keukenmachine dan instabiel kan worden.
λGebruik de machine niet aan de rand van het werkoppervlak.
λDit apparaat kan worden gebruikt door personen met verminderde lichamelijke, sensorische of geestelijke capaciteiten of gebrek aan ervaring en kennis mits ze onder toezicht staan of instructie hebben gekregen over het veilig gebruik van het apparaat en de betrokken risico's begrijpen.
λMisbruik van uw apparaat kan tot letsel leiden.
λDit apparaat mag niet door kinderen worden gebruikt. Houd het apparaat en het snoer buiten het bereik van kinderen.
λGebruik het apparaat alleen voor het huishoudelijke gebruik waarvoor het is bedoeld. Kenwood kan niet aansprakelijk worden gesteld in het geval dat het apparaat niet correct is gebruikt, of waar deze instructies niet worden opgevolgd.
Voordat u de stekker in het stopcontact steekt
•Zorg dat de elektriciteitsvoorziening dezelfde spanning heeft als op de onderkant van het apparaat wordt aangegeven.
•Dit apparaat voldoet aan EG Verordening 1935/2004 inzake materialen en voorwerpen die bestemd zijn om met levensmiddelen in contact te komen.
Voordat u de machine voor het eerst gebruikt
•Lees het deel 'Onderhoud en reiniging', voordat u de onderdelen gaat schoonmaken.
13
De onderdelen van de keukenmachine
legenda
1Contact hoge snelheid
2Contact lage snelheid
3Contact voor het komhulpstukContacten voor hulpstukken
Mixer
4 Deksel voor hogesnelheidscontact
5 Mixerkop
6 Vrijzethendel voor de kop
7 Snelheidsen stootregeling
8 Stand-byknop
9 Motorgedeelte bk Kom
bl Deksel voor lagesnelheidscontact
bm Opbergvak voor het snoer bn K-klopper
bo Garde bp Deeghaak bq Spatel
br Kopscherm bs Spatscherm
Opmerking: De weergegeven sleutel bl dient alleen ter illustratie en wordt niet met de verpakking meegeleverd.
Optionele hulpstukken
Er zijn diverse optionele hulpstukken verkrijgbaar voor uw keukenmachine. Raadpleeg de brochure met hulpstukken in de verpakking of ga naar www.kenwoodworld.com om het hele assortiment te bekijken, compleet met instructies voor het kopen van een hulpstuk dat niet met de machine is meegeleverd.
Opmerking: Hulpstukken voor het lagesnelheidscontact
Het lagesnelheidscontact van uw keukenmachinemodel heeft een draaiverbinding. Het is speciaal ontworpen voor hulpstukken die uitgerust zijn met het draaiverbindingssysteem.
Als u nieuwe hulpstukken voor het lagesnelheidscontact koopt, dient u de compatibiliteit met uw keukenmachine te controleren. Alle hulpstukken met het draaiverbindingssysteem zijn te herkennen aan de productcode die begint met KAX en aan het Twist-logo  dat op de verpakking staat. Voor nadere informatie gaat u naar www.kenwoodworld.com/twist.
Als u hulpstukken hebt met het stangverbindingssysteem  , dan hebt u de KAT002ME-adapter nodig om deze hulpstukken aan het draaiverbindingssysteem
  van uw keukenmachine te bevestigen.
Ga voor meer informatie naar www.kenwoodworld.com/twist.
14
De menghulpstukken gebruiken
K-klopper
Voor het bereiden van taarten, koekjes, gebakjes, suikerglazuur, vullingen, éclairs en aardappelpuree.
Garde
Voor eieren, room, beslag, vetloos eiergebak, meringue, kaastaart, mousse, soufflés. Gebruik de garde niet voor zware mengsels (bijv. boter en suiker), omdat de
garde daardoor beschadigd kan raken.
Deeghaak
Alleen voor gistmengsels.
De menghulpstukken gebruiken
Zorg ervoor dat u het hele snoer uit het opbergvak bm hebt gehaald, voordat u de keukenmachine gebruikt.
1Steek de stekker in het stopcontact. De Stand-byknop 8 gaat branden.
Opmerking: Het lichtje van de Standbyknop 8 gaat knipperen en de keukenmachine functioneert niet als de kop omhoog gehaald is of de snelheidsregeling niet op 'O' staat. Voorafgaand aan het gebruik controleert u of de kop goed omlaag is vergrendeld en of de snelheidsregeling op 'O' staat. Als het lichtje blijft knipperen, raadpleegt u het deel 'Problemen oplossen.
2Duw de vrijzethendel 1 naar beneden
en haal de kop omhoog, totdat hij vast zit 2.
3Plaats de kom op het onderstel en draai hem naar rechts 3 om hem op zijn plaats vast te zetten.
4Steek het gewenste hulpstuk in het contact. Duw het hulpstuk omhoog 4 en draai eraan 5 om hem op zijn plaats vast te zetten.
Opmerking: Als de K-klopper of garde geen ingrediënten van de bodem van de kom meenemen, raadpleegt u het deel 'Hulpstukken afstellen'.
5Laat de kop zakken door de vrijzethendel omlaag te duwen 6 en zorg ervoor dat de kop vergrendelt 7.
6Start de machine door de snelheidsregeling 7 naar de gewenste snelheid te draaien. Gebruik de stoot (P)
stand voor korte stoten op de maximumsnelheid.
7Na het gebruik zet u de snelheidsregeling op 'O' (uit) en haalt u de stekker uit het stopcontact.
8Draai het hulpstuk naar rechts uit het contact en verwijder het.
Tips
•Om te verzekeren dat u alle ingrediënten mengt, stopt u de machine en schraapt u de kom regelmatig met de spatel af.
•Voor het beste resultaat gebruikt u eieren op kamertemperatuur.
•Zorg ervoor dat er geen boter of eigeel op de garde of in de kom aanwezig is, voordat u eiwit gaat opkloppen.
•Gebruik koude ingrediënten als u deeg gaat maken, tenzij het recept iets anders voorschrijft.
15
Tips voor het bereiden van brood Belangrijk
•Nooit de opgegeven maximumcapaciteit overschrijden – anders raakt de machine overbelast.
•Als u hoort dat de machine het deeg niet goed aan kan, zet u de machine uit, verwijdert u de helft van het deeg en mengt u elke helft afzonderlijk.
•De ingrediënten zullen het beste mengen als u eerst de vloeistof in de kom giet.
Gist
•Gedroogde gist (het soort dat gereconstitueerd moet worden): giet het warme water in de kom. Voeg er de gist en de suiker aan toe en laat het mengsel ca. 10 minuten rusten, totdat het opschuimt.
•Verse gist: brokkel de gist in de bloem.
•Andere soorten gist: volg de aanwijzingen van de producent.
•Doe het deeg in een ingevette plastic zak of in een kom met daar overheen een theedoek. Laat het op een warme plek rusten, totdat de deegbal tweemaal zo groot is geworden.
Belangrijk
Zorg ervoor dat er geen menghulpstukken zijn geplaatst of in de kom aanwezig zijn wanneer u andere contacten gebruikt.
Maximumcapaciteit |
|
Chef |
Chef XL |
|
|
|
|
Kruimeldeeg |
Bloemgewicht |
680 gr |
910 gr |
|
|
|
|
Brooddeeg |
Bloemgewicht |
1,36 kg |
1,6 kg |
|
|
|
|
(stijf gegist) |
Totaalgewicht |
2,18 kg |
2,5 kg |
|
|
|
|
Zacht gegist deeg |
Bloemgewicht |
1,3 kg |
2,6 kg |
|
|
|
|
(verrijkt met boter en eieren) |
Totaalgewicht |
2,5 kg |
5 kg |
|
|
|
|
Fruittaartmix |
Totaalgewicht |
2,72 kg |
4,55 kg |
(roomvet en suiker methode) |
|
(mengsel met |
(mengsel met |
|
|
9 eieren) |
15 eieren) |
|
|
|
|
Eiwit |
Aantal |
12 |
16 |
|
Gewicht |
(455 gr) |
(605 gr) |
|
|
|
|
* Gebruikte eieren = medium (gewicht 53 – 63 gr)
16
Hulpmiddel |
Recept/proces |
Aanbevolen snelheid |
|
|
|
|
|
K-klopper |
Boter/margarine en suiker romig |
Start op 'min' en verhoog |
|
|
maken |
geleidelijk tot 'max'. |
|
|
|
|
|
|
Eieren in cakemix kloppen |
4 naar 'max' |
|
|
|
|
|
|
Bloem, fruit, enz. in het mengsel |
'Fold' naar 1 |
|
|
vouwen |
|
|
|
|
|
|
|
All-in-one cakemix |
Start op 'min' en ga geleidelijk |
|
|
|
|
naar 'max'. |
|
|
|
|
|
Deegwaren en koekjes – boter en |
'min' naar 2 |
|
|
de bloem vermengen |
|
|
|
|
|
|
|
Royal icing |
'min' naar 1 |
|
|
|
|
|
|
Aardappelpuree |
Start op 'min' en ga geleidelijk |
|
|
|
|
naar 'max'. |
|
|
|
|
Garde |
Eiwit |
|
|
|
|
|
|
|
Vetloze sponge cake |
Verhoog geleidelijk maar 'max' |
|
|
|
|
|
|
Room |
|
|
|
|
|
|
Deeghaak |
Voor gegiste deegmengsels |
Op 'min' snelheid gedurende |
|
|
|
|
45 - 60 seconden. |
|
|
|
Verhoog naar snelheid 1 |
|
|
|
gedurende ca. 3 – 4 minuten. |
|
|
|
|
|
|
|
Kneed het deeg opnieuw op |
|
|
|
snelheid 1 |
Het spatdeksel plaatsen en gebruiken
Monteren
Het spatdeksel bestaat uit 2 onderdelen: het kopscherm br en het spatscherm bs. Het spatscherm kan alleen op de kom worden geplaatst als het komscherm aanwezig is.
1Haal de mixerkop omhoog, totdat hij vastklikt.
2Klem het kopscherm naar boven op de onderkant van de mixerkop 8 totdat hij goed vast zit.
3Plaats de kom op het onderstel.
4Laat de mixerkop zakken.
5Leg het spatscherm op de rand van de
kom en schuif hem naar voren, totdat hij goed vastzit 9.
•Tijdens het mengen kunnen de ingrediënten direct via de toevoertrechter aan de kom worden toegevoegd.
6U verwijdert het spatscherm door hem van de mengkom af te trekken.
7U verwijdert het kopscherm door de mixerkop omhoog te halen, totdat hij vastklikt. Verwijder het geplaatste hulpstuk en trek het kopscherm naar beneden vanaf de onderkant van de mixerkop.
Opmerking: u mag het spatdeksel alleen plaatsen of verwijderen als de mixerkop
vergrendeld is.
Aanbevolen wordt het kopscherm regelmatig van de mixerkop te verwijderen en te reinigen.
17
Hulpstukken afstellen
K-klopper en garde
De hulpstukken zijn ingesteld op de juiste hoogte voor de kom die door de fabriek wordt geleverd en hoeven gewoonlijk niet afgesteld te worden.
Als u het hulpstuk echter toch wilt afstellen, hebt u een geschikte sleutel nodig:
TYPE KVC50 = 15 mm
TYPE KVL60 = 19 mm
Volg onderstaande aanwijzingen:
1Haal de stekker uit het stopcontact.
2Haal de mixerkop omhoog en steek de garde of klopper erin.
3Laat de mixerkop zakken. Als de spelingsafstand veranderd moet worden, haalt u de mixerkop omhoog en verwijdert u het hulpstuk. Het beste is als
de garde en K-klopper de bodem van de kom bk bijna raken.
4Gebruik een geschikte sleutel om de
moer voldoende los te halen om de as af te kunnen stellen bl. Als u het hulpstuk dichter bij de bodem van de kom wilt
laten zakken, draait u de as naar links. Als u het hulpstuk van de bodem van de kom af wilt halen, draait u de as naar rechts.
5Draai de moer weer vast.
6Steek het hulpstuk in de mixer en laat de mixerkop zakken. (Controleer de positie aan de hand van bovenstaande punten).
7Herhaal deze stappen zo nodig, totdat
het hulpstuk goed is afgesteld. Tot slot
•Opmerking: De weergegeven sleutel bl dient alleen ter illustratie.draait u de moer stevig aan.
Deeghaak
Dit hulpstuk is in de fabriek ingesteld en hoeft niet verder afgesteld te worden.
18
Onderhoud en reiniging
•Zet de machine altijd uit en haal de stekker uit het stopcontact.
•Er kan wat vet uit het lagesnelheidscontact 2 stromen wanneer u het voor het eerst gebruikt.
Dit is normaal – veeg het vet weg.
Motorgedeelte en contactdeksels
•Veeg ze met een vochtige doek schoon en droog ze af.
•Gebruik nooit schuurmiddelen en dompel de onderdelen nooit onder in water.
•Berg de rest van het snoer op in het opbergvak bm aan de achterkant van de machine.
Kom
•Was de kom met de hand en droog hem goed af, of plaats hem in de vaatwasmachine.
•Gebruik geen staalborstel, schuursponsje of bleekmiddel om uw roestvrijstalen kom te reinigen. Gebruik azijn om kalkaanslag te verwijderen.
•Houd de kom uit de buurt van hittebronnen (gaspitten, ovens, magnetrons).
Hulpstukken en spatdeksel
•Met de hand wassen en afdrogen.
•Ze kunnen ook op het bovenrek van uw vaatwasmachine gewassen worden. Plaats geen onderdelen op het onderste rek, vlak boven het verwarmingselement. Aanbevolen wordt een kort wasprogramma op lage temperatuur (maximaal 50°C) te gebruiken.
Onderhoud en klantenservice
•Als het snoer beschadigd is, moet het om veiligheidsredenen door Kenwood of een door Kenwood geautoriseerd reparatiebedrijf vervangen worden.
•Als u problemen ondervindt met de werking van de machine, raadpleegt u de informatie onder ‘problemen oplossen’ in deze handleiding of gaat u naar www.kenwoodworld.com.
•Dit product is gedekt door een garantie die voldoet aan alle wettelijke regels voor bestaande garanties en consumentenrechten die gelden in het land waar het product is gekocht.
•Als uw Kenwood product niet goed functioneert of als u defecten opmerkt, kunt u het naar een erkend Service Center van KENWOOD sturen of brengen. Voor informatie over het KENWOOD Service Center in uw buurt gaat u naar www.kenwoodworld.com of naar de specifieke website in uw land.
•Ontworpen en ontwikkeld door Kenwood in het VK.
•Vervaardigd in China.
19

Problemen oplossen
Probleem |
Oorzaak |
Oplossing |
|
|
|
|
|
|
|
|
|
De garde of K-klopper |
De hoogte van het |
Verstel de hoogte met een |
|
|
|
stoot tegen de onderkant |
hulpstuk is verkeerd en |
geschikte sleutel – raadpleeg het |
|||
van de kom aan of bereikt |
moet afgesteld worden. |
deel “Hulpstukken afstellen”. |
|||
de ingrediënten aan de |
|
|
|
|
|
bodem van de kom niet. |
|
|
|
|
|
Het hulpstuk voor lage |
Controleer of het hulpstuk |
Het hulpstuk moet een KAX |
|
|
|
snelheid kan niet worden |
geschikt is voor uw |
draaiverbinding hebben |
, zodat |
||
gemonteerd. |
machinemodel. Het |
hij op het contact past. |
|
|
|
|
hulpstuk moet een |
Als u hulpstukken hebt met het |
|||
|
draaiverbinding hebben |
stangverbindingssysteem |
|
|
, |
|
(model KAX) |
dan hebt u de KAT002ME |
|
|
|
|
-adapter |
||||
|
|
nodig om deze hulpstukken aan |
|||
|
|
de draaiverbindingssysteem van |
|||
|
|
uw keukenmachine te bevestigen. |
|||
|
|
Ga voor meer informatie naar |
|||
|
|
www.kenwoodworld.com/twist. |
|||
Knipperend stand-bylichtje |
Snelheidsregeling staat niet |
Zet de snelheidsregeling op 'O'. |
|||
wanneer de keukenmachine |
op 'O'. |
|
|
|
|
wordt ingeschakeld. |
|
|
|
|
|
|
De mixerkop staat omhoog |
Controleer of de kop van de |
|||
|
of is niet goed vergrendeld. |
keukenmachine goed omlaag |
|||
|
|
vergrendeld is. |
|
|
|
De keukenmachine schakelt |
Overbelastingsbeveiliging of |
Haal de stekker uit het stopcontact |
|||
ineens uit. Het stand- |
oververhittingssysteem |
en controleer de machine op |
|||
bylichtje knippert snel. |
geactiveerd. De |
blokkeringen of overbelasting. |
|||
|
maximumcapaciteit is |
Zet de snelheidsregeling op 'O' en |
|||
|
overschreden. |
start de machine opnieuw. |
|
|
|
|
|
Als de machine niet functioneert, |
|||
|
|
verwijdert u enkele ingrediënten |
|||
|
|
om de belasting te reduceren. |
|||
|
|
Start de machine opnieuw. |
|
|
|
|
|
Als het probleem nog steeds niet |
|||
|
|
is verholpen, haalt u de stekker uit |
|||
|
|
het stopcontact en laat u de |
|||
|
|
machine 15 minuten rusten. Steek |
|||
|
|
de stekker in het stopcontact en |
|||
|
|
laat de machine op de gewenste |
|||
|
|
snelheid draaien. |
|
|
|
|
|
Als de machine na bovenstaande |
|||
|
|
procedure niet start, neemt u |
|||
|
|
contact op met de klantenservice. |
|||
|
|
|
|
|
|
20

|
|
|
|
|
|
|
|
|
Probleem |
Oorzaak |
Oplossing |
|
|
|
|
|
|
|
|
|
|
|
|
|
Stand-bylichtje uit terwijl de |
De keukenmachine is |
Druk eenmaal op de stand-byknop |
||||||||
|
machine ingeschakeld is. |
langer dan 30 minuten niet |
om de machine te resetten. |
||||||||
|
|
|
|
|
|
|
|
|
|
gebruikt en staat nu op |
|
|
|
|
|
|
|
|
|
|
|
stand-by. |
|
|
|
|
|
|
|
|
|
|
|
|
|
|
|
|
|
|
|
|
|
|
|
|
|
|
|
|
|
|
|
|
|
|
|
|
|
|
|
|
|
|
|
|
|
|
|
|
|
|
|
|
|
|
|
|
|
|
|
|
|
BELANGRIJKE INFORMATIE VOOR DE JUISTE VERWIJDERING VAN HET PRODUCT VOLGENS DE EUROPESE RICHTLIJN BETREFFENDE AFGEDANKTE ELEKTRISCHE EN ELEKTRONISCHE APPARATUUR (AEEA)
Aan het einde van de levensduur van het product mag het niet samen met het gewone huishoudelijke afval worden verwerkt. Het moet naar een speciaal centrum voor gescheiden afvalinzameling van de gemeente worden gebracht, of naar een verkooppunt dat deze service verschaft. Het apart verwerken van een huishoudelijk apparaat voorkomt mogelijke gevolgen voor het milieu en de gezondheid die door een ongeschikte verwerking ontstaan en zorgt ervoor dat de materialen waaruit het apparaat bestaat, teruggewonnen kunnen worden om een aanmerkelijke besparing van energie en grondstoffen te verkrijgen. Om op de verplichting tot gescheiden verwerking van elektrische huishoudelijke apparatuur te wijzen, is op het product het symbool van een doorgekruiste vuilnisbak aangebracht.
21

Français
Découvrez votre robot pâtissier multifonction Kenwood
Nous tenons à vous féliciter d'avoir porté votre choix sur un robot Kenwood. Avec un tel éventail d'accessoires, votre robot de cuisine est bien plus qu'un simple robot pâtissier. Vous bénéficiez du robot pâtissier multifonction le plus perfectionné à ce jour. Nous espérons qu'il vous apportera pleine satisfaction.
Robuste. Fiable. Polyvalent. Kenwood.
Sécurité
λLisez et conservez soigneusement ces instructions pour pouvoir vous y référer ultérieurement.
λRetirez tous les éléments d’emballage et les étiquettes.
λMettez la commande de vitesse sur la position " O " OFF (Arrêt) et débranchez avant d'installer ou de retirer des ustensiles / accessoires, après utilisation et avant toute opération de nettoyage.
λN'approchez jamais vos doigts des éléments ou des accessoires installés en mouvement.
λNe laissez jamais le robot pâtissier multifonction sans surveillance lorsqu'il fonctionne.
λN’utilisez jamais un appareil endommagé. Faites-le vérifier ou réparer : reportez-vous à la rubrique " service après-vente ".
λNe faites jamais fonctionner votre robot pâtissier multifonction avec la tête en position levée.
λNe laissez jamais le cordon pendre de telle façon qu’un enfant puisse s’en saisir.
λVeillez à ne jamais mouiller le bloc moteur, le cordon d’alimentation ou la prise.
λN'utilisez jamais un accessoire non agréé ou plus d'un seul accessoire à la fois.
λNe dépassez jamais les quantités stipulées dans le tableau indiquant les quantités maximales.
λLorsque vous utilisez un accessoire, veuillez lire et suivre les consignes de sécurité qui sont fournies avec.
λFaites attention lorsque vous soulevez cet appareil car il pèse
22
lourd. Assurez-vous que la tête est correctement disposée en position de fermeture vers le bas et que le bol, les pièces, les caches des sorties et le cordon sont sécurisés avant de soulever l'appareil.
λVeillez à ce que le cordon soit totalement déroulé et sorti du compartiment de rangement du cordon bm avant d'utiliser votre robot pâtissier multifonction.
λLes enfants doivent être sous surveillance pour veiller à ce qu'ils ne jouent pas avec l'appareil.
λNe bougez pas la tête du robot, et ne la soulevez pas lorsqu'un accessoire est installé car cela pourrait rendre le robot pâtissier multifonction instable.
λNe faites pas fonctionner votre appareil près du bord d'un plan de travail.
λLes appareils peuvent être utilisée par des personnes dont les capacités physiques, sensorielles ou mentales sont diminuées, ou qui ne disposent pas des connaissances ou de l’expérience nécessaires, si elles ont été formées et encadrées pour l’utilisation des appareils, et si elles ont conscience des risques encourus.
λToute mauvaise utilisation de votre appareil peut être source de blessures.
λCet appareil ne doit pas être utilisé par des enfants. Veuillez garder l'appareil et le cordon hors de portée des enfants.
λN’employez l’appareil qu’à des fins domestiques. Kenwood décline toute responsabilité dans les cas où l’appareil est utilisé incorrectement ou que les présentes instructions ne sont pas respectées.
Avant de brancher votre appareil
•Assurez-vous que votre alimentation électrique correspond à celle qui est indiquée sur la partie inférieure de votre appareil.
•Cet appareil est conforme au règlement 1935/2004 de la CE sur les matériaux et les articles destinés au contact alimentaire.
Avant d'utiliser votre appareil pour la première fois
•Lavez les pièces : reportez-vous à la section " entretien et nettoyage ".
23
Découvrez votre robot pâtissier multifonction Kenwood
Légende
1Sorties pour les accessoires sortie rapide
2 sortie lente
3 sortie du bol
Robot
4 cache de la sortie rapide
5 tête du robot
6 manette d'ouverture de la tête
7 commande pulse et variateur de vitesse
8 bouton Marche / Arrêt
9 bloc d'alimentation bk bol
bl cache de la sortie lente
bm compartiment de rangement du cordon bn batteur- K
bo fouet bp pétrin bq spatule
br protège-tête
bs couvercle anti-éclaboussures
Remarque : La clé bl présentée est uniquement à des fins d'illustration et n'est pas fournie avec l'appareil.
Accessoires en option
Il existe tout un éventail d'accessoires en option pouvant être utilisés avec votre robot pâtissier multifonction. Reportezvous à la brochure relative aux accessoires contenue dans votre emballage ou consultez le site www.kenwoodworld.com pour découvrir la gamme complète et acheter le ou les accessoires non inclus avec votre appareil.
Remarque : accessoires pour la sortie lente
La sortie lente sur le modèle de votre robot pâtissier comporte le Système de connexion Twist. Il est conçu pour accepter les accessoires du Système de connexion Twist.
Lorsque vous achetez de nouveaux accessoires pour la sortie lente, vous devez vérifier leur compatibilité avec votre robot. Tous les accessoires du Système de connexion Twist sont identifiables par le code produit commençant par KAX, de même que par le symbole Twist  dessiné sur l'emballage. Pour plus d'informations, veuillez consulter le site www.kenwoodworld.com/twist.
Si vos accessoires comportent le Système de connexion Bar  , vous devez utiliser l'adaptateur KAT002ME pour raccorder ces derniers au Système de connexion Twist
  sur votre robot.
Pour plus d'informations, veuillez consulter le site www.kenwoodworld.com/twist.
24
Les ustensiles du bol et certaines de leur utilisation
Batteur-K
Pour réaliser des gâteaux, des biscuits, de la pâtisserie, des glaçages, des crèmes, des éclairs et des écrasés de pommes de terre.
Fouet
Pour battre des œufs, confectionner des crèmes, des préparations, des génoises, des meringues, des cheesecakes, des mousses, des soufflés. N'utilisez pas le fouet pour les mélanges épais (par exemple, pour monter en crème du sucre et des matières grasses) - vous risqueriez d'endommager votre robot.
Pétrin
Uniquement pour les mélanges à base de levure.
Utilisation des ustensiles du bol
Vérifiez que le cordon soit suffisamment déroulé du compartiment de rangement du cordon bm avant d'utiliser votre robot.
1Branchez votre robot : le témoin lumineux Marche / Arrêt 8 s'allume.
Remarque : le témoin lumineux 8 clignote et le robot pâtissier multifonction ne peut pas fonctionner tant que la tête du robot se trouve en position relevée ou que la commande de vitesse n'est pas sur la position " O ".
Avant de faire fonctionner votre appareil, vérifiez si la tête du robot est correctement verrouillée et la commande de vitesse sur la position " O ". Si le témoin lumineux continue de clignoter, reportez-vous au " guide de dépannage ".
2 Poussez la manette d'ouverture de la tête 1 vers le bas et levez la tête jusqu'à ce qu'elle soit verrouillée en place 2.
3 Installez le bol sur la base et tournez-le dans le sens des aiguilles d'une montre 3 pour le mettre en place.
4 Positionnez l'ustensile requis dans l'axe. Puis appuyez dessus 4 et tournez 5 l'ustensile pour le mettre en place. Remarque : Si le batteur-K ou le fouet ne collecte pas les ingrédients dans le fond du bol, reportez-vous à la rubrique " Réglage des ustensiles ".
5Abaissez la tête du robot en poussant vers le bas la manette d'ouverture 6 et
baissez la tête du robot jusqu'à ce qu'elle soit verrouillée 7.
6Mettez en fonctionnement le robot en
tournant pour ce faire le variateur de vitesse 7 sur la vitesse souhaitée. Utilisez la position pulse (P) pour les
impulsions courtes à vitesse maximale.
7Après utilisation, remettez la commande de vitesse " O " sur la position OFF (arrêt) et débranchez votre robot .
8Retirez l'ustensile en le tournant dans le sens inverse des aiguilles d'une montre pour le sortir de l'axe, puis retirez-le.
25
Conseils
•Pour incorporer intégralement les ingrédients, arrêtez de mélanger et raclez fréquemment vers le bas les parois du bol à l'aide de la spatule.
•Pour de meilleurs résultats lorsque vous travaillez au fouet, utilisez des œufs à température ambiante.
•Avant de travailler au fouet des blancs d'œuf, vérifiez qu'il n'y ait aucune trace de matière grasse ou de jaune d'œuf sur le fouet ou à l'intérieur du bol.
•Utilisez des ingrédients froids pour la pâtisserie, hormis si la recette que vous suivez mentionne d'agir autrement.
Quelques éléments à prendre en compte pour faire du pain Important
•Ne dépassez jamais les capacités maximales mentionnées - vous pourriez surcharger votre robot.
•Si vous entendez que votre robot peine à tourner, éteignez-le, retirez la moitié de la quantité de pâte et travaillez chaque moitié de pâte séparément.
•Les ingrédients se mélangent mieux si vous insérez en premier les ingrédients liquides.
Levure
•Levure sèche (le type de levure nécessitant d'être reconstituée) : versez l'eau chaude dans le bol. Puis ajoutez la levure et le sucre, et laissez reposer pendant environ 10 minutes jusqu'à ce que le mélange devienne mousseux.
•Levure fraîche : mélangez-la à la farine.
•Autres types de levure : suivez les indications du fabricant.
•Disposez la pâte dans un sachet en polyéthylène graissé ou un bol et recouvrez d'une serviette. Laissez ensuite dans un endroit au chaud jusqu'à ce que la pâte ait doublé de volume.
Important
Veillez à ce que le bol ne comporte aucun ustensile installé ni entreposé dedans lorsque vous utilisez d'autres sorties.
26
Capacités maximales |
|
Chef |
Chef XL |
Pâte brisée |
Quantité de farine |
680 g |
910 g |
|
|
|
|
Pâte à pain |
Quantité de farine |
1,36 kg |
1,6 kg |
|
|
|
|
(levurée ferme) |
Poids total |
2,18 kg |
2,5 kg |
|
|
|
|
Pâte levurée souple |
Quantité de farine |
1,3 kg |
2,6 kg |
|
|
|
|
(enrichie au beurre et aux œufs) |
Poids total |
2,5 kg |
5 kg |
|
|
|
|
Préparation pour cake aux fruits |
Poids total |
2,72 kg |
4,55 kg |
(avec montage en crème du |
|
(mélange à base |
(mélange à base |
sucre et des matières grasses) |
|
de 9 œufs) |
de 15 œufs) |
|
|
|
|
Blancs en neige |
Nombre |
12 |
16 |
|
Poids |
(455 g) |
(605 g) |
* Taille des œufs utilisés = taille moyenne (poids variant de 53 à – 63 g)
Ustensile |
Recette / Vitesse de traitement |
Recommandée |
|
|
|
|
|
Batteur-K |
Monter en crème du beurre / de |
Démarrez sur vitesse " Min " et |
|
|
la margarine et du sucre |
augmentez graduellement |
|
|
|
|
jusqu'à " Max " |
|
|
|
|
|
Battre des œufs dans le cadre de |
" 4 " à " Max " |
|
|
préparations pour gâteau |
|
|
|
|
|
|
|
Incorporer de la farine, du ou |
" Mélange délicat " à " 1 " |
|
|
des fruits, etc. |
|
|
|
|
|
|
|
Préparations pour gâteau |
Démarrez sur vitesse " Min " et |
|
|
tout-en-un |
augmentez graduellement |
|
|
|
|
jusqu'à " Max " |
|
|
|
|
|
Pâtisserie & Biscuits – pour |
" Min " à " 2 " |
|
|
intégrer le corps gras à la farine |
|
|
|
|
|
|
|
Glaçage royal |
‘" Min " à " 1 " |
|
|
Pommes de terre écrasées |
Démarrez sur vitesse " Min " et |
|
|
|
|
augmentez graduellement |
|
|
|
jusqu'à " Max " |
|
|
|
|
Fouet |
Blancs en neige |
Passez graduellement sur " |
|
|
|
|
|
|
Génoises |
Max " |
|
|
|
|
|
|
Crème |
|
|
|
|
|
|
Pétrin |
Pour les préparations à base |
vitesse " Min " pendant 45 à 60 |
|
|
de pâte levurée |
secondes. |
|
|
|
|
Puis passez à la vitesse 1 |
|
|
|
pendant environ 3 – à 4 |
|
|
|
minutes. |
|
|
|
|
|
|
|
Pétrissez de nouveau sur |
|
|
|
vitesse 1. |
27
 Loading...