


LIFE STYLE HI-FI COMPONENT SYSTEM
C-707I
INSTRUCTION MANUAL
This model consists of a main unit (RD-C707) and a pair of speakers (LS-C707).
Declaration of Conformity with regard to the EMC Directive 2004/108/EC
Manufacturer:
Kenwood Corporation
2967-3 Ishikawa-machi, Hachioji-shi, Tokyo, 192-8525 Japan
EU Representative’s:
Kenwood Electronics Europe BV
Amsterdamseweg 37, 1422 AC UITHOORN, The Netherlands
© B60-5700-08/00 (E/X) AB
en01_c-707i.indd 1 |
12/27/2007 4:29:06 PM |
 Safety Precautions
Before Applying Power
 Caution: Read this page carefully to ensure safe operation.
Units are designed for operation as follows.
Australia ..................................................... |
AC 240 V only |
Europe ........................................................ |
AC 230 V only |
Safety precautions
WARNING : TO PREVENT FIRE OR ELECTRIC SHOCK, DO NOT EXPOSE THIS APPLIANCE TO RAIN OR MOISTURE.
CAUTION
RISK OF ELECTRIC SHOCK
DO NOT OPEN
CAUTION: TO REDUCE THE RISK OF ELECTRIC SHOCK, DO NOT REMOVE COVER (OR BACK). NO USER-SERVICEABLE PARTS INSIDE. REFER SERVICING TO QUALIFIED SERVICE PERSONNEL.
THE LIGHTNING FLASH WITH ARROWHEAD SYMBOL, WITHIN AN EQUILATERAL TRIANGLE,
IS INTENDED TO ALERT THE USER TO THE PRESENCE OF UNINSULATED “DANGEROUS
VOLTAGE”WITHIN THE PRODUCT’S ENCLOSURE THAT MAY BE OF SUFFICIENT MAGNITUDE TO
CONSTITUTE A RISK OF ELECTRIC SHOCK TO PERSONS.
THE EXCLAMATION POINT WITHIN AN EQUILATERAL TRIANGLE IS INTENDED TO ALERT
THE USER TO THE PRESENCE OF IMPORTANT OPERATING AND MAINTENANCE (SERVICING)
INSTRUCTIONS IN THE LITERATURE ACCOMPANYING THE APPLIANCE.
The marking of products using lasers
CLASS 1
LASER PRODUCT
The marking this product has been classified as Class 1. It means that there is no danger of hazardous radiation outside the product.
Location: Back panel
2C-707I
en01_c-707i.indd 2 |
12/27/2007 4:29:07 PM |
Safety Precautions
IMPORTANT SAFETY INSTRUCTIONS
 Caution: Read this page carefully to ensure safe operation.
Read Instructions
– All the safety and operating instructions should be read before the product is operated.
Retain Instructions
– The safety and operating instructions should be retained for future reference.
Heed Warnings
– All warnings on the product and in the operating instructions should be adhered to.
Follow Instructions
– All operating and use instructions should be followed.
1. Cleaning
– Unplug this product from the wall outlet before cleaning. Do not use liquid cleaners or aerosol cleaners. Use a damp cloth for cleaning.
2. Attachments
– Do not use attachments not recommended by the product manufacturer as they may cause hazards.
3. Water and Moisture
– This product shall not be exposed to dripping and splashing – for example, near a bath tub, wash bowl, kitchen sink, or laundry tub; in a wet basement; or near a swimming pool; and the like. Do not place an object containing liquid, such as a flower vase, on the appliance.
4. Accessories
– Do not place this product on an unstable cart, stand, tripod, bracket, or table. The product may fall, causing serious injury to a child or adult, and serious damage to the product. Use only with a cart, stand, tripod, bracket, or table recommended by the manufacturer. Any mounting of the product should follow the manufacturer’s instructions, and should use a mounting
accessory recommended by the manufacturer.
A product and cart combination
should be moved with care. Quick stops, excessive force, and
uneven surfaces may cause the product and cart combination to overturn.
5. Ventilation
– Slots and openings in the cabinet are provided for ventilation and to ensure reliable operation of the product and to protect it from overheating, and these openings must not be blocked or covered. The openings should never be blocked by placing the product on a bed, sofa, rug, or other similar surface. This product should not be placed in a built-in installation such as a bookcase or rack unless proper ventilation is provided or the manufacturer’s instructions have been adhered to.
6. Power Sources
– This product should be operated only from the type of power source indicated on the product. If you are not sure of the type of power supply to your home, consult your product dealer or local power company.
7. Polarization
– This product may be equipped with a polarized alternating-current line plug (a plug having one blade wider than the other). This plug will fit into the power outlet only one way. This is a safety feature. If you are unable to insert the plug fully into the outlet, try reversing the plug. If the plug should still fail to fit, contact your electrician to replace your obsolete outlet. Do not defeat the safety purpose of the polarized plug.
Continued to next page
English 3
en01_c-707i.indd 3 |
12/27/2007 4:29:07 PM |
Safety Precautions
IMPORTANT SAFETY INSTRUCTIONS
8. Power Cord Protection
– Power-supply cords should be routed so that they are not likely to be walked on or pinched by items placed upon or against them, paying
particular attention to cords at plugs, convenience receptacles, and the point where they exit from the product.
9. Lightning
– For added protection for this product during a lightning storm, or when it is left unattended and unused for long periods of time, unplug it from the wall outlet and disconnect the antenna or cable system. This will prevent damage to the product due to lightning and power-line surges.
10. Overloading
– Do not overload wall outlets, extension cords, or integral convenience receptacles as this can result in a risk of fire or electric shock.
11. Object and Liquid Entry
– Never push objects of any kind into this product through openings as they may touch dangerous voltage points or short-out parts that could result in a fire or electric shock. Never spill liquid of any kind on the product.
12. Servicing
– Do not attempt to service this product yourself as opening or removing covers may expose you to dangerous voltage or other hazards. Refer all servicing to qualified service personnel.
13. Damage Requiring Service
– Unplug this product from the wall outlet and refer servicing to qualified service personnel under the following conditions:
a)When the power-supply cord or plug is damaged,
b)If liquid has been spilled, or objects have fallen into the product,
c)If the product has been exposed to rain or water,
d)If the product does not operate normally by following the operating instructions.
e)If the product has been dropped or damaged in any way, and
f)When the product exhibits a distinct change in performance – this indicates a need for service.
g)If an abnormal smell or smoke is detected.
14. Replacement Parts
– When replacement parts are required, be sure the service technician has used replacement parts specified by the manufacturer or have the same characteristics as the original part. Unauthorized substitutions may result in fire, electric shock, or other hazards.
15. Safety Check
– Upon completion of any service or repairs to this product, ask the service technician to perform safety checks to determine that the product is in proper operating condition.
16. Wall or Ceiling Mounting
– This product should be mounted to a wall or ceiling only as recommended by the manufacturer.
17. Heat
– This product should be situated away from heat sources such as radiators, heat registers, stoves, or other products that produce heat. Do not place a flaming object, such as a candle or lantern, or near the product.
18. Power Lines
– An outside antenna system should not be located in the vicinity of overhead power lines or other electric light or power circuits, or where it can fall into such power lines or circuits. When installing an outside antenna system, extreme care should be taken to keep from touching such
power lines or circuits as contact with them might be fatal.
4C-707I
en01_c-707i.indd 4 |
12/27/2007 4:29:07 PM |

19. Outdoor Antenna Grounding
– If an outside antenna or cable system is connected to the product, be sure the antenna or cable system is grounded so as to provide some protection against voltage surges and built-up static charges. Article 810 of the National Electrical Code, ANSI/NFPA 70, provides information with regard to proper grounding of the mast and supporting structure, grounding of the lead-in wire to an antenna discharge unit, size of grounding conductors, location of
antenna-discharge unit, connection to grounding electrodes, and requirements for the grounding electrode.
EXAMPLE OF ANTENNA GROUNDING AS PER NATIONAL ELECTRICAL CODE
ANTENNA LEAD IN WIRE
GROUND CLAMPS
ANTENNA DISCHARGE UNIT (NEC SECTION 810-20)
ELECTRIC SERVICE |
GROUNDING CONDUCTORS |
EQUIPMENT |
|
|
(NEC SECTION 810-21) |
|
GROUND CLAMP |
POWER SERVICE GROUNDING ELECTRODE SYSTEM
(NEC ART 250, PART H)
NEC – NATIONAL ELECTRICAL CODE
Notes:
1.Item 7 is not required except for grounded or polarized equipment.
2.Item 19 complies with UL in the U.S.A.
en01_c-707i.indd 5
Safety Precautions
Information on Disposal of Old Electrical and Electronic Equipment (applicable for EU countries that have adopted separate waste collection systems)
Products with the symbol (crossed-
out wheeled bin) cannot be
disposed as household waste. Old electrical and electronic
equipment should be recycled at a facility capable of handling these
items and their waste byproducts. Contact your local authority for details in locating a recycle facility nearest to you. Proper recycling and waste disposal will help conserve resources whilst preventing detrimental effects on our health and the environment.
English 5
12/27/2007 4:29:07 PM
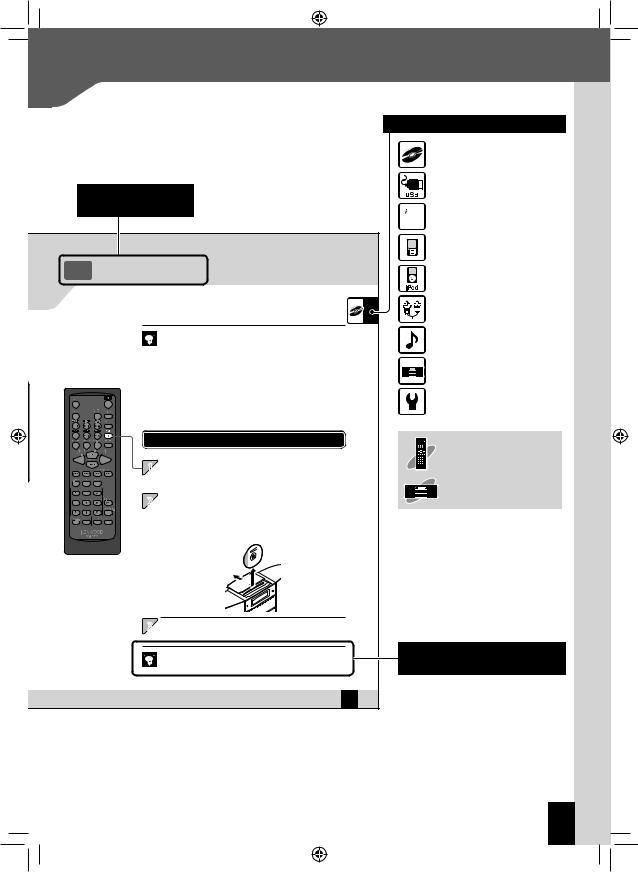
 How to Use This Manual
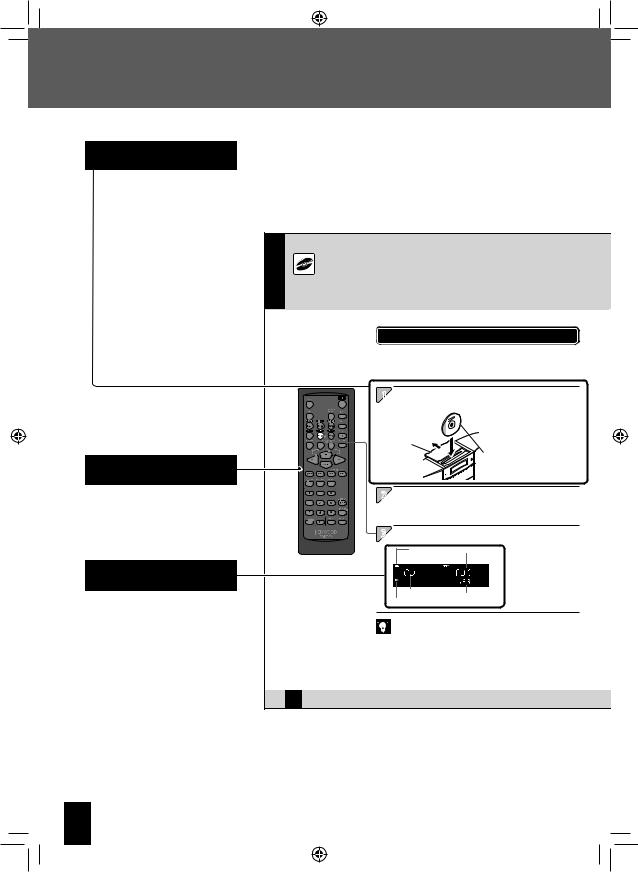
Operation procedure
While this system can be controlled from either the remote control or the main unit, the explanations in this manual primarily describe operation procedures using the remote control.
Remote control keys used in the procedure
Display shown during or after an operation
zThe displays shown in this instruction manual may differ from the actual displays.
CD
This section explains how to play a CD. In addition to commercially available music CDs, you also can play discs with MP3 and WMA audio files recorded on them. For details, see <Supported Media> (page 24).
Playing a CD
Load and play the CD.
zIf a disc is already loaded, simply press the [CDE] key to turn the system on and begin playback.
1Open the slide door and load the CD.
|
|
z Center the CD with the inlet |
|
|
slot with the label side facing |
|
|
towards the front of the main |
|
|
unit. |
Slide door |
|
z After you inset the CD |
|
|
part way, it will be pulled |
|
Label |
automatically the rest of the |
|
way in. |
|
|
surface |
|
|
|
2 |
Slide the slide door towards the front panel to close it. |
|
|
z The CD will not play unless the slide door is closed. |
|
3 |
Press the [CDE] key. |
|
|
Indicates CD is loaded. Track number |
|
|
Source |
Elapsed time of |
|
Playback indicator |
|
|
current track |
|
z Track numbers may not display correctly while following types of discs are playing.
– Discs recorded in Mix mode *
–Discs recorded in multiple sessions
–Discs recorded in mixed formats of CD-DA format and non-music data formats
* Mix mode combines the CD-DA format with audio files, such as MP3 and WMA.
30 C-707I
6C-707I
en01_c-707i.indd 6 |
12/27/2007 4:29:07 PM |
Related functions that may also be helpful
CD
z Supported Media RPage 24 Related z Audio Settings RPage 63 onwards
Information z Selecting Track Program Playback Mode RPage 39
z Cautions when loading a CD
– A CD cannot be loaded while the system is in Standby mode.
– Do not try to force a CD into the inlet slot while the system is in Standby mode. Doing so can cause malfunction.
|
|
– If you experience problems loading a CD, pull it out and then re-insert it. |
|
|
– Do not touch the playing surface of the disc. |
|
|
– Use of an 8 cm CD adapter is not supported. |
|
|
– If you insert an 8 cm CD so it is off center relative to the inlet slot, it will not slide |
|
|
all the way into the slot. Take care when using an 8 cm CD. |
|
|
– If a CD is already loaded, opening the slide door will eject it. |
|
Removing a CD |
|
1 |
|
|
|
Press the [F] key to stop playback. |
|
2 |
|
|
|
Slide the slide door cover towards the back panel to eject |
|
|
|
the CD. |
Sliding the slide door will eject the CD.
z If the CD is playing when you slide the slide door to the back panel, playback will stop and the CD will be ejected.
3Slide the slide door towards the front panel to close it.
z A CD cannot be ejected while the system is in Standby mode.
z Ejecting a CD deletes all program playback settings. (Page 39)
English 31
en01_c-707i.indd 7
How to Use This Manual
Operation icons
Explains the procedure for CDs.
Explains the procedures for USB devices.
 Explains the procedure for the radio.
Explains the procedure for digital audio players.
Explains the procedures for iPods.
Explains the procedures for external components.
Explains how to set the sound quality.
Explains how to set up component units.
Explains how to carry out system maintenance.
Explanations of remote control procedures
Explanations of main unit procedures
Supplementary information about procedures
English 7
12/27/2007 4:29:08 PM
 What the System Can Do
 Wide range of recording formats
Disc Playback
As well as music CDs, the system will also play discs containing recorded audio files (MP3/
WMA).
 Supports USB device connection
USB Input Port
A USB port supports connection of USB flash memory and USB mass storage class compliant digital audio players.
 Supports iPod connection
iPod Input Connector
An iPod connector lets you enjoy using the system with your Apple iPod.
 Supports many types of components
External Input Terminals
An AUX input terminal supports connection of a cassette deck, a video deck, or other device.
 Kenwood digital audio player support
D.AUDIO IN terminal
This input terminal supports use of a Kenwood digital audio player, which can be controlled using the system or remote control.
 Supports recording from a variety of sound sources
REC OUT Function
Connecting a Kenwood memory audio player provides support of various different sound sources.
8C-707I
en01_c-707i.indd 8 |
12/27/2007 4:29:09 PM |
 Contents
Before Using the
System
Be sure to read these precautions.
 Safety Precautions……………………… 2
 Before Applying Power …………… 2
 IMPORTANT SAFETY INSTRUCTIONS
………………………………………… 3 How to Use This Manual…………………… 6
Accessories ……………………………… |
10 |
Installing the System …………………… |
11 |
Connecting the System ………………… |
12 |
Component Names and Functions …… |
18 |
Basic Operation ………………………… |
22 |
Important Information ………………… |
24 |
en02_c-707i.indd 9
To ensure safety, read the items by this mark carefully.
Procedures by Input Source  P.29
P.29
This chapter explains how to connect and use the system with the different input sources.
• CD
•USB
•CD/USB Playback Operations
• Receiving Radio Broadcasts
•RDS (Radio Data System)
•D.AUDIO
•iPod
• External Components
Audio Settings |
P.63 |
This chapter explains how to tailor the system to your audio preferences.
•EX.BASS
•SOUND
Component Settings  P.67
P.67
This chapter explains how to select the settings for the system.
•Setting the System Clock
•Setting the Timer
•Display Settings
•Auto Power Save
Maintenance  P.77
P.77
This chapter explains how to store and maintain your system so that it continues to give pleasure for many years to come.
•Messages
•Troubleshooting
•Glossary
•Care and Storage
•Specifications
English 9
12/27/2007 3:14:34 PM
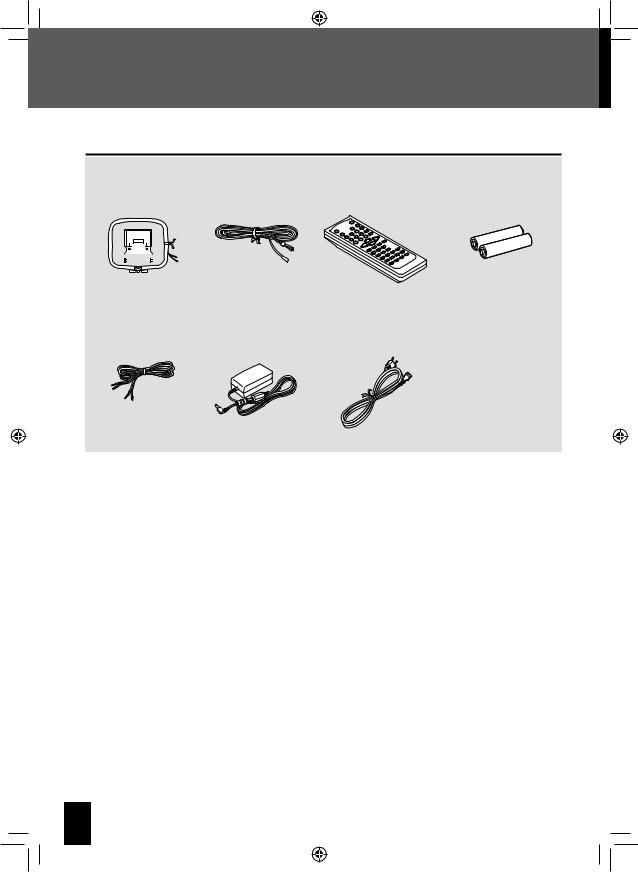
 Accessories
Check that all accessories are present in the package.
AM loop antenna (1) |
FM indoor |
Remote control |
Remote control |
||||||
|
|
|
|
|
|
|
antenna (1) |
(RC-F0509E: 1) |
batteries (R6: 2) |
|
|
|
|
|
|
|
|
|
|
|
|
|
|
|
|
|
|
|
|
|
|
|
|
|
|
|
|
|
|
|
|
|
|
|
|
|
|
|
|
|
|
|
|
|
|
|
|
|
|
|
|
|
|
|
|
|
|
|
|
|
|
|
|
|
|
|
|
|
|
Speaker cords |
AC adapter |
Power cord (1) |
(50 cm: 2) |
(AC-120400A: |
1) |
The speaker cords are connected at the factory.
If any accessories are missing, or if the unit is damaged or fails to operate, notify your dealer immediately. If the unit was shipped to you directly, notify your shipper immediately. Kenwood recommends that you retain the original carton and packing materials in case you need to move or ship the unit in the future. Keep this manual handy for future reference.
10 C-707I
en02_c-707i.indd 10 |
12/27/2007 3:14:35 PM |

 Installing the System
Notes on installing the system
Always install the system on a flat, stable surface. When installing the system on a stand of some sort, be sure to check the strength of the stand.
Do not locate the speakers too close to a TV or PC. The magnets used in the speakers may cause color irregularities on TV or PC screens.
When moving this system, be sure to hold onto the main unit. Holding onto the speakers can cause the main unit to fall.
Main unit
|
|
|
|
|
|
|
|
|
|
|
|
|
|
|
|
|
|
|
|
|
|
|
|
|
|
|
|
|
|
|
|
|
|
|
|
|
|
|
|
|
|
|
|
|
|
|
|
|
|
|
|
|
|
|
|
|
|
|
|
|
|
|
|
|
|
|
|
|
|
|
|
|
|
|
|
|
|
|
|
|
|
|
|
|
|
|
|
|
|
|
|
|
|
|
|
|
|
|
|
|
|
|
|
|
|
|
|
|
|
|
|
|
|
|
|
|
|
|
|
|
|
|
|
|
|
|
|
|
|
|
|
Left speaker |
|
|
|
|
Right speaker |
||||||
CAUTION
Observe the following cautions when installing the system. Insufficient heat radiation may build up internal heat and cause a malfunction or fire hazard.
Do not place any object on the system that may hinder heat radiation.
Leave spaces around the cabinets of the main unit as specified below.
Top panel: 50 cm or more, Side panel: 10 cm or more, Back panel: 10 cm or more
Install the system so the power outlet is easily accessible, and unplug the power cord from the power outlet immediately in case of any trouble.
Note that the power supply to the system is not shut down completely by simply setting the power switch to OFF.
To shut down the power supply completely, unplug the power cord.
Getting the best acoustic effect
The sound will vary depending on the positioning of the speakers. To get the best possible sound quality, note the guidelines below.
Ensure that the areas around the left and right speakers are as identical as possible. Set up the left and right speakers away from the wall and hang thick curtains on any windows to minimize echoes or reverberation.
Position the speakers at the same height as your ears when you are using the system.
English 11
en02_c-707i.indd 11 |
12/27/2007 3:14:36 PM |
 Connecting the System
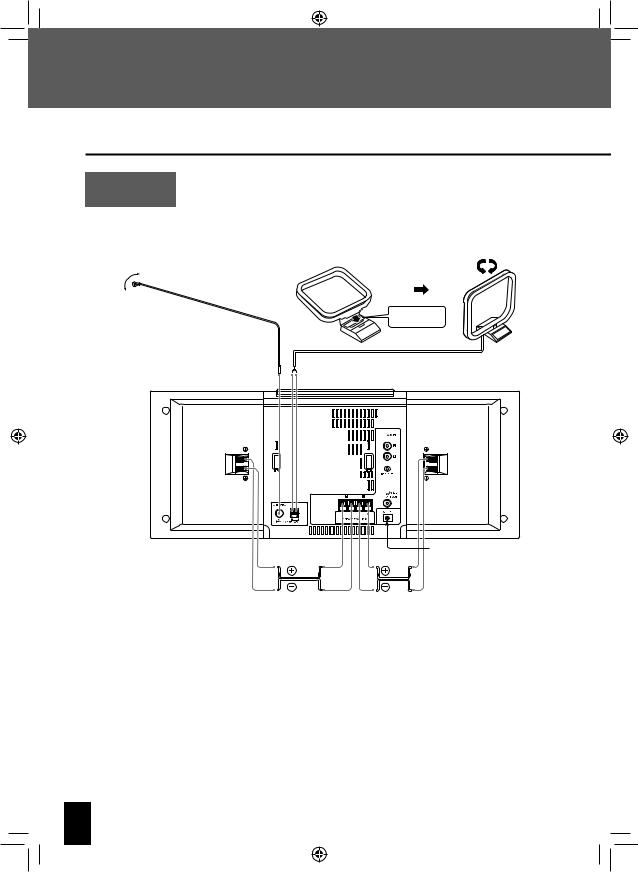
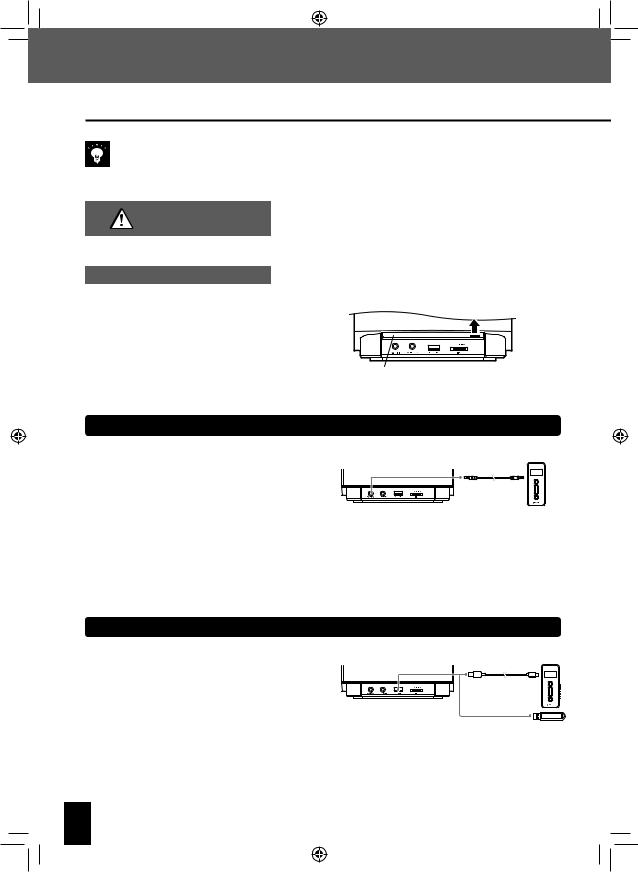
Main Connections
Caution for
Do not plug the AC power cord into an AC wall outlet until all the connections are completed.
Connection
Before disconnecting any cords or cables, always turn the system off and unplug the power cord from the AC wall outlet.
FM indoor antenna |
|
AM loop antenna |
Push into the slot.
1Connect the lead to the [FM75Ω] terminal.
2Find the location that gives the best reception.
3Secure the antenna as high up as possible.
|
|
See <Connecting the AC |
Red |
Red |
adapter>. |
|
||
band |
band |
|
Right speaker |
|
Left speaker |
The speaker cords are connected at the factory.
12 C-707I
en02_c-707i.indd 12 |
12/27/2007 3:14:36 PM |
Connecting the System
Microcomputer malfunctions |
If the system does not operate normally or shows display errors, reset the |
|
microcomputer. (Page 81) |
||
|
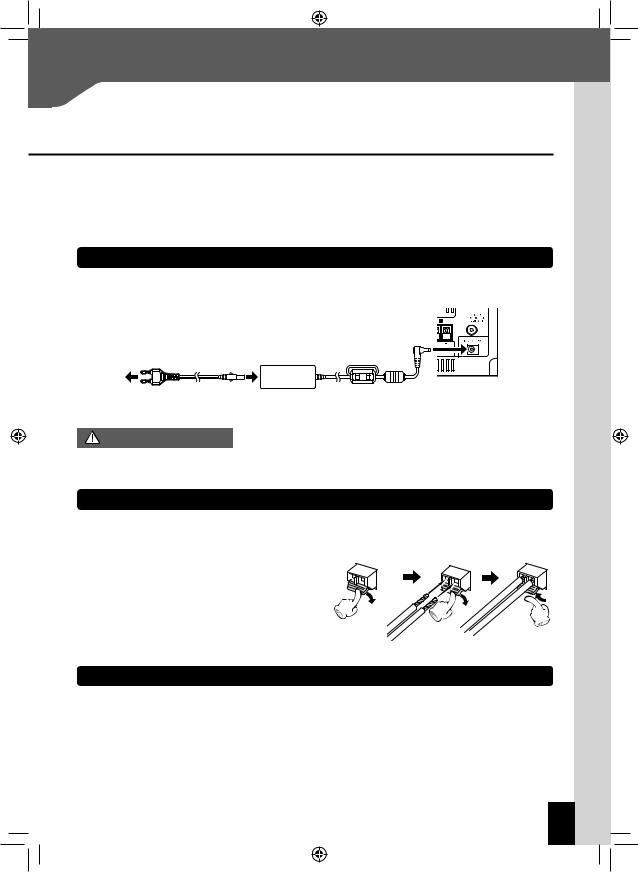
Connecting the AC adapter
Use only the AC-120400A that comes with this product.
To ensure optimum operation of the system, locate the AC adapter as far away as possible from the system.
AC power cord
To AC wall outlet
AC adapter cautions
Do not cover or wrap the AC adapter with cloth, blanket or other material.
Doing so will result in fire due to excessive heat accumulating in the adapter.
Connecting the AM loop antenna
The antenna supplied with the system is for indoor use. Place it as far away as possible from the system, your TV set, the speaker cords, AC adapter and the power cord, and point it in the direction that provides the best reception.
Connecting the antenna cord |
1 |
2 |
3 |
Connect the AM antenna cord to the [AM] and [MGND] terminals, as shown on the right.
Connecting the FM indoor antenna
The antenna supplied with the system is a basic antenna for indoor use. For stable signal reception, the use of an outdoor antenna (commercially available) is recommended. Disconnect the indoor antenna first before connecting an outdoor antenna.
English 13
en02_c-707i.indd 13 |
12/27/2007 3:14:37 PM |
Connecting the System
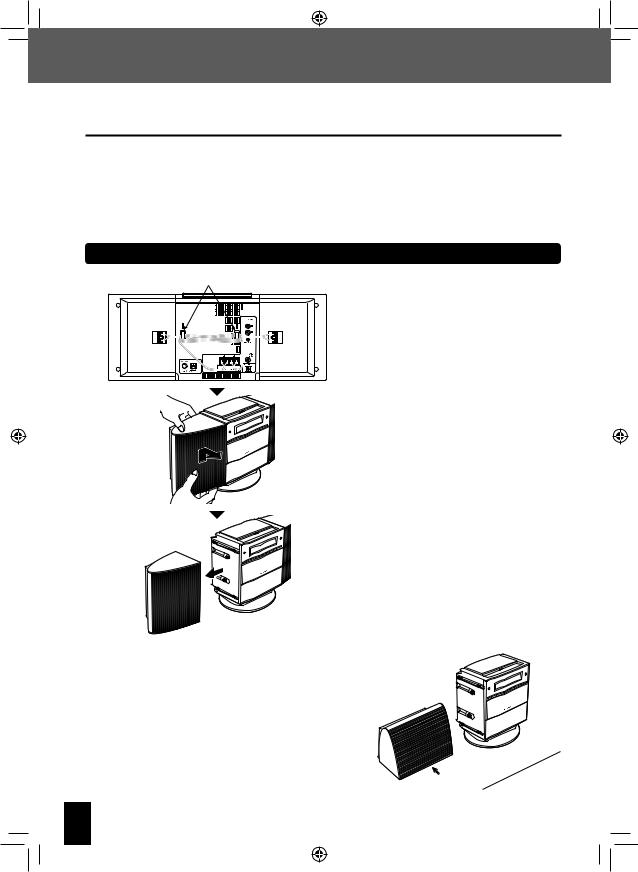
Detaching and attaching the speakers
You can detach the speakers from the main unit and position them as you like.
Before detaching or attaching the speakers, or replacing the speaker cords, always turn the system off and unplug the power cord from the AC wall outlet. If there is a disc in the main unit, remove it.
When only one of the speakers is detached, the unit is unstable and can tip over when subjected to vibration or impact. Take care whenever detaching or attaching speakers.
When attaching the speakers, make sure they are attached securely. Improper installation creates the risk of the speaker falling.
Detaching the speakers
Hooks
Remove the speaker cords from the hooks on the back of the main unit.
From the back of the speaker, move it as indicated by the arrow.
Take care so you do not drop the speaker.
Detach the speaker from the main unit.
Placing a detached speaker on a flat surface
Lay the speaker onto the flat surface with the side that attaches to the main unit downwards.
The side of the speaker that attaches to the main unit has non-skid feed.
The magnets used in the speakers may cause color irregularities on
TV or PC screens. Do not locate the speakers too close to a TV or PC.
Side that attaches to main unit
14 C-707I
en02_c-707i.indd 14 |
12/27/2007 3:14:37 PM |
Connecting the System
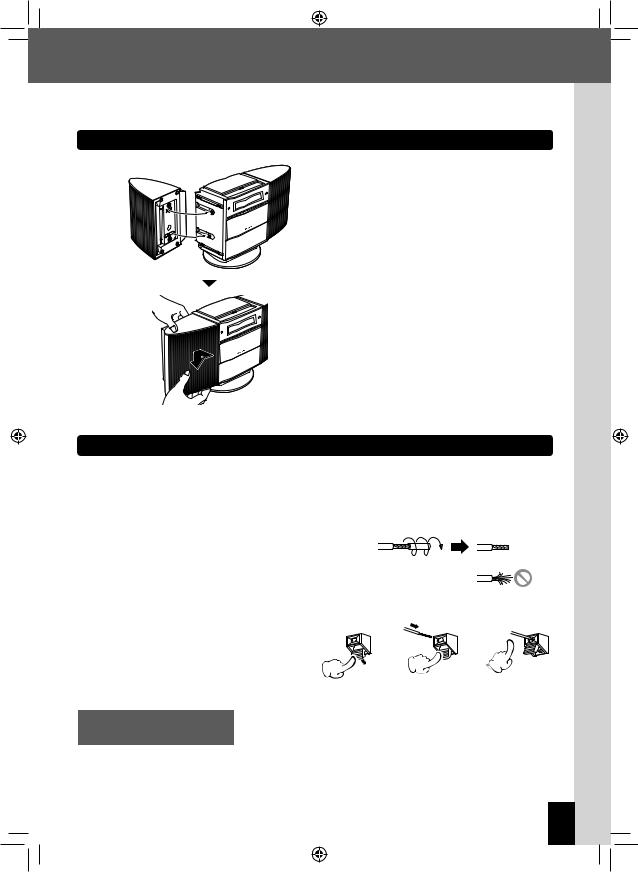
Connecting the speakers
Align the speaker with the main unit so the protrusions in the main unit enter the installation holes of the speaker.
From the front of the speaker, move it as indicated by the arrow.
Replacing the speaker cords
If you want to use the speakers while they are detached from the main unit and the speaker cords are too short, you can replace the supplied cords with the following type of commercially available speaker cords: AWG24-18 (Conductor Diameter: 0.511 mm - 1.024 mm).
Strip about 1 cm of the vinyl insulation from the tips of both ends of the replacement speaker cords, twist the ends of the wires together so they do not unravel when you connect them.
Preparing the ends of the speaker cords
Twist the plastic sleeve on the end of the cord as you pull it off.
Connecting the speaker cords |
1 |
2 |
3 |
Notes on connecting the
Never short-circuit the positive (+) and negative (–) ends of the speaker cords.
speaker cords
(Do not touch the + and – cords together.) Mistakenly reversing the positive and negative polarity will result in unnatural and unclear sound.
English 15
en02_c-707i.indd 15 |
12/27/2007 3:14:37 PM |
Connecting the System
Connecting Other (Commercially Available) Devices
When connecting a related system component, read the instruction manual that comes with the component too.
Ensure that all the cords are securely connected. Loose or incomplete connections may result in noise interference or no sound at all.
Caution for outdoor antenna installation
Opening the front panel
Since antenna installation requires skill and experience, always consult your dealer before installation. The antenna should be located away from power lines. If the antenna falls over, contact with a power line creates the risk of electric shock.
To connect other devices to the front panel connectors of the main unit, raise the panel cover and then connect the devices.
Raise
Panel cover
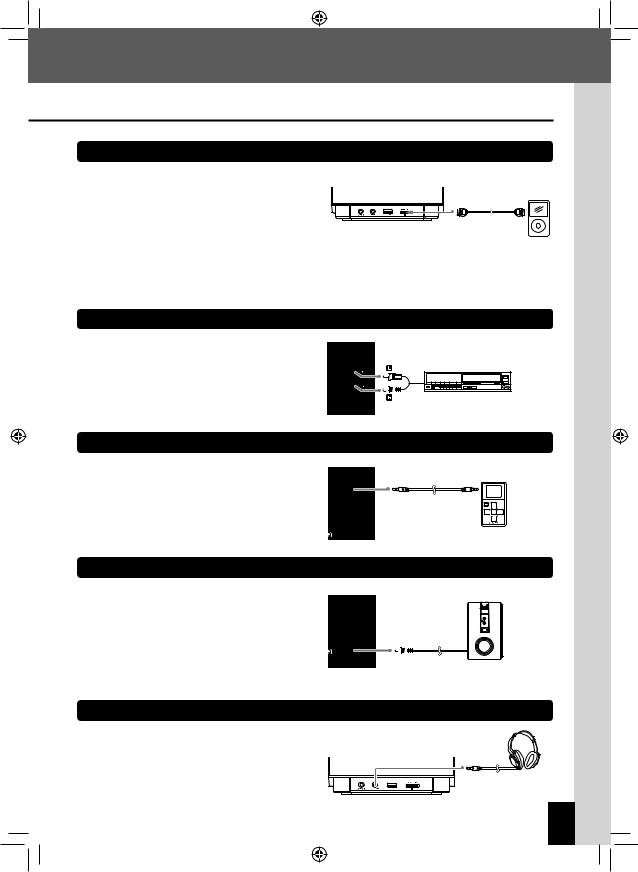
D.AUDIO IN
Connect digital audio players to the [D.AUDIO IN] terminal on the front panel of the main unit.
If you connect a Kenwood player that supports digital audio link using the dedicated cable, you can control the
player from the main unit and the remote control. (Page
48) It can also be connected using a 3.5 mm stereo mini- Digital audio player plug cable (commercially available unit).
When you are not using the digital audio player, unplug the mini-plug cable from the main unit.
USB
Connect USB flash memory or USB mass storage class compliant digital audio players to the [ USB] port on the front panel of the main unit.
Depending on the device being connected, it may take some time for the system to recognize it.
With some models, a USB connection mode selection screen will appear. Select “Storage Mode”.
16 C-707I
en02_c-707i.indd 16 |
12/27/2007 3:14:38 PM |
Connecting the System
iPod
Connect an iPod to the [iPod] terminal on the front panel of the main unit.
To connect an iPod, you will need a PNC-iP120 iPod connection cable (optional accessory).
When you are not using the iPod, unplug the iPod connection cable from the main unit.
For information about supported iPod models, see page 27.
AUX IN
Connect the audio OUT terminals on components such as VCRs to the [AUX IN] terminal on the rear panel of the main unit.
VCR, etc.
Audio OUT
REC OUT
Connect a Kenwood digital audio player with direct encode feature to the [REC OUT] terminal on the rear panel of the main unit.
[REC OUT] outputs an analog audio signal.
SUB WOOFER PRE OUT
Connect a subwoofer (such as the optional SW-40HT) to the [SUB WOOFER PRE OUT] terminal on the rear panel of the main unit.
Powered Subwoofer
PHONES
Plug headphones equipped with a 3.5 mm stereo miniplug into the [ PHONES] jack on the front panel of the main unit.
English 17
en02_c-707i.indd 17 |
12/27/2007 3:14:38 PM |
 Component Names and Functions
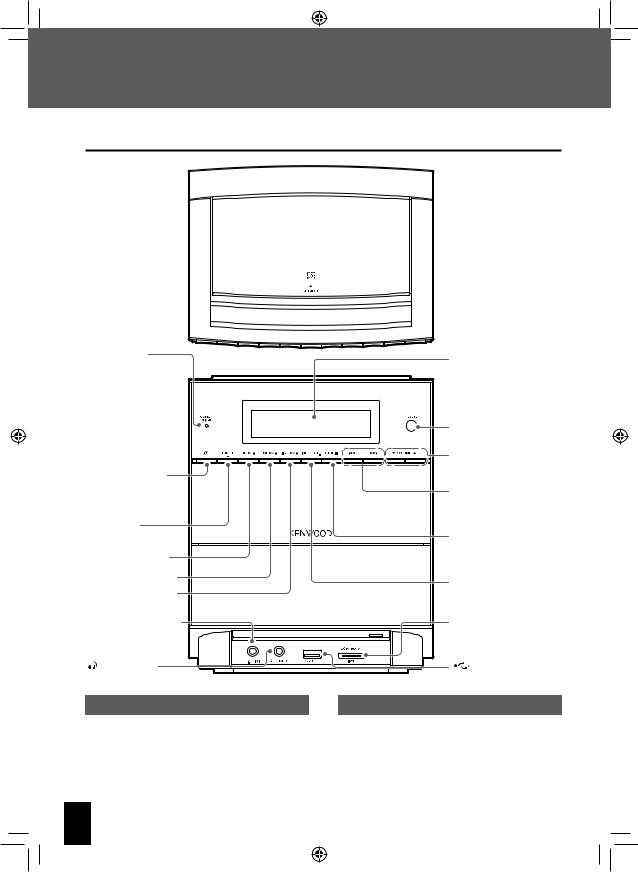
Main unit
Top
 CD slot (Page 30)
Front |
|
|
Standby timer |
Display (Page 19) |
|
indicator |
||
|
||
Red: |
|
|
Normal standby |
|
|
Orange: |
|
|
Timer standby |
|
|
|
Remote sensor (Page 21) |
|
|
VOLUME (Page 22) |
|
PowerK(Page 23) |
|
|
Turns the system on |
G, H |
|
or off (Standby). |
||
(Pages 34, 35, 50, 57) |
||
|
||
TUNER/band |
STOPF |
|
(Page 42) |
||
CDE(Page 30) |
(Pages 34, 35) |
|
|
||
USBE(Page 32) |
INPUT SEL. |
|
iPodE(Page 56) |
||
(Pages 48, 60) |
[D.AUDIO IN] terminal |
|
(Pages 16, 48) |
|
[ |
PHONES] jack |
(Page 17) |
|
Standby Mode
While the [STANDBY/TIMER] indicator on the main unit is lit, the system is using very weak current to maintain the built-in memory. This is called Standby mode. When system main unit is in this mode, you can turn it on using the remote control.
[iPod] terminal (Pages 17, 56)
USB] port |
(Pages 16, 32) |
One-touch Operation
This system features a convenient one-touch operation function. In Standby mode, pressing any of the following keys will turn on system power: [TUNER/band],
[CDE], [USBE], [iPodE], [D.AUDIOE]
(remote control only) or [AUX] (remote control only). If there is a disc loaded, playback will begin.
18 C-707I
en02_c-707i.indd 18 |
12/27/2007 3:14:39 PM |

Display
Component Names and Functions
The displays shown here may differ from the actual display.
Shows numbers and text.
Displayed when a USB device is detected. (Page 32)
Displayed when an iPod is detected. (Page 56)
Displayed while a CD is loaded. (Page 30)
Displayed while an audio folder or file is selected. (Page 37)
Displayed while CD or USB playback is paused. (Pages 30, 32)
Displayed during CD or USB playback. (Pages 30, 32)
Displayed while playback mode is set. (Page 37-41)
Displayed while the program timer is set. (Page 70)
Displayed while the sleep timer is set. (Page 69)
Lights in the PTY search mode. (Page 47 )
Lights when an RDS broadcast is received. (Page 46)
Displayed while SOUND is selected. (Page 65)
Displayed while EX.BASS is on. (Page 64)
Displayed while a broadcast is being received in FM STEREO mode. (Page 42)
Displayed in FM reception mode. (Page 42) 
Shows the clock, the elapsed time or the frequency. FM : Displayed in FM reception mode.
(Page 42)
AM : Displayed in AM reception mode. (Page 42)
Displayed while the clock is displayed. (Page 68)
PM : Displayed while the clock is displayed. (Page 68)
TOTAL : Displayed during CD playback while the total elapsed time and remaining time are displayed. (Page 36)
kHz : Shows the AM frequency. (Page 42) MHz : Shows the FM frequency. (Page 42)
Displayed while sound is muted. (Page 22)
Lights when Auto Power Save (A.P.S.) is set. (Page 75)
Displayed during WMA audio file playback. (Pages 30, 32)
Displayed during MP3 audio file playback. (Pages 30, 32)
English 19
en02_c-707i.indd 19 |
12/27/2007 3:14:39 PM |

Component Names and Functions
Remote control
Remote control keys with the same names as keys on the main unit have the same functions as the main unit keys.
Displays channel. (Page 46) 
Adjusts the recording level.
(Page 54) 
 Performs PTY search. (Page 47)
Switches the source/controls  playback.
(Pages 30, 32, 42, 48, 56, 60)
Switches power on and off (Standby). (Page 23)
Configures time and timer settings. (Pages 68, 69)
Stops. (Pages 34, 35)
Switches the folder playback mode. (Page 37)
Sets sound quality. |
(Pages 64, 65) |
Applies settings. |
Selects folders. (Page 34, 35, 37, 50)
Selects the radio station. (Page 42)
Selects the album. (Page 57) Adjusts various levels. (Pages 51, 62, 68, 70)
Selects the track. (Pages 34, 35, 50, 57)
Switches the playback method. (Pages 39-41, 58, 59)
Numbers pad  Selects tracks or radio stations.
(Pages 34, 35, 42)
Adjusts volume. (Page 22) Adjusts the level. (Page 65)
Skips back or forward through tracks. (Page 34, 35, 57)
Selects the radio station. (Page 43)
Switches the information shown on the display. (Page 36)
Turns on iPod backlight. (Page 57)
Adjusts display brightness. (Page 74)
Switches the time indication shown on the display. (Page 36)
Configures the Auto Power |
Mute. (Page 22) |
Save setting. (Page 75) |
Clears settings. |
|
20 C-707I
en02_c-707i.indd 20 |
12/27/2007 3:14:39 PM |
Component Names and Functions
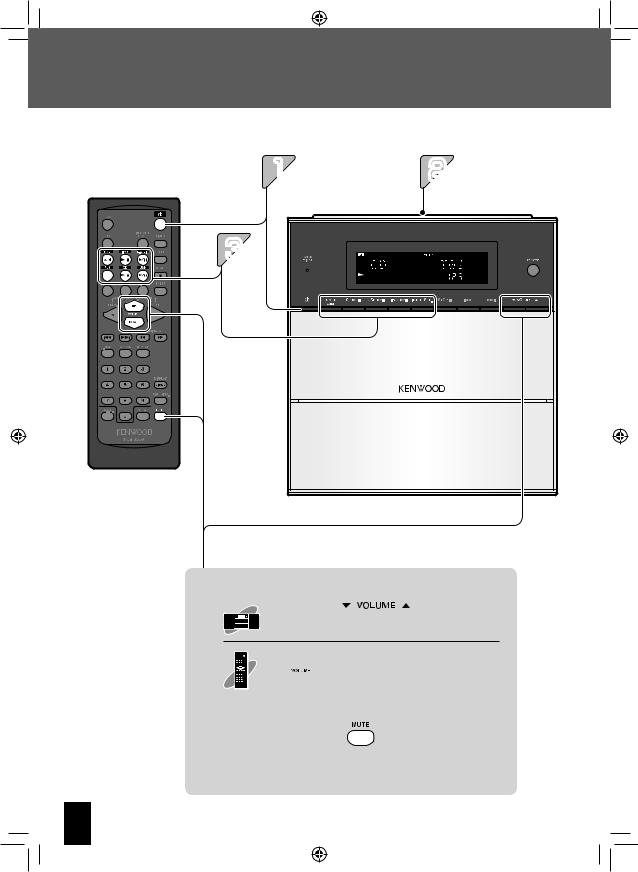
Using the remote control
After plugging the main unit into an AC wall outlet, press the power [K] key on the remote control unit
to turn the system on. After the system powers up, press the key for the
function you want to use.
Point the remote control at the remote sensor when
using it.
Approx. 6 m
15° 15°
The remote control may not operate correctly if direct sunlight or light from a high-frequency fluorescent lamp (such as an inverter type) is shining on the remote sensor. If this happens, move the system to a different location to avoid this type of malfunction.
Loading the remote control batteries
The batteries supplied with the system are for operational testing and may last only for a short time.
1Remove the |
2Load the R6-size |
3Close the |
battery cover. |
batteries supplied with |
battery cover. |
|
the system. |
|
Always replace the batteries with two new ones.
CAUTION
Check the polarity of the batteries (UV) when loading them.
Never heat or take apart the batteries, or put them in the fire or the water.
If batteries are not used correctly, they may burst or leak. This will cause a fire, injury to persons or damage to the surroundings.
English 21
en02_c-707i.indd 21 |
12/27/2007 3:14:40 PM |
 Basic Operation
This section explains basic general operations and how to play music.
12
3 |
Adjusting the volume level
Lowers the |
|
|
Raises the |
volume |
|
|
volume |
 Raises the volume
 Lowers the volume
Mute
Press this key again to unmute the sound.
22 C-707I
en02_c-707i.indd 22 |
12/27/2007 3:14:40 PM |
Preparations
Basic Operation
Check the connections. (Pages 12-17) Have the remote control ready. (Page 21)
If you plan to use a USB device, digital audio player, iPod, or other external device, connect the device to the main unit. (Pages 16, 17)
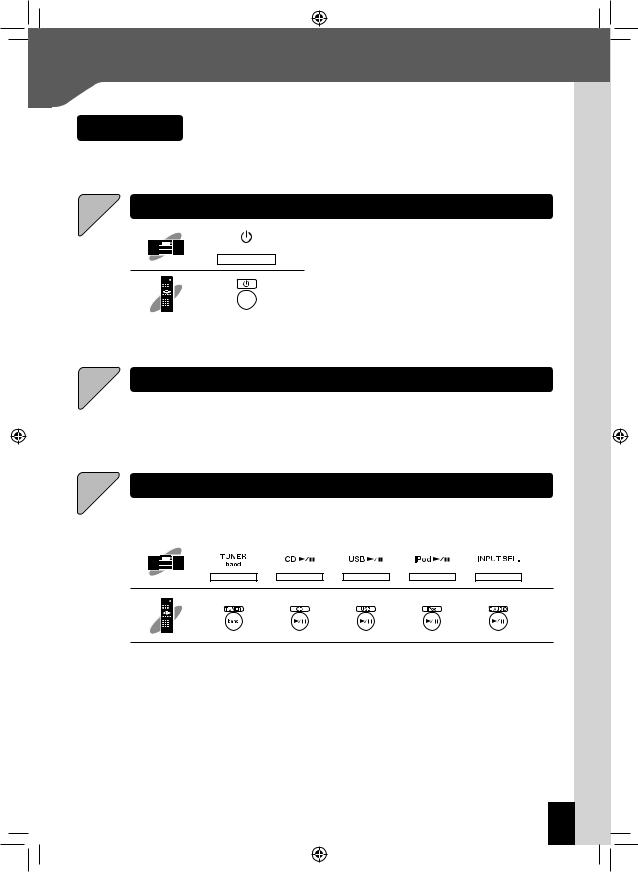
1Turn on the system.
Pressing the [TUNER/band], [CDE], [USBE], [iPodE], [INPUT SEL.] (main unit only), [D.AUDIOE] (remote control only), or [AUX] (remote control only) key will turn on power.
Pressing the power [K] key when the system is on turns it off (Standby mode).
2
3
Load a disc (CD).
For other types (non-CD) of playback, proceed to step 3.
See page 30 for information about how to load a CD.
Start playback.
Press the Play/Pause key for the input source. See <Procedures by Input Source> (pages 29-62) for details. If you are using an external device, perform the required operation on the external device to start playback.
You can select the sound quality you want. See <Audio Settings> (pages 63-65) for details.
If the system is not operated for a specified period of time the display starts to scroll to protect the screen from image burn and uneven brightness.
English 23
en02_c-707i.indd 23 |
12/27/2007 3:14:40 PM |
 Important Information
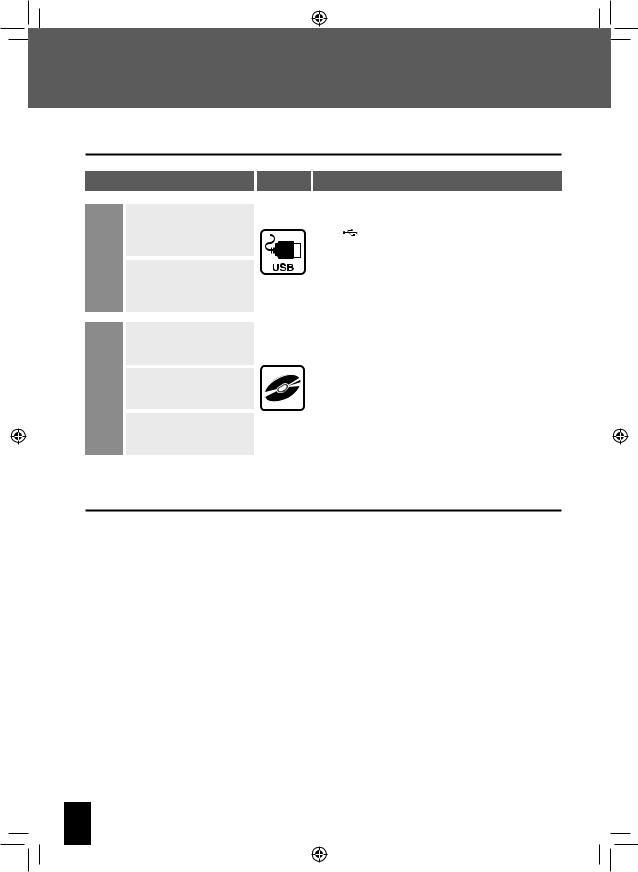
Supported Media
Media |
Icon in this manual |
Explanation |
USB flash memory
USB
USB mass storage class compliant digital audio player
Never connect any other device besides USB flash memory or a USB mass storage class compliant digital audio player to the USB] terminal. Note that Kenwood will not be held liable for any losses related to malfunction, damage, or data loss due to connection of any other type of device.
Commercially available music CDs
CD |
CD-R/CD-RW recorded with |
|
CD-DA format |
||
|
CD-ROM/CD-R/CD-RW discs recorded with MP3/WMA files
You may not be able to play discs that do not conform to the CD standard, such as Copy Control CDs.
Discs must be finalized during writing.
In this manual, MP3 and WMA files are referred to collectively as“audio files”.
Depending on the equipment or recording mode used for recording onto a CD-ROM, CD-R or CD-RW disc, and
depending on the type of CD-ROM, CD-R or CD-RW disc used, you may not be able to play the disc on this system.
Precautions when writing data to discs
Discs recorded in Packet Write mode or UDF (Universal Disc Format) cannot be played.
When writing data to a disc, always close the session or finalize the disc. The disc may not play properly if you do not close the session or finalize the disc.
Depending on the specifications of the writing software used, the recorded folder names and file names may not be displayed correctly.
Playback for multi-session discs or discs that contain large numbers of folders may take longer to begin than for normal discs.
If you write audio files and music CD tracks (CD-DA format) to the same disc, the disc may not play correctly.
Before writing audio files to a disc, check that the files play back correctly on the PC being used to write the files. After you finish writing, check that the written files are played back correctly.
Use the correct file extensions (mp3, wma) in the names of audio files. Files without file extensions will not play. Also, do not use audio file extensions (mp3, wma) for files that are not audio files.
For more information on file extensions, see <Supported Audio Files> on the right.
24 C-707I
en02_c-707i.indd 24 |
12/27/2007 3:14:41 PM |
Important Information
Supported Audio Files
On this system, you can play the audio file types listed below (MP3, WMA), which have been recorded with a CD-ROM, CD-R, CD-RW, or USB device.
MP3 files
File formats: MPEG 1 Audio Layer 3/ MPEG 2 Audio Layer 3/ MPEG 2 Audio Layer 3, Lower sampling rate (MPEG 2.5)
Extension: .mp3
Sampling frequency: 8 kHz to 48 kHz
Bit rate: 32 kbps to 320 kbps
WMA files
File format:
Windows Media™ Audio compliant
Extension: .wma
Sampling frequency: 32 kHz to 48 kHz
Bit rate: 64 kbps to 192 kbps
Files created using functions in Windows Media™ Player 9 or later cannot be played.
-WMA Professional
-WMA Lossless
-WMA Voice
Disc formats
ISO 9660 Level 1
ISO 9660 Level 2
Joliet
Romeo
USB Supported File Systems
FAT16
FAT32
Number of File Limits
Max. files/folders: 65280 in total
Max. folders: 255
Files per folder: 256
Maximum number of displayable characters
File names: 32 (including file extension)
Folder names: 32
Tag display (Title/Album/Artist): 30
This system is capable of displaying alphanumeric characters. Other character types are displayed as pound (#) marks.
Other notes
Note that even where audio files comply with the above standards, playback may fail due to factors such as the disc characteristics or recording conditions.
Playback also may fail depending on the specifications of the encoding software or the settings used for encoding.
DRM (Digital Rights Management) files cannot be played.
Audio files encoded using VBR (Variable Bit Rate) may use bit rates that fall outside the supported range. Audio files with bit rates outside the supported range cannot be played.
Windows Media is a trademark of Microsoft Corporation registered in the U.S. and other countries.
English 25
en02_c-707i.indd 25 |
12/27/2007 3:14:41 PM |
Important Information
Handling Discs
Handling precautions
When handing a disc, never touch the playing surface.
Discs playable on the system
This system can play back CD (12 cm, 8 cm), CD-ROM, CD- R, or CD-RW discs, or the audio part of CD-EXTRA discs.
Use of an 8 cm CD adapter is not supported.
Notes on CD-ROM/CD-R/CD-RW discs
If the CD-ROM, CD-R or CD-RW disc being used has a printable label surface, the label surface may cause sticking that makes it impossible to remove the disc from the system. To prevent malfunction of the system, do not use such discs.
Cautions on CD discs
Always use a disc carrying the
 marking.
A disc without this marking may be unable to be played back correctly.
The disc rotates at a high speed during playback. Never use a cracked, chipped or greatly warped disc. Otherwise, damage or malfunction of the player may result.
Also, do not use a disc with a non-circular shape as this may result in malfunction.
Handling USB devices
Handling precautions
Be sure to read the instruction manual that comes with the device you are using.
This system does not come with a USB device. It is up to you to purchase a commercially available USB device separately.
The USB] port on the front panel of the main unit supports USB2.0 (Full speed).
Do not use a USB device connected via a USB hub.
Certain conditions while using a USB device can cause contents stored on the USB device to be lost. Note that Kenwood will not be held liable for any losses arising out of loss of stored contents.
Supported USB devices
The following are the limitations on the type of USB devices that can be used and on the scope of their use.
USB mass storage class compliant
Consult your retailer to find out whether your USB device is USB mass storage class compliant.
Maximum current consumption of 500 mA
Use of a USB device that does not comply with the above conditions may result in improper playback of track files. Even if a USB device does satisfy the above conditions, certain device types and conditions may make proper playback impossible.
This system supplies power to USB devices, which means you can enjoy listening to music while charging your device. To do this, the system must be turned on and USB must be selected as the source.
26 C-707I
en02_c-707i.indd 26 |
12/27/2007 3:14:42 PM |
 Loading...