


Kenwood Limited, New Lane, Havant, Hampshire PO9 2NH, UK |
|
www.kenwoodworld.com |
57660/1 |
g 900 g 700
|
|
|
|
|
g |
|
|
|
|
|
|
|
00 |
|
|
|
|
|
9 |
|
|
||
|
|
|
id |
|
|
|
|
|
|
p |
|
|
|
|
|
ra |
|
|
|
|
|
||
7 |
|
|
gh |
|
|
||
|
|
ou |
|
|
|
|
|
|
d |
|
|
|
|
|
|
8 |
|
|
|
|
|
e |
|
|
|
jam |
|
|
e |
||
|
|
|
fr |
|
|||
9 |
|
|
en |
|
|
||
|
|
|
ut |
h |
|||
|
|
0gl |
|
|
|||
|
1 |
|
|
ic |
|
||
|
|
|
|
|
dw |
|
|
|
|
|
|
n |
|
|
|
|
|
|
sa |
|
|
|
|
|
|
11 |
ake |
|
|
||
|
|
|
|
|
|
||
|
|
|
b |
|
|
|
|
|
|
12 |
|
|
|
|
|
as |
|
|
|
|
|
eat |
|
|
|
ic |
|
|
wh |
|
|||
b |
|
nch |
|
|
||||
1 |
fre |
|
e |
|
|
|
||
|
|
l |
|
|
|
|
||
2 |
|
|
ho |
|
|
|
|
|
|
|
w |
|
|
|
|
|
|
|
3 |
cake |
|
et |
g |
|||
|
|
|
|
|
|
e |
00 |
|
|
|
|
4 |
|
w |
|
7 |
|
|
|
|
|
s |
|
id |
||
|
|
|
5 |
|
|
p |
|
|
|
|
|
|
|
|
ra |
|
|
|
|
|
|
|
6 |
|
|
|
BM210
English |
2 - 9 |
Nederlands |
10 - 18 |
French |
19 - 28 |
Deutsch |
29 - 37 |
Italiano |
38 - 46 |
Danish |
47 - 54 |
Svenska |
55 - 63 |
Norsk |
64 - 71 |
Suomi |
72 - 79 |
|
pid |
900g |
|
|
|
|
7ra |
|
|
ugh |
|
|
8do |
free |
|
jam |
|
|
9 |
en |
|
glut |
|
|
10 |
wich |
900g |
sand |
|
11 |
ke |
|
700g |
12ba |
|
|
sic |
|
|
|
t |
|
|
|
|
|
|
ea |
|
||
1 |
ba |
nch |
wh |
|
|||
fre |
|
|
e |
|
|
||
|
2 |
|
hol |
|
|
|
|
|
|
w |
|
e |
|
0g |
|
|
|
3 |
|
ak |
t |
||
|
|
|
4c |
ee |
70 |
||
|
|
|
|
|
sw |
d |
|
|
|
|
|
5 |
rapi |
|
|
|
|
|
|
|
6 |
|
|
1 basic
2 french
3 whole wheat
4 cake |
700g 900g |
5 sweet
6 rapid 700g
tsp
tbsp
7 rapid 900g
8 dough
9 jam
10 gluten free
11 sandwich
12 bake

1 |
2 |
7 |
8 |
3 |
9 |
13 |
14 |
15 |
19 |
20 |
21 |
4 |
5 |
6 |
10 |
11 |
12 |
1 |
|
12 |
700g |
|
900g |
|
|
||||
|
|
16 |
17 |
18 |
English
before using your Kenwood appliance
●Read these instructions carefully and retain for future reference.
●Remove all packaging and any labels, including the cardboard support inside the baking chamber.
safety
●Do not touch hot surfaces. Accessible surfaces are liable to get hot during use. Always use oven gloves to remove the hot bread pan.
●To prevent spillages inside the oven chamber, always remove the bread pan from the machine before adding the ingredients. Ingredients that splash onto the heating element can burn and cause smoke.
●Do not use this appliance if there is any visible sign of damage to the supply cord or if it has been accidentally dropped.
●Do not immerse this appliance, the supply cord or the plug in water or any other liquid.
●Always unplug this appliance after use, before fitting or removing parts or before cleaning.
●Do not let the electrical supply cord hang over the edge of a work surface or allow it to touch hot surfaces such as a gas or electric hob.
●This appliance should only be used on a flat heat resistant surface.
●Do not place your hand inside the oven chamber after the bread pan has been removed as it will be very hot.
●Do not touch moving parts within the Bread Maker.
●Do not exceed the maximum capacities stated as this could result in over-loading the Bread Maker.
●Do not place the Bread Maker in direct sun light, near hot appliances or in a draught. All these things can affect the internal temperature of the oven, which could spoil the results.
●In the unfortunate event of a power cut occurring after the ingredients have been partly processed, you will have to start again.
●Do not use this appliance outdoors.
●Do not operate the Bread Maker when it is empty as this could cause it serious damage.
●Do not use the oven chamber for any type of storage.
●Do not cover the steam vents in the lid and ensure there is adequate ventilation around the bread maker during operation.
●Do not let infirm people use the appliance without supervision.
●Do not let children use or play with the appliance.
●Only use the appliance for its intended domestic use. Kenwood will not accept any liability if the appliance is subject to improper use, or failure to comply with these instructions.
before plugging in
●Make sure your electricity supply is the same as the one shown on the underside of your Bread Maker.
●This machine complies with European Economic Community Directive 89/336/EEC
before using your bread maker for the first time
●Wash all parts (see cleaning).
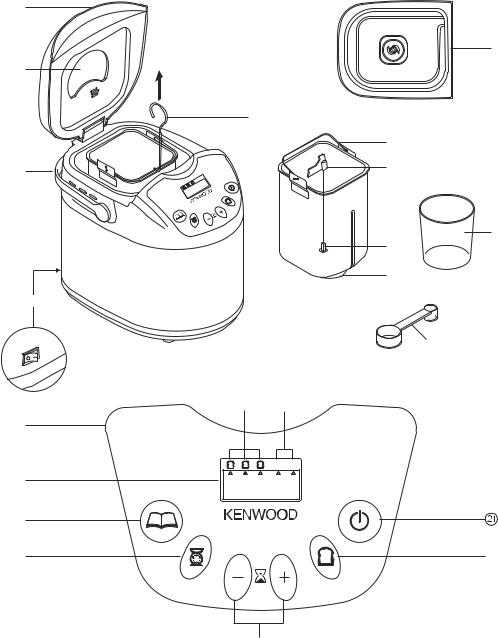
key
lid handle
viewing windowcarrying handlepan hook
heating elementbread pan handlekneader
drive shaft
drive couplingmeasuring cup
dual measuring spoon 1tsp & 1tbspon/off switch
control paneldisplay window
crust colour indicators (light, medium, dark)loaf size indicators
menu padloaf size pad
delay timer padscrust colour pad  start/stop pad
2

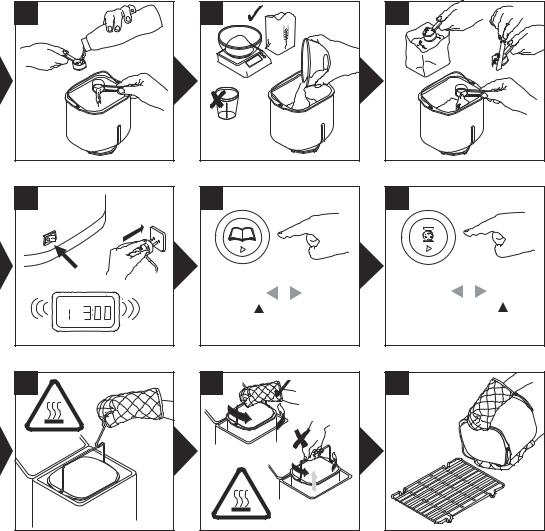
how to measure ingredients (refer to illustrations 3 to 7)
It is extremely important to use the exact measure of ingredients for best results.
●Always measure liquid ingredients in the see-through measuring cup with graduated markings provided. Liquid should just reach marking on cup at eye level, not above or below (see 3).
●Always use liquids at room temperature, 20ºC/68ºF, unless making bread using the rapid 1 hour cycle. Follow the instructions given in the recipe section.
●Always use the measuring spoon provided to measure smaller quantities of dry and liquid ingredients. For 1 tsp or 1 tbsp, fill to the top and level off the spoon (see 6).
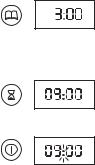
on/off switch
Your Kenwood breadmaker is fitted with an ON/OFF switch and will not operate until the “on” switch is pressed.
●Plug in and press the ON/OFF switch situated at the back of the breadmaker - 3:00 will appear in the display window.
●Always switch off and unplug your breadmaker after use.
using your Bread Maker
(refer to illustration panel)
1Remove the bread pan by holding the handle and turning the pan to the back of the machine.
2Fit the kneader.
3Pour the water into the bread pan.
4Add the rest of the ingredients to the pan in the order
listed in the recipes.
Ensure that all the ingredients are weighed accurately
7as incorrect measures will produce poor results.
8Insert the bread pan into the oven chamber by positioning the bread pan at an angle towards the back of the machine. Then lock the pan by turning it towards the front.
9Lower the handle and close the lid.
10Plug in and switch on - the unit will beep and default to setting 1 (3:00).
11Press the MENU pad until the required program is selected. The breadmaker will default to 900g & medium crust colour.
12Select the loaf size by pressing the LOAF SIZE paduntil the indicator moves to the required loaf size.
13Select the crust colour by pressing the CRUST paduntil the indicator moves to the required crust colour (light, medium or dark).
14Press the START pad  . To stop or cancel the program press the START/STOP pad for 2 – 3 seconds.
15At the end of the baking cycle unplug the breadmaker
16Use the hook supplied to lift up the pan handle.
17Remove the bread pan by holding the handle and turning the pan to the back of the machine. Always use oven gloves as the pan handle will be hot.
18Then turn out onto a wire rack to cool.
19Leave the bread to cool for at least 30 minutes before slicing, to allow the steam to escape. The bread will be difficult to slice if hot.
20Clean the bread pan and kneader immediately after use (see care and cleaning).
3

bread/dough program chart
program |
|
Total Program |
Alert For Adding |
|
|||
|
Time |
Ingredients |
Keep Warm |
||||
|
|
900g |
700g |
900g |
|
700g |
|
1 basic |
White or Brown Bread Flour recipes |
3:00 |
2:53 |
2:20 |
|
2:15 |
60 |
|
|
|
|
|
|
|
|
2 french |
Produces a crisper crust and suited |
3:50 |
3:40 |
2:35 |
|
2:30 |
60 |
|
to loaves low in fat and sugar |
|
|
|
|
|
|
|
|
|
|
|
|
|
|
3 whole wheat |
Whole wheat or wholemeal flour |
3:40 |
3:32 |
|
- |
60 |
|
|
recipes |
|
|
|
|
|
|
|
|
|
|
|
|
|
|
4 cake |
Non – yeast batter breads & cakes |
1:40 |
|
- |
60 |
||
|
|
|
|
|
|
|
|
5 sweet |
High sugar bread recipes |
2:55 |
2:50 |
2:30 |
|
2:25 |
60 |
|
|
|
|
|
|
|
|
6 rapid 700g |
Produces loaves of bread in under |
0:58 |
|
- |
60 |
||
|
1 hour. Loaves require warm water, |
|
|
|
|
|
|
7 rapid 900g |
0:58 |
|
- |
60 |
|||
extra yeast and less salt. |
|
||||||
|
|
|
|
|
|
|
|
8 dough |
Dough for hand shaping and |
1:30 |
|
- |
- |
||
|
baking in your own oven. |
|
|
|
|
|
|
|
|
|
|
|
|
|
|
9 jam |
For making jams |
1:20 |
|
- |
- |
||
|
|
|
|
|
|
|
|
10 gluten free |
For use with gluten free flours |
2:50 |
|
- |
60 |
||
|
and gluten free bread mixes. |
|
|
|
|
|
|
|
|
|
|
|
|
|
|
11 sandwich |
Softer crust and closer texture loaves |
3:00 |
2:55 |
2:04 |
|
1:59 |
60 |
|
|
|
|
|
|
|
|
12 bake |
Bake only feature. Can also be |
1:00 |
|
- |
60 |
||
|
used to rewarm or crisp loaves |
|
|
|
|
|
|
|
already baked and cooled. |
|
|
|
|
|
|
|
|
|
|
|
|
|
|
An alert will sound before the end of the 2nd kneading cycle to add ingredients if the recipe recommends doing so.
The Bread maker will automatically go in to the keep warm mode at the end of the baking cycle. It will stay in the keep warm mode for up to 1hour or until the machine is turned off, which ever is soonest.
4
delay timer 
The Delay timer allows you to delay the bread making process up to 13 hours. The delayed start is not recommended for use with the dough, jam, gluten-free or rapid settings.
IMPORTANT: When using this delayed start function you must not use perishable ingredients – things that ‘go off’ easily at room temperature or above, such as milk, egg, cheese and yoghurt etc.
To use the DELAY TIMER simply place the ingredients in the bread pan and lock the pan into the bread maker. Then:
●Press the MENU pad  to choose the required program – the program cycle time is displayed.
●Select the crust colour and size required.
●Then set the delay timer.
●Press the (+) TIMER pad and keep pressing until the total time required is displayed. If you go past the required time press the (-) TIMER pad to go back. The timer pad when pressed, moves in 10 minute increments. You do not need to work out the difference between the program time selected and the total hours required as the bread maker will automatically include the setting cycle time.
Example: Finished loaf required at 7am. If the breadmaker is set up with the required recipe ingredients at 10pm the evening before, total time to be set on the delayed timer is 9 hours.
●Press the MENU pad to choose your program e.g. 1 and use the (+) timer pad to scroll the time in 10 minute increments to display ‘9:00’. If you go past ‘9:00’, simply press the (-) timer pad until you return to ‘9:00’.
●Press the start pad and the display colon (:) will flash. The timer will start to count down.
●If you make a mistake or wish to change the time set,
press the START/STOP pad until it beeps. You can then reset the time.
power interruption protection
Your breadmaker has a 15 mins power interruption protection in case the unit is accidentally unplugged during operation. The unit will continue the program if plugged back in straight away.
care and cleaning
IMPORTANT: unplug the Bread Maker and allow to cool before cleaning.
●Do not immerse either the Bread Maker body or the outside base of the bread pan in water.
●Do not use a dishwasher to clean bread pan. Dishwashing can damage the non-stick properties of the bread pan allowing bread to stick during baking.
●Do not use abrasive scouring pads or metal implements.
●Clean the bread pan and the kneader immediately after each use by partially filling the pan with warm soapy water. Leave to soak for 5 to 10 minutes. To remove the kneader, turn clockwise and lift off. Finish cleaning with a soft cloth, rinse and dry.
If the kneader cannot be removed after 10 minutes, hold the shaft from underneath the pan and twist back and forth until the kneader is released.
●Use a soft damp cloth to clean the outside and inside surfaces of the Bread Maker if necessary.
service and customer care
●If the cord is damaged it must, for safety reasons, be replaced by KENWOOD or an authorised KENWOOD repairer.
If you need help with:
●using your bread maker
●servicing or repairs
Contact the shop where you bought your bread maker.
5
Recipes (add the ingredients to the pan in the order listed in the recipes)
Basic White Bread |
Program 1 |
|
|
|
|
Ingredients |
900g |
700g |
|
|
|
Water |
320ml |
270ml |
|
|
|
Vegetable oil |
11⁄2tbsp |
1tbsp |
Unbleached white bread flour |
500g |
400g |
|
|
|
Skimmed milk powder |
5tsp |
1tbsp |
|
|
|
Salt |
11⁄2tsp |
1tsp |
Sugar |
1tbsp |
2tsp |
|
|
|
Easy blend dried yeast |
7g (21⁄4tsp) |
11⁄2tsp |
tsp = 5 ml teaspoon |
|
|
tbsp = 15ml tablespoon |
|
|
Wholemeal Seeded Bread Program 3 |
||
|
|
|
Ingredients |
900g |
700g |
|
|
|
Water |
310mls |
250mls |
|
|
|
Vegetable Oil |
11⁄2tbsp |
1tbsp |
Wholemeal bread flour |
450g |
370g |
|
|
|
Unbleached white bread flour |
50g |
30g |
|
|
|
Skimmed milk powder |
5tsp |
3tsp |
|
|
|
Salt |
1tsp |
1tsp |
|
|
|
Sugar |
4tsp |
3tsp |
|
|
|
Easy blend dried yeast |
1tsp |
1tsp |
|
|
|
Pumpkin Seeds |
1tbsp |
2tsp |
|
|
|
Sunflower seeds |
1tbsp |
2tsp |
|
|
|
Poppy seeds |
2tsp |
2tsp |
|
|
|
Lightly toasted sesame seeds |
2tsp |
2tsp |
1.Add the seeds when the machine makes an audible sound during the 2nd kneading cycle.
Brioche Bread |
Program 5 |
|
|
|
|
Ingredients |
900g |
700g |
|
|
|
Milk |
200ml |
160ml |
|
|
|
Eggs |
2 |
1 |
|
|
|
Butter, melted |
140g |
80g |
|
|
|
Unbleached white bread flour |
500g |
400g |
|
|
|
Salt |
11⁄2tsp |
1tsp |
Sugar |
60g |
40g |
|
|
|
Easy blend dried yeast |
2tsp |
11⁄2tsp |
Rapid White Bread |
Program 6-7 |
|
|
|
|
Ingredients |
900g |
700g |
|
|
|
Water, lukewarm (32-35°C) |
320ml |
250ml |
|
|
|
Unbleached white bread flour |
500g |
400g |
|
|
|
Skimmed milk powder |
5tsp |
4tsp |
|
|
|
Salt |
1tsp |
1tsp |
|
|
|
Sugar |
4tsp |
3tsp |
|
|
|
Butter |
25g |
15g |
|
|
|
Easy blend dried yeast |
4tsp |
3tsp |
|
|
|
Bread rolls |
Program 8 |
|
|
|
|
Ingredients |
|
Makes 12 |
|
|
|
Water |
|
240ml |
|
|
|
Egg |
|
1 |
|
|
|
Unbleached white bread flour |
|
450g |
|
|
|
Salt |
|
1tsp |
|
|
|
Sugar |
|
2tsp |
|
|
|
Butter |
|
25g |
|
|
|
Easy blend dried yeast |
|
11⁄2tsp |
For the topping: |
|
|
Egg yolk beaten with 15ml (1tbsp) water |
|
1 |
|
|
|
Sesame seeds and poppy seeds, |
|
|
for sprinkling, optional |
|
|
1At the end of the cycle, turn the dough out onto a lightly floured surface. Gently knock back the dough and divide into 12 equal pieces and hand shape.
2After shaping, leave the dough for a final proving then bake in your conventional oven.
6

troubleshooting guide
Following are some typical problems that can occur when making bread in your bread maker. Please review the problems, their possible cause and the corrective action that should be taken to ensure successful bread making.
PROBLEM |
POSSIBLE CAUSE |
SOLUTION |
|
|
|
LOAF SIZE AND SHAPE |
|
1. Bread does not rise |
• Wholemeal breads will be lower than |
• Normal situation, no solution. |
|
|
enough |
white breads due to less gluten |
|
|
|
forming protein in whole wheat flour. |
|
|
|
• Not enough liquid. |
• Increase liquid by 15ml/3tsp. |
|
|
• Sugar omitted or not enough added. |
• Assemble ingredients as listed in recipe. |
|
|
• Wrong type of flour used. |
• You may have used plain white flour |
|
|
|
instead of strong bread flour which has |
|
|
|
a higher gluten content. |
|
|
|
• Do not use all-purpose flour. |
|
|
• Wrong type of yeast used. |
• For best results use only fast action |
|
|
|
“easy blend” yeast. |
|
|
• Not enough yeast added or too old. |
• Measure amount recommended and |
|
|
|
check expiry date on package. |
|
|
• Rapid bread cycle chosen. |
• This cycle produces shorter loaves. This |
|
|
|
is normal. |
|
|
• Yeast and sugar came into contact |
• Make sure they remain separate |
|
|
with each other before kneading cycle. |
when added to the bread pan. |
|
|
|
|
2. |
Flat loaves, |
• Yeast omitted. |
• Assemble ingredients as listed in recipe. |
|
no rising. |
• Yeast too old. |
• Check expiry date. |
|
|
• Liquid too hot. |
• Use liquid at correct temperature for |
|
|
|
bread setting being used. |
|
|
• Too much salt added. |
• Use amount recommended. |
|
|
• If using timer, yeast got wet before |
• Place dry ingredients into corners of pan |
|
|
bread making process started. |
and make slight well in centre of dry |
|
|
|
ingredients for yeast to protect it from |
|
|
|
liquids. |
|
|
|
|
3. |
Top inflated - |
• Too much yeast. |
• Reduce yeast by 1/4tsp. |
|
mushroom-like in |
• Too much sugar. |
• Reduce sugar by 1tsp. |
|
appearance. |
• Too much flour. |
• Reduce flour by 6 to 9tsp. |
|
|
• Not enough salt. |
• Use amount of salt recommended in |
|
|
|
recipe. |
|
|
• Warm, humid weather. |
• Reduce liquid by 15ml/3 tsp and yeast |
|
|
|
by 1/4 tsp. |
4. |
Top and sides cave in. |
• Too much liquid. |
• Reduce liquid by 15ml/3tsp next time or |
|
|
|
add a little extra flour. |
|
|
• Too much yeast. |
• Use amount recommended in recipe or |
|
|
|
try a quicker cycle next time. |
|
|
• High humidity and warm weather may |
• Chill the water or add milk straight from |
|
|
have caused the dough to rise too fast. |
the fridge |
|
|
|
|
5. |
Gnarly, knotted top - |
• Not enough liquid. |
• Increase liquid by 15ml/3tsp. |
|
not smooth. |
• Too much flour. |
• Measure flour acurately. |
|
|
• Tops of loaves may not all be perfectly |
• Make sure dough is made under the |
|
|
shaped, however, this does not affect |
best possible conditions. |
|
|
wonderful flavour of bread. |
|
|
|
|
|
7

troubleshooting guide (continued)
PROBLEM |
POSSIBLE CAUSE |
SOLUTION |
|
|
|
LOAF SIZE AND SHAPE |
|
6. |
Collapsed |
• Machine was placed in a draught or |
• Reposition bread maker. |
|
while baking. |
may have been knocked or jolted |
|
|
|
during rising. |
|
|
|
• Exceeding capacity of bread pan. |
• Do not use more ingredients than |
|
|
|
recommended for large loaf (max. 900g). |
|
|
• Not enough salt used or omitted. (salt |
• Use amount of salt recommended in |
|
|
helps prevent the dough over proving) |
recipe. |
|
|
• Too much yeast. |
• Measure yeast acurately. |
|
|
• Warm, humid weather. |
• Reduce liquid by 15ml/3tsp and |
|
|
|
reduce yeast by 1/4tsp. |
7. |
Loaves uneven |
• Dough too dry and not allowed to rise |
• Increase liquid by 15ml/3 tsp. |
|
shorter on one end. |
evenly in pan. |
|
|
|
|
|
|
|
BREAD TEXTURE |
|
|
|
|
|
8. |
Heavy dense texture. |
• Too much flour. |
• Measure accurately. |
|
|
• Not enough yeast. |
• Measure right amount of |
|
|
|
recommended yeast. |
|
|
• Not enough sugar. |
• Measure accurately. |
|
|
|
|
9. |
Open, course, holey |
• Salt omitted. |
• Assemble ingredients as listed in recipe. |
|
texture. |
• Too much yeast. |
• Measure right amount of recommended |
|
|
|
yeast. |
|
|
• Too much liquid. |
• Reduce liquid by 15ml/3tsp. |
|
|
|
|
10. Centre of loaf is raw, |
• Too much liquid. |
• Reduce liquid by 15ml/3tsp. |
|
|
not baked enough. |
• Power cut during operation. |
• If power is cut during operation, the |
|
|
|
bread maker will remain off when power |
|
|
|
is restored. You will need to remove |
|
|
|
unbaked loaf from pan and start again |
|
|
|
with fresh ingredients. |
|
|
• Quantities were too large and machine |
• Reduce amounts to maximum |
|
|
could not cope. |
quantities allowed. |
|
|
|
|
11. Bread doesn’t slice |
• Sliced while too hot. |
• Allow bread to cool on rack at least |
|
|
well, very sticky. |
|
30 minutes to release steam, before |
|
|
|
slicing. |
|
|
• Not using proper knife. |
• Use a good bread knife. |
|
|
|
|
|
|
CRUST COLOUR AND THICKNESS |
|
|
|
|
|
12. Dark crust colour/ |
• DARK crust setting used. |
• Use medium of light setting the |
|
|
too thick. |
|
next time. |
|
|
|
|
13. Loaf of bread is burnt. |
• Bread maker malfunctioning. |
• Refer to “Service and customer care” |
|
|
|
|
section. |
|
|
|
|
14. Crust too light. |
• Bread not baked long enough. |
• Extend baking time. |
|
|
|
• No milk powder or fresh milk in recipe. |
• Add 15ml/3tsp skimmed milk powder |
|
|
|
or replace 50% of water with milk to |
|
|
|
encourage browning. |
8

troubleshooting guide (continued)
PROBLEM |
POSSIBLE CAUSE |
SOLUTION |
PAN PROBLEMS
15. Kneader cannot |
• You must add water to bread pan and |
be removed. |
allow kneader to soak before it can |
|
be removed. |
16. Bread sticks to pan/ |
• Can happen over prolonged use. |
difficult to shake out. |
|
|
|
•Follow cleaning instructions after use. You may need to twist kneader slightly after soaking to loosen.
•Lightly wipe the inside of bread pan with vegetable oil.
•Refer to “Service and customer care” section.
MACHINE MECHANICS
|
17. Breadmaker not |
• Breadmaker not switched on |
• Check on/off switch is in the ON position. |
|
operating/Kneader not |
|
|
|
moving. |
• Pan not correctly located. |
• Check the pan is locked in place. |
|
|
• Delay timer selected. |
• Breadmaker will not start until the |
|
|
|
countdown reaches the program start |
|
|
|
time. |
|
|
|
|
|
18. Ingredients not mixed. |
• Did not start bread maker. |
• After programming control panel, press |
|
|
|
start button to turn bread maker on. |
|
|
• Forgot to put kneader in pan. |
• Always make sure kneader is on shaft |
|
|
|
in bottom of pan before adding |
|
|
|
ingredients. |
|
|
|
|
|
19. Burning odour noted |
• Ingredients spilled inside oven. |
• Be careful not to spill ingredients when |
|
during operation. |
|
adding to pan. Ingredients can burn on |
|
|
|
heating unit and cause smoke. |
|
|
• Pan leaks. |
• See “Service and Customer care” |
|
|
|
section. |
|
|
• Exceeding capacity of bread pan. |
• Do not use more ingredients than |
|
|
|
recommended in recipe and always |
|
|
|
measure ingredients accurately. |
|
|
|
|
|
20. Machine unplugged |
• If machine is in knead cycle, discard ingredients and start again. |
|
|
by mistake or power |
• If machine is in rise cycle, remove dough from bread pan, shape and place in |
|
|
lost during use. |
greased 23 x 12.5cm/9 x 5 in. loaf tin, cover and allow to rise until doubled in size. |
|
|
How can I save |
Use bake only setting 12 or bake in pre-heated conventional oven at |
|
|
the bread?. |
200ºC/400ºF/Gas mark 6 for 30-35 minutes or until golden brown. |
|
|
|
• If machine is in bake cycle, use the bake only setting 12 or bake in pre-heated |
|
|
|
conventional oven at 200ºC/400ºF/Gas mark 6 and remove top rack. Carefully |
|
|
|
remove pan from machine and place on bottom rack in oven. Bake until golden brown. |
|
|
|
|
|
|
21. H:HH appears on |
• Oven chamber too hot. |
• Unplug and allow to cool down for 30 |
|
display and machine |
|
minutes. |
|
cannot be turned on. |
|
|
|
|
|
|
|
22. E:EE appears in |
• Bread machine is malfunctioning. |
• See “Service and Customer care” |
|
display and machine |
Temperature sensor error |
section. |
|
does not operate. |
|
|
|
|
|
|
9

Nederlands
Vouw voor het lezen a.u.b. de voorpagina met illustraties uit
voordat u uw Kenwood-apparaat gebruikt:
●Lees deze instructies zorgvuldig door en bewaar ze voor toekomstig gebruik.
●Verwijder de verpakking en etiketten, inclusief de kartonnen steun in het bakgedeelte.
veiligheid
●De hete oppervlakken nooit aanraken. De toegankelijke oppervlakken kunnen tijdens het gebruik erg warm worden. Gebruik altijd ovenhandschoenen om de hete broodpan te verwijderen.
●Om te voorkomen dat er gemorst wordt in de oven, dient u het brood altijd uit het broodblik te verwijderen voor u ingrediënten toevoegt. Ingrediënten die op het verhittingselement komen, kunnen verbranden en rook veroorzaken.
●Gebruik dit apparaat niet, als het snoer zichtbaar beschadigd is of als hij per ongeluk op de grond is gevallen.
●Dompel dit apparaat, het snoer of de stekker nooit in water of in een andere vloeistof.
●Haal de stekker van het apparaat na gebruik uit het stopcontact,en ook voor u onderdelen monteert of verwijdert of voordat u het apparaat reinigt.
●Laat het snoer nooit over de rand van een werkoppervlak hangen en zorg dat het niet in aanraking komt met hete oppervlakken zoals een gasfornuis of elektrische kookplaat.
●Dit apparaat dient uitsluitend op een vlak hittebestendig oppervlak gebruikt te worden.
●Steek geen hand in de ovenkamer, nadat de broodpan is verwijderd.
●Raak geen bewegende delen in de broodbakmachine aan.
●Overschrijd niet de aangegeven maximale capaciteit, omdat de broodbakmachine anders overbelast zou kunnen raken.
●Plaats de broodbakmachine niet in direct zonlicht, in de buurt van hete apparaten of op een tochtige plaats. Al deze dingen kunnen invloed hebben op de oventemperatuur en daardoor slechte resultaten opleveren.
●Mocht de stroom uitvallen nadat de ingrediënten gedeeltelijk zijn verwerkt, dan zult u weer van voren af aan moeten beginnen.
●Zet de broodbakmachine nooit aan als hij leeg is, omdat dit tot ernstige schade zou kunnen leiden.
●Gebruik de ovenkamer nooit om er iets in te bewaren.
●Bedek nooit de ventilatiegaten voor stoom in het deksel en zorg voor voldoende ventilatie rond de broodbakmachine, als deze in bedrijf is.
●Waarschuwing: Gebruik geen harde ingredienten of suikerklontjes bij de bereiding van het brood.
●Lichamelijk of verstandelijk zwakke personen mogen dit apparaat nooit zonder toezicht gebruiken.
●Laat kinderen nooit het apparaat bedienen of er mee spelen.
●Gebruik het apparaat alleen voor het huishoudelijke gebruik waarvoor het is bedoeld. Kenwood kan niet aansprakelijk worden gesteld in het geval dat het apparaat niet correct is gebruikt, of waar deze instructies niet worden opgevolgd.
voordat de stekker in het stopcontact wordt gestoken
●Controleer of de netspanning overeenkomt met de waarde vermeld op de onderzijde van de broodbakmachine.
●Dit apparaat voldoet aan EG-richtlijn 89/336/EEG.
voordat u de broodbakmachine voor het eerst gebruikt
●Was alle onderdelen (zie reiniging).
legenda
handvat van het dekselkijkvenster
hengselblikhaak
verhittingselementhandvat broodblikkneder
aandrijfas
aandrijfkoppelmaatbeker
dubbele maatlepel 1 theelepel & 1 eetlepelaan/uitschakelaar
bedieningspaneelweergavevenster
indicatoren voor korstkleur (licht, medium, donker)indicator broodafmeting
menutoets
toets voor broodafmetingprogrammeerbare timertoetskorstkleurtoets
start/stop-toets
10

ingrediënten afwegen (zie illustratie 3 tot en met 7)
Voor de beste resultaten is het erg belangrijk dat u de exacte hoeveelheid ingrediënten afweegt.
●Meet vloeibare ingrediënten altijd af in de meegeleverde doorzichtige maatbeker met maatstrepen. Het niveau van vloeistoffen moet op ooghoogte van een maatstreep zijn, niet erboven of eronder (zie 3).
●Gebruik altijd vloeistoffen op kamertemperatuur (20°C), tenzij brood wordt gebakken met een snelle 1- uurscyclus. Volg de aanwijzingen in het receptenboek.
●Meet de vloeibare ingrediënten altijd af in de doorzichtige gekalibreerde maatbeker. Vul voor het afmeten van 1 theelepel de lepel tot de rand en strijk hem dan af. Vul voor het afmeten van een halve theelepel de lepel tot de maatstreep (zie 6).
aan/uitschakelaar
Uw Kenwood-broodmachine is uitgerust met een AAN/UIT-schakelaar en werkt pas wanneer de schakelaar op Aan staat.
●Steek de stekker in het stopcontact en druk op de AAN/UIT-schakelaar die zich aan de achterkant van de broodmachine bevindt - 3:00 wordt nu in het venster weergegeven
●Schakel de broodmachine na gebruik altijd uit en haal de stekker uit het stopcontact.
gebruik van uw broodmachine
(zie de illustraties)
1Verwijder het broodblik door het handvat vast te pakken en het blik in de richting van de achterkant van de machine te draaien.
2Zet de kneder in de machine.
3Giet het water in het broodblik
4Voeg de rest van de ingrediënten aan het blik toe in
de volgorde die in het recept wordt aangegeven. Zorg dat alle ingrediënten nauwkeurig zijn afgewogen; onnauwkeurige hoeveelheden leiden tot slechte
7resultaten.
8Zet het broodblik in de oven en plaats het achterover gekanteld in de machine. Vergrendel het blik vervolgens door het naar voren te draaien.
9Duw het handvat naar beneden en sluit het deksel.
10Steek de stekker in het stopcontact; het apparaat geeft een pieptoon en wordt standaard op stand 1 gezet (3:00).
11Druk op de MENU-toets tot het gewenste programma geselecteerd is. De broodmachine wordt standaard ingesteld op 900 gram en een medium korstkleur.
12Selecteer de broodafmeting door op de toets BROODAFMETING te drukken tot de indicator op de gewenste broodafmeting staat.
13Selecteer de korstkleur door op de toets KORSTKLEUR te drukken tot de indicator op de gewenste korstkleur staat (licht, medium, donker).
14Druk op de START-toets  . Om het programma te stoppen of te annuleren, drukt u gedurende 2 à 3 seconden op de START/STOP-toets.
15Na afloop van de bakcyclus dient u de stekker van de broodmachine uit het stopcontact te halen.
16Gebruik de bijgeleverde haak om het handvat van het blik op te tillen.
17Verwijder het broodblik door het handvat vast te pakken en het blik in de richting van de achterkant van de machine te draaien. Het handvat van het blik is heet: gebruik dus altijd ovenhandschoenen.
18Keer het blik om en leg het brood op een rooster om af te koelen.
19Laat het brood ten minste 30 minuten afkoelen voor u het snijdt, zodat de stoom kan ontsnappen. Het brood is moeilijk te snijden wanneer het warm is.
20Het broodblik en de kneder onmiddellijk na gebruik reinigen (zie Onderhoud en verzorging)
11

brood/deeg-programmakaart
|
|
Totale |
Waarschuwing |
|
|||
programma |
|
programmatijd |
voor het |
Warm |
|||
|
|
|
toevoegen van |
houden |
|||
|
|
|
|
ingrediënten |
|
||
|
|
900g |
700g |
900g |
|
700g |
|
1 normaal |
Recepten voor witof bruinbrood |
3:00 |
2:53 |
2:20 |
|
2:15 |
60 |
|
|
|
|
|
|
|
|
2 stokbrood |
Voor een knapperiger korst en voor |
3:50 |
3:40 |
2:35 |
|
2:30 |
60 |
|
broden met een laag veten |
|
|
|
|
|
|
|
suikergehalte |
|
|
|
|
|
|
|
|
|
|
|
|
|
|
3 tarwe |
Recepten voor tarweof volkorenmeel |
3:40 |
3:32 |
|
- |
60 |
|
|
|
|
|
|
|
|
|
4 cake |
Broden en cakes zonder gist |
1:40 |
|
- |
60 |
||
|
|
|
|
|
|
|
|
5 zoet |
Recepten voor broden met een |
2:55 |
2:50 |
2:30 |
|
2:25 |
60 |
|
hoog suikergehalte |
|
|
|
|
|
|
|
|
|
|
|
|
|
|
6 snel 700 g |
Bakt een brood in minder dan een |
0:58 |
|
- |
60 |
||
uur. Hiervoor gebruikt u warm |
|
||||||
|
|
|
|
|
|
|
|
7 snel 900 g |
0:58 |
|
- |
60 |
|||
water, extra gist en minder zout. |
|
||||||
|
|
|
|
|
|
|
|
8 deeg |
Deeg voor handvormen en bakken |
1:30 |
|
- |
- |
||
|
in uw eigen oven. |
|
|
|
|
|
|
|
|
|
|
|
|
|
|
9 jam |
Voor het maken van jam |
1:20 |
|
- |
- |
||
|
|
|
|
|
|
|
|
10 glutenvrij |
Voor gebruik met glutenvrij meel en |
2:50 |
|
- |
60 |
||
|
glutenvrije broodmix. |
|
|
|
|
|
|
|
|
|
|
|
|
|
|
11 sandwich |
Zachtere korst en dichtere textuur |
3:00 |
2:55 |
2:04 |
|
1:59 |
60 |
|
|
|
|
|
|
|
|
12 bakken |
Uitsluitend bakken. Kan ook gebruikt |
1:00 |
|
- |
60 |
||
|
worden om reeds gebakken brood op |
|
|
|
|
|
|
|
te warmen of een knapperige korst |
|
|
|
|
|
|
|
te geven. |
|
|
|
|
|
|
|
|
|
|
|
|
|
|
Voor het eind van de tweede kneedcyclus klinkt een alarm dat aangeeft dat ingrediënten toegevoegd moeten worden, als het recept dit aangeeft.
De broodmachine schakelt aan het eind van de bakcyclus automatisch naar de warmhoudmodus. De machine blijft maximaal 1 uur in de warmhoudmodus of tot de machine wordt uitgeschakeld,
12

vertragingstimer |
bescherming tegen stroomuitval |
Met de programmeerbare timer kunt u het broodproces maximaal 13 uur uitstellen. De uitgestelde start wordt niet aanbevolen voor gebruik in de stand deeg, jam, glutenvrij of snel.
BELANGRIJK: Wanneer u deze functie voor een uitgestelde start gebruikt, dient u geen ingrediënten te gebruiken die op kamertemperatuur of hoger gemakkelijk bederven, zoals melk, eieren, kaas, yoghurt, enz.
Uw broodmachine beschikt over een stroomonderbrekingsbescherming van 15 minuten voor het geval de stekker van het apparaat per ongeluk uit het stopcontact gehaald wordt, terwijl het apparaat in bedrijf is. Het apparaat werkt het programma normaal af, wanneer het onmiddellijk weer op het stopcontact wordt aangesloten.
Als u de VERTRAGINGSTIMER wilt gebruiken, doet u alle de ingrediënten in de broodpan. Zet de broodpan in de machine vast. Dan:
●Kies de MENU-knop  om de gewenste stand te kiezen.
●Kies de gewenste korstkleur en het gewenste gewicht.
●Stel de vertragingstimer in.
●Druk op (+) TIMER-toets en blijf drukken tot de totaal benodigde tijd wordt weergegeven. Als u te ver gaat, kunt u op de (-) TIMER-toets drukken om terug te gaan. De timertoets verzet de tijd in stappen van 10 minuten. U hoeft niet het verschil te berekenen tussen de geselecteerde programmatijd en de totaal benodigde tijd; de broodmachine neemt de cyclustijd automatisch in aanmerking.
Voorbeeld: U wilt dat er om 7 uur ’s morgens een vers gebakken brood voor u klaar ligt. Als de broodmachine om 10 uur de avond ervoor wordt voorbereid met alle benodigde ingrediënten, moet vertragingstimer ingesteld worden op 9 uren.
●Druk op de MENU-toets om uw programma te selecteren, bv. 1 en gebruik de (+)
timertoets om de tijd in stappen van 10 minuten in te stellen op 9:00. Als u 9:00 voorbijgaat, kunt u op de (-)- toets drukken tot u weer bij 9:00 bent.
● Druk op de starttoets en de weergegeven dubbele punt
(:) gaat knipperen. De timer telt nu naar beneden af.
● Als u een fout maakt of de ingestelde tijd wilt veranderen, drukt u op de START/STOPtoets tot u een pieptoon hoort. U kunt nu de tijd opnieuw instellen.
verzorging en reiniging
BELANGRIJK: trek de stekker uit het stopcontact en laat de machine vóór reiniging afkoelen.
●Dompel het hoofddeel van de broodbakmachine of de voet van de broodpan NOOIT onder in water.
●U mag het broodblik niet in de afwasmachine reinigen. De afwasmachine kan de anti-aanbakeigenschappen van het broodblik beschadigen, waardoor het brood aan de het blik kan blijven plakken tijdens het bakken.
●Gebruik NOOIT schuursponsjes of metalen gereedschappen.
●Reinig de broodpan en deeghaak na elk gebruik door de pan gedeeltelijk met warm zeepwater te vullen. Laat het 5-10 minuten weken. Om de deeghaak te verwijderen moet deze met de klok mee worden gedraaid en vervolgens van de as worden getrokken. Reinig de pan ten slotte met een zachte doek, spoel de pan en droog hem dan.
Als u de kneder na 10 minuten niet kunt verwijderen, houdt u de as aan de onderkant van de pan vast en draait u hem heen en weer, totdat de kneder los komt.
●Reinig de inwendige en uitwendige oppervlakken van de broodbakmachine zo nodig met een zachte, vochtige doek.
onderhoud en klantenservice
●Als het snoer van uw broodbakmachine is beschadigd, moet het om veiligheidsredenen worden vervangen door Kenwood of een bevoegde Kenwood-monteur.
Indien u hulp nodig heeft bij:
●het gebruik van uw machine
●service of reparaties (binnen of buiten de garantieperiode)
neem dan contact op met de zaak waar u de broodbakmachine heeft gekocht.
13
recepten (voeg de ingrediënten aan het blik toe in de volgorde die in het recept wordt aangegeven)
Gewoon witbrood |
Programma 1 |
|
|
|
|
Ingrediënten |
900 g |
700 g |
|
|
|
Water |
320 ml |
270 ml |
|
|
|
Plantaardige olie |
11⁄2 el |
1 el |
Ongebleekt meel voor witbrood |
500 g |
400 g |
|
|
|
Magere melkpoeder |
5 theel |
1 el |
|
|
|
Zout |
11⁄2 theel |
1 theel |
Suiker |
1 el |
2 theel |
|
|
|
Gemakkelijk mengbare droge gist |
7g (21⁄4 theel) |
11⁄2 theel |
theel = theelepel van 5 ml |
|
|
el = eetlepel van 15 ml |
|
|
Volkoren brood met zadenProgramma 3
Ingrediënten |
900 g |
700 g |
|
|
|
Water |
310 ml |
250 ml |
|
|
|
Plantaardige olie |
11⁄2 el |
1 el |
Volkoren broodmeel |
450 g |
370 g |
|
|
|
Ongebleekte witte bloem |
50 g |
30 g |
|
|
|
Magere melkpoeder |
5 tl |
3 tl |
|
|
|
Zout |
1 tl |
1 tl |
|
|
|
Suiker |
4 tl |
3 tl |
|
|
|
Gedroogde gist |
1 tl |
1 tl |
|
|
|
Pompoenpitten |
1 el |
2 tl |
|
|
|
Zonnebloempitten |
1 el |
2 tl |
|
|
|
Blauwmaanzaad |
2 tl |
2 tl |
|
|
|
Licht geroosterde sesamzaadjes |
2 tl |
2 tl |
1Voeg de zaden of pitten toe wanneer de machine een hoorbaar geluid maakt tijdens de tweede kneedcyclus.
Brioche |
Programma 5 |
|
|
|
|
Ingrediënten |
900 g |
700 g |
|
|
|
Melk |
200 ml |
160 ml |
|
|
|
Eieren |
2 |
1 |
|
|
|
Boter, gesmolten |
140 g |
80 g |
|
|
|
Ongebleekte witte bloem |
500 g |
400 g |
|
|
|
Zout |
11⁄2 tl |
1 tl |
Suiker |
60 g |
40 g |
|
|
|
Gedroogde gist |
2 tl |
11⁄2 tl |
Snel witbrood |
Programma 6-7 |
||
|
|
|
|
Ingrediënten |
|
900g |
700g |
|
|
|
|
Lauw water (32-35°C) |
|
320 ml |
250 ml |
|
|
|
|
Ongebleekt meel voor witbrood |
|
500 g |
400 g |
|
|
|
|
Magere melkpoeder |
|
5 eetl |
4 eetl |
|
|
|
|
Zout |
|
1 theel |
1 theel |
|
|
|
|
Suiker |
|
4 theel |
3 theel |
|
|
|
|
Boter |
|
25 g |
15 g |
|
|
|
|
Gemakkelijk mengbare droge gist |
|
4 theel |
3 theel |
|
|
|
|
Rolvormige baksels Programma 8
Ingrediënten |
maakt u 12 |
Water |
240ml |
|
|
Ei |
1 |
|
|
Ongebleekte bloem |
450g |
|
|
Zout |
1 theel |
|
|
Suiker |
2 theel |
|
|
Boter |
25g |
|
|
Gemakkelijk te mengen, gedroogde gist |
11⁄2 theel |
Voor het glazuur: |
|
|
|
1 eidooier geklutst met |
|
15 ml (3 tl.) water |
1 |
|
|
facultatief: sesamzaad en papaverzaad |
|
om de baksels mee te bestrooien |
|
1Breng aan het einde van de cyclus het deeg over op een licht met bloem bestrooid oppervlak. Tik het deeg voorzichtig terug en verdeel het in 12 gelijke stukken.
2Laat het deeg na het vormen nog een laatste keer rijzen en bak het vervolgens in uw conventionele oven.
14
Het opsporen en oplossen van problemen
Hier volgen enige gebruikelijke problemen die bij broodbakken in de broodbakmachine kunnen optreden. Bestudeer de problemen, hun mogelijke oorzaak en de maatregel die moet worden genomen om brood met succes te bakken.
PROBLEEM |
|
MOGELIJKE OORZAAK |
OPLOSSING |
|
|
|
|
|
|
|
|
GROOTTE EN VORM VAN BRODEN |
||
|
|
|
|
|
1. |
Brood rijst niet |
|
• Volkorenbrood rijst minder dan |
• Normale situatie, geen oplossing. |
|
voldoende. |
|
wittebrood, omdat volkorenmeel een |
|
|
|
|
lager gehalte aan glutenvormende |
|
|
|
|
eiwitten heeft. |
|
|
|
|
• Onvoldoende vloeistof. |
• Verhoog de hoeveelheid vloeistof met 15ml/3 tl. |
|
|
|
• Geen of te weinig suiker toegevoegd. |
• Verzamel de in het recept genoemde |
|
|
|
|
ingrediënten. |
|
|
|
• Verkeerde soort meel gebruikt |
• Mogelijk heeft u pure bloem gebruikt in plaats |
|
|
|
|
van stevig meel, dat een |
|
|
|
|
hoger glutengehalte heeft. |
|
|
|
|
• Gebruik geen universeel toepasbaar meel. |
|
|
|
• Verkeerde soort gist gebruikt. |
• Voor het beste resultaat wordt gemakkelijk |
|
|
|
|
mengbare zeer actieve gist aanbevolen. |
|
|
|
• Onvoldoende gist toegevoegd of gist is |
• Meet de aanbevolen hoeveelheid af en |
|
|
|
te oud. |
controleer de uiterste gebruiksdatum op |
|
|
|
|
de verpakking. |
|
|
|
• De snelle cyclus is geselecteerd. |
• Bij deze cyclus ontstaan kortere broden. Dit |
|
|
|
|
is normaal. |
|
|
|
• Gist en suiker zijn vóór het kneden al |
• Zorg dat de ingrediënten bij het in de |
|
|
|
met elkaar in contact gekomen. |
broodpan doen gescheiden blijven. |
|
|
|
|
|
2. |
Platte broden; rijzen |
|
• Geen gist toegevoegd. |
• Verzamel de in het recept genoemde |
|
niet. |
|
|
ingrediënten. |
|
|
|
• Gist is te oud. |
• Controleer de uiterste gebruiksdatum. |
|
|
|
• Vloeistof is te warm. |
• Gebruik vloeistof op de juiste temperatuur voor |
|
|
|
|
de gebruikte instelling. |
|
|
|
• Te veel zout toegevoegd. |
• Gebruik de aanbevolen hoeveelheid. |
|
|
|
• Als de tijdklok is gebruikt, is de gist |
• Plaats droge ingrediënten in de hoeken van de |
|
|
|
vóór het bakken nat geworden. |
pan en maak een kuiltje in het midden van de |
|
|
|
|
droge ingrediënten voor de gist om deze |
|
|
|
|
gescheiden van de vloeistoffen te houden. |
|
|
|
|
|
3. |
Bovenkant |
|
• Te veel gist. |
• Verlaag de hoeveelheid gist met 1⁄4 tl. |
|
opgezwollen - brood |
|
• Te veel suiker. |
• Verlaag de hoeveelheid suiker met 1 tl. |
|
ziet eruit als een |
|
• Te veel meel. |
• Verlaag de hoeveelheid meel met 6-9 tl. |
|
paddestoel. |
|
• Onvoldoende zout. |
• Gebruik de in het recept aanbevolen |
|
|
|
|
hoeveelheid zout. |
|
|
|
• Warm, vochtig weer. |
• Verlaag de hoeveelheid vloeistof met |
|
|
|
|
15ml/3 tl. en de hoeveelheid gist met 1⁄4 tl. |
|
|
|
|
|
15
Het opsporen en oplossen van problemen (vervolg)
PROBLEEM |
|
MOGELIJKE OORZAAK |
|
OPLOSSING |
|
|
|
||||
|
|
|
|
|
|
4. |
Bovenkant en |
|
• Te veel vloeistof. |
|
• Verlaag de volgende keer de hoeveelheid |
|
zijkanten zakken in. |
|
|
|
vloeistof met 15 ml/3 tl. of voeg wat extra meel |
|
|
|
|
|
toe. |
|
|
|
• Te veel gist. |
|
• Gebruik de in het recept aanbevolen hoeveelheid |
|
|
|
|
|
of probeer de volgende keer een snellere cyclus. |
|
|
|
• Het deeg is mogelijk te snel gerezen |
|
• Koel het water af of voeg melk toe rechtstreeks |
|
|
|
als gevolg van een hoge |
|
uit de koelkast. |
|
|
|
luchtvochtigheid en warm weer. |
|
|
|
|
|
|
|
|
5. |
Misvormde, knoestige |
|
• Onvoldoende vloeistof. |
|
• Verhoog de hoeveelheid vloeistof met |
|
bovenkant - niet glad. |
|
|
|
15 ml/3 tl. |
|
|
|
• Te veel meel. |
|
• Meet het meel nauwkeurig af. |
|
|
|
• Ook al zijn broden lelijk van boven, |
|
• Zorg dat het deeg onder optimale |
|
|
|
hun verrukkelijke smaak lijdt daar niet |
|
omstandigheden wordt gemaakt. |
|
|
|
onder. |
|
|
|
|
|
|
|
|
6. |
In elkaar gezakt |
|
• De machine is op een tochtige plaats |
|
• Zet de broodbakmachine op een andere plaats. |
|
tijdens het bakken. |
|
gezet of tijdens het rijzen is ertegen |
|
|
|
|
|
gestoten. |
|
|
|
|
|
• De capaciteit van de broodpan is |
|
• Gebruik niet meer ingrediënten dan aanbevolen |
|
|
|
overschreden. |
|
wordt voor een groot brood (max. 900 g). |
|
|
|
• Er is onvoldoende of geen zout |
|
• Gebruik de in het recept aanbevolen hoeveelheid |
|
|
|
gebruikt. (zout helpt te voorkomen dat |
|
zout. |
|
|
|
het deeg te sterk rijst) |
|
|
|
|
|
• Te veel gist. |
|
• Meet de gist nauwkeurig af. |
|
|
|
• Warm, vochtig weer. |
|
• Verlaag de hoeveelheid vloeistof met 15 |
|
|
|
|
|
ml/3 tl. en verlaag de hoeveelheid gist |
|
|
|
|
|
met 1⁄4 tl. |
|
|
|
|
|
|
7. Broden zijn oneffen en |
|
• Het deeg is te droog en kon in de pan |
|
• Verhoog de hoeveelheid vloeistof met |
|
|
korter aan één kant. |
|
niet gelijkmatig rijzen. |
|
15 ml/3 tl. |
|
|
|
|
|
|
16

Het opsporen en oplossen van problemen (vervolg)
PROBLEEM |
MOGELIJKE OORZAAK |
OPLOSSING |
BROODTEXTUUR
8. |
Dichte textuur. |
• Te veel deeg. |
• Nauwkeurig afmeten. |
||
|
|
|
• Onvoldoende gist. |
• De juiste hoeveelheid aanbevolen gist afmeten. |
|
|
|
|
• Onvoldoende suiker. |
• Nauwkeurig afmeten. |
|
|
|
|
|
|
|
9. |
Open, grove, |
• Geen zout toegevoegd. |
• Verzamel de in het recept genoemde ingrediënten. |
||
|
|
sponsachtige |
|
|
|
|
|
structuur. |
• Te veel gist. |
• Meet de juiste hoeveelheid aanbevolen gist af. |
|
|
|
|
• Te veel vloeistof. |
• Verlaag de hoeveelheid vloeistof met 15 ml/3 tl. |
|
|
|
|
|
|
|
|
10. Het midden van het |
• Te veel vloeistof. |
• Verlaag de hoeveelheid vloeistof med 15 ml/3 tl. |
||
|
|
brood is onvoldoende |
|
|
|
|
|
gebakken. |
• Stroomstoring tijdens het bakken. |
• Als tijdens het bakken de stroom is uitgevallen, |
|
|
|
|
|
blijft de brookbakmachine uit wanneer de storing |
|
|
|
|
|
is opgeheven. U moet het ongebakken brood dan |
|
|
|
|
|
uit de pan halen en van voren af aan beginnen |
|
|
|
|
|
met nieuwe ingrediënten. |
|
|
|
|
• Te grote hoeveelheden; de machine |
• Verlaag de hoeveelheden tot de maximaal |
|
|
|
|
kon het niet aan. |
toegestane hoeveelheden. |
|
|
|
|
|
|
|
|
11. Het brood is niet |
• Sneetjes zijn gesneden terwijl het |
• Laat brood minimaal 30 minuten op een rooster |
||
|
|
gemakkelijk in |
brood te warm was. |
afkoelen om stoom eruit te laten ontsnappen, |
|
|
|
sneetjes te snijden en |
|
voordat u het in sneetjes snijdt. |
|
|
|
is erg kleverig. |
|
|
|
|
|
|
• Er is geen goed mes gebruikt. |
• Gebruik een goed broodmes. |
|
|
|
|
|
|
|
|
|
|
KORSTKLEUREN DIKTE |
|
|
|
12. Donkere korst/korst te |
• De instelling voor een donkere korst is |
• Gebruik de volgende keer een medium of lage |
||
|
|
dik. |
gebruikt. |
stand. |
|
|
|
|
|
||
|
13. Het brood is |
• De broodbakmachine is defect. |
• Zie paragraaf “Onderhoud en klantenservice”. |
||
|
|
aangebrand. |
|
|
|
|
|
|
|
||
|
14. De korst is te licht. |
• Het brood is niet lang genoeg |
• Verleng de baktijd. |
||
|
|
|
gebakken. |
• Voeg 15 ml/3 tl. magere melkpoeder toe of |
|
|
|
|
• Het recept bevat geen melkpoeder of |
vervang 50% van het water door melk ter |
|
|
|
|
verse melk. |
bevordering van het bruin worden. |
|
|
|
|
|
|
|
|
|
|
PROBLEMEN MET PAN |
||
|
15. De deeghaak kan |
• U moet water in de broodpan gieten en |
• Volg na gebruik de reinigingsinstructies. Mogelijk |
||
|
|
niet worden |
de deeghaak vóór verwijdering laten |
moet u de deeghaak na het inweken iets draaien |
|
|
|
verwijderd. |
weken. |
om hem los te krijgen. |
|
|
|
|
|
|
|
|
16. Het brood kleeft aan |
• Kan gebeuren bij langdurig gebruik. |
• Smeer de binnenkant van de broodpan licht in |
||
|
|
de pan/is moeilijk door |
|
met plantaardige olie. |
|
|
|
schudden eruit te krijgen. |
|
• Zie paragraaf “Onderhoud en klantenservice” |
|
17

Het opsporen en oplossen van problemen (vervolg)
PROBLEEM |
|
MOGELIJKE OORZAAK |
|
OPLOSSING |
|
|
|
|
|
MECHANISCHE ASPECTEN VAN DE MACHINE |
||||
17. De broodmachine |
|
• Broodmachine staat niet aan |
|
• Controleer of de aan/uitschakelaar in de |
|
|
|||
functioneert niet/De |
|
|
|
AAN-stand staat. |
kneder beweegt niet. |
|
|
|
|
|
|
• De broodpan is niet goed in de |
|
• Controleer of de pan goed vergrendeld is. |
|
|
machine geplaatst. |
|
|
|
|
• De vertragingstimer werd ingesteld. |
|
• De broodmachine begint pas te werken wanneer |
|
|
|
|
de timer klaar is met aftellen en de begintijd van |
|
|
|
|
het programma is bereikt. |
|
|
|
|
|
18. De ingrediënten zijn |
|
• De broodbakmachine is niet aangezet. |
|
• Druk na het programmeren van het |
niet gemengd. |
|
|
|
bedieningspaneel op de starttoets om de |
|
|
|
|
broodbakmachine aan te zetten. |
|
|
• Er is vergeten de deeghaak in de |
|
• Controleer vóór het toevoegen van ingrediënten |
|
|
pan aan te brengen. |
|
altijd of de deeghaak zich op de as onder in de |
|
|
|
|
pan bevindt. |
|
|
|
|
|
19. Tijdens bedrijf wordt |
|
• In de oven is met ingrediënten |
|
• Pas ervoor op tijdens het toevoegen van |
een brandlucht |
|
gemorst. |
|
ingrediënten niet te morsen, want ingrediënten |
opgemerkt. |
|
|
|
kunnen op het verwarmingselement verbranden |
|
|
|
|
en rook veroorzaken. |
|
|
• De pan lekt. |
|
• Zie het hoofdstuk “Onderhoud en klantenservice” |
|
|
• De capaciteit van de broodpan is |
|
• Gebruik van de ingrediënten niet meer dan in het |
|
|
overschreden. |
|
recept is aanbevolen en meet ingrediënten altijd |
|
|
|
|
nauwkeurig af. |
|
|
|
|
|
20. Tijdens gebruik is per |
|
• Als de machine in de kneedfase uit gaat, gooit u alle ingrediënten weg, en begint u opnieuw. |
||
ongeluk de stekker uit |
|
• Als de machine in de rijsfase uit gaat, haalt u het deeg uit de broodpan, vormt u het opnieuw |
||
het stopcontact |
|
en legt u het in een ingevet broodblik van 23 x 12,5 cm. Bedek het blik en laat het deeg |
||
getrokken of is de |
|
rijzen, totdat het twee keer zo hoog is. |
|
|
stroom uitgevallen. |
|
Gebruik de alleen bakken-stand 12 of bak het brood in een voorverwarmde conventionele |
||
Hoe kan ik het brood |
|
oven 30-35 minuten lang op 200°C of tot goudbruin van kleur. |
||
redden? |
|
• Als de machine in de bakfase uit gaat, gebruikt u de alleen bakken-stand 12 of bakt u het |
||
|
|
brood in een voorverwarmde conventionele oven op 200°C en verwijdert u het bovenste |
||
|
|
rooster. Verwijder de pan voorzichtig uit de broodmachine en plaats hem op het onderste |
||
|
|
rooster in de oven. Bak het brood totdat het goudbruin van kleur is. |
||
|
|
|
|
|
21. H:HH wordt |
|
• De ovenkamer is te heet. |
|
• Trek de stekker uit het stopcontact en |
weergegeven en de |
|
|
|
laat de machine 30 minuten afkoelen. |
machine kan niet |
|
|
|
|
ingeschakeld worden. |
|
|
|
|
|
|
|
|
|
22. E:EE wordt |
|
• Broodmachine vertoont een storing. |
|
• Zie het hoofdstuk “Onderhoud en klantenservice” |
weergegeven en de |
|
Fout temperatuursensor |
|
|
machine werkt niet. |
|
|
|
|
|
|
|
|
|
18

Français
Avant de lire, dépliez la première page pour voir les illustrations
avant d’utiliser votre appareil Kenwood
●Lisez et conservez soigneusement ces instructions pour pouvoir vous y référer ultérieurement.
●Enlevez tous les emballages et étiquettes, y compris le support en carton se trouvant à l'intérieur de la chambre de cuisson.
sécurité
●Ne pas toucher les surfaces chaudes. Les surfaces accessibles sont susceptibles de devenir très chaudes en cours d’utilisation. Utilisez toujours un gant pour sortir le bol à pain chaud.
●Pour éviter tout déversement à l’intérieur de l’enceinte du four, toujours retirer le moule à pain de la machine avant d’ajouter les ingrédients. Les projections d’ingrédient sur l’élément chauffant peuvent brûler et causer alors un dégagement de fumée.
●N’utilisez pas cet appareil s’il y a un quelconque signe visible de dommage au cordon fourni ou s’il est accidentellement tombé.
●Ne mettez jamais l’appareil dans l'eau et ne laissez jamais le cordon d'alimentation ou la prise électrique se mouiller.
●Toujours débrancher la prise de courant de l’appareil après l’utilisation, avant la mise en place ou le retrait d'accessoires et avant le nettoyage.
●Ne laissez pas le cordon d'alimentation pendre du plan de travail et ne le laissez pas toucher des surfaces chaudes comme une plaque électrique ou à gaz.
●Cet appareil doit uniquement être utilisé sur une surface plane résistant au feu.
●Ne mettez pas votre main à l’intérieur du four après avoir enlevé le bol à pain.
●Ne touchez pas les pièces mobiles dans la machine à pain.
●Ne depassez pas les capacités maximales de charge établies car cela pourrait provoquer une surcharge de la machine à pain.
●Ne placez pas la machine à pain directement au soleil, près d’appareils chauds ou dans un courant d’air. Toutes ces choses peuvent affecter la température interne du four, et les résultats pourraient être voués à l'échec.
●Dans la malheureuse éventualité d’une coupure de courant après que les ingrédients aient été partiellement traités, vous devrez recommencer à zéro.
●N’utilisez pas cet appareil dehors.
●Ne faites pas fonctionner la machine à pain à vide car cela pourrait l’endommager sérieusement.
●N’utilisez pas l’intérieur de la machine comme lieu de stockage quelconque.
●Ne couvrez pas les trous d'échappement de la vapeur situés sur le couvercle et assurez-vous que la ventilation est adéquate autour de la machine à pain lorsqu elle fonctionne.
●Ne laissez pas les personnes handicapées se servir de l'appareil sans surveillance.
●Ne laissez pas les enfants jouer avec l’appareil ni l’utiliser.
●N’employez l’appareil qu’à la fin domestique prévue. Kenwood décline toute responsabilité dans les cas où l’appareil est utilisé incorrectement ou que les présentes instructions ne sont pas respectées.
avant de brancher l’appareil, assurez-vous que
●Assurez-vous que le courant électrique que vous utilisez est le même que celui indiqué sous votre appareil.
●Cet appareil est conforme à la directive 89/336 de la C.E.
avant d'utiliser votre machine à pain pour la première fois :
●Lavez tous les éléments de l'appareil (voir "Nettoyage").
légende
poignée du couverclehublot de surveillancepoignée de transportcrochet du moule
elément chauffant
poignée du moule à painbras pétrisseur
arbre de transmission
accouplement entre bras pétrisseur et moteurtasse graduée
double cuillère à mesurer : 1 cuillère à café & 1 cuillère à soupe
interrupteur marche / arrêt
panneau de contrôlefenêtre d’affichage
témoins de couleur de la croûte (claire, moyennement dorée, dorée)
témoins du poids du painbouton menu
bouton poids du pain
boutons du programmateurbouton de couleur de la croûte
bouton marche/arrêt
19

comment mesurer les ingrédients (veuillez vous référer aux tableaux 3 à 7)
Il est très important d’utiliser les quantités d’ingrédients exactes afin d’obtenir les meilleurs résultats possibles.
●Mesurez toujours les ingrédients liquides avec le gobelet doseur transparent gradué fourni. Le liquide doit atteindre juste le repère sur le godet au niveau des yeux, non en-dessous ou en-dessus de celui-ci (voir le 3).
●Utilisez toujours des liquides qui sont à la température ambiante, soit 20°C, à moins que le pain ne soit préparé avec le cycle rapide d'une heure. Suivez les instructions données dans le livre de recettes.
●Mesurez toujours les ingrédients liquides dans le gobelet doseur transparent avec les repères gradués fourni. Pour 1 cuillerée à café, remplir au ras et aplanir le dessus. Pour 1/2 cuillerée à café, mesurez jusqu'à la ligne (voir le 6).
interrupteur marche / arrêt
Votre machine à pain de Kenwood est équipée d’un interrupteur MARCHE / ARRÊT et ne fonctionne pas tant que l’interrupteur n’est pas actionné en position de
« marche ».
●Brancher l’appareil et presser l’interrupteur MARCHE / ARRÊT situé au dos de la machine à pain - 3:00 apparaît alors dans la fenêtre d’affichage.
●Toujours éteindre et débrancher votre machine à pain après l’utilisation.
utilisation de votre machine à pain
(veuillez vous référer aux grilles d’illustrations)
1Otez le moule à pain en tenant la poignée et en tournant le moule vers l’arrière de l’appareil.
2Mettez le bras pétrisseur en place.
3Versez l’eau dans le moule à pain.
4Ajoutez le reste des ingrédients dans le moule en
respectant l’ordre indiqué dans les recettes. Assurez-vous que tous les ingrédients ont été pesés avec précision.
Des quantités incorrectes risquent de donner de
7mauvais résultats.
8Insérez le moule dans la chambre de cuisson en le plaçant en biais, orienté vers l’arrière de l’appareil. Verrouillez ensuite le moule en le tournant vers l’avant de la machine.
9Abaisser la poignée et fermer le couvercle.
10Brancher et mettre en marche l’unité qui émet alors un bip et prend implicitement la valeur de réglage 1 (3:00).
11Appuyez sur le bouton MENU jusqu’à ce que le programme désiré soit sélectionné. Par défaut, la machine à pain est réglée sur 900 g & croûte moyennement dorée.
12Sélectionnez le poids du pain en appuyant sur le bouton POIDS DU PAIN jusqu’à ce que le témoin se place sur le poids désiré.
13Sélectionnez la couleur de la croûte en appuyant sur le bouton CROUTE jusqu’à ce que le témoin se place sur la couleur désirée (claire, moyennement dorée ou dorée).
14Appuyez sur le bouton MARCHE  . Pour arrêter ou annuler le programme, appuyez sur le bouton MARCHE/ARRET pendant 2 à 3 secondes.
15A la fin du programme de cuisson, débranchez la machine à pain.
16Utilisez le crochet fourni pour soulever la poignée du moule.
17Otez le moule à pain en tenant la poignée et en tournant le moule vers l’arrière de l’appareil.
Toujours utiliser des gants de cuisine car la poignée du moule peut être très chaude.
18Démoulez le pain sur une grille.
19Laissez le pain refroidir pendant 30 minutes au minimum, pour permettre à la vapeur de s’échapper, avant de le trancher. Le pain sera difficile à couper s’il est encore chaud.
20Nettoyez le moule et le bras pétrisseur immédiatement après l’utilisation (voir le paragraphe entretien et nettoyage).
20

grilles des programmes pain/pâte
Programme |
|
Durée totale |
Signal d’ajout |
Maintien au |
|||
|
du programme |
d’ingrédients |
|||||
|
|
|
|
|
|
|
chaud |
|
|
|
900g |
700g |
900g |
700g |
|
|
|
|
|
||||
1 |
Pain normal |
Recettes à base de farine blanche |
3:00 |
2:53 |
2:20 |
2:15 |
60 |
|
|
ou de farine de blé entier |
|
|
|
|
|
|
|
|
|
|
|
|
|
2 |
Pain français |
Produit une croûte plus croustillante, |
3:50 |
3:40 |
2:35 |
2:30 |
60 |
|
|
adapté pour les pains allégés en |
|
|
|
|
|
|
|
sucres et en graisses |
|
|
|
|
|
|
|
|
|
|
|
|
|
3 |
Blé entier |
Recettes à base de farine de blé |
3:40 |
3:32 |
|
- |
60 |
|
|
entier ou de farine complète |
|
|
|
|
|
|
|
|
|
|
|
|
|
4 |
Gâteaux |
Pâtes à frire & gâteaux sans levure |
1:40 |
|
- |
60 |
|
|
|
|
|
|
|
|
|
5 |
Pain sucré |
Recette de pain très concentré |
2:55 |
2:50 |
2:30 |
2:25 |
60 |
|
|
en sucre |
|
|
|
|
|
|
|
|
|
|
|
|
|
6 |
Rapide 700g |
Produit des pains en moins d’une |
0:58 |
|
- |
60 |
|
|
|
heure. Les pains nécessitent de l’eau |
|
|
|
|
|
7 |
Rapide 900g |
0:58 |
|
- |
60 |
||
chaude, plus de levure et moins de sel. |
|
||||||
8 |
Pâtes |
Pâtes à travailler à la main et à cuire |
1:30 |
|
- |
- |
|
|
|
dans votre four. |
|
|
|
|
|
|
|
|
|
|
|
|
|
9 |
Confitures |
Pour confectionner des confitures. |
1:20 |
|
- |
- |
|
|
|
|
|
|
|
|
|
10 Sans gluten |
Pour l’utilisation de farines et de |
2:50 |
|
- |
60 |
||
|
|
mélanges à pain sans gluten. |
|
|
|
|
|
|
|
|
|
|
|
|
|
11 Sandwich |
Croûte plus molle et texture plus dense. |
3:00 |
2:55 |
2:04 |
1:59 |
60 |
|
|
|
|
|
|
|
|
|
12 Cuisson |
Fonction de cuisson uniquement. |
1:00 |
|
- |
60 |
||
|
|
Peut être également utilisé pour |
|
|
|
|
|
|
|
réchauffer ou rendre croustillants |
|
|
|
|
|
|
|
des pains déjà cuits et refroidis. |
|
|
|
|
|
Un signal retentit avant la fin du deuxième cycle de pétrissage pour permettre d’ajouter des ingrédients, si la recette le nécessite.
La machine à pain se met automatiquement en mode maintien au chaud à la fin du cycle de cuisson. Elle reste sur ce mode pendant 1 heure environ, ou, jusqu’à ce que l’appareil soit éteint.
21
 Loading...