


 Loading...
User Guide
Coupon Eligible Converter Box with Analog Pass through
NS-DXA1-APT
Insignia
NS-DXA1-APT
Coupon Eligible Converter Box with Analog Pass Through
Contents
Welcome . . . . . . . . . . . . . . . . . . . . . . . . . . . . . . . .1
TV Converter Box Coupon Program. . . . . . . . . . . . . 1
Safety information . . . . . . . . . . . . . . . . . . . . . . . . .1 Introduction to digital TV . . . . . . . . . . . . . . . . . . . .2
How do I watch channels still broadcast in analog? . 2
Features. . . . . . . . . . . . . . . . . . . . . . . . . . . . . . . . .3
Package contents . . . . . . . . . . . . . . . . . . . . . . . . . . . 3 Front . . . . . . . . . . . . . . . . . . . . . . . . . . . . . . . . . . . . . 3 Back . . . . . . . . . . . . . . . . . . . . . . . . . . . . . . . . . . . . . 3 Remote control . . . . . . . . . . . . . . . . . . . . . . . . . . . . . 4
Setting up your converter box . . . . . . . . . . . . . . . .5
Connecting an antenna . . . . . . . . . . . . . . . . . . . . . . 5 Connecting to a VCR or DVD player. . . . . . . . . . . . . 5 Setting basic options . . . . . . . . . . . . . . . . . . . . . . . . 5
Using your converter box . . . . . . . . . . . . . . . . . . . .6
Turning your converter box on or off. . . . . . . . . . . . . 6 Setting the output channel . . . . . . . . . . . . . . . . . . . . 6 Changing channels. . . . . . . . . . . . . . . . . . . . . . . . . . 7 Adjusting the volume . . . . . . . . . . . . . . . . . . . . . . . . 7 Searching for channels. . . . . . . . . . . . . . . . . . . . . . . 7 Adding new channels to the channel list . . . . . . . . . 7 Editing the memorized channel list. . . . . . . . . . . . . . 8 Creating a Favorites list . . . . . . . . . . . . . . . . . . . . . . 8 Manually adding channels . . . . . . . . . . . . . . . . . . . . 8 Selecting the TV type . . . . . . . . . . . . . . . . . . . . . . . . 9 Selecting the TV program aspect ratio . . . . . . . . . . . 9 Setting the Sleep timer . . . . . . . . . . . . . . . . . . . . . . 10 Displaying the channel banner . . . . . . . . . . . . . . . . 10 Using the Simple Guide . . . . . . . . . . . . . . . . . . . . . 10 Viewing TV program information . . . . . . . . . . . . . . 10 Controlling closed captions . . . . . . . . . . . . . . . . . . 11 Controlling closed captions . . . . . . . . . . . . . . . . . . 11 Turning the lock system on or off . . . . . . . . . . . . . . 11 Changing the password . . . . . . . . . . . . . . . . . . . . . 11 Blocking channels. . . . . . . . . . . . . . . . . . . . . . . . . . 12 Blocking children’s TV programs . . . . . . . . . . . . . . 12 Blocking general TV programs . . . . . . . . . . . . . . . . 13 Blocking movies . . . . . . . . . . . . . . . . . . . . . . . . . . . 13 Downloading rating information . . . . . . . . . . . . . . . 14 Using the on-screen menu system. . . . . . . . . . . . . 14 Programming the converter box remote control . . . 16
Troubleshooting . . . . . . . . . . . . . . . . . . . . . . . . . .18 Specifications. . . . . . . . . . . . . . . . . . . . . . . . . . . .18 Legal notices . . . . . . . . . . . . . . . . . . . . . . . . . . . .18 90-day limited warranty . . . . . . . . . . . . . . . . . . . .19
Welcome
Congratulations on your purchase of a high-quality Insignia product. Your NS-DXA1-APT represents the state of the art in coupon eligible converter box design and is designed for reliable and trouble-free performance.
TV Converter Box Coupon Program
You should have already received and applied your coupon towards the purchase of your converter box. However, if you did not, take your receipt and coupon to your local Best Buy and they will apply your coupon.
If you do not have a coupon, you can download one at https://www.dtv2009.gov/.
Safety information
CAUTION
RISK OF ELECTRIC SHOCK
DO NOT OPEN
CAUTION: TO REDUCE THE RISK OF ELECTRIC SHOCK DO NOT REMOVE THE COVER (OR BACK). NO USER-SERVICEABLE PARTS INSIDE. REFER SERVICING TO QUALIFIED SERVICE PERSONNEL.
The lightning flash with arrowhead symbol within a triangle is intended to alert you to the presence of uninsulated dangerous voltage within
your converter box’s enclosure that may be of sufficient magnitude to constitute risk of electric shock to persons.
The exclamation point within a triangle is intended to alert you to the presence of important operating and
maintenance (servicing) instructions in the literature accompanying your converter box.
Warning
To prevent fire or electric shock hazard, do not expose your converter box to rain or moisture.
Warning
Do not install your converter box in a confined space such a bookcase or similar unit.
www.insignia-products.com |
1 |

|
|
|
|
|
|
|
|
|
Converter Box with Analog Pass Through |
|
|
|
|
|
|
|
|
|
12 Use only with the cart, stand, |
||
|
|
Warning |
|
|
|
|
|
|
tripod, bracket, or table |
|
|
|
Do not block any ventilation openings. Install in accordance with |
|
specified by the manufacturer or |
||||||
|
|
the manufacturer’s instructions. Slots and openings in the |
|
sold with your converter box. |
||||||
|
|
cabinet are provided for ventilation and to ensure reliable |
|
|||||||
|
|
|
When a cart is used, use |
|||||||
|
|
operation of your converter box and to protect it from |
|
|||||||
|
|
|
caution when moving the |
|||||||
|
|
overheating. |
|
|||||||
|
|
|
cart/converter box combination to avoid injury |
|||||||
|
|
The openings should be never be blocked by placing your |
|
|||||||
|
|
|
from tip-over. |
|||||||
|
|
converter box on a bed, sofa, rug, or other similar surface.Your |
|
|||||||
|
|
converter box should not be placed in a built-in installation such |
13 Unplug your converter box during lightning |
|||||||
|
|
as a bookcase or rack unless proper ventilation is provided or |
|
storms or when unused for long periods of |
||||||
|
|
the manufacturer's instructions have been adhered to. |
|
time. |
||||||
|
|
|
|
|
|
|
|
|
||
|
|
|
|
|
|
|
|
14 Refer all servicing to qualified service |
||
|
|
Caution |
|
|
|
|
|
|
personnel. Servicing is required when your |
|
|
|
Your converter box should not be exposed to water (dripping or |
|
converter box has been damaged in any way, |
||||||
|
|
splashing) and no objects filled with liquids, such as vases, |
|
such as when the power cord or plug is |
||||||
|
|
should be placed on it. |
|
|||||||
|
|
|
damaged, liquid has been spilled or objects |
|||||||
|
|
|
|
|
|
|
|
|
||
|
|
|
|
|
|
|
|
|
have fallen into your converter box, your |
|
|
|
Power cord warning |
|
converter box has been exposed to rain or |
||||||
|
|
Most appliances recommend they be placed upon a dedicated |
|
moisture, does not operate normally, or has |
||||||
|
|
circuit—a single outlet circuit which powers only that appliance |
|
been dropped. |
||||||
|
|
and has no additional outlets or branch circuits. |
Introduction to digital TV |
|||||||
|
|
extension cords, frayed power cords, or damaged or cracked |
||||||||
|
|
Overloaded power outlets, loose or damaged wall outlets, |
|
|
||||||
|
|
wire insulation are dangerous. Any of these conditions could |
What’s digital TV about? |
|||||||
|
|
result in electric shock or fire. Periodically examine the cord of |
||||||||
|
|
|
|
|||||||
|
|
your converter box, and if its appearance indicates damage or |
The TV broadcasting industry is in the process |
|||||||
|
|
deterioration, unplug it, discontinue use of your converter box, |
of converting from analog TV signals to digital |
|||||||
|
|
and have the cord replaced with an exact replacement part by an |
TV signals. The conversion will be complete by |
|||||||
|
|
authorized service personnel. |
||||||||
|
|
February 2009. |
||||||||
|
|
Protect the power cord from physical or mechanical abuse, |
||||||||
|
|
A digital TV signal transmits more data than an |
||||||||
|
|
such as being twisted, kinked, pinched, closed in a door, or |
||||||||
|
|
analog signal. This increase in data provides a |
||||||||
|
|
walked upon. Pay particular attention to plugs, wall outlets, and |
||||||||
|
|
the point where the cord exits your converter box. |
better picture and sound with less static and |
|||||||
|
|
To disconnect the main power from your converter box, unplug |
interference. |
|||||||
|
|
the power cord from the power outlet. When installing your |
How will the conversion to digital affect me? |
|||||||
|
|
converter box, make sure that the plug is easily accessible. |
||||||||
|
|
If you use an outside antenna and have an older |
||||||||
|
|
|
|
|
|
|
|
|||
Important safety |
||||||||||
(analog) TV, you may not be able to receive TV |
||||||||||
instructions |
signals after the conversion to digital signals is |
|||||||||
complete. |
||||||||||
1 |
Read these instructions. |
To receive digital signals on an analog TV, you |
||||||||
need a converter box like the NS-DXA1-APT. |
||||||||||
2 |
Keep these instructions. |
Your converter box receives the digital signal |
||||||||
3 |
Heed all warnings. |
from the antenna, then converts the digital signal |
||||||||
into analog so your analog TV can display the |
||||||||||
4 |
Follow all instructions. |
|||||||||
picture and play the sound. |
||||||||||
|
|
5 Do not use your converter box near water. |
For more information about the transition to |
|||||||
|
|
6 Clean only with a dry cloth. |
digital TV signals, visit: |
|||||||
|
|
• |
www.fcc.gov/cgb/consumerfacts/digitaltv.html |
|||||||
|
|
7 Do not block any ventilation openings. Install |
||||||||
|
|
• |
www.digitaltips.org |
|||||||
|
|
|
in accordance with the manufacturer's |
|||||||
|
|
|
• |
www.dtvtransition.org |
||||||
|
|
|
instructions. |
|||||||
|
|
|
• |
www.dtvanswers.com |
||||||
|
|
8 Do not install near any heat sources such as |
||||||||
|
|
How do I watch channels still broadcast in analog? |
||||||||
|
|
|
radiators, heat registers, stoves, or other |
|||||||
|
|
|
apparatus (including amplifiers) that |
The analog pass-through functionality in your |
||||||
|
|
|
produces heat. |
|||||||
|
|
|
digital converter box lets you continue viewing |
|||||||
|
|
9 Do not defeat the safety purpose of the |
||||||||
|
|
analog channels. If some of the channels in your |
||||||||
|
|
|
polarized plug. A polarized plug has two |
area are digital and some still analog, connect |
||||||
|
|
|
blades with one wider than the other. The |
your converter box, then turn it on to watch |
||||||
|
|
|
wide blade is provided for your safety. If the |
digital channels and turn it off to watch analog |
||||||
|
|
|
provided plug does not fit into your outlet, |
channels. |
||||||
|
|
|
consult an electrician for replacement of the |
|
|
|||||
|
|
|
obsolete outlet. |
|
|
|||||
10Protect the power cord from being walked on or pinched particularly at plugs, convenience receptacles, and the point where they exit from the apparatus.
11Only use attachments or accessories specified by the manufacturer.
2 |
www.insignia-products.com |
Converter Box with Analog Pass Through
Digital sub channels
The increase data capacity of a digital signal lets broadcasters fit several channels into the same bandwidth as an analog signal. Broadcasters may use these sub channels to transmit a variety of information, such as weather forecasts, foreign languages, or commercials.
A digital sub channel is indicated by the main channel number followed by a dash and the sub channel number. For example, 5-1 indicates sub channel 1 of the main channel 5.
Features
Package contents
•RF cable (1)
•Video cable (1)
•Audio (L/R) cable (1)
•Remote control (1)
•Battery (size AAA) (1)
•Quick Start Guide (1)
•User Guide (1)
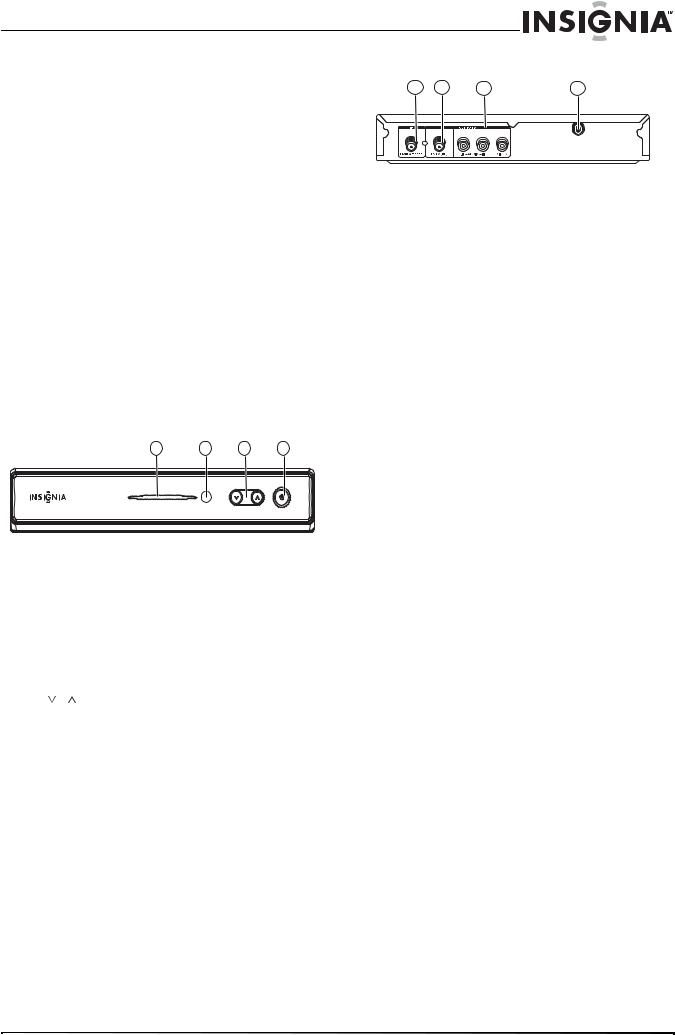
Front
1 |
2 |
3 |
4 |
Back
1 |
2 |
3 |
4 |
No. |
Component |
Description |
|
|
|
1 |
From Antenna |
Connect this jack to your antenna. |
|
|
|
2 |
To TV (RF) |
If your TV does not have A/V jacks, |
|
|
connect this jack to the antenna IN jack |
|
|
on your TV. |
|
|
|
3 |
R AUDIO |
If your TV has A/V jacks, connect these |
|
L AUDIO |
jacks to the corresponding jacks on |
|
VIDEO |
your TV. These jacks provide the best |
|
audio and video. If your TV does not |
|
|
|
|
|
|
have A/V jacks, connect your TV to the |
|
|
To TV (RF) jack. |
|
|
|
4 |
Power cord |
Plug this cord into a power outlet or |
|
|
surge protector. |
No. |
Component |
Description |
|
|
|
1 |
Power indicator |
Lights when your converter box is |
|
|
turned on. |
|
|
Red—Standby mode |
|
|
Blue—On mode |
|
|
Blinking—Receiving remote control |
|
|
signal |
|
|
|
2 |
Remote control |
Receives signals from the remote |
|
sensor |
control. Do not block. |
|
|
|
3 |
/ |
Press to scan through memorized |
|
|
channels. |
4 |
Power |
Press to turn your converter box on or |
|
|
off. |
www.insignia-products.com |
3 |

Remote control
|
TV |
|
POWER |
14 |
|
1 |
POWER |
|
|||
|
|
||||
|
SLEEP |
|
15 |
||
2 |
SIGNAL |
SAP |
ZOOM |
||
16 |
|||||
3 |
DISPLAY MENU |
GUIDE |
|||
17 |
|||||
4 |
|
|
|
||
|
|
|
|
||
5 |
|
|
|
|
|
6 |
|
|
|
|
|
7 |
|
|
|
|
|
8 |
EXIT |
|
CCD |
18 |
|
|
|
|
|||
9 |
|
FAV |
|
|
|
10 |
VOL |
CH GA |
|
||
|
|
|
P |
19 |
|
|
|
|
E |
||
11 |
|
MUTE |
|
|
|
|
|
|
|
||
|
1 |
2 |
3 |
|
|
12 |
4 |
5 |
6 |
|
|
|
7 |
8 |
9 |
|
|
13 |
|
0 |
RECALL |
20 |
|
No. |
Button |
Description |
|
|
|
1 |
TV POWER |
Press to turn the TV on or off. For |
|
|
more information, see |
|
|
“Programming the converter box |
|
|
remote control” on page 16. |
|
|
|
2 |
SLEEP |
Press to set the Sleep timer. For |
|
|
more information, see “Setting |
|
|
the Sleep timer” on page 10. |
|
|
|
3 |
SIGNAL |
Press to view the signal strength |
|
|
for the current channel. You will |
|
|
also hear a series of beeps. The |
|
|
faster the beeps sound, the |
|
|
stronger the signal is. |
|
|
|
4 |
DISPLAY |
Press to view information about |
|
|
the program on the current TV |
|
|
channel. |
|
|
|
5 |
MENU |
Press to open or close the |
|
|
on-screen menu. |
|
|
|
6 |
|
Press to highlight options in a |
|
|
menu. |
|
|
|
7 |
(Select) |
Press after you enter a channel |
|
|
number with the button numbers |
|
|
to tune to the channel |
|
|
immediately. |
|
|
In on-screen menus, press to |
|
|
select a highlighted option. |
|
|
|
8 |
EXIT |
Press to close any on-screen |
|
|
display or menu and return to |
|
|
normal TV viewing. |
|
|
|
9 |
FAV |
Press to select a channel from the |
|
|
Favorites list. For more |
|
|
information, see “Creating a |
|
|
Favorites list” on page 8. |
|
|
|
10 |
VOL+/VOL– |
Press to increase or decrease the |
|
|
volume. |
|
|
|
11 |
MUTE |
Press to turn off the sound. Press |
|
|
again to restore the sound. |
|
|
|
12 |
Numbers |
Press to enter a channel number |
|
|
or parental control password. |
Converter Box with Analog Pass Through
No. |
Button |
Description |
|
|
|
|
|
13 |
— |
|
Press to enter a sub channel |
|
|
|
number. For example, to enter |
|
|
|
sub channel 1 for the main |
|
|
|
channel 2, press 2, press this |
|
|
|
button, then press 1. |
|
|
|
For more information about sub |
|
|
|
channels, see “Digital sub |
|
|
|
channels” on page 3. |
|
|
|
|
14 |
POWER |
Press to turn your converter box |
|
|
|
|
on or off. |
|
|
|
|
15 |
SAP |
|
Press to select a secondary audio |
|
|
|
program (SAP) for the current TV |
|
|
|
program. |
|
|
|
|
16 |
ZOOM |
|
Press to select the aspect ratio. |
|
|
|
|
17 |
GUIDE |
Press to open the Simple Guide. |
|
|
|
|
For more information, see “Using |
|
|
|
the Simple Guide” on page 10. |
|
|
|
|
18 |
CCD |
|
Press to select the closed caption |
|
|
|
mode, if available. For more |
|
|
|
information, see “Controlling |
|
|
|
closed captions” on page 11. |
|
|
|
|
19 |
CH |
/ PAGE |
Press to go to the next or |
|
CH |
/ PAGE |
previous channel, or press to go |
|
to the next or previous page in the |
||
|
|
|
Channel Edit or Block Channel |
|
|
|
menu. |
|
|
|
|
20 |
RECALL |
Press to go to the last viewed |
|
|
|
|
channel. |
Note
If you use a universal remote control, you can use it to control your converter box.
To program the universal remote control to control your converter box, set the remote control’s operation mode to Set-Top Box, then set your remote control to the manufacturer codes for LG or Zenith.
Installing the remote control battery
To install the remote control battery:
1Remove the battery compartment cover on the back of the remote control.
2Insert one AAA battery into the battery compartment. Make sure that the + and – on the battery align with the + and – in the battery compartment.
3 Replace the battery compartment cover.
4 |
www.insignia-products.com |

Converter Box with Analog Pass Through
Setting up your converter box
Connecting an antenna
Note
If you need information about the type of antenna you
should use in your area, visit www.antennaweb.org on the
Internet.
To connect your converter box to an antenna:
1Disconnect the coaxial cable from the Antenna IN jack on the back of the TV.
2Connect the coaxial cable to the From Antenna jack on the back of your converter box.
|
|
|
Back of TV |
|
|
|
|
ANTENNA |
|
|
|
|
|
INPUT |
|
|
|
AntennaFrom |
(RF)TVTo |
OR |
AUDIOL |
AUDIO/R |
VIDEO |
|
|
|
|
|
Back of converter box
3Connect the supplied audio cable to the
R AUDIO and L AUDIO jacks on the back of your converter box, connect the supplied video cable to the VIDEO jack on the back of your converter box, then connect the other ends of the cables to the corresponding jacks on the back of the TV. This connection provides the best picture and sound.
Or
Connect the supplied coaxial cable to the To TV (RF) jack on the back of your converter box, then connect the other end of the cable to the Antenna IN jack on the back of the TV. For best performance with this connection, change the Audio Output option to Mono. For more information, see “OPTION menu” on page 15.
4Plug the power cord into a power outlet or surge protector. The light on the box turns red.
5Turn on the TV and set the TV to the appropriate video source if you used the audio and video cables to connect your converter box to the TV. (For more information, see the TV’s documentation.)
Or
Tune the TV to channel 3 if you used the coaxial cable to connect your converter box to the TV.
Note
If you connected the TV with a coaxial cable, set the Audio Output option to Mono.
When your converter box is turned off, the signal from the From Antenna jack is sent through the To TV (RF) jack to your TV or monitor.
Connecting to a VCR or DVD player
Note
TiVo® does not support converter boxes, only set-top satellite and cable boxes. If you have a cable or satellite set-top box that you want to connect to your TiVo, you can use an IR-blaster to send signals from the TiVo to the set-top box to change channels so that you are on the correct channel to record.
You can connect your converter box to a video device, such as a VCR or DVD player, then connect the VCR or DVD player to the TV.
Note
If you have a VCR connected to the TV to record TV programs, you must set the channel on the converter box to the TV channel you want to record.
If you have programmed recordings set up, you must set the channel on the converter box to the TV channel for the programmed recording before the start of each recording session.
To connect a video device:
1Disconnect the coaxial cable that goes from the antenna connection to the video device, if connected.
2Connect the coaxial cable from the antenna connection to the From Antenna jack on the back of your converter box.
3Connect the supplied audio cable to the
R AUDIO and L AUDIO jacks on the back of your converter box, connect the supplied video cable to the VIDEO jack on the back of your converter box, then connect the other ends of the cables to the corresponding jacks on the back of the video device.
4Depending on the type of AV jacks on the video device and the TV, connect the Audio and Video OUT jacks on the video device to the Audio and Video IN jacks on the TV.
5Plug the power cord into a power outlet or surge protector. The light on the box turns red.
6Turn on the TV and set the TV to the appropriate video source. (For more information, see the TV’s documentation).
Setting basic options
Note
If you connected the TV to the To TV (RF) jack, the TV must be tuned to channel 3. Otherwise, you will not see a picture.
When you turn on your converter box for the first time, the Install Guide opens where you can:
•Select the menu language
•Select the TV aspect ratio
•Search for and memorize channels
•Select the time zone
www.insignia-products.com |
5 |

|
|
|
|
|
|
|
Converter Box with Analog Pass Through |
|
To set basic options: |
6 When the search is complete, press . The |
|||||
|
1 Turn on your converter box and TV. The |
Time Zone screen opens. |
|||||
|
|
WELCOME screen opens. |
|
||||
7 |
Press |
or to select a time zone, then |
2 Press . The Menu Language screen opens. |
press |
. The THANK YOU screen opens. |
3Press  or
or  to select the menu language (English, Spanish, or French), then
press  . The TV Aspect Ratio screen opens.
8Press  to complete the setup and close the Install Guide.
Using your converter box
Turning your converter box on or off
To turn your converter box on or off:
1Make sure that the TV is connected to your converter box and that the TV and your converter box are plugged into power outlets.
2Press POWER. The power LED lights.
•Red—Standby mode
•Blue—On mode
4Press  or
or  to select the aspect ratio for your TV, then press
  . If the TV has a standard (normal) size screen, select Normal TV. If the TV has a wide size screen, select Wide TV. The Searching for Channels screen opens.
5Press  to start the channel search. Your converter box searches for available channels in your area and stores them in memory.
•Blinking—Receiving remote control signal
3If this is the first time you have turned on your converter box, follow the on-screen prompts to set basic options. For more information, see “Setting basic options” on page 5.
4To turn off your converter box, press POWER again.
Setting the output channel
If the TV is connected through the To TV (RF) jack, you need to set the output channel for the TV signal. The TV must be tuned to the same channel as output channel.
6 |
www.insignia-products.com |
Loading...