


User Guide
Digital AM/FM Clock Radio
NS-CLOPP2
Before using your new product, please read these instructions to prevent any damage.

NS-CLOPP2
Insignia NS-CLOPP2
Digital AM/FM Clock Radio
Contents
Introduction . . . . . . . . . . . . . . . . . . . . . . . . . . . . . . . . . . . . . . . . . . . . . . 2 Important Safety Instructions . . . . . . . . . . . . . . . . . . . . . . . . . . . . . . . 3 Features. . . . . . . . . . . . . . . . . . . . . . . . . . . . . . . . . . . . . . . . . . . . . . . . . . 5 Set up your clock radio . . . . . . . . . . . . . . . . . . . . . . . . . . . . . . . . . . . . . 8 Use your clock radio. . . . . . . . . . . . . . . . . . . . . . . . . . . . . . . . . . . . . . . 12 Clean your clock radio . . . . . . . . . . . . . . . . . . . . . . . . . . . . . . . . . . . . . 16 Troubleshooting . . . . . . . . . . . . . . . . . . . . . . . . . . . . . . . . . . . . . . . . . . 16 Specifications . . . . . . . . . . . . . . . . . . . . . . . . . . . . . . . . . . . . . . . . . . . . 17 Legal notices. . . . . . . . . . . . . . . . . . . . . . . . . . . . . . . . . . . . . . . . . . . . . 17 One-year limited warranty - Insignia . . . . . . . . . . . . . . . . . . . . . . . . 21
Introduction
Congratulations on your purchase of this high-quality Insignia Digital AM/FM Clock Radio. This system represents the state of the art in clock radio design and is designed for reliable and trouble-free performance.
This User Guide explains how to correctly set up, operate, and get the best performance from your Insignia clock radio. Read this guide carefully before setting up your clock radio, then keep it handy for quick reference.
2www.insigniaproducts.com

Digital AM/FM Clock Radio
Important Safety Instructions
1 Read these instructions.
2 Keep these instructions.
3 Heed all warnings.
4 Follow all instructions.
5 Do not use this apparatus near water.
6 Clean only with dry cloth.
7 Do not block any ventilation openings. Install in accordance with themanufacture’s instructions.
8 Do not install near any heat sources such as radiators, heat registers, stoves, or other apparatus (including amplifiers) that product heat.
9 Do not defeat the safety purpose of the polarized or grounding plug. A polarized plug has two blades with one wider than the other. A grounding plug has two blades and a third grounding prong. The wide blade or the third prong is provided for your safety. If the provided plug does not fit into your outlet, consult an electrician for replacement of the obsolete outlet.
10 Protect the power cord from being walked on or pinched particularly at the plugs, convenience receptacles, and at the point where they exit from the apparatus.
11 Only use attachments/accessories provided by the manufacturer.
12 Use only with the cart, stand, tripod, bracket, or table specified by the manufacturer, or sold with the apparatus. When a cart or rack is used, use caution when moving the cart/apparatus combination to avoid injury from tip-over.
13 Unplug the apparatus during lightning storms or when unused for long periods of time.
www.insigniaproducts.com 3

NS-CLOPP2
14.Refer all servicing to qualified personnel. Servicing is required when the apparatus has been damaged in any way, such as power supply cord or plug is damaged, liquid has been spilled or objects have fallen into the apparatus, has been exposed to rain or moisture, does not operate normally, or has been dropped.
15 Please keep the unit in a good ventilation environment. Do not install this equipment in a confined space such as a bookcase or similar unit.
16 WARNING: To reduce the risk of fire or electric shock, do not expose apparatus to rain or moisture. The apparatus shall not be exposed to dripping or apparatus.
17 WARNING: The main plug is used as a disconnect device. The disconnect device shall remain readily operable.
18 WARNING: The batteries (battery pack or batteries installed) shall not be exposed to excessive heat, such as sunshine, fire, or the like.
19
The lightning flash with arrowhead symbol within an equilateral triangle is intended to alert the user to the presence of non-insulated “dangerous voltage” within the product’s enclosure that may be of sufficient magnitude to constitute a risk of electrical shock.
WARNING: To reduce the risk of electric shock, do not remove cover (or back) as The exclamation point within an equilateral triangle is intended to alert the user to the presence of important operating and maintenance instructions in the literature accompanying the appliance.
20 

 The apparatus is classified as a class II apparatus.
4www.insigniaproducts.com
Digital AM/FM Clock Radio
Features
Package contents
Your clock radio includes the following items:
•Clock radio
•AC adapter
•Batteries “AA” (2)
•User Guide
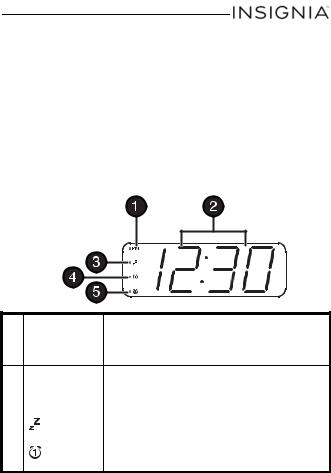
LED display
# |
Item |
Description |
|
|
|
|
|
1 |
PM indicator |
When lit, indicates that the time shown is after |
|
|
|
noon (PM). |
|
2TIME/ALARM/ In standby mode, digits show current time or FREQUENCY alarm time hours and minutes.
|
display |
In radio mode, digits show the current radio |
|
|
frequency. |
|
|
|
3 |
Sleep timer |
When lit, indicates that the sleep timer is set. |
|
indicator |
|
|
|
|
4 |
Alarm 1 |
When lit, indicates that Alarm 1 is set. |
|
indicator |
|
www.insigniaproducts.com 5

|
|
NS-CLOPP2 |
|
|
|
# |
Item |
Description |
|
|
|
5 |
Alarm 2 |
When lit, indicates that Alarm 2 is set. |
|
indicator |
|
|
|
|
Top panel
|
|
|
|
|
|
|
|
|
|
|
|
|
|
|
|
|
|
|
|
|
|
|
|
|
|
|
|
|
|
|
|
|
|
|
|
|
|
|
|
|
|
|
|
|
|
|
|
|
|
|
|
|
|
|
|
|
|
|
|
|
|
|
|
|
|
|
|
|
|
|
|
|
|
|
|
|
|
|
|
|
|
|
|
|
|
|
|
|
|
|
|
|
|
|
|
|
|
|
|
|
|
|
|
|
|
|
|
|
|
|
|
|
|
|
|
|
|
|
|
|
|
|
|
|
|
|
|
|
|
|
|
|
|
|
|
|
|
|
|
|
|
|
|
|
|
|
|
|
|
|
|
|
|
|
|
|
|
|
|
|
|
|
|
|
|
|
|
|
|
|
|
|
|
|
|
|
|
|
|
|
|
|
|
|
|
|
|
|
|
|
|
|
|
|
|
|
|
|
|
|
|
|
|
|
|
|
|
|
|
|
|
|
|
|
|
|
|
|
|
|
|
|
|
|
|
|
|
|
|
|
|
|
|
|
|
|
|
|
|
|
|
|
|
|
|
|
|
|
|
|
|
|
|
|
|
|
|
|
|
|
|
|
|
|
|
|
|
|
|
|
|
|
|
|
|
|
|
|
|
|
|
|
|
|
|
|
|
|
|
|
|
|
|
|
|
|
|
|
|
|
|
|
|
|
|
|
|
|
|
|
|
|
|
|
|
|
|
|
|
# |
|
Item |
|
Description |
|||||||||||||||||||||||||||||||||||
|
|
|
|
|
|
|
|
|
|
|
|
|
|
|
|
|
|
|
|
|
|
|
|
|
|
|
|
|
|
|
|
|
|
|
|
|
|
|
|
1 |
|
|
|
(power) |
|
Press to turn the radio on. Press again to turn the |
|||||||||||||||||||||||||||||||||
|
|
|
|
||||||||||||||||||||||||||||||||||||
|
|
|
button |
|
radio to standby mode. |
||||||||||||||||||||||||||||||||||
|
|
|
|
|
|
|
|
|
|
|
|
|
|
|
|
|
|
|
|
|
|
|
|
|
|
|
|
|
|
|
|
|
|
|
|
|
|
|
|
2 |
|
AM/FM |
|
Press to toggle between AM and FM channels. |
|||||||||||||||||||||||||||||||||||
|
|
|
(RADIO) button |
|
|
|
|
|
|
|
|
|
|
|
|
|
|
|
|
|
|
|
|
|
|
|
|
|
|
||||||||||
|
|
|
|
|
|
|
|
|
|
|
|
|
|
|
|
|
|
|
|
|
|
|
|
|
|
|
|
|
|
|
|
|
|
|
|
|
|
|
|
3 |
|
|
|
|
|
|
|
|
|
|
|
|
|
In radio mode, press to tune the radio to the |
|||||||||||||||||||||||||
|
|
|
|
|
|
|
|
|
|
|
|
|
|
|
previous or next station. |
||||||||||||||||||||||||
|
|
|
TUNE / |
|
When setting the clock, press to set the hours and |
||||||||||||||||||||||||||||||||||
|
|
|
|
minutes backward or forward. |
|||||||||||||||||||||||||||||||||||
|
|
|
|
|
|
|
|
|
|
|
|
|
|
|
When setting the alarm, use to select the alarm |
||||||||||||||||||||||||
|
|
|
|
|
|
|
|
|
|
|
|
|
|
|
time or to select the alarm mode or adjust the |
||||||||||||||||||||||||
|
|
|
|
|
|
|
|
|
|
|
|
|
|
|
alarm volume. |
||||||||||||||||||||||||
|
|
|
|
|
|
|
|
|
|
|
|
|
|
|
|
|
|
|
|
|
|
|
|
|
|
|
|
|
|
|
|
|
|
|
|
|
|
|
|
6www.insigniaproducts.com

Digital AM/FM Clock Radio
# |
Item |
Description |
|
|
|
4 |
SNOOZE |
When the alarm sounds, press to mute the alarm |
|
(DIMMER) |
for nine minutes. |
|
button |
Press to adjust the display brightness. |
|
|
|
5 |
/MEM/ |
In standby mode, press and hold to set the clock |
|
time. When listening to the radio, press and hold |
|
|
PRESET button |
to enter preset mode for presetting your desired |
|
|
station or press to select a preset station. |
|
|
|
6 |
(sleep) |
Press to set the sleep timer. You can select 90 |
|
button |
min, 60 min, 45 min, 30 min, 15 min, or OFF. |
|
|
The time appears on the display. |
|
|
|
7 |
VOL –/ |
In AM or FM mode, press to decrease the volume. |
|
button |
In alarm mode, press to set alarm 1. |
|
|
|
8 |
VOL+/ |
In AM or FM mode, press to increase the volume. |
|
button |
In alarm mode, press to set alarm 2. |
|
|
|
www.insigniaproducts.com 7

NS-CLOPP2
Back panel
# |
Item |
Description |
|
|
|
1 |
Battery |
Insert two AA batteries into this compartment for |
|
compartment |
battery backup. |
|
|
|
2 |
FM antenna |
Improves FM radio reception. |
|
wire |
|
|
|
|
3 |
AC power |
Plug the AC power adapter into a wall plug to |
|
adapter |
power your clock radio. |
Set up your clock radio
Install the backup batteries
The clock radio uses a backup battery system to provide continuous alarm operation and clock settings in the event of a power failure. If the backup batteries have been installed and a power failure occurs or the AC power adapter is accidentally disconnected, the display will not remain lit, but the current time and alarm time settings will be temporarily maintained. Otherwise, you must reset the time and alarm settings.
8www.insigniaproducts.com
 Loading...