


 Loading...
USER GUIDE
LED TV User Guide
Before using your new product, please read these instructions to prevent any damage.

Contents
Introduction . . . . . . . . . . . . . . . . . . . . . . . . . . . . . . . . . . . . . . . . . . . . . . . . . . . . . . . . . . . . . . . . . . . . . . . . . . . . . . . . . . . . . 4
INlink . . . . . . . . . . . . . . . . . . . . . . . . . . . . . . . . . . . . . . . . . . . . . . . . . . . . . . . . . . . . . . . . . . . . . . . . . . . . . . . . . . . . . . . . . . . . . . . . . . . . . . . .4 DTS® audio enhancement . . . . . . . . . . . . . . . . . . . . . . . . . . . . . . . . . . . . . . . . . . . . . . . . . . . . . . . . . . . . . . . . . . . . . . . . . . . . . . . . . . . .4 Game mode . . . . . . . . . . . . . . . . . . . . . . . . . . . . . . . . . . . . . . . . . . . . . . . . . . . . . . . . . . . . . . . . . . . . . . . . . . . . . . . . . . . . . . . . . . . . . . . . . .4 Audio accessibility . . . . . . . . . . . . . . . . . . . . . . . . . . . . . . . . . . . . . . . . . . . . . . . . . . . . . . . . . . . . . . . . . . . . . . . . . . . . . . . . . . . . . . . . . . .4
TV components . . . . . . . . . . . . . . . . . . . . . . . . . . . . . . . . . . . . . . . . . . . . . . . . . . . . . . . . . . . . . . . . . . . . . . . . . . . . . . . . . . 4
TV front . . . . . . . . . . . . . . . . . . . . . . . . . . . . . . . . . . . . . . . . . . . . . . . . . . . . . . . . . . . . . . . . . . . . . . . . . . . . . . . . . . . . . . . . . . . . . . . . . . . . . 4
Jacks . . . . . . . . . . . . . . . . . . . . . . . . . . . . . . . . . . . . . . . . . . . . . . . . . . . . . . . . . . . . . . . . . . . . . . . . . . . . . . . . . . . . . . . . . . . . . . . . . . . . . . . . 5
Remote control . . . . . . . . . . . . . . . . . . . . . . . . . . . . . . . . . . . . . . . . . . . . . . . . . . . . . . . . . . . . . . . . . . . . . . . . . . . . . . . . . . . . . . . . . . . . . .6
Connecting a cable or satellite box . . . . . . . . . . . . . . . . . . . . . . . . . . . . . . . . . . . . . . . . . . . . . . . . . . . . . . . . . . . . . . . . 7
HDMI (best). . . . . . . . . . . . . . . . . . . . . . . . . . . . . . . . . . . . . . . . . . . . . . . . . . . . . . . . . . . . . . . . . . . . . . . . . . . . . . . . . . . . . . . . . . . . . . . . . . 7
AV (good) . . . . . . . . . . . . . . . . . . . . . . . . . . . . . . . . . . . . . . . . . . . . . . . . . . . . . . . . . . . . . . . . . . . . . . . . . . . . . . . . . . . . . . . . . . . . . . . . . . . 7
Coaxial (good) . . . . . . . . . . . . . . . . . . . . . . . . . . . . . . . . . . . . . . . . . . . . . . . . . . . . . . . . . . . . . . . . . . . . . . . . . . . . . . . . . . . . . . . . . . . . . . . 8
Connecting an antenna or cable TV (no box) . . . . . . . . . . . . . . . . . . . . . . . . . . . . . . . . . . . . . . . . . . . . . . . . . . . . . . 8 Connecting a DVD or Blu-ray player . . . . . . . . . . . . . . . . . . . . . . . . . . . . . . . . . . . . . . . . . . . . . . . . . . . . . . . . . . . . . . . 9
HDMI (best). . . . . . . . . . . . . . . . . . . . . . . . . . . . . . . . . . . . . . . . . . . . . . . . . . . . . . . . . . . . . . . . . . . . . . . . . . . . . . . . . . . . . . . . . . . . . . . . . . 9
AV (good) . . . . . . . . . . . . . . . . . . . . . . . . . . . . . . . . . . . . . . . . . . . . . . . . . . . . . . . . . . . . . . . . . . . . . . . . . . . . . . . . . . . . . . . . . . . . . . . . . . . 9
Connecting a game console . . . . . . . . . . . . . . . . . . . . . . . . . . . . . . . . . . . . . . . . . . . . . . . . . . . . . . . . . . . . . . . . . . . . . 10
HDMI (best). . . . . . . . . . . . . . . . . . . . . . . . . . . . . . . . . . . . . . . . . . . . . . . . . . . . . . . . . . . . . . . . . . . . . . . . . . . . . . . . . . . . . . . . . . . . . . . . . 10
AV (good) . . . . . . . . . . . . . . . . . . . . . . . . . . . . . . . . . . . . . . . . . . . . . . . . . . . . . . . . . . . . . . . . . . . . . . . . . . . . . . . . . . . . . . . . . . . . . . . . . . 10
Connecting a computer . . . . . . . . . . . . . . . . . . . . . . . . . . . . . . . . . . . . . . . . . . . . . . . . . . . . . . . . . . . . . . . . . . . . . . . . . 11 Connecting a USB flash drive . . . . . . . . . . . . . . . . . . . . . . . . . . . . . . . . . . . . . . . . . . . . . . . . . . . . . . . . . . . . . . . . . . . . 11 Connecting headphones . . . . . . . . . . . . . . . . . . . . . . . . . . . . . . . . . . . . . . . . . . . . . . . . . . . . . . . . . . . . . . . . . . . . . . . . 12 Connecting external speakers or a sound bar . . . . . . . . . . . . . . . . . . . . . . . . . . . . . . . . . . . . . . . . . . . . . . . . . . . . . 12
Digital audio. . . . . . . . . . . . . . . . . . . . . . . . . . . . . . . . . . . . . . . . . . . . . . . . . . . . . . . . . . . . . . . . . . . . . . . . . . . . . . . . . . . . . . . . . . . . . . . . 12
Analog audio . . . . . . . . . . . . . . . . . . . . . . . . . . . . . . . . . . . . . . . . . . . . . . . . . . . . . . . . . . . . . . . . . . . . . . . . . . . . . . . . . . . . . . . . . . . . . . . 13
Connecting power . . . . . . . . . . . . . . . . . . . . . . . . . . . . . . . . . . . . . . . . . . . . . . . . . . . . . . . . . . . . . . . . . . . . . . . . . . . . . . 13 Using a universal remote control . . . . . . . . . . . . . . . . . . . . . . . . . . . . . . . . . . . . . . . . . . . . . . . . . . . . . . . . . . . . . . . . . 14
Programming universal remote controls . . . . . . . . . . . . . . . . . . . . . . . . . . . . . . . . . . . . . . . . . . . . . . . . . . . . . . . . . . . . . . . . . . . . |
.14 |
Viewing universal remote control codes . . . . . . . . . . . . . . . . . . . . . . . . . . . . . . . . . . . . . . . . . . . . . . . . . . . . . . . . . . . . . . . . . . . . . |
14 |
Turning on your TV for the first time . . . . . . . . . . . . . . . . . . . . . . . . . . . . . . . . . . . . . . . . . . . . . . . . . . . . . . . . . . . . . |
15 |
Understanding the basics . . . . . . . . . . . . . . . . . . . . . . . . . . . . . . . . . . . . . . . . . . . . . . . . . . . . . . . . . . . . . . . . . . . . . . . . |
17 |
Turning your TV on or off . . . . . . . . . . . . . . . . . . . . . . . . . . . . . . . . . . . . . . . . . . . . . . . . . . . . . . . . . . . . . . . . . . . . . . . . . . . . . . . . . . . .17 Selecting the video input source . . . . . . . . . . . . . . . . . . . . . . . . . . . . . . . . . . . . . . . . . . . . . . . . . . . . . . . . . . . . . . . . . . . . . . . . . . . . .18 On-screen menu overview . . . . . . . . . . . . . . . . . . . . . . . . . . . . . . . . . . . . . . . . . . . . . . . . . . . . . . . . . . . . . . . . . . . . . . . . . . . . . . . . . . .18 Selecting a channel . . . . . . . . . . . . . . . . . . . . . . . . . . . . . . . . . . . . . . . . . . . . . . . . . . . . . . . . . . . . . . . . . . . . . . . . . . . . . . . . . . . . . . . . .19 Adjusting the volume . . . . . . . . . . . . . . . . . . . . . . . . . . . . . . . . . . . . . . . . . . . . . . . . . . . . . . . . . . . . . . . . . . . . . . . . . . . . . . . . . . . . . . .19 Viewing channel information . . . . . . . . . . . . . . . . . . . . . . . . . . . . . . . . . . . . . . . . . . . . . . . . . . . . . . . . . . . . . . . . . . . . . . . . . . . . . . . .19 Navigating the menus . . . . . . . . . . . . . . . . . . . . . . . . . . . . . . . . . . . . . . . . . . . . . . . . . . . . . . . . . . . . . . . . . . . . . . . . . . . . . . . . . . . . . . .19
2 |
www.insigniaproducts.com |

Contents
Adjusting settings . . . . . . . . . . . . . . . . . . . . . . . . . . . . . . . . . . . . . . . . . . . . . . . . . . . . . . . . . . . . . . . . . . . . . . . . . . . . . . . . . . . . . . . . . . .20
Using INlink . . . . . . . . . . . . . . . . . . . . . . . . . . . . . . . . . . . . . . . . . . . . . . . . . . . . . . . . . . . . . . . . . . . . . . . . . . . . . . . . . . . . . 20 Using a USB flash drive . . . . . . . . . . . . . . . . . . . . . . . . . . . . . . . . . . . . . . . . . . . . . . . . . . . . . . . . . . . . . . . . . . . . . . . . . . 21
Switching to USB mode . . . . . . . . . . . . . . . . . . . . . . . . . . . . . . . . . . . . . . . . . . . . . . . . . . . . . . . . . . . . . . . . . . . . . . . . . . . . . . . . . . . . . |
21 |
Adjusting the picture . . . . . . . . . . . . . . . . . . . . . . . . . . . . . . . . . . . . . . . . . . . . . . . . . . . . . . . . . . . . . . . . . . . . . . . . . . . . 22
Adjusting the TV picture . . . . . . . . . . . . . . . . . . . . . . . . . . . . . . . . . . . . . . . . . . . . . . . . . . . . . . . . . . . . . . . . . . . . . . . . . . . . . . . . . . . . .22 Automatically adjusting the aspect ratio . . . . . . . . . . . . . . . . . . . . . . . . . . . . . . . . . . . . . . . . . . . . . . . . . . . . . . . . . . . . . . . . . . . . .24 Setting the power on picture mode . . . . . . . . . . . . . . . . . . . . . . . . . . . . . . . . . . . . . . . . . . . . . . . . . . . . . . . . . . . . . . . . . . . . . . . . . .24
Adjusting the sound . . . . . . . . . . . . . . . . . . . . . . . . . . . . . . . . . . . . . . . . . . . . . . . . . . . . . . . . . . . . . . . . . . . . . . . . . . . . . 24
Adjusting sound settings . . . . . . . . . . . . . . . . . . . . . . . . . . . . . . . . . . . . . . . . . . . . . . . . . . . . . . . . . . . . . . . . . . . . . . . . . . . . . . . . . . . . |
24 |
Selecting the audio out mode . . . . . . . . . . . . . . . . . . . . . . . . . . . . . . . . . . . . . . . . . . . . . . . . . . . . . . . . . . . . . . . . . . . . . . . . . . . . . . . |
25 |
Playing TV audio only . . . . . . . . . . . . . . . . . . . . . . . . . . . . . . . . . . . . . . . . . . . . . . . . . . . . . . . . . . . . . . . . . . . . . . . . . . . . . . . . . . . . . . . |
25 |
Changing channel settings . . . . . . . . . . . . . . . . . . . . . . . . . . . . . . . . . . . . . . . . . . . . . . . . . . . . . . . . . . . . . . . . . . . . . . 26 Setting parental controls . . . . . . . . . . . . . . . . . . . . . . . . . . . . . . . . . . . . . . . . . . . . . . . . . . . . . . . . . . . . . . . . . . . . . . . . 27
Locking the power button on your TV . . . . . . . . . . . . . . . . . . . . . . . . . . . . . . . . . . . . . . . . . . . . . . . . . . . . . . . . . . . . . . . . . . . . . . . .28
Using closed captioning . . . . . . . . . . . . . . . . . . . . . . . . . . . . . . . . . . . . . . . . . . . . . . . . . . . . . . . . . . . . . . . . . . . . . . . . . 29 Adjusting time settings . . . . . . . . . . . . . . . . . . . . . . . . . . . . . . . . . . . . . . . . . . . . . . . . . . . . . . . . . . . . . . . . . . . . . . . . . . 29 Adjusting menu settings . . . . . . . . . . . . . . . . . . . . . . . . . . . . . . . . . . . . . . . . . . . . . . . . . . . . . . . . . . . . . . . . . . . . . . . . 29 Adjusting accessibility settings . . . . . . . . . . . . . . . . . . . . . . . . . . . . . . . . . . . . . . . . . . . . . . . . . . . . . . . . . . . . . . . . . . 30 Maintaining . . . . . . . . . . . . . . . . . . . . . . . . . . . . . . . . . . . . . . . . . . . . . . . . . . . . . . . . . . . . . . . . . . . . . . . . . . . . . . . . . . . . . 30
Cleaning the TV cabinet . . . . . . . . . . . . . . . . . . . . . . . . . . . . . . . . . . . . . . . . . . . . . . . . . . . . . . . . . . . . . . . . . . . . . . . . . . . . . . . . . . . . .30 Cleaning the TV screen . . . . . . . . . . . . . . . . . . . . . . . . . . . . . . . . . . . . . . . . . . . . . . . . . . . . . . . . . . . . . . . . . . . . . . . . . . . . . . . . . . . . . .30
Troubleshooting . . . . . . . . . . . . . . . . . . . . . . . . . . . . . . . . . . . . . . . . . . . . . . . . . . . . . . . . . . . . . . . . . . . . . . . . . . . . . . . . 31
Using the HELP menu . . . . . . . . . . . . . . . . . . . . . . . . . . . . . . . . . . . . . . . . . . . . . . . . . . . . . . . . . . . . . . . . . . . . . . . . . . . . . . . . . . . . . . .31 Video and audio . . . . . . . . . . . . . . . . . . . . . . . . . . . . . . . . . . . . . . . . . . . . . . . . . . . . . . . . . . . . . . . . . . . . . . . . . . . . . . . . . . . . . . . . . . . . 31
Remote control . . . . . . . . . . . . . . . . . . . . . . . . . . . . . . . . . . . . . . . . . . . . . . . . . . . . . . . . . . . . . . . . . . . . . . . . . . . . . . . . . . . . . . . . . . . . . 34
General. . . . . . . . . . . . . . . . . . . . . . . . . . . . . . . . . . . . . . . . . . . . . . . . . . . . . . . . . . . . . . . . . . . . . . . . . . . . . . . . . . . . . . . . . . . . . . . . . . . . . 35
INlink (CEC-compatible) device. . . . . . . . . . . . . . . . . . . . . . . . . . . . . . . . . . . . . . . . . . . . . . . . . . . . . . . . . . . . . . . . . . . . . . . . . . . . . . 36
Legal notices . . . . . . . . . . . . . . . . . . . . . . . . . . . . . . . . . . . . . . . . . . . . . . . . . . . . . . . . . . . . . . . . . . . . . . . . . . . . . . . . . . . . 38 ONE-YEAR LIMITED WARRANTY . . . . . . . . . . . . . . . . . . . . . . . . . . . . . . . . . . . . . . . . . . . . . . . . . . . . . . . . . . . . . . . . . . 39 One-year limited warranty - Insignia Televisions—Mexico . . . . . . . . . . . . . . . . . . . . . . . . . . . . . . . . . . . . . . . . 40
www.insigniaproducts.com |
3 |

Insignia LED TV
Insignia LED TV
Introduction
Congratulations on your purchase of a high-quality, Insignia TV. Your TV represents the state-of-the-art in LED TV technology and is designed for reliable and trouble-free performance.
INlink
Enjoy the benefit of having HDMI CEC-compatible products plug and play! No setup is needed! CEC technology lets different devices discover and communicate with each other. (See page 20 for instructions on how to use INlink.)
DTS® audio enhancement
DTS sound solutions delivers clear, crisp, and natural sound while providing deep, enveloping bass.
Game mode
Video games generally require adjustments to the TV picture settings to get the maximum experience. By simply pressing the GAME button on your remote control, your TV settings automatically adjust for video games. It couldn't be easier.
Audio accessibility
Your TV provides audio descriptions of menus and some remote control functions. Depending on the broadcaster, audio narration of key elements in programs may also be available. (See page 30 for instructions on how to turn on audio narration.)
TV components
This section covers basic information for:
•TV front
•Jacks
•Remote control
TV front
You can find these items on the front of your TV.
ITEM |
DESCRIPTION |
|
|
Remote control sensor |
Receives signals from the remote control. Do not block. |
|
|
Power indicator |
Turns off when your TV is on. Lights red when your TV is off (standby mode). |
|
|
4 |
www.insigniaproducts.com |
Insignia LED TV
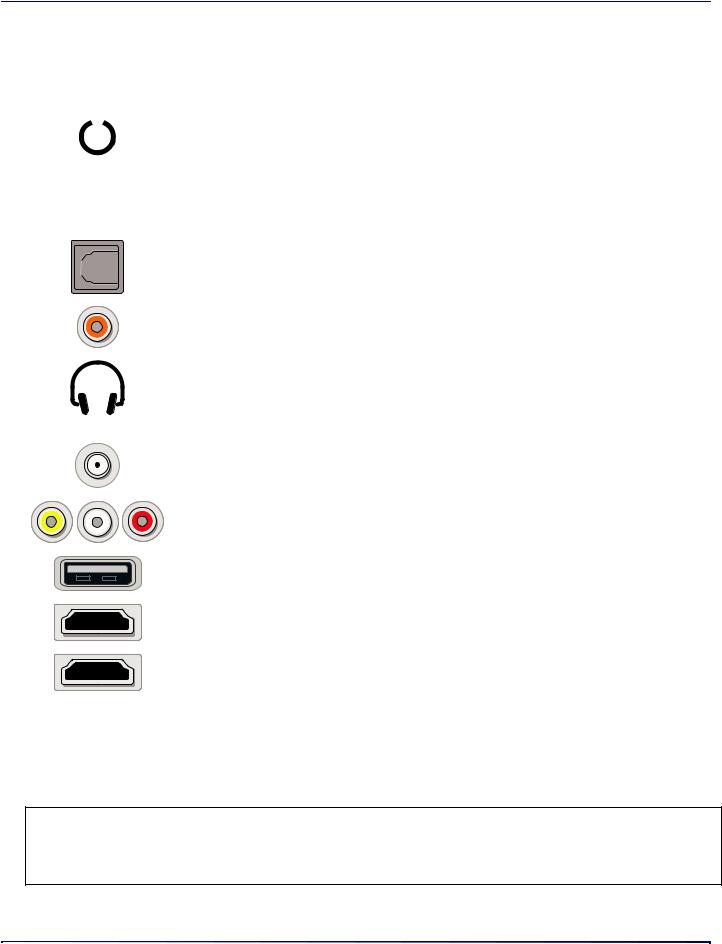
Jacks
Your TV may have any of the following items:
ITEM |
DESCRIPTION |
FUNCTION |
||||||||
|
|
|
|
|
|
|
|
|
|
|
|
|
|
|
|
|
|
|
|
|
Power—Press to turn on your TV when your TV is off (in standby |
|
|
|
|
|
|
|
|
|
|
|
|
|
|
|
|
|
|
|
|
|
mode). Press and hold to turn off your TV when your TV is on. |
|
|
|
|
|
|
|
|
|
|
Warning: When your TV is off, power still flows through it. To |
|
|
|
|
|
|
|
|
|
Power/Input button |
completely disconnect power, unplug the power cord. |
|
|
|
|
|
|
|
|
|
Input—Quickly press and release to open the INPUT SOURCE list, |
|
|
|
|
|
|
|
|
|
|
|
|
|
|
|
|
|
|
|
|
|
|
press one or more times to select a video input source, then wait a |
|
|
|
|
|
|
|
|
|
|
few seconds. Your TV switches to the source you selected. See |
|
|
|
|
|
|
|
|
|
|
Selecting the video input source on page 18. |
|
|
|
|
|
|
|
|
|
|
|
|
|
|
|
|
|
|
|
|
Digital OPTICAL output |
|
|
|
|
|
|
|
|
|
|
jack |
Connect a sound bar, digital speaker system, or home theater system |
|
|
|
|
|
|
|
|
|
||
|
|
|
|
|
|
|
|
|
|
|
|
|
|
|
|
|
|
|
|
|
to this jack to listen to TV audio through external speakers. See |
|
|
|
|
|
|
|
|
|
Digital COAXIAL output |
Digital audio on page 12. |
|
|
|
|
|
|
|
|
|
|
|
|
|
|
|
|
|
|
|
|
jack |
|
|
|
|
|
|
|
|
|
|
|
|
|
|
|
|
|
|
|
|
|
Headphone jack |
On some TVs the headphone jack and audio out jack are combined |
|
|
|
|
|
|
|
|
|
into one jack. |
|
|
|
|
|
|
|
|
|
|
OR |
Connect headphones, a sound bar, analog speaker system, or a |
|
|
|
|
|
|
|
|
|
AUDIO OUT jack |
home theater system to this jack to listen to TV audio through |
|
|
|
|
|
|
|
|
|
|
external speakers. See Analog audio on page 13. |
|
|
|
|
|
|
|
|
|
|
|
|
|
|
|
|
|
|
|
|
Antenna/Cable in jack |
Connect an antenna or cable TV to this jack. See Coaxial (good) on |
|
|
|
|
|
|
|
|
|
page 8 or Connecting an antenna or cable TV (no box) on page 8. |
|
|
|
|
|
|
|
|
|
|
|
|
|
|
|
|
|
|
|
|
|
|
|
|
|
|
|
|
|
|
|
|
Analog video and audio |
Connect the video and audio for an AV device to these jacks. See AV |
|
|
|
|
|
|
|
|
|
(AV) jacks |
(good) on page 7, 9, or 10. |
|
|
|
|
|
|
|
|
|
|
|
|
|
|
|
|
|
|
|
|
|
Connect a USB flash drive to this jack to view compatible JPEG |
|
|
|
|
|
|
|
|
|
USB |
picture files. See Connecting a USB flash drive on page 11 and Using |
|
|
|
|
|
|
|
|
|
|
a USB flash drive on page 21. |
|
|
|
|
|
|
|
|
|
|
|
|
|
|
|
|
|
|
|
|
HDMI |
Connect an HDMI device to this jack. See HDMI (best) on page 7, 9, or |
|
|
|
|
|
|
|
|
|
|
10, or Connecting a computer on page 11. |
|
|
|
|
|
|
|
|
|
|
|
|
|
|
|
|
|
|
|
|
|
Connect an ARC-enabled home theater receiver to this jack. |
|
|
|
|
|
|
|
|
|
HDMI/ARC |
OR |
|
|
|
|
|
|
|
|
|
Connect an HDMI device to this jack. See HDMI (best) on page 7, 9, or |
|
|
|
|
|
|
|
|
|
|
||
|
|
|
|
|
|
|
|
|
|
|
|
|
|
|
|
|
|
|
|
|
10, or Connecting a computer on page 11. |
|
|
|
|
|
|
|
|
|
|
|
|
|
|
|
|
|
|
|
|
RESET |
Press to reset your TV to the factory defaults. If this button is in a |
|
|
|
|
|
|
|
|
|
recessed hole, use a thin item, like a paper clip, to press the button. |
|
|
|
|
|
|
|
|
|
|
|
|
|
|
|
|
|
|
|
|
|
|
|
|
|
|
|
|
|
|
|
|
SERVICE |
Do not connect a device to this jack. Do not insert anything into this |
|
|
|
|
|
|
|
|
|
|
jack. |
|
|
|
|
|
|
|
|
|
|
|
CAUTIONS:
•Check the jacks for position and type before making any connections.
•Loose connections can cause poor audio or video quality. Make sure that all connections are tight and secure.
•The external audio/video equipment shown may be different from your equipment. If you have questions, refer to the documentation that came with your equipment.
•Always unplug the power cord when connecting external equipment.
www.insigniaproducts.com |
5 |
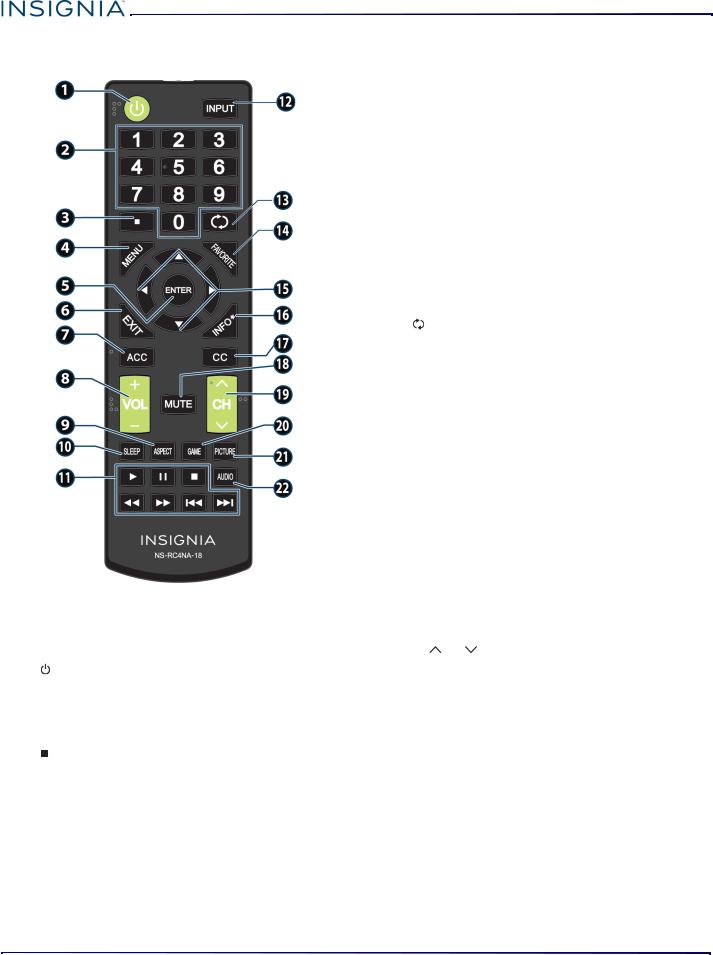
Remote control
# |
BUTTON |
PRESS TO... |
|
|
|
|
|
|
|
Turn your TV on or off (standby mode). |
|
1 |
(power) |
Warning: When your TV is off, power |
|
still flows through it. To disconnect |
|||
|
|
||
|
|
power, unplug the power cord. |
|
|
|
|
|
2 |
Numbers |
Enter channel numbers and the |
|
parental control password. |
|||
|
|
||
|
|
|
|
3 |
|
Enter a digital sub-channel number. See |
|
|
Selecting a channel on page 19. |
||
|
|
|
|
4 |
MENU |
Open the on-screen menu. |
|
|
|
||
|
|
|
|
5 |
ENTER |
Confirm selections or changes in TV |
|
menus. |
|||
|
|
||
|
|
|
|
6 |
EXIT |
Close the on-screen TV menu. |
|
|
|
|
|
|
|
Open the Accessibility menu. See |
|
7 |
ACC |
Adjusting accessibility settings on |
|
|
|
page 30. |
Insignia LED TV
# |
BUTTON |
PRESS TO... |
|
|
|
|
|
|
|
TV: Adjusts the volume. |
|
8 |
VOL+/VOL– |
TV menu: Navigate left or right. |
|
|
|
USB: Control a photo slideshow. |
|
|
|
|
|
|
|
TV: Change how the pictures appears |
|
9 |
ASPECT |
on the screen. |
|
USB: Zoom when displaying a photo. |
|||
|
|
||
|
|
|
|
|
|
Set the sleep timer. You can select Off, |
|
10 |
SLEEP |
5, 10, 15, 30, 60, 90, 120, 180, or 240 |
|
|
|
minutes. |
|
11 |
Media |
Control INlink-compatible (HDMI CEC) |
|
devices. See Using INlink on page 20. |
|||
controls |
|||
|
|
||
|
|
|
|
|
|
Open the INPUT SOURCE list and select a |
|
12 |
INPUT |
video input source. See Selecting the |
|
|
|
video input source on page 18. |
|
13 |
(return) |
Return to the previous channel. |
|
|
|
||
|
|
|
|
|
|
Set up the Favorite channel list or open |
|
|
|
the existing Favorite channel list. See |
|
14 |
FAVORITE |
the Favorite Channel Setup and |
|
|
|
Favorite Channel List options in |
|
|
|
Changing channel settings on page 26. |
|
|
|
|
|
|
|
TV menus—Navigate on-screen TV |
|
15 |
|
menus and adjust settings. |
|
|
|
USB—Control a photo slideshow. |
|
|
|
|
|
|
|
Display TV status information, such as |
|
16 |
INFO* |
the channel number, channel name (if |
|
available), or signal source. See Viewing |
|||
|
|
channel information on page 19. |
|
|
|
|
|
|
|
Turn closed captioning on or off. You |
|
|
|
can select CC Off, CC On, or CC On |
|
17 |
CC |
when mute. See the Caption Control |
|
|
|
option in Using closed captioning on |
|
|
|
page 29. |
|
|
|
|
|
18 |
MUTE |
Mute or un-mute the sound. |
|
|
|
||
|
|
|
|
|
|
TV: Change to the next higher or lower |
|
19 |
CH /CH |
channel in the channel list. |
|
TV menu: Navigate up or down. |
|||
|
|
||
|
|
|
|
20 |
GAME |
Change the picture mode to Game |
|
mode. |
|||
|
|
||
|
|
|
|
|
|
Select the picture mode. You can select |
|
|
|
Vivid, Standard, Energy Savings, |
|
21 |
PICTURE |
Movie, Game, or Custom. See the |
|
|
|
Picture Mode option in Adjusting the |
|
|
|
TV picture on page 22. |
|
|
|
|
|
|
|
Select the audio mode. You can select |
|
22 |
AUDIO |
Standard, Theater, Music, News, or |
|
Custom. See the Audio Mode option in |
|||
|
|
Adjusting sound settings on page 24. |
|
|
|
|
6 |
www.insigniaproducts.com |

Insignia LED TV
Connecting a cable or satellite box
Many cable or satellite TV boxes have more than one connection type. To get the best video, you should use the best connection type available. See Jacks on page 5.
You can connect a cable or satellite box using:
•HDMI (best)
•AV (good)
•Coaxial (good)
HDMI (best)
HMDI jack |
Cable or satellite box |
Cable wall jack |
|
|
Coaxial |
HDMI Cable |
|
cable |
1Make sure that your TV’s power cord is unplugged and all connected equipment is turned off.
2Connect a coaxial cable (not provided) to the cable wall jack and to the cable-in jack on the cable or satellite box.
3Connect an HDMI cable (not provided) to one of the HDMI jacks on your TV and to the HDMI out jack on the cable or satellite box.
4Plug your TV’s power cord into a power outlet, turn on your TV, then turn on the cable or satellite box.
5Press INPUT to open the INPUT SOURCE list, select the HDMI jack you connected the cable or satellite box to, then press
ENTER.
Note: An HDMI cable carries both audio and video. You do not need to use any audio cables.
AV (good)
Note: Cables are often color-coded to match color-coded jacks.
Video and audio jacks |
Cable or satellite box |
Cable wall jack |
|
Coaxial |
AV cable |
cable |
1Make sure that your TV’s power cord is unplugged and all connected equipment is turned off.
2Connect a coaxial cable (not provided) to the cable wall jack and to the cable-in jack on the cable or satellite box.
3Connect an AV cable (not provided) to the AV jacks on your TV and to the AV out jacks on the cable or satellite box.
IMPORTANT: When you connect the audio using the AV jacks, the audio output is analog.
4Plug your TV’s power cord into a power outlet, turn on your TV, then turn on the cable or satellite box.
5Press INPUT to open the INPUT SOURCE list, select AV, then press ENTER.
www.insigniaproducts.com |
7 |
|
|
Insignia LED TV |
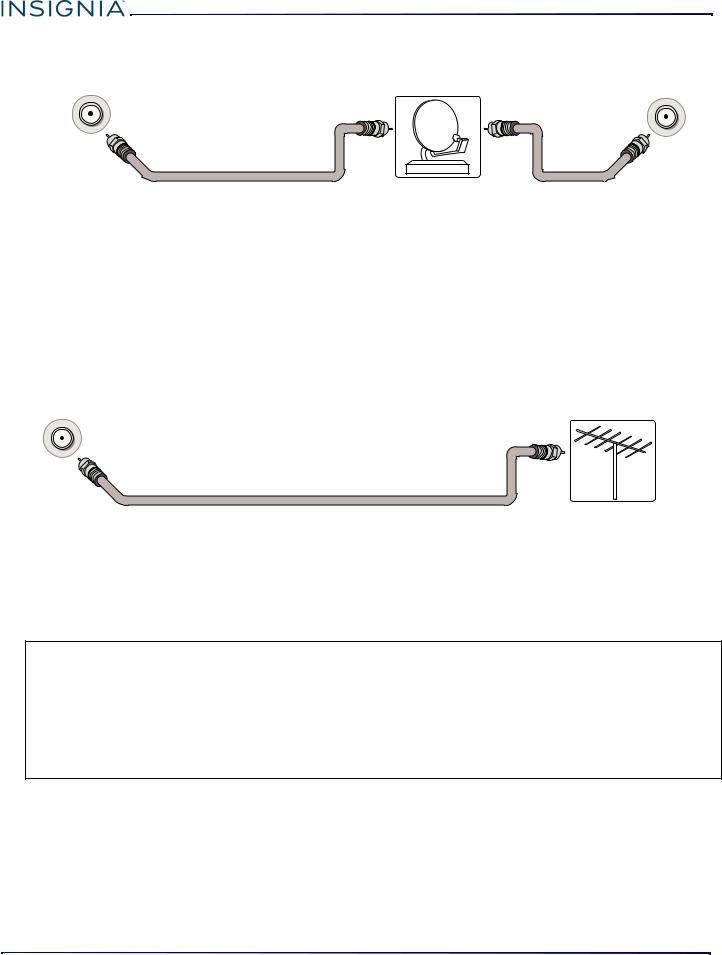
Coaxial (good) |
|
|
Antenna/cable jack |
Cable or satellite box |
Cable wall jack |
|
|
Coaxial |
Coaxial cable |
|
cable |
1Make sure that your TV’s power cord is unplugged and all connected equipment is turned off.
2Connect the coaxial cable to the cable wall jack and to the cable-in jack on the cable or satellite box.
3Connect a coaxial cable (not provided) to the antenna/cable jack on your TV and to the coaxial out jack on the cable or satellite box.
4Plug your TV’s power cord into a power outlet, turn on your TV, then turn on the cable or satellite box.
5Press INPUT to open the INPUT SOURCE list, select TV, then press ENTER.
6If you cannot tune to channels you know exist, scan for channels. See the Auto Channel Search option in Changing channel settings on page 26.
Connecting an antenna or cable TV (no box)
Antenna/cable |
Antenna or cable TV (no box) |
jack |
Coaxial cable
1Make sure that your TV’s power cord is unplugged and all connected equipment is turned off.
2Connect a coaxial cable (not provided) to the antenna/cable jack on your TV and to the antenna or cable TV wall jack.
3Plug your TV’s power cord into a power outlet, then turn on your TV.
4Press INPUT to open the INPUT SOURCE list, select TV, then press ENTER.
5If you cannot tune to channels you know exist, scan for channels. See the Auto Channel Search option in Changing channel settings on page 26.
Notes:
•Use a coaxial cable to eliminate interference and noise from radio waves.
•If the antenna is not installed correctly, contact qualified service personnel to correct the problem.
•If the signal level for a channel is weak, the picture may be distorted. Adjust the antenna or use a highly directional outdoor or set-top antenna with a built-in amplifier.
•If the picture quality is good on some channels and poor on others, the problem may be caused by a poor or weak signal from the broadcaster or cable TV provider.
•If you connect to cable TV without a set-top box and experience poor picture quality, you may need to install a set-top box to improve signal reception and picture quality. Contact your cable TV provider about upgrading to a set-top box.
•Many high-definition (HD) channels upscale standard-definition (SD) content. The picture displayed on your TV is still displayed as SD, thus the picture quality will not be as clear or crisp as it would be if the content was originally recorded in HD.
8 |
www.insigniaproducts.com |
Insignia LED TV
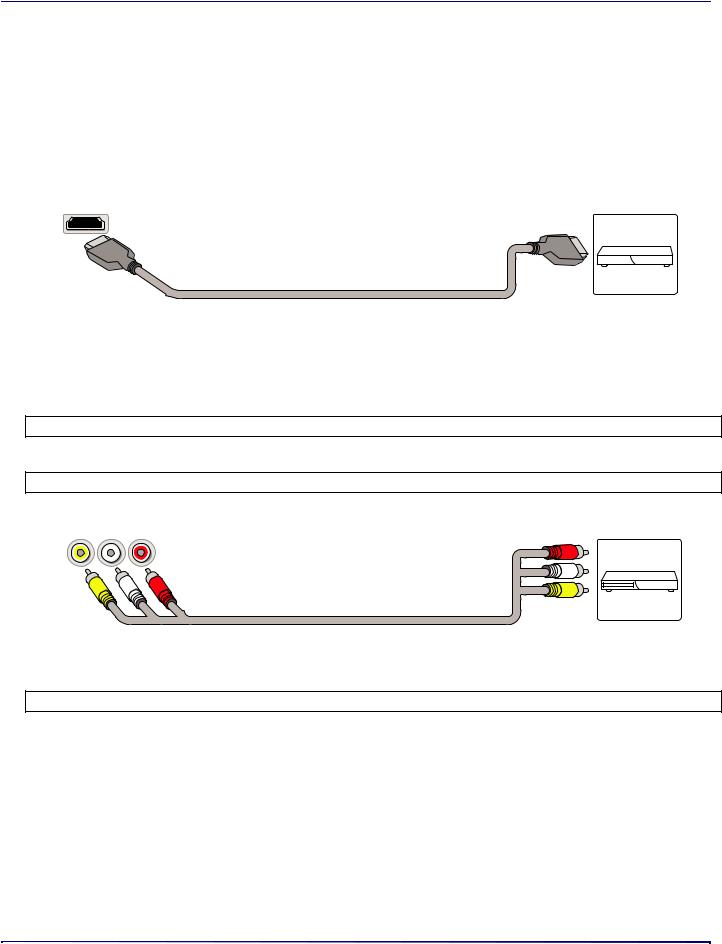
Connecting a DVD or Blu-ray player
Many DVD or Blu-ray players have more than one connection type. To get the best video, you should use the best connection type available. See Jacks on page 5.
You can connect a DVD or Blu-ray player using:
• HDMI (best)
• AV (good)
HDMI (best)
|
|
|
|
|
|
|
DVD or Blu-ray |
||||
HDMI jack |
|
|
|
|
|
|
player |
||||
|
|
|
|
|
|
|
|
|
|
|
|
|
|
|
|
|
|
|
|
|
|
|
|
|
|
|
|
|
|
|
|
|
|
|
|
|
|
|
|
|
|
|
|
|
|
|
|
HDMI cable
1Make sure that your TV’s power cord is unplugged and the DVD or Blu-ray player is turned off.
2Connect an HDMI cable (not provided) to one of the HDMI jacks on your TV and to the HDMI out jack on the DVD or Blu-ray player.
3Plug your TV’s power cord into a power outlet, then turn on your TV and DVD or Blu-ray player.
4Press INPUT to open the INPUT SOURCE list, select the HDMI jack you connected the player to, then press ENTER.
Note: An HDMI cable carries both audio and video. You do not need to use any audio cables.
AV (good)
Note: Cables are often color-coded to match color-coded jacks.
Video and audio jacks |
DVD or Blu-ray |
player |
AV cable
1Make sure that your TV’s power cord is unplugged and the DVD or Blu-ray player is turned off.
2Connect an AV cable (not provided) to the AV jacks on your TV and to the AV out jacks on the DVD or Blu-ray player.
IMPORTANT: When you connect the audio using the AV jacks, the audio output is analog.
3Plug your TV’s power cord into a power outlet, then turn on your TV and DVD or Blu-ray player.
4If needed, set the player to the correct output mode. See the documentation that came with the player.
5Press INPUT to open the INPUT SOURCE list, select AV, then press ENTER.
www.insigniaproducts.com |
9 |

Insignia LED TV
Connecting a game console
You can connect a game console using:
•HDMI (best)
•AV (good)
HDMI (best)
HDMI jack |
|
|
|
|
Game console |
||
|
|
|
|
|
|
|
|
|
|
|
|
|
|
|
|
|
|
|
|
|
|
|
|
|
|
|
|
|
|
|
|
HDMI cable
1Make sure that your TV’s power cord is unplugged and the game console is turned off.
2Connect an HDMI cable (not provided) to one of the HDMI jacks on your TV and to the HDMI out jack on the game console.
3Plug your TV’s power cord into a power outlet, then turn on your TV.
4Turn on the game console, then set it to the correct output mode. See the documentation that came with the console.
5Press INPUT to open the INPUT SOURCE list, select the HDMI jack you connected the console to, then press ENTER.
Note: An HDMI cable carries both audio and video. You do not need to use any audio cables.
AV (good)
Note: Cables are often color-coded to match color-coded jacks.
Video and audio jacks |
Game console |
Console-specific AV cable
1Make sure that your TV’s power cord is unplugged and the game console is turned off.
2Connect the console-specific AV cable to the AV jacks on your TV and to the AV jack(s) on the game console.
IMPORTANT:
•Some older game consoles come with a special AV cable. See the documentation that came with your game console or check the manufacturer’s website.
•When you connect the audio using the AV jacks, the audio output is analog.
3Plug your TV’s power cord into a power outlet, then turn on your TV.
4Turn on the game console, then set it to the correct output mode. See the documentation that came with the console.
5Press INPUT to open the INPUT SOURCE list, select AV, then press ENTER.
10 |
www.insigniaproducts.com |
Insignia LED TV
Connecting a computer
HDMI jack |
|
|
|
|
Computer |
||
|
|
|
|
|
|
|
|
|
|
|
|
|
|
|
|
|
|
|
|
|
|
|
|
|
|
|
|
|
|
|
|
HDMI cable
1Make sure that your TV’s power cord is unplugged and the computer is turned off.
2Connect an HDMI cable (not provided) to one of the HDMI jacks on your TV and to the HDMI out jack on the computer.
3Plug your TV’s power cord into a power outlet, then turn on your TV and the computer.
4Press INPUT to open the INPUT SOURCE list, select the HDMI jack you connected the computer to, then press ENTER.
5Adjust the display properties on the computer, if necessary.
Connecting a USB flash drive
USB port
USB flash drive
1 Plug a USB flash drive into the USB port on your TV.
CAUTION: Do not remove the USB flash drive or turn off the TV while using the USB flash drive. You may lose data or damage the USB flash drive.
2 Select Yes in the message that appears. The PHOTOS menu opens. OR
If you switch to a different video input source after you plug in the USB flash drive and want to switch back to the drive, press INPUT to open the INPUT SOURCE list, select USB(Photos), then press ENTER. The PHOTOS menu opens.
Note: The Photos viewer only supports JPEG format images (with “.jpg” file extensions) and not all JPEG files are compatible with your TV. See Using a USB flash drive on page 21.
www.insigniaproducts.com |
11 |
Insignia LED TV
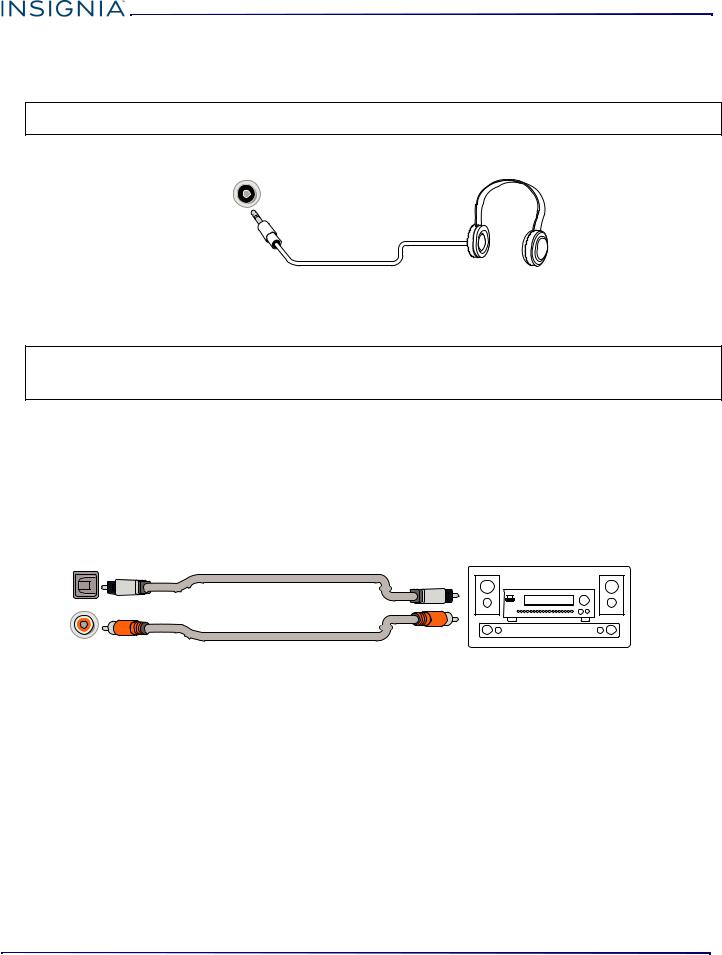
Connecting headphones
When you connect headphones, the TV speakers are muted.
WARNING: Loud noise can damage your hearing. When using headphones, use the lowest volume setting on your headphones that still lets you hear the sound.
Headphone/Audio out jack
1Connect the headphones to the headphone jack on your TV.
2In the screen that opens, select Headphones/Audio Out Variable, then press ENTER. See Selecting the audio out mode on page 25.
Notes:
•If you connect headphones when your TV is turned off, then you turn on your TV, the TV speakers are muted and the audio plays through the headphones.
•You can also connect a home theater system, sound bar, or external speaker system to the headphone jack.
Connecting external speakers or a sound bar
You can connect external speakers or a sound bar using:
•Digital audio
•Analog audio
Digital audio
Depending on the model, your TV may have a digital optical or digital coaxial audio jack.
Digital optical |
Digital optical audio cable |
Digital speaker system |
audio jack |
|
|
|
|
|
|
OR |
|
Digital coaxial |
Digital coaxial audio cable |
|
audio jack |
Sound bar |
1Make sure that your TV’s power cord is unplugged and the digital speaker system or sound bar is turned off.
2Connect a digital coaxial or digital optical audio cable (not provided) to the digital output jack on your TV and to the audio in jack on the digital speaker system or sound bar.
3Plug your TV’s power cord into a power outlet, then turn on your TV.
4Turn on the digital speaker system or sound bar, then set it to the correct source. See the documentation that came with the digital speaker system or sound bar.
5On your TV’s Audio menu, select Digital Audio Format / Audio Delay, then set the Audio Format option to PCM. See the Digital Audio Format / Audio Delay option in Adjusting sound settings on page 24.
12 |
www.insigniaproducts.com |

Insignia LED TV
Analog audio
When you connect an analog speaker system or sound bar to the audio out jack, the TV speakers are muted. Audio out jack
Audio cable
1Make sure that your TV’s power cord is unplugged and the analog speaker system or sound bar is turned off.
2Connect an audio cable (not provided) to the audio out jack on your TV and to the audio in jacks on the analog speaker system or sound bar.
3Plug your TV’s power cord into a power outlet, then turn on your TV.
4Turn on the analog speaker system or sound bar, then set it to the correct source. See the documentation that came with the analog speaker system or sound bar.
5On your TV, set the Headphones / Audio Out option on the Audio menu to Headphones/Audio Out Variable or Audio Out Fixed. See the Headphones / Audio Out option in Adjusting sound settings on page 24.
Connecting power
1If your power cord is not permanently connected to your TV, connect it to the power connector on your TV.
2Connect the power cord to a power outlet.
CAUTION:
•Your TV should only be operated from the power source indicated on the label.
•Always unplug the power cord from the power outlet when you will not be using your TV for an extended period of time.
•If the power cord is permanently attached to your TV, do not try to unplug it from your TV.
www.insigniaproducts.com |
13 |
Loading...