


Cooker |
K 6C7 M.C/R |
Installation and use |
|
Fornuis |
|
Installatie en gebruik |
|
Кухoннaя плита |
|
Установка и пользование |
|
Sporák
Instalace a použití

Cooker with multifunction oven and ceramic hob |
|
Instructions for installation and use |
3 |
Fornuis met multifunctie-oven en keramiekplaat |
|
Gebruiksaanwijzingen voor de plaatsing en gebruik |
11 |
Плита с мультифункциональной духовкой и |
|
стеклокерамической поверхностью |
|
Инструкции по использованию и обслуживанию |
19 |
CZ Sporák s víceúcelovou pecící troubou a sklokeramickou
varnou deskou |
|
Návod k instalaci a použití |
28 |

Instruction
To maintain the EFFICIENCY and SAFETY of this appliance, we recommend:
•call only the Service Centers authorized by the manufacturer
•always use original Spare Parts
1This appliance is intended for non-professional use within the home.
2Before using the appliance, carefully read the instructions contained in this manual, as they provide important information for ensuring safe installation, use and maintenance. Keep this manual as a reference guide.
3Remove the packing and make sure the appliance hasn’t been damaged during transport. If you have any doubts, don’t use the appliance. Call a qualified technician for assistance. For safety, keep packing materials (plastic bags, polystyrene foam, tacks, etc.) away from children.
4The appliance must be installed by a qualified technician in accordance with the manufacturer’s instructions. No liability for injury or damage to persons, animals or property will be accepted by the manufacturer arising from failure to follow these instructions.
5The electrical safety of this appliance is ensured only if it is correctly connected to an efficiently earthed system in accordance with electrical safety regulations. Make sure this basic safety requirement has been complied with. If in doubt, have it checked by a qualified technician.No liability for damage will be accepted by the manufacturer because of defective earthing.
6Before connecting the appliance, make sure the specifications on the rating plate correspond with those of your power supply.
7Check that your supply and sockets are sufficient for the total load taken by your appliance which is stated on the rating plate. If you have any doubts, contact a qualified technician for service.
8A multipole circuit breaker with a space between contacts of 3 mm or more must be fitted for installation
9If the socket and cooker plug are not compatible, have the socket replaced with a suitable model by a qualified technician who should also check that the cross-section of the socket cable is suited to the power absorbed by the appliance. The use of adaptors, multiple sockets and/or extensions, is not recommended. If their use can not be avoided, remember to use only single or multiple adapters and extensions which comply with current safety regulations. In these cases, never exceed the maximum current capacity indicated on the single adaptor or extension and the maximum power indicated on the multiple adapter.
10Do not leave the appliance plugged in if it is not necessary. Switch off the main switch and gas cock when you are not using the cooker.
11The openings and slots used for ventilation and dispersion of heat must never be closed or plugged.
12The user must not replace the supply cable of this appliance. Always call an after-sales servicing centre authorised by the manufacturer in the case of cable damage or replacement.
13This appliance must be used for the purpose for which it was expressly designed.
Any other use (e.g.heating rooms) is considered to be improper and consequently dangerous.
The manufacturer declines all responsibility for damage resulting from improper and irresponsible use.
14A number of fundamental rules must be followed when using electrical appliances.The following are of particular importance:
·do not touch the appliance when your hands or feet are wet
·do not use the appliance barefooted
·do not use extensions, but if these are necessary caution must be exercised.
·never pull the power supply cable or the appliance to unplug the appliance plug from the mains.
·never leave the appliance exposed to atmospheric agents (rain, sun etc.)
·do not allow children or persons who are not familiar with the appliance to use it, without supervision.
15Always unplug the hob from the mains or switch off the main switch before cleaning or carrying out maintenance operations.
16If the surface of the glass breaks, disconnect the appliance immediately. For repairs call only an authorised after-sales servicing centre and request the use of original spare parts only. Failure to comply with the above may compromise the safety of the appliance.
17If you are no longer using the appliance, remember to make it unserviceable by unplugging the appliance from the mains and cutting the supply cable. Also make all potentially dangerous parts of the appliance, safe, above all for children who could play with the appliance.
18The vitreous china hob is resistant to temperature fluctuations and shockproof. Remember however that sharp kitchen tools or cutters may break the surface of the hob. If this happens, unplug the cooker immediately from the mains and call your local servicing centre.
19Remember that the cooking surface remains hot for at least half an hour after you switch off the surface. Do not place containers or other objects on the hot surface.
20Avoid setting anything on the glass surface of the cooktop.
21Do not turn on the cooking surfaces if there are sheets of aluminium foil or plastic on the hob.
22Keep away from the hot surfaces.
23When using small electrical household appliances close to the hob, ensure that the power cable does not rest on the hot surfaces
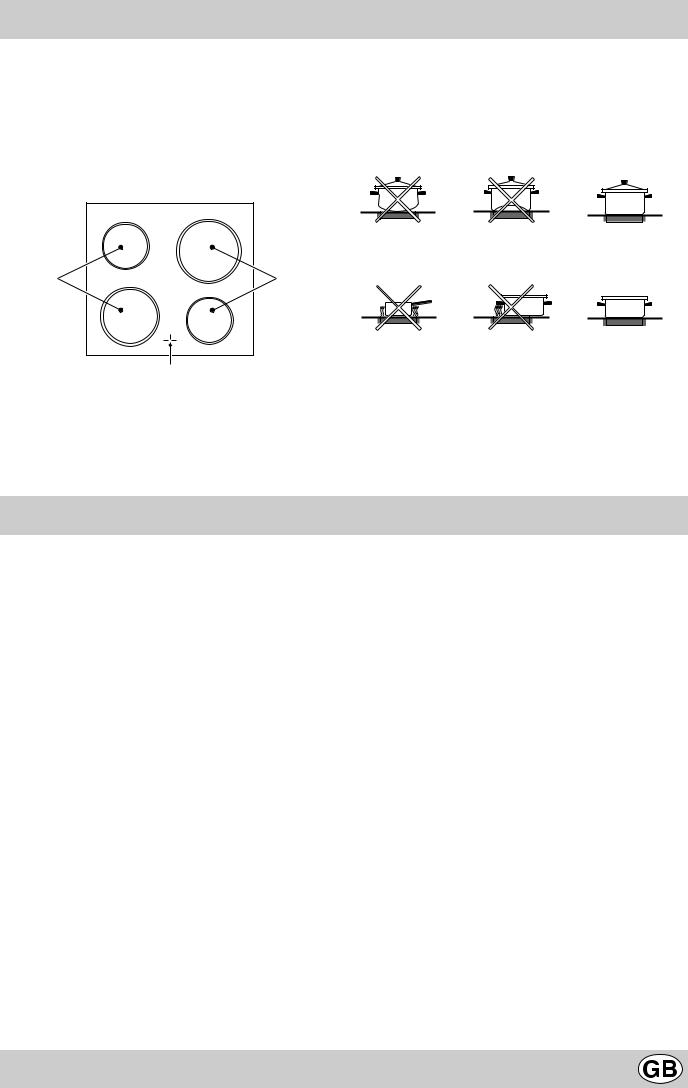
24Keep pot handles turned inwards to avoid knocking the pot off the hob.
25When you turn on the cooking surface always place a pot on the surface immediately as it will otherwise overheat very quickly and possibly damage the heating elements.
26Preliminary instructions. The glass sealant utilised may leave traces of grease on the glass. Remember to wipe these away with a normal non abrasive detergent before you turn on the appliance. During the first few hours of use there may be a smell of rubber which will disappear very quickly.
27When the appliance is in use, the heating elements and some parts of the oven door become extremely hot. Make sure you don't touch them and keep children well away.
28Make sure the knobs are in the “•”/”o” position when the appliance is not in use.
29If the cooker is placed on a pedestal, take the necessary precautions to prevent the same from sliding off the pedestal itself.
3
Installation
The following instructions should be read by a qualified technician to ensure that the appliance is installed, regulated and technically serviced correctly in compliance with current regulations.
Important: disconnect the cooker from the electricity when making any adjustement, maintenance operation, etc.
Positioning
The cooker is prepared with protection degree against excessive heating of type X, the appliance can therefore be installed next to cabinets, provided the height does not exceed that of the hob
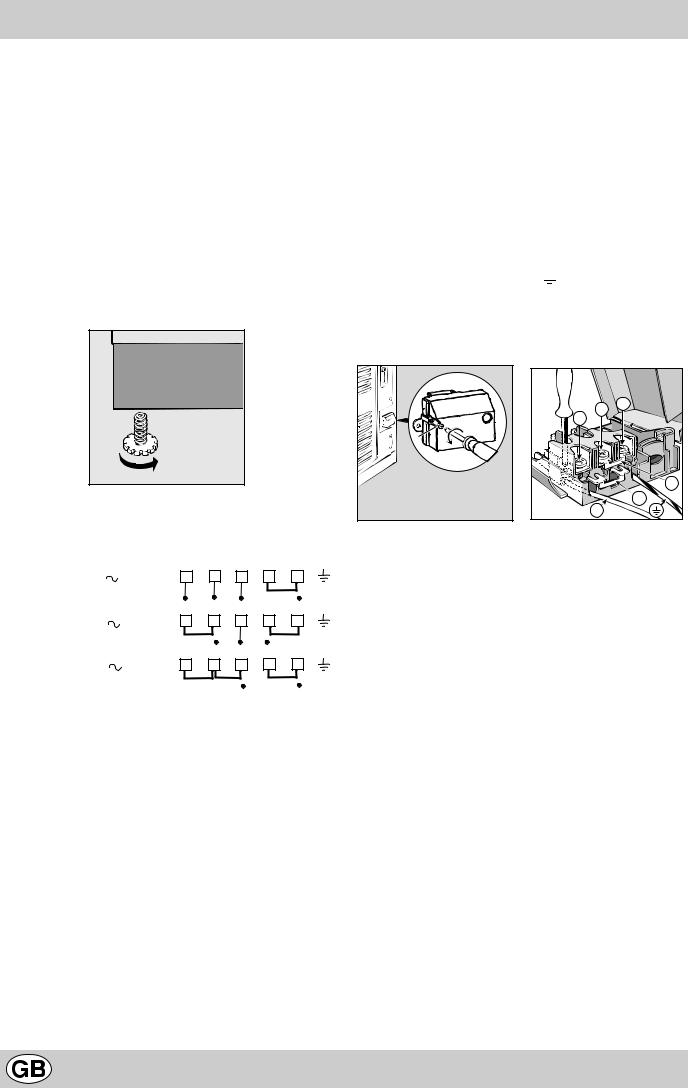
Levelling
In order to have a perfect levelling of the cooker adjustable feets are supplyed (see Fig.1). They can be screwed in the seats positioned in the corners of the cooker base.
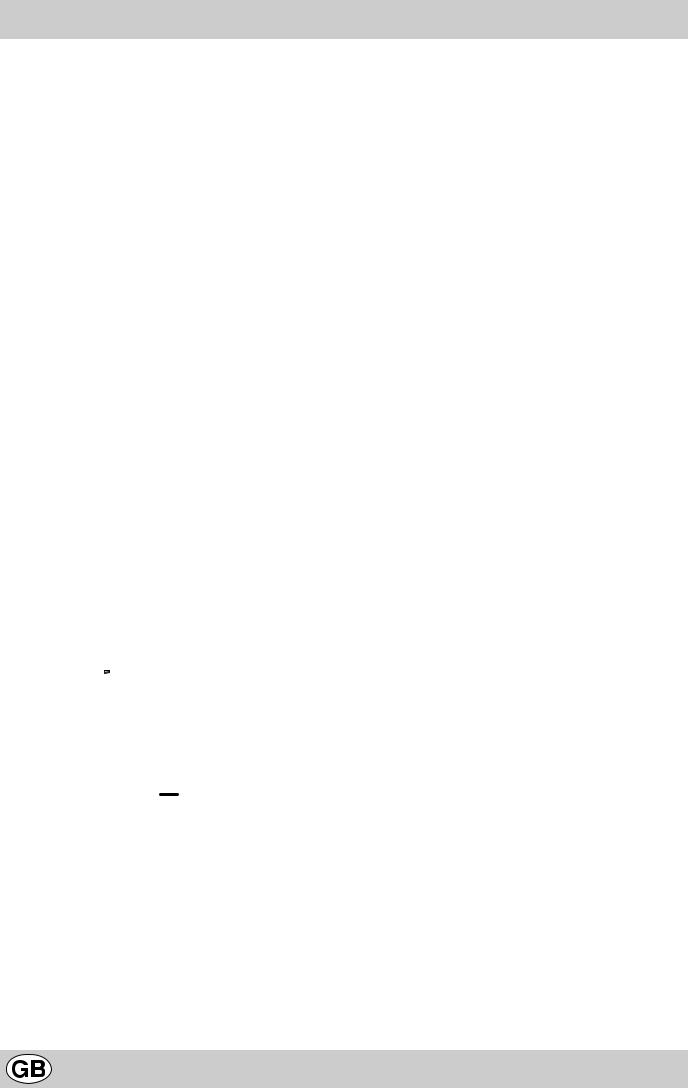
Electrical connection
The power supply cable since its size depends on the electric connection (see the following connection diagram).
400 3N |
1 |
2 |
3 |
4 |
5 |
H05RR-F 5x2.5 CEI-UNEL 35363 R |
|
S |
T |
|
N |
400V 2N |
1 |
2 |
3 |
4 |
5 |
H05RR-F 4x2.5 CEI-UNEL 35363 |
|
R |
S N |
|
|
230V 1N |
1 |
2 |
3 |
4 |
5 |
H07RN-F 3x4 CEI-UNEL 35364 |
|
|
R |
|
N |
|
|
|
|
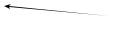
Feeding cable installation
Terminal block opening:
·Unscrew screw “V”
·Pull and open the junction block lid
For the installation of the feeding cable carry out the following operations:
·position the small connection A-B according to the type of connection that has to be performed using the scheme shown in the figure 3.
Note: the small connections are prepared by the Factory for the 230V monophase connection (contacts 1-2-3 are connected to one another). The bridge 4-5 is situated in the lower part of the terminal block.
·introduce the cables (N and  ) as shown in the figure and tighten the relative screws.
·fix the remaining cables on the 1-2-3 clips.
·fix the feeding cable in the special cable stop and close the cover fastening it with the screw “V”.
V |
2 |
3 |
1 |
|
|
B |
N |
A |
|
Connecting the supply cable to the mains
Fit a plug, normalised for the load indicated on the data plate, on the cable; when making the connection directly to the mains, an omnipoIar switch with a minimum opening of 3 mm between the contacts, must be installed between the appliance and the mains.This switch must be sufficient for the load and must comply to regulations in force (the earthing wire must not be interrupted by the switch). The power supply cable must be positioned so that it does not exceed 50°C more than room temperature at any point of its length. Before making the connection check that:
·the limiter valve and the home system can support the appliance load (see data plate);
·the power supply system has an efficient earthing connection which complies with the provisions of current regulations;
·the socket or omnipoar circuit-breaker is easily accessible once the cooker has been installed.
4

Technical characteristics
Oven |
|
Dimensions (WxDxH) |
32x40,5x39,5 cm |
Volume |
52 lt |
Oven absorption Max |
2300 W |
|
|
Ceramic Hob |
|
Front Left |
1700 W |
Back Left |
1200 W |
Back Right |
2100 W |
Front Right |
1200 W |
Hob Ceramic absorption Max |
6200 W |
|
|
ENERGY LABEL
Directive 2002/40/EC on the label of electric ovens Norm EN 50304
Energy consumption for Forced convection
heating mode:  Ventilation Declared energy consumption for Natural convection Class
heating mode:  Convection
Voltage and frequency |
230V / 400V 3N AC 50 Hz |
|
|
This appliance conforms with the following European Economic Community directives:
-73/23/EEC of 19/02/73 (Low Voltage) and subsequent modifications;
-89/336/EEC of 03/05/89 (Electromagnetic Compatibility) and subsequent modifications;
-93/68/EEC of 22/07/93 and subsequent modifications.
Cooker description
A

B
E L

 C
C
D
 D
D
G H M I
AControl panel
BOven grate shelf
CDrip pan or cooking plate
DAdjustable fet
EThermostat Light
GSelector Knob
HThermostat Knob
IElectric plate knob
LThe pilot lamp
MCooking Control Timer Knob
5
Using instructions the oven
The various functions included in the cooker are selected by operating the control devices located on the cooker control panel.
Notice: The first time you use your appliance, we recommend that you set the thermostat to the highest setting and leave the oven on for about half an hour with nothing in it, with the oven door shut. Then, open the oven door and let the room air. The odour that is often detected during this initial use is due to the evaporation of substances used to protect the oven during storage and until it is installed.
Attention: Only use the bottom shelf of the oven when using the rotisserie to cook (where present). For all other types of cooking, never use the bottom shelf and never place anything on the bottom of the oven when it is in operation because this could damage the enamel. Always place your cookware (dishes, aluminium foil, etc. etc.) on the grate provided with the appliance inserted especially along the oven guides.
Attention: to use the oven in manual mode without the cooking control timer, match the indicator on the control
panel with the  symbol on the timer knob.
The Oven Control Knobs
The multifunction oven combines the advantages of traditional convection ovens with those of the more modern forced air ventilation models. It is an extremely versatile appliance that allows you to easily and safely choose between 5 different cooking modes. The various features are selected by means of the knobs located on the control panel:
G - selector knob; H - thermostat knob.
When the selector knob is on any other setting than that identified by the “o”, the oven light turns on. The setting
identified by the  symbol makes it possible to turn the oven light on without having any of the oven heating elements on. When the oven light is on, it means that the oven is in use, and it will remain on for the entire time the oven is being used.
1.Convection Mode
-Position of the “G” knob: 
-Position of the “H” knob: between 50°C and Max
On this setting, the light comes on and the top and bottom heating elements are activated. This is the classic, traditional type oven which Ariston has perfected, with exceptional heat distribution and reduced energy consumption. The convection oven is still unequalled when it comes to cooking dishes made up of several ingredients, e.g. cabbage with ribs, stews, etc. Excellent results are achieved when preparing meat-based dishes as well (braised meats, stew, goulash, wild game, ham etc.) which need to cook slowly and require basting or the addition of liquid. It still remains the best system for cooking pastries and fruit in general. When cooking in convection mode, only use one dripping-pan or cooking rack at a time, otherwise the heat distribution will be uneven. Select from among the various
6
rack heights based on whether the dish needs more or less heat from the top or bottom.
2. Ventilation Mode
-Position of the “G” knob: 
-Position of the “H” knob: between 50°C and Max
Since the heat remains constant and uniform throughout the oven due to the fan at the bottom, the air cooks and browns food uniformly over its entire surface. With this mode, you can also cook various dishes at the same time, as long as their respective cooking temperatures are the same. A maximum of 2 rack levels can be used at the same time, following the instructions in the section entitled, "Cooking On More Than One Rack". This cooking mode is ideal for au gratin dishes or those which require an extended cooking time like lasagne etc...
Moreover, the excellent heat distribution makes it possible to use lower temperatures when cooking roasts. This results in less loss of juices, meat which is more tender and a decrease in the loss of weight for the roast. The ventilated mode is especially suited for cooking fish, which can be prepared with the addition of a limited amount of condiments, thus maintaining their flavour and appearance. Excellent results can also be attained when cooking vegetable-based side dishes like cabbage, beats, courgettes, aubergines, peppers, etc.
Desserts: leavened cakes are also perfect for the ventilated mode. Moreover, this mode can also be used to thaw white or red meat, fish and bread by setting the temperature to 80°-100°C. To thaw more delicate foods, set the thermostat to 50°C or use only the cold air circulation feature by setting the thermostat to 0°C.
3. Grill
-Position of the “G” knob: 
-Position of the “H” knob: Max
The incandescent heating element cooks food by means of thermal radiation directed downward.The extremely high and direct temperature of the grill makes it possible to brown the surface of meats and roasts while locking in the juices to keep them tender. The grill is also highly recommended for dishes that require high temperature on the surface: beef steaks, veal, entrecôte, filets, hamburger etc...
4. Double Grill
-Position of the “G” knob: 
-Position of the “H” knob: Max
This oversized grill has a completely new design, increasing cooking efficiency by 50%. The double grill also eliminates pockets of unheated air in the corners of the oven. Note: When using the grill (features 3, 4), the oven door must be closed.
5. Ventilated Double Grill
-Position of the “G” knob: 
-Position of the “H” knob: between 50 and 200°C
This combination of features increases the effectiveness of the unidirectional thermal radiation of the heating elements through forced air circulation of the air throughout the oven. This helps prevents foods from burning on the surface, allowing the heat to penetrate into the food. Ex-
cellent results are achieved with kebabs made with meats and vegetables, sausages, ribs, lamb chops, chicken, quail, pork chops, etc. This mode is also ideal for cooking fish steaks, like swordfish, tuna, grouper etc.
Thermostat Light (E)
This light indicates that the oven is heating. When it turns off, the temperature inside the oven has reached the setting made with the thermostat knob. At this point, the light will turn on and off as the oven maintains the temperature at a constant level.
Green Light (L)
This turns on whenever any electric heating element in the cook-top.
Cooking Control Timer Knob
Some models are equipped with a timer program to control when the oven shuts off during cooking.To use this feature, you must wind the "M" knob one full turn in the counter-
clockwise direction  ;Then, turn the knob in the clockwise direction
  , to set the time by matching up the indicator
on the control panel with the number of minutes on the knob.
At the end of the programmed length of time, the timer will sound and automatically turn off the oven.
When the oven is not in use, the cooking control timer can be used like a normal timer.
Attention: to use the oven in manual mode without the cooking control timer, match the indicator on the control
panel with the  symbol on the timer knob.
Attention
Avoid the children touch the oven door because it is very hot during the cooking.
3rd Oven Glass
In order to further decrease the temperature of the oven door and reduce energy consumption, a supplemental kit has been made available. This kit should be installed if the oven is used in the presence of small children. To install the protective glass for the oven door (code 074657), contact your nearest Merloni Eletrodomestici Service Centre indicated on the list provided with the appliance.
Pratical advice for oven cooking
Selection |
Food to be cooked |
Wt. |
Cooking |
Heating time |
Thermostat |
Cooking |
||||||
knob |
|
(Kg) |
position from |
(min.) |
knob |
time |
||||||
|
|
|
|
|
|
|
|
|
bottom |
|
|
(min.) |
|
|
|
|
|
|
|
|
|
|
|
|
|
1 Static |
Roast pork |
0,5 |
2 |
15 |
200 |
35 |
||||||
|
|
|
|
|
|
|
Roast veal |
0,5 |
2 |
15 |
200 |
30 |
|
|
|
|
|
|
|
||||||
|
|
|
|
|
|
|
Duck |
0,5 |
1-2 |
15 |
200 |
30-35 |
|
|
|
|
|
|
|
Meringues |
- |
2 |
10 |
100 |
60-75 |
|
|
|
|
|
|
|
Biscuits |
- |
2 |
10 |
140 |
15-20 |
|
|
|
|
|
|
|
|
|
|
|
|
|
2 Fan oven |
Pizza |
1 |
2 |
15 |
220 |
20-35 |
||||||
cooking |
Lasagne |
1 |
3 |
10 |
180 |
30-35 |
||||||
|
|
|
|
|
|
|
Baked noodles |
1 |
3 |
10 |
180 |
20-30 |
|
|
|
|
|
|
|
Lamb |
1 |
2 |
10 |
180 |
40-45 |
|
|
|
|
|
|
|
Chicken |
1 |
2 |
10 |
180 |
60-75 |
|
|
|
|
|
|
|
Mackerel |
1 |
2 |
10 |
180 |
50-55 |
|
|
|
|
|
|
|
Red porgy |
1,5 |
2 |
10 |
180 |
55-60 |
|
|
|
|
|
|
|
Chocolate cake |
1 |
3 |
10 |
160 |
50-60 |
|
|
|
|
|
|
|
|
|
|
|
|
|
3 Grill |
Sole and cuttle fish |
1 |
4 |
5 |
Max |
8 |
||||||
|
|
|
|
|
|
|
Squid and shrimp on |
|
|
|
|
|
|
|
|
|
|
|
|
|
|
|
|
|
|
|
|
|
|
|
|
|
spits |
1 |
4 |
5 |
Max |
4 |
|
|
|
|
|
|
|
Cod steaks |
1 |
4 |
5 |
Max |
10 |
|
|
|
|
|
|
|
Grilled vegetables |
1 |
3-4 |
5 |
Max |
8-10 |
|
|
|
|
|
|
|
|
|
|
|
|
|
4 Double Grill |
Veal steaks |
1 |
4 |
5 |
Max |
15-20 |
||||||
|
|
|
|
|
|
|
Cutlets |
1,5 |
4 |
5 |
Max |
25 |
|
|
|
|
|
|
|
||||||
|
|
|
|
|
|
|
Hamburgers |
1 |
3 |
5 |
Max |
7 |
|
|
|
|
|
|
|
Caballas |
1 |
4 |
5 |
Max |
20-25 |
|
|
|
|
|
|
|
|
|
|
|
|
|
5 Ventilated |
Grilled chicken |
1,5 |
2 |
5 |
200 |
55-60 |
||||||
Double Grill |
Cuttle fish |
1,5 |
2 |
5 |
200 |
40-45 |
||||||
|
|
|
|
|
|
|
|
|
|
|
|
|
|
|
|
|
|
|
|
|
|
|
|
|
|
NB: cooking times are approximate and may vary according to personal taste.
7

Practical Cooking Advice
The oven offers a wide range of alternatives which allow you to cook any type of food in the best possible way. The various features make it possible to select the level of heat and to direct it as you like: from the bottom, from above or uniformly. With time you will learn to make the best use of this versatile cooking appliance and the following directions are only a guideline which may be varied according to your own personal experience.
Baking Pastries
When baking pastries, always place them in the oven after it has been preheated (about 15 minutes). The temperature is normally around 160°C. Do not open the door while the pastry is cooking in order to prevent it from dropping. Batters must not be too runny, as this will result in prolonged cooking times. In general:
Pastry is too dry
Increase the temperature by 10°C and reduce the cooking time.
Pastry dropped
Use less liquid or lower the the temperature by 10°C.
Pastry is too dark on top
Place it on a lower rack, lower the temperature, and increase the cooking time.
Cooked well on the inside but sticky on the outside
Use less liquid, lower the temperature, and increase the cooking time.
The pastry sticks to the pan
Grease the pan well and sprinkle it with a dusting of flour.
I used more than one level and they are not all at the same cooking point
Use a lower temperature setting. It is not necessary to remove the food from all the racks at the same time.
Cooking Fish and Meat
Meat must weigh at least 1 Kg in order to prevent it from drying out. When cooking white meat, fowl and fish, use low temperature settings (150°C-175°C). For red meat that should be well done on the outside while tender and juicy in the inside, it is a good idea to start with a high temperature setting (200°C-220°C) for a short time, then turn the oven down afterwards. In general, the larger the roast, the lower the temperature setting. Place the meat on the centre of the rack and place the dripping pan beneath it to catch the fat. Make sure that the rack is inserted so that it is in the centre of the oven. If you would like to increase the amount of heat from below, use the low rack heights. For savoury roasts (especially duck and wild game), dress the meat with lard or bacon on the top.
Cooking on More Than One Rack
If you have to cook on more than one rack, use only feature no. 2  “Position of the “ G” knob "Ventilated Mode,” as it is the only one designed for this type of operation.
·The oven has 5 different rack heights.When cooking with the ventilated mode, use only the two centre rack heights: the bottom and topmost rack heights directly receive hot air and this could result in more delicate dishes being burned.
·In general, use levels 2 and 4 from the bottom, placing the food requiring more heat at level no. 2. For example, when cooking a roast together with other food, place the roast at level 2 and the more delicate dishes at level 4.
·When cooking foods requiring different cooking times and temperatures, make sure that the temperature is set between the two recommended temperatures and put the more delicate dishes at level no. 4. Finally, remove the dish with the shorter cooking time first.
·Use the dripping pan at the bottommost rack height and the grill at the top.
·When cooking pizza on more than one rack, position the racks at heights 2 and 4, with the temperature set at 220°C. Remember to preheat the oven for at least 15 minutes. In general the 4th rack height cooks a little slower, so remove the pizza on the second rack height first and leave the other one in the oven for a few minutes.
·When cooking pastries on two racks, use rack heights 3 and 4. Do not use no. 2 because it receives too much heat.
Using the Grill
The oven allows you to use two different grilling methods. Use the no. 3 setting  “Grill” for small portions. Energy consumption for this feature is only 1200 W; however, it is ideal for grilling small dishes or portions, e.g.toast, frankfurters, etc.
Place the food in the centre of the grill, as only the centre of the heating element is turned on. Food in the corners of the oven will not be cooked.
The no.4 setting  “Double Grill” allows you to grill along the entire surface area of the grill itself. Use this feature when you have food distributed uniformly beneath the grill and you want it to be browned evenly.
Important: Always leave the oven door closed when using the grill setting n order to achieve the best results and save on energy (about 10%).
When using the grill settings, it is recommended that the thermostat be set to maximum, as this is the optimal setting for the grill, which utilizes radiation produced by infrared rays. However, this does not mean that lower temperature settings cannot be used when necessary by simply turning the control knob.
When using the grill, place the rack at the top rack heights (see cooking table) and place the dripping-pan beneath the oven rack to prevent grease from falling onto the bottom of the oven.
8
User's instructions the ceramic hob
Description
The hobs have been provided with radiant electric heaters. These heaters are incorporated under the surface of the hob as zones which redden while they are in use.
A.Cooking area (A).
B.A lights which indicate whether the corresponding heaters are at a temperature in excess of 60° C; even if the hob/zone has been switched off.
Instructions for using the pyroceram top
To obtain the best results from your hob, there are some basic rules to follow when cooking or preparing food.
·All types of pots and pans may be used on the ceramic glass cooktop. However, the bottom surface must be perfectly flat. Naturally, the thicker the bottom of the pot or pan, the more uniformly the heat is distributed.
A |
A |
B
Description of the heating elements
The radiant heating elements are composed of circular heating elements.They only become red after being turned on for 10-20 seconds.
·Make sure that the base of the pan completely covers the cooking ring, so as to make full use of the heat produced
·Always make sure that the pan base is always dry and clean so as to guarantee proper contact as well as longer-lasting pans and the long life-span of the hob.
·Do not use the same pans which are used for cooking on gas burners. The heat strength of gas burners may deform the pan base and will not give the same results if it is subsequently used on a glazed ceramic hob.
Pratical advice for using the electric plates
The cook-top electric plate control knobs (I)
The cookers may be equipped with standard, fast and automatic electric plates in various combinations (the fast plates distinguished from the others by a red dot in the centre, the automatic ones by a round aluminium disk at the centre.
To avoid heat dispersion and damage to the plates, recommend using cooking vessels with flat bottoms in diameters which are not smaller than the plate diameter. Table shows the correspondence between the position indicated on the knobs and the use for which the plates advised.
Setting |
Normal or Fast Plate |
|
|
|
|
0 |
Off |
|
|
|
|
1 |
Cooking vegetables, fish |
|
|
|
|
2 |
Cooking potatoes (using steam) soups, |
|
chickpeas, beans. |
||
|
||
|
|
|
3 |
Continuing the cooking of large quantities of |
|
food, minestrone |
||
|
||
|
|
|
4 |
For roasting (average) |
|
|
|
|
5 |
For roasting (above average) |
|
|
|
|
6 |
For browning and reaching a boil in a short |
|
time. |
||
|
||
|
|
9
Routine maintenance and cleaning of the oven
Disconnect the oven from the source of electricity before performing any maintenance or cleaning. To ensure a long life for your oven, clean it frequently and carefully, keeping in mind that:
·Do not use steam equipment to clean the appliance.
·the enamelled parts and the self-cleaning panels should be washed with warm water without the addition of abrasive powders or corrosive substances which could damage the finish;
·stainless steel may become marked if it comes into contact with very hard water or harsh detergents (containing phosphorous) for long periods of time. After cleaning, it is advisable to rinse thoroughly and dry. It is also recommended to dry any water drops;
·avoid dirt and grease accumulating on the control panel by cleaning it frequently. Use non-abrasive sponges or soft cloths to avoid scratching enamelled or shiny steel parts.
Cleaning the hob surface
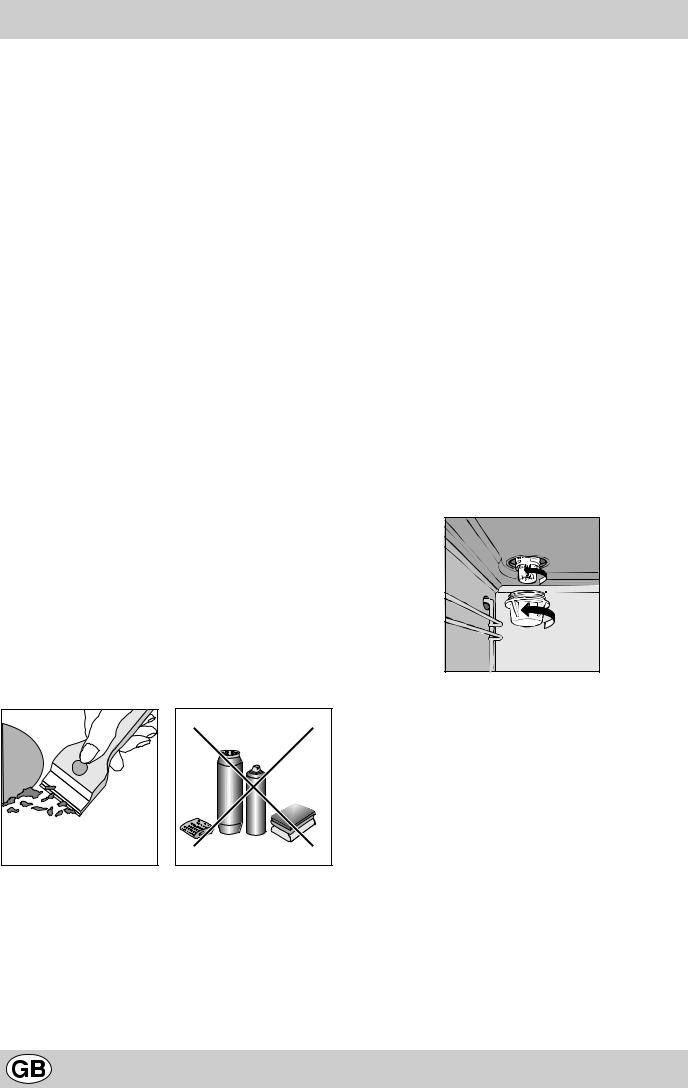
Prior to cooking, the hob surface should always be cleaned using a damp cloth to remove any dust or stray food particles. The hob surface should be regularly cleaned with a lukewarm solution of water and a mild detergent. Periodically it may be necessary to use a proprietary ceramic hob cleaner. First remove all spilt food and fat with a window scrape, preferably the razor blade type 


 (not supplied) or, failing that, the fixed blade razor edge type (see Fig. A). Then clean the hob while it is still warm to the touch with a suitable cleaner and paper towel.
Then rinse it and wipe it dry with a clean cloth .If aluminium foil or plastic items are accidentally allowed to melt on the hob surface they should be immediately removed from the hot cooking area with a scraper. This will avoid any possible damage to the surface.This also applies to sugar or any food with a high sugar content.
Do not use abrasive sponges or scourers of any type. Corrosive cleaners such as oven sprays and stain removers should also not be used (see Fig. B).
Glass ceramic hob cleaners |
Available from |
|
|
Window scraper Razor blade |
DIY Stores |
scrapers |
|
|
|
Replacement blades |
DIY Stores, |
|
supermarkets, |
|
chemists |
|
|
COLLO luneta |
Boots, Co-op stores, |
HOB BRITE |
department stores, Regional |
Hob Clean |
Electricity Company shops, |
SWISSCLEANER |
supermarkets |
|
|
Replacing the oven light bulb
·Either pull out the plug (if it is accessible) or disconnect the oven from the mains by turning off the multipole switch used for connecting the oven to the electricity source;
·Remove the glass cover of the lamp holder;
·Unscrew the bulb and replace it with a high temperature resistant bulb (300°C) with the following characteristics:
-Voltage 230/240 V
-Wattage 25W
-Type E14
·Replace the glass cover and reconnect the power supply to the oven.
Fig. A |
Fig. B |
10
Aanwijzingen
Om de doelmatigheid en veiligheid van dit toestel te garanderen raden wij u aan:
•voor reparaties alleen de Service Centers te bellen die door de fabrikant gemachtigd zijn.
•altijd gebruik te maken van originele onderdelen.
1Dit apparaat is vervaardigd voor niet-professioneel gebruik binnenshuis.
2Voordat u het apparaat gaat gebruiken wordt u verzocht de gebruiksaanwijzingen in deze handleiding aandachtig te lezen aangezien zij belangrijke gegevens bevatten betreffende de veiligheid van de installatie, het gebruik en het onderhoud. Bewaar dit boekje zorgvuldig voor eventuele verdere raadpleging.
3Na het uitpakken van het apparaat moet men goed kijken of het ongeschonden is. In geval van twijfel moet men zich tot een bevoegde installateur wenden voordat men het apparaat in gebruik neemt. Het verpakkingsmateriaal (plastic zakken, polystyreen, spijkers enz.) moet buiten het bereik van kinderen worden gelegd aangezien het aanleiding tot gevaar kan geven.
4Het installeren moet uitgevoerd worden volgens de instrukties van de fabrikant en door een bevoegde installateur. Een verkeerde aansluiting kan schade berokkenen aan personen, dieren of dingen en voor deze gevallen kan de fabrikant niet verantwoordelijk gesteld worden.
5De elektrische veiligheid van dit apparaat is slechts dan gegarandeerd als het op de juiste wijze geaard is volgens de geldende normen voor elektrische veiligheid. Men moet zich hiervan verzekeren en, in geval van twijfel, een nauwkeurige kontrole van de installatie laten uitvoeren door een bevoegde installateur. De fabrikant kan niet verantwoordelijk gesteld worden voor schade die veroorzaakt is doordat het apparaat niet geaard is.
6Voordat men het fornuis aansluit, moet men zich ervan verzekeren dat de gegevens op het typeplaatje (op het apparaat en/of de verpakking) overeenkomen met uw elektriciteitsnet en stadsgas.
7Kontroleer dat de elektrische capaciteit van het net en van de stopkontakten voldoende is voor het maximum vermogen van het apparaat aangegeven op het typeplaatje. In geval van twijfel moet men zich tot een erkende installateur wenden.
8Men gebruikt een veelpolige schakelaar met een afstand tussen de kontaktpunten van minstens 3 mm.
9Als de stekker niet in het stopkontakt past laat men het stopkontakt vervangen door het juiste type door een bevoegde installateur. Deze moet er ook op letten dat de doorsnede van de draden van het stopkontakt geschikt is voor het opnemingsvermogen van de apparatuur. Het gebruik van adaptors, dubbelstekkers en/of verlengsnoeren wordt afgeraden. Wanneer het gebruik hiervan onvermijdelijk is moet men slechts enkelvoudige adaptors gebruiken, of meervoudige adaptors en verlengsnoeren die voldoen aan de geldende veiligheidsnormen. Let op dat het vermogen van de stroom, zoals aangegeven op de enkelvoudige adaptor en op de verlengsnoeren, niet wordt overschreden, noch het maximum vermogen aangegeven op de meervoudige adaptor.
10Laat het apparaat niet onnodig aan staan.Sluit de hoofdschakelaar van het apparaat af wanneer het apparaat niet in gebruik is en sluit de gaskraan af.
11Houdt de ventileeropeningen vrij.
12De voedingskabel van dit apparaat mag niet door de gebruiker zelf vervangen worden.In het geval hij beschadigd is en vervangen moet worden wendt men zich uitsluitend tot een door de fabrikant geauthoriseerde technische dienst.
13Deze apparatuur mag alleen voor het ervoor bestemde doel gebruikt worden. Ieder ander gebruik (zoals b.v. verwarming van het vertrek) is ongeschikt en daardoor gevaarlijk. De fabrikant stelt zich niet verantwoordelijk voor schade die veroorzaakt is door onjuist, ongeschikt of onredelijk gebruik.
14Het gebruik van iedere elektrische apparatuur brengt het in acht nemen van enkele fundamentele regels met zich mee. In het bijzonder:
•raak de apparatuur niet met natte of vochtige handen of voeten aan
•gebruik het apparaat niet aan U blootvoets bent
•gebruik verlengsnoeren slechts met grote voorzichtigheid.
•trek niet aan de voedingskabel of aan het apparaat zelf om de stekker uit het stopkontakt te verwijderen
•laat de apparatuur niet aan atmosferische invloeden (zon, regen enz.) bloot staan.
•laat de apparatuur niet door kinderen of gehandicapte personen gebruiken zonder toezicht
15Voordat men enige handeling verricht voor schoonmaken of onderhoud moet men altijd eerst de stroom afsluiten door de stekker uit het stopkontakt te trekken of de schakelaar uit te schakelen.
16Als het apparaat niet goed funktioneert moet men het uitschakelen, de gaskraan dicht draaien en er verder niet aan zitten. Voor de reparatie moet men zich uitsluitend tot een erkende installateur wenden en originele onderdelen eisen. Bij in gebreke blijven kan de alektrische veiligheid in gevaar gebracht worden.
17Als men het apparaat niet meer gebruikt moet men het onklaar maken door de voedingskabel door te snijden nadat men de stroom heeft afgesloten. Wij raden ook aan die onderdelen onklaar te maken die een gevaar kunnen opleveren voor kinderen die het ongebruikte apparaat voor spelen willen gebruiken.
18Het keramische kookvlak is hittebestendig en kan tegen een stootje. Maar het kan breken als het wordt getroffen door scherpe voorwerpen. In dit geval moet u de stroom afsluiten en zich tot een erkende installateur wenden.
19Vergeet niet dat de kookzone minstens een half uur na het uitschakelen warm blijft. Wees dus voorzichtig en leg er geen voorwerpen op.
20De glasoppervlakte moet niet gebruikt worden voor het opbergen of tegenaan leunen van welk voorwerp ook.
21 Schakel de kookzones niet in als er aluminium folie of plastic materiaal op ligt.
22Raak de warme kookzones niet aan.
23Bij gebruik van kleine electrische huishoudapparaten in de buurt van het kookvlak moet u opletten dat de snoeren hiervan niet op de warme zones terecht komen.
24Richt de handvaten van de pannen naar binnen toe zodat er niet per ongeluk tegen gestoten kan worden.
25Laat nooit een kookzone aan staan als er geen pan op staat, aangezien de hitte dan snel maximum bereikt met mogelijke schade aan de verwarmingselementen.
26Aanwijzingen voor het eerste gebruik. De lijm die gebruikt is voor het verzegelen van het glas kan vettige resten achter laten. Wij raden aan deze vòòr het eerste gebruik te verwijderen met een niet-schurend middel.Gedurende het eerste gebruik kan zich een rubberachtige geur voordoen, die echter snel verdwijnt.
27Gedurende het gebruik van de oven worden de verwarmingselementen en enkele delen van de ovendeur heet. Raak er niet aan en houd de kinderen op een afstand.
28Controleer altijd dat de knoppen in de positie “•”/”¡” staan als het fornuis niet gebruikt wordt.
29Als het fornuis op een voetstuk wordt geplaatst moet u er voor zorgen dat het er niet af kan schuiven.
11
Het installeren
De volgende instructies zijn gericht tot de erkende installateur zodat deze de handelingen van installeren, reguleren en technisch onderhoud op de juiste wijze en volgens de geldende normen uit kan voeren.
Belangrijk: sluit altijd eerst de stroom af voordat u overgaat tot reguleren, onderhoud enz.
Het plaatsen
Het fornuis heeft een protectiegraad tegen oververhitting van het type X en het kan dus geïnstalleerd worden naast meubels die niet hoger zijn dan het kookvlak.
Het waterpas stellen
Het fornuis heeft hiervoor stelschroeven. Deze kunnen indien nodig worden aangebracht in de hoeken onder het fornuis.
Electrische aansluiting
De kabel moet gedimensioneerd worden naar gelang het type electrische aansluiting dat men gebruikt (zie schema hieronder).
400 3N |
1 |
2 |
3 |
4 |
5 |
H05RR-F 5x2.5 CEI-UNEL 35363 R |
|
S |
T |
|
N |
400V 2N |
1 |
2 |
3 |
4 |
5 |
H05RR-F 4x2.5 CEI-UNEL 35363 |
|
R |
S N |
|
|
230V 1N |
1 |
2 |
3 |
4 |
5 |
H07RN-F 3x4 CEI-UNEL 35364 |
|
|
R |
|
N |
|
|
|
|
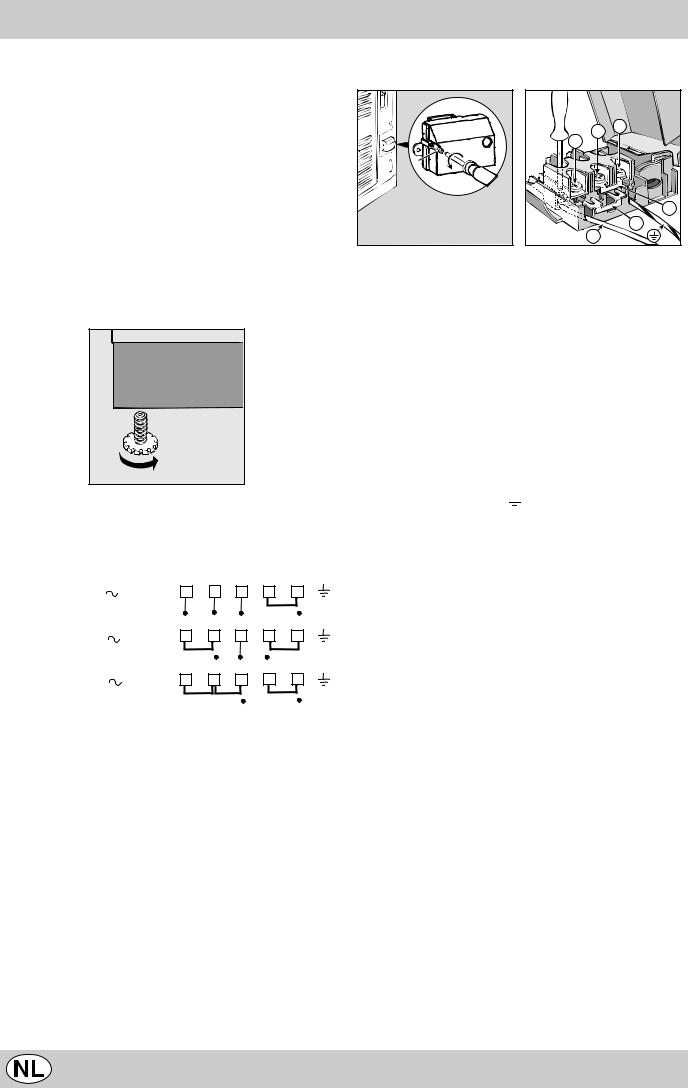
Het monteren van de voedingskabel
V |
2 |
3 |
1 |
|
|
B |
N |
A |
|
Afb. A |
Afb. B |
Het openen van het klemmenbord:
•Draai de schroef “V” los (afb. A);
•Trek de deksel ervan open.
Voor het in werking stellen van de kabel gaat u als volgt te werk:
•plaats de bruggetjes A - B in de functie van het type aansluiting dat u wilt gebruiken met behulp van het schema in afbeelding B.
N.B.: de bruggetjes zijn gebruiksklaar gemaakt in de fabriek voor aansluiting aan éénfasige 230V (contacten 1-2-3 onderling verbonden). Het bruggetje 4-5 bevindt zich aan de onderkant van het klemmenbord.
•plaats de kabels (N en  ) zoals in afbeelding en draai de respectievelijke schroeven aan.
•bevestig de overige draden in de kroonsteentjes 1-2-3.
•bevestig de kabel in de kabelklem en sluit de deksel met de schroeven “V”.
Het aansluiten van de kabel aan het net
Monteer op de kabel een stekker die is aangepast aan het vermogen dat is aangegeven op het typeplaatje. Bij rechtstreekse aansluiting aan het net moet tussen het apparaat en het net een veelpolige schakelaar worden aangebracht met een minimum afstnd tussen de contactpunten van 3mm, gedimensioneerd aan het vermogen en voldoende aan de geldende normen (de aardleiding mag niet worden onderbroken door de schakelaar). De voedingskabel moet zodanig worden geplaatst dat hij nergens een temperatuur bereikt die hoger is dan 50°C boven kamertemperatuur.
Voordat u de aansluiting tot stand brengt moet u zich ervan verzekeren dat:
•de hoofdzekering en het net van uw huis de belasting van het apparaat kunnen dragen (zie typeplaatje);
•de stroomvoorziening voorzien is van een doeltreffende aarding volgens de normen en voorschriften van de wet;
•het stopcontact of de veelpolige schakelaar gemakkelijk te bereiken zijn als het fornuis geïnstalleerd is.
12
 Loading...