


Cooker |
K3C11/R |
Installation and use |
|
Плита и рабочей поверхностью Инструкции по установке и эксплуатации
sporák
instalace a použití
Готварска печка Монтаж и употреба
Konyhabútor Beépítés és használat
Sporák
Návod na inštaláciu a použitie

Cooker with electric oven and ceramic hob
Instructions for installation and use
Плита с электрической духовкой и стеклокерамической поверхностью
Инструкции по использованию и обслуживанию
CZ |
Sporák s elektrickou troubou |
|
Návod k instalaci a použití |
Готварска печка с електрическа фурна и керамичен плот
Инструкции за монтаж и употреба
HU Konyhabútor többfunkciós sütovel és üvegkerámia munkalappal
Beépítési és használati utasítások
SK Sporák sklokeramickou platòou
Návod na inštaláciu a použitie
3
11
21
32
40
48

Caution
In order to guarantee that your appliance operates in a safe and efficient manner:
•seek help only from authorised technical assistance centres;
•always insist on the use of original spare parts.
1This appliance was designed for domestic use inside the home.
2These instructions are only valid for the countries whose symbols appear in the manual and on the serial number plate located on the appliance.
3This is a class 1 (insulated) or class 2 - subclass 1 (recessed between 2 cabinets) appliance.
4Before using the appliance, please read this instruction booklet carefully as it contains important information regarding the safe installation, use and maintenance of the cooker. Keep this booklet in a safe place so that, if necessary, it may be consulted at a later date.
5After the packaging has been removed, ensure that the appliance is intact and not damaged in any way. If there is any doubt, contact a professionally qualified technician and do not use the appliance. All packaging (plastic bags, polystyrene foam, staples, etc.) should be kept out of reach of children as it is potentially dangerous.
6The appliance must be installed by a qualified person in compliance with the instructions provided. The manufacturer shall not be held responsible for any harm caused to persons or animals or for any damage to personal property resulting from incorrect installation.
7The electrical safety of this appliance is only guaranteed when it has been correctly connected to an efficient earthed electricity supply in compliance with current electrical safety regulations. This is a fundamental safety requirement that must be checked and, if there is any doubt, you should ask a professionally qualified technician to carry out a thorough check of the supply system. The manufacturer may not be held responsible for any damage caused by a mains supply that has not been earthed correctly.
8Before connecting the appliance, make sure its rating (which can be found on the appliance itself and/or on the packaging) corresponds to the power supply.
9Make sure that the mains supply and the electrical sockets can withstand the maximum power of the appliance, which is indicated on the serial number plate. If there is any doubt, contact a professionally qualified technician.
10The appliance must be connected to the mains by means of an omnipolar switch with a minimum contact opening of 3 mm.
11If the socket is incompatible with the plug, ask a professionally qualified technician to replace it with a suitable one. The technician should also make sure that the power cables attached to the socket can withstand the maximum power of the appliance. In general, it is not advisable to use adaptors, multiple sockets and/or extension cords. If this cannot be avoided, only use single or multiple adaptors and extension cords that comply with current safety regulations. Never exceed the maximum current capacity indicated on the single adaptor or extension cord, or the maximum power level indicated on the multiple adaptor.
12Do not leave the appliance plugged in if it is not in use. Shut off the main switch for the appliance when it is not being used.
13The openings used for ventilation and dispersion of heat must never be covered.
14Do not attempt to replace the power supply cable yourself. If the cable is damaged or needs replacing, contact a technical assistance centre that has been authorised by the manufacturer.
15This appliance should only be used for the purpose for which it was designed. Any other purpose (for example, heating the room) constitutes improper use of the oven and is dangerous. The manufacturer may not be held responsible for any damage caused as a result of improper, incorrect and unreasonable use of the appliance.
16All users of electrical appliances should observe several basic rules. These include:
•Do not touch the appliance with wet or damp hands or feet.
•Do not use the appliance when barefoot.
•Do not use extension cords. If this cannot be avoided, be especially careful.
•When unplugging the appliance always pull the plug from the mains socket, do not pull on the cable.
•Do not leave the appliance exposed to atmospheric agents (rain, sunlight, etc.)
•Do not allow children or disabled individuals to operate the appliance without supervision.
17Always disconnect the appliance from the mains supply (either by unplugging it or by shutting off the switch) before cleaning it or carrying out any maintenance work.
18Before disposing of the appliance, make it unusable by unplugging it and cutting off the power supply cable. It is also advisable to remove any potentially hazardous parts, especially with regard to children who may use the old appliance as a toy.
19Do not use unstable or misshapen pans on the electric cooking zones; this will help to avoid accidental spills. Make sure pan handles are turned towards the centre of the hob in order to avoid accidental burns.
20Do not use flammable liquids (alcohol, petrol, etc...) near the appliance while it is in use.
21If you are using small domestic appliances near the hob, ensure that their power supply cables do not come into contact with the hot parts of the surface.
22Always make sure that the knobs are in the “<B>•”/“l”/“¡” position when the appliance is not in use.
23The heating elements and certain parts of the oven door become extremely hot when the appliance is in use. Do not touch these parts yourself and keep children well away from the appliance.
24If the cooker is placed on a pedestal, take all necessary precautions to ensure that the appliance does not slide off this pedestal.
25If the surface of the glass cracks, unplug the appliance immediately. For any repairs, contact only an authorised aftersales service centre and demand original spare parts. Failure to comply with the above may compromise the safety appliace.
26The glass ceramic hob is resistent to thermal and mechanical shocks. However, it may break due to a shock caused by a sharp object, such as tool for example. In this case, unplug the appliance immediately and contact an authorised aftersales service centre to have it repaired.
27Rememer that the heating area stays hot for at least half an hour after being turned off; please refrain from placing any cookware or other items on the cooking zone while still hot
3

Installation
The following instructions should be read by a qualified technician to ensure that the appliance is installed, regulated and technically serviced correctly in compliance with current regulations.
Important: disconnect the cooker from the electricity when making any adjustement, maintenance operation, etc.
Positioning
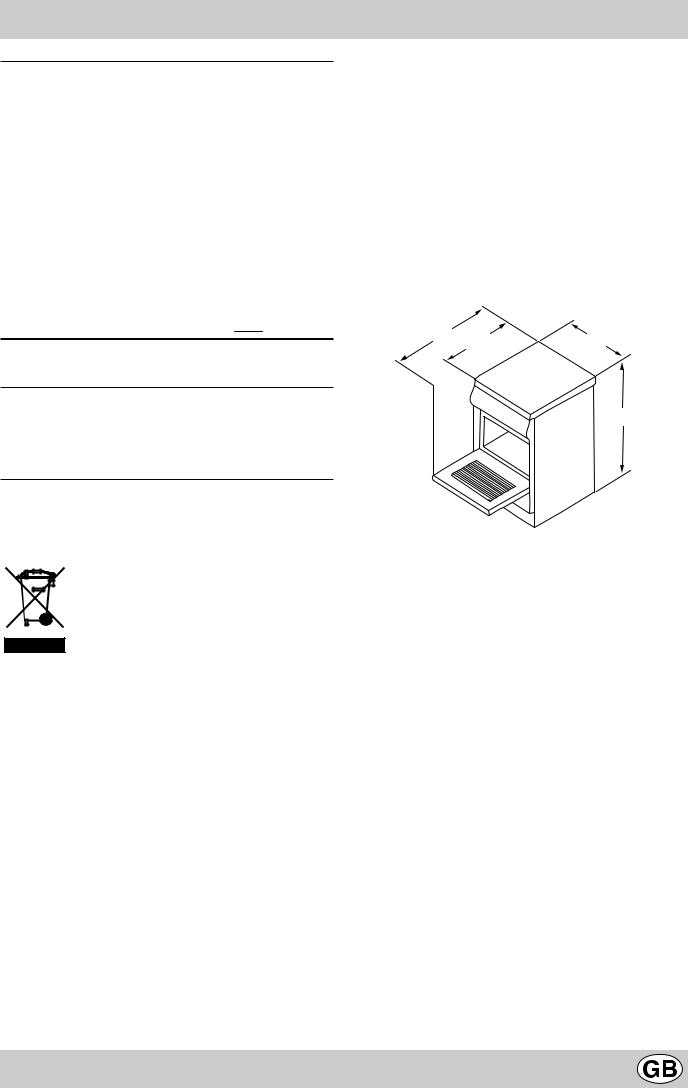
The appliance can be installed next to furniture units which are no taller than the top of the cooker hob. For proper installation of the cooker, the following precautions must be taken:
a)Kitchen cabinets installed next to the cooker that are taller than the top of the hob must be situated at least 200 mm from the edge of the hob.
b)Hoods must be installed according to the requirements in the installation manual for the hoods themselves and in any case at a minimum distance of 650 mm.
c)Place the wall cabinets adjacent to the hood at a minimum height of 420 mm from the hob (see figure).
d)Should the cooker be installed beneath a wall cabinet, the latter should be situated at least 700 mm (millimetres) away from the hob, as shown in the figure.
e)the cut-out for the cooker cabinet should have the dimensions indicated in the figure.
|
HOOD |
|
|
Min. 600 mm. |
min. 650 mm. with hood min. 700 mm. without hood |
Min. 420 mm. |
Min. 420 mm. |
Levelling
In order to have a perfect levelling of the cooker adjustable feets are supplyed. They can be screwed in the seats positioned in the corners of the cooker base.
Electrical connection
The power supply cable since its size depends on the electric connection (see the following connection diagram).
400 3N |
1 |
2 |
3 |
4 |
5 |
H05RR-F 5x2.5 CEI-UNEL 35363 |
R |
S |
T |
|
N |
400V 2N |
1 |
2 |
3 |
4 |
5 |
|
|
|
|
|
|
H05RR-F 4x2.5 CEI-UNEL 35363 |
|
R |
S N |
|
|
230V 1N |
1 |
2 |
3 |
4 |
5 |
H07RN-F 3x4 CEI-UNEL 35364 |
|
|
R |
|
N |
|
|
|
|
Feeding cable installation
Terminal block opening:
•Unscrew screw “V”
•Pull and open the junction block lid
For the installation of the feeding cable carry out the following operations:
•position the small connection A-B according to the type of connection that has to be performed using the scheme shown in the figure.
Note: the small connections are prepared by the Factory for the 230V monophase connection (contacts 1-2-3 are connected to one another). The bridge 4-5 is situated in the lower part of the terminal block.
•introduce the cables (N and $) as shown in the figure and tighten the relative screws.
•fix the remaining cables on the 1-2-3 clips.
•fix the feeding cable in the special cable stop and close the cover fastening it with the screw “V”.
V |
Connecting the supply cable to the mains
Fit a plug, normalised for the load indicated on the data plate, on the cable; when making the connection directly to the mains, an omnipoIar switch with a minimum opening of 3 mm between the contacts, must be installed between the appliance and the mains.This switch must be sufficient for the load and must comply to regulations in force (the earthing wire must not be interrupted by the switch). The power supply cable must be positioned so that it does not exceed 50°C more than room temperature at any point of its length. Before making the connection check that:
•the limiter valve and the home system can support the appliance load (see data plate);
•the power supply system has an efficient earthing connection which complies with the provisions of current regulations;
•the socket or omnipoar circuit-breaker is easily accessible once the cooker has been installed.
4
Technical Specifications
Oven |
|
Dimensions (WxDxH) |
39x44x34 cm |
Volume |
58 lt |
Oven absorption Max |
2100 W |
|
|
Ceramic Hob |
|
Front Left |
1200 W |
Back Left |
1700 W |
Back Right |
1200 W |
Front Right |
1700 W |
Hob Ceramic absorption Max |
5800 W |
|
|
ENERGY LABEL
Directive 2002/40/EC on the label of electric ovens Norm EN 50304
Declared energy consumption for Natural convection Class
%
This appliance conforms with the following European Economic Community directives:
-73/23/EEC of 19/02/73 (Low Voltage) and subsequent modifications;
-89/336/EEC of 03/05/89 (Electromagnetic Compatibility) and subsequent modifications;
-93/68/EEC of 22/07/93 and subsequent modifications.
heating mode: |
|
Convection |
104 |
60 |
50 |
|
Voltage and frequency
see data plate
Inner Dimensions of the Food Warmer:
85/90
Width: 42 cm
Depth: 44 cm
Height: 23 cm
Disposal of old electrical appliances
The European Directive 2002/96/EC on Waste Electrical and Electronic Equipment (WEEE), requires that old household electrical appliances must not be disposed of in the normal unsorted municipal waste stream. Old appliances must be collected separately in order to optimise the recovery and recycling of the materials they contain and reduce the impact on human health and the environment.The crossed out “wheeled bin” symbol on the product reminds you of your obligation, that when you dispose of the appliance it must be separately collected. Consumers may take their old appliance to public waste collection areas, other communal collection areas, or if national legislation allows return it to a retailer when purchasing a similar new product.
All major household appliance manufacturers are active in the creation of systems to manage the collection and disposal of old appliances.
5
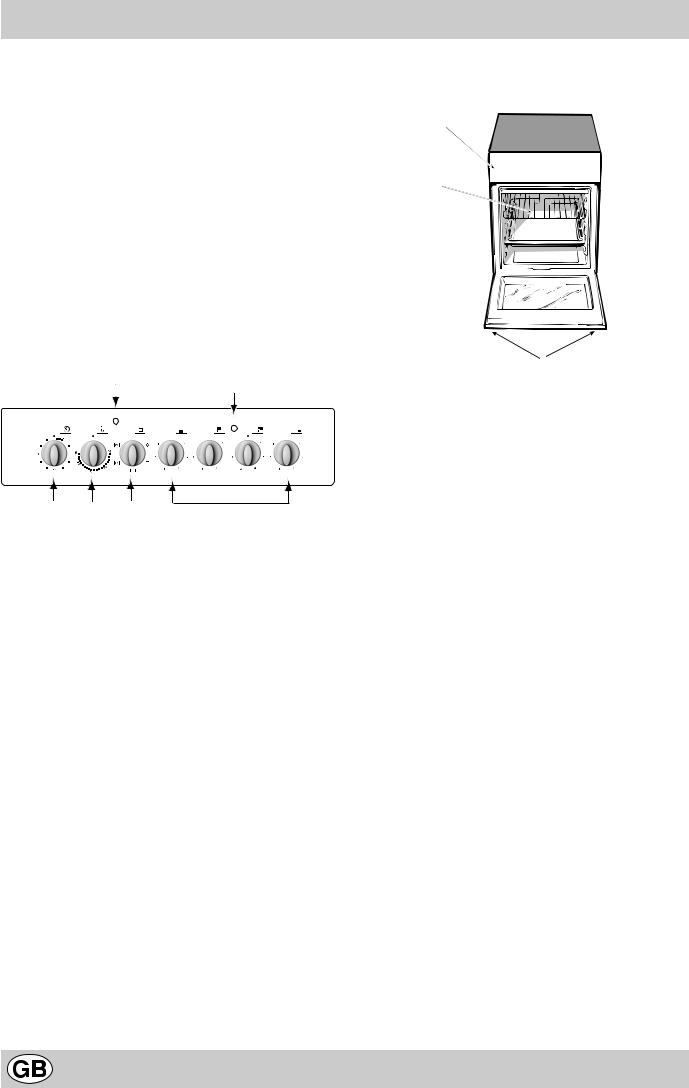
The cooker with electric oven and ceramic hob
D.Dripping Pan or Baking Sheet
E.Control Panel
F.Adjustable Feet or Legs
G.Selector Knob
H.The green pilot lamp
I.The control knobs for the electric plates
K.Oven Rack
L.Thermostat Light
M.Timer Knob
N.Thermostat Knob
E
K
D
F
L H
M N G I
6
The different functions and uses of the oven
The various functions included in the cooker are selected by operating the control devices located on the cooker control panel.
Notice: The first time you use your appliance, we recommend that you set the thermostat to the highest setting and leave the oven on for about half an hour with nothing in it, with the oven door shut. Then, open the oven door and let the room air. The odour that is often detected during this initial use is due to the evaporation of substances used to protect the oven during storage and until it is installed.
Attention: Only use the bottom shelf of the oven when using the rotisserie to cook (where present). For all other types of cooking, never use the bottom shelf and never place anything on the bottom of the oven when it is in operation because this could damage the enamel. Always place your cookware (dishes, aluminium foil, etc. etc.) on the grate provided with the appliance inserted especially along the oven guides.
The oven knobs
With these two controls you can select the different functions of the oven and choose the cooking temperature suitable for the food you are preparing. The different cooking functions are set up by operating the two knobs: G - the selection knob
N - the thermostat knob on the oven panel.
For any selection-knob setting different from idle, identified by the “0”, the oven light turns on; the knob setting marked
& permits turning on the oven light without any heating element being switched on. When the oven light is on, it means that the oven is in use, and it will remain on for the entire time the oven is being used.
1. Static oven
-Knob “G” setting:
-Knob “N” setting: anywhere between 50°C and Max
The oven light turns on and the top and bottom heating elements (resistors) switch on. The temperature, fixed by the thermostat knob, is reached automatically and kept constant by the thermostat control. This function permits cooking and type of food thanks to excellent temperature distribution.
2. The bottom heating element
- Knob “G” setting:
- Knob “N” setting: anywhere between 50°C and Max
The oven light turns on and so does the bottom heating element. The temperature, fixed by the thermostat knob, is reached automatically and kept constant.This setting is recommended for finishing the cooking of foods (placed in pans) that are well done on the outside but still not done inside or for desserts covered with fruit or jam which require a light browning on top. Note that this function does not permit reaching the maximum (250°C) temperature inside for cooking foods always on this oven setting unless the foods are cakes which only require temperatures below or equal to 180°C.
3.The Top heating element
-Knob “G” setting: 


-Knob “N” setting: anywhere between 50°C and Max
The oven light turns on and so does the infra-red ray grill, and the motor starts turning the spit. The rather high and direct temperature of the grill permits browning the outside of meats immediately thus keeping in the juices and assuring tenderness.
4. The grill
-Knob “G” setting: 


-Knob “N” setting: anywhere between 50°C and Max
The oven light turns on and so does the double heating element of the grill and the motor starts turning the spit. This grill is larger than the average and has a completely new design: cooking performance is increased 50%. The double grill makes sure that even the corners are touched by heat.
Important: when using the grill, keep the oven door closed to obtain the best results and save energy (about 10%). When utilizing the grill, place the rack at the lower levels (see cooking table). To catch grease or fat and prevent smoke, place a dripping-pan at the bottom rack level.
The oven-operating pilot lamp (L)
Signals when the oven is heating. It switches off when the temperature inside the oven reached the temperature selected by the knob. At this point the alternate turning on and turning off of this light indicates that the thermostat is operating correctly to keep the oven temperature constant.
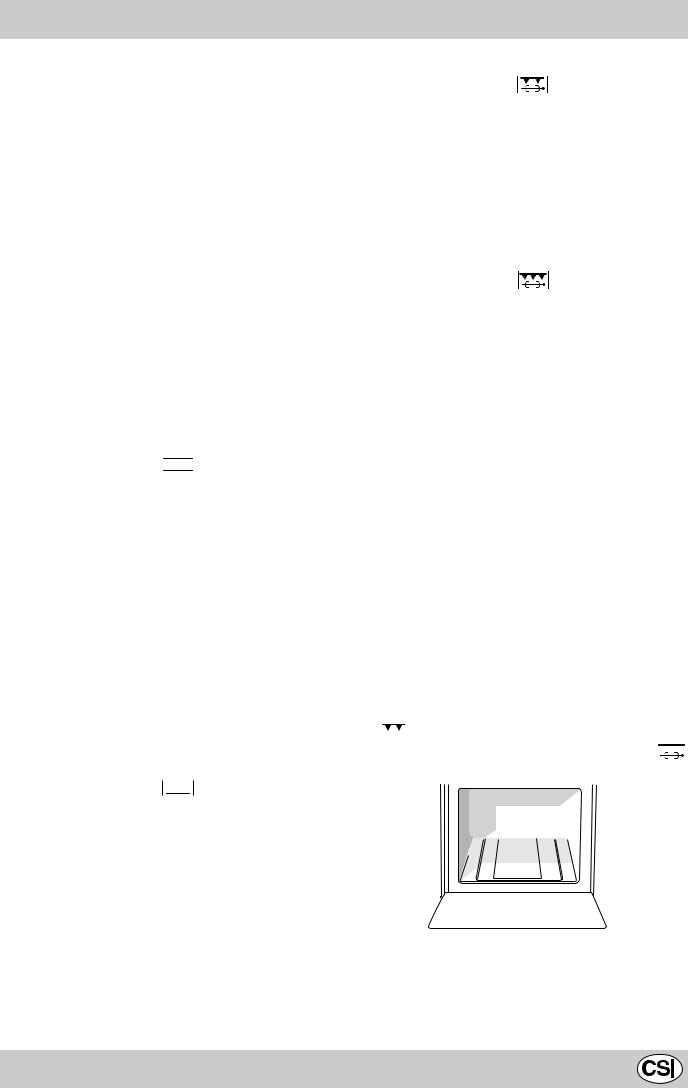
Attention
Avoid the children touch the oven door because it is very hot during the cooking.
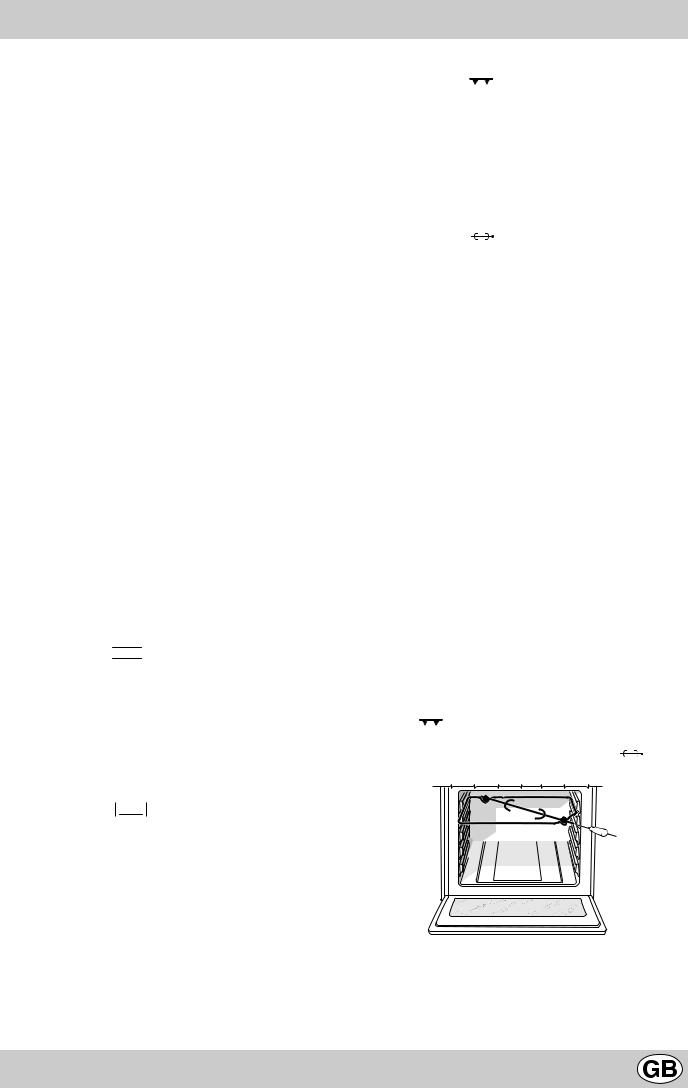
The rotisserie
To operate the rotisserie, proceed as follows:
a)place the dripping-pan on the 1st rack;
b)insert the special rotisserie support on the 4th rack and position the spit by inserting it through the special hole into the rotisserie at the back of the oven;
c)to start the spit, set the oven selection knob (G) on setting 

 (which delivers 50% of the total grill power)
for small quantities of food, or on setting 


 (which delivers total grill power).
Timer Knob
To use the timer, the ringer “M” must be wound up by turning the knob one full turn clockwise "; then turn it back #, to the desired time so that the number of minutes on the knob matches the reference mark on the panel.
7
Cooking advice
The oven offers a wide range of alternatives which allow you to cook any type of food in the best possible way. With time you will learn to make the best use of this versatile cooking appliance and the following directions are only a guideline which may be varied according to your own personal experience.
Baking cakes
The oven should always be warm before putting in cakes wait till the end of preheating (about 10-15 min.). Cakebaking temperatures are normally around 160°C/200°C. Do not open the oven door during the baking process as this could cause the cake to sink.In general:
Pastry is too dry
Increase the temperature by 10°C and reduce the cooking time.
Pastry dropped
Use less liquid or lower the temperature by 10°C.
Pastry is too dark on top
Place it on a lower rack, lower the temperature, and increase the cooking time.
Cooked well on the inside but sticky on the outside
Use less liquid, lower the temperature, and increase the cooking time.
The pastry sticks to the pan
Grease the pan well and sprinkle it with a dusting of flour or use greaseproof paper.
Cooking fish and meat
When cooking white meat, fowl and fish use low temperatures. (150°C-175°C). When red meat must be superficially well-cooked but succulent inside, it is advisable to start with a high temperature (200-220°C) for a short time, and then to reduce it at a later point. Generally speaking, the more meat there is, the lower the temperature and the longer the cooking time should be.Place the meat in the centre of the grid and put a spilltray underneath to catch grease drips. Insert the grid so that it is in the middle of the oven. If more heat from below is required, use the 1° bottom shelf.
To grill
When using any of the grilling modes, it is recommended that the thermostat knob be turned to the highest setting, as it is the most efficient way to use the grill (which utilizes infrared rays). If necessary, however, the thermostat can be set to lower temperatures for grilling. When using the grill functions, place the grid on the lower racks (see cooking table) then, to prevent fat and grease from dripping onto the bottom of the oven and smoke from forming, place a dripping-pan on the 1st oven rack from the bottom.
Important: always use the grill with the oven door closed. This will allow you both to obtain excellent results and to save on energy (approximately 10%). Table 1 includes the recommended temperatures, cooking times and positions for you to obtain the best results when cooking.
8
User’s instructions the ceramic hob
Description
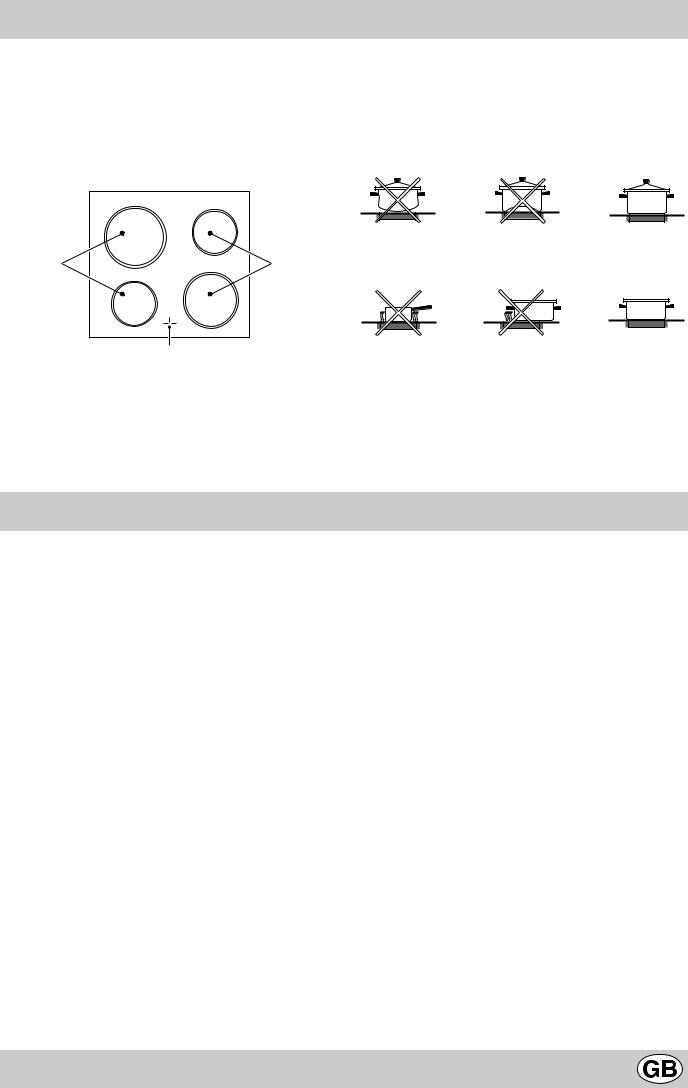
The hobs have been provided with radiant electric heaters. These heaters are incorporated under the surface of the hob as zones which redden while they are in use.
A.Cooking area (A).
B.A lights which indicate whether the corresponding heaters are at a temperature in excess of 60° C; even if the hob/zone has been switched off.
Instructions for using the pyroceram top
To obtain the best results from your hob, there are some basic rules to follow when cooking or preparing food.
•All types of pots and pans may be used on the ceramic glass cooktop. However, the bottom surface must be perfectly flat. Naturally, the thicker the bottom of the pot or pan, the more uniformly the heat is distributed.
A |
A |
•Make sure that the base of the pan completely covers the cooking ring, so as to make full use of the heat produced
B
Description of the heating elements
The radiant heating elements are composed of circular heating elements.They only become red after being turned on for 10-20 seconds.
•Always make sure that the pan base is always dry and clean so as to guarantee proper contact as well as longer-lasting pans and the long life-span of the hob.
•Do not use the same pans which are used for cooking on gas burners. The heat strength of gas burners may deform the pan base and will not give the same results if it is subsequently used on a glazed ceramic hob.
Pratical advice for using the electric plates
The cook-top electric plate control knobs (I)
The cookers may be equipped with standard, fast and automatic electric plates in various combinations (the fast plates distinguished from the others by a red dot in the centre, the automatic ones by a round aluminium disk at the centre.
To avoid heat dispersion and damage to the plates, recommend using cooking vessels with flat bottoms in diameters which are not smaller than the plate diameter. Table shows the correspondence between the position indicated on the knobs and the use for which the plates advised.
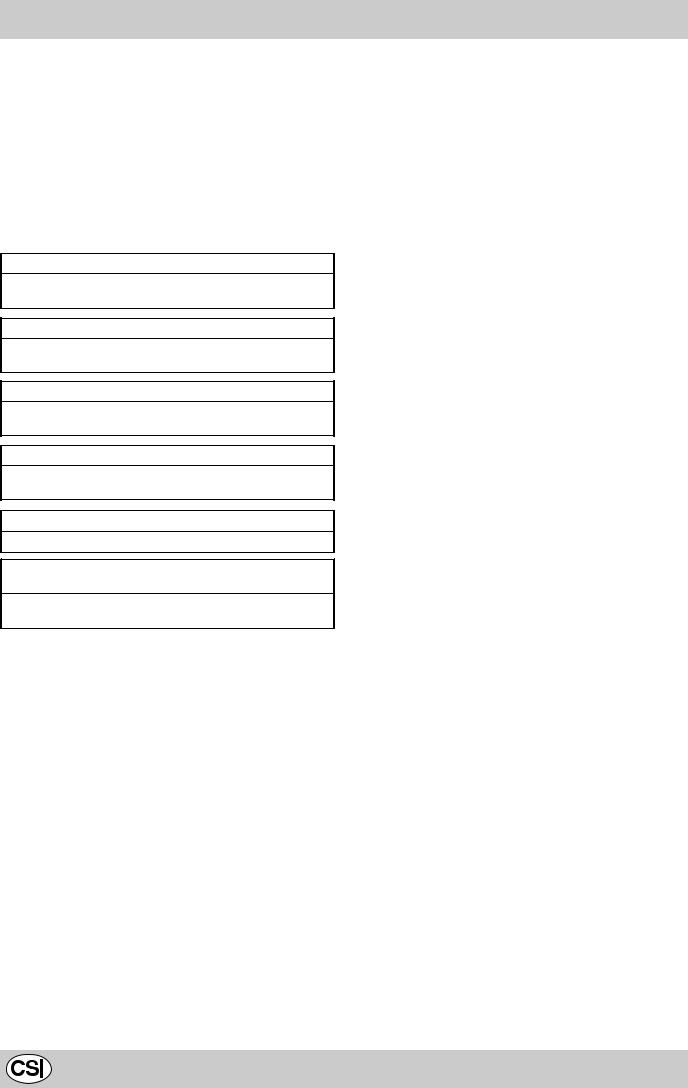
Setting |
Normal or Fast Plate |
|
|
|
|
0 |
Off |
|
|
|
|
1 |
Cooking vegetables, fish |
|
|
|
|
2 |
Cooking potatoes (using steam) soups, |
|
chickpeas, beans. |
||
|
||
|
|
|
3 |
Continuing the cooking of large quantities of |
|
food, minestrone |
||
|
||
|
|
|
4 |
For roasting (average) |
|
|
|
|
5 |
For roasting (above average) |
|
|
|
|
6 |
For browning and reaching a boil in a short |
|
time. |
||
|
||
|
|
The green pilot lamp (H)
This lights up when an electric plate is turned on.
9

Cooking advice
Selection |
Foods |
Wt. |
Cooking |
Heating time |
Thermostat |
Cooking |
|||||
knob setting |
|
(Kg) |
position from |
(minutes) |
knob |
time |
|||||
|
|
|
|
|
|
|
|
bottom |
|
|
(minutes) |
|
|
|
|
|
|
|
|
|
|
|
|
1 Static |
Lasagne |
2,5 |
2 |
5 |
200 |
45-50 |
|||||
|
|
|
|
|
|
Cannelloni |
2,5 |
3 |
5 |
200 |
30-35 |
|
|
|
|
|
|
||||||
|
|
|
|
|
|
Pasta bakes au gratin |
2,0 |
3 |
5 |
200 |
30-35 |
|
|
|
|
|
|
||||||
|
|
|
|
|
|
Veal |
1,7 |
2 |
10 |
180 |
60-70 |
|
|
|
|
|
|
Chicken |
1,5 |
3 |
10 |
200 |
80-90 |
|
|
|
|
|
|
Duck |
1,8 |
3 |
10 |
180 |
90-100 |
|
|
|
|
|
|
Rabbit |
2 |
3 |
10 |
180 |
70-80 |
|
|
|
|
|
|
Pork |
2,1 |
3 |
10 |
180 |
70-80 |
|
|
|
|
|
|
Lamb |
1,8 |
3 |
10 |
180 |
70-80 |
|
|
|
|
|
|
Mackerel |
1,1 |
2 |
5 |
180 |
30-40 |
|
|
|
|
|
|
Red porgy |
1,5 |
2 |
5 |
180 |
30-35 |
|
|
|
|
|
|
Trout baked in paper |
1 |
2 |
5 |
180 |
25-30 |
|
|
|
|
|
|
Napolitan pizza |
1 |
2 |
15 |
220 |
15-20 |
|
|
|
|
|
|
Biscuits or cookies |
0,5 |
3 |
10 |
180 |
10-15 |
|
|
|
|
|
|
Flan or tart |
1,1 |
3 |
10 |
180 |
25-30 |
|
|
|
|
|
|
Savoury pie |
1 |
3 |
10 |
180 |
30-35 |
|
|
|
|
|
|
Yeast cake |
0,5 |
3 |
10 |
160 |
25-30 |
|
|
|
|
|
|
Fruit cake |
1 |
3 |
10 |
170 |
25-30 |
|
|
|
|
|
|
|
|
|
|
|
|
2 Oven |
Finishing touches |
|
|
|
|
|
|||||
bottom |
|
|
|
|
|
|
|||||
|
|
|
|
|
|
|
|
|
|
|
|
|
|
|
|
|
|
|
|
|
|
|
|
|
|
|
|
|
|
|
|
|
|
|
|
3 Top bottom |
Sole and cuttlefish |
1 |
4 |
5 |
Max |
8 |
|||||
|
|
|
|
|
|
Squid and shrimp on |
1 |
4 |
5 |
Max |
4 |
|
|
|
|
|
|
||||||
|
|
|
|
|
|
spits |
|||||
|
|
|
|
|
|
||||||
|
|
|
|
|
|
Cod fillets |
1 |
4 |
5 |
Max |
10 |
|
|
|
|
|
|
Grilled vegetables |
1 |
3/4 |
5 |
Max |
8-10 |
|
|
|
|
|
|
|
|
|
|
|
|
4 Grill |
Veal steaks |
1 |
4 |
5 |
Max |
15-20 |
|||||
|
|
|
|
|
|
Cutlets |
1,5 |
4 |
5 |
Max |
20 |
|
|
|
|
|
|
||||||
|
|
|
|
|
|
Hamburgers |
1 |
3 |
5 |
Max |
7 |
|
|
|
|
|
|
||||||
|
|
|
|
|
|
Mackerels |
1 |
4 |
5 |
Max |
15-20 |
|
|
|
|
|
|
Toast sandwiches |
n.° 4 |
4 |
5 |
Max |
5 |
|
|
|
|
|
|
|
|
|
|
|
|
|
|
|
|
|
|
With rotisserie |
|
|
|
|
|
|
|
|
|
|
|
Veal on the spit |
1,0 |
- |
5 |
Max |
70-80 |
|
|
|
|
|
|
Chicken on the spit |
2,0 |
- |
5 |
Max |
70-80 |
|
|
|
|
|
|
|
|
|
|
|
|
NB: cooking times are approximate and may vary according to personal taste. When cooking using the grill or double grill, the dripping-pan must always be placed on the 1st oven rack from the bottom.
10
Routine maintenance and cleaning of the oven
Disconnect the oven from the source of electricity before performing any maintenance or cleaning. To ensure a long life for your oven, clean it frequently and carefully, keeping in mind that:
•Do not use steam equipment to clean the appliance.
•the enamelled parts and the self-cleaning panels should be washed with warm water without the addition of abrasive powders or corrosive substances which could damage the finish;
•The inside of the oven should be cleaned fairly often while it is still warm, using warm water and detergent followed by careful rinsing and drying;
•stainless steel may become marked if it comes into contact with very hard water or harsh detergents (containing phosphorous) for long periods of time. After cleaning, it is advisable to rinse thoroughly and dry. It is also recommended to dry any water drops;
•avoid dirt and grease accumulating on the control panel by cleaning it frequently. Use non-abrasive sponges or soft cloths to avoid scratching enamelled or shiny steel parts.
Cleaning the hob surface
Prior to cooking, the hob surface should always be cleaned using a damp cloth to remove any dust or stray food particles. The hob surface should be regularly cleaned with a lukewarm solution of water and a mild detergent. Periodically it may be necessary to use a proprietary ceramic hob cleaner. First remove all spilt food and fat with a window scrape, preferably the razor blade type *(not supplied) or, failing that, the fixed blade razor edge type.
Then clean the hob while it is still warm to the touch with a suitable cleaner and paper towel.Then rinse it and wipe it dry with a clean cloth .If aluminium foil or plastic items are accidentally allowed to melt on the hob surface they should be immediately removed from the hot cooking area with a scraper. This will avoid any possible damage to the surface. This also applies to sugar or any food with a high sugar content. Do not use abrasive sponges or scourers of any type. Corrosive cleaners such as oven sprays and stain removers should also not be used.
Glass ceramic hob |
Available from |
|
cleaners |
||
|
||
|
|
|
Window scraper Razor blade |
DIY Stores |
|
scrapers |
|
|
|
|
|
Replacement blades |
DIY Stores, |
|
|
supermarkets, |
|
|
chemists |
|
|
|
|
COLLO luneta |
Boots, Co-op stores, |
|
HOB BRITE |
department stores, Regional |
|
Hob Clean |
Electricity Company shops, |
|
SWISSCLEANER |
supermarkets |
|
|
|
Replacing the oven light bulb
•Either pull out the plug (if it is accessible) or disconnect the oven from the mains by turning off the multipole switch used for connecting the oven to the electricity source;
•Remove the glass cover of the lamp holder;
•Unscrew the bulb and replace it with a high temperature resistant bulb (300°C) with the following characteristics:
-Voltage 230 V
-Wattage 25W
-Type E14
•Replace the glass cover and reconnect the power supply to the oven.
11

Безопасность — хорошая привычка
1.Это оборудование разработано для использования внутри помещений. Ни при каких обстоятельствах не используйте оборудование на улице.
2.Плита должна использоваться в домашних условиях для приготовления и разогрева пищи в соответствии с данной инструкцией. Использование оборудования не по назначению, а также промышленное использование, использование плиты в офисах, предприятиях сферы обслуживания, здравоохранения, просвещения и т.п. не предусмотрено. Производитель не несет ответственности за выход из строя оборудования при нарушении данного пункта инструкции.
3.Данная инструкция относится к оборудованию класса 1 (свободная установка) и класса 2 подкласса 1 (установка между двумя шкафами).
4.Снимите упаковку; элементы упаковки (пластиковые пакеты, пенопласт, металлические скрепки) могут быть потенциально опасны для детей, поэтому выбросьте упаковку сразу же или уберите в недоступное место.
5.Убедитесь, что Ваша плита не повреждена и полностью укоплектована. Если у Вас есть сомнения, свяжитесь с продавцом немедленно.
6.Запрещено использование удлинителей и переходников. Длина кабеля не должна превышать 1,5 м. Производитель не несет ответственности за возгорания, произошедшие из-за использования тройников и удлинителей, а также соединительного кабеля, сечение которого не соответствует потребляемой оборудованием мощности. При установке необходимо проверить соответствие характеристик сети и плиты. Необходимые сведения содержатся в специальной таблице на задней стороне плиты.
7.Розетка и вилка должны быть одного типа.
8.Плита должна устанавливаться только квалифицированным персоналом, в соответствии с рекомендациями Производителя и стандартами, действующими на территории стран СНГ. Неправильная установка может принести вред людям, животным или Вашей собственности. В случае неправильной установки Производитель снимает с себя всякую ответственность.
9.Электрическая безопасность гарантирована только при наличии эффективного заземления, выполненного в соответствии с правилами электрической безопасности. Это требование обязательно должно соблюдаться. Если возникли сомнения, свяжитесь со специалистом по установке, который проверит Вашу систему заземления.
Производитель не несет ответственности за ущерб, вызванный отсутствием заземления или его неисправностью.
10.Если плита подключается непосредственно к сети (без вилки и розетки), необходимо установить многолинейный выключатель с расстоянием между разведенными контактами не менее 3 мм, линия заземления при
12

|
|
|
|
Установка |
|
|
|
|
Этот раздел предназначен для квалифицированных техни- |
кого соединения (см. следующую таблицу, содержащую све- |
|||
|
|
ков и содержит инструкции по установке и обслуживанию |
дения о различных способах соединения проводов и пере- |
|||
|
|
плиты в соответствии с действующими нормами безопаснос- |
мычек для адаптации электроплит к электрической сети, а |
|||
|
|
òè. |
|
|
|
|
|
|
Важно: перед любыми работами по наладке, обслуживанию |
|
|
||
|
|
и т.п. отключите плиту от электрической сети. |
|
|
||
|
|
Установка плиты |
|
|
|
|
|
|
Плита может устанавливаться рядом с кухонной мебелью, ко- |
|
|
||
|
|
торая, однако, не должна быть выше плиты. |
|
|
||
|
|
При установке плиты необходимо соблюдать следующие меры |
|
|
||
|
|
предосторожности: |
|
|
|
|
|
|
a) |
Кухонная мебель, превышающая по высоте плиту, долж- |
|
|
|
|
|
|
на находиться на расстоянии не менее 200 мм от края |
также требования к типу кабеля). |
||
|
|
|
рабочей поверхности плиты. |
|||
|
|
|
|
|
||
|
|
б) Вытяжки устанавливаются согласно их инструкциям по по |
В России: R=A, S=B, T=C. |
|||
|
|
|
|
|||
|
|
|
эксплуатации, и на расстоянии не менее 650 мм от рабочей |
Установка питающего кабеля |
||
|
|
|
поверхности плиты. |
|
Чтобы открыть коммутационную колодку: |
|
|
|
в) Стенные шкафы, смежные с вытяжкой, навешиваются на |
||||
|
|
• выверните винт V (рис. С); |
|
|||
|
|
|
высоте не менее 420 мм от рабочей поверхности плиты |
|
||
|
|
|
• снимите крышку колодки, потянув ее на себя. |
|||
|
|
|
(ñì. ðèñ.). |
|
||
|
|
|
|
Подсоединение питающего кабеля производится следующим |
||
|
|
г) При установке плиты под стенными шкафами расстоя- |
||||
|
|
|
ние между шкафами и рабочей поверхностью плиты дол- |
образом : |
|
|
|
|
|
• установите перемычки А-В согласно требуемой схеме |
|||
|
|
|
жно составлять не менее 700 мм, как показано на рисунке. |
|||
|
|
е) Размеры для встраивания плиты в модуль кухонной |
соединения (рис. D). |
|
||
|
|
|
|
|
Примечание: заводская предустановка выполнена для одно- |
|
|
|
|
|
|
фазного соединения 230 В (контакты 1-2-3 соединены между |
|
|
|
|
|
|
собой). Перемычка 4-5 находится в нижней части |
|
|
|
|
|
|
коммутационной колодки. |
|
|
|
|
|
|
• подсоедините провода (N и $) как показано на рис. D |
|
|
|
|
|
|
и закрепите их винтами; |
|
|
|
|
|
|
• зафиксируйте оставшиеся провода в зажимах 1-2-3; |
|
|
|
|
|
|
• зафиксируйте питающий кабель в хомуте и закройте крыш- |
|
|
|
|
|
|
ку коммутационной колодки, завернув винт V. |
|
|
|
|
мебели указаны на рисунке. |
|
|
|
|
|
Выравнивание плиты (только для некоторых моделей) |
|
|
||
|
|
Ваша плита снабжена регулируемыми ножками, которые |
|
|
||
|
|
служат для ее выравнивания. При необходимости, ножки вкру- |
|
|
||
|
|
чиваются в отверстия по углам основания плиты |
|
|
||
|
|
(ðèñ. A). |
|
|
|
|
|
|
Установка опор (только для некоторых моделей) |
|
|
||
|
|
Плита комплектуется надставными опорами, которые |
|
|
||
|
|
устанавливаются нажатием под основанием плиты (рис. |
|
|
||
|
|
B). |
|
|
Ðèñ. C |
Ðèñ. D |
|
|
|
|
|
||
|
|
|
|
|
Подсоединение кабеля к сети |
|
|
|
|
|
|
Оснастите питающий кабель соответствующей вилкой (см. |
|
|
|
|
|
|
табличку характеристик) или непосредственно подключите |
|
|
|
|
|
|
оборудование к сети (без вилки и розетки). В последнем слу- |
|
|
|
|
|
|
чае должен быть установлен многолинейный выключатель, |
|
|
|
|
|
|
соответствующий нагрузке оборудования, с расстоянием |
|
|
|
|
|
|
между разведенными контактами не менее 3 мм, причем |
|
|
|
|
|
|
линия заземления не должна разрываться. Питающий кабель |
|
|
|
|
|
|
следует располагать так, чтобы по всей длине он никогда не |
|
|
|
|
|
|
нагревался до температуры, превышающей на 50°С |
|
|
|
Ðèñ. A |
Ðèñ. B |
комнатную. |
|
|
|
|
Перед подсоединением убедитесь в том, что: |
||||
|
|
ЭЛЕКТРИЧЕСКИЕ СОЕДИНЕНИЯ |
• предохранители (пробки) или автоматические выключате- |
|||
|
|
ли и проводка выдерживают рабочую нагрузку оборудова- |
||||
|
|
Электрическая безопасность этого оборудования гаранти- |
||||
|
|
ния (см. табличку характеристик); |
||||
|
|
руется только при правильном его заземлении в соответ- |
||||
|
|
• заземление соответствует правилам и требованиям, |
||||
|
|
ствии со стандартами электрической безопасности. |
||||
|
|
предъявляемыми к заземлению бытовой техники; |
||||
|
|
Производитель снимает с себя всякую ответственность |
||||
|
|
• розетка или многолинейный выключатель находятся в |
||||
|
|
за любой ущерб, причиной которого явилось неправильное |
||||
|
|
легкодоступном месте. |
|
|||
|
|
подключение оборудования. |
|
|
||
|
|
|
|
|
||
|
|
Параметры питающего кабеля зависят от типа электричес- |
|
|
||
|
|
|
|
|
13 |
|
2V123NAB4003 4 51 2 3 |
4 3N5 |
H05RR-F 5x2.5 CEI-UNEL 35363 |
|
|
|
|

Технические характеристики
ДУХОВКА
Размеры (Ширина x Глубина x Высота)
39x44x34 ñì
Объем
|
58 ë |
|
|
Мощность духовки (max) |
|
|
2100 Âò |
СТЕКЛОКЕРАМИчЕСКАŸ ПОВЕРХНОСТЬ |
|
(зоны нагрева) |
|
Передняя левая |
1200 Âò |
Задняя лева |
1700 Âò |
Задняя правая |
1200 Âò |
Передняя правая |
1700 Âò |
Максимальная мощность |
5800 Âò |
|
|
%
Это оборудование соответствует следующим директивам Европейского экономического сообщества:
-73/23/EEC от 19/02/73 (Низкое напряжение) и последующие модификации;
-89/336/EEC от 03/05/89 (Электромагнитная совместимость) и последующие модификации;
-93/68/EEC от 22/07/93 и последующие модификации.
ENERGY LABEL
Директива 2002/40/CE касательно этикеток на электрических духовках
Норматив EN 50304
Заявление о расходах электроэнергии для класса натуральной конвекции
функция нагревания: Статическое
Напряжение и частота питания
См. таблицу характеристик
Размеры отделения для хранения и подогрева:
Ширина: 42 см Глубина: 44 см Высота: 23 см
Продукция сертифицирована |
Код органа |
|||
íà |
соответствие |
ГОСТам: |
по сертификации |
|
|
||||
|
|
|
A |
77 |
|
|
|
|
|
104 |
60 |
50 |
|
85/90
Плита с электрической духовкой (описание)
D Поддон для сбора жира или противень E Панель управления
F Регулируемые ножки или опоры G Рукоятка выбора функций духовки
H Зеленый индикатор электрических конфорок K Решетчатая полка духовки
I Рукоятки управления электрическими конфорками L Индикатор термостата духовки
N Рукоятка термостата M Рукоятка таймера
L H
M N G I
14
E
K
D
F
Инструкции по эксплуатации
Для выбора различных функций плиты служат рукоятки и кнопки на панели управления.
Внимание: перед первым использованием духовки и гриля прокалите пустую духовку в течение получаса с открытой дверцей, установив термостат в максимальное положение. Убедитесь, что комната хорошо проветривается. На некоторое время может появится неприятный запах — это сгорают смазочные вещества, используемые для консервации духовки и гриля во время хранения оборудования.
Рукоятки управления духовкой
Выбор различных режимов приготовления в духовке осуществляется с помощью двух рукояток, расположенных на панели управления:
G — рукоятки выбора функций духовки ; N — рукоятки термостата — символ
(символьные обозначения рукояток нанесены на панель управления).
Когда рукоятка выбора функций духовки G находится в любом положении, кроме «0» — выключено, в духовке горит
свет. При установке рукоятки в позицию &свет зажигается без включения нагревательных элементов. Горящая лампоч- ка духовки показывает, что духовка используется. Свет остается гореть в течение всего времени использования духовки.
1. СТАТИчНАŸ ДУХОВКА
-Положение рукоятки G:
-Положение рукоятки N: любое между 50°C и Max
Горит лампа освещения, включены верхний и нижний нагревательные элементы. Духовка нагревается до температуры, заданной рукояткой термостата; выбранная температура поддерживается автоматически. Поток горячего воздуха направлен сверху вниз. Превосходное распределение температуры позволяет готовить в этом режиме любые виды продуктов.
Статичная духовка особенно подходит для приготовления мясных блюд, которые должны готовиться медленно и в процессе приготовления требуют добавления жидкости, или блюд, состоящих из двух (и более) компонентов (например, гуляш, мясные запеканки). Также режим подходит для приготовления сухих бисквитов, печенья, галет, запеченных фруктов.
Для равномерного распределения тепла используйте только один противень (или решетку). Уровень расположения противня выбирайте в зависимости от необходимости большего нагрева блюда сверху или снизу.
2. НИЖНИЙ НАГРЕВАТЕЛЬНЫЙ ЭЛЕМЕНТ
- Положение рукоятки G:
- Положение рукоятки N: любое между 50°C и Max
Горит лампа освещения и включен нижний нагревательный элемент. Духовка нагревается до температуры, заданной рукояткой термостата; выбранная температура поддерживается автоматически. Это положение рукоятки G рекомендуется использовать для завершающей стадии приготовления блюд (в формах), которые уже готовы снаружи, но еще сырые внутри, или для подрумянивания поверхности десертов, покрытых фруктами или джемом.
Эта опция не позволяет достигать в духовке максимально возможной температуры 250°С, поэтому рекомендуем использовать данную функцию только для блюд, температура приготовления которых не превышает 180°, например, пирогов, тортов.
3. ГРИЛЬ
- Положение рукоятки G:
- Положение рукоятки N: любое между 50°C и Max
В духовке горит свет, пища подвергается тепловому инфракрасному излучению от раскаленного верхнего центральноСильное направленное тепло гриля нагревает поверхность мяса непосредственно (воздух нагревается слабо). На мясе образуется румяная корочка, которая сохраняет мясо сочным и мягким. Гриль идеален для приготовления блюд, требующих высокой температуры поверхности, таких как: бифштекс, филе, гамбургеры, ромштекс и т.д.
4. ГРИЛЬ
- Положение рукоятки G:
- Положение рукоятки N: любое между 50°C и Max
В духовке горит свет и работает двойной нагревательный элемент гриля, мотор вращает вертел. Этот гриль больше обычного, его мощность на 50% превышает мощность простого гриля. При работе двойного гриля воздействию тепла
подвергаются даже углы духовки.
Важно: при пользовании грилем всегда держите дверцу духовки закрытой. Это позволит вам получить превосход-
ные результы и сбережет электроэнергию (около 10%). Помещайте решетку на верхние уровни (см. таблицу гл. “Практические советы по приготовлению пищи в духовке”). Под решетку гриля поместите поддон для сбора жира.
Индикатор термостата духовки (L)
Индикатор горит, когда духовка нагревается. Индикатор погаснет, когда температура в духовке достигнет значения, заданного рукояткой термостата. С этого момента индикатор начнет мигать, показывая, что термостат работает правильно, поддерживая в духовке постоянную температуру.
Внимание: дверца духовки в процессе приготовления сильно нагревается, не позволяйте детям прикасаться к ней.
Вертел
При использовании вертела, действуйте следующим образом:
a) поместите поддон для сбора жира на 1-й уровень;
б) вставьте рамку вертела на 4-й уровень и поместите на нее вертел, вставив его в специальное отверстие в задней стенке духовки;
в) включите вертел, установив рукоятку G в положение


 (используется 50% мощности гриля) для небольших количеств пищи, или в положение


 (гриль включен на полную мощность).
Таймер (M)
Чтобы завести таймер, поверните рукоятку M почти на один полный оборот по часовой стрелке ". Затем обратным вращением #рукоятки M установите желаемое время приготовления, совместив риску рукоятки с меткой, соответствующей выбранному времени (в мин.).
15
Практические советы
Широкий диапазон функций духовки позволяет приготовить пищу наилучшим способом. Со временем Вы приобретете собственный опыт, который позволит наиболее полно использовать возможности оборудования. Кроме того, Вам помогут следующие рекомендации:
Выпечка пирогов
Перед выпечкой пирогов всегда прогревайте духовку (около 10-15 мин.). Обычно температура приготовления 160/ 200°C. Не открывайте дверцу духовки во время выпекания, чтобы тесто не осело. Тесто не должно быть слишком жидким, иначе время приготовления может затянуться.
Общие замечания:
Если пирог слишком сухой:
в следующий раз повысьте температуру на 10°C и сократите время приготовления.
Если пирог слишком сырой:
в следующий раз понизьте температуру на 10°C или сократите количество жидкости при замешивании теста.
Если поверхность пирога слишком темная:
поместите форму на более низкий уровень, уменьшите температуру и увеличьте время приготовления.
Если пирог хорошо пропечен снаружи, а внутри сырой:
сократите количество жидкости при замешивании теста, уменьшите температуру и увеличьте время приготовления.
Если пирог пригорает к форме:
хорошо смажьте и посыпьте мукой форму.
Когда готовится сразу несколько блюд, блюда доходят до готовности не одновременно:
уменьшите температуру. Блюда, которые Вы готовите, должны иметь одинаковое время приготовления.
Приготовление рыбы и мяса
Чтобы избежать пересушивания, готовьте мясо кусками не меньше 1 килограмма. Когда готовите белое мясо, птицу или рыбу, задавайте низкую температуру (150–175°С). При приготовлении красного мяса, которое должно быть хорошо пропеченным снаружи и сочным внутри, на короткий промежуток времени повысьте температуру до 200–220°С, а затем установите прежнее значение. В основном чем больше жаркое, тем ниже температура и дольше время приготовления. Положите мясо на середину решетки, а под нее поместите поддон для сбора жира. Поставьте решетку на средний (центральный) уровень духовки. Если Вы хотите увеличить количество тепла снизу, используйте нижний уровень духовки. Для получения вкусной корочки поливайте мясо растопленным жиром или обложите кусочками бекона, решетку поместите в верхнюю часть духовки.
Использование гриля
При использовании режимов гриля рекомендуется рукоятку термостата устанавливать в максимальное положение — это наиболее эффективный способ применения гриля, использующего инфракрасные лучи. Однако, при необходимости, термостат можно установить на более низкую температуру простым поворотом рукоятки к желаемой позиции.
При пользовании грилем помещайте решетку на верхние уровни, на первый снизу уровень поместите поддон для сбора жира
Важно: для получения превосходных результатов и экономии электроэнергии (около 10%) при пользовании грилем всегда держите дверцу духовки закрытой.
В таблице гл. “Практические советы по приготовлению пищи в духовке” приведены сведения о температуре и времени приготовления, уровнях решетки (противня), рекомендуемых для достижения наилучших результатов при приготовлении в духовке.
16
Использование стеклокерамической поверхности
Описание
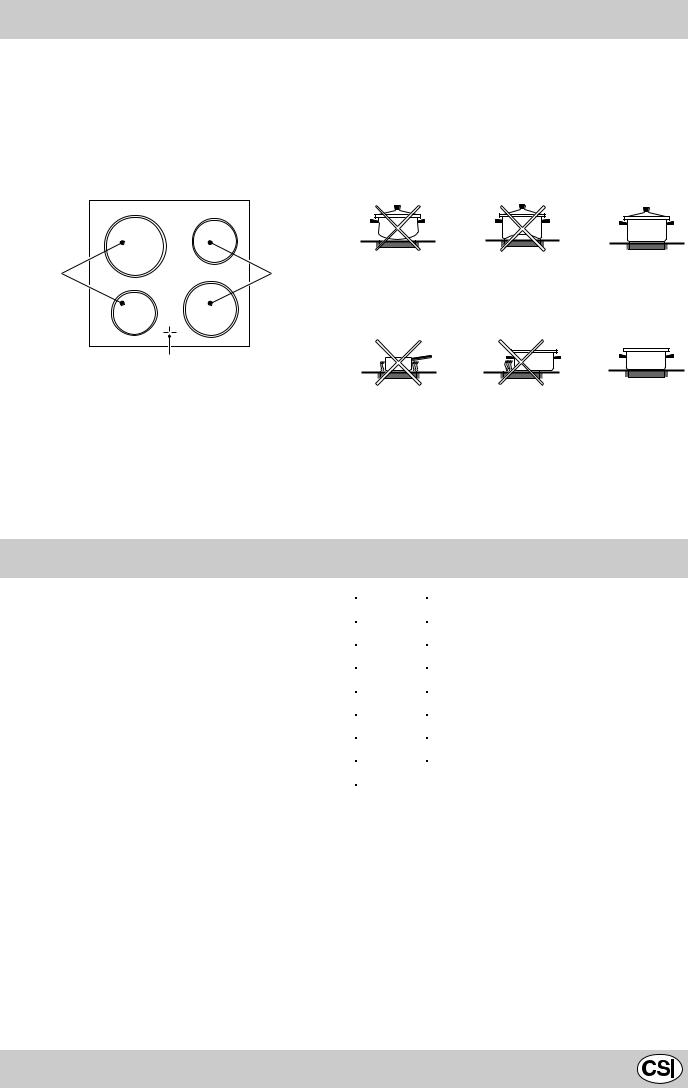
Рабочая поверхность оборудована радиальными конфорками, встроенными под поверхность как зоны нагрева, которые становятся красными во время использования.
A. Области для готовки (A).
Â.Индикаторы остаточного тепла — показывают, что температура соответствующей зоны нагрева (конфорки) выше 60°С, даже если нагревательный элемент уже выключен.
Использование посуды на стеклокерамической поверхности
Для достижения наилучших результатов при использовании стеклокерамической рабочей поверхности соблюдайте следующие правила:
•
A |
•
 A
A
B
Описание нагревательных элементов
Радиальные конфорки представляют собой круглые нагревательные элементы, которые нагреваются до красна через 10–20 секунд после включения.
•
•
Рекомендации по использованию электрических конфорок
РУКОЯТКИУПРАВЛЕНИЯЭЛЕКТРИЧЕСКИМИ КОНФОРКАМИ (I)
Плиты могут быть оборудованы обычными, быстронагревающимися и автоматическими электрическими конфорками в различных комбинациях (быстронагревающиеся конфорки можно отличить по красному кружку в центре, автомати- ческие — по алюминиевому диску в центре).
Чтобы избежать потерь тепла и порчи посуды, рекомендуем использовать посуду с плоским дном, диаметр которого не превышает диаметр конфорки.
Таблица показывает соответствие между позицией рукоятки и целью, для которой она используется.
Позиция |
Обычная или быстрая конфорка |
|
|
0 |
Выключено |
|
|
1 |
Приготовление овощей, рыбы |
|
|
2 |
Варка картофеля, супов, гороха, фасоли |
|
|
3 |
Тушение больших объемов пищи |
|
|
4 |
Жаренье (средняя температура) |
|
|
5 |
Жаренье (температура выше среднего) |
|
|
6 |
Для быстрого поджаривания и кипячения |
|
|
Зеленый индикатор электрических конфорок (H)
Индикатор горит, когда включена хотя бы одна электрическая конфорка.
17

Перед любой операцией по уходу и чистке отключайте духовку и рабочую поверхность от электрической сети.
Духовка
Для продления срока службы оборудования необходимо тщательно и регулярно его чистить, имея в виду, что:
•Эмалированные части и самоочищающиеся поверхности мойте теплой водой без применения абразивных и разъедающих средств, которые могут испортить их.
•Изнутри духовку промывайте пока она еще не остыла теплой водой с моющим средством, затем тщательно ополосните и вытрите.
•Нержавеющая сталь может потерять свои свойства при
18
 Loading...