


HP ENVY 20-d010, ENVY 20-d013w, ENVY 20-d011, ENVY 20-d010t, ENVY 20-d030 Quick Setup Guide
...12” (30cm) 
http://www.hp.com/go/contactHP http://welcome.hp.com/country/us/en/wwcontact_us.html

Copyright and License
© Copyright 2012 Hewlett-Packard
Development Company, L.P.
The information contained herein is subject to change without notice. The only warranties for HP products and services are set forth in the express warranty statements accompanying such products and services. Nothing herein should be construed as constituting an additional warranty. HP shall not be liable for technical or editorial errors or omissions contained herein.
This product incorporates copyright protection technology that is protected by U.S. patents and other intellectual property rights. Use of this copyright protection technology must be authorized by Macrovision, and is intended for home and other limited viewing uses only unless otherwise authorized by Macrovision. Reverse engineering or disassembly is prohibited.
Microsoft and Windows are trademarks of Microsoft Corporation in the U.S. and other countries.
HP supports lawful use of technology and does not endorse or encourage the use of our products for purposes other than those permitted by copyright law.
Product notice
This guide describes features that are common to most models. Some features may not be available on your computer.
Warranty Print on Demand Statement
You can find the expressly provided HP Limited Warranty applicable to your product located with the user guides on your computer and/or on the CD/DVD provided in the box. In some countries/ regions, HP may provide a printed HP Limited Warranty in the box. For some countries/regions where the warranty is not provided in printed format, you may request a printed copy from hp.com/go/orderdocuments or write to:
North America: Hewlett-Packard, MS POD, 11311 Chinden Blvd., Boise, ID 83714, USA
Europe, Middle East, Africa: Hewlett-Packard, POD, Via G. Di Vittorio, 9, 20063 Cernusco s/ Naviglio (MI), Italy
Asia Pacific: Hewlett-Packard, POD, P.O. Box 200, Alexandra Post Office, Singapore 911507
When you request a printed copy of your warranty, please include your product number, warranty period (found on your service label), name, and postal address.
IMPORTANT! Do NOT return your HP product to the addresses above. For U.S. products, go to http://www.hp.com/go/contactHP. For worldwide support, go to http://welcome.hp.com/country/us/en/ wwcontact_us.html.

1 Getting information
Type of information |
Where to find |
|
|
|
|
● |
Set up your computer. |
Quick Setup (this Guide) |
|
|
|
● |
Use the computer. |
Quick Setup (this Guide) |
●Connect to the Internet.
●Recover factory settings. Troubleshooting and Maintenance Guide on your computer. Select the HP
Support Assistant app on the Start screen, select My computer, and then select User guides.
●See how-to videos about using the features of your computer.
Visit http://www.hp.com/supportvideos (English only)
● Learn how to use the |
Help and Support |
||
|
Microsoft Windows operating |
From the Start screen, type h, and then select Help and Support. For |
|
|
system. |
||
|
U.S. support, go to http://www.hp.com/go/contactHP. For worldwide |
||
|
|
||
● |
Find Windows password |
support, go to http://welcome.hp.com/country/us/en/wwcontact_us.html. |
|
|
information. |
|
|
|
Windows troubleshooting tools |
||
● Find links to driver updates. |
|||
1. From the Start screen, type c, and then select Control Panel. |
|||
● |
Read frequently asked |
||
|
|||
|
questions. |
2. Select System and Security, and then under Action Center, select |
|
|
|
Troubleshoot common computer problems. |
|
|
|
|
|
● |
Troubleshoot the most |
Troubleshooting and Maintenance Guide on your computer. Select the HP |
|
|
common computer hardware |
Support Assistant app on the Start screen, select My computer, and |
|
|
and software issues. |
then select User guides. |
|
|
|
||
● Find electronic user guides |
HP Support website: http://www.hp.com/go/contactHP |
||
|
and specifications for your |
|
|
|
computer model. |
|
|
●Order parts and find additional troubleshooting help.
Upgrading and Servicing Guide
HP Support website: http://www.hp.com/go/contactHP
1

Type of information |
Where to find |
|
|
|
|
● |
Find computer warranty |
HP Worldwide Limited Warranty and Technical Support included with your |
|
information. |
computer. |
|
|
– or – |
|
|
Select the HP Support Assistant app on the Start screen, select My |
|
|
computer, and then select User guides. |
|
|
|
● |
Get up-to-date information |
http://www.hp.com/support/consumer-forum |
|
and help from the Windows |
|
|
community. |
|
●Connect to a TV.
Watching and Recording TV
Select the HP Support Assistant app on the Start screen, select My computer, and then select User guides.
If the guide is not available there, visit http://www.hp.com/go/contactHP.
● |
Maintain your computer. |
HP Support Assistant — Maintains your computer performance and |
|
|
resolves problems faster by using automated updates, on-board |
|
|
diagnostics, and guided assistance. |
|
|
Select the HP Support Assistant app on the Start screen. |
|
|
Troubleshooting and Maintenance Guide |
|
|
Select the HP Support Assistant app on the Start screen, select My |
|
|
computer, and then select User guides. |
|
|
Maintaining Your Computer (this Guide) |
●Find safety and regulatory notices.
Regulatory, Safety and Environmental Notices
Select the HP Support Assistant app on the Start screen, select My computer, and then select User guides or visit http://www.hp.com/go/ contactHP.
● |
Find ergonomic information. |
Safety & Comfort Guide |
|
|
Select the HP Support Assistant app on the Start screen, select My |
|
|
computer, and then select User guides or visit http://www.hp.com/ergo. |
|
|
|
2 Chapter 1 Getting information

2 Setting up your computer
WARNING! To reduce the risk of electrical shock or damage to your equipment:
•Place the computer in a location away from water, dust, moisture, and soot. These can increase the inside temperature, or can cause fire or electrocution.
•Do not disable the power cord grounding plug. The grounding plug is an important safety feature.
•Plug the power cord in a grounded (earthed) outlet that is easily accessible at all times.
•Disconnect power from the equipment by unplugging the power cord from the electrical outlet. To prevent direct exposure to laser beam, do not try to open the enclosure of the CD or DVD drives.
•The power supply is preset for the country/region in which you purchased your computer. If you move, check the voltage requirements for your new location before plugging the computer into an AC power outlet.
The computer may be heavy; be sure to use ergonomically correct lifting procedures when moving the computer.
To reduce the risk of serious injury read the Safety & Comfort Guide. The guide is located on the web at http://www.hp.com/ergo.
1.Place the computer so that all ventilation openings are unobstructed and cabling is not in a walkway or where it can be stepped on or damaged by placing furniture on it.
2.Connect all power cords from the monitor, computer, and accessories to a power surge protection device that is specifically labeled as having surge protection, an uninterruptible power supply (UPS), or a similar device. If the computer has a television tuner, or a modem or telephone connection, protect the computer by using surge protection with these signal inputs as well. Connect the television cable or the telephone line cord to the surge protection device, and then connect the device to the computer.
3.Download and install operating system updates.
a.Find out what operating system and version your computer is currently running.
(From the Start screen, type c, select Control Panel, select System and Security, and then select System. The operating system and version are shown under Specifications.)
b.Open your internet browser and go to http://www.hp.com/go/ contactHP.
3

c.Select your country and language, if necessary, and click Support & Drivers.
d.Select Download drivers and software (and firmware), type your computer model name and number in the product field, and press Enter.
e.If necessary, select your computer model from Product search results.
f.Select your computer operating system.
g.Click Download next to each update you wish to download.
h.Follow the on-screen instructions to install each downloaded update.
4.Look in the computer box for additional printed details or updates.
5.Read the Regulatory, Safety and Environmental Notices included with your computer. Select the HP Support Assistant app on the Start screen, select
My computer, and then select User guides.
6.Read the Safety & Comfort Guide for proper workstation setup, posture, health and work habits, and electrical and mechanical safety information. Select the HP Support Assistant app on the Start screen, select My computer, and then select User guides or visit http://www.hp.com/ergo.
After you complete the initial computer setup, you might want to install additional software programs or hardware devices. Check the operating system, memory, and other requirements listed before purchasing new software or hardware for your computer. Follow the software manufacturer's directions to install the new software.


 NOTE: Use only licensed original software. Installing copied software could
result in an unstable installation, infect the computer with a virus, or be illegal.
Security solutions can deter theft, mishandling, and software attacks, but cannot prevent them.
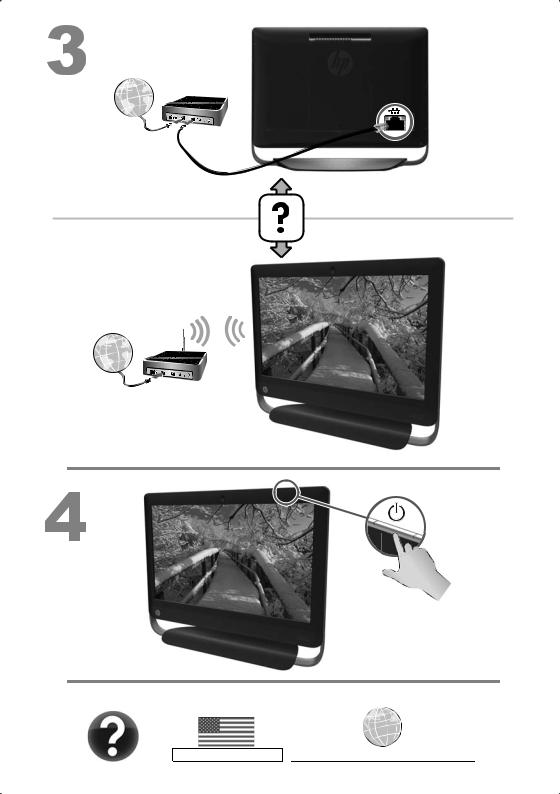
Connecting to the Internet
Steps to connect to the Internet:
1.Connect the hardware as shown on the setup view.
2.Get Internet service.
Sign up with an Internet Service Provider (ISP). If you already have an account with an ISP, skip this step and follow the instructions provided by the ISP.
3.Using your Internet connection through your ISP, open a web browser and browse the Internet.


 NOTE: If you have issues connecting to the Internet, see Internet access
 on page 13.
4 |
Chapter 2 Setting up your computer |
 Loading...