


hp digital media receiver
user's guide

Contents
welcome ............................... |
1 |
getting started....................... |
3 |
unpacking the box . . . . . . . . . . . . . . . . . . . . . 3 installing software . . . . . . . . . . . . . . . . . . . . . . 4 video. . . . . . . . . . . . . . . . . . . . . . . . . . . . . . . 5 audio . . . . . . . . . . . . . . . . . . . . . . . . . . . . . . 6 remote control . . . . . . . . . . . . . . . . . . . . . . . . 6 network connection . . . . . . . . . . . . . . . . . . . . . 7 connecting power . . . . . . . . . . . . . . . . . . . . . . 8 setup wizard . . . . . . . . . . . . . . . . . . . . . . . . . 8
controlling your receiver........ |
9 |
menu basics . . . . . . . . . . . . . . . . . . . . . . . . . . 9 remote buttons . . . . . . . . . . . . . . . . . . . . . . . 10 onscreen keyboard . . . . . . . . . . . . . . . . . . . . 11 receiver options . . . . . . . . . . . . . . . . . . . . . . 11 changing the receiver name . . . . . . . . . . . . . . 12 controlling another receiver . . . . . . . . . . . . . . 12 screen saver . . . . . . . . . . . . . . . . . . . . . . . . . 12 running the setup wizard . . . . . . . . . . . . . . . . 12
sharing content ................... |
13 |
server software. . . . . . . . . . . . . . . . . . . . . . . 13 server menu . . . . . . . . . . . . . . . . . . . . . . . . . 14 sharing content. . . . . . . . . . . . . . . . . . . . . . . 14 synchronizing content . . . . . . . . . . . . . . . . . . 15 forcing resynchronization . . . . . . . . . . . . . . . 15 music quality . . . . . . . . . . . . . . . . . . . . . . . . 16 supported music formats . . . . . . . . . . . . . . . . 16 recording digital music . . . . . . . . . . . . . . . . . 17 copy protection . . . . . . . . . . . . . . . . . . . . . . 17 organizing music files . . . . . . . . . . . . . . . . . . 18 creating music playlists . . . . . . . . . . . . . . . . . 18 supported photo formats . . . . . . . . . . . . . . . . 19 organizing photo albums. . . . . . . . . . . . . . . . 19 server printers . . . . . . . . . . . . . . . . . . . . . . . 20 connection list . . . . . . . . . . . . . . . . . . . . . . . 20 power settings . . . . . . . . . . . . . . . . . . . . . . . 21
playing music ...................... |
23 |
music jukebox . . . . . . . . . . . . . . . . . . . . . . . 23 supported music files. . . . . . . . . . . . . . . . . . . 23
user’s guide |
i |
playing a track . . . . . . . . . . . . . . . . . . . . . . . 23 browsing for music . . . . . . . . . . . . . . . . . . . . 24 music icon hints . . . . . . . . . . . . . . . . . . . . . . 25 searching for music . . . . . . . . . . . . . . . . . . . . 25 playing an artist or album . . . . . . . . . . . . . . . 26 creating a playlist . . . . . . . . . . . . . . . . . . . . . 26 playing a playlist . . . . . . . . . . . . . . . . . . . . . 27 controlling music playback . . . . . . . . . . . . . . . 28 displaying music status . . . . . . . . . . . . . . . . . 28 shuffle and repeat . . . . . . . . . . . . . . . . . . . . . 28 viewing track information. . . . . . . . . . . . . . . . 29 viewing photos with music . . . . . . . . . . . . . . . 29 changing the view order . . . . . . . . . . . . . . . . 29 controlling other receivers . . . . . . . . . . . . . . . 30
viewing photos ................... |
31 |
photo albums . . . . . . . . . . . . . . . . . . . . . . . . 31 supported photo files . . . . . . . . . . . . . . . . . . . 31 viewing a photo . . . . . . . . . . . . . . . . . . . . . . 31 photo and album icon hints . . . . . . . . . . . . . . 32 playing a photo slideshow . . . . . . . . . . . . . . . 32 controlling photo playback . . . . . . . . . . . . . . . 32 viewing photo information . . . . . . . . . . . . . . . 33 playing music with slideshows . . . . . . . . . . . . 33 setting music for an album . . . . . . . . . . . . . . . 33
printing photos . . . . . . . . . . . . . . . . . . . . . . . 34 rotating photos . . . . . . . . . . . . . . . . . . . . . . . 34 changing the view order . . . . . . . . . . . . . . . . 34 organizing your photos . . . . . . . . . . . . . . . . . 34
network setup ..................... |
35 |
running the setup wizard . . . . . . . . . . . . . . . . 35 preparing for wired setup . . . . . . . . . . . . . . . 35 wired home network . . . . . . . . . . . . . . . . . . . 37 wired with dynamic address . . . . . . . . . . . . . 37 wired with static address . . . . . . . . . . . . . . . . 38 wired with cross-over cable . . . . . . . . . . . . . . 39 preparing for wireless setup . . . . . . . . . . . . . . 40 wireless infrastructure . . . . . . . . . . . . . . . . . . 41 wireless ad hoc . . . . . . . . . . . . . . . . . . . . . . 41 wireless encryption . . . . . . . . . . . . . . . . . . . . 42 wireless signal strength . . . . . . . . . . . . . . . . . 44
troubleshooting ................... |
45 |
glossary .............................. |
49 |
warranty and license........... |
53 |
ii hp digital media receiver

1 welcome
Thank you for purchasing an hp digital media receiver! With your new, easy-to-use media receiver you can:
•Browse and listen to your digital music on any TV and stereo in your home
•View your favorite digital pictures right on your TV and print them to any PC-connected printer
•Combine music and pictures into entertaining multimedia slideshows
•Automatically gather all digital music and pictures from multiple PCs to a central location
•Control music on multiple hp digital media receivers
setting up your receiver
This guide describes how to use your new media receiver. It includes information to help you get acquainted with your receiver, and plenty of detailed usage and troubleshooting information.
To begin setting up your hp digital media receiver, see “unpacking the box” on page 3.
finding information
Setup Sheet. Follow the instructions to quickly and easily set up your receiver.
User’s Guide. You are here! Use this guide to learn about using your receiver.
Onscreen User’s Guide. This is the electronic version of this guide. View it directly off of the CD or from the Start Menu program group after you install the receiver software on the PC.
World Wide Web. Visit Hewlett-Packard’s internet website at http://www.hp.com for information and support.
user’s guide |
1 |
viewing the onscreen guide
A copy of this User’s Guide is available on your computer when you install the media receiver software CD.
To view the onscreen User’s Guide:
1.Click on the Start menu button
2.Select All Programs
3.Select hp digital media
4.Select View User’s Guide
If Adobe® Acrobat® Reader® version 4.0 or later is not installed on your computer, it will be installed for you automatically when you first view the guide.
2 hp digital media receiver

2 getting started
This section will help you set up your hp digital media receiver. Your connection locations and system components may vary.
unpacking the box
Make sure you have the following items:
hp digital media receiver
batteries |
remote control |
|
|
|
audio cable |
power adapter
video cable
installation cd
network cable |
user’s guide |
front of receiver
power button
back of receiver
wireless antenna (model ew5000 only)
ethernet network |
|
|
dc power in |
s-video |
video |
audio left |
audio right |
|
|
user’s guide |
3 |

installing software
Install the hp digital media software on the PC where you store your music and digital photos.
It is best to install the software before setting up the receiver, so the receiver has content to display.
To install the software, insert the CD into the CD-ROM drive of your computer. The installation program starts automatically, and you can follow the on-screen instructions.
Note: If the software does not start automatically, you can access it from the Start menu on the Windows taskbar. On the Start menu, click Run. In the Run dialog box, type x:/setup.exe, where x is the drive letter of your CD-ROM drive.
The software will share the music and photos in your My Music and My Pictures folders. To change these folders or add additional shared folders, see “sharing content” on page 14.
You can install the software on multiple computers if you wish to share additional music and photos.
4 hp digital media receiver

video
Connect the video cable from the video connector on the media receiver and attach it to the video input on your television. Some televisions have video inputs on the back of the TV and some have them on the front.
Note: If you have run out of video connections on your TV, connect the media receiver to your VCR.
For home theater systems, connect the video to your home theater receiver.
s-video
The hp digital media receiver supports s-video. If your television supports s-video, use an s-video cable (not included) for a better television picture.
Note: You should connect either the video cable or the s-video cable...not both.
user’s guide |
5 |

audio |
|
|
|
|
remote control |
||||||||||||||
|
|
|
|
|
|
|
|
|
|
|
|
|
|
|
|
|
|
|
|
|
|
|
|
|
|
|
|
|
|
|
|
|
|
|
|
|
|
|
|
|
|
|
|
|
|
|
|
|
|
|
|
|
|
|
|
|
|
|
|
|
|
|
|
|
|
|
|
|
|
|
|
|
|
|
|
|
|
|
|
|
|
|
|
|
|
|
|
|
|
|
|
|
|
|
|
|
|
|
|
|
|
|
|
|
|
|
|
|
|
|
|
|
|
|
|
|
|
|
|
|
|
|
|
|
|
|
|
|
|
|
|
|
|
|
|
|
|
|
|
|
|
|
|
|
|
|
|
|
|
|
|
|
|
|
|
|
|
|
|
|
|
|
|
|
|
|
|
|
|
|
|
|
|
|
|
|
|
|
|
|
|
|
|
|
|
|
|
|
|
|
|
|
|
|
|
|
|
|
|
|
|
|
|
|
|
|
|
|
|
|
|
|
|
|
|
|
|
|
|
|
|
|
|
|
|
|
|
|
|
|
|
|
|
|
|
|
|
|
|
|
|
|
|
|
|
|
|
|
|
|
|
|
|
|
|
|
|
|
|
For the best music quality, connect the media receiver audio output to your home stereo system.
Alternately, connect the audio cable to your television.
Place the included batteries in the remote control.
Match the battery direction shown above for proper operation.
6 hp digital media receiver
network connection
In a wired home network, connect the media receiver to your home network hub or router.
If your computer is connected directly to a cable or DSL modem, and there is only one network port on the back of the modem, you do not have a home network. To set up your network, purchase a modem or router with additional network ports.
A router will allow you to share your internet connection with other PCs, and allows the media receiver access to your music and photos stored on your PC.
Note: For alternate network connections, see page 39.
In a wireless home network, no network cable connection is required (model ew5000 only).
For the best possible reception, rotate the antenna so it extends perpendicular to the receiver, as shown above.
The hp digital media receiver can communicate with wireless access points (infrastructure mode) or directly to computers with wireless network cards (ad hoc mode).
Like all wireless devices, some experimentation may be necessary to find the best location for your media receiver. Signal strength and quality will depend on distance, walls, and building structure.
user’s guide |
7 |

connecting power
Turn your television on. If you hooked up the audio to your stereo system, turn your stereo system on as well. Tune them both to the proper mode to match the audio and video connectors attached to the receiver.
Insert the small end of the power adapter cable into the power connection on the back of the media receiver. Make sure it is connected firmly.
Plug the power adapter into a working electrical outlet.
setup wizard
When power is applied for the first time, the setup wizard will appear.
Use the remote control to set up your hp digital media receiver. The setup wizard allows you to assign a name and quickly configure your network settings.
Once you have successfully completed the wizard, your media receiver will be ready to use!
Note: You can run the setup wizard again if you wish to change any of your settings. On the main screen, press the options button, highlight Run Setup Wizard, and press select.
8 hp digital media receiver

3 controlling your receiver
menu basics
The hp digital media receiver uses a menu interface. As you move through the menus, you will use the selection arrows to move up, down, right and left. The highlight bar moves from item to item as you press the selection arrows.
The highlight bar contains arrow “hints” to help you with menu navigation. These hints show you the
possible paths you may take. For example, a down arrow hints that more items are available if you move the highlight bar down.
To move to the next menu screen, use the right arrow. Similarly, use the left arrow to move to the previous screen.
There are two additional hint icons: select and play.
The select hint indicates the highlighted option can be selected by the select button.
The play hint indicates the highlighted option can be played with the play button.
menu help
A menu help line appears at the bottom of the screen. This line provides additional help as you navigate through the media receiver menus and options.
user’s guide |
9 |

remote buttons
power 
play
selection arrows 
select
previous
 page up/down


rewind 

home 
 control
display 


 print
print 


 pause
pause  stop
stop
 next
next
 fast forward
 search
 options
shuffle/repeat
power. The power button turns the receiver on, or places the receiver in a low-power standby state.
play, pause, stop. Play, pause, or stop music tracks and photo slideshows.
selection arrows, select. Navigate the onscreen menus with the selection arrows, and press select to choose the highlighted item.
previous, next. Skip to the previous or next track, or skip photos in a slideshow.
page up/down. Page up and down quickly through long menu lists.
rewind, fast forward. Rewind or fast forward through a music track.
home. Jump directly to the home menu screen. search. Search for a particular music track.
display. Display status information at the top of the screen. Multiple presses will cycle through any additional information.
control. Control a different receiver on your network.
options. Display or change options for the current music file, photo, or album. Also displays the main receiver options when pressed while on the main menu.
print. If a photo file is highlighted, the photo will be printed on your computer’s default printer.
shuffle/repeat. Cycle between shuffle, repeat, shuffle and repeat, and original order. Useful when playing music albums or photo slideshows.
10 hp digital media receiver
menu home
The menu home screen is the top level menu. From the home screen, you can access the music jukebox and the photo album. To jump directly to the home screen, press the home button on the remote.
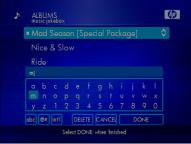
onscreen keyboard
The onscreen keyboard will appear whenever any text entry is required. The keyboard appears when naming your media receiver, entering network addresses, and performing searches.
To use the keyboard, highlight a character with the arrow buttons and press select. Highlight and select Done when you are finished entering text.
receiver options
The options button is context sensitive. This means it displays options for the currently highlighted menu.
While on the menu home page, press the options button to view or change main receiver options. From the main options menu, you can change your receiver preferences, configure your network settings, control other hp digital media receivers, or run the setup wizard.
Within the music jukebox, the options button will display options for the highlighted genre, artist, album, or track. For example, highlight a track and press options. From the music options menu, select Track Information to view the artist and album name, track title, date, and duration.
Similarly, highlight a photo and press the options button to print or rotate the photo, view photo information, or adjust the slideshow delay.
See “playing music” on page 23 and “viewing photos” on page 31 for more information on using the options button.
user’s guide 11
changing the receiver name
During setup, the receiver name defaults to “My Receiver”. You can either leave this name or change it to something more meaningful, such as “Living Room” or “Bedroom”. The name is used when allowing access to your servers, or when you are controlling more than one media receiver on your network.
From the home screen, press the options button, select Preferences and then Receiver Name. Use the onscreen keyboard to edit the name.
controlling another receiver
You can control music playback on another receiver if you have more than one media receiver on your network. See “controlling music playback” on
page 28.
screen saver
The screen saver will appear after two minutes of inactivity. Press any button on the remote to exit the screen saver.
The screen saver time-out can be changed. From the home screen, press the options button, select
Preferences and then Screen Saver Delay. Choose a delay from a minimum of15 seconds to a maximum of 10 minutes.
Note: If your TV is sensitive to screen burn-in, you should reduce the screen saver delay to a minimum. Consult your TV manual for recommended settings.
running the setup wizard
The setup wizard runs the very first time you setup your hp digital media receiver. If you relocate the receiver or wish to make changes to your settings, you can run the setup wizard again.
From the home screen, press the options button, then highlight and select Run Setup Wizard.
12 hp digital media receiver

4 sharing content on your pc
server software
The first step toward sharing content is installing the digital media software on your PC. Simply install the included software on each PC where you store your music or digital photos. For installation instructions, see “installing software” on page 4.
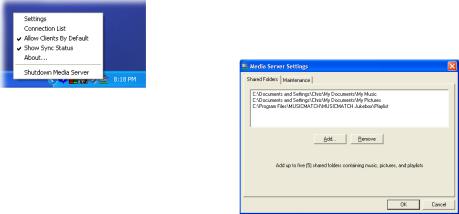
Once the software is installed, the media server icon will appear in your system tray. To configure the server, click on the icon.
The server shares the music
and photos on your PC with all media receivers on your network. When you view a photo or music file on your TV, the server sends (serves) the file to your media receiver.
server start and stop
The media server software will start whenever you power on your PC. If the server software is not running, you can access it from the Start menu on the Windows taskbar. On the Start menu, click All Programs, then hp digital media, and select hp digital media server. The server icon will appear in your system tray.
To stop the server (and stop sharing your photos and music on your PC), click on the server icon and select Shutdown from the server menu.
Note: If the media server is not running, your photos and music will not be available on your hp digital media receiver.
user’s guide 13
server menu
To open the server menu, click the server icon with your left or right mouse button. The server menu will then display.
sharing content
The media server will share content in the following default directory folders:
•My Music
•My Pictures
•MUSICMATCH playlists (if MUSICMATCH Jukebox is installed)
You can share up to five folders per computer. All subfolders within a shared folder are shared as well.
To add or change the shared folders, click on the media server icon and select Settings. A dialog will appear with a list of shared folders.
Add folders where your music and photos are stored, or remove folders you no longer wish to share. Depending on the number of files in your folders, it may take some time for the receiver to fully list the new folder contents.
Note: You cannot share folders that reside on a network or on removable drives or CDs. Shared folders must be local (physically attached) to your PC.
14 hp digital media receiver

synchronizing content
Your music and photos must be synchronized between the server software on your PC, and the hp digital media receiver. This can take several minutes or more the first time, depending on the number of files you are sharing.
While the server software is synchronizing your files, a dialog box will be displayed on your PC. During synchronization, your music
and photo files will be unavailable on the media receiver. If all servers are synchronizing, the media receiver will display a help message to let you know that “All servers synchronizing”. Your music and photos will be available once synchronization is complete.
Note: The synchronization status message can be hidden. Click on the server icon and uncheck Show Synch Status. Check the option to turn the status message on again. During synchronization, the server icon will display an hourglass.
Synchronization will also occur any time you add or remove files to your shared folders. This occurs very quickly when adding a small number of files or when ripping a CD. If you add or remove shared folders, or drag-and-drop a large subfolder into your shared folder directories, synchronization will take longer.
forcing resynchronization
If you have changed a large number of files, or renamed or restructured your folders, your media receiver may become out of sync with your server.
If some files are not appearing on your media receiver, or they are appearing incorrectly, try resynchronizing the server. Click on the server icon, select Settings from the menu, choose the Maintenance tab, and click the Resynchronize button. This will force a resynchronization of all your shared folders.
Note: When photos are resynchronized, the photo rotation setting will be lost. Photos will again appear in their original orientation. To permanently rotate your photos, use your photo editing software to rotate and save them.
user’s guide 15
about mediaspace
If you run the media server software on more than one PC on your network, the media receiver will collect all of the content and display it as one unified list. This list is called Mediaspace.
Mediaspace means all your music and photos are available on any of your media receivers at any time. It does not matter where the files are stored.
music quality
Your music listening experience on the receiver depends upon the quality of your digital music files on your PC. Avoid quality settings below 48kbps as they are unsupported. For CD quality music, rip your CDs at 128kbps. In recorders such as MUSICMATCH Jukebox, 128kbps is the default setting.
supported music formats
The following music file formats are supported:
•mp3
MPEG Audio file. The standard internet music file format, and the most common.
•wma
Windows Media Audio file. Supported by the Microsoft Windows Media player and some music jukebox programs.
•m3u, pls, and rmp
A playlist file. This is a text file supported by nearly all music software. A playlist is used for creating and storing lists of music tracks.
16 hp digital media receiver
recording digital music
It is easy to digitally record your music onto your PC. This process is commonly called ripping. To rip a file with MUSICMATCH Jukebox:
1.Start the MUSICMATCH Jukebox program by selecting it from your Start menu, or by doubleclicking the MMJB icon on your desktop.
2.Insert a music CD into your CD-ROM drive
3.Click the red recorder button on the player
4.MUSICMATCH will auto-configure your CD-ROM (this only happens once)
5.If you are connected to the Internet, the CD lookup service will auto-enter tag information (album, artist, and song name) into the Recorder screen.
6.Click the box next to the tracks you want to record
7.Click Record
The recorded tracks will be placed into your Music Library when completed. If you have that directory
shared (which is the default), the tracks will appear on your hp digital media receiver as well.
MUSICMATCH Jukebox is automatically set to record (rip) music files into the MP3 format at 128kbps, which is widely accepted as CD quality. If you want to change the quality settings:
1.Select Options/Settings from the main dropdown menu
2.Click on the Recorder tab
3.Adjust the quality and format as desired (48kbps minimum).
copy protection
Some music files are copy protected and can only be played on your computer. Copy protected files cannot be played on your hp digital media receiver. If a file is copy protected, it will not appear in the media receiver music jukebox.
If you plan on sharing and playing music files on your media receiver, turn copy protection off when ripping your own CDs to your PC.
user’s guide 17
 Loading...