


660LX

HP 620LX/660LX PALMTOP USER GUIDE
HP Part Number F1270-90004
Printed in Singapore
Edition 1
HP Palmtop PC User Guide - i

Notice
This manual and any examples contained herein are provided “as is” and are
subject to change without notice. Hewlett-Packard Company makes no warranty
of any kind with regard to this manual, including, but not limited to, the implied
warranties of merchantability and fitness for a particular purpose. Hewlett-Packard
Co. shall not be liable for any errors or for incidental or consequential damages
in connection with the furnishing, performance, or use of this manual or the
examples herein.
The above disclaimers and limitations shall not apply to consumer transactions
in Australia and the United Kingdom and shall not affect the statutory rights
of consumers.
© Hewlett-Packard Co. 1998. All rights reserved. Reproduction, adaptation, or
translation of this manual is prohibited without prior written permission of HewlettPackard Company, except as allowed under the copyright laws.
The programs that control this product are copyrighted and all rights are reserved.
Reproduction, adaptation, or translation of those programs without prior written
permission of Hewlett-Packard Co. is also prohibited.
Microsoft, MS-DOS, MS, Windows, Windows NT, and Win32 are either registered trademarks or trademarks of Microsoft, Corporation in the U.S.A. and/or
other countries. All other brands or product names are trademarks or registered
trademarks of their respective companies.
Hewlett-Packard Singapore (Pte) Ltd.
Asia Pacific Personal Computer Division
452 Alexandra Road
Singapore 119961
Edition History
Edition 1 . . . . . . . . . . . . . . . . . . . . . . . . . . . . . . May 1998
ii - HP Palmtop PC User Guide

HP Software Product License Agreement
Important: Please carefully read this License Agreement before operating the equipment. Rights in
the software are offered only on the condition that the Customer agrees to all terms and conditions of
the License Agreement. Operating the equipment indicates your acceptance of these terms and
conditions. If you do not agree to the License Agreement, you may return the unopened package for
a full refund. In return for payment of the applicable fee, HP grants the Customer a license in the
software, until terminated, subject to the following:
Use:
• Customer may use the software on any one computer.
• Customer may not reverse assemble or decompile the software.
Copies and Adaptations:
• Customer may make copies or adaptations of the software:
• For archival purposes, or
• When copying or adaptation is an essential step in the use of the software with a computer so long
as the copies and adaptations are used in no other manner.
• Customer has no other rights to copy unless they acquire an appropriate license to reproduce which
is available from HP for some software.
• Customer agrees that no warranty, free installation, or free training is provided by HP for any copies
or adaptations made by Customer.
• All copies and adaptations of the software must bear the copyright notice(s) contained in or on
the original.
Ownership:
• Customer agrees that they do not have any title or ownership of the software, other than
ownership of the physical media.
• Customer acknowledges and agrees that the software is copyrighted and protected under the copy
right laws.
• Customer acknowledges and agrees that the software may have been developed by a third party
software supplier named in the copyright notice(s) included with the software, who shall be
authorized to hold the Customer responsible for any copyright infringement or violation of this
License Agreement.
Transfer of Rights in Software:
• Customer may transfer rights in the software to a third party only as part of the transfer of all their
rights and only if Customer obtains the prior agreement of the third party to be bound by the terms
of this License Agreement.
• Upon such a transfer, Customer agrees that their rights in the software are terminated and that they
will either destroy their copies and adaptations or deliver them to the third party.
• Transfer to a U.S. government department or agency or to a prime or lower tier contractor in
connection with a U.S. government contract shall be made only upon their prior written agreement
to terms required by HP.
HP Palmtop PC User Guide - iii

Sublicensing and Distribution: Customer may not sublicense the software or distribute copies or
adaptations of the software to the public in physical media or by telecommunication without the prior
written consent of HP.
Termination: HP may terminate this software license for failure to comply with any of these terms
provided HP has requested Customer to cure the failure and Customer has failed to do so within thirty
(30) days of such notice.
Updates and Upgrades: Customer agrees that the software does not include updates and upgrades
which may be available from HP under a separate support agreement.
Export Clause: Customer agrees not to export or re-export the software or any copy or adaptation in
violation of the U.S. Export Administration regulations or other applicable regulations.
iv - HP Palmtop PC User Guide

HP Shrinkwrap License Terms
The following License Terms govern your use of the accompanying Software unless you have a separate signed agreement with HP.
License Grant: HP grants you a license to use one copy of the Software. “Use” means storing, loading, installing, executing or displaying the Software. You may not modify the Software or disable any
licensing or control features of the Software. If the Software is licensed for “concurrent use”, you may
not allow more than the maximum number of authorized users to Use the software concurrently.
Ownership: The Software is owned and copyrighted by HP or its third party suppliers. Your license
confers no title to, or ownership in, the Software and is not a sale of any rights in the Software. HP’s
third party suppliers may protect their rights in the event of any violation of these License Terms.
Copies and Adaptations: You may only make copies or adaptations of the Software for archival
purposes or when copying or adaptation is an essential step in the authorized Use of the Software. You
must reproduce all copyright notices in the original Software on all copies or adaptations. You may not
copy the Software onto any public network.
No Disassembly or Decryption: You may not disassemble or decompile the Software unless HP’s
prior written consent is obtained. In some jurisdictions, HP’s consent may not be required for limited
disassembly or decompilation. Upon request, you will provide HP with reasonably detailed information regarding any disassembly or decompilation. You may not decrypt the Software unless decryption
is a necessary part of the operation of the Software.
Transfer: Your license will automatically terminate upon any transfer of the Software. Upon transfer,
you must deliver the Software, including any copies and related documentation, to the transferee.
The transferee must accept these License Terms as a condition to the transfer.
Termination: HP may terminate your license upon notice for failure to comply with any of these
License Terms. Upon termination, you must immediately destroy the Software, together with all
copies, adaptations and merged portions in any form.
Export Requirements: You may not export or re-export the Software or any copy or
adaptation in violation of any applicable laws or regulations.
U.S. Government Restricted Rights: The Software and Documentation have been developed
entirely at private expense. They are delivered and licensed as “commercial computer software” as
defined in DFARS 252.227-7013 (Oct 1988), DFARS 252.211-7015 (May 1991) or DFARS 252.2277014 (Jun 1995), as “commercial item” as defined in FAR 2.101 (a), or as “Restricted computer
software” as defined in FAR 52.227-19 (Jun 1987) (or any equivalent agency regulation or contract
clause), whichever is applicable. You have only those rights provided for such Software and
Documentation by the applicable FAR or DFARS clause or the HP standard software agreement for
the product involved.
HP Palmtop PC User Guide - v

vi - HP Palmtop PC User Guide

CONTENTS
Contents vii
Introduction 1
A Note on Models 1
About This Guide 1
1. A Closer Look at the HP Palmtop PC 3
2. Using the HP Palmtop PC for the First Time 7
Installing the Batteries 7
Getting Started 8
The Welcome Wizard 9
Partnering with Your Desktop Computer 12
3. Working with the HP Palmtop PC 15
Getting Started with Windows CE 15
Getting Help On-line 16
Using AC Power 17
Managing Battery Power 17
Customizing Your HP Palmtop PC 19
Printing 25
Resetting 26
Transferring Files 27
Using a PC Card 29
Using a PC Card Modem 30
Using a CompactFlash Card 31
Synchronizing Data 31
Backing Up and Restoring Data 34
HP Palmtop PC User Guide - vii
Contents

4. Translating HP PIM Data Files 41
Installing the HP PIM Translation Utility 41
Starting the Translation 42
Translating Appointment Data 42
Translating Phone Book Data 43
Reviewing Translation Status 47
5. Working with Pre-Installed Applications 49
Overview of HP Palmtop PC Pre-installed Applications 49
Information Manager for Windows CE – 52
Calendar, Contacts, and Tasks
Microsoft Pocket Word 66
Microsoft Pocket Excel 75
Microsoft Pocket Powerpoint 84
Quicken® ExpensAble
Fiscal Pro
TM
TM
86
100
Microsoft Voice Recorder 101
bFAXTM Pro Fax Send/Receive Application 102
Inbox 110
Microsoft Pocket Internet Explorer 122
bFIND
TM
Global Find Utility 130
World Clock 133
Calculator 136
Synchronization with the desktop PC (Mobile Devices) 137
Connection to an ISP (Internet Service Provider) 142
viii - HP Palmtop PC User Guide

6. Reference 149
Safety, Care, and Maintenance 149
Tips and Troubleshooting 149
Electrostatic Discharge Warning 153
Warranty, Support, and Service 153
Index 157
HP Palmtop PC User Guide - ix
Contents

x - HP Palmtop PC User Guide

INTRODUCTION
Congratulations and thank you for purchasing the HP Palmtop PC.
This guide introduces you to your new palmtop PC and shows you how you can
quickly begin to use it either on its own or as an effective desktop PC companion.
A NOTE ON MODELS
The HP Palmtop PC (600 Series) is available in two models, the HP 620LX and
the HP 660LX. Both models are described in the guide. The HP 660LX includes
all the features of the 620LX plus the following enhancements:
• 32MB RAM (the HP 620LX has 16MB RAM)
• a 56kbps Fax/Modem Card
• the Microsoft Windows CE Services 2.1 with ActiveSync CD-ROM (the HP
620LX uses Services 2.0)
Please note that on the 660LX a maximum of 16MB RAM can be used for storage
memory. The remaining 16MB is program memory.
ABOUT THIS GUIDE
The HP Palmtop PC uses the Microsoft Windows CE operating system, which is
very similar to the Microsoft Windows™ 95 and Windows NT 4.0 operating systems. This guide assumes that you are already familiar with one of these desktop
operating systems.
HP Palmtop PC User Guide - 1
Introduction

Chapter 1: A Closer Look at the HP Palmtop PC
This chapter describes the physical features of the HP Palmtop PC.
Chapter 2: Using the HP Palmtop PC the First Time
This chapter describes how to start the HP Palmtop PC for the first time, how to
calibrate the touch screen with the stylus, and how to establish the partnership
between your palmtop PC and your desktop computer using the Synch Cable or
the Docking Cradle. It also covers installing batteries and using AC power.
Chapter 3: Working with the HP Palmtop PC
This chapter describes the common features of Windows CE and the HP Palmtop
PC that you need to get started quickly and to make the transition from desktop
PC to palmtop PC easier. The chapter also includes tips on how you can take
advantage of the portability of your palmtop PC along with the power and storage
of your desktop PC.
Chapter 4: Translating HP PIM Data Files
This chapter describes the HP PIM translation utility, which enables users of the
HP 100LX/200LX palmtop PCs and HP OmniGo 100/120 organizers to transfer
their Appointment Book and Phone Book data to Windows CE Information Manager applications.
Chapter 5: Working with Pre-installed Applications
This chapter gives you instructions on the use of Windows CE applications to
keep appointments, manage phone book data and tasks, perform word processing
and spreadsheet tasks, dial up to the Internet, etc.
Chapter 6: Reference
This chapter includes tips on how to take care of your palmtop PC, troubleshooing
information, and warranty, support, and service information.
2 - HP Palmtop PC User Guide
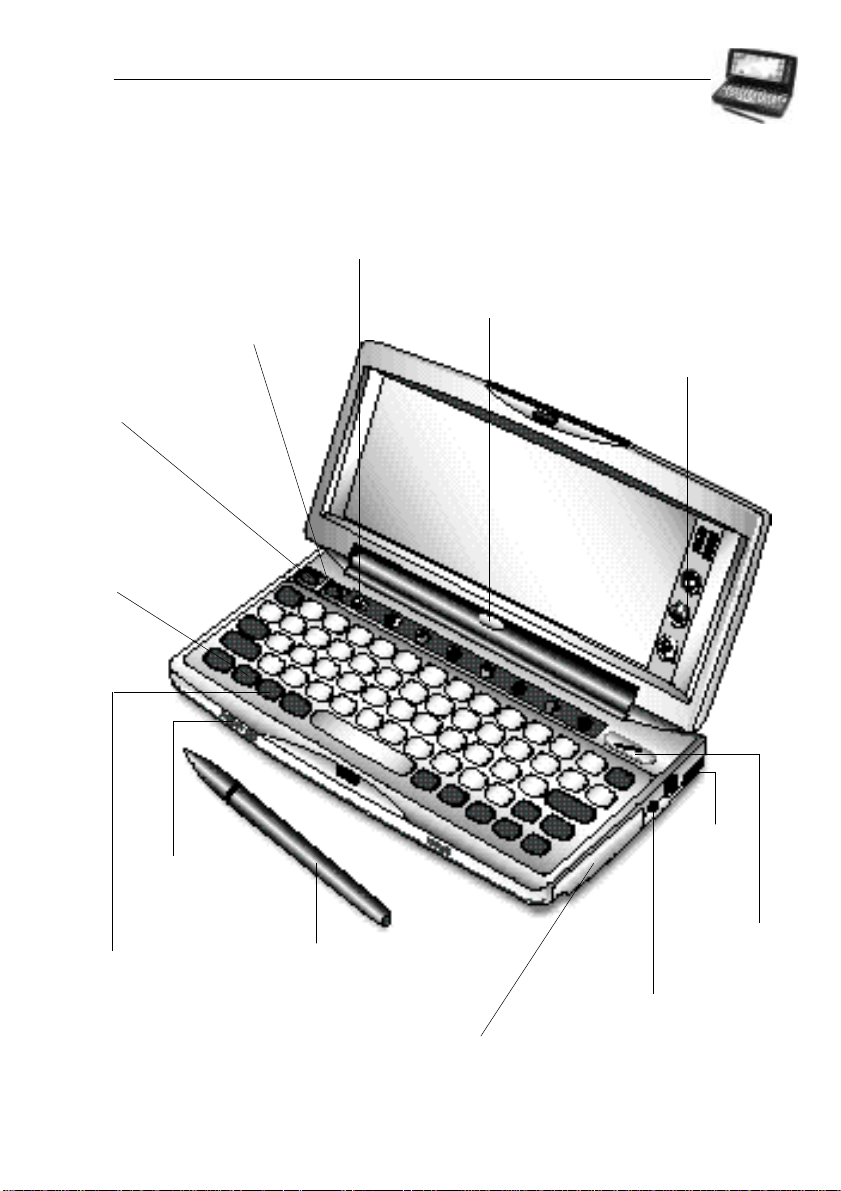
Chapter 1 – A CLOSER
LOOK AT THE HP PALMTOP PC
External Features - Front view
Quick Application
Launch Pad
Record Key
On/Off Switch
Microsoft
Windows Key
LED Multifunction
Record Key
Hard Icon Panel
Microphone
Number Lock Key
Stylus
Compact Flash
Memory Card Drawer
A Closer Look at the HP Palmtop PC
HP Palmtop PC User Guide - 3
Serial Port
Stylus Ejection
Button
AC Adapter Port

External Features - Back view
Back-up Battery
Red Reset Button
Back-up Battery
Compartment
IR (Infrared) Port
Main Battery
Compartment
Battery Release
Catch
PC Card
Eject Button
PC Card Slot
4 - HP Palmtop PC User Guide
Docking Cradle
Connector
Lithium-Ion Main
Battery Pack
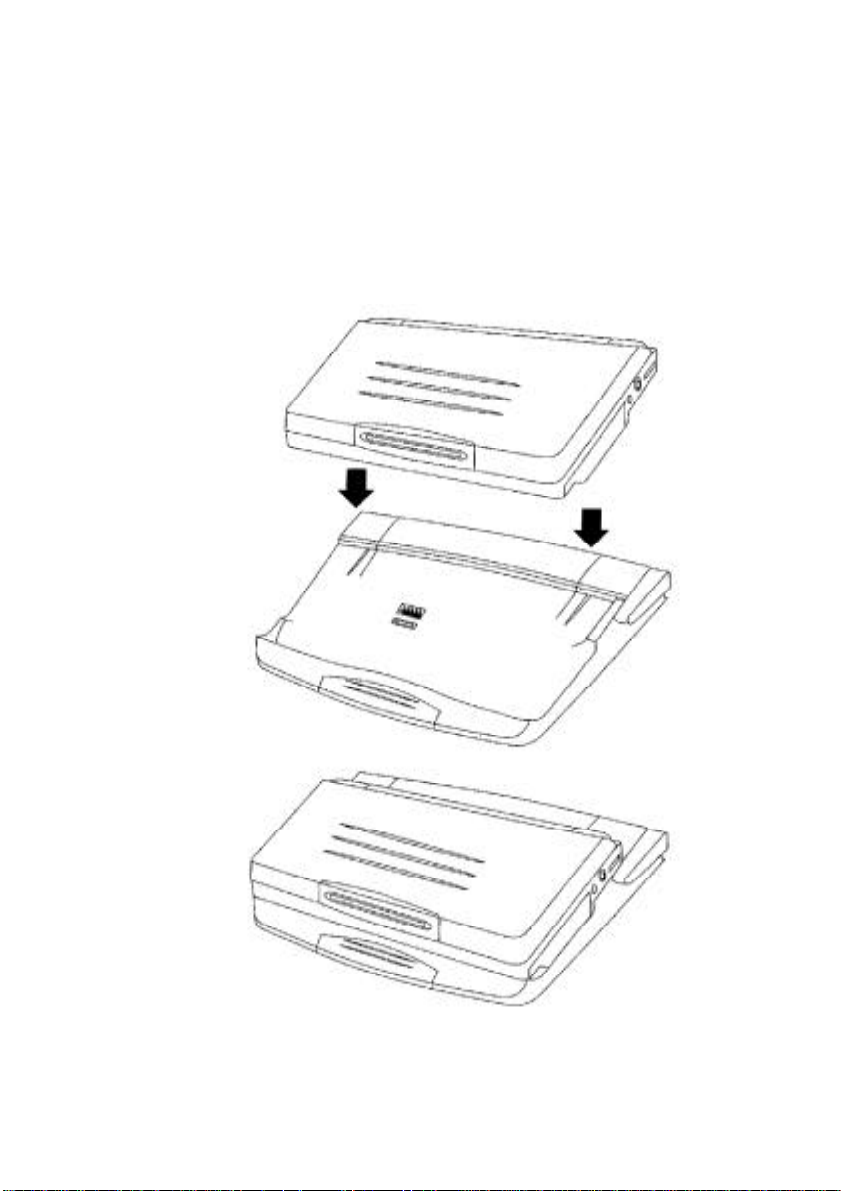
The HP Palmtop PC comes with a Docking Cradle. Use the Docking Cradle to
connect the HP Palmtop PC to a desktop PC, as described in Chapter 2, “Using
the HP Palmtop PC for the First Time.”
A Closer Look at the HP Palmtop PC
HP Palmtop PC User Guide - 5

6 - HP Palmtop PC User Guide
Chapter 2 – USING THE HP
PALMTOP PC FOR THE FIRST TIME
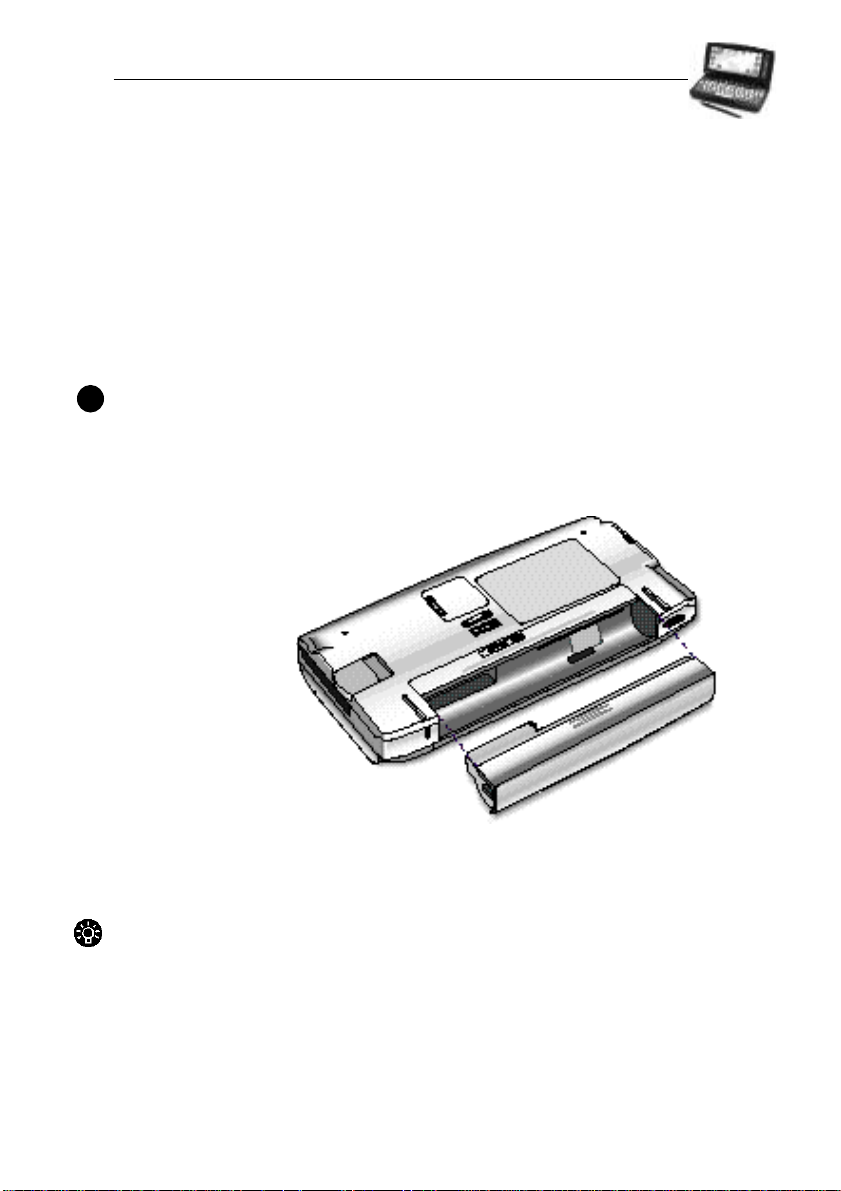
INSTALLING THE BATTERIES
The HP Palmtop PC requires two types of batteries to operate as a portable unit:
• Rechargeable Lithium-Ion main battery pack
• 1 CR2032 3-volt coin cell backup battery
To install the batteries:
Important
!
Install the main battery pack before installing the backup battery.
1. First, install the Lithium-Ion main battery pack by sliding the battery pack into
the battery compartment and snap it in place.
2. Charge the Lithium-Ion main battery pack by connecting the AC adapter to a
power source and to the AC adapter port on the palmtop PC.
Tips
• The orange LED Multifunction Record Key light on top of the palmtop PC
indicates that the main battery pack is being charged.
• You can use the palmtop PC while charging.
• The LED light turns green when the battery pack is fully charged, 5 hours.
• Do not press the LED Multifunction Record Key before completing the
Welcome Wizard.
Using the HP Palmtop PC for the First Time
HP Palmtop PC User Guide - 7

3. Remove the backup battery cover and install the 3-volt CR2032 coin cell
battery with the positive side up.
Warning
!
Do not mutilate, puncture, or dispose of batteries in fire. The batteries can burst
or explode, releasing hazardous chemicals. Discard used batteries according to
the manufacturer’s instructions. The backup (lithium) battery can explode if it is
inserted incorrectly.
GETTING STARTED
To begin using your HP Palmtop PC for the first time, do the following:
1. Power on the palmtop PC by pressing the / key.
2. Adjust the contrast and volume by launching the QuickSettings Application.
To turn off the HP Palmtop PC, press the / key again.
8 - HP Palmtop PC User Guide
ON OFF
ON OFF
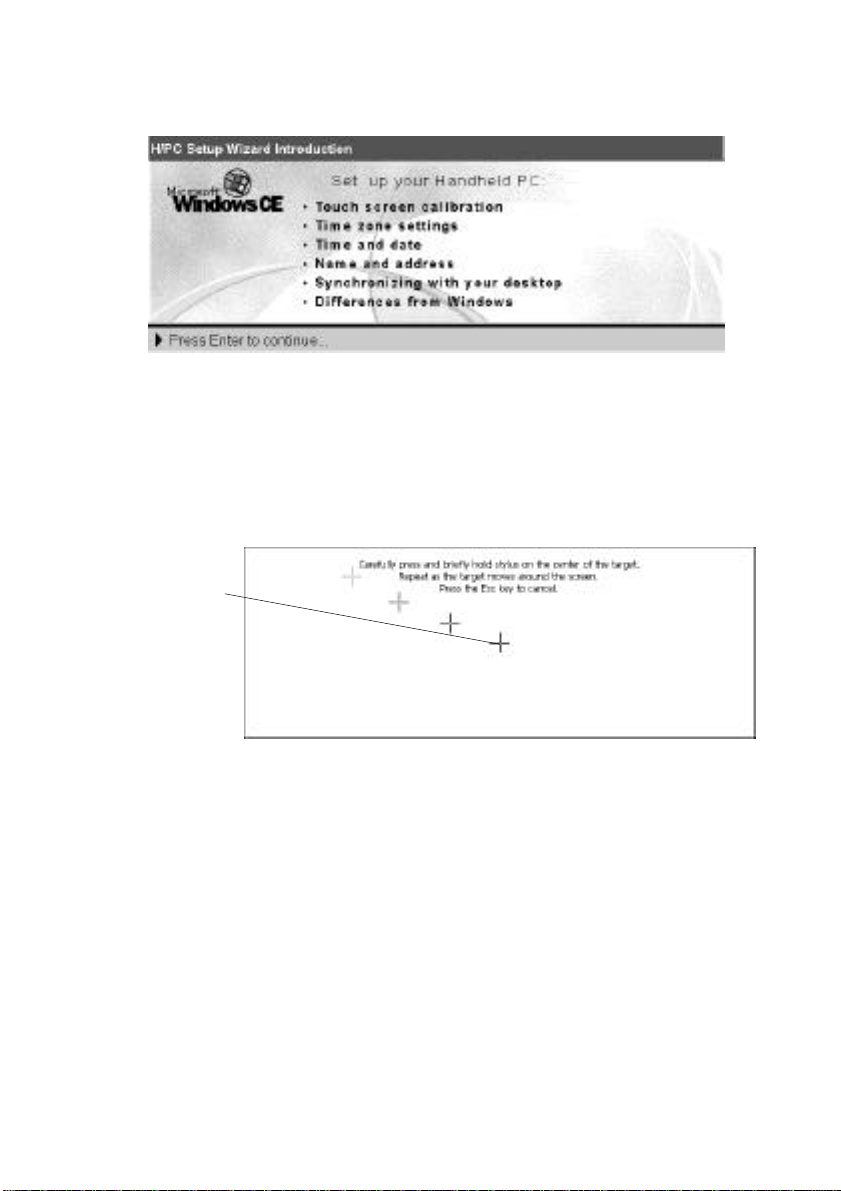
THE WELCOME WIZARD
Calibrating the Screen and Stylus
You need to first calibrate the screen and the stylus so the screen responds correctly to a stylus tap. To calibrate the stylus, do the following:
1. Press the Stylus Ejection Button and take out the stylus.
2. Press and
briefly hold the
stylus at the
center of each
cross or target
that appears on
the calibration
screen.
Once the screen and stylus are calibrated, you can use the stylus as a
mouse substitute to perform the following operations:
• Tap to select a button or menu item
• Double-tap an icon to open an application
• Drag the stylus across words or items to select them
• Drag-and-drop a selection to another part of the screen
Using the HP Palmtop PC for the First Time
HP Palmtop PC User Guide - 9
Important
!
Do not use any stylus other than the one that comes with your HP Palmtop PC to
tap or write on screen. Using a different stylus or an ordinary pen is likely to
damage the screen.
Tips
If you make a mistake while calibrating the touch screen, or if screen accuracy
diminishes over time, you may not be able to use the stylus. If this happens, you
can open the stylus calibration screen without the stylus by pressing
+ + .
CTRL
ALT
=
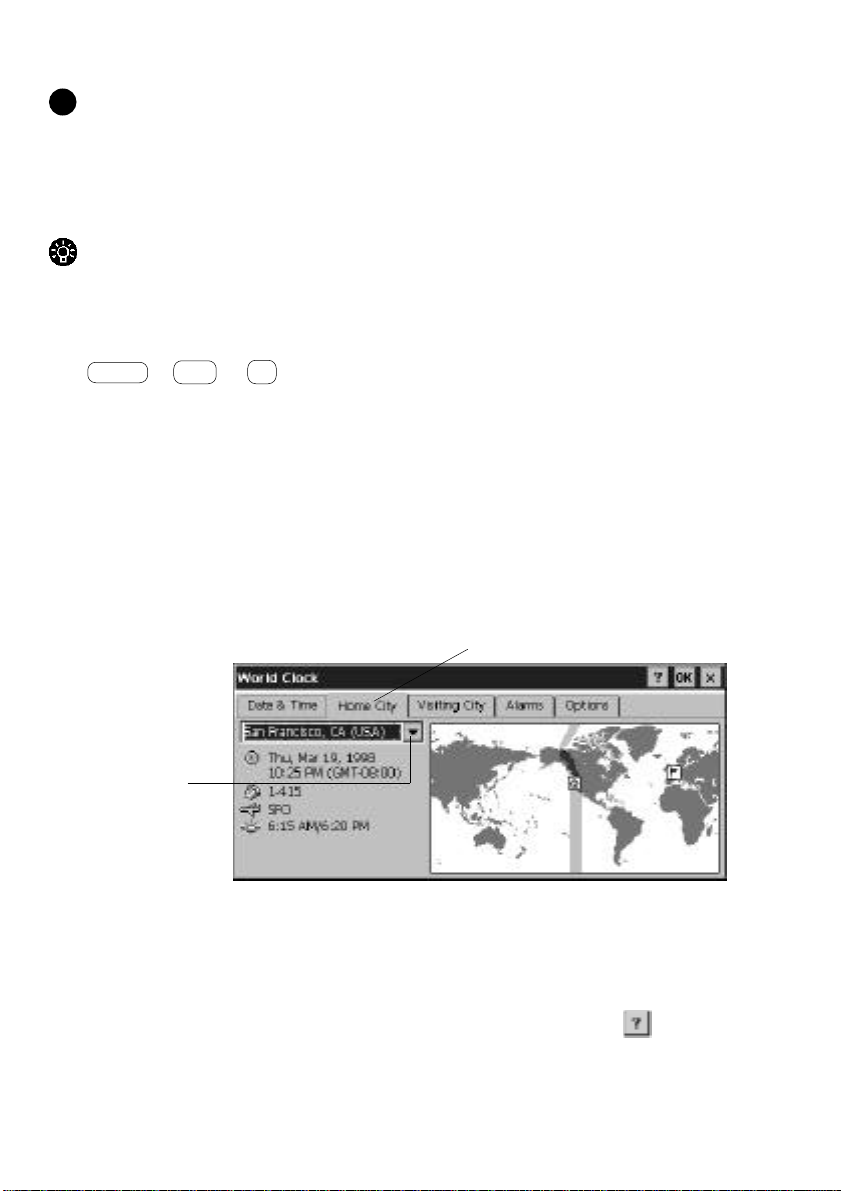
Setting the World Clock
You can set the time zone you are in and, if you wish, an additional time zone
(such as one you may be travelling to). These settings keep track of any reminders
and alarms that you set later on.
Setting the Time Zone
On the World Clock screen that appears, do the following:
1. Tap the Home City tab.
2. Select your
home city (or
one nearby)
from the drop down list.
3. When you
have finished,
tap Next.
To specify the time zone for a place you are visiting, follow the steps shown above,
but tap the Visiting City tab.
If the city you want (or one near it) does not appear in the list, you can
add it following the instructions in the online Help by pressing the button.
10 - HP Palmtop PC User Guide

Setting Time and Date
To set time and date for your home or visiting location, do the following:
1. Tap Date & Time.
2. Tap the forward or back arrows to locate the month and year.
3. Tap the date.
4. Select the time and tap and drag the hands to adjust the setting.
5. When you have finished, tap Next.
Using the World Clock control panel, you can change time zone, date, and time
information whenever you want. You can also set alarms, apply daylight savings
time, and display travel information.
Using the HP Palmtop PC for the First Time
HP Palmtop PC User Guide - 11
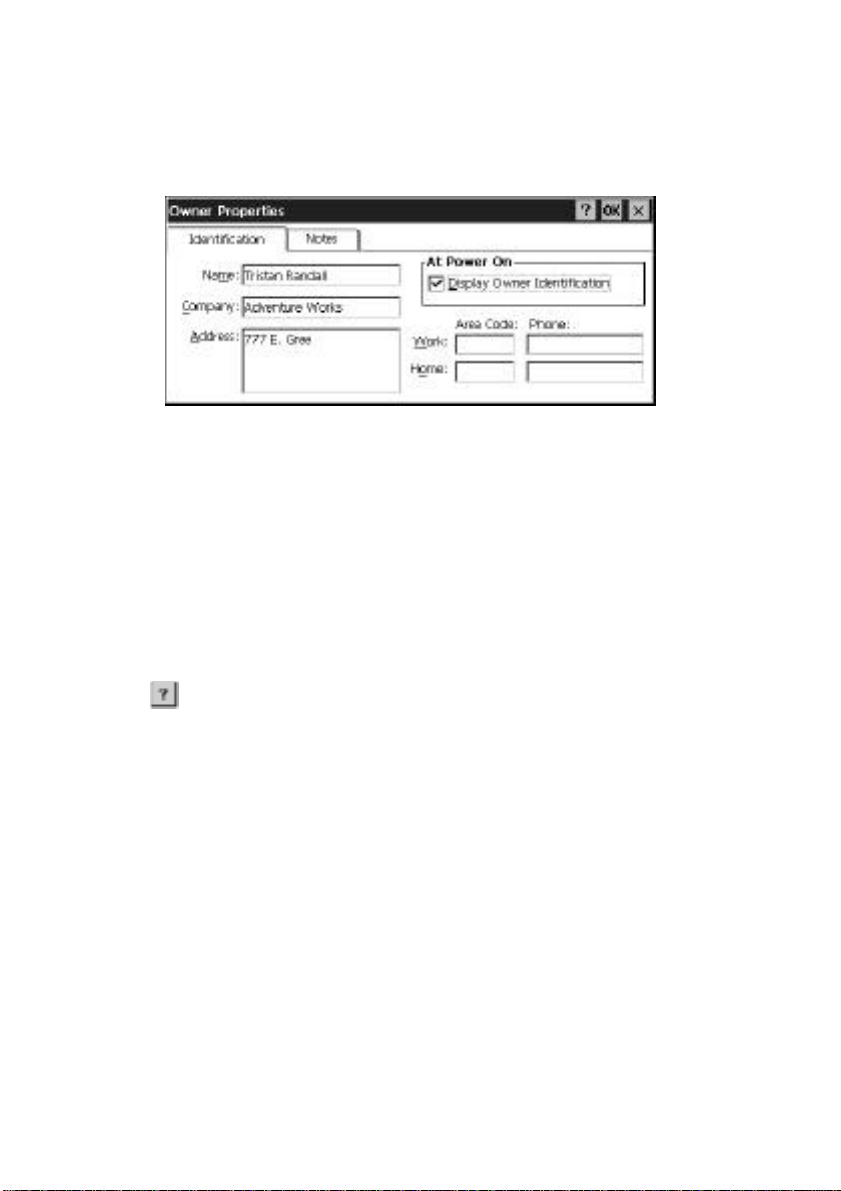
Entering Personal Identification Information
The last step in the Welcome Wizard is entering your name, address, and other
personal information.
See the section “Changing Owner Information” on page 25 for information on
adding a password and notes about where to return your HP Palmtop PC if
it is found.
Set up is now complete.
You can learn more about Windows CE in the User’s Guide or online Help. To
access Help:
Tab Help on the Start menu
Tap the button in the upper right corner of a program window
PARTNERING WITH YOUR DESKTOP COMPUTER
One of the most useful features of the HP Palmtop PC is the ease of connecting it
to your desktop PC and transferring data back and forth between the two. You can
also use your desktop PC to back up data from your HP Palmtop PC. In order for
your desktop PC to communicate with the HP Palmtop PC, you must do
two things:
• install Microsoft Windows CE Services 2.0 software that comes with the HP
Palmtop PC on the desktop computer
• establish a physical connection between the two computers
12 - HP Palmtop PC User Guide

Installing Microsoft Windows CE Services 2.0
Before you can install Microsoft Windows CE Services 2.0 on your PC you
need to:
• be running Windows 95 or Windows NT 4.0 on the desktop computer
• have your Windows 95 or Windows NT 4.0 installation CD available
• have the Microsoft Windows CE Services 2.0 CD-ROM that comes with the
HP Palmtop PC ready
1. Insert the Microsoft Windows CE Services 2.0 CD-ROM into the CD-ROM
drive on your PC. Setup should launch automatically.
If Setup does not launch, Click Run, then type d:setup where d is the letter
assigned to your CD-ROM drive.
2. The screen should prompt you to set up 3 applications/utilities if they are not
already installed:
1. Microsoft Exchange update for Windows®95
2. Microsoft Schedule+ 7.0a
3. Microsoft Windows CE Services 2.0
4. Optional Components
* Your computer will be restarted several times during the installation process
Using the HP Palmtop PC for the First Time
HP Palmtop PC User Guide - 13

3. Start Windows CE Services 2.0 if it is not already running on your desktop/
notebook PC and turn on your HP Palmtop PC.
4. Prepare the docking cradle for connecting to the desktop PC. Insert the 9-pin
end of the synch cable into the serial port of the desktop PC. Insert fully
the flat end of the synch cable, arrow side up, to the serial port at the back of
the cradle. Connect the AC to a power source and to back of the cradle.
Be sure never to have serial or power cable connected directly to the palmtop
!
when using the cradle. Doing so will permanently damage the unit.
5. Close the palmtop, carefully center it on the cradle. Press down on the
palmtop until the unit clicks into place. Partnership should automatically
establish between your HP Palmtop PC and the desktop/notebook PC.
After you have established the partnership, you are ready to transfer Microsoft
Word, Excel and other files between your desktop computer and the HP
Palmtop PC. You can also synchronize calendar, contact and task information
from your desktop Information Manager data files with data from your Infor mation Manager applications on your desktop computer. If you need further
guidance, refer to the “Communications” portion in our website (http://
www.hp.com/handheld/palmtops/hp600lxmanual/index.html).
Note
!
If you are using Windows 95 on your desktop you can also establish partnership
and synchronize data by using an infrared connection. Please refer to “Synchronizing Data” in Chapter 3, for details.
14 - HP Palmtop PC User Guide
Chapter 3 – WORKING WITH
THE HP PALMTOP PC
This chapter discusses basic information you should be familiar with in order to
use your HP Palmtop PC effectively. There are brief introductions to Windows
CE, tips on power management, and information on customizing your palmtop
PC and on printing.
GETTING STARTED WITH WINDOWS CE
Microsoft Windows CE on the HP Palmtop PC is very much like Microsoft
Windows 95 or Windows NT 4.0 on a desktop PC. Windows CE screens include
familiar elements like the Start button, desktop, taskbar, menu bars, toolbars,
and shortcuts.
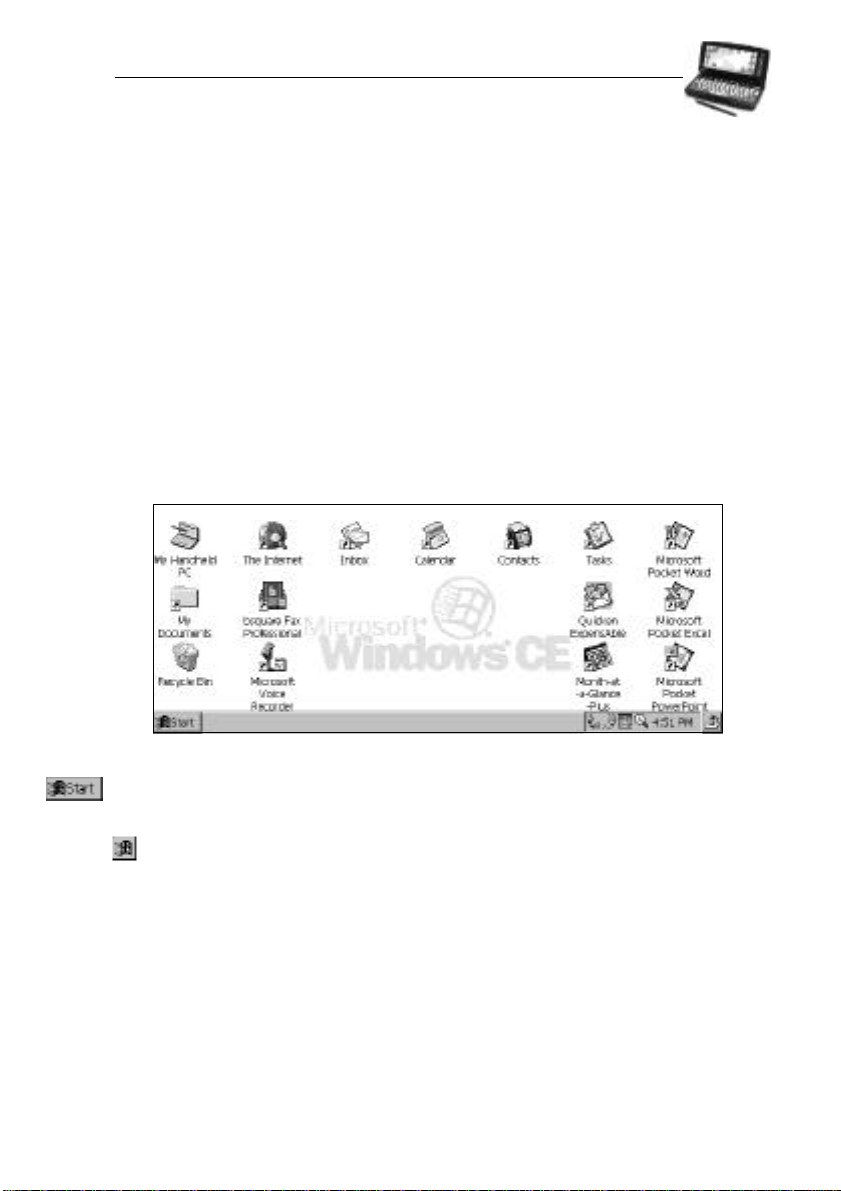
The Start Button and Start Menu
Tap the Start button in the lower left corner of the screen or press the
(Windows) key on the keyboard to bring up the Start menu. The Start menu is
your gateway to the programs, documents, and utilities on the HP Palmtop PC.
Tap on an item in the Start menu to launch an application, open the Control Panel
to adjust custom settings, get on-line help, or explore the contents of your HP
Palmtop PC.
HP Palmtop PC User Guide - 15
Working with the HP Palmtop PC

Buttons on a Typical Title Bar
The title bar of a typical Windows CE screen or display includes two
or more of the following buttons in the upper right corner:
Tap OK to confirm the operation in the display and to close the window.
Tap X to close the display without saving any changes.
Tap ? to see context-sensitive on-line help related to the display.
Manipulating Windows
In Windows CE, most windows and dialog boxes take up the entire screen; you
cannot have multiple windows displayed simultaneously. While you cannot move
or resize application or document windows, you can maximize and minimize them
by tapping the appropriate buttons on the taskbar.
Tap here to maximize an
inactive window (Control Panel).
Tap here to minimize the
active window (Power Properties).
Emulating the Right Mouse Button
To access right-mouse click functions, hold down the key while tapping
ALT
with the stylus.
GETTING HELP ON-LINE
On-line help is available in Windows CE by:
• tapping the button on a display’s title bar or toolbar for context sensitive help
• tapping the Help option on the Start menu
• pressing + to get window-specific help while an application
ALT
is running
16 - HP Palmtop PC User Guide
H

USING AC POWER
An AC adapter for stationary use is available for the HP Palmtop PC.
If You are Using the Docking Cradle…
Plug the AC adapter into the port on the back of the Docking Cradle
and plug the other end into a wall socket.
If You Are Not Using the Docking Cradle…
Plug the AC adapter into the adapter port at the side of your HP Palmtop PC and
plug the other end into a wall socket.
Important
!
Do not connect the palmtop PC to two AC power sources at the same time. Doing
so will damage the unit.
MANAGING BATTERY POWER
You can operate your HP Palmtop PC on battery power or on AC current with the
AC adapter. Built-in software helps you manage power on your HP Palmtop PC,
by letting you check battery type and use time on the main and backup batteries,
reporting status when you charge batteries using the AC adapter, and setting when
you want the power to time-out and turn off.
To access the power management features:
1. On the Start menu, tap Settings, then Control Panel
2. Double-tap the Power icon.
The Power Properties window that appears has two tabs: Power Off
and Dimming Control .
The Power Properties window shows the power source (for example, Main Batteries), how much power remains in the main batteries, backup battery status, and
recharging status if you are recharging.
Working with the HP Palmtop PC
HP Palmtop PC User Guide - 17
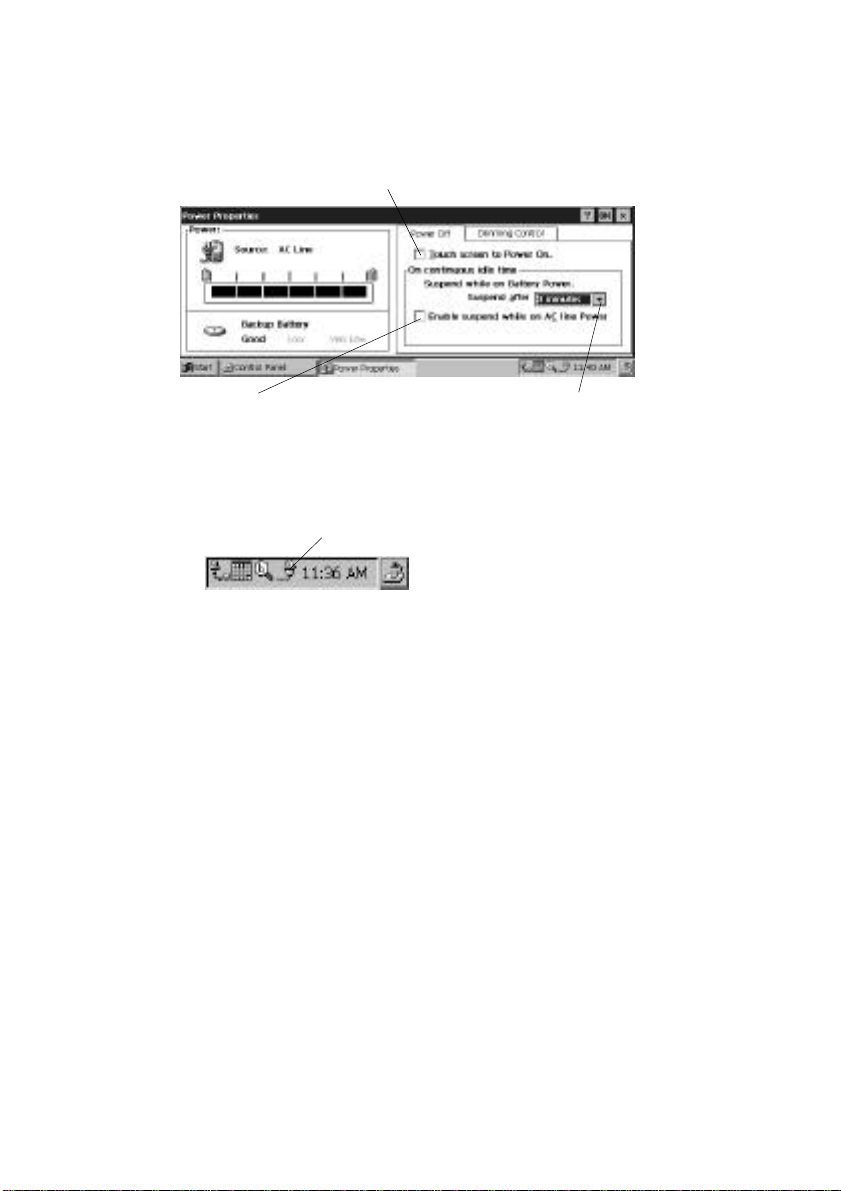
Power Off
Tap the Power Off tab to set the automatic power time-out for both battery and AC
power operation.
Tap here to enable the palmtop PC’s “touch on” feature.
Tap here to set the automatic power
time-out for AC power operation.
Select the length of idle time
before your palmtop PC times out.
Power Status Icons
An icon appears on the taskbar next to the current time, when the AC power is
connected.
Power status icon.
You can double-tap on the power icon in the taskbar to open the Power Properties
window and get more information about power status.
Other Warnings about Power
Dialog boxes also appear to warn you when your backup battery or main batteries
are running low or very low. If your battery is running down, the dialog appears at
each power-on or start up, and every 30 minutes while the device is being used.
Recharging Batteries
You can recharge the batteries within the palmtop PC.
1. Attach the AC adapter to the palmtop PC or to the Docking Cradle
holding the palmtop PC.
2. Plug the adapter into a wall socket.
Tips for Using Batteries Efficiently
To get the longest possible use out of your batteries and to minimize the possibility of data loss, keep the following tips in mind:
18 - HP Palmtop PC User Guide

• Charge the main batteries as soon as possible after a low battery warning
appears.
• Whenever possible, switch to AC power when you use high-power PC Cards
(such as modem cards). Using these cards when the main batteries are low
can cause data corruption or loss.
• Use the AC adapter while the palmtop PC is connected to a desktop PC.
Don’t leave the Synch Cable attached while on battery power if you’re not
actually exchanging data with the desktop PC.
• Avoid using sounds when your main batteries are low. Playing .wav files
when the batteries are low can cause the unit to shut down, hence losing
unsaved data.
• Don’t use battery power for dial-up connections. PC Card modems and other
PC Cards require considerable power to operate. Always use AC power when
making dial-up connections with a PC Card modem.
Note
!
The HP Palmtop PC will not power on if the main batteries are very low.
CUSTOMIZING YOUR HP PALMTOP PC
You can personalize and customize your Palmtop PC by adjusting settings,
adding ID and password, and loading new software. Most customizations are
done using the Control Panel.
To open the Control Panel, tap Settings on the Start menu.
Double-tap on an icon in the Control Panel
to open the associated Properties window.
Working with the HP Palmtop PC
HP Palmtop PC User Guide - 19
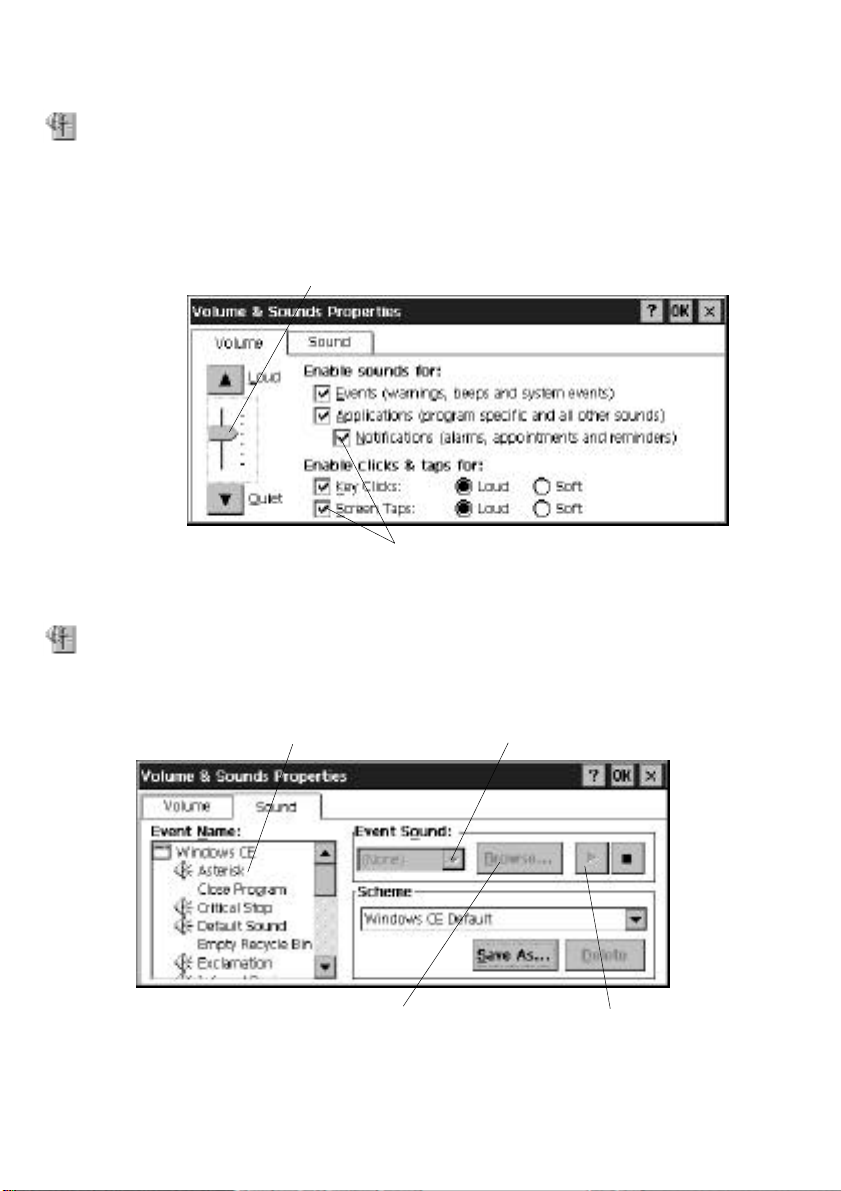
Adjusting Volume
You can turn event, notice, and applications sounds on and off and adjust volume.
Double-tap the Volume & Sounds icon in the Control Panel, or tap the Quick
Settings Hard Icon panel.
In the Volume & Sounds Properties Window Volume tab,
use the volume slider to raise or lower volume.
Clear or check boxes to turn the sounds
associated with different kinds of events on or off.
Changing Sounds
Double-tap the Volume & Sounds icon in the Control Panel, then tap the Sound
tab in the Volume & Sounds Properties window.
Select the event with which
you want to associate a sound.
Tap Browse to locate the
sound you want to use.
Select a sound from the
Event Sound drop-down list.
To remove a sound, select None from the Event Sound list.
20 - HP Palmtop PC User Guide
Preview the select sound
by tapping this button.
 Loading...