


hp scanjet 5530 digital flatbed scanner
user‘s manual

hp scanjet 5530 digital flatbed scanner
user’s manual

copyright information
© Copyright Hewlett-Packard Company 2003
All rights reserved. Reproduction, adaptation, or translation without prior written permission is prohibited, except as allowed under copyright laws.
This product incorporates Adobe’s PDF technology, which contains an implementation of Lempel-Ziv-Welch (LZW) data compression licensed under U.S. Patent 4,558,302.
trademark credits
Adobe and the Acrobat logo are registered trademarks or trademarks of Adobe Systems Incorporated in the United States and other countries and regions.
Energy Star is a U.S. registered service mark of the United States Environmental Protection Agency.
Microsoft and Windows are registered trademarks of Microsoft Corporation.
All other product names mentioned herein may be trademarks of their respective companies.
document warranty
The information contained in this document is subject to change without notice.
Hewlett-Packard makes no warranty of any kind with respect to this information. HEWLETT-PACKARD SPECIFICALLY DISCLAIMS ANY IMPLIED WARRANTY OF MERCHANTABILITY AND FITNESS FOR A PARTICULAR PURPOSE.
Hewlett-Packard shall not be liable for any direct, indirect, incidental, consequential, or other damage alleged in connection with the furnishing or use of this information.
The TWAIN Toolkit is distributed as is. The developers and distributors of the TWAIN Toolkit expressly disclaim all implied, express or statutory warranties including, without limitation, the implied warranties of merchantability, noninfringement of third party rights and fitness for a particular purpose. Neither the developers nor the distributors shall be liable for damages, whether direct, indirect, special, incidental, or consequential, as a result of the reproduction, modification, distribution, or other use of the TWAIN Toolkit.
NOTICE TO U.S. GOVERNMENT USERS: RESTRICTED RIGHTS COMMERCIAL COMPUTER SOFTWARE: Use, duplication, or disclosure by the Government is subject to restrictions as set forth in subparagraph (c) (1) (ii) of the Rights in Technical Data Clause at DFARS 52.227-7013.
Material scanned by this product may be protected by governmental laws and other regulations, such as copyright laws. The customer is solely responsible for complying with all such laws and regulations.
product restricted material
This HP product contains the following materials that might require special handling at end-of-life:
•mercury in the scanner fluorescent lamp and transparent materials adapter (< 5 mg)
•lead in solder
For recycling information, contact www.hp.com/go/recycle, your local authorities, or the Electronic Industries Alliance at www.eiae.org.
For information about HP’s environmental stewardship program, see environmental stewardship program on page 21. For product warranty information see hewlettpackard limited warranty statement on page 20.

contents
how to use the scanner . . . . . . . . . . . . . . . . . . . . . . . . . . . . . .1 scanner parts and accessories. . . . . . . . . . . . . . . . . . . . . . . . .1 front panel and accessories overview . . . . . . . . . . . . . . . . . . . .1 scanning overview . . . . . . . . . . . . . . . . . . . . . . . . . . . . . . . . .4 scan pictures and documents. . . . . . . . . . . . . . . . . . . . . . . . . .5 print copies. . . . . . . . . . . . . . . . . . . . . . . . . . . . . . . . . . . . . .5 share a scanned picture using HP Instant Share . . . . . . . . . . . . .6 create a picture show and save it on CD. . . . . . . . . . . . . . . . . .6 use the power save button. . . . . . . . . . . . . . . . . . . . . . . . . . . .7 cancel a scan . . . . . . . . . . . . . . . . . . . . . . . . . . . . . . . . . . . .7 change settings . . . . . . . . . . . . . . . . . . . . . . . . . . . . . . . . . . .7 e-mail a scanned picture. . . . . . . . . . . . . . . . . . . . . . . . . . . . .8 scan text for editing . . . . . . . . . . . . . . . . . . . . . . . . . . . . . . . .8 scan pictures from the automatic photo feeder (APF) . . . . . . . . . .8 care and maintenance . . . . . . . . . . . . . . . . . . . . . . . . . . . . . .9
how to scan slides and negatives. . . . . . . . . . . . . . . . . . . . . .10 set up the TMA . . . . . . . . . . . . . . . . . . . . . . . . . . . . . . . . . .10 scan slides . . . . . . . . . . . . . . . . . . . . . . . . . . . . . . . . . . . . .11 scan negatives . . . . . . . . . . . . . . . . . . . . . . . . . . . . . . . . . .12 adjust an image when scanning with the TMA. . . . . . . . . . . . .14 resolve issues with the transparent materials adapter (TMA) . . . .14 resolve issues with slides and negatives. . . . . . . . . . . . . . . . . .15 clean the transparent materials adapter (TMA). . . . . . . . . . . . .16
troubleshooting. . . . . . . . . . . . . . . . . . . . . . . . . . . . . . . . . . .17 scanner installation or setup problems . . . . . . . . . . . . . . . . . .17 scanner initialization and hardware problems . . . . . . . . . . . . .18 scanner has stopped working properly . . . . . . . . . . . . . . . . . .19 additional troubleshooting information . . . . . . . . . . . . . . . . . .19
warranty . . . . . . . . . . . . . . . . . . . . . . . . . . . . . . . . . . . . . . .20 hewlett-packard limited warranty statement . . . . . . . . . . . . . . .20 regulatory information . . . . . . . . . . . . . . . . . . . . . . . . . . . . .21 environmental stewardship program . . . . . . . . . . . . . . . . . . . .21
product support . . . . . . . . . . . . . . . . . . . . . . . . . . . . . . . . . .23 accessibility website . . . . . . . . . . . . . . . . . . . . . . . . . . . . . . 23 hp scanjet website . . . . . . . . . . . . . . . . . . . . . . . . . . . . . . . . 23 support process . . . . . . . . . . . . . . . . . . . . . . . . . . . . . . . . . . 23 upgraded warranty options. . . . . . . . . . . . . . . . . . . . . . . . . . 27
product specifications and options . . . . . . . . . . . . . . . . . . . . .28 scanner specifications . . . . . . . . . . . . . . . . . . . . . . . . . . . . . 28 transparent materials adapter (TMA) specifications . . . . . . . . . . 28 automatic photo feeder (APF) specifications. . . . . . . . . . . . . . . 29 environmental specifications for the scanner, APF, and TMA. . . . 29
iii
1 how to use the scanner
This manual describes the operation of the HP Scanjet 5530 scanner, including installation problems, customer support, and how to use the scanner.
For installation procedures, see the Setup Poster. For scanning software procedures, see the HP Photo & Imaging software Help.
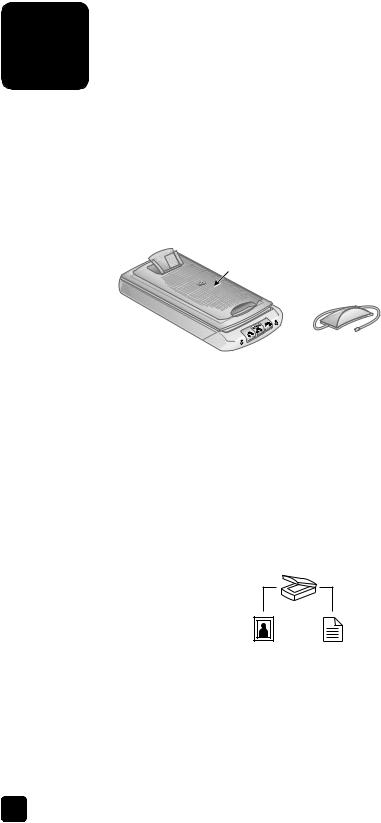
scanner parts and accessories
3
2 
1
1Scanner
2Transparent materials adapter (TMA) for scanning 35 mm slides and negatives
3Automatic photo feeder (APF) for quickly scanning pictures (in the lid)
front panel and accessories overview
SCAN buttons
Press SCAN PICTURE if you are scanning a printed picture, graphic, slide, or negative. Press SCAN DOCUMENT if you are scanning text, both text and graphics, or any text that you want to edit later.
SCAN PICTURE
Scans pictures on the scanner glass, from the automatic photo feeder (APF), or a slide or negative from the transparent materials adapter (TMA).
SCAN DOCUMENT
Scans a document from the glass to a selected destination (an application, such as a word processor).
1

how to use the scanner
COPY buttons
Use the COLOR COPY button to print color copies, and the BLACK & WHITE COPY button to print black and white copies. Both buttons start the HP Copying software, scan the original, and send the scanned image to the default printer. Select the number of copies and whether the item should be scanned in color or black and white before pressing one of the COPY buttons.
COLOR COPY
Prints a color copy of the original.
BLACK & WHITE COPY
Prints a black and white copy of the original.
# OF COPIES button
Use the # OF COPIES button to select the number of copies to be printed before pressing either the COLOR COPY or the BLACK & WHITE COPY buttons. The number of copies appears in the front panel display.
user’s manual |
2 |

chapter 1
SHARE buttons
Use the HP INSTANT SHARE button to share scanned pictures with family and friends. Use the MEMORIES DISC CREATOR button to create personalized picture shows on a CD or DVD with music and titles. Both buttons scan an original from the glass,a stack of photos from the automatic photo feeder (APF), or slides and negatives from the transparent materials adapter (TMA).
HP INSTANT SHARE
Scans the picture and enables you to share it in e-mail, create an album on the HP Photo website, or order high-quality prints. (Not all services are available in all locations or for all operating systems.)
MEMORIES DISC CREATOR
Scans the pictures to the Memories Disc Creator software, where you can create a picture show on a CD or DVD (to view on your TV), along with background music and titles.
POWER SAVE button
When you press the POWER SAVE button, the scanner lamp, the small indicator lights, and the LCD turn off, and the scanner lamp returns to its starting position. To use the scanner again, press any button on the front panel of the scanner or start a scan from the computer. After a short warm-up cycle, the scan begins.
Power Save
CANCEL button
Cancels a scan in progress.
CANCEL
3 |
hp scanjet 5530 digital flatbed scanner |

how to use the scanner
automatic photo feeder (APF)
The HP Scanjet 5530 scanner has an automatic photo feeder (APF), which allows you to scan multiple pictures quickly and easily.
For more information about the APF, see scan pictures from the automatic photo feeder (APF) in this manual, and in the online help.
transparent materials adapter (TMA)
You can use the transparent materials adapter (TMA) to scan 35 mm slides or negatives.
For more information about the TMA, refer to how to scan slides and negatives in this manual and to the online Help.
scanning overview
You can start scanning in one of three ways:
•scan from the scanner's front panel buttons
•scan from the hp director
•scan from other applications
Note: Macintosh users, see the HP Photo & Imaging software Help for information about scanning procedures.
scan from the scanner's front panel buttons
The front panel buttons on the scanner provide shortcuts to frequently used scanning functions, such as scanning documents and pictures. Descriptions for using the front panel buttons are located in this manual.
scan from the hp director
Scan from the HP Photo & Imaging Director (HP Director) when you want more control over your scan, such as when you want to preview the image before the final scan.
To start the HP Photo & Imaging software, double-click the HP Director icon (  ) on the desktop. The HP Director window appears. From this window you can scan, view, or print images, use online Help, and more.
If the HP Director icon is not on the desktop, on the Start menu, point to Programs or All Programs, point to Hewlett-Packard, point to the name of your scanner or to Scanners, and then click HP Photo & Imaging Director.
scan from other applications
You can bring an image directly into an open file in one of your applications if the application is TWAIN-compliant. Generally, the application is compliant if it has an option such as Acquire, Scan, or Import New Object. If you are unsure whether the application is compliant or what the option is, see the documentation for that application.
user’s manual |
4 |

chapter 1
scan pictures and documents
Press SCAN PICTURE if you are scanning a picture, graphic, slide, or negative from the scanner glass, the automatic photo feeder (APF) or transparent materials adapter (TMA. Press SCAN DOCUMENT if you are scanning text, both text and graphics, or any text that you want to edit later.
Note: Macintosh users, see the HP Photo & Imaging software Help for information about scanning procedures.
1Place the original face down on the scanner glass as indicated by the reference marks on the scanner.
2Press the SCAN PICTURE button or the SCAN DOCUMENT button.
3If necessary, follow the instructions on the screen to finish scanning.
Scanned documents appear in the specified destination. Scanned pictures appear in the HP Photo & Imaging Gallery.
Note: By default, the software does not prompt you to preview the picture or document when you use the SCAN PICTURE or SCAN DOCUMENT buttons on the scanner. If you want to preview the item, either change the button settings in the HP Director (see change settings on page 7), or begin the scan from the HP Director instead of the buttons on the front of the scanner.
Tip: The HP Scanning software can automatically correct your pictures or restore faded colors in old pictures. To turn picture correction on or off, select Automatically Correct Photos in the Basic menu of the HP Scanning software, then choose the options you want.
print copies
Use the COLOR COPY button ( 
 ) or BLACK & WHITE COPY button(
 ) to scan an original and send it directly to a printer to make color or black and white copies.
Note: Macintosh users, see the HP Photo & Imaging software Help for information about copying procedures.
1Place the original face down on the scanner glass and close the lid.
2Press either the COLOR COPY or BLACK & WHITE COPY button on the scanner. A progress dialog box shows the copy progress.
Note: To change any copy settings, such as size, darkness, or the printer, click Cancel in the Copy in Progress dialog box. The HP Copying dialog box appears, where you can change settings.
You can also make copies by accessing the HP Copying software from the HP Director. For more information, see the HP Photo & Imaging software Help.
5 |
hp scanjet 5530 digital flatbed scanner |
how to use the scanner
share a scanned picture using HP Instant Share
Use the HP INSTANT SHARE button (

 ) on the front of the scanner to share scanned pictures with family and friends. You can easily 1) send someone an e- mail with thumbnails and links to your pictures stored on a secure HP website – no more attachments; 2) upload pictures to the HP Photo website to create online picture albums; or 3) order professional-quality prints from an HP partner web site. (Not all services are available in all regions or for all operating systems.)
You must be connected to the Internet to use HP Instant Share.
Note: Macintosh users, see the HP Photo & Imaging software Help for information about using the HP INSTANT SHARE button.
Note: Use the HP INSTANT SHARE button to scan and share only pictures. If you want to scan and share a document, use the SCAN DOCUMENT (  ) button on the scanner.
1Place the original face down on the scanner glass as indicated by the reference marks on the scanner.
2Press the HP INSTANT SHARE button (

 ) on the front of the scanner to start the scan.
3A dialog box appears, asking if you want to scan another image. Follow the instructions on the screen.
4All your scanned pictures are sent to the HP Instant Share software. Follow the instructions on the screen to share your scanned picture.
Note: By default, the software does not prompt you to preview the picture when you use the HP INSTANT SHARE button on the scanner. If you want to preview the picture, use the HP Director instead of the HP INSTANT SHARE button on the scanner.
You can also use the HP INSTANT SHARE button to scan pictures from the automatic photo feeder (APF), and 35 mm slides or negatives from the transparent materials adapter (TMA).
You can also access HP Instant Share using the software. For more information, see the HP Photo & Imaging software Help.
create a picture show and save it on CD
Use the MEMORIES DISC CREATOR button (  ) on the front panel of your HP scanner to create personalized picture shows on a CD or DVD with music and titles. Then you can watch the picture show on your television using a compatible digital versatile disc (DVD) or video compact disc (VCD) player. You can also make picture reprints from the CD. (You must have an Intel® Pentium II processor or above, 700MB of free disk space, a read/write CD-ROM drive and writable CDs to use Memories Disc Creator.)
1Place the original face down on the scanner glass as indicated by the reference marks on the scanner, and close the lid.
2Press the MEMORIES DISC CREATOR button (  ) on the scanner. Select whether you are scanning from the scanner glass or from the transparent materials adapter (TMA), then click Scan.
user’s manual |
6 |

chapter 1
3A dialog box appears, asking if you want to scan another image. Follow the instructions on the screen.
4Place another original on the glass, close the lid, click Accept, and follow the instructions on the screen.
Note: You can also use the MEMORIES DISC CREATOR button to scan pictures from the APF, and to scan 35 mm slides or negatives from the TMA. For more information about using the TMA, see how to scan slides and negatives in this manual.
You can also create a memories disc by using the software. For more information, see the HP Photo & Imaging software Help.
use the power save button
The scanner lamp turns off automatically after approximately 15 minutes. However, you may want to manually turn off the lamp when you have finished using the scanner.
To turn off the scanner lamp and put the scanner in low-power mode, press the POWER SAVE button (  ).
).
To use the scanner again, start a scan either from a button on the front panel or from the HP Director. After a short warm-up cycle, the scan begins.
cancel a scan
The CANCEL button (  ) cancels the scan in progress. When you press the CANCEL button during the scan, the lamp returns to its starting position.
change settings
You can customize some features of the HP Scanjet scanner, including the front panel button settings, previewing of images, and other preferences.
change settings from the hp director
When you use the scanner buttons or the HP Photo & Imaging Director (HP Director) software, the scanner uses settings optimized for the scanned original type, such as a picture. You can change all scan settings from the Settings menu in the HP Director, including button settings, scanning preferences, and other settings. To change settings, start the HP Director, and then click Settings.
turn preview image on or off
Note: Macintosh users, see the HP Photo & Imaging software Help for information about turning preview on or off.
You can change whether a preview image appears or does not appear. To change this setting, start the HP Photo & Imaging Director (HP Director), and then click Settings. Click Scan Preferences, and then go to the Preview tab. For more information, see the HP Photo & Imaging software Help.
7 |
hp scanjet 5530 digital flatbed scanner |
 Loading...