


 Loading...
Voyager™ XP 1472g Series
Cordless Area-Imaging Scanner
Quick Start Guide
VG1472-EN-QS-01 Rev A
6/19
Note: Refer to your user’s guide for information about cleaning your device.
For localized language versions of this document, go to www.honeywellaidc.com.
Getting Started
Turn off the computer’s power before connecting the base, then power up the computer once the base is fully connected. When the base is connected and powered up, put the scanner in the base to establish a link. The green LED on the base flashes to indicate the scanner’s battery is charging.
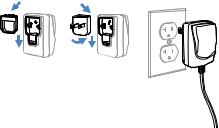
Power Supply Assembly (if included)
Note: The power supply must be ordered separately, if needed.
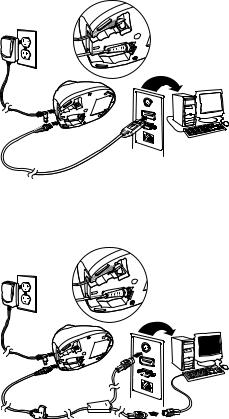
USB Connection:
Keyboard Wedge Connection:

RS232 Serial Port Connection:
RS485 Connection:

Reading Techniques
The view finder projects an aiming dot that should be centered over the bar code, but it can be positioned in any direction for a good read.
Hold the scanner over the bar code, pull the trigger, and center the aiming dot on the bar code.
The aiming dot is smaller when the scanner is closer to the code
and larger when it is farther from the code. Hold the scanner close to smaller bar codes, and farther away from large bar codes to get a proper read.
If the bar code is highly reflective (e.g., laminated), you may need to tilt the scanner at an angle so the bar code can be scanned.
Note: If the scanner razzes when scanning a bar code, the link has not been established. If the scanner beeps once, the link has been established.
Standard Product Defaults
The following bar code resets all standard product default settings.
Standard Product
Note: PDF and 2D bar codes can only be read by Voyager model
1472g2D and cannot be read by model 1472g1D.
Loading...