Honeywell HCM 100 Operation Manual
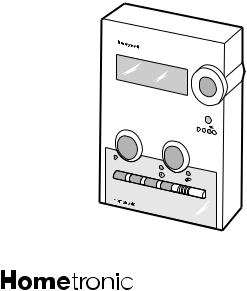
eco
Kommen |
gehen |
|
|
|
urlaub |
|
|
|
|
party |
|
|
|
|
2SHUDWLQJ LQVWUXFWLRQV +&0 FHQWUDO FRQWURO XQLW

7$%/( 2) &217(176
7$%/( 2) &217(176
$%287 7+(6( 23(5$7,1* ,16758&7,216
7+( +20(7521,& 6<67(0 |
|
System components ................................................................... |
5 |
How your Hometronic works ....................................................... |
6 |
23(5$7,21 |
|
User controls............................................................................... |
9 |
Operating example: Setting the date and time .......................... |
10 |
Automatic operation .................................................................. |
13 |
Manual operation ...................................................................... |
16 |
Economy mode ......................................................................... |
18 |
Lifestyles ................................................................................... |
19 |
Locking Hometronic .................................................................. |
23 |
6(77,1* 83 7,0( 352*5$06 |
|
Changing switching points ........................................................ |
28 |
Deleting switching points .......................................................... |
29 |
Inserting switching points .......................................................... |
32 |
Copying switching points .......................................................... |
33 |
Operating example: time programs ........................................... |
35 |
|
|

Table of contents |
|
6(77,1* 83 /,)(67</(6 |
|
Activating lifestyles ................................................................... |
38 |
Changing lifestyles ................................................................... |
39 |
Adding new lifestyles ................................................................ |
45 |
6(77,1*6 |
|
Installation and de-installation .................................................. |
48 |
Daylight saving time.................................................................. |
48 |
PARAMETER............................................................................ |
50 |
Changing lifestyle names and room names ............................. |
51 |
Saving and getting settings ...................................................... |
55 |
Factory settings ........................................................................ |
58 |
LCD contrast............................................................................. |
59 |
Service area.............................................................................. |
59 |
&+$1*,1* 7+( %$77(5,(6
+(/3 :,7+ 352%/(06
23(5$7,1* 29(59,(:

$%287 7+(6( 23(5$7,1* ,16758&7,216
The Hometronic system is a modern system which allows you to individually regulate the temperature in your home. Hometronic provides you with many functions which you can use to tailor this control to your individual requirements.
If you wish to make fullest use of the functionality of Hometronic we recommend you read through these instructions in this order:
•The section entitled THE HOMETRONIC SYSTEM describes how the Hometronic system is organized and how it individually regulates the temperatures of the individual rooms.
•The section entitled OPERATION describes how you can switch between different operating modes and how you can make basic inputs.
•The section entitled SETTING UP TIME PROGRAMS describes how you can define the time programs which the Hometronic follows when regulating room temperatures in automatic operation.
•The section entitled SETTING UP LIFESTYLES describes how you can adapt existing lifestyles to your personal requirements and set up new lifestyles.
•The section entitled SETTINGS describes how you can change basic parameters, such as, for example, the contrast of the display.
It also explains how you can store your personal settings.
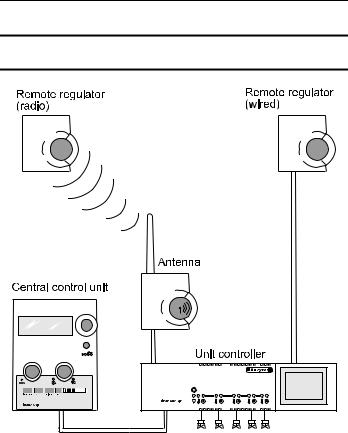
The Hometronic System
7+( +20(7521,& 6<67(0
)LJ &RPSRQHQWV RI WKH +RPHWURQLF V\VWHP
6\VWHP FRPSRQHQWV
The Hometronic system consists of:
•Central control unit
•Remote regulators
•Unit controllers
&HQWUDO FRQWURO XQLW
The Hometronic Manager is the input unit of the Hometronic system. With the central control unit you can define how the temperatures in your home are to be controlled.
Various operating modes, such as automatic and manual mode, economy mode or special lifestyles allow you to adapt the Hometronic system to your own personal requirements.
5HPRWH UHJXODWRUV
Remote regulators are installed in the individual rooms. The remote regulators report the current room temperatures to the unit controllers.
In addition you can also use the regulator wheels of the remote regulators to change the room temperatures on the fly. Changes made at a remote regulator always relate to the temperature preset by the central control unit: what you do is specify upward or downward temperature deviations. The current setting of the remote regulator is not displayed on the control unit.

The Hometronic System
8QLW FRQWUROOHUV
The unit controller is the interface between the Hometronic Manager, the remote regulators and the heating. From the settings you have specified at the central control unit and from the temperature reports sent by the remote regulators the unit controller determines what heating is required for the individual rooms.
+RZ \RXU +RPHWURQLF ZRUNV
Under automatic operation, Hometronic controls all rooms on the basis of preset time programs. You can set up an individual time program for each room.
A time program consists of switching points and temperature setpoint values which tell Hometronic at what time which temperature should be set.
You can input different switching points and temperature setpoint values for the individual rooms – this gives you great flexibility in adapting the time programs to your particular requirements.
([DPSOH
You input the following 3 switching points and temperature setpoint values for the living room for Mondays:
•6:00 hours: 20 °C
•17:00 hours: 22 °C
•22:00 hours: 16 °C

With these 3 inputs you have arranged for Hometronic to regulate the temperatures in the living room every Monday in this way:
•from 6:00 to 17:00 hours the temperature will be kept at 20 °C
•from 17:00 to 22:00 hours the temperature will be kept at 22 °C
•from 22:00 hours the temperature will be kept at 16 °C (up until the first switching point on Tuesday).
Hometronic makes it easy for you to quickly prepare and enter the time programs which the system uses (see the ” Setting up time programs” section).

Operation
23(5$7,21
The simplest way of learning to operate Hometronic is to familiarize yourself with the controls and then work your way through the following operating example.
Display |
Input button |
(turn/press) |
Return button |
ECONOMY button |
Auto/Manual button |
Lifestyle buttons |

8VHU FRQWUROV
•The GLVSOD\ provides you with information about the setpoint values and you can see the settings you have made in time programs, for example.
•With the LQSXW EXWWRQ you can make your settings. The input button can be pressed and turned:
–3UHVVLQJ activates the cursor (a flashing rectangle in the display) or confirms inputs.
–7XUQLQJ moves the cursor within the display or changes names and numbers.
•If you press the UHWXUQ EXWWRQ this takes you back one level in the menus. All changes will then be discarded unless you have already confirmed them with the input button.
•With the HFRQRP\ EXWWRQ you can lower the room temperature in all rooms by a configurable amount.
•The $XWR PDQXDO EXWWRQ is used for switching between automatic and manual modes.
•The OLIHVW\OH buttons are used for activating the individual lifestyles directly.

Operation
2SHUDWLQJ H[DPSOH 6HWWLQJ WKH GDWH DQG WLPH
You can actively work through this example with the central control unit. In that way you will quickly get accustomed to using it. The actions you perform in this example are typical and will be used again and again.
Before you use the central control unit for the first time you will see the following main menu in the display:
Please check the
time |
|
|
SU |
27.4.1997 |
16:27 |
No |
lifestyle active |
|
LIVING |
22.0 °C |
|
Note:
If the clock has already been set during the installation phase the first line will read: HOMETRONIC.
1.If you do not see the main menu in the display, press (possibly several times) the return button until the main menu appears.
2.Press the input button.
The cursor (a blinking rectangle) will appear at the bottom right-hand corner.
When the cursor is EOLQNLQJ you can select words or numbers in the display.

Right now you will see that the temperature is selected :
22.0°C.
3.Turn the input button slowly clockwise and then anticlockwise.
The cursor moves up and then down again. As you do this, help texts are displayed on each line.
4.Move the cursor to the 2nd line and the date. The help text reads Setting date/time.
5.Press the input button.
Hometronic displays the ”Date and time” submenu:
DATE: |
27.04.1997 |
TIME: |
17:19 |
6.Turn the input button clockwise and then anti-clockwise.
In this way you can use the cursor to select the day, month, year number, hour and minute.
7.Select the day.
In the display the cursor blinks over the 27.
8.Press on the input button.
The day is underlined: 27.04.1997.
When a value is XQGHUOLQHG you can change it by turning the input button.

Operation
8.Enter today’s date and press the input button.
The day is now set, the cursor is blinking over the month 04.
9.Repeat these steps to set month, year, hour and minute.
10.Press the input button to confirm the change to the last value as well.
11.Use the return button to quit the submenu. You are now returned to the main menu.
The date and time are now set.
The message Please check the time on the first line has disappeared and in its place is HOMETRONIC.
Note:
You can undo your changes at any time by pressing the return button instead of pressing the input button to confirm them.
$XWRPDWLF RSHUDWLRQ
Automatic operation is the default operating mode of the Hometronic system.
When in automatic mode, Hometronic controls the room temperatures of the individual rooms as specified by the settings in the time programs (in this connection see the section ”How your Hometronic works” on Page 6). For information on configuring the time programs to your personal requirements, please refer to the section ”Setting up time programs” on
Page 24.
5HDGLQJ DQG FKDQJLQJ WHPSHUDWXUHV
Under automatic operation you can display the room temperatures of all rooms at the central control unit and change them.
Your changes will only remain in force until the next switching point of the time program.

Operation
To display the room temperature setpoint values proceed as follows:
1. Start at the main menu:
HOMETRONIC |
|
|
SU |
27.4.1997 |
16:27 |
No |
lifestyle active |
|
LIVING |
20.0 °C |
|
2. Turn the input button one click anti-clockwise each time.
At the bottom left-hand corner you will see the room names which have been installed for your home.
At the bottom right-hand corner the corresponding room temperature setpoint value for each room is displayed.
3.Turn the input button clockwise to return to the room name first displayed.
To change the temperature of a room:
1.In the main menu use the input button to select a room name, for example LIVING.
In the display you will see:

|
|
|
|
|
|
|
|
|
|
|
|
|
|
|
|
|
|
|
|
|
|
|
|
|
|
|
|
HOMETRONIC |
|
|
|
|
|
|
|
|
SU |
27.4.1997 |
16:27 |
|
|
|
|
|
|
No |
lifestyle active |
|
|
|
|
|
|
|
LIVING |
20.0°C |
|
|
|
|
|
|
2.Press the input button.
You will see the cursor blinking at bottom right.
3.Press the input button again.
The figure immediately following the decimal point of the temperature next to LIVING is now underlined:
20.0°C.
4.Increase the temperature by turning the input button to
22.0 °C.
5.Press the input button.
In the display you will see:
HOMETRONIC |
|
|
SU |
27.4.1997 |
16:27 |
No |
lifestyle active |
|
LIVING |
22.0°C |
|
The temperature change has been accepted.
Hometronic increases the temperature of the LIVING room to 22 °C.
Operation
0DQXDO RSHUDWLRQ
In manual mode the time programs are disabled and instead you input the room temperature setpoint values for each room manually.
In contrast to temperature changes made under automatic operation your settings will remain in force until you change back to automatic operation.
6ZLWFKLQJ EHWZHHQ DXWRPDWLF DQG PDQXDO PRGHV
–Press the auto/manual button.
The yellow LED for automatic operation goes out and the red LED for manual mode comes on.
All room temperature setpoint values are reset to the basic temperatures for manual mode (factory setting: 20 °C).
–Press the auto/manual button again.
The red LED goes out and the yellow LED comes on.
All of the room temperature setpoint values are now once more controlled by the time programs.
Note:
The basic temperature for manual mode (factory
setting: 20 °C) can be defined in the PARAMETER menu (see the 6(77,1*6” section ).
&KDQJLQJ URRP WHPSHUDWXUHV
You can change the room temperature setpoint values in manual mode in precisely the same way as in automatic operation.
1.In the main menu select a room name whose temperature you wish to change, for example LIVING.
In the display you will see:
HOMETRONIC |
|
SU 27.4.1997 |
16:27 |
No lifestyle active
LIVING 20.0°C
2.Press the input button twice.
A line appears beneath the temperature ( 22.0°C).
3.Enter the new temperature and press the input button.
4.Set the temperatures of the other rooms in precisely the same way.

Operation
(FRQRP\ PRGH
With the economy button of the Hometronic Manager you can quickly lower the temperature in all rooms.
–You can put Hometronic into economy mode by pressing the economy button.
The green LED on the left of the economy button comes on.
The temperature is lowered in all rooms by a preconfigurable temperature value (ECONOMY reduction value). Rooms whose setpoint room temperatures are actually below the ECONOMY threshold value will not be affected by this temperature reduction.
–You can cancel this reduction of the room temperatures by pressing the economy button again.
The green LED on the left of the economy button goes out again.
In all of the rooms the room setpoint temperatures are restored.
Note:
The economy temperature reduction value (factory setting: 3 °C) and the economy threshold value (factory
setting: 17 °C) can be defined in the PARAMETER menu (see the ”6(77,1*6” section).

/LIHVW\OHV
With LIFESTYLES you can control the temperatures of certain rooms to a different plan than that defined in the time programs. You can also specify for how long this special program should apply.
A typical example is YDFDWLRQ:
While you are away on vacation you wish the temperature in all rooms to be lowered, to 12° C, for example, with the exception of one room in which you keep delicate plants.
You do not need to manually specify this temperature reduction every time you are about to go on vacation - instead you can use the ”Vacation” lifestyle. You only need define these temperature changes RQFH; thereafter simply press the corresponding lifestyle button!
When you activate the lifestyle you can also specify for how long it should apply. You can specify to the very minute the time when the normal time program should come back into force. This means that when you return from your vacation you will find a warm home waiting for you. That is especially welcome in winter!
 Loading...