


Honeywell HCM-6013, HCM-6012I-CST, HCM-6011, HCM-6011WW, HCM-6012 User Manual
...OWNER’S MANUAL
Console Humidifiers with Air Washing Technology
MODELS:
HCM-6009 HCM-6009-TGT HCM-6010-CST HCM-6011
HCM-6012 HCM-6012I-CST HCM-6013 HCM-6011WW
The Honeywell trademark is used by Kaz, Inc. under license from Honeywell International Inc. Honeywell International Inc. makes no representation or warranties with respect to this product.

IMPORTANT SAFETY INSTRUCTIONS
READ AND SAVE THESE SAFETY INSTRUCTIONS BEFORE USING THIS HUMIDIFIER
When using electrical appliances, basic precautions should always be followed to reduce the risk of fire, electric shock, and injury to persons, including the following:
1.Always place this humidifier on a firm, flat and level surface. This humidifier may not work properly on an uneven surface.
2.Place this humidifier in an area where it is not accessible to children.
3.Do not place the humidifier near any heat sources such as stoves, radiators, and heaters.
4.Do not use the humidifier outdoors.
5.Before using the humidifier, check the power cord for any signs of damage. If the cord is found to be damaged, DO NOT USE and return the humidifier to the manufacturer under the warranty agreement for repair.
6.This appliance has a polarized plug (one blade is wider than the other). To reduce the risk of shock, this plug is intended to fit only one way in a polarized outlet. If the plug does not fit securely in the outlet, reverse the plug. If it still does not fit, contact a qualified electrician. DO NOT attempt to defeat this safety feature.
7.To disconnect the humidifier, first turn controls to the OFF position, then grip the plug and pull it from the wall outlet. Never pull by the cord.
8.A loose fit between the AC outlet (receptacle) and plug may cause overheating and a distortion of the plug. Contact a qualified electrician to replace loose or worn outlet.
9.The humidifier should always be unplugged and emptied when not in operation or while being serviced or cleaned.
10.Never tilt or attempt to move the humidifier while it is operating or filled with water. UNPLUG the humidifier before moving.
11.This humidifier requires regular cleaning. Refer to the CLEANING instructions provided. Never clean the humidifier in any manner other than as instructed in this manual.
12.Do not direct moisture flow directly at individuals, walls or furniture.
13.When a humidifier is used in a closed room or small rooms, check periodically for proper ventilation, as excessive humidity can cause condensation stains on walls.
14.Turn the humidifier OFF if you notice moisture on the inside of your windows. For proper humidity reading use a hygrometer, which is available in many hardware and department stores, or by ordering one from the manufacturer.
15.This product is intended for residential use only.
2

Introduction
H O W D O E S I T W O R K ?
 COOL MOISTURE SYSTEM:
Dry air is pulled through the humidifier and the QuietCare™ fan blows out invisible, moisture-balanced air. Unwanted minerals and bacteria from the water are trapped inside the Filter. When the unit is running you will not see or feel a “mist”. You will know your humidifier is putting moisture into the air as you watch the water level in your tank decrease throughout the day.
AIR WASHING PRE FILTER:
The Filter in your humidifier also includes a specially formulated “pre-filter” which helps capture some dust, dirt, pollen and other small particles that pass through the filter.
Protec™ Treated Filter: Your filter has been treated with Protec™ which helps prevent surface growth and migration of mold, mildew, algae, fungus and odor-causing bacteria in the filter for its life – approximately 1-3 months**. Keep in mind, depending on your water quality, mineral deposits can still clog or discolor the filter, affecting its life and that of the humidifier.
**The agent contained in this product is intended to prolong filter life only by inhibiting the growth of unsightly mold, mildew and algae, as well as controlling odor from odor-causing bacteria. The filter does not protect users or others against bacteria, viruses, germs or other disease-causing organisms. Always follow the humidifier manufacturer’s instructions regarding cleaning, maintenance and servicing of your humidifier.
3

Your Humidifier
Water Tank
Motor
Housing
Water Tank
Filter
Pre-Filter |
Tank Cap |
|
Base
Casters
Set-Up
NOTE: We recommend that the humidifier be disinfected prior to first use. Please see CLEANING INSTRUCTIONS.
Select a firm, level, flat location - at least six inches (15 cm) from any wall for proper air flow. Place the humidifier on a water-resistant surface, as water can damage furniture and some flooring.
Kaz will not accept responsibility for property damage caused by water spillage.
Install Casters:
•Make sure the humidifier is unplugged and in the OFF position.
•Turn the Base of the humidifier upside down.
•Push the wheels into each wheel base pin until you hear them snap into position (Fig.1).
NOTE: Save your box for end of season storage (See End of Season Care and Storage Section).
Fig. 1 |
4
Filling
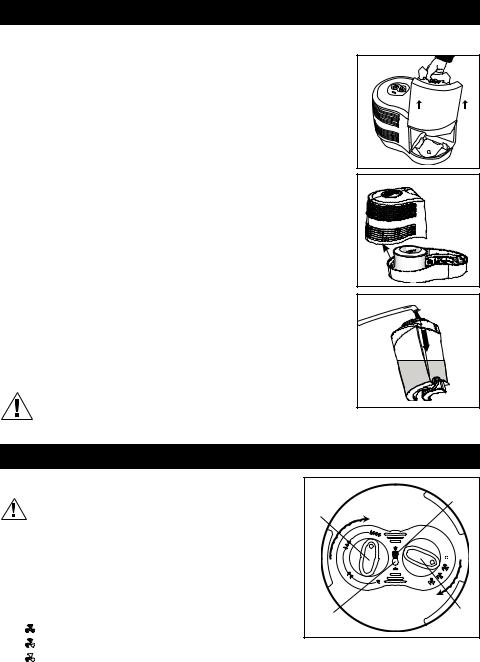
• Remove the Water Tanks by grasping the handle and pulling straight up. Set aside (Fig. 2).
• Lift up on the Motor Housing to remove and set aside (Fig. 3). Remove the |
Fig. 2 |
|
Filter from the Base before filling the unit with water. Soak the Filter in a |
||
|
||
sink full of cool water to help reduce mineral buildup and place back in the |
|
|
humidifier while wet. DO NOT SQUEEZE OR WRING OUT THE FILTER. To |
|
|
help extend the life of your Filter, repeat this step each time you fill your |
|
|
humidifier. |
|
•Turn the Water Tank upside down so that the Fill Cap is facing up; unscrew the Fill Cap by turning it counter-clockwise  and set aside.
•Fill each Water Tank with COOL tap water (Fig. 4). Distilled water is not necessary as the water is filtered by the Filter. DO NOT USE HOT WATER. Doing so may damage the humidifier.
•Replace the Fill Cap by turning it clockwise  . DO NOT OVER-TIGHTEN. Turn the Water Tank right-side up.
NOTE: When carrying the filled Water Tank please use the handle and place your other hand under the tank for additional support. Carry only one at a time.
•Place the Motor Housing back into the Base.
•Position each Water Tank in the humidifier and push into place. Some water will empty into the Base. Note: The tanks do not drain simultaneously, one tank will drain before the other.
•Once the filled tanks have been positioned, do not attempt to move the humidifier. If it has to be moved, unplug the humidifier and remove the Water Tanks first.
CAUTION: DO NOT POUR WATER INTO THE GRILLE IN THE FRONT OF THE HUMIDIFIER. DOING SO MAY DAMAGE THE HUMIDIFIER OR CAUSE PERSONAL INJURY.
Fig. 3 |
Fig. 4
Manual Control Operation (Models HCM-6009, HCM-6011, HCM-6011WW)
P O W E R |
Fig. 5 |
Power Light |
CAUTION: DO NOT PLUG IN THE HUMIDIFIER WITH WET |
|
(Illuminated) |
Humidistat |
|
|
Knob |
|
|
HANDS AS AN ELECTRICAL SHOCK COULD OCCUR. |
|
|
|
|
• With the power switch in the OFF position, plug the filled humidifier into a polarized 120V outlet.
DO NOT FORCE THE POLARIZED PLUG INTO THE OUTLET; it will only fit one way.
O U T P U T / F A N S P E E D C O N T R O L |
Desired |
|
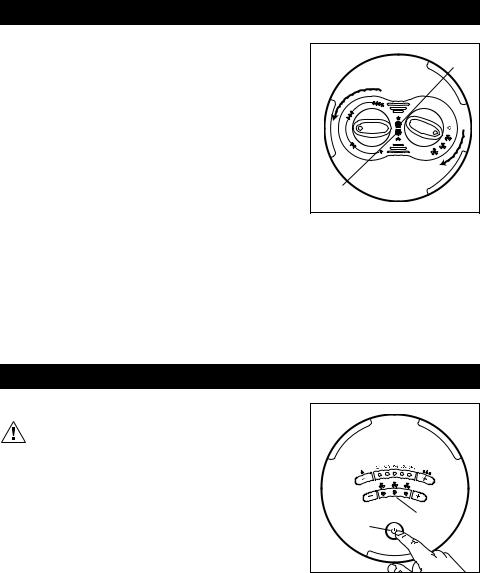
Set the fan speed to the desired position (Fig. 5). |
Humidity |
Fan Speed |
Light |
||
HIGH: For fast humidifying |
|
Knob |
|
|
|
MED: For everyday moisture control |
|
|
LOW: For minimum operation (ideal for nighttime use, or when silent operation is needed) |
|
|
NOTE: Turn the humidifier off if the humidity level feels too moist or you notice condensation forming on the walls.
5
Manual Control Operation (Models HCM-6009, HCM-6009-TGT, HCM-6011, HCM-6011WW) (Continued)
H U M I D I S T A T
The humidistat allows you to adjust and select the humidity level to your personal preference. Your humidifier will turn on and off throughout the day and night to maintain the desired humidity level you have selected.
H O W T O S E T T H E H U M I D I S T A T
First, turn the humidifier on and select your output/speed level.
Set the humidistat on High by turning the knob clockwise  to the end (Fig. 5).
•Let the humidifier run on high for a least one hour or until your room has reached a comfortable humidity level.
Fig. 6
Desired
Humidity Light
(Illuminated)
Power Light (Illuminated)
•At this point, slowly turn your Humidistat knob counter-clockwise  until the humidifier shuts off and the Desired Humidity light illuminates (Fig. 6).
•Now that your Humidistat knob is set, the humidifier will automatically turn back on when your room drops below your comfort setting and will automatically turn off again when the setting is reached.
NOTE: If the humidifier fan will not start or restart when you select a fan speed, the Advanced Mist™ Humidistat may be set too low. Turn the dial clockwise  to the end (Fig. 5). The Desired Humidity light will turn Off when the unit is producing moisture. When the Desired Humidity light turns ON, you have reached optimal humidity.
EasySet™ Control Operation (Model HCM-6013i)
P O W E R
CAUTION: DO NOT PLUG IN THE HUMIDIFIER WITH WET HANDS AS AN ELECTRICAL SHOCK COULD OCCUR.
•With the power OFF, plug the filled humidifier into a polarized 120V outlet.
DO NOT FORCE THE POLARIZED PLUG INTO THE OUTLET; it will only fit one way.
S T E P 1 : P O W E R
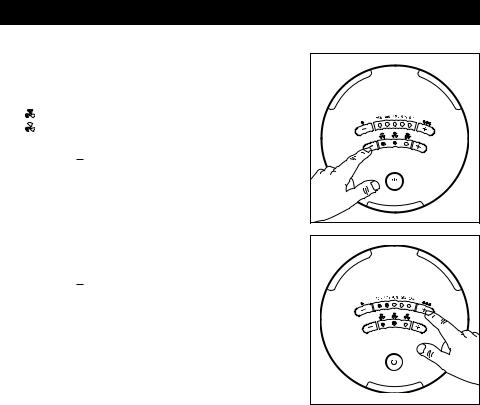
•Press the Power button to start the humidifier. Your humidifier will automatically start on High power, Continuous Mode (Fig. 7).
Fig. 7
Humidistat
Control 
Power |
Fan Speed |
|
Control |
||
Button |
||
|
6
EasySet™ Control Operation (Model HCM-6013i) (Continued)
• To turn your humidifier OFF simply press the Power button again.
S T E P 2 : O U T P U T / F A N S P E E D C O N T R O L
Your unit has three output levels/fan speeds:
 HIGH: For fast humidifying
MED: For everyday moisture control
LOW: For minimum operation (ideal for nighttime use)
• Push the up button (+) to increase output level and push the down button ( ) to decrease output level. The LED’s will illuminate to reflect which speed you have selected (Fig. 8).
NOTE: Turn the humidifier off if the humidity level feels too moist or you notice condensation forming on the walls.
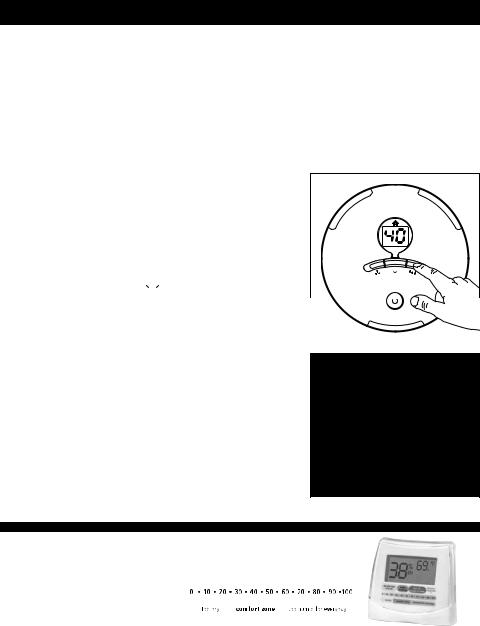
S T E P 3 : S E T H U M I D I T Y
•Set your desired humidity anywhere between 35% and 55%.
•Push the up button (+) to increase desired humidity and push the
down button ( ) to decrease desired humidity. The LED’s will illuminate to reflect which desired humidity level you have selected (Fig. 9).
For example: If you set your humidity at 40%, the 35% and 40% LED’s will be illuminated.
•Once you have set your desired humidity, the unit will operate under this setting until the unit is turned off or your selected humidity is reached.
•When the desired room humidity has been reached the fan will automatically shut off. (The humidity LED’s will remain illuminated)
Fig. 8
Fig. 9
• The fan will turn back on when your room decreases beyond your set level.
NOTE: Your room humidity can often fluctuate. It is normal for your unit to turn itself on and off throughout the day as it is monitoring your changing environment.
To turn your unit off and then back on and select your desired output setting (see Step 2).
7
Digital EasySet™ Control Operation (Model HCM-6012 & HCM-6012-CST)
P O W E R |
|
|
||
Fig. 10 |
|
|||
|
CAUTION: DO NOT PLUG IN THE HUMIDIFIER WITH WET |
|
||
|
|
|
||
|
HANDS AS AN ELECTRICAL SHOCK COULD OCCUR. |
|
|
|
• |
With the power OFF, plug the filled humidifier into a polarized 120V |
Desired |
|
|
|
outlet. DO NOT FORCE THE POLARIZED PLUG INTO THE OUTLET; it |
|
||
|
Humidity |
Humidistat |
||
|
will only fit one way. |
Light |
Control |
|
|
|
|
||
S T E P 1 : P O W E R |
Fan Speed |
Timer |
||
|
|
|||
• |
Press the Power button to start the humidifier. Your humidifier will |
Control |
||
Control |
||||
|
||||
|
automatically start on High power, Continuous Mode. The display |
|
|
|
|
will be illuminated and will reflect the current room humidity |
|
|
|
|
(Fig. 10). |
|
|
|
|
|
|
||
• |
To turn your humidifier OFF simply press the Power button again. |
|
|
|
S T E P 2 : O U T P U T / F A N S P E E D C O N T R O L |
|
|
||
Fig. 11 |
|
|||
Your unit has three output levels/fan speeds:
 HIGH: For fast humidifying
 MED: For everyday moisture control
 LOW: For minimum operation (ideal for nighttime use)
• To change your fan speed press the fan speed button (  ) up or down (Fig. 11).
•Once you have selected your desired speed the display will go back to showing the current room humidity after 3 seconds.
NOTE: If you wish to change or check your output/speed setting simply
press the fan speed button (  ) once and it will show you your setting.
If you would like to change it, continue to push the button up or down Fig. 12 until you have reached your desired setting. Again, after 3 seconds the
display will revert to showing the current room humidity.
NOTE: Turn the humidifier off if the humidity level feels too moist or you notice condensation forming on the walls.
S T E P 3 : T I M E R C O N T R O L
• You can set your timer for up to 18 hours. This function should only be used if you desire that the humidifier be automatically shut off after a certain period of time.
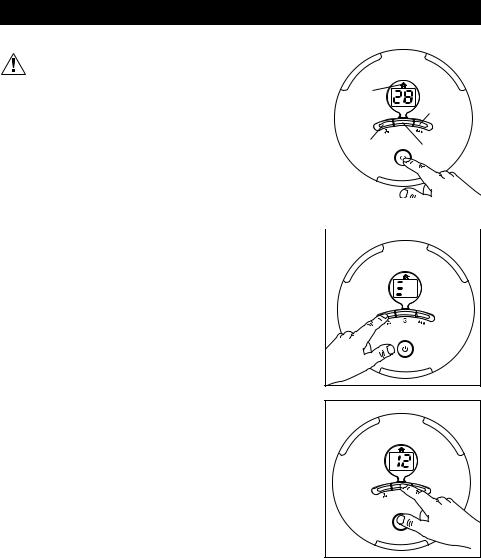
•Press the Timer button ( ) up or down to set how many hours you would like the humidifier to run (Fig. 12).
•When the display indicates your desired time, wait 3 seconds.
•After 3 seconds, your desired time is set and the display will revert back to showing the current room humidity.
NOTE: If you wish to change your timer setting or check to see how much time is left, simply press the Timer button ( ) once and it will show you the time left. If you want to change the time remaining, continue to push the button up or down until you have reached your desired time. Again, after 3 seconds the display will revert to showing the current room humidity. If you set a timer but no longer wish to have it set, turn the unit off and then repeat steps 1 and 2.
8
Digital EasySet™ Control Operation (Model HCM-6012 & HCM-6012-CST) (Continued)
S T E P 4 : S E T H U M I D I T Y
•You can set your desired humidity in 1% increments anywhere from 25% to 65%.
•To set your desired humidity, press the humidity button (
 ) up or down (Fig. 13).
•When the display indicates your desired humidity setting wait 3 seconds.
•After 3 seconds your desired humidity is set and the display will revert back to showing the current room humidity.
NOTE: If you wish to change your humidity setting or check to see what you set, simply press the humidity button once and it will show you the set humidity. If you want to
change it, continue to push the button up or down until you have reached your new desired humidity. Again, after 3 seconds the display will revert to showing the current room humidity.
• Once you have set your humidity the unit will operate under this setting until the unit is turned off or your selected humidity is reached.
• When your desired room humidity has been reached the fan will shut off and the house icon ( 

 ) on the top of your display will illuminate (Fig. 14). It will stay illuminated until your desired humidity decreases at which time the fan will turn back on.
NOTE: Your room humidity can often fluctuate. It is normal for your unit to turn itself on and off throughout the day as it is monitoring your changing environment.
To go back to continuous mode, turn your unit off and then back on and select your desired output setting (see step 2).
NOTE: To ensure proper humidity in your home, you should use a hygrometer (room humidity indictor) such as the E-10 and place across the room from your humidifier.
(Hygrometer sold separately)
9

Cleaning
You should clean your humidifier regularly as needed.
Cleaning involves two steps, SCALE REMOVAL and DISINFECTING.
Be sure to perform these in the proper order to avoid harmful chemical interactions.
•First, turn off and unplug the humidifier.
•Remove the Water Tanks and Motor Housing.
•Remove the Filter from the Base.
•Empty any water from the Base.
NOTE: REMOVE FILTER BEFORE CLEANING
Failure to remove Filter during cleaning will destroy the Filter.
STEP ONE:
SCALE REMOVAL
BASE
1.Fill the Base with:
• 1 cup (8 ozs.) of undiluted white vinegar
2.Let solution stand for 20 minutes.
3.With the vinegar in the Base, clean all interior surfaces with a soft cloth or brush to help remove scales.
4.Rinse the Base thoroughly with water to remove scale and cleaning solution.
NOTES:
STEP TWO:
DISINFECTING
WATER TANK/BASE
1.Fill the Water Tank with:
• 1 teaspoon of household bleach
and
•1 gallon of water
Pour some of this solution into the Base.
2.Let solution stand for 20 minutes.
3.Rinse with water until the smell of bleach is gone.
•The use of other water treatment products and chemicals may cause deterioration of the Filter or damage the humidifier, thereby hindering the humidifier’s effectiveness.
10
 Loading...