


This manual should be considered a permanent part of the scooter and should remain with the scooter when it is resold.
This Owner’s Manual covers the |
FSC600D |
and FSC600A models. You may find |
descriptions of equipment and features that are not on your particular model. |
||
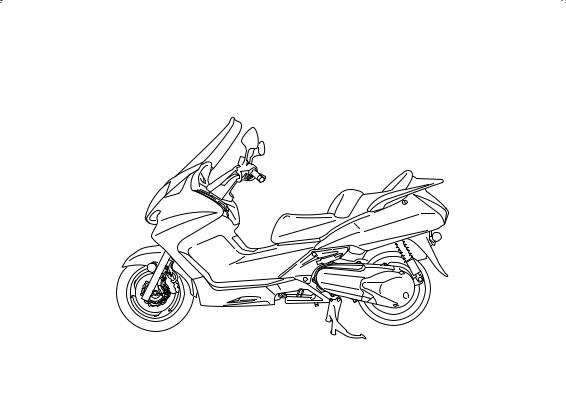
All illustrations are based on the |
FSC600A |
model, unless noted otherwise. |
This publication includes the latest production information available before printing. Honda Motor Co., Ltd. reserves the right to make changes at any time without notice and without incurring any obligation.
No part of this publication may be reproduced without written permission.
The vehicle pictured on the front cover may not match your vehicle.
 2006 Honda Motor Co., Ltd.
2007
Honda FSC600D/A SILVER WING OWNER’S MANUAL
Introduction
Congratulations on choosing your Honda scooter.
When you own a Honda, you’re part of a worldwide family of satisfied customerspeople who appreciate Honda’s reputation for building quality into every product.
Before riding, take time to get acquainted with your scooter and how it works. To protect your investment, we urge you to take responsibility for keeping your scooter well maintained. Scheduled service is a must, of course. But it’s just as important to observe the break-in guidelines, and perform all pre-ride and other periodic checks detailed in this manual.
We also recommend that you read this owner’s manual before you ride. It’s full of facts, instructions, safety information, and helpful tips. To make it easy to use, the manual contains a detailed list of topics at the beginning of each section, and both an in-depth table of contents and an index at the back of the book.
As you read this manual, you will find information that is preceded by a


 symbol. This information is intended to help you avoid damage to your Honda, other property, or the environment.
Introduction

Introduction
Read the Warranties Booklet (page 215 ) thoroughly so you understand the coverages that protect your new Honda and are aware of your rights and responsibilities.
If you have any questions, or if you ever need special service or repairs, remember that your Honda dealer knows your scooter best and is dedicated to your complete satisfaction.
Please report any change of address or ownership to your Honda dealer so we will be able to contact you concerning important production information.
You may also want to visit our website at www.honda.com.
Happy riding!
California Proposition 65 Warning WARNING: This product contains or emits chemicals known to the State of California to cause cancer and birth defects or other reproductive harm.
Introduction

A Few Words About Safety
Your safety, and the safety of others, is very important. And operating this scooter safely is an important responsibility.
To help you make informed decisions about safety, we have provided operating procedures and other information on labels and in this manual. This information alerts you to potential hazards that could hurt you or others.
Of course, it is not practical or possible to warn you about all hazards associated with operating or maintaining a scooter. You must use your own good judgment.
You will find important safety information in a variety of forms, including:
 Safety Labels –– on the scooter.
 Safety Messages –– preceded by a safety alert symbol
  and one of three signal words:
DANGER, WARNING, or CAUTION.
These signal words mean:
Safety Messages

A Few Words About Safety
You WILL be KILLED or SERIOUSLY HURT if you don’t follow instructions.
You CAN be KILLED or SERIOUSLY HURT if you don’t follow instructions.
You CAN be HURT if you don’t follow instructions.
 Safety Headings –– such as Important Safety Reminders or Important Safety Precautions.
 Safety Section –– such as Scooter Safety.
 Instructions –– how to use this scooter correctly and safely.
This entire manual is filled with important safety information –– please read it carefully.
Safety Messages

Contents
These pages give an overview of the contents of your owner’s manual. The first page of each section lists the topics covered in that section.
Scooter Safety ..................................... |
1 |
Important safety information you |
|
should know, plus a look at the safety- |
|
related labels on your scooter. |
|
Instruments & Controls..................... |
9 |
The location and function of |
|
indicators, gauges and controls on |
|
your scooter and operating |
|
instructions for various controls and |
|
features. |
|
Before Riding ...................................... |
35 |
The importance of wearing a helmet and other protective gear, how to make sure you and your scooter are ready to ride, and important information about loading.
Basic Operation & Riding ................. 53
How to start and stop the engine, and use the brakes. Also, includes riding precautions and important information about riding with a passenger or cargo.
Contents

Contents
Servicing Your Honda ....................... |
77 |
Why your scooter needs regular maintenance, what you need to know before servicing your Honda, an owner maintenance schedule, and instructions for specific maintenance and adjustment items.
Tips....................................................... |
163 |
How to store and transport your |
|
scooter and how to be an |
|
environmentally-responsible rider. |
|
Taking Care of the Unexpected........ |
169 |
What to do if you have a flat tire, |
|
your engine won’t start, etc. |
|
Technical Information....................... |
191 |
ID numbers, technical specifications, |
|
and other technical facts. |
|
Consumer Information...................... |
211 |
Information on warranties, emission |
|
controls, how to get Honda service |
|
manuals, and... |
|
‘‘Reporting Safety Defects’’ ......... |
221 |
Table of Contents ............................... |
222 |
Sequential listing of topics in this |
|
owner’s manual. |
|
Index..................................................... |
228 |
Quick Reference
Handy facts about fuel, engine oil, tire sizes, and air pressures.
Contents


|
Scooter Safety |
|
This section presents some of the most |
Important Safety Information ................. |
2 |
important information and |
Accessories & Modifications.................. |
5 |
recommendations to help you ride your |
Safety Labels ........................................... |
7 |
scooter safely. Please take a few moments |
|
|
to read these pages. This section also |
|
|
includes information about the location of |
|
|
safety labels on your scooter. |
|
|
Scooter Safety |
1 |
Important Safety Information
Your scooter can provide many years of service and pleasure if you take responsibility for your own safety and understand the challenges you can meet while riding.
There is much that you can do to protect yourself when you ride. You’ll find many helpful recommendations throughout this manual. The following are a few that we consider most important.
Always Wear a Helmet
It’s a proven fact: helmets significantly reduce the number and severity of head injuries. So always wear an approved motorcycle helmet and make sure your passenger does the same. We also recommend that you wear eye protection, sturdy boots, gloves, and other protective gear (page 36 ).
2 Scooter Safety

Important Safety Information
Take Time to Learn & Practice
Even if you have ridden other scooters, take time to become familiar with how this scooter works and handles. Practice in a safe area until you build your skills and get accustomed to the scooter’s size and weight.
Because many accidents involve inexperienced or untrained riders, we urge all riders to take a certified course approved by the Motorcycle Safety Foundation (MSF). See page 38 .
Ride Defensively
The most frequent scooter collision happens when a car turns left in front of a scooter. Another common situation is a car moving suddenly into your lane.
Always pay attention to other vehicles around you, and do not assume that other drivers see you. Be prepared to stop quickly or make an evasive maneuver. For other riding tips, see the booklet, You and Your Motorcycle: Riding Tips and Practice Guide, which came with your new scooter (USA only).
Make Yourself Easy to See
Some drivers do not see scooters because they are not looking for them. To make yourself more visible, wear bright reflective clothing, position yourself so other drivers can see you, signal before turning or changing lanes, and use your horn when it will help others notice you.
Scooter Safety |
3 |

Important Safety Information
Ride within Your Limits
Pushing limits is another major cause of scooter accidents. Never ride beyond your personal abilities or faster than conditions warrant. Remember that alcohol, drugs, fatigue, and inattention can significantly reduce your ability to make good judgments and ride safely.
Don’t Drink and Ride
Alcohol and riding don’t mix. Even one drink can reduce your ability to respond to changing conditions, and your reaction time gets worse with every additional drink. So don’t drink and ride, and don’t let your friends drink and ride either.
Keep Your Honda in Safe Condition
It’s important to keep your scooter properly maintained and in safe riding condition. To help avoid problems, inspect your scooter before every ride and perform all recommended maintenance. Never exceed load limits (page 44 ), and do not modify your scooter (page 6 ) or install accessories that would make your scooter unsafe (page 5 ).
4 Scooter Safety
Accessories & Modifications
Modifying your scooter or using nonHonda accessories can make your scooter unsafe. Before you consider making any modifications or adding an accessory, be sure to read the following information.
Improper accessories or modifications can cause a crash in which you can be seriously hurt or killed.
Follow all instructions in this owner’s manual regarding accessories and modifications.
Accessories
We strongly recommend that you use only genuine Honda accessories that have been specifically designed and tested for your scooter. Because Honda cannot test all other accessories, you must be personally responsible for proper selection, installation, and use of non-Honda accessories.
Check with your Honda dealer for assistance and always follow these guidelines:
 Make sure the accessory does not obscure any lights, reduce ground clearance and lean angle, limit suspension travel or steering travel, alter
your riding position, or interfere with |
|
|
operating any controls. |
(cont’d) |
|
Scooter Safety |
5 |
|
Accessories & Modifications
 Do not add any electrical equipment that will exceed the scooter’s electrical system capacity (page 199 ). A blown fuse can cause a loss of lights or engine power (page 183 ).
 Do not pull a trailer or sidecar with your scooter. This scooter was not designed for these attachments, and their use can seriously impair your scooter’s handling.
Modifications
We strongly advise you not to remove any original equipment or modify your scooter in any way that would change its design or operation. Such changes could seriously impair your scooter’s handling, stability, and braking, making it unsafe to ride.
Removing or modifying your lights, exhaust system, emission control system, or other equipment can also make your scooter illegal.
6 Scooter Safety
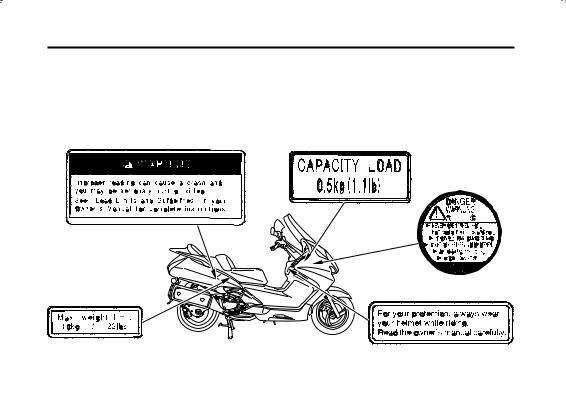
Safety Labels
Safety labels on your scooter either warn you of potential hazards that could cause serious injury or they provide important safety information. Read these labels carefully and don’t remove them.
If a label comes off or becomes hard to read, contact your Honda dealer for a replacement.
Scooter Safety |
7 |

Safety Labels
For USA |
For Canada |
8 Scooter Safety

|
Instruments & Controls |
|
This section shows the location of all |
Operation Component Locations ............ |
10 |
gauges, indicators, and controls you would |
Gauges, Indicators & Displays................ |
13 |
normally use before or while riding your |
Multi-function Display........................ |
20 |
scooter. |
Coolant Temperature Meter................ |
21 |
|
Fuel Gauge........................................... |
23 |
The items listed on this page are described |
Odometer/Tripmeter A & B................ |
24 |
in this section. Instructions for other |
Digital Clock ....................................... |
25 |
components are presented in other sections |
Controls & Features................................. |
28 |
of this manual where they will be most |
Ignition Switch .................................... |
28 |
useful. |
Start Button.......................................... |
29 |
|
Engine Stop Switch ............................. |
29 |
|
Headlight Dimmer Switch .................. |
30 |
|
Turn Signal Switch.............................. |
30 |
|
Horn Button ......................................... |
31 |
|
RESET Button..................................... |
31 |
|
MODE Button ..................................... |
31 |
|
Parking Brake Lock............................. |
32 |
Instruments & Controls |
9 |
Operation Component Locations
rear brake lever |
front brake lever |
headlight |
|
engine stop |
|
dimmer switch |
|
switch |
|
turn signal switch |
|
throttle grip |
|
|
horn button |
|
start button |
left fairing pocket |
left fairing pocket lock |
right fairing pocket |
|
|
|
|
ignition switch |
10 |
Instruments & Controls |
|
|

Operation Component Locations
center compartment
 parking brake lever
Instruments & Controls 11
Operation Component Locations
helmet holder
seat lock
12 Instruments & Controls
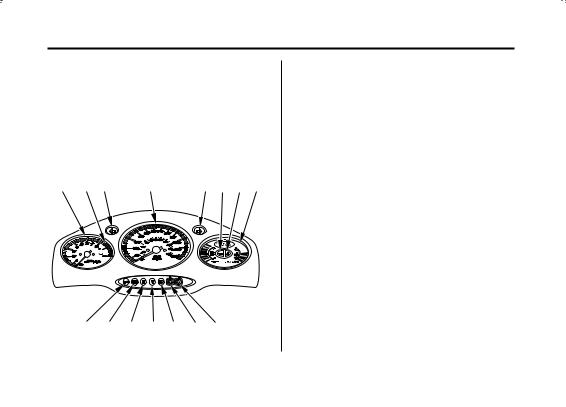
Gauges, Indicators & Displays
The gauges and indicators on your scooter keep you informed, alert you to possible problems, and make your riding safer and more enjoyable. Refer to the gauges and indicators frequently. Their functions are described on the following pages.
(1) |
(2) |
(3) |
(4) |
(5) (6) (7) (8) |
(15)(14)(13)(12) (11)(10)(9)
(1)tachometer
(2)tachometer red zone
(3)left turn signal indicator
(4)speedometer
(5)right turn signal indicator
(6)low oil pressure indicator
(7)high coolant temperature indicator
(8)multi-function display
(9)RESET button
(10)MODE button
(11)high beam indicator
(12)V-matic indicator
(13)PGM-FI malfunction indicator lamp (MIL)
(14)parking brake indicator
(15)anti-lock brake system (ABS)
indicator (FSC600A)
USA: Odometer & tripmeter read in miles. Canada: Odometer & tripmeter read in kilometers.
Instruments & Controls 13

Gauges, Indicators & Displays
Lamp Check
The low oil pressure indicator comes on when you turn the ignition switch ON so you can check that it is working. The indicator remains on until after the engine is started.
The high coolant temperature indicator and V-matic indicator light for a few seconds and then go off when you turn the ignition switch ON.
These indicators are identified in the table on pages 16 18 with the words: Lamp Check.
When applicable, the parking brake and high beam indicators come on when you turn the ignition switch ON and remains on until you release the parking brake lever or select the low beam.
If one of these indicators does not come on when it should, have your Honda dealer check for problems.
14 Instruments & Controls

Gauges, Indicators & Displays
Display Check
(1)
When the ignition switch is turned ON, the multi-function display ( 1 ) will display from the bottom up in sequence. Thereafter, it will temporarily show all the modes and digital segments so you can make sure the liquid crystal display is functioning properly.
The displays are identified in the table on page 17 with the words: Display Check.
If any part of these displays does not come on when it should, have your Honda dealer check for problems.
(1) multi-function display
Instruments & Controls 15

Gauges, Indicators & Displays
1 |
tachometer |
Shows engine speed in revolutions per minute (rpm). |
2 |
tachometer red zone |
Shows excessive engine rpm range (indicated from |
|
|
the beginning of the tachometer red zone) in which |
|
|
operation may damage the engine. Do not let the |
|
|
tachometer needle enter the red zone. |
3 |
left turn signal indicator |
Flashes when the left turn signal operates. |
|
(amber) |
|
4 |
speedometer |
Shows riding speed in miles (USA) or kilometers |
|
|
(Canada) per hour. |
5 |
right turn signal indicator |
Flashes when the right turn signal operates. |
|
(amber) |
|
6 |
low oil pressure indicator |
Lights when engine oil pressure is low enough to |
|
(red) |
cause engine damage. If the low oil pressure |
|
|
indicator lights during operation, pull safely to the |
|
|
side of the road. See page 182 for instructions and |
|
|
cautions. Lamp Check. |
16 Instruments & Controls

|
|
Gauges, Indicators & Displays |
|
|
|
7 |
high coolant temperature |
Lights when the coolant is over the specified |
|
indicator (red) |
temperature. If the indicator comes on, pull safely to |
|
|
the side of the road. See page 180 for instructions |
|
|
and cautions. Lamp Check. |
8 |
multi-function display |
The display includes the following functions: |
|
|
Display Check. |
|
coolant temperature |
Shows coolant temperature (page 21 ). |
|
meter |
|
|
fuel gauge |
Shows approximate fuel supply available (page 23 ). |
|
odometer |
Shows the total miles (USA) or kilometers (Canada) |
|
|
ridden. |
|
tripmeter A & B |
Shows the number of miles (USA) or kilometers |
|
|
(Canada) ridden since you last reset the meter. The |
|
|
tripmeter has two sub modes, ‘‘A’’ and ‘‘B.’’ To zero |
|
|
(0) the tripmeter, press the RESET button (page 24 ). |
|
digital clock |
Shows hour and minute (page 25 ). |
Instruments & Controls 17

Gauges, Indicators & Displays
9 |
RESET button |
Resets the tripmeter to zero (0) (page 24 ). |
|
|
Also used to set the digital clock (page 25 ). |
10 |
MODE button |
Selects tripmeter A, tripmeter B, or odometer (page |
|
|
24 ). |
|
|
Also used to set the digital clock (page 25 ). |
11 |
high beam indicator |
Lights when the headlight is on high beam. |
|
(blue) |
|
12 |
V-matic indicator |
Lights when V-matic parts have to be replaced. If |
|
(amber) |
the indicator lights, see your Honda dealer. Lamp |
|
|
Check. |
18 Instruments & Controls

|
|
Gauges, Indicators & Displays |
|
|
|
13 |
PGM-FI malfunction |
Flashes when there is any abnormality in the PGM- |
|
indicator lamp (MIL) |
FI (Programmed Fuel Injection) system. Should also |
|
(red) |
light for a few seconds and then go off when the |
|
|
ignition switch is turned ON and the engine stop |
|
|
switch is at RUN. If the indicator comes on at any |
|
|
other time, reduce speed and take your scooter to a |
|
|
Honda dealer as soon as possible. |
14 |
parking brake indicator |
Lights as a reminder that you have not released the |
|
(red) |
parking brake lever. |
15 |
anti-lock brake system |
Lights when there is any abnormality in the anti-lock |
|
(ABS) indicator (red) |
brake system (ABS). Normally, this indicator comes |
|
(FSC600A) |
on when the ignition switch is turned ON, and goes |
|
|
off after you ride the scooter at a speed above 6 mph |
|
|
(10 km/h). If the indicator comes on while riding, |
|
|
stop the scooter in a safe place and turn off the |
|
|
engine. Refer to ABS indicator light, page 71 . For |
|
|
information about ABS, see page 70 . |
Instruments & Controls 19

Gauges, Indicators & Displays
Multi-function Display
The multi-function display ( 1) includes the following functions:
coolant temperature meter fuel gauge odometer/tripmeter A & B digital clock
Both the digital clock and tripmeter will reset if the battery is disconnected.
20 Instruments & Controls
(5)(1)
(3)


 (2)
(2)
(4)
(7)


 (6)
(6)
(1)multi-function display
(2)coolant temperature meter
(3)fuel gauge
(4)odometer/tripmeter A & B
(5)digital clock
(6)RESET button
(7)MODE button
|
Gauges, Indicators & Displays |
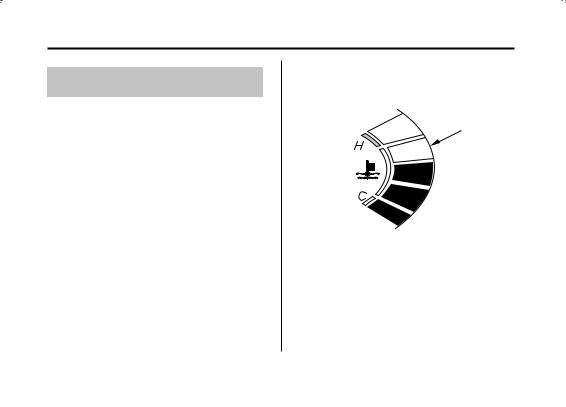
Coolant Temperature Meter |
|
The coolant temperature meter ( 1 ) shows |
|
the coolant temperature digitally. |
(1) |
(1) coolant temperature meter
Instruments & Controls 21
 Loading...