


HR214
Table of contents
 Loading...

Thank you for purchasing a Honda mower.
This manual covers operation and maintenance of Honda HR214 rotary mowers, type SMA (self-propelled,
electric starting), type SXA (self-propelled, manual starting), and type PXA (manually propelled, manual
starting). Illustrations in this manual are based on type SXA, unless otherwise noted. Honda HR214 mowers
meet CPSC blade safety requirements for walk-behind rotary power mowers. Honda’ Motor
CO.,
Ltd. reserves
the right to make Fhanges at any time without notice and without incurring any obligation.
No part of this publication may be reproduced without written permission.
This manual should be considered a permanent part of the mower and remain with the mower when sold.
Pay special attention to statements preceded by the following’words;
Indicates a strong possibility of severe personal injury or loss of life if instructions are not followed.
CAUTION
Indicates a possibility of personal injury or equipment damage if instructions are not followed.
NOTE: Gives helpful information.
If a problem should arise, of if you have any questions about the mower, consult an authorized Honda dealer.
HONDA MOTOR CO., LTD. 1983, ALL RIGHTS RESERVED
* The Honda rotary mower is designed to give safe and dependable service if operated according to instructions
and intended use: mowing (cutting)
grass, and bagging cut grass when equipped with the grass bag. Any other
use could be dangerous.
* Read and understand the Owner’s Manual before operating the mower. Failure to do so could result in
personal injury or equipment damage.
CONTENTS . . . . . . . . . . . . . . . . . . . . . . . . . . . . . . . . . . . . . . . . . . . . . . . . . . . . . . . 3
CAUTION LABEL LOCATION ........................................
GENERAL SAFETY
COMPONENT IDENTIFICATION ......................................
CONTROLS
OPERATION
BEFORE YOU START THE MOWER
l
STARTING AND STOPPING THE ENGINE
TRANSPORTING/STORAGE .........................................
MAINTENANCE ...................................................
TROUBLESHOOTING ..............................................
SPECIFICATIONS ..................................................
WIRINGDIAGRAM ................................................ 41
WARRANTY SERVICE
....................................................... 9
......................................................
High altitude operation
................................................
...................................
........................................
..............................
.............................................
4
6
7
11
12
15
15
22
25
.39
40
42
3
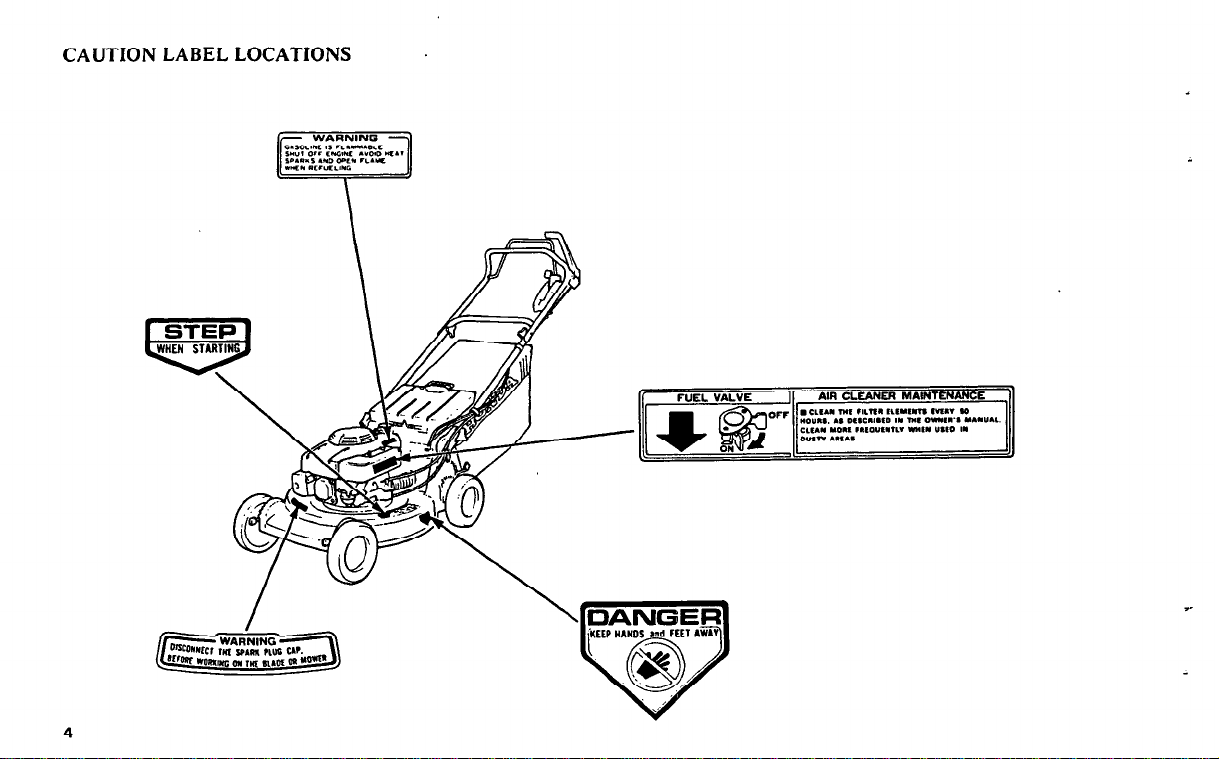
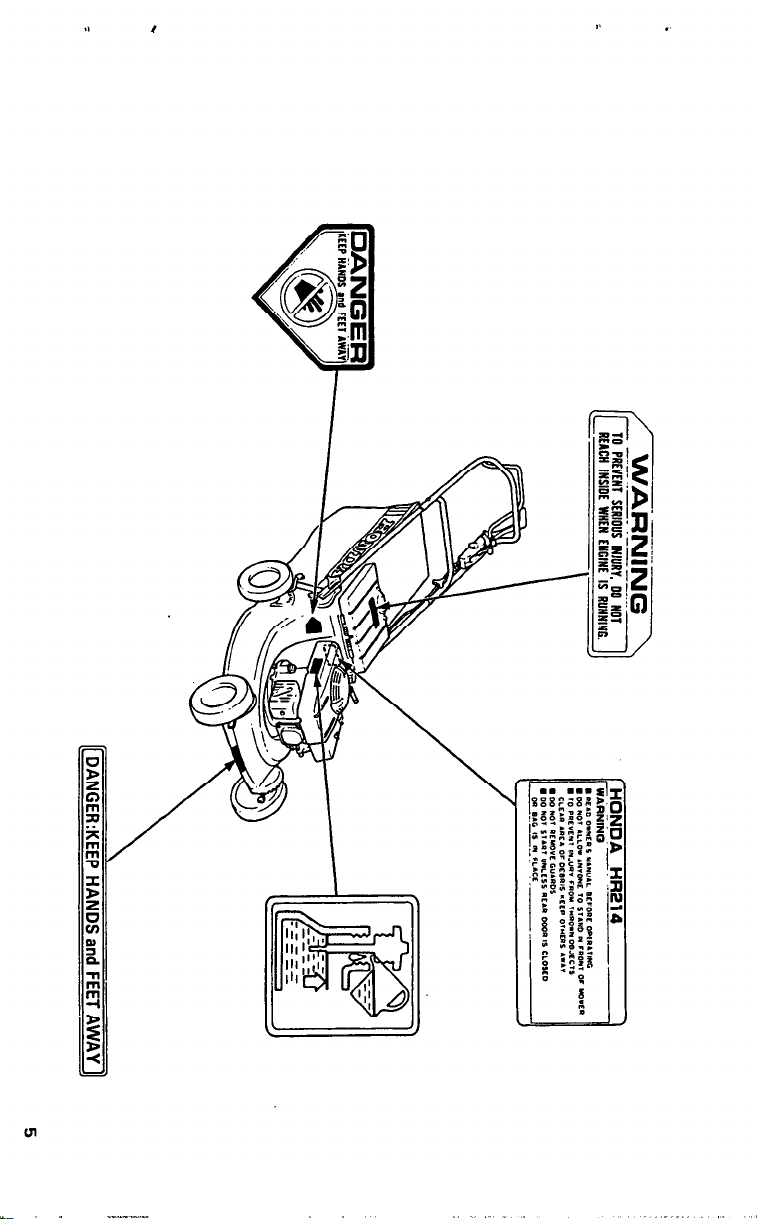
CAUTION LABEL LOCATIONS
GENERAL SAFETY
* Know how to stop the engine quickly and under-
stand operation of all the controls. Never permit
anyone to operate the mower without proper instruction.
* The rear shield is for your protection; keep it in
place at all times.
* The blade is sharp and dangerous. Never put your
hands or feet under the mower. Never tilt the
mower to expose the blade while the engine is
running. If you find it necessary to work on the
blade or mower, stop the engine and remove the
spark plug cap.
* Never stand in front of self-propelled mowers
when the engine is running. Someone may acci-
dentally engage the drive clutch.
* Clear the lawn of sticks, stones, or debris before
mowing. Mow only in cleared areas in daylight or
good artificial light.
* Protect yourself by wearing long trousers and
appropriate shoes..Don’t wear loose fitting clothing
or sandals when mowing.
* Keep children and pets away from the mower at all
times.
* If the blade strikes a stone, sprinkler head, etc., be
sure the blade, blade holder, woodruff key, fasteners, crankshaft, etc. are in good condition before
continuing to mow.
Replace any damaged parts.
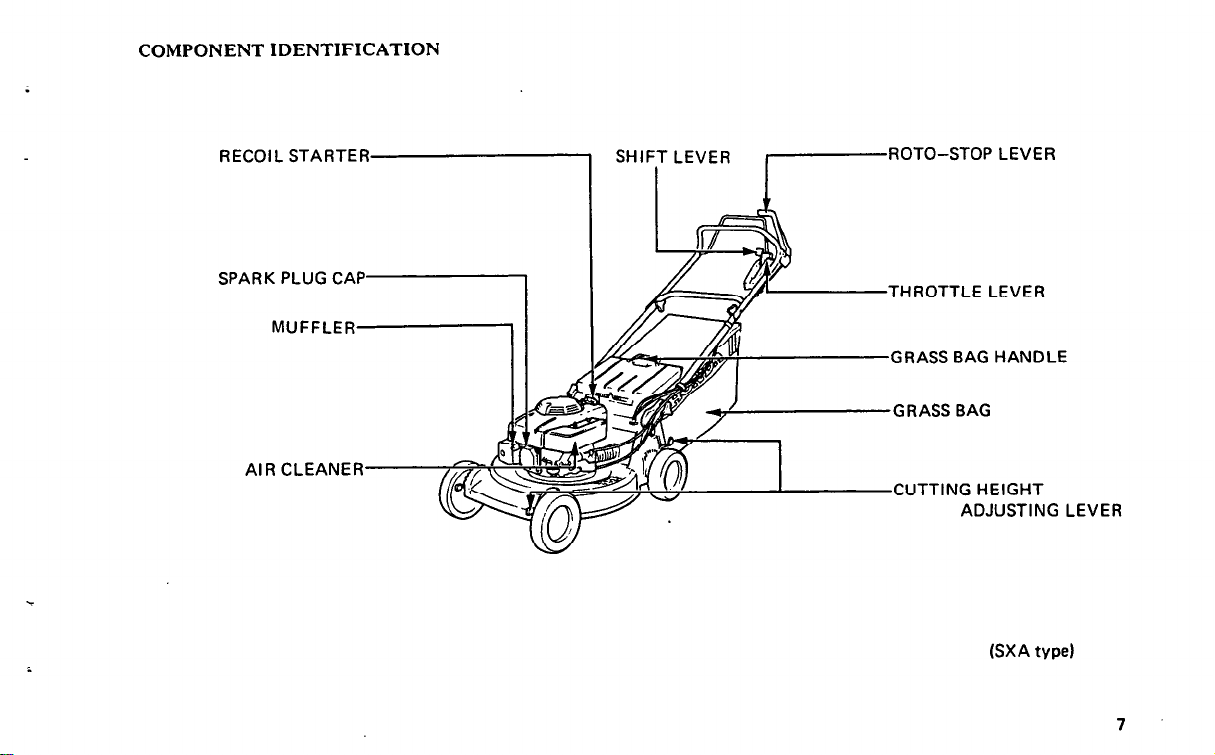
COMPONENT IDENTIFICATION
RECOIL STARTER
..- __._ _.. -..
I SHI
, -. ..F,T LEVER rROTO-STOP LEVER
SPARK PLUG CAP---l
MUFFLER
Al R CLEANER
THROTTLE LEVER
GRASS BAG HANDLE
GRASS BAG
CUTTING HEIGHT
ADJUSTING LEVER
WA typeJ
7
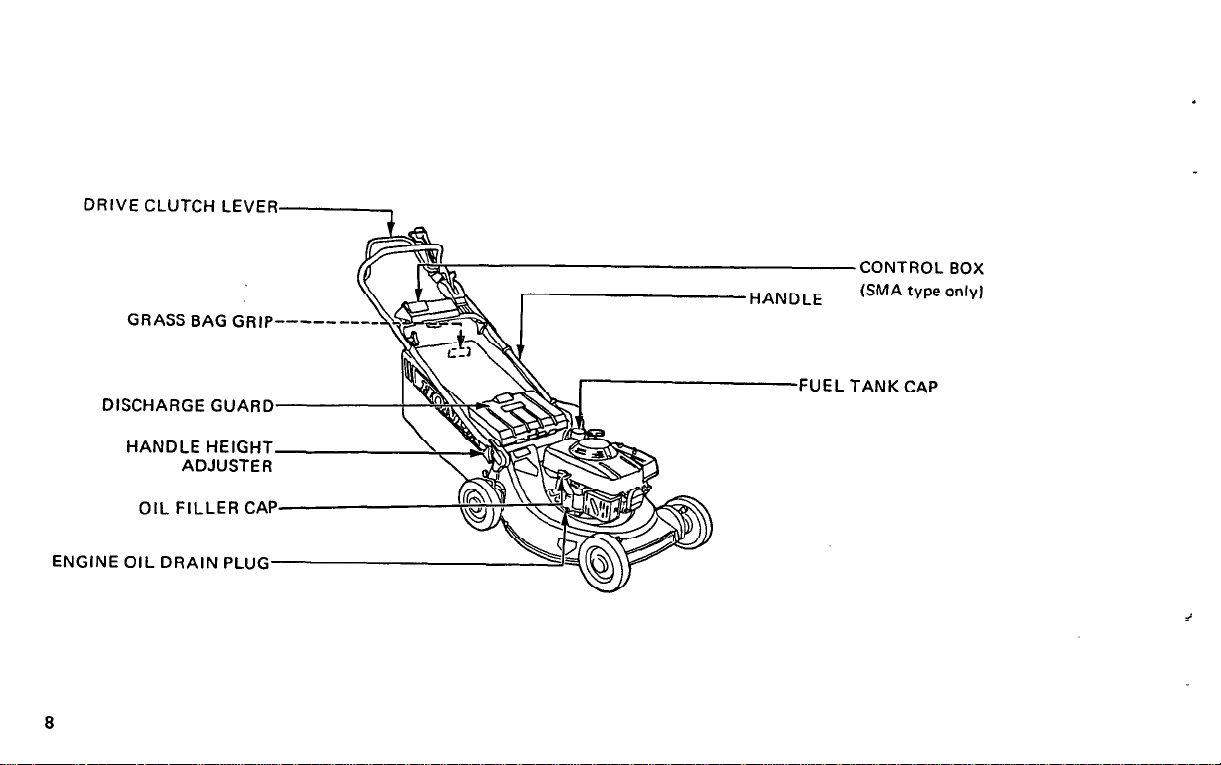
DRIVE CLUTCH LEVER-
GRASS BAG GRIP--------
DISCHARGE GUARD
HANDLE HEIGHT
OIL FILLER CA
ENGINE OIL DRAIN PLUG
8
HANDLE
.FUEL TANK CAP
CONTROL
(SMA type
BOX
oW
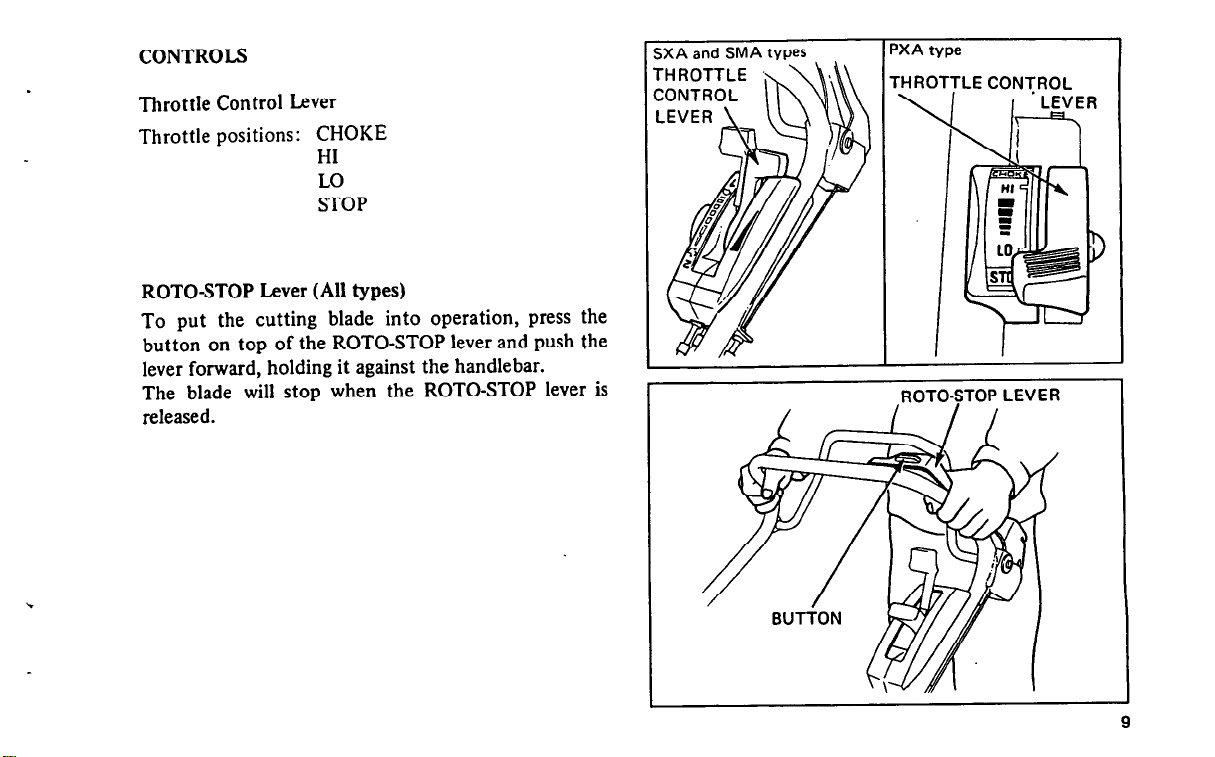
CONTROLS
Throttle Control Lever
Throttle positions: CHOKE
HI
LO
STOP
ROTO-STOP Lever (All types)
To put the cutting blade into operation, press the
button on top of the ROTO-STOP lever and push the
lever forward, holding it against the handlebar.
The blade will stop when the ROTO-STOP lever is
released.
ROTO-STOP LEVER
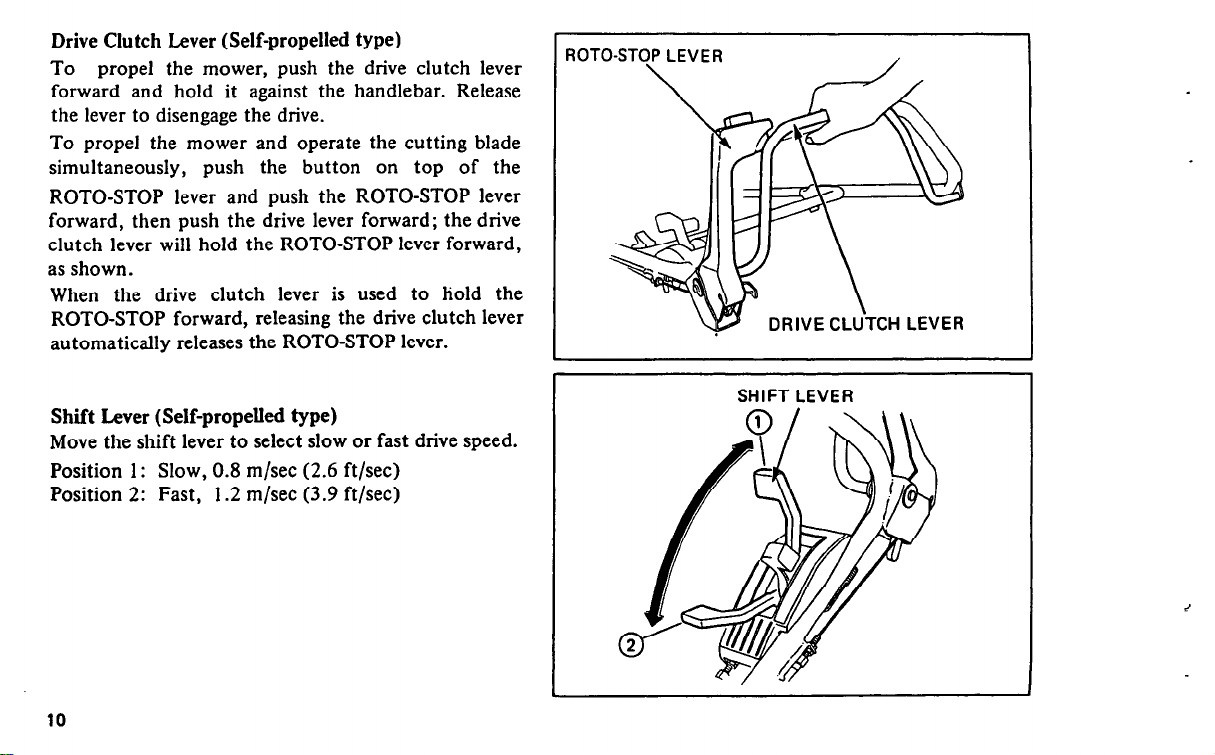
Drive Clutch Lever (Self-propelled type)
To propel the mower, push the drive clutch lever
forward and hold it against the handlebar. Release
the lever to disengage the drive.
To propel the mower and operate the cutting blade
simultaneously, push the button on top of the
ROTO-STOP lever and push the ROTO-STOP lever
forward, then push the drive lever forward; the drive
clutch lever will hold the ROTO-STOP lever forward,
as shown.
When the drive clutch lever is used to hold the
ROTO-STOP forward, releasing the drive clutch lever
automatically releases the ROTO-STOP lever.
ROTO-STQP LEVER
/
Shift Lever (Self-propelled type)
Move the shift lever to select slow or fast drive speed.
Position 1: Slow, 0.8 m/set (2.6 ft/sec)
Position 2: Fast, 1.2 m/set (3.9 ft/sec)
10
SHIFT LEVER
I
OPERATION
.
This MOWER should be used with the grass ban.
The following suggestions and rules are intended
to help you operate your Honda HR214 under the
safest conditions possible. Be. alert and exercise the
same care using the mower as you would using any
other power tool.
CAUTION
Use extra care when mowing around objects to
keep the blade from striking them. Never deliberately mow over any object.
Stop the engine immediately if the blade hits an
object or the mower starts to vibrate. Remove the
spark plug cap (keep the wire away from the plug)
and inspect for damage.
* Be especially careful when mowing uneven or
rough ground. The mower may tilt, exposing the
blade, and hidden objects could be thrown by the
blade. Keep all four wheels on the ground.
+ Mow across slopes. Do not mow excessively steep
NOTE: (Self-propelled type) Do not use the drive
clutch when maneuvering around trees, etc. Release
the clutch and push the mower while using the
ROTO-STOP for better directional control.
slopes.
* Control direction by the handle, not by foot pres-
sure or the mower housing.
* Keep a firm hold on the handle and walk, never
run, with the mower. Don’t lag behind the machine
or let it pull you.
11
BEFORE YOU START THE MOWER
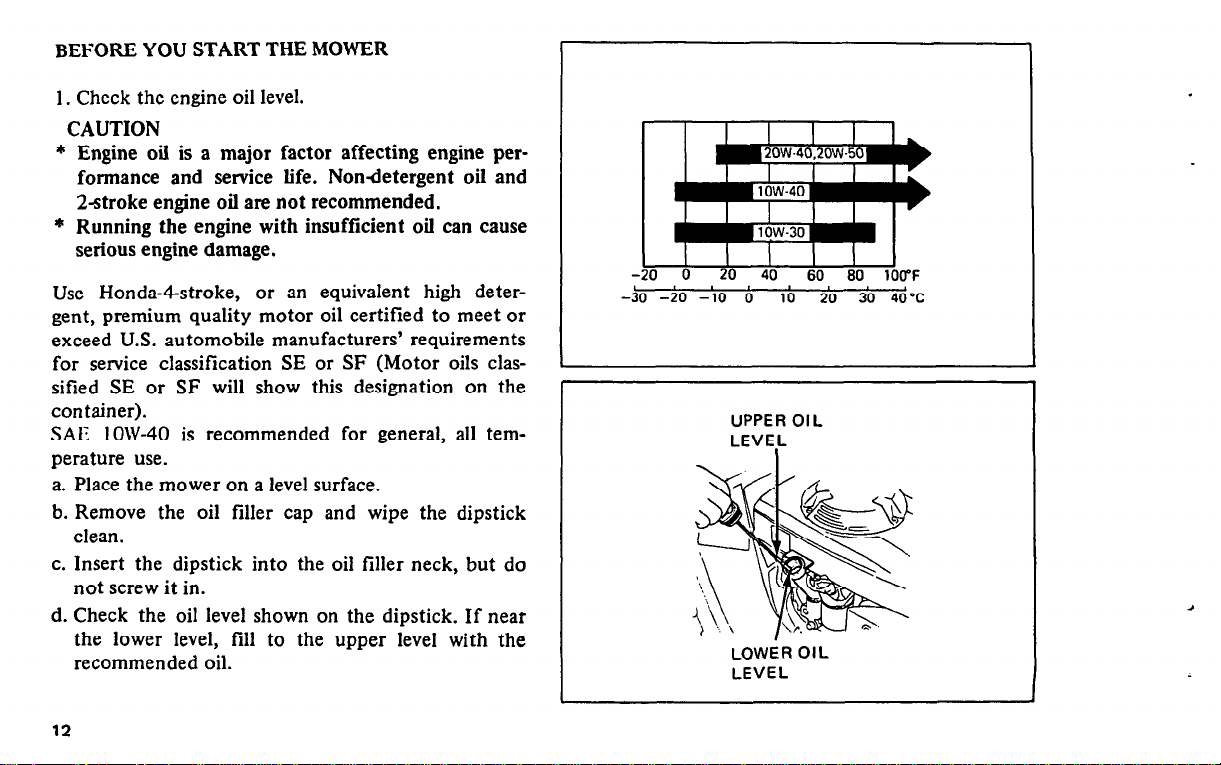
1. Check the engine oil level.
CAUTION
* Engine oil is a major factor affecting engine per-
formance and service life. Nondetergent oil and
Zstroke engine oil are not recommended.
* Running the engine with insufficient oil can cause
serious engine damage.
Use Honda-&troke, or an equivalent high detergent, premium quality motor oil certified to meet or
exceed U.S. automobile manufacturers’ requirements
for service classification SE or SF (Motor oils classified SE or SF will show this designation on the
con tamer).
SAE IOW-40 is recommended for general, all tem-
perature use.
a. Place the mower on a level surface.
b. Remove the oil tiller cap and wipe the dipstick
clean.
c. Insert the dipstick into the oil tiller neck, but do
not screw it in.
d. Check the oil level shown on the dipstick. If near
the lower level, till to the upper level with the
recommended oil.
I
I I 1
I
-20 0 20 40 60
1
-30 -20 -10 0 10 20 30 40-c
I
I
I
80 lO(PF
1
I I
I
UPPER OIL
LOWER OIL
LEVEL
I
12
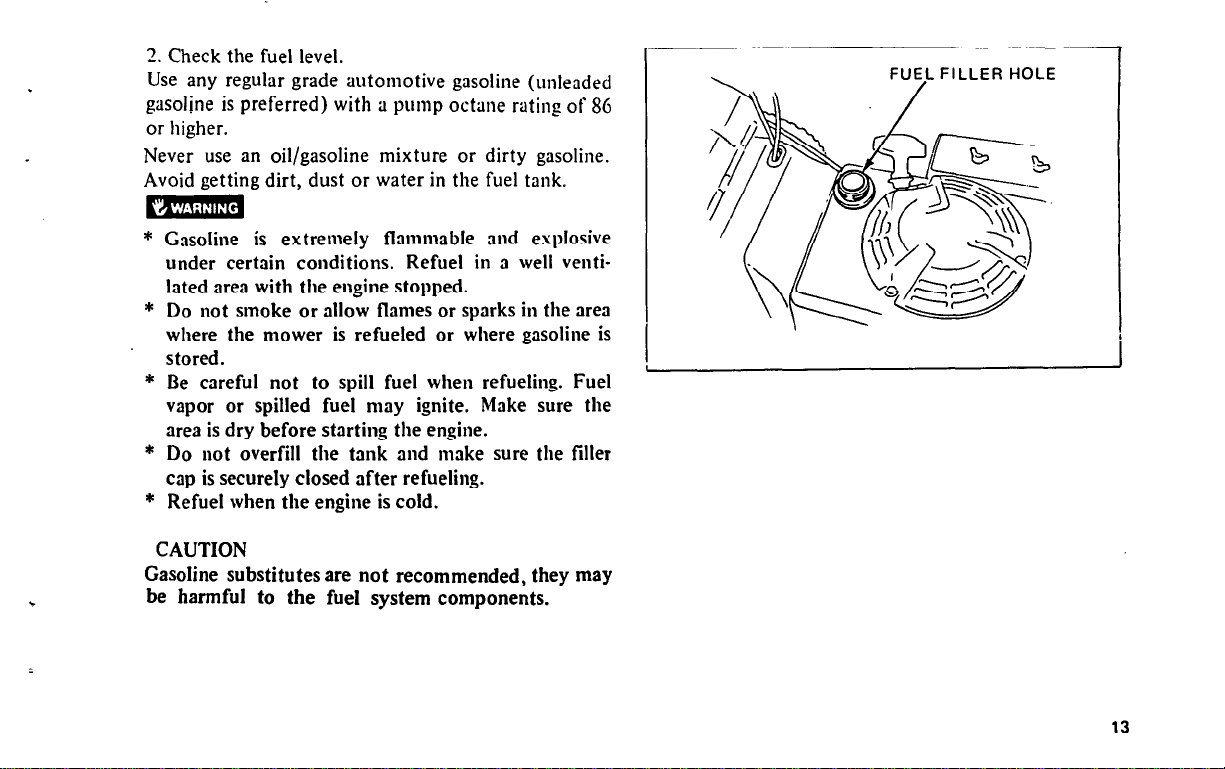
2. Check the fuel level.
Use any regular grade automotive gasoline (unleaded
gasoline is preferred) with a pump octane rating of 86
or higher.
Never use an oil/gasoline mixture or dirty gasoline.
Avoid getting dirt, dust or water in the fuel tank.
* Gasoline is extremely flammable and esplosive
under certain conditions. Refuel in a well ventilated area with the engine stopped.
* Do not smoke or allow flames or sparks in the area
where the mower is refueled or where gasoline is
stored.
* Be careful not to spill fuel when refueling. Fuel
vapor or spilled fuel may ignite. Make sure the
area is dry before starting the engine.
* Do not overfill the tank and make sure the filler
cap is securely closed after refueling.
* Refuel when the engine is cold.
CAUTION
Gasoline substitutes are not recommended, they may
be harmful to the fuel system components.
FILLER HOLE
I
13
Loading...