


TILLER
F720
OWNER'S MANUAL
MANUEL DE L'UTILISATEUR BEDIENUNGSANLEITUNG MANUAL DE EXPLICACIONES

Thank you for purchasing a Honda tiller.
This manual covers operation and maintenance of the F720 tiller.
All information in this publication is based on the latest product information available at the time of printing.
Honda Motor Co., Ltd. reserves the right to make changes at any time without notice and without incurring any obligation.
No part of this publication may be reproduced without written permission.
This manual is considered a permanent part of the tiller and it must stay with the tiller if resold.
Pay special attention to statements preceded by the following words:
 Indicates a strong possibility of severe personal injuly or death if instructions are not followed.


 Indicates a possibility of personal injury or equipment damage if instructions are not followed.
Gives helpful information.
If a problem should arise, or if you have any questions about your tiller, consult an authorized Honda tiller dealer.
The Honda tiller is designed to give safe and dependable service if operated according to instructions. Read and understand the Owner’s Manual before operating the tiller. Failure to do so could result in personal injuly or equipment damage.
 The illustration may vary according to the type.
1

CONTENTS |
|
|
1. |
SAFETY INSTRUCTIONS.................................................................... |
3 |
2. |
SAFETY LABEL LOCATIONS.............................................................. |
8 |
|
CE mark location............................................................................... |
9 |
3. |
COMPONENT IDENTIFICATION ...................................................... |
10 |
4. |
PRE-OPERATION CHECK ................................................................. |
12 |
5. |
STARTING THE ENGINE .................................................................. |
16 |
|
High altitude operation |
|
6. |
TILLER OPERATION.......................................................................... |
22 |
7. |
STOPPING THE ENGINE .................................................................. |
29 |
8. |
MAINTENANCE................................................................................. |
31 |
9. |
TRANSPORTING/STORAGE ............................................................ |
43 |
10. TROUBLESHOOTING ....................................................................... |
44 |
|
11. SPECIFICATIONS .............................................................................. |
45 |
|
12. MAJOR Honda DISTRIBUTOR ADDRESSES IN EUROPE ............. |
46 |
|
2
1. SAFETY INSTRUCTIONS
To ensure safe operation
For your safety and the safety of others, pay special attention to these precautions:
 Honda tiller is designed to give safe and dependable service if operated according to instructions.
Read and understand the Owner’s Manual before operating the tiller. Failure to do so could result in personal injury or equipment damage.
 Exhaust gas contains poisonous carbon monoxide.
Never run the tiller in an enclosed area.
Be sure to provide adequate ventilation.
When installed in ventilated protection are to be observed.
 The rotating tines are sharp and they turn at high speed. Accidental contact can cause serious injury.
 Keep your hands and feet away from the tines while engine is running.
 Stop the engine and disengage the tines clutch before inspection or maintenance of tines.
 Disconnect the spark plug cap to prevent any possibility of accidental starting. Wear heavy gloves to protect your hands from the tines when cleaning the tines or when inspecting or replacing the tines.
Operator responsibility
 Keep the tiller in good operating condition. Operating a tiller in poor or questionable condition could result in serious injury.
 Be sure all safety devices are in working order and warning labels are in place. These items are installed for your safety.
 Be sure the safety covers (fan cover, recoil starter cover) are in place.
 Know how to stop the engine and tines quickly in case of emergency. Understand the use of all controls.
 Keep a firm hold on the handlebars. They may tend to lift during clutch engagement.
3

To ensure safe operation
Operator responsibility
 Read the owner’s manual carefully. Be familiar with the controls and their proper use of the tiller.
 Use the tiller for the purpose it is intended that is, cultivating the soil. Any other use could be dangerous or damage the equipment, especially never use it to cultivate soil containing rocks, stones, wires and any other hard materials.
 Never allow children or people unfamiliar with this owner’s manual to use the tiller. Local regulations may restrict the age of the operator.
 Before each use, visually inspect the tiller including parts for any wear, damage and looseness. If necessary, replace the damaged parts as an assembly.
 Keep in mind that the owner or user is responsible for accidents or damage, occurring to other people or their property.
In the event of hire use, be sure that operational explanations are given in the presence of the user.
 Keep your hands and feet away from the tines while the engine is running.
 Allowing anyone to operate this tiller without proper instruction may result in injury.
 Wear sturdy, full-coverage footwear. Operating this tiller barefoot or with open toe shoes or sandals increases your risk of injury.
 Dress sensibly. Loose clothing may get caught in moving parts, increasing your risk of injury.
 Be alert. Operating this tiller when you are tired, ill or under the influence of alcohol or drugs may result in serious injury.
 Keep all persons and pets away from the tilling area.
 Be sure drag bar is in place and properly adjusted.
 Do not change the engine governor settings or overspeed the engine.
 Start the engine carefully according to the instructions in this manual, keeping your feet away from the tines.
 When starting the engine, keep your feet away from the tines.
 Avoid operating the tiller at night or in a bad weather of poor visibility, because there is much possibility of accident.
 Walk, never run during operation.
 When taking backward steps during operation, pay special attention to people and obstacles behind the operator.
 Before transporting or hoisting the tiller, make sure that the engine is stopped.
4

To ensure safe operation
Operator responsibility
 Stop the engine in the following cases:Whenever you leave the tiller unattended.Before refueling
 When stopping the engine, move the throttle lever to the LOW position, then turn the engine switch OFF. If the fuel valve is equipped on the tiller, be sure to turn the fuel valve OFF.
 Keep all nuts, bolts and screws tight to be sure the tiller is in safe working condition. Regular maintenance is an essential aid to user’s safety and retaining a high level of performance.
 Never store the tiller with gasoline in the tank inside a building where fumes may reach an open flame, spark or high temperature source.
 Allow the engine to cool before storing in any enclosure.
 To reduce the fire hazard, keep the tiller especially the engine, muffler, the gasoline storage area as well, free of grass, leaves, or excessive grease.
Do not leave containers of vegetable matters in or near a building.
 If the fuel tank has to be drained, this should be done outdoors, with a cold engine.
 Replace the worn or damaged parts for safety.
Child safety
 Keep children indoors and supervised at all times when any outdoor power equipment is being used nearby. Young children move quickly and are attracted especially to the tiller and the tilling activity.
 Never assume children will remain where you last saw them. Be alert and turn the tiller off if children enter the area.
 Children should never be allowed to operate the tiller, even under adult supervision.
Thrown object hazard
Objects hit by the rotating tines can be thrown from the tiller with great force, and may cause serious injury.
 Before tilling, clear the tilling area of sticks, large stones, wire, glass, etc. Till only in daylight.
 Always inspect the tiller for damage after striking a foreign object. Repair or replace any damaged parts before continuous use.
 Pieces thrown from worn or damaged tines can cause serious injury. Always inspect the tines before using the tiller.
5

To ensure safe operation
Fire and burn hazard
Gasoline is extremely flammable, and gasoline vapor can explode. Use extreme care when handling gasoline. Keep gasoline out of reach of children.
 Add fuel before starting the engine. Never remove the cap of the fuel tank or add gasoline while the engine is running or when the engine is hot.
 Refuel in a well-ventilated area with the engine stopped.
 Refuel outdoors only and do not smoke while refueling or handling fuel.
 Allow the engine to cool before refueling. Fuel vapor or spilled fuel may ignite.
 The engine and exhaust system become very hot during operation and remain hot for a while after stopping. Contact with hot engine components can cause burn injuries and can ignite some materials.
 Avoid touching a hot engine or exhaust system.
 Allow the engine to cool before performing maintenance or storing the tiller indoors.
 Tighten all fuel tanks and container caps securely.
 Store fuel in containers specifically designed for this purpose.
 If gasoline is spilled, do not attempt to start the engine but move the tiller away from the area of spillage and avoid creating any source of ignition until gasoline vapors have dissipated.
6

To ensure safe operation
Carbon monoxide poisoning hazard
Exhaust contains poisonous carbon monoxide, a colorless and odorless gas. Breathing exhaust can cause loss of consciousness and may lead to death.
 If you run the engine in an area that is confined or even partially enclosed, the air you breathe could contain a dangerous amount of exhaust gas. To keep exhaust gas from building up, provide adequate ventilation.
 Replace faulty muffler.
 Do not operate the engine in a confined space where dangerous carbon monoxide fumes can collect.
Operation on slope
 When tilling on slopes, keep the fuel tank less than half full to minimize fuel spillage.
 Till across the slope (at equally spaced intervals) rather than up and down it.
 Be very careful when changing the direction of the tiller on a slope.
  Do not use the tiller on a slope of more than 10°.
The maximum safe grade angle shown is for reference purpose only and should be determined according to the type of the tool. Before starting the engine, check that the tiller is not damaged and in good condition. For your safety and safety of others, exercise extreme care when using the tiller on up or down hill.
7
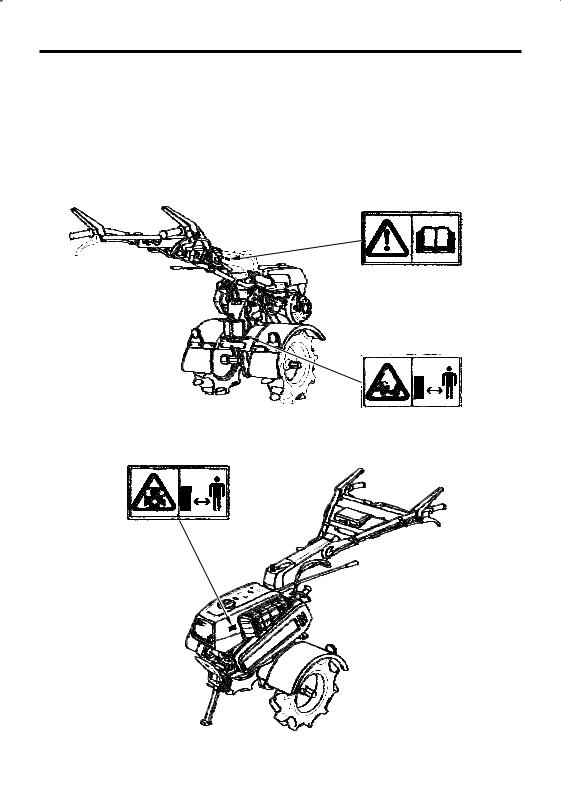
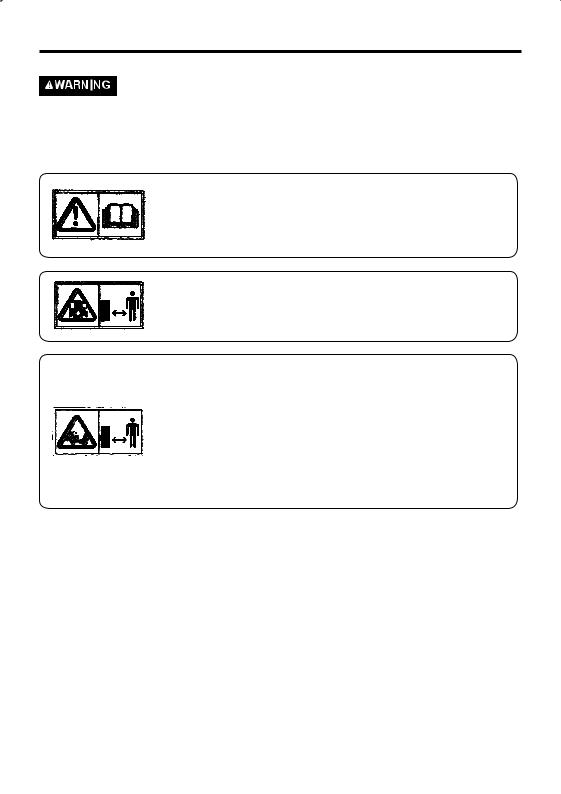
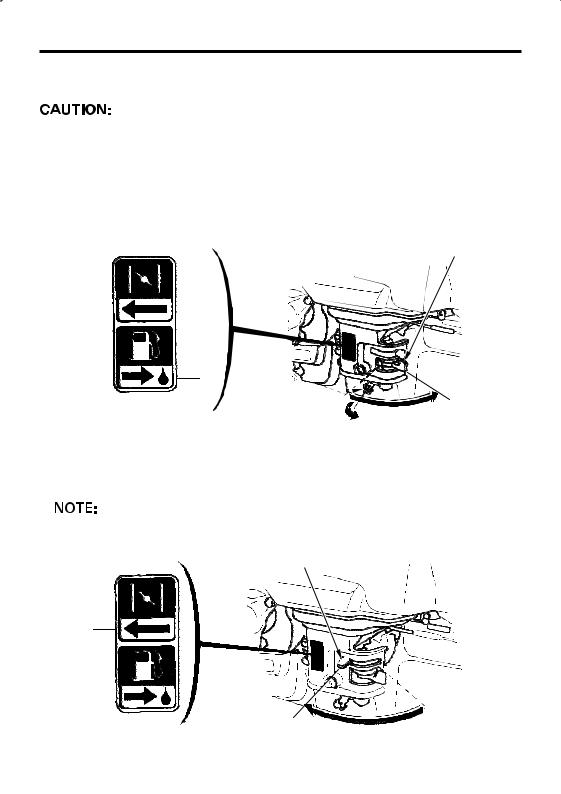
2. SAFETY LABEL LOCATIONS
These labels warn you of potential hazards that can cause serious injury. Read the labels and safety notes and precautions described in this manual carefully.
If a label comes off or becomes hard to read, contact your Honda dealer for a replacement.
READ OWNER’S MANUAL
CUTTING DANGER
EXHAUST CAUTION
8

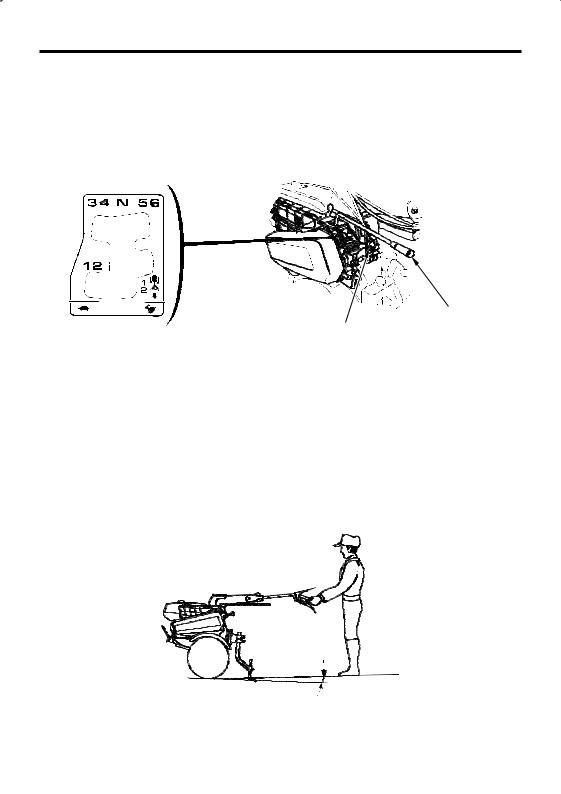
CE mark location
CE MARK
Manufacturer and address
|
Description code |
|
|
Year of manufacture |
|
|
Machine mass |
|
|
(standard specification) |
|
|
Maximum trailing |
|
Maximum trailing |
load of hitch |
|
Net power |
||
force of hitch |
||
|
9
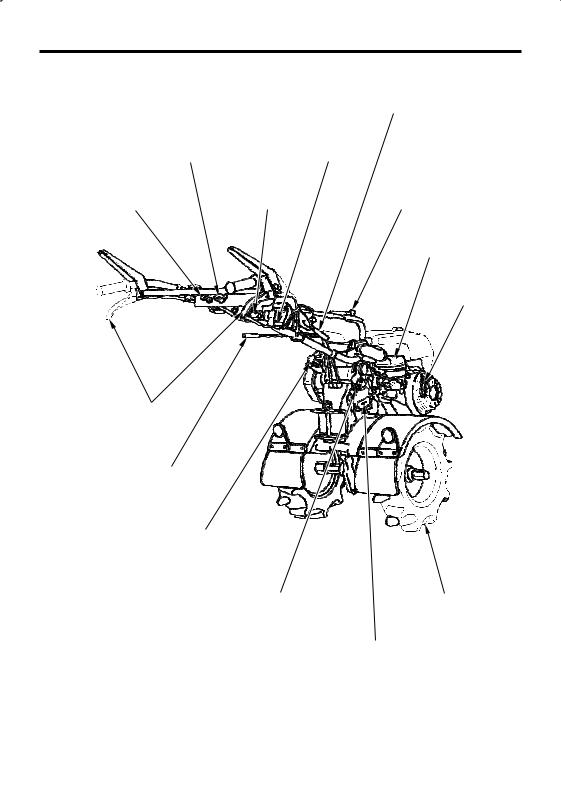
3. COMPONENT IDENTIFICATION
THROTTLE LEVER
MAIN CLUTCH LEVER MAIN CLUTCH LEVER
HANDLE ANGLE ADJUSTER
FUEL LEVEL METER
FUEL TANK CAP
HEADLIGHT


 MUFFLER
BELT COVER
STAND 
(EE Type)
ENGINE OIL FILLER CAP
ENGINE SWITCH  (Except for EE Type)
10
|
|
HANDLE HEIGHT ADJUSTER |
ENGINE SWITCH |
LIGHT SWITCH |
|
CHOKE KNOB |
BATTERY |
HANDLE ANGLE ADJUSTER |
|
|
AIR CLEANER |
|
|
STARTER GRIP |
SIDE CLUTCH LEVERS
MAIN SHIFT LEVER
SUB SHIFT LEVER
TRANSMISSION OIL FILLER CAP TIRE
FRAME SERIAL NUMBER
11

4. PRE-OPERATION CHECK
1. Engine oil
Be sure to check the tiller on a level surface with the engine stopped.
1.Remove the oil filler cap and wipe the dipstick clean.
2.Insert the dipstick into the oil filler neck, but do not screw it in.
3.If the level is low, fill to the top of the oil filler neck with the recommended oil.
OIL FILLER CAP
UPPER
LIMIT
OIL FILLER NECK
Use 4-stroke motor oil that meets or exceeds the requirements for API service classification SE or later (or equivalent). Always check the API service label on the oil container to be sure it includes the letters SE or later (or equivalent).
AMBIENT TEMPERATURE
SAE 10W-30 is recommended for general use. Other viscosities shown in the chart may be used when the average temperature in your area is within the indicated range.
 Using nondetergent oil or 2-stroke engine oil will shorten the engine’s service life.
 Engine oil is a major factor affecting engine performance and service life.
Non-detergent or vegetable oils are not recommended.
 Running the engine with insufficient oil can cause serious engine damage.
12

2. Transmission oil
Place the tiller on a level surface and remove the oil filler cap. The oil should be level with the lower edge of the oil filler hole. Add oil same as the engine oil (see page 12 ) if the level is low.
TRANSMISSION OIL FILLER CAP |
LOWER |
|
EDGE OF THE OIL |
|
FILLER HOLE |
|
UPPER LIMIT |
OIL FILLER HOLE
3. Air cleaner
Check cleaner for dirt or obstruction of elements. (See page 34 )
 ELEMENTS
13
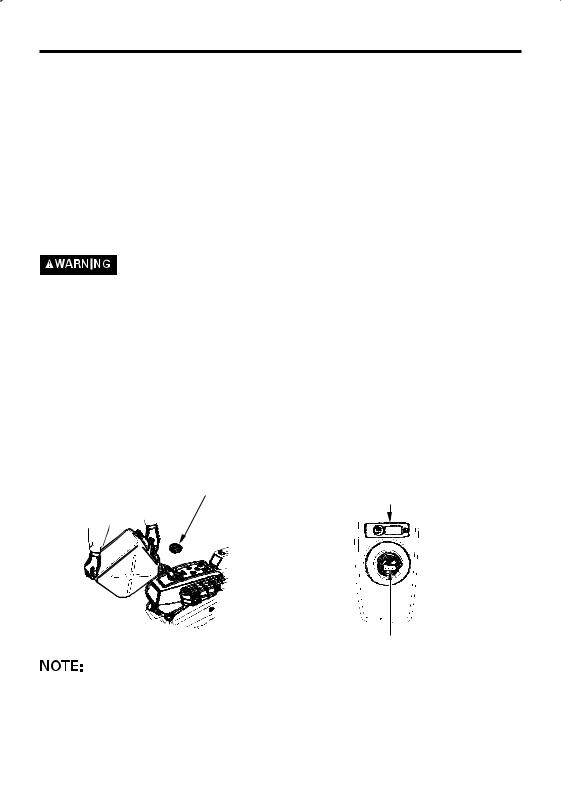
4. Fuel
Remove the fuel tank cap and check the fuel level. Refill the tank if the fuel level is low.
Use automotive unleaded gasoline with a Research Octane Number of 91 or higher (a Pump Octane Number of 86 or higher).
Never use stale or contaminated gasoline or an oil/gasoline mixture. Avoid getting dirt or water in the fuel tank.
After refueling, tighten the fuel tank cap securely.
 Gasoline is extremely flammable and is explosive under certain conditions.
 Refuel in a well-ventilated area with the engine stopped. Do not smoke or allow flames or sparks in the area where the engine is refueled or where gasoline is stored.
 Do not overfill the fuel tank. After refueling, make sure the tank cap is closed properly and securely.
 Be careful not to spill fuel when refueling. Spilled fuel or fuel vapor may ignite. If any fuel is spilled, make sure the area is dry before starting the engine.
 Avoid repeated or prolonged contact with skin or breathing of vapor. KEEP OUT OF REACH OF CHILDREN.
FUEL TANK CAP
FUEL METER
FUEL LEVEL GAUGE
Gasoline spoils very quickly depending on factors such as light exposure, temperature and time.
In worst cases, gasoline can be contaminated within 30 days.
Using contaminated gasoline can seriously damage the engine (carburetor clogged, valve stuck).
14

Such damage due to spoiled fuel is disallowed from coverage by the warranty.
To avoid this please strictly follow these recommendations:
 Only use specified gasoline (see page 14 ).
 Use fresh and clean gasoline.
 To slow deterioration, keep gasoline in a certified fuel container.
 If long storage (more than 30 days) is foreseen, drain fuel tank and carburetor (see page 35 ).
Gasolines containing alcohol
If you decide to use a gasoline containing alcohol (gasohol), be sure it’s octane rating is at least as high as that recommended by Honda. There are two types of ‘‘gasohol’’: one containing ethanol, and the other containing methanol.
Do not use gasohol that contains more than 10% ethanol. Do not use gasoline containing methanol (methyl or wood alcohol) that does not also contain cosolvents and corrosion inhibitors for methanol.
Never use gasoline containing more than 5% methanol, even if it has cosolvents and corrosion inhibitors.
 Fuel system damage or engine performance problems resulting from the use of gasoline that contains alcohol is not covered under the warranty.
Honda cannot endorse the use of gasoline containing methanol since evidence of its suitability is as yet incomplete.
 Before buying gasoline from an unfamiliar station, first determine if the gasoline contains alcohol; if it does, find out the type and percentage of alcohol used.
If you notice any undesirable operating symptoms while using a gasoline that contains alcohol, or one that you think contains alcohol, switch to a gasoline that you know does not contain alcohol.
5. Tire pressure
Check tire pressures. lmproper inflation can reduce both tire life and load carrying capacity. TIRE SIZE: 4.00-8 for DE and GE types
TIRE PRESSURES: 118 kPa (1.2 kgf/cm , 17 psi)
6. Tools and Attachments
To install a tool or attachment on the tiller, follow the instructions furnished with the tool or attachment. Ask your Honda dealer for advice if you encouter any problem or difficulty in installing a tool or attachment.
15
5. STARTING THE ENGINE
 With recoil starter
Be sure the clutch is disengaged and the shift lever is in the neutral position to prevent sudden uncontrolled movement when the engine starts.
The clutch is engaged by holding in the clutch lever and disengaged by releasing the lever.
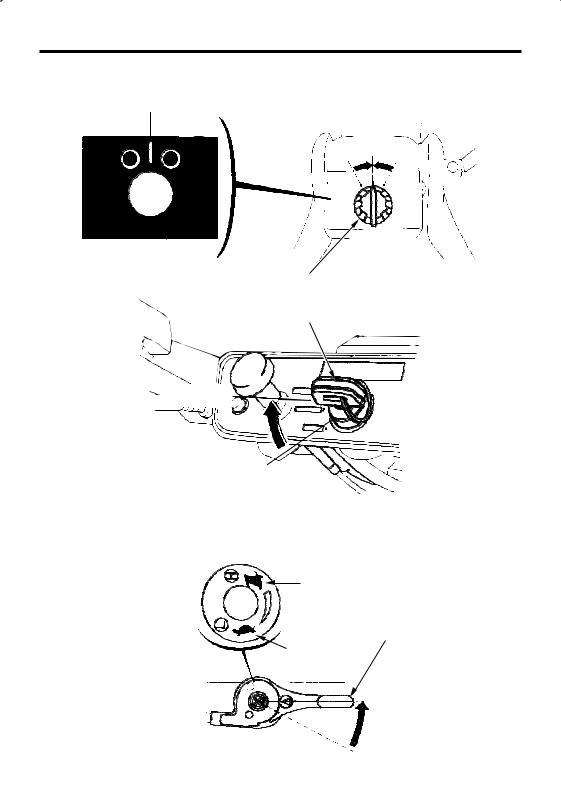
1. Turn the fuel valve ON. Check for tighteness of drain knob.
FUEL VALVE
ON
DRAIN KNOB 
ON
2.In cold weather and when the engine is cold, move the choke lever to the CLOSE position.
Do not use the choke if the engine is warm or the air temperature is high.
CHOKE LEVER
CLOSE
CLOSE
16
3. Turn the engine switch ON.
ON
ON
OFF OFF
ENGINE SWITCH |
(Except for EE Type) |
ENGINE SWITCH |
|
ON
OFF
(EE Type)
4.Align the mark ‘‘ ’’ on the throttle lever with the mark ‘‘○’’ as shown. (START position)
HIGH

 START
START
THROTTLE LEVER
 LOW
LOW
17

5.Hold the handle post with your left hand and pull the starter grip lightly until you feel resistance, then pull the starter grip briskly in the direction of the arrow as shown.
Do not allow the starter grip to snap back against the engine. Return it gently to prevent damage to the starter.
STARTER GRIP
Direction to pull
6.Let the engine warm up for several minutes. If the choke has been pulled out to the CLOSE position, return it gradually to the OPEN position as the engine warms up.
CHOKE LEVER

 OPEN
OPEN
OPEN
18
 With electric starter (EE Type)
1.Turn the fuel valve to the ON position. Check for tighteness of drain knob.
FUEL VALVE
DRAIN KNOB
2.In cold weather and when the engine is cold, pull the choke knob to the CLOSE position.
CHOKE KNOB
CLOSE
19
3.Align the mark ‘‘ ’’ on the throttle lever with the mark ‘‘○’’ as shown. (START position)
HIGH

 START
START
THROTTLE LEVER
 LOW
LOW
4.Turn the engine switch to START and hold it there until the engine starts.
Do not use the starter motor for more than 5 seconds. If the engine fails to start, release the key, and wait at least 10 seconds before operating the starter motor again.
The battery will automatically recharge while the tiller is operated. If the tiller is not operated frequently enough to keep the battery charged, there will be a decrease in starter motor speed. If the battery is too discharged to run the starter motor, use the recoil starter.
ENGINE SWITCH
START
ON 


OFF
5. After the engine starts, let the engine switch return to ON.
START
ON 


20

6.Let the engine warm up for several minutes. If the choke has been pulled out to the CLOSE position, return it gradually to the OPEN position as the engine warms up.
CHOKE KNOB
OPEN
 High altitude operation
At high altitude, the standard carburetor air-fuel mixture will be excessively rich. Performance will decrease, and fuel consumption will increase.
High altitude performance can be improved by specifications to the carburetor. If you always operate the tiller at altitude higher than 1,500 m (5,000 feet) above sea level, have your authorized Honda dealer perform these carburetor modifications.
Even with suitable carburetor jetting, engine horsepower will decrease approximately 3.5 % for each 300 m (1,000 feet) increase in altitude. The effect of altitude on horsepower will be greater than this if no carburetor modification is made.
Operation of the tiller at an altitude lower than the carburetor is jetted for may result in reduced performance, overheating, and serious engine damage caused by an excessively lean air-fuel mixture.
21

6. TILLER OPERATION
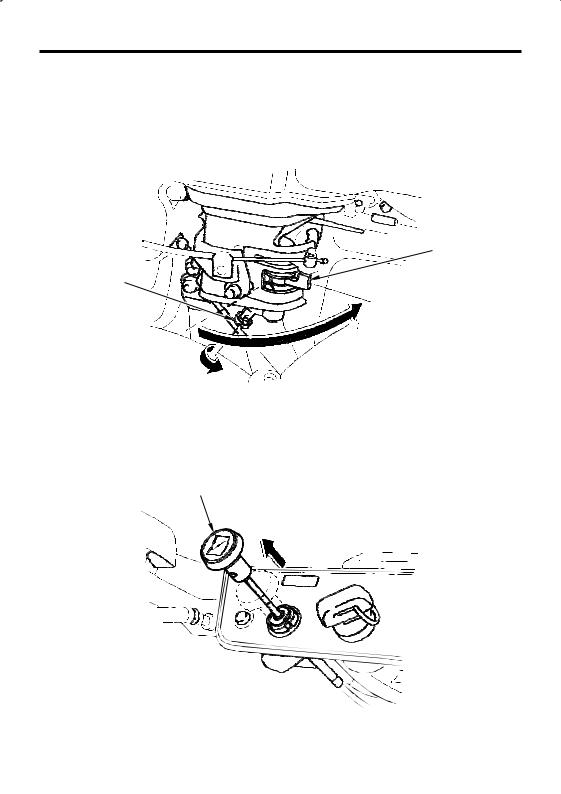
1. Handle angle adjustment
1.The handle can be adjusted at four different angles in either direction.
To adjust, loosen the handle angle adjuster and turn the handle column to the required position. After adjustment, tighten the adjuster securely.
LOOSEN
TIGHTEN
HANDLE ANGLE ADJUSTER
2.When the handle column is swung to the left, also turn the shift lever not to interfere with the handle column. Pull the main shift lever up to release it from the change cover and turn clockwise.
HANDLE COLUMN |
MAIN SHIFT LEVER |
CHANGE COVER
22

2. Handlebar height adjustment
The handle position should be adjusted to suit the stature of the operator and work condition.
Before adjusting the handlebar, place the tiller on the firm level ground to prevent the handle from collapsing accidentally.
To adjust the handlebar height, loosen the adjuster, select the appropriate position and tighten the adjuster.
LOOSEN
TIGHTEN
ADJUSTER
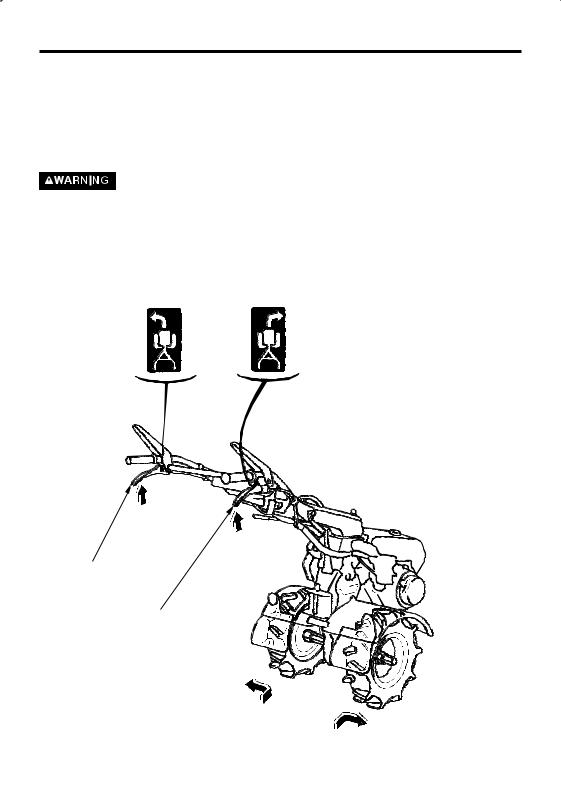
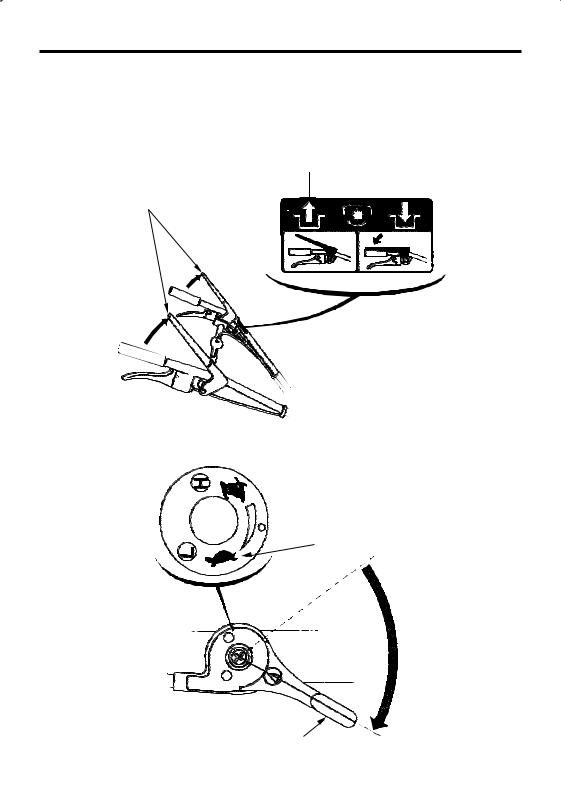
3. Main clutch operation
The clutch engages and disengages the power from the engine to the transmission.
When the clutch lever is squeezed, the clutch is engaged and power is transmitted. Squeeze the lever. The tool will be rotated.
When the lever is released, the clutch is disengaged and power is not transmitted. Release the clutch lever. The tool will be stopped.
Reduce engine rpm before operating main clutch operation.
MAIN CLUTCH LEVERS
DISENGAGED ENGAGED
Disengaged
Engaged
Disengaged
Engaged
23
4. Side clutch operation
The side clutches are used for turning the tiller to the right or to the left. Turn the tiller to the RIGHT; Grasp the RIGHT side clutch.
Turn the tiller to the LEFT; Grasp the LEFT side clutch.
 Reduce engine rpm before operating the side clutches.
 Do not ever use the side clutches when pulling a trailer.
 Avoid using the side clutches when going up or downhill.
 In the case of heavy load trailing, side clutch operation should be done carefully because it might be dangerous.
LEFT SIDE CLUTCH
RIGHT SIDE CLUTCH
24
5. Gear shift operation
The transmission is of a three forward speeds and one reverse speed transmission (six forward speeds and two reverse speeds by multipling the two speeds of the sub transmission). When shifting the shift lever, make use of the shift lever indicator.
MAIN SHIFT LEVER
SUB SHIFT LEVER
Gear shifting
1.Move the throttle lever to the right fully to bring the engine speed to idle.
2.Disengage the main clutch.
3.Shift into required position.
6. Normal operating angle
Lower the handle slightly so the front of the machine is raised about 6 8°.
6 8°
To get the maximum advantage from the tiller, try to hold the machine at the angle shown while you are tilling the ground:
25

 Do not use the tiller with a rotor whose diameter is in excess of 360 mm.
 Operating the tiller on grades could cause the tiller to tip over.
 Allowing any one to operate this tiller without proper instruction may result in injury.
 Wear sturdy, full coverage footgear. Operating this tiller with bare feet, or with open toe shoes or sandals increases your risk of injury.
 Do not use the tiller in the night.
 Be sure to use two people to transport the tiller from one place to another without using a carrier.
 When the rotor is clogged with mud, pebbles etc., immediately stop the engine and clean the rotor in a safe place. Be sure to wear heavy gloves when cleaning the rotor.
To prevent damage, check the tiller for any signs of damage or other faults each time the tiller is used after it has been operated last.
26
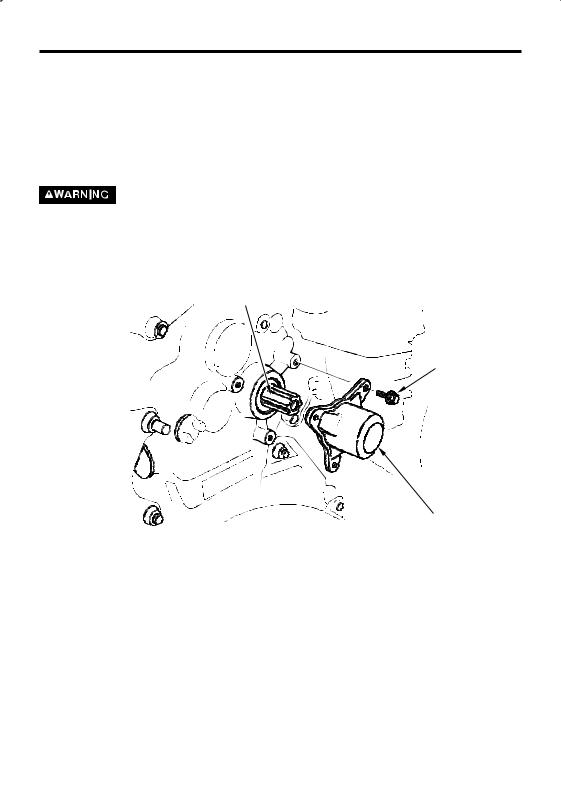
7. P.T.O. (Power Take Off) operation
The P.T.O. shaft is used for stationary work, hulling, spraying and moving, etc.
To use, remove the three 6 mm bolts and P.T.O. cover. To use, remove the P.T.O. cover.
 When using for stationary work, the gear shift lever should be shifed into Neutral position.
 Do not operate the tiller without the P.T.O. cover when the P.T.O. is not used.
P.T.O. SHAFT
6 mm BOLT
P.T.O. COVER
8. A.C. output (GE Type)
An alternating current (12V 50W) can be taken out of these terminals.
27

9. Headlight switch operation (EE Type)
The switch turns the headlights ON and OFF.
Shift the transmission to a lower speed range to maintain a safe speed when visibility is poor.
OFF
ON
OFF
10.Tilling depth adjustment (Equipped type only)
1.Install the hitch attachment in the hitch box with a hitch pin.
2.The tilling depth adjustment can be made by loosening the bolts securing the drag bars A and B and sliding the drag bars up down as necessary.
DRAG BAR A
HITCH PIN
HITCH BOX 

DRAG BAR B
28
7. STOPPING THE ENGINE
 In normal use:
1.Release the clutch lever to the DISENGAGED position and shift lever is in neutral position.
Release the clutch lever. The tool will be stopped.
DISENGAGED
MAIN CLUTCH LEVERS
Disengaged
Disengaged
2. Move the throttle lever towards you (LOW position).
 LOW
LOW
THROTTLE LEVER
29
 Loading...