


 Loading...
Owner’s Manual
TILLER |
FRC800 |
o2002-2009 Honda Motor Co., Ltd. -All Rights Reserved

The engine exhaust from this product contains chemicals known to the State of California to cause cancer, birth defects or other reproductive harm.
Keep this owner’s manual handy so you can refer to it at any time. This owner’s manual is considered a permanent part of the tiller and should remain with the tiller if resold.
The information and specifications included in this publication were in effect at the time of approval for printing. Honda Motor Co., Ltd. reserves the right, however, to discontinue or change specifications or design at any time without notice and without incurring any obligation whatever.

INTRODUCTION
Congratulations on your selection of a Honda tiller. We are certain you will be pleased with your purchase of one of the finest tillers on the market.
We want to help you get the best results from your new tiller and to operate it safely. This manual contains the information on how to do that; please read it carefully.
As you read this manual, you will find information preceded by a 


 symbol. That information is intended to help you avoid
damage to your tiller, other property, or the environment.
We suggest you read the warranty policy to fully understand its coverage and your responsibilities of ownership. The warranty policy is a separate document that should have been given to you by your dealer.
When your tiller needs scheduled maintenance, keep in mind that your Honda servicing dealer is specially trained in servicing Honda tillers and is supported by the parts and service divisions of American Honda. Your Honda servicing dealer is dedicated to your satisfaction and will be pleased to answer your questions and concerns.
Best Wishes,
Honda Motor Co., Ltd.
1

INTRODUCTION
A FEW WORDS ABOUT SAFETY
Your safety and the safety of others are very important. And using this tiller safely is an important responsibility.
To help you make informed decisions about safety, we have provided operating procedures and other information on labels and in this manual. This information alerts you to potential hazards that could hurt you or others.
Of course, it is not practical or possible to warn you about all the hazards associated with operating or maintaining a tiller. You must use your own good judgment.
You will find important safety information in a variety of forms, including:
 Safety Labels –– on the tiller.
 Safety Messages –– preceded by a safety alert symbol
  and one of three signal words, DANGER, WARNING, or CAUTION.
These signal words mean:

 You WILL be KILLED or SERIOUSLY HURT if
  you don’t follow instructions.

 You CAN be KILLED or SERIOUSLY HURT if
  you don’t follow instructions.
You CAN be HURT if you don’t follow instructions.
 Safety Headings –– such as IMPORTANT SAFETY INFORMATION.
 Safety Section –– such as TILLER SAFETY.
 Instructions –– how to use this tiller correctly and safely.
This entire book is filled with important safety information –– please read it carefully.
2

CONTENTS |
|
TILLER SAFETY.......................................................................................... |
5 |
IMPORTANT SAFETY INFORMATION ................................................. |
5 |
SAFETY LABEL LOCATIONS................................................................. |
8 |
CONTROLS................................................................................................. |
9 |
COMPONENT & CONTROL LOCATIONS............................................. |
9 |
CONTROLS........................................................................................... |
10 |
Fuel Valve.......................................................................................... |
10 |
Choke Lever ...................................................................................... |
10 |
Engine Switch................................................................................... |
10 |
Starter Grip ....................................................................................... |
11 |
Throttle Lever ................................................................................... |
11 |
Handlebar Height Adjuster.............................................................. |
11 |
Main Clutch Lever ............................................................................ |
12 |
Gearshift Lever ................................................................................. |
12 |
Drag Bar ............................................................................................ |
12 |
BEFORE OPERATION .............................................................................. |
13 |
ARE YOU READY TO GET STARTED .............................................. |
13 |
IS YOUR TILLER READY TO GO ...................................................... |
13 |
Check the Engine.............................................................................. |
14 |
Check the Tiller ................................................................................. |
14 |
OPERATION ............................................................................................. |
15 |
SAFE OPERATING PRECAUTIONS .................................................... |
15 |
STARTING THE ENGINE ..................................................................... |
16 |
OPERATING THE CONTROLS FOR TILLING...................................... |
19 |
HANDLING TIPS................................................................................... |
23 |
STOPPING THE ENGINE ..................................................................... |
24 |
SERVICING YOUR TILLER ...................................................................... |
25 |
THE IMPORTANCE OF MAINTENANCE............................................. |
25 |
MAINTENANCE SAFETY..................................................................... |
26 |
MAINTENANCE SCHEDULE ............................................................... |
27 |
REFUELING .......................................................................................... |
28 |
FUEL RECOMMENDATIONS .............................................................. |
28 |
ENGINE OIL LEVEL CHECK ................................................................. |
30 |
ENGINE OIL CHANGE.......................................................................... |
31 |
ENGINE OIL RECOMMENDATIONS................................................... |
32 |
TRANSMISSION OIL LEVEL CHECK................................................... |
33 |
AIR FILTER INSPECTION ..................................................................... |
34 |
AIR FILTER CLEANING ........................................................................ |
34 |
SPARK PLUG SERVICE........................................................................ |
36 |
3

CONTENTS |
|
|
SERVICING YOUR TILLER (continued) |
|
|
CLUTCH CABLE ADJUSTMENT ........................................................ |
. |
37 |
THROTTLE CABLE ADJUSTMENT .................................................... |
. |
38 |
DRIVE BELT ADJUSTMENT ............................................................... |
. |
39 |
SEDIMENT CUP CLEANING............................................................... |
. |
41 |
SPARK ARRESTER SERVICE.............................................................. |
. |
42 |
TINE REPLACEMENT.......................................................................... |
. |
43 |
TIRE PRESSURE CHECK..................................................................... |
. |
44 |
TINES AND FASTENERS CHECK....................................................... |
. |
45 |
STORAGE ................................................................................................ |
. |
46 |
STORAGE PREPARATION.................................................................. |
. |
46 |
Cleaning ........................................................................................... |
. |
46 |
Fuel ................................................................................................... |
. |
47 |
Engine Oil......................................................................................... |
. |
50 |
STORAGE PRECAUTIONS ................................................................. |
. |
51 |
REMOVAL FROM STORAGE.............................................................. |
. |
51 |
TRANSPORTING..................................................................................... |
. |
52 |
TAKING CARE OF UNEXPECTED PROBLEMS..................................... |
. |
53 |
ENGINE PROBLEMS ........................................................................... |
. |
53 |
Engine Will Not Start ...................................................................... |
. |
53 |
Engine Lacks Power ........................................................................ |
. |
54 |
TILLING PROBLEMS ........................................................................... |
. |
55 |
Poor Tilling Quality ......................................................................... |
. |
55 |
TECHNICAL & CONSUMER INFORMATION ........................................ |
. |
56 |
TECHNICAL INFORMATION .............................................................. |
. |
56 |
Serial Number Locations................................................................ |
. |
56 |
Carburetor Modification for High Altitude Operation................... |
57 |
|
Emission Control System Information.......................................... |
. |
58 |
Air Index........................................................................................... |
. |
60 |
Specifications .................................................................................. |
. |
61 |
CONSUMER INFORMATION ............................................................. |
. |
62 |
Dealer Locator Information ............................................................ |
. |
62 |
Honda Publications ......................................................................... |
. |
62 |
Customer Service Information....................................................... |
. |
63 |
QUICK REFERENCE INFORMATION ............................ |
Inside back cover |
|
4

TILLER SAFETY
IMPORTANT SAFETY INFORMATION
Honda tillers are designed to cultivate earth outdoors. Other uses can result in injury to the operator or damage to the tiller and other property.
Most accidents can be prevented if you follow all instructions in this manual and on the tiller. The most common hazards are discussed below, along with the best way to protect yourself and others.
Operator Responsibility
 Know how to stop the tiller quickly in case of emergency.
 Understand the use of all tiller controls.
 Be very cautious when operating the tiller in REVERSE, especially if attachments are being used.
 Keep a firm hold on the handlebars. They may tend to lift during clutch engagement.
 Be sure the drag bar is in place and properly adjusted.
 Be sure that anyone who operates the tiller receives proper instruction. Do not let children operate the tiller. Keep children and pets away from the area of operation.
Carbon Monoxide Hazards
 Exhaust contains poisonous carbon monoxide, a colorless, odorless gas. Breathing carbon monoxide can cause loss of consciousness and may lead to death.
 If you run the tiller in a confined or even partially enclosed area, the air you breathe could contain dangerous amounts of carbon monoxide. To keep carbon monoxide from building up, provide adequate ventilation.
5

TILLER SAFETY
Fire and Burn Hazards
 The exhaust system gets hot enough to ignite some materials.
Keep the tiller at least 3 feet (1 meter) away from buildings and other equipment during operation.
Keep flammable materials away from the tiller.
 The muffer becomes very hot during operation and remains hot for a while after stopping the engine.
Be careful not to touch the muffler while it is hot. Let the engine cool before storing the tiller indoors.
Refuel With Care
Gasoline is extremely flammable, and gasoline vapor can explode. Allow the engine to cool if the tiller has been in operation. Refuel only outdoors in a well-ventilated area with the engine OFF. Do not overfill the fuel tank. Never smoke near gasoline, and keep other flames and sparks away. Always store gasoline in an approved container. Make sure that any spilled fuel has been wiped up before starting the engine.
Avoid Rotating Tines
Rotating tines can cause serious cuts and even amputate body parts. Keep away from the tine area whenever the engine is running. If you need to work around the tines to clear an object accumulation or for any other reason, always shut off the engine. Disconnect the spark plug cap, and wear heavy gloves when you need to clean the tine area or handle the tines.
Clear Tilling Area
A tine can throw rocks and other objects with enough force to cause serious injury. Before tilling, carefully inspect the area and remove all stones, sticks, bones, nails, pieces of wire, and other loose objects. Be aware; if children are in the shop area, stop the tiller. Never operate the tines over gravel.
6

TILLER SAFETY
Keep Shields in Place
Guards and shields are designed to protect you from being hit by thrown objects and to keep you from touching hot engine parts and moving components. For your safety and the safety of others, keep all shields in place when the engine is running.
Wear Protective Clothing
Wearing protective clothing will reduce your risk of injury. Long pants and eye protection reduce the risk of injures from thrown objects. Sturdy shoes with aggressive soles provide better traction.
Turn Engine Off When Not Operating the Tiller
If you need to leave the tiller for any reason, even just to inspect the area ahead, always turn the engine off.
Slope Operation
 When tilling on slopes, keep the fuel tank less than half full to minimize fuel spillage.
 Till across the slope (at equally spaced intervals) rather than up and down it.
 Be very careful when changing the direction of the tiller on a slope.
 Do not use the tiller on a slope of more than 10°. Before starting the engine, check that the tiller is not damaged and is in good condition. For your safety and the safety of others, exercise extreme care when using the tiller on a slope.
Tilling Conditions
Operate the tiller only in daylight or good artificial light. Do not operate the tiller at night or under poor light conditions.
7

TILLER SAFETY
SAFETY LABEL LOCATIONS
These labels warn you of potential hazards that can cause serious injury. Read them carefully. If a label comes off or becomes hard to read, contact your Honda tiller dealer for a replacement.
California type
California type |
Non-California type |
8
CONTROLS
COMPONENT & CONTROL LOCATIONS
MAIN CLUTCH LEVER
HANDLEBAR
STARTER GRIP
AIR CLEANER
FUEL TANK CAP
RECOIL STARTER
TRANSMISSION
OIL FILLER CAP
CHOKE LEVER
ENGINE OIL FILLER
CAP/DIPSTICK
FUEL VALVE LEVER
THROTTLE LEVER
GEAR SHIFT LEVER
MUFFLER
SPARK PLUG
ENGINE SWITCH
 DRAG BAR
V-BELT COVER
 MUD GUARD
HANDLE HEIGHT ADJUSTER
ROTARY TINES
9
CONTROLS
CONTROLS
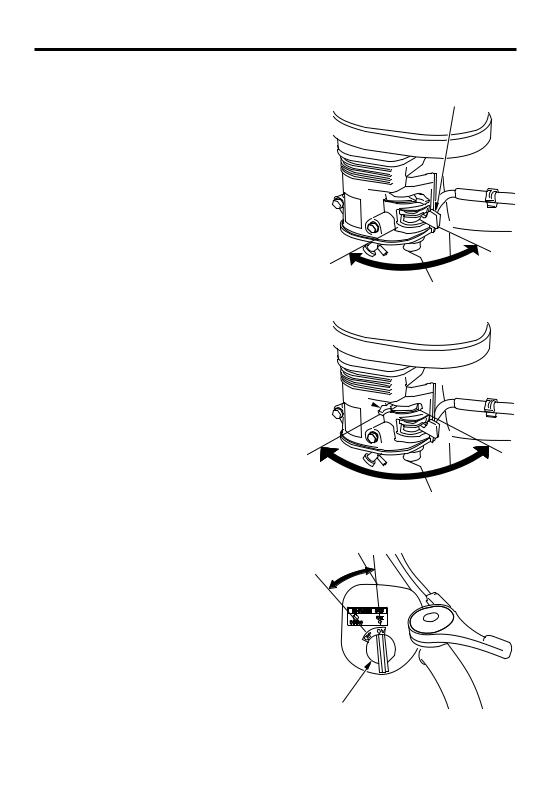
Fuel Valve
The fuel valve opens and closes the connection between the fuel tank and the carburetor.
The fuel valve lever must be in the ON position for the engine to run.
After stopping the engine, turn the fuel valve lever to the OFF position.
Choke Lever
The choke lever opens and closes the choke valve in the carburetor.
The CLOSED position enriches the fuel mixture for starting a cold engine.
The OPEN position provides the correct fuel mixture for operation after starting and for restarting a warm engine.
Engine Switch
The engine switch controls the ignition system.
OFF Stops the engine.
ON Running position.
FUEL VALVE LEVER
ON
OFF
CHOKE
LEVER 
CLOSED |
OPEN |
ON
OFF
ENGINE SWITCH
10
CONTROLS
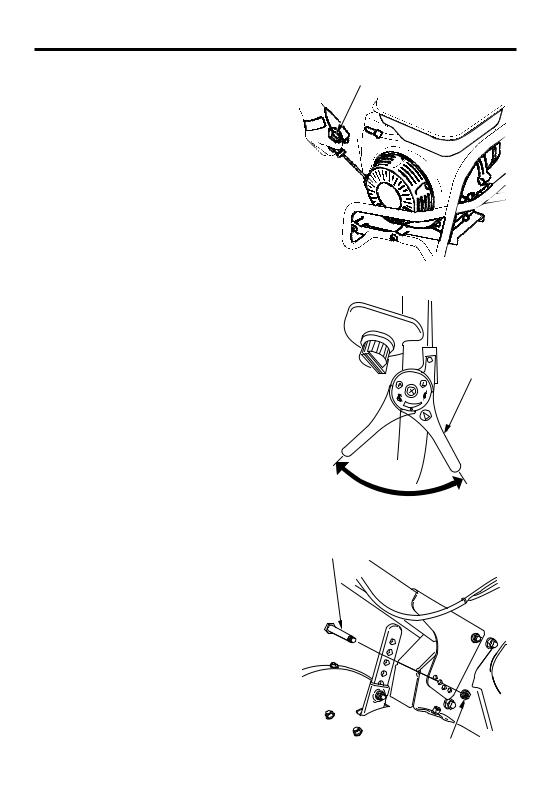
Starter Grip
STARTER GRIP
Pulling the starter grip operates the recoil starter to crank the engine.
Throttle Lever
The throttle lever controls engine speed.
Moving the throttle lever in the directions shown makes the engine run faster or slower.
Tine speed is controlled by adjusting the throttle lever. At maximum throttle position, the
tines will rotate at the highest speed. FAST Moving the throttle lever toward the
idle position will decrease the tine speed.
THROTTLE LEVER
SLOW
Handlebar Height Adjuster |
HEIGHT ADJUSTING BOLT |
Handlebar height can be adjusted to match operator height.
For normal tilling, the most comfortable operator position is with the handlebars at waist height.
HANDLEBAR LOCK NUT
11
CONTROLS
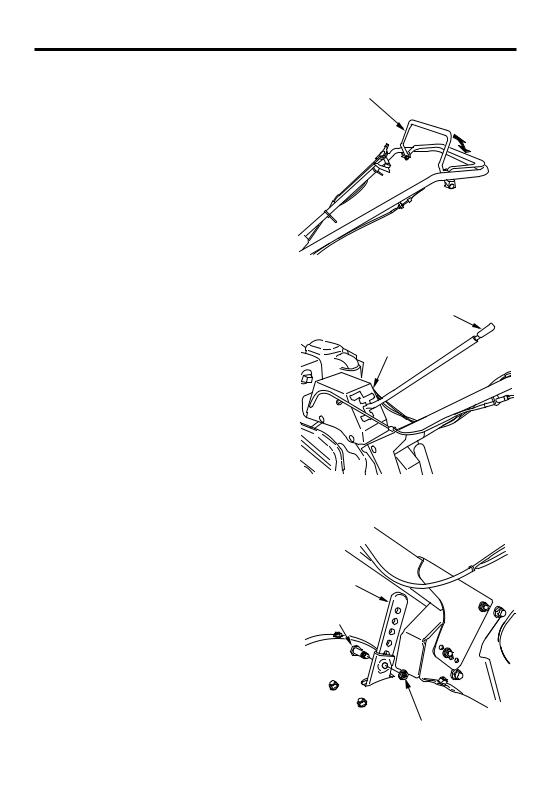
Main Clutch Lever
The main clutch lever engages and disengages the transmission that drives the tines.
Gearshift Lever
The transmission offers a choice of three forward speeds, neutral, and one reverse speed. Shift lever positions are indicated on the gearshift lever bracket.
Drag Bar
The drag bar controls tilling depth and should always be used when tilling. It enables you to compensate for the hardness of the soil. Ideal drag bar height will depend on the type of soil being tilled and soil conditions at the time of tilling. In general, the drag bar should be adjusted so that the tiller is tilted slightly backward.
MAIN CLUTCH LEVER
DISENGAGED
ENGAGED
GEARSHIFT LEVER 
GEARSHIFT LEVER
BRACKET
DRAG BAR 
LOCKING BOLT
LOCKING NUT
12

BEFORE OPERATION
ARE YOU READY TO GET STARTED?
Your safety is your responsibility. A little time spent in preparation will significantly reduce your risk of injury.
Knowledge
Read and understand this manual. Know what the controls do and how to operate them.
Familiarize yourself with the tiller and its operation before you begin using it. Know how to quickly shut off the tiller in case of an emergency.
IS YOUR TILLER READY TO GO?
For your safety, and to maximize the service life of your equipment, it is very important to take a few moments before you operate the tiller to check its condition. Be sure to take care of any problem you find, or have your servicing dealer correct it, before you operate the tiller.
Improperly maintaining this tiller, or failing to correct a problem before operation, could cause a malfunction in which you could be seriously injured.
Always perform a pre-operation inspection before each operation, and correct any problem.
13

BEFORE OPERATION
Do not place flammable objects close to the engine.
Before beginning your pre-operation checks, be sure the tiller is on a level surface and the engine switch is in the OFF position.
Check the Engine
Check the oil level (see page 30 ).
Check the air filter (see page 34 ). A dirty air filter will restrict air flow to the carburetor, reducing engine and tiller performance.
Check the fuel level (see page 28). Starting with a full tank will help to eliminate or reduce operating interruptions for refueling.
Check the Tiller
Check the transmission oil (see page 33 ).
14
OPERATION
SAFE OPERATING PRECAUTIONS
Before operating the tiller for the first time, please review both the
TILLER SAFETY chapter and the chapter titled BEFORE OPERATION.
For your safety, avoid starting or operating the tiller in an enclosed area such as a garage. Your tiller’s exhaust contains poisonous carbon monoxide gas that can collect rapidly in an enclosed area and cause illness or death.
Carbon monoxide gas is toxic. Breathing it can cause unconsciousness and even kill you.
Avoid any enclosed areas or activities that expose you to carbon monoxide.
15

OPERATION
STARTING THE ENGINE
Refer to Safe Operating Precautions on Page 15 .
Tines are sharp and spin fast.
Spinning tines can cut you severely and can amputate body parts.
 Wear protective footwear.
 Keep your hands and feet away from the tines while the engine is running.
 Stop the engine before performing any adjustment, inspection, or maintenance.
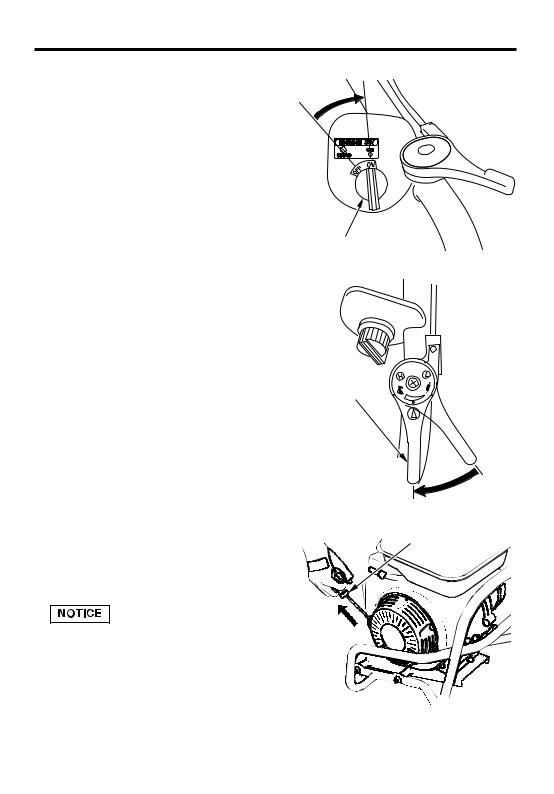
1.Turn the fuel valve lever to the ON position. Check that the fuel drain screw is tightened securely.
FUEL VALVE LEVER
DRAIN |
|
SCREW |
ON |
|
2. Move the choke lever to the |
|
CLOSED position to start a cold |
|
engine. |
CHOKE |
|
LEVER |
Leave the choke lever in the OPEN |
|
position to restart a warm engine. |
|
|
OPEN |
|
CLOSED |
16
OPERATION
3.Turn the engine switch to the ON position.
ON
ENGINE SWITCH
4. Move the throttle lever away from the SLOW position, about 1/3 of the way toward the FAST position.
THROTTLE
LEVER
SLOW
FAST
5.Pull the starter grip lightly until you feel resistance, then pull briskly in the direction of the arrow as shown.
Do not allow the starter grip to snap back against the engine. Return it gently to prevent damage to the starter.
STARTER GRIP
Direction to pull
17

OPERATION
6.If the choke lever was moved to the CLOSED position to start the engine, gradually move it to the OPEN position as the engine warms up.
CHOKE LEVER
CLOSED |
OPEN |
18
OPERATION
OPERATING THE CONTROLS FOR TILLING
If the tines dig in but the machine will not move forward, move the handlebars from side-to-side.
Handlebar Height Adjustment
HEIGHT ADJUSTING BOLT
Stop the engine before adjusting the handlebar height.
Remove the handlebar height adjusting bolt, adjust the handlebar height, and reinstall the bolt in the appropriate holes.
Clutch
When the main clutch lever is squeezed, the clutch is engaged, and power is transmitted to the transmission.
When the lever is released, the clutch is disengaged, and power is not transmitted.
HANDLEBAR LOCK NUT
MAIN CLUTCH LEVER
DISENGAGED
ENGAGED
19
Loading...