


INTRODUCTION
Congratulations on your selection of a Honda lawn mower! We are certain you will be pleased with your purchase of one of the finest lawn mowers on the market.
We want to help you get the best results from your new mower and to operate it safely. This manual contains the information on how to do that; please read it carefully.
We suggest you read the DISTRIBUTOR’S LIMITED WARRANTY (page 20) and EMISSION CONTROL SYSTEM WARRANTY
(page 21) to fully understand coverage and your responsibilities of ownership.
When your mower needs scheduled maintenance, keep in mind that an authorized Honda servicing dealer is specially trained in servicing Honda mowers and is supported by the parts and service divisions of American Honda. Your Honda dealer is dedicated to your satisfaction and will be pleased to answer your questions and concerns.
Keep this owner’s manual handy so you can refer to it at any time. This owner’s manual is considered a permanent part of the lawn mower and should remain with the lawn mower if resold.
The information and specifications included in this publication were in effect at the time of approval for printing. American Honda Motor Co., Inc. reserves the right, however, to discontinue or change specifications or design at any time without notice and without incurring any obligation whatever. No part of this publication may be reproduced without written permission.
SAFETY MESSAGES
Your safety and the safety of others are very important. We have provided important safety messages in this manual and on the mower. This information alerts you to potential hazards that could hurt you or others. Please read these messages carefully.
Of course, it is not practical or possible to warn you about all the hazards associated with operating or maintaining a lawn mower. You must use your own good judgment.
You will find important safety information in a variety of forms:
•Safety Labels – on the lawn mower.
•Instructions – how to use this mower correctly and safely.
•Safety Messages – preceded by a safety alert A symbol and one of three signal words: DANGER, WARNING, or CAUTION.
These signal words mean:
BDANGER
BWARNING
BCAUTION
You WILL be KILLED or SERIOUSLY HURT if you don't follow instructions.
You CAN be KILLED or SERIOUSLY HURT if you don't follow instructions.
You CAN be HURT if you don't follow instructions.
Each message tells you what the hazard is, what can happen, and what you can do to avoid or reduce injury.
•Damage Prevention Messages – You will also see other important messages that are preceded by the word NOTICE. This word means:
|
|
Your lawn mower or other property can be |
|
NOTICE |
|
|
damaged if you don’t follow instructions. |
|
|
|
|
|
||
© 2004–2009 American Honda Motor Co., Inc.—All Rights Reserved |
||
31VK6723 |
EM5 |
K3 |
POM31VK6723 |
00X31-VK6-7230 |
IPC.4755.2009.03 |
||
|
|
|
PRINTED IN U.S.A. |
OWNER’S MANUAL
HRC216HXA
BWARNING: B
The engine exhaust from this product contains chemicals known to the State of California to cause cancer, birth defects, or other reproductive harm.
CONTENTS*
INTRODUCTION ............................... |
1 |
SAFETY MESSAGES........................ |
1 |
LAWN MOWER SAFETY .................. |
2 |
IMPORTANT MESSAGE TO |
|
PARENTS..................................... |
2 |
IMPORTANT MESSAGE TO |
|
EMPLOYERS ............................... |
2 |
SAFETY LABEL LOCATIONS...... |
2 |
SETTING UP YOUR NEW MOWER .3 |
|
CONTROL LOCATIONS ................... |
4 |
BEFORE OPERATION...................... |
5 |
IS YOUR LAWN MOWER |
|
READY TO GO?........................... |
5 |
CHECK YOUR MOWING AREA .. |
5 |
GET THE MOWER READY.......... |
5 |
OPERATION...................................... |
6 |
SAFE OPERATING |
|
PRECAUTIONS .......................... |
6 |
STARTING THE ENGINE............. |
6 |
OPERATING THE CONTROLS |
|
FOR MOWING.............................. |
7 |
STOPPING THE ENGINE ............ |
7 |
SAFE MOWING PRACTICES ...... |
8 |
SERVICING YOUR LAWN MOWER .8 |
|
MAINTENANCE SAFETY............. |
8 |
MAINTENANCE SCHEDULE ....... |
9 |
BLADES........................................ |
9 |
GRASS BAG CLEANING AND |
|
REPLACEMENT......................... |
10 |
ENGINE MAINTENANCE........... |
11 |
FUEL SYSTEM........................... |
14 |
TRANSPORTING ............................ |
14 |
STORAGE ....................................... |
14 |
TAKING CARE OF UNEXPECTED |
|
PROBLEMS..................................... |
16 |
TECHNICAL INFORMATION .......... |
17 |
SERIAL NUMBER LOCATIONS. 17 |
|
CARBURETOR |
|
MODIFICATION FOR HIGH |
|
ALTITUDE OPERATION ............ |
17 |
EMISSION CONTROL SYSTEM 17 |
|
SPECIFICATIONS...................... |
18 |
CONSUMER INFORMATION ......... |
19 |
REPLACEMENT PARTS, |
|
OPTIONAL EQUIPMENT, AND |
|
SERVICE ITEMS........................ |
19 |
CUSTOMER SERVICE |
|
INFORMATION........................... |
19 |
DISTRIBUTOR'S LIMITED |
|
WARRANTY ............................... |
20 |
EMISSION CONTROL SYSTEM |
|
WARRANTY ............................... |
21 |
*For more information regarding cable adjustment or how to mow your lawn, see FAQs at www.hondapowerequipment.com/faq
1

LAWN MOWER SAFETY
Most injuries or property damage with walk-behind mowers can be prevented if you follow all instructions in this manual and on the mower. The most common hazards are discussed below, along with the best way to protect yourself and others.
Avoid Rotating Blades
Rotating blades can cause serious cuts and even amputate fingers, hands, toes, or feet. Keep away from the mower deck whenever the engine is running. If you need to adjust the cutting height or work around the deck for any other reason, always shut off the engine. Wear heavy gloves and disconnect the spark plug cap when you need to clean the mower deck or handle the blades.
Clear Mowing Area
Mower blades can throw rocks and other objects with enough force to cause serious injury. Before mowing, carefully inspect the area and remove all sticks, stones, pieces of wire, and other loose objects. Never operate the blades over gravel.
Keep Shields in Place
Guards and shields are designed to protect you from being hit by thrown objects and from hot engine parts and moving components. For your safety and the safety of others, keep all shields in place when the engine is running.
Refuel with Care
Gasoline is extremely flammable and gasoline vapor can explode. Refuel only outdoors in a well-ventilated area with the engine OFF. Never smoke near gasoline and keep other flames and sparks away. Always store gasoline in an approved container.
Wear Protective Clothing
Wearing protective clothing will reduce your risk of injury. Long pants and eye protection reduce the risk of injuries from thrown objects. Sturdy shoes with aggressive soles will help protect your feet and give you better traction on slopes or uneven ground.
Turn Engine Off When Not Mowing
If you need to leave the mower for any reason, even just to inspect the lawn ahead, always turn the engine OFF.
IMPORTANT MESSAGE TO PARENTS
THE SAFETY OF YOUR CHILDREN IS VERY IMPORTANT to Honda. That’s why we urge you to read this message before letting your child operate this lawn mower. Lawn mowers are tools, not toys. As with any equipment, bad judgments can result in serious injuries. You can help prevent injuries by making good decisions about if, when, and how your child operates this equipment.
The first question you’ll need to ask is whether your child is capable of operating this mower safely. Remember, young people vary widely, and AGE IS NOT THE ONLY FACTOR.
Physically, a child must be LARGE ENOUGH AND STRONG ENOUGH to easily start the mower and control its direction. The child also needs enough size, strength, and coordination to comfortably reach and operate the controls.
A tougher question you need to ask is if your child has enough MATURITY AND RESPONSIBILITY to safely operate this mower. Does the young person think through problems and come to logical solutions? Be honest! Anyone who takes unnecessary risks and doesn’t obey rules should not operate this lawn mower.
If you decide that your son or daughter can handle the mower safely, CAREFULLY READ THE OWNER’S MANUAL with your child. Make sure you both understand all instructions and safety information. Also, be sure your child wears sturdy shoes and other protective clothing when operating or handling the mower.
2
SUPERVISION is also very important. Walk with your child during the first few minutes of mowing. Even after he or she has become confident with the mower, do not let him or her use the mower without good adult supervision. An adult should also be present during refueling and maintenance. In fact, it’s up to the adult owner to make sure that the mower is properly maintained and kept in safe operating condition.
By always placing safety first, your child will acquire useful skills and a sense of accomplishment. And you’ll both get the best results from your lawn mower.
IMPORTANT MESSAGE TO EMPLOYERS
As an employer, you have special responsibilities to the people who work for you.
Before you ask anyone to operate this mower, you need to determine whether the person is old enough, large enough, and strong enough to safely handle and control the mower.
If you decide he or she is, make sure the employee reads and understands all instructions and warnings in this manual and on the labels before operating the mower.
Allow adequate time for hands-on training by a qualified instructor, and personally supervise practice sessions until you feel sure the employee is ready to operate the machine.
Also be sure employees wear proper clothing and have eye protection and any other gear that may be required by local ordinances or your insurance company.
Remember, too, that you are responsible for keeping the mower properly maintained and in safe operating condition. Your commitment to safety on the job can help prevent injuries and property damage.
SAFETY LABEL LOCATIONS
These labels warn you of potential hazards that can cause serious injury. Read them carefully. If a label comes off or becomes hard to read, contact an authorized Honda servicing dealer for a replacement.
SETTING UP YOUR NEW MOWER
Loose Parts
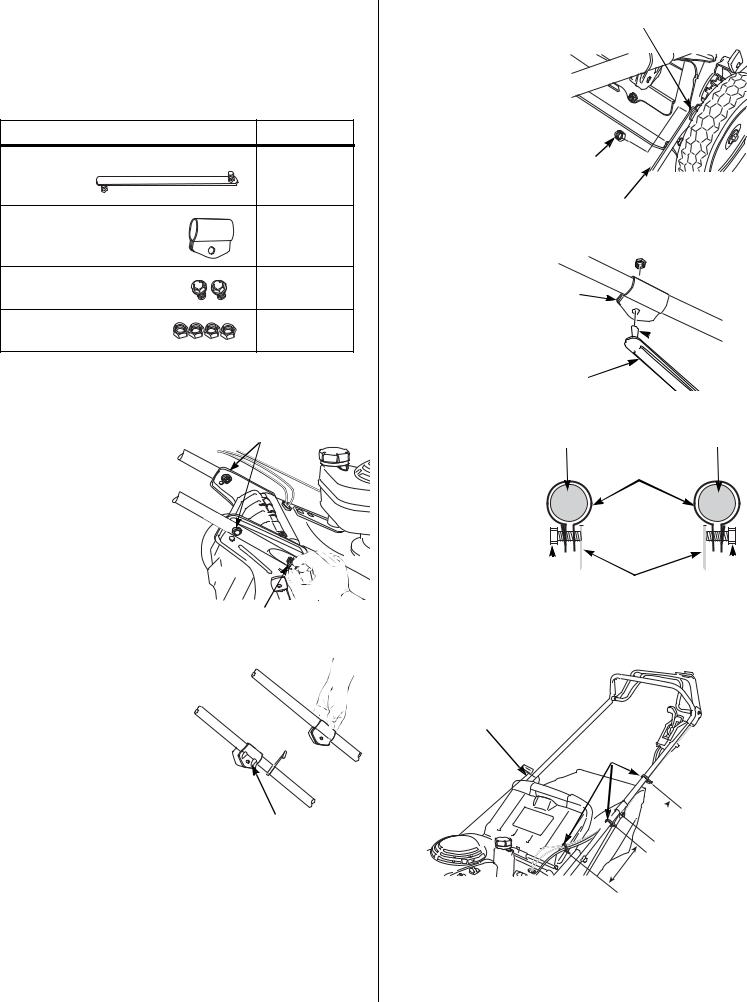
Use the following included loose parts to set up the lawn mower.
Part |
Quantity |
Handle support plate |
2 |
Handle support hanger |
2 |
Flange bolt (8 x 16 mm) |
2 |
Self-locking nut (8 mm) |
4 |
Handlebar Setup
1.Raise the rear wheel height adjusters to the highest cutting height (to allow the handlebar to be raised without contacting the tires).
2. Raise the handlebar and |
8 x 40 mm BOLT (2) |
install the two 8 x 16 mm |
|
flange bolts through the |
|
handlebar lower bolt holes. |
|
3. Confirm that the handlebar |
|
is positioned to the desired |
|
height. |
|
To change the handlebar |
|
height, remove the two |
|
8 x 40 mm upper handlebar |
|
bolts and reposition the |
|
bolts into the lower holes. |
|
Tighten the four handlebar |
8 x 16 mm BOLT (2) |
bolts. |
|
4.Pry open the handle support hangers and place them over the handlebar with the ribs
facing out. Position the right hanger above the starter rope guide and squeeze the ends together.
5. Reposition the rear wheel height adjusters to the lowest cutting height.
RIBS OUT
6. Insert the stud on one
end of the handle support STUD plate into the lower hole
in the housing.
7. Install an 8 mm self-locking nut on the stud on the inside of the mower deck. Do not fully tighten the nut at this point.
8 mm NUT
(2)
HANDLE
SUPPORT PLATE
8.From the grass bag side of the handle, insert the stud on the end of the handle support plate through the handle support hanger. Make sure the stud goes through both holes in the handle support hanger.
9.Install an 8 mm self-locking nut on the stud.
10.Tighten the lock nut on the stud at each end of the handle support plate.
11.Repeat Steps 6 through 10 to install the handle support on the other side of the lawn mower.
12.Position cable ties at the locations shown.
STARTER
ROPE HANGER
LEFT HANDLE
HANDLE
SUPPORT HANGER

 STUD
STUD
HANDLE
SUPPORT
PLATE
LEFT HANDLE |
RIGHT HANDLE |
HANDLE SUPPORT
HANGER (2)
|
|
|
HANDLE SUPPORT |
|
|
|
|
|
|
|
|
|
|
|
|
|
|
||
|
|
|
|
|
|
|
|
||
|
|
|
|
|
|
|
|
||
|
|
|
|
|
|
|
|
||
|
|
|
PLATE (2) |
|
|
|
|
|
|
8 mm |
8 mm |
||||||||
|
|||||||||
LOCK NUT |
|
LOCK NUT |
|||||||
CABLE
TIES
 10 in (250 mm)
3 in (75 mm)
12 in (300 mm)
3
Engine Oil
The mower is shipped
WITHOUT OIL in the engine.
Add enough SAE 10W-30 API service category SJ or later oil to bring the oil level between the upper and lower limit marks on the dipstick as shown.
Do not overfill the engine with oil. If the engine is overfilled, the excess oil may get transferred to the air cleaner housing and air filter.
After filling the engine with oil, remove the hang tag near the recoil starter grip that says “The engine has no oil..”
Fuel
Refer to page 14.
Before Using Your Mower
FILLER CAP/DIPSTICK (do not screw in the dipstick when checking the oil level)
 UPPER LIMIT
  LOWER LIMIT
Before using the lawn mower, all mower operators must read the following sections:
•LAWN MOWER SAFETY (page 2)
•CONTROL LOCATIONS (page 4)
•BEFORE OPERATION (page 5)
•OPERATION (page 6)
•MAINTENANCE SCHEDULE (page 9)
You can also find additional information on the Honda Power Equipment web site. Visit www.hondapowerequipment.com/faq
Please Register Your Lawn Mower
If your dealer did not collect registration information from you, please take a few minutes and register your purchase with Honda. This allows us to contact you with any important updates regarding your mower. Please note registration is not required to obtain warranty service.
You can register by completing and mailing the included product registration card or going online to www.hondapowerequipment.com and click on Product Registration.
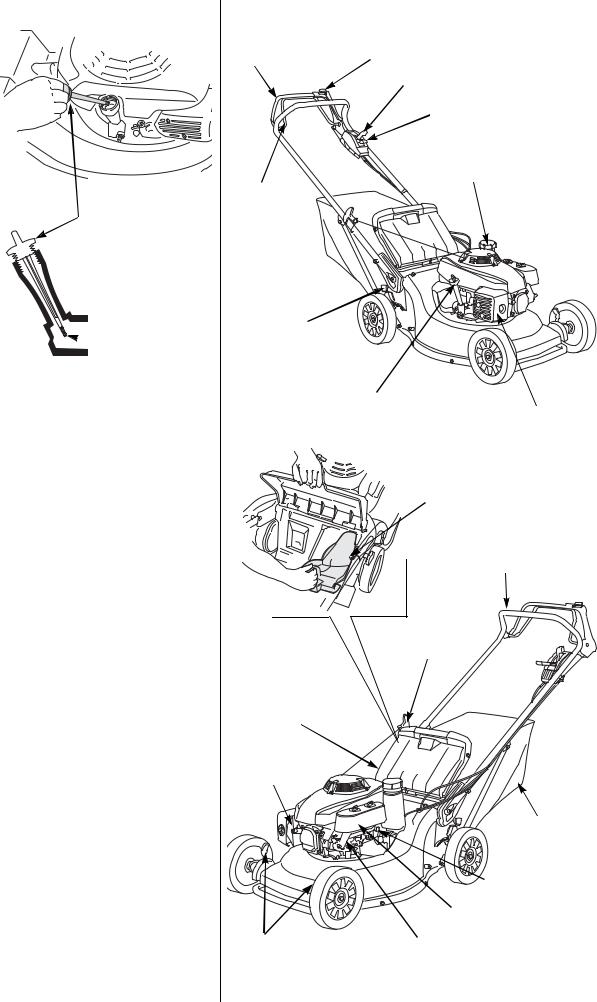
CONTROL LOCATIONS
BLADE CONTROL |
BLADE CONTROL |
LEVER (P. 7) |
BUTTON |
|
SHIFT LEVER (P. 7) |
|
THROTTLE LEVER (P. 7) |
|
FUEL TANK CAP (P. 14) |
DRIVE |
|
CLUTCH |
|
LEVER |
|
(P. 7) |
|
|
HONDA |
REAR CUTTING HEIGHT ADJUSTMENT LEVER (2) (P. 6)
OIL FILLER |
|
CAP/DIPSTICK (P. 11) |
MUFFLER |
MULCHING
PLUG (P. 5)
HANDLEBAR
RECOIL STARTER
GRIP (P. 6)
DISCHARGE
GUARD
SPARK PLUG
CAP
HONDA |
|
|
|
GRASS |
|
|
BAG (P. 10) |
|
|
FUEL VALVE (P. 6) |
|
|
AIR CLEANER (P. 11) |
|
FRONT CUTTING |
CARBURETOR |
|
HEIGHT ADJUSTMENT |
||
|
||
LEVERS (P. 6) |
|
4

BEFORE OPERATION
Your safety is your responsibility. A little time spent in preparation will significantly reduce your risk of injury.
Read and understand this manual. Know what the controls do and how to operate them.
Familiarize yourself with the lawn mower and its operation before you begin using it. Know how to shut off the lawn mower quickly in case of an emergency.
IS YOUR LAWN MOWER READY TO GO?
For your safety, and to maximize the service life of your lawn mower, it is very important to take a few moments before you operate the lawn mower to check its condition. Be sure to take care of any problem you find or have your servicing dealer correct it before you operate the lawn mower.
B WARNING
Improperly maintaining this lawn mower or failing to correct a problem before operation could cause a malfunction in which you could be seriously injured.
Always perform a pre-operation inspection before each operation and correct any problem.
Before beginning your pre-operation checks, be sure the lawn mower is on a level surface.
Check the General Condition of the Lawn Mower:
•Look around and underneath the lawn mower for signs of oil or gasoline leaks.
•Look for signs of damage.
•Check each control for proper operation.
•Check the blades for wear. Replace as necessary (page 9).
•Check that the blade bolts are tight (page 10).
•Check that all nuts, bolts, and screws are tightened.
Check the Engine:
•Check the air cleaner (page 11) and oil level (page 11).
•Check the fuel level (page 14). Starting with a full tank will help eliminate or reduce operating interruptions for refueling.
CHECK YOUR MOWING AREA
For your safety and the safety of others, always inspect the area before operating the lawn mower.
Objects
Anything that can be picked up by the blades and thrown is a potential hazard to you and others. Look for things like stones, sticks, nails, and wire, and remove them from the work area.
People and Pets
People and animals near the work area can move into your lawn mower’s path or into a position where they could be struck by thrown objects. Clear the area of pets and people, especially children. Their safety is your responsibility.
Work Area
Check the condition of the grass. Adjust your lawn mower ground speed and mowing swath accordingly.
GET THE MOWER READY
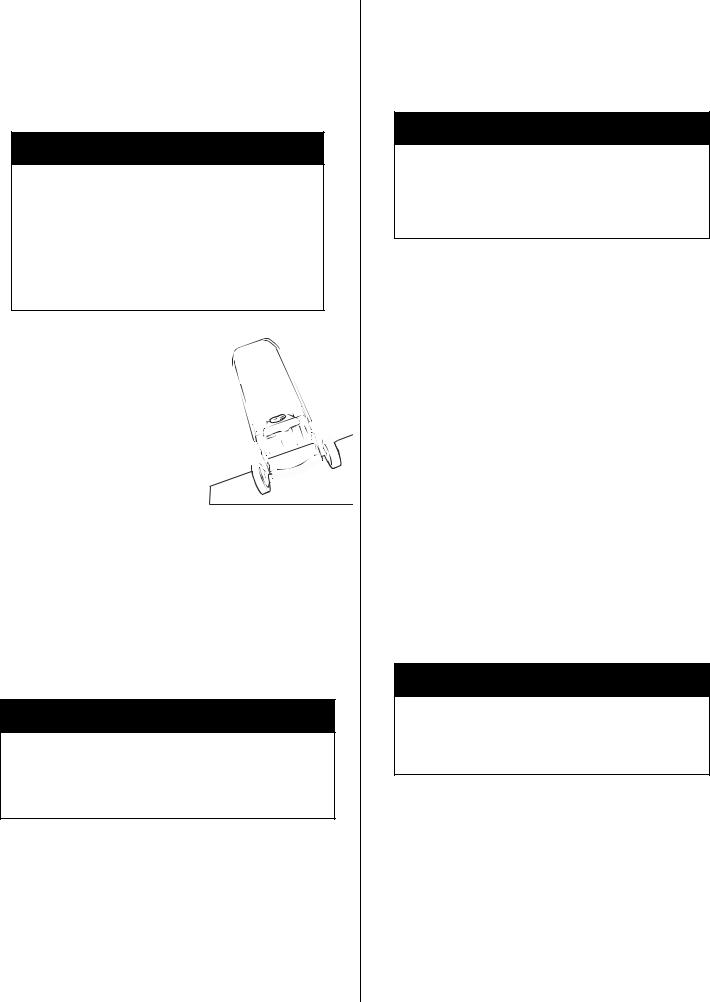
Mulching Plug
The mulching plug helps to curve the inside of the mower deck for more efficient mulching.
Install and remove the mulching plug by raising the discharge guard as shown. The mulching plug only fits one way. Remove the mulching plug when using a grass bag.
SLOT
TAB
Grass Bag
A lawn mower works like a vacuum cleaner; it blows air through the bag, which traps the grass clippings. Always empty the grass bag before it becomes filled to the limit of its capacity. Bagging performance will diminish after the bag becomes about 90% filled. Also, the bag is easier to empty when it is not packed full.
Inspection
During normal use, the grass bag material is subject to deterioration and wear.
NOTICE
Frequently inspect the grass bag for tears, holes, and excessive wear. Check for necessary replacement. Make sure the new bag meets the original specifications.
Grass bag replacement is explained on page 10.
Installation
1.Raise the discharge guard and hook the grass bag onto the mower deck as shown.
2.Release the discharge guard to secure the grass bag.
DISCHARGE GUARD
GRASS BAG LID
Removal
1. Raise the discharge guard, grasp the grass bag handle,
and remove the grass bag.
2.Release the discharge guard.
3.When the grass bag is clear of the discharge guard, you can lift it through the handlebar opening, or you can remove it to the rear of the mower below the handlebar.
5

Rear Shield
During normal use the rear shield is subject to deterioration and wear. Remove the grass bag and raise the discharge guard. Check the rear shield for cracks or tears. If the rear shield is excessively worn, have it replaced by your authorized Honda servicing dealer.
DISCHARGE GUARD
REAR SHIELD
STARTING THE ENGINE
Before starting, always release the blade control lever and the drive clutch lever so the blade will not turn and the mower will not move forward when you operate the starter.
1. Turn the fuel valve |
FUEL VALVE |
to the ON position. |


 ON
ON
Cutting Height Adjustment
The cutting height figures are approximate. The actual height of cut grass will vary with lawn and soil conditions.
To adjust the cutting height, pull each adjustment lever toward the wheel, and move it into another notch.
Move the adjustment lever to the same notch on each wheel.
If you are not sure what cutting height to select, start with a high setting and check the appearance of the lawn after mowing a small area. Then readjust the cutting height if necessary.
3/4 in (19 mm) 1 in (25 mm)
1-1/2 in (39 mm)
2 in (51 mm)
2-1/2 in (63 mm)
3 in (76 mm)
3-1/2 in (89 mm)
4 in (101 mm)
ADJUSTMENT LEVER (4)
ADJUSTMENT LEVERS
2.Move the throttle lever to the proper starting position.
COLD ENGINE:
Move the throttle lever to the CHOKE position.
WARM ENGINE:
Move the throttle lever to the FAST position.
3.Pull the starter grip lightly until you feel resistance, then pull briskly. Return the starter grip gently.
Throttle
CHOKE 

FAST
 THROTTLE LEVER
STARTER
GRIP
OPERATION
SAFE OPERATING PRECAUTIONS
Before operating the mower for the first time, please review LAWN MOWER SAFETY (page 2). Even if you have operated other mowers, take time to become familiar with how this mower works and practice in a safe area until you build up your skills. For your safety, avoid starting or operating the engine in an enclosed area, such as a garage. Your mower’s exhaust contains poisonous carbon monoxide gas, which can collect rapidly in an enclosed area and cause illness or death.
6
4.If the CHOKE position was used during starting, move the throttle lever away from the CHOKE position as soon as the engine warms up enough to run smoothly without using the choke. Set the throttle lever at FAST to mow or at SLOW to idle.
OPERATING THE CONTROLS FOR MOWING
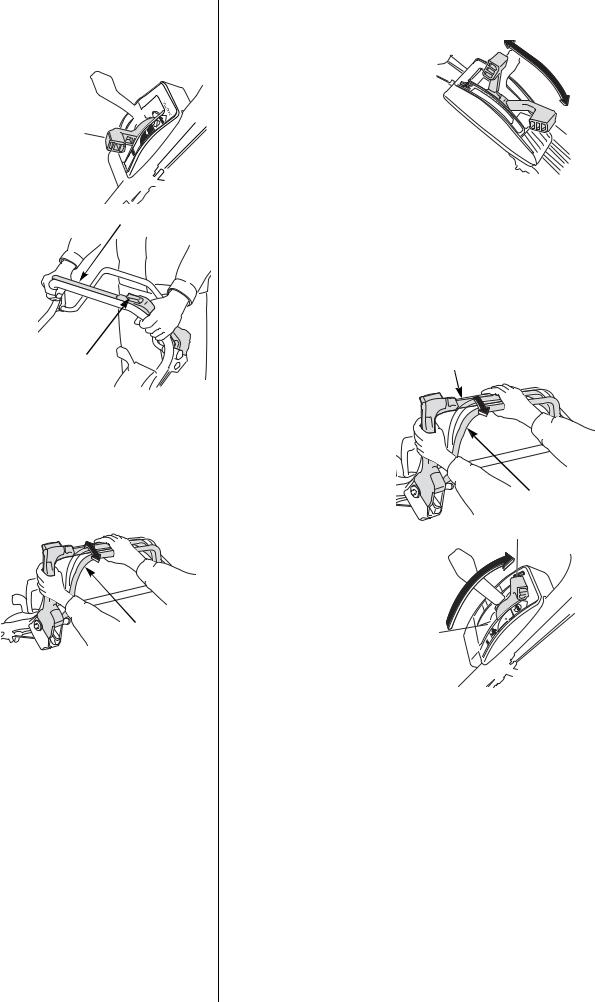
Throttle Lever
For best cut quality, always mow with the throttle lever in the FAST position. When the blades rotate at the preset fast speed, they create a strong fan action that lifts and cuts grass more efficiently.
Do not try to increase the preset engine speed; the blades could fracture and come apart.
Blade Control Lever
To start blade rotation, make sure the throttle lever is in the FAST position.
1.Press the button on top of the blade control lever.
2.Push the blade control lever forward quickly and hold it against the handlebar.
Continue to hold the blade control lever against the handlebar to maintain blade rotation.
FAST
BLADE CONTROL LEVER
BUTTON
Operate the blade control lever with a quick and complete motion, so the blade control is always either fully engaged or stopped. This will help prevent stalling the engine, and it will also extend the service life of the blade control mechanism.
Always release the blade control lever before starting the engine to prevent the blades from turning.
Drive Clutch Lever
With the engine running, push the drive clutch lever forward to propel the mower forward.
Release the drive clutch |
|
lever to stop the mower’s |
|
forward movement. |
DRIVE CLUTCH LEVER |
You can control self-propelled speed with the drive clutch lever. The mower will move gradually
faster as you push the drive clutch lever forward. If you push the lever all the way forward to the handlebar, the mower will move at the speed determined by the shift lever setting.
When moving and using the drive clutch lever to change self-propelled speed, continue to fully hold the blade control lever against the handlebar. This will help prevent damage to the blade control mechanism. Use the shift lever to change the maximum speed so you can hold the drive clutch lever comfortably against the handlebar.
For self-propelled mowing, press the button on top of the blade control lever, push the blade control lever forward, then push the drive clutch lever forward. The drive clutch lever can be used to hold the blade control lever against the handlebar.
Always release the drive clutch lever before starting the engine. If the drive clutch is engaged, the mower will move forward when you operate the starter.
Shift Lever
Use the shift lever to select the forward speed at which you wish to mow.
Do not use the throttle lever to adjust your forward speed. The throttle lever must remain in the FAST position for good mowing performance. Otherwise, cut quality suffers.
The position of the shift lever determines the maximum ground speed when the drive clutch lever is fully engaged.
SLOW
E |
THROTTL |
|
FAST
SHIFT LEVER
If you wish to momentarily slow the mower during operation, partially release the drive clutch lever, then resume your normal speed by pushing the drive clutch lever forward again. It is not necessary to move the shift lever for momentary speed reduction.
For maximum mowing performance, use the lower speed range for mowing and the higher speed range for transporting.
STOPPING THE ENGINE
1. Release the drive clutch |
BLADE CONTROL LEVER |
and blade control levers. |
|
DRIVE CLUTCH LEVER
2. Move the throttle lever to
the STOP position to stop STOP the engine.
3. When the mower is not in use, turn the fuel valve to the OFF position.
7
SAFE MOWING PRACTICES
For your safety, keep all four wheels on the ground and be careful to avoid losing your footing and your control of the mower. Keep a firm grip on the handlebar and walk, never run, with the mower. Be very careful when mowing uneven or rough ground.
If stuck, do not kick or shove the mower with your foot. Use the handlebar to control the mower.
B WARNING
The blades are sharp and spin at high speed. Spinning blades can cut you severely and can amputate fingers and toes.
•Wear protective footwear.
•Keep your hands and feet away from the mower deck while the engine is running.
•Stop the engine before performing any adjustment, inspection, or maintenance.
Slopes
Mow across slopes, not up and down. Avoid steep slopes (more than 20°), and be careful when changing direction. Mowing on a slope when the grass is damp or wet could cause you to slip, fall, and lose control of the mower.
Obstacles
Use the side of the mower to cut close to large obstacles, such as fences or walls.
Release the drive clutch lever to disengage the drive when mowing around trees and other obstacles. Push the mower around obstacles for better directional control. Be careful when mowing over obstacles embedded in the lawn, such as sprinkler heads, paving, edging, raised tree roots, etc. Avoid anything that sticks up above the surface of the lawn.
If a blade hits something or the mower starts to vibrate, stop the engine immediately, disconnect the spark plug cap, and check for damage (page 9). Striking objects may damage the blades, bend the crankshaft, and/or break the mower deck or other components. Vibration usually indicates serious trouble.
B WARNING
A worn, cracked, or damaged blade can break, and pieces of the damaged blade can become dangerous projectiles.
Thrown objects can cause serious injury.
Inspect the blades regularly, and do not operate the mower with a worn or damaged blade.
The DISTRIBUTOR’S LIMITED WARRANTY (page 20) does not cover parts damaged by collision.
Gravel and Loose Objects
Gravel, loose stones, and landscaping material can be picked up by the mower and thrown many feet with enough force to cause serious personal injury and/or property damage. The best way to prevent potential injury from thrown objects is to release the blade control lever to stop the blades before reaching areas with gravel, loose stones, or landscaping material.
8
SERVICING YOUR LAWN MOWER
Proper maintenance is essential for safe, economical, and trouble-free operation. It will also help reduce air pollution.
B WARNING
Improper maintenance or failure to correct a problem before operation can cause a malfunction in which you can be seriously hurt or killed.
Always follow the inspection and maintenance recommendations and schedules in this owner’s manual.
To help you properly care for your mower, the following pages include a maintenance schedule, routine inspection procedures, and simple maintenance procedures using basic hand tools. Other service tasks that are more difficult, or require special tools, are best handled by professionals and are normally performed by a Honda technician or other qualified mechanic.
The maintenance schedule applies to normal operating conditions. If you operate your mower under severe conditions, such as sustained high-load or high-temperature operation, or use in unusually wet or dusty conditions, consult your servicing dealer for recommendations applicable to your individual needs and use.
Remember that an authorized Honda servicing dealer knows your mower best and is fully equipped to maintain and repair it.
To ensure the best quality and reliability, use only new, Honda Genuine Parts or their equivalents for repair and replacement.
Maintenance, replacement, or repair of the emission control devices and systems may be performed by any engine repair establishment or individual, using parts that are “certified” to EPA standards.
MAINTENANCE SAFETY
Some of the most important safety precautions follow. However, we cannot warn you of every conceivable hazard that can arise in performing maintenance. Only you can decide whether or not you should perform a given task.
B WARNING
Failure to properly follow maintenance instructions and precautions can cause you to be seriously hurt or killed.
Always follow the procedures and precautions in this owner’s manual.
 Loading...