

Page 1

Owner’s Manual
2020 FIT
Page 2

3
WARNING
California Proposition 65 Warning
Operating, servicing and maintaining a
passenger vehicle or off-highway motor
vehicle can expose you to chemicals including
engine exhaust, carbon monoxide,
phthalates, and lead, which are known to the
State of California to cause cancer and birth
defects or other reproductive harm. To
minimize exposure, avoid breathing exhaust,
do not idle the engine except as necessary,
service your vehicle in a well-ventilated area
and wear gloves or wash your hands
frequently when servicing your vehicle. For
more information go to
www.P65Warnings.ca.gov/passenger-vehicle
.
Event Data Recorders
This vehicle is equipped with an event data recorder (EDR).
The main purpose of an EDR is to record, in certain crash or near
crash-like situations, such as an air bag deployment or hitting a
road obstacle, data that will assist in understanding how a vehicle’s
systems performed. The EDR is designed to record data related
to vehicle dynamics and safety systems for a short period of
time, typically 30 seconds or less. The EDR in this vehicle is
designed to record such data as:
• How various systems in your vehicle were operating;
• Whether or not the driver and passenger safety belts were
buckled/fastened;
• How far (if at all) the driver was depressing the accelerator
and/or brake pedal; and,
• How fast the vehicle was traveling.
These data can help provide a better understanding of the
circumstances in which crashes and injuries occur. NOTE: EDR data
are recorded by your vehicle only if a non-trivial crash situation
occurs; no data are recorded by the EDR under normal driving
conditions and no personal data (e.g., name, gender, age, and
crash location) are recorded. However, other parties, such as law
enforcement, could combine the EDR data with the type of
personally identifying data routinely acquired during a crash
investigation.
To read data recorded by an EDR, special equipment is required,
and access to the vehicle or the EDR is needed. In addition to the
vehicle manufacturer, other parties, such as law enforcement, that
have the special equipment, can read the information if they have
access to the vehicle or the EDR.
The data belongs to the vehicle owner and may not be accessed by
anyone else except as legally required or with the permission of the
vehicle owner.
Service Diagnostic Recorders
This vehicle is equipped with service-related devices that record
information about powertrain performance. The data can be used
to verify emissions law requirements and/or help technicians
diagnose and solve service problems. It may also be combined with
data from other sources for research purposes, but it remains
confidential. Some diagnostic and maintenance information is
uploaded to Honda upon vehicle start up.
Page 3

California Perchlorate Contamination Prevention Act
NOTICE
3DANGER
3WARNING
3CAUTION
The airbags, seat belt tensioners, and CR type batteries in this
vehicle may contain perchlorate materials - special handling may
apply. See www.dtsc.ca.gov/hazardouswaste/perchlorate/
To help you make informed decisions about safety, we have
provided operating procedures and other information on labels and
in this manual. This information alerts you to potential hazards that
could hurt you or others.
As you read this manual, you will find information that is preceded
by a symbol. This information is intended to help you avoid
damage to your vehicle, other property, or the environment.
Software End User License Agreement
Your vehicle comes equipped with software, which is governed by
the End User License Agreement in Owner’s Manual, and which
contains a binding arbitration clause. Please refer to the End User
License Agreement for the terms and conditions governing your
use of the installed software, as well as the applications, services,
functions, and content provided through the software. Your use of
the installed software will serve as your consent to the terms and
conditions of the End User License Agreement.
You may opt out within 30 days of your initial use of the Software
by sending a signed, written notice to HONDA at American Honda
Motor Co., Inc. Honda Automobile Customer Services Mail Stop
100-5E-8A, 1919 Torrance Blvd. Torrance, CA 90501-2746.
Privacy Notice
This vehicle may share location and usage information. To manage
this setting, visit www.hondalink.com/vehicle-data-choices.
A Few Words About Safety
Your safety, and the safety of others, is very important. And
operating this vehicle safely is an important responsibility.
Of course, it is not practical or possible to warn you about all the
hazards associated with operating or maintaining your vehicle. You
must use your own good judgment.
You will find this important safety information in a variety of forms,
including:
● Safety Labels - on the vehicle.
● Safety Messages - preceded by a safety alert symbol
one of three signal words: DANGER, WARNING, or CAUTION.
These signal words mean:
You WILL be KILLED or SERIOUSLY HURT if
you don't follow instructions.
You CAN be KILLED or SERIOUSLY HURT if
you don't follow instructions.
You CAN be HURT if you don't follow
instructions.
● Safety Headings - such as Important Safety Precautions.
● Safety Section - such as Safe Driving.
● Instructions - how to use this vehicle correctly and safely.
This entire book is filled with important safety information - please
read it carefully.
3 and
Page 4

Contents
This owner’s manual should be considered a permanent part of the
vehicle and should remain with the vehicle when it is sold.
This owner’s manual covers all models of your vehicle. You may find
descriptions of equipment and features that are not on your
particular model.
Images throughout this owner’s manual (including the front cover)
represent features and equipment that are available on some, but
not all, models. Your particular model may not have some of these
features.
This owner’s manual is for vehicles sold in the United States and
Canada.
The information and specifications included in this publication were
in effect at the time of approval for printing. Honda Motor Co., Ltd.
reserves the right, however, to discontinue or change specifications
or design at any time without notice and without incurring any
obligation.
2 Safe Driving P. 31
For Safe Driving P. 32 Seat Belts P. 36 Airbags P. 46
2 Instrument Panel P. 75
Indicators P. 76 Gauges and Displays P. 103
2 Controls P. 121
Clock P. 122 Locking and Unlocking the Doors P. 124
Opening and Closing the Windows P. 151
Operating the Switches Around the Steering Wheel P. 154
Interior Lights/Interior Convenience Items P. 186
2 Features P. 205
Audio System P. 206 Audio System Basic Operation P. 212, 233
Customized Features P. 321, 328 Bluetooth® HandsFreeLink® P. 343, 368
2 Driving P. 399
Before Driving P. 400 Towing a Trailer P. 405
Multi-View Rear Camera P. 482
2 Maintenance P. 489
Before Performing Maintenance P. 490 Maintenance MinderTM P. 493
Checking and Maintaining Wiper Blades P. 520
Heating and Cooling System
*
/Climate Control System* Maintenance P. 538
2 Handling the Unexpected P. 545
Tools P. 546 If a Tire Goes Flat P. 547
Overheating P. 560 Indicator, Coming On/Blinking P. 562 Fuses P. 566
2 Information P. 575
Specifications P. 576 Identification Numbers P. 578
Emissions Testing P. 581 Warranty Coverages P. 583
Page 5
Contents
Child Safety P. 60 Exhaust Gas Hazard P. 73 Safety Labels P. 74
Opening and Closing the Tailgate P. 145 Security System P. 148
Opening and Closing the Moonroof
Adjusting the Mirrors P. 173 Adjusting the Seats P. 174
Heating and Cooling System
Audio Error Messages P. 312 General Information on the Audio System P. 317
When Driving P. 409 Braking P. 469 Parking Your Vehicle P. 481
Refueling P. 484 Fuel Economy and CO
Maintenance Under the Hood P. 501 Replacing Light Bulbs P. 513
Checking and Maintaining Tires P. 524 Battery P. 534 Remote Transmitter Care P. 536
Cleaning P. 539 Accessories and Modifications P. 544
Engine Does Not Start P. 554 Jump Starting P. 557 Shift Lever Does Not Move P. 559
Emergency Towing P. 571 When You Cannot Open the Tailgate P. 572
*
P. 153
*
P. 196 Climate Control System* P. 199
Emissions P. 487
2
Quick Reference Guide
Safe Driving
Instrument Panel
Controls
Features
Driving
Maintenance
Handling the Unexpected
Information
Index
P. 4
P. 31
P. 75
P. 121
P. 205
P. 399
P. 489
P. 545
P. 575
P. 588
Devices that Emit Radio Waves P. 579 Reporting Safety Defects P. 580
Authorized Manuals P. 585 Customer Service Information P. 586
Page 6
Quick Reference Guide
Quick Reference Guide
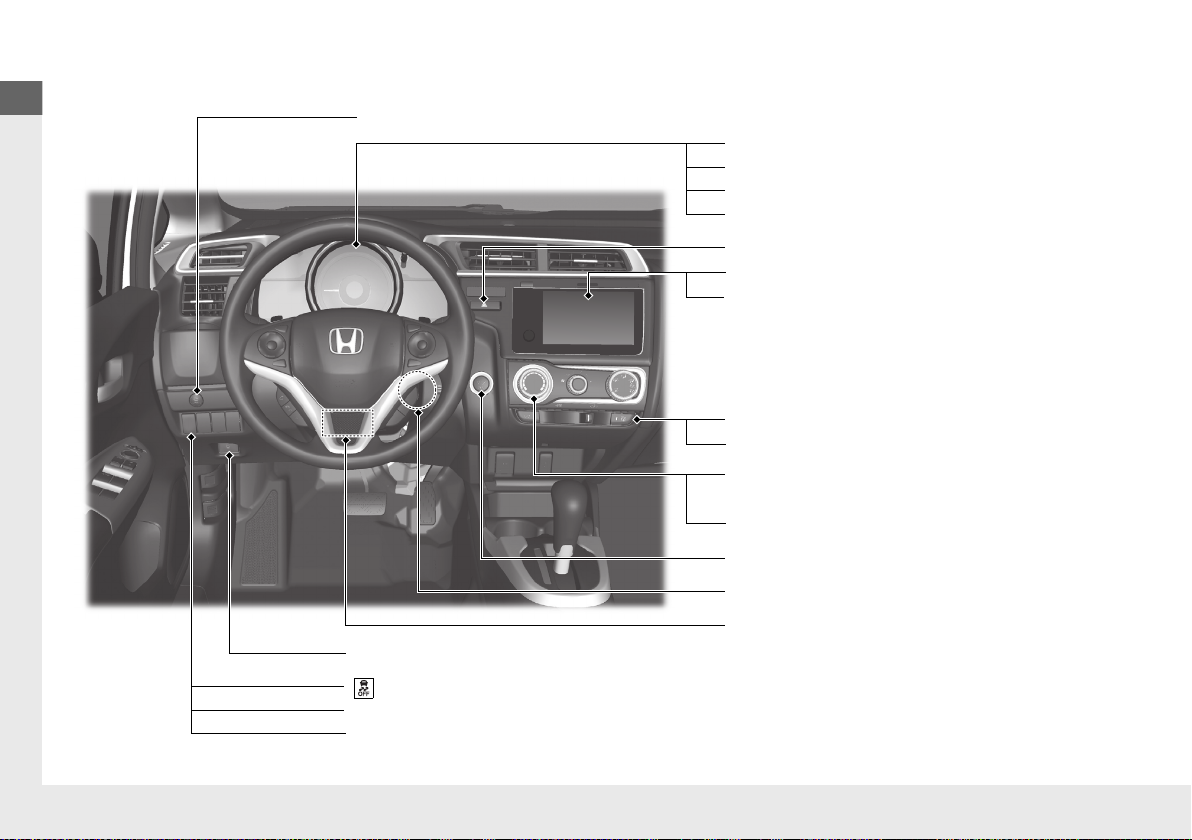
*1: Models with the smart entry system have an ENGINE START/STOP button instead of an ignition switch.
❙ Tire Pressure Monitoring System (TPMS) Button
*
(P465)
❙ ENGINE START/STOP Button
*1
(P155)
❙ Steering Wheel Adjustments (P172)
❙ Heating and Cooling System
*
(P196)
❙ Climate Control System
*
(P199)
❙ Rear Defogger (P171)
❙ Heated Mirror Button
*
(P171)
❙ Audio System (P206)
❙ Navigation System
*
() See the Navigation System Manual
❙ ECON Button
*
(P427)
❙ Ignition Switch
*
(P154)
❙ Hazard Warning Button
❙ (Vehicle Stability Assist
TM
(VSA®) System OFF) Button (P460)
❙ Collision Mitigation Braking System
TM
(CMBSTM) OFF Button* (P473)
❙ Road Departure Mitigation (RDM) Button
*
(P447)
❙ System Indicators (P76)
❙ Gauges (P103)
❙ Information Display
*
(P104)
❙ Multi-Information Display
*
(P107)
Visual Index
4
Page 7
Quick Reference Guide
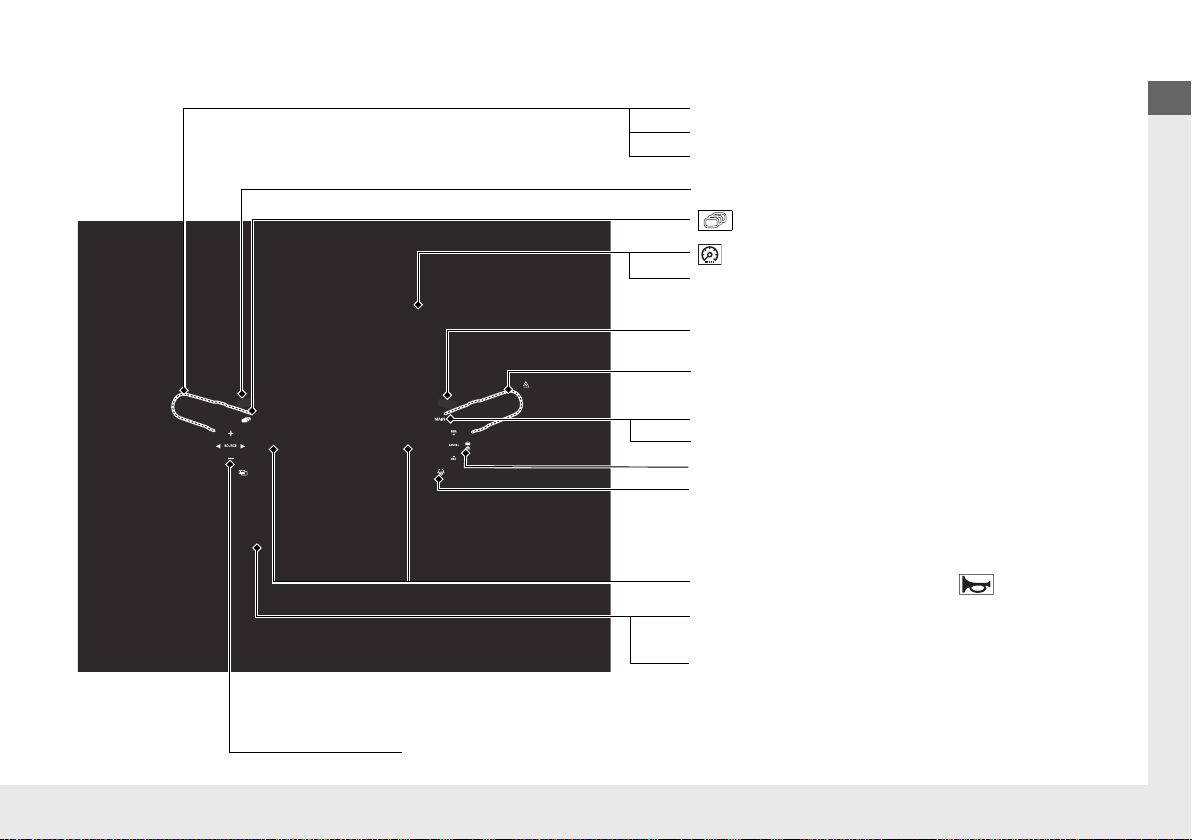
❙ Paddle Shifter (Shift Up)
*
(P422)
❙ (Select/Reset) Knob (P104)
❙ Brightness Control (P170)
❙ (Display) Button
*
(P234)
❙ Paddle Shifter (Shift Down)
*
(P 422)
❙ Headlights/Turn Signals (P159, 160)
❙ Fog Lights
*
(P163)
❙ LaneWatch
TM*
(P461)
❙ Audio Remote Control Buttons
*
(P210)
❙ Horn (Press an area around .)
❙ Bluetooth® HandsFreeLink® System
Voice Control Buttons
(P343, 368)
❙ Navigation System Voice Control Buttons
*
() See the Navigation System Manual
❙ Wipers/Washers (P168)
❙ MAIN Button
*
(P434)
❙ CRUISE Button
*
(P428)
❙ Interval Button
*
(P441)
❙ Lane Keeping Assist System (LKAS) Button
*
(P452)
* Not available on all models
5
Page 8
Visual Index
Quick Reference Guide
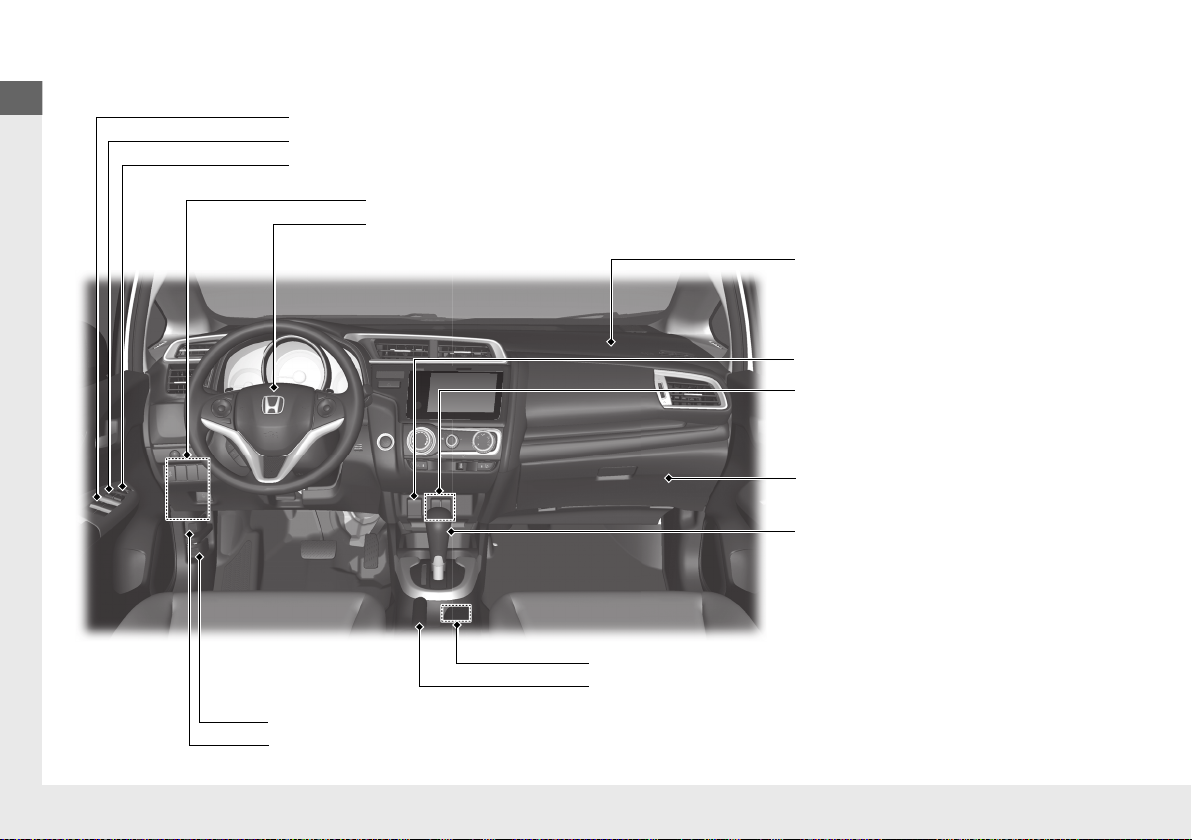
❙ Glove Box (P188)
❙ Shift Lever
Continuously Variable
Transmission
*
(P417, 419)
Manual Transmission* (P423)
❙ Seat Heater Switches
*
(P195)
❙ Parking Brake (P469)
❙ Hood Release Handle (P502)
❙ Fuel Fill Door Release Handle (P485)
❙ Accessory Power Socket (P191)
❙ Passenger’s Front Airbag (P49)
❙ USB Port (P207)
❙ Interior Fuse Box (P568)
❙ Driver’s Front Airbag (P49)
❙ Power Window Switches (P151)
❙ Power Door Lock Master Switch (P137)
❙ Door Mirror Controls (P173)
6
Page 9
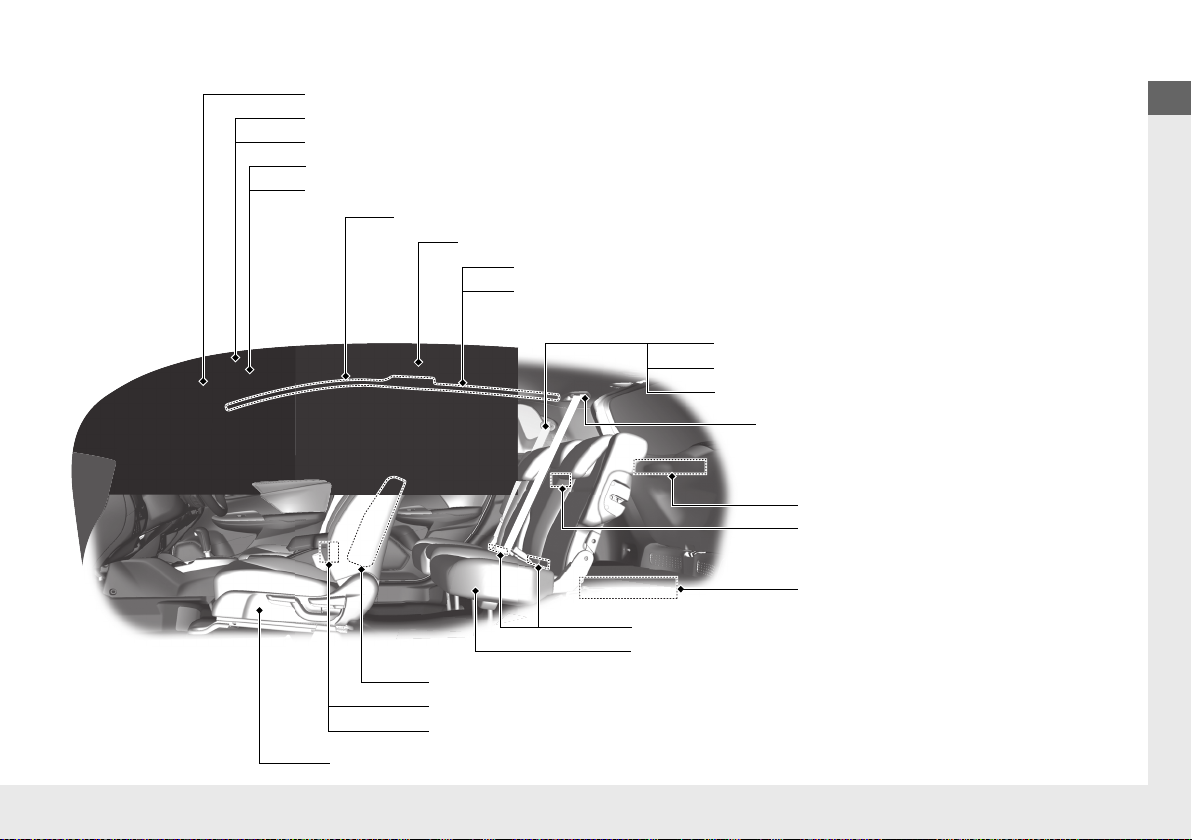
Quick Reference Guide
❙ Grab Handle
❙ Coat Hook (P192)
(Only on the rear left side)
❙ Interior Light (P186)
❙ Side Curtain Airbags (P55)
❙ Rearview Mirror (P173)
❙ Sun Visors
❙ Vanity Mirrors
❙ Map Lights (P187)
❙ Moonroof Switch
*
(P153)
❙ Cargo Floor Box (P190)
❙ Cargo Area Cover
*
(P194)
❙ Cargo Area Light (P187)
❙ LATCH to Secure a Child Seat (P65)
❙ Rear Seat (P178)
❙ Side Airbags (P53)
❙ Accessory Power Socket
*
(P191)
❙ USB Port
*
(P207)
❙ Front Seat (P174)
❙ Seat Belts (P36)
❙ Seat Belt (Installing a Child Seat) (P67)
❙ Seat Belt to Secure a Child Seat (P69)
❙ Seat Belt with Detachable Anchor
(P43)
* Not available on all models
7
Page 10
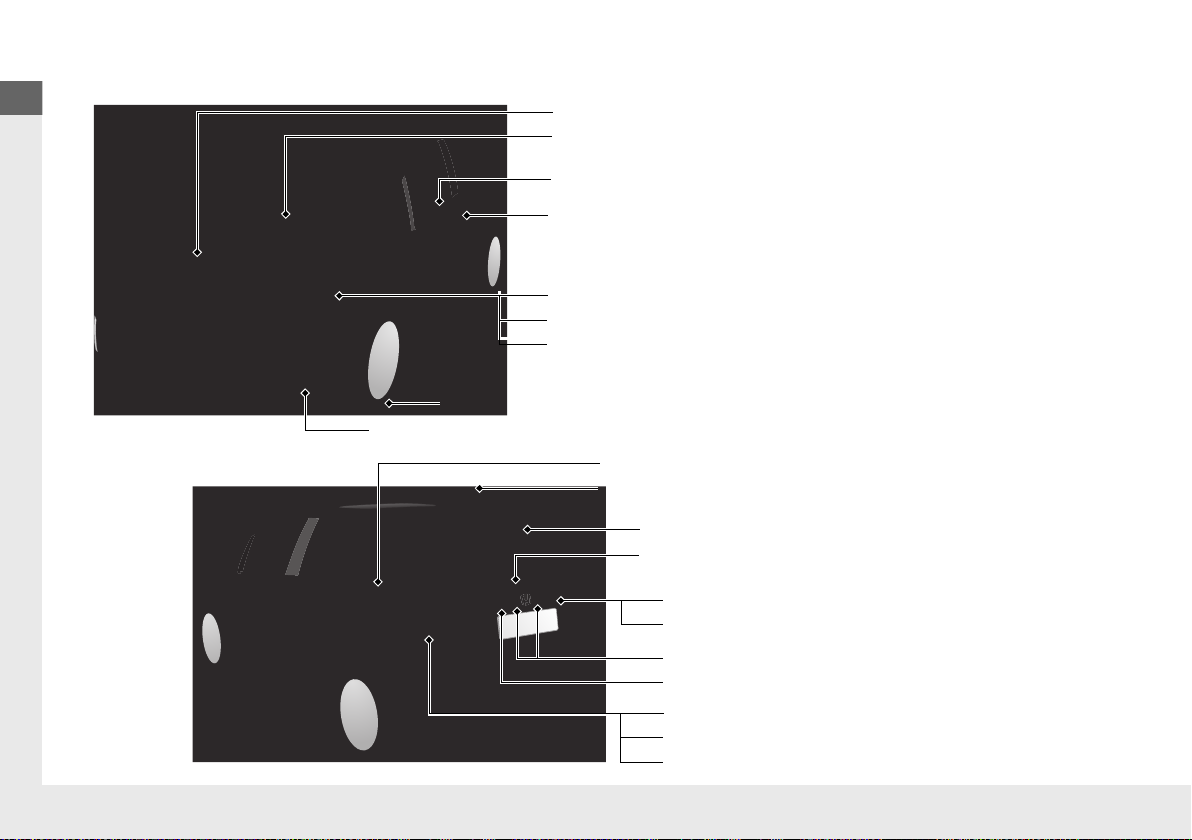
Visual Index
Quick Reference Guide
❙ Door Lock/Unlock Control (P127)
❙ Power Door Mirrors (P173)
❙ Maintenance Under the Hood (P501)
❙ Windshield Wipers (P168, 520)
❙ Headlights (P160, 513)
❙ Front Turn Signal/Parking Lights (P159, 514)
❙ Side Marker Lights (P160, 515)
❙ Tires (P524, 547)
❙ Fog Lights
*
(P163, 515)
❙ Audio Antenna (P209)
❙ High-Mount Brake Light (P518)
❙ Rear Wiper (P169, 522)
❙ Opening/Closing the Tailgate (P145)
❙ Tailgate Outer Handle/Release Button (P146)
❙ License Plate Lights (P519)
❙ Multi-View Rear Camera (P482)
❙ Brake/Tail/Rear Side Marker Lights (P518)
❙ Back-Up Lights (P517)
❙ Rear Turn Signal Lights (P517)
❙ How to Refuel (P485)
8
Page 11
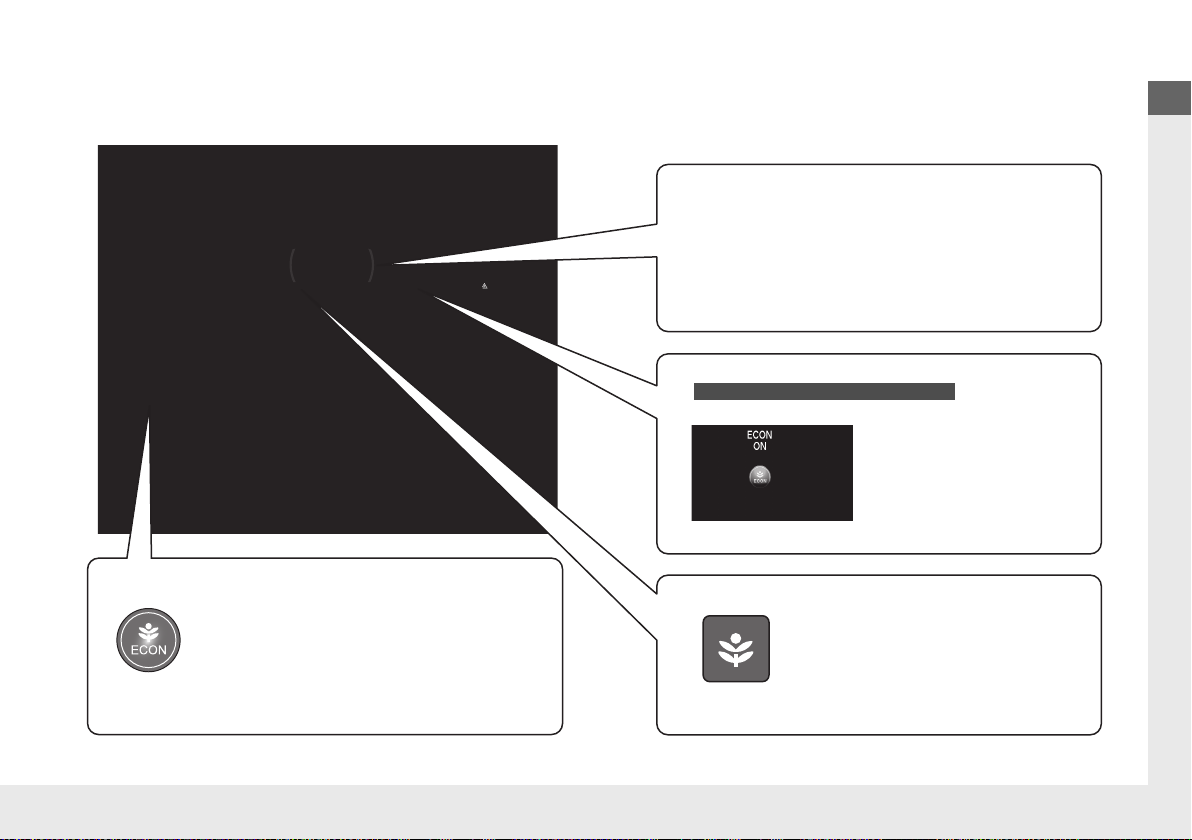
Quick Reference Guide
Ambient Meter
● The color of the ambient meter changes to green
to indicate that the vehicle is being driven in a fuel
efficient manner.
ECON Mode Indicator*
(P85)
Comes on when the ECON button is
pressed.
ECON Button* (P427)
Helps maximize fuel economy.
Models with multi-information display
The message is displayed for
a few seconds when the
ECON button is pressed.
* Not available on all models
Eco Assist® System
9
Page 12
Quick Reference Guide
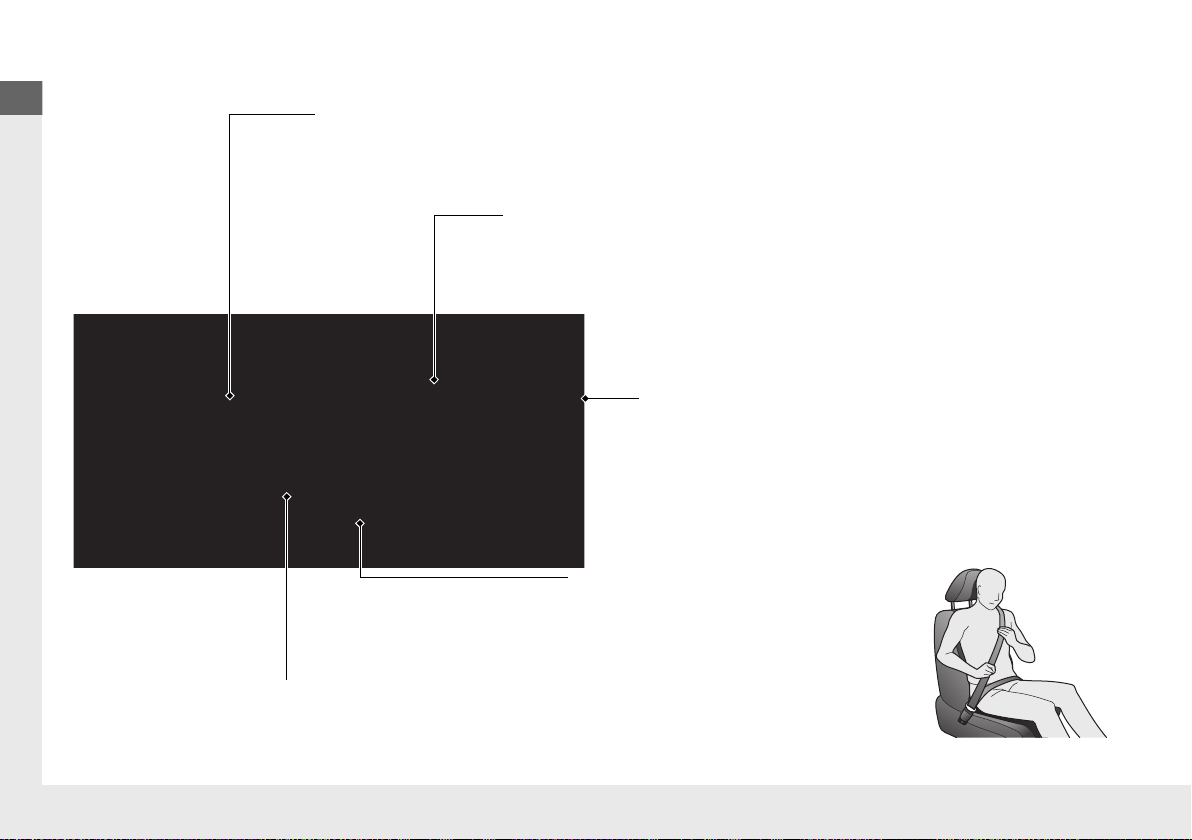
Safe Driving (P 31)
Airbags (P46)
● Your vehicle is fitted with airbags to help protect you and
your passengers during a moderate-to-severe collision.
Child Safety (P60)
● All children 12 and younger should be seated in the rear seat.
● Smaller children should be properly restrained in a forward-facing child seat.
● Infants must be properly restrained in a rear-facing child seat.
Exhaust Gas Hazard (P73)
● Your vehicle emits dangerous exhaust gases that contain
carbon monoxide. Do not run the engine in confined spaces
where carbon monoxide gas can accumulate.
Before Driving Checklist (P400)
● Before driving, check that the front seats, head restraints,
steering wheel, and mirrors have been properly adjusted.
Seat Belts (P36)
● Fasten your seat belt and sit upright well
back in the seat.
● Check that your passengers are wearing
their seat belts correctly.
Fasten your lap belt as
low as possible.
10
Page 13
Quick Reference Guide
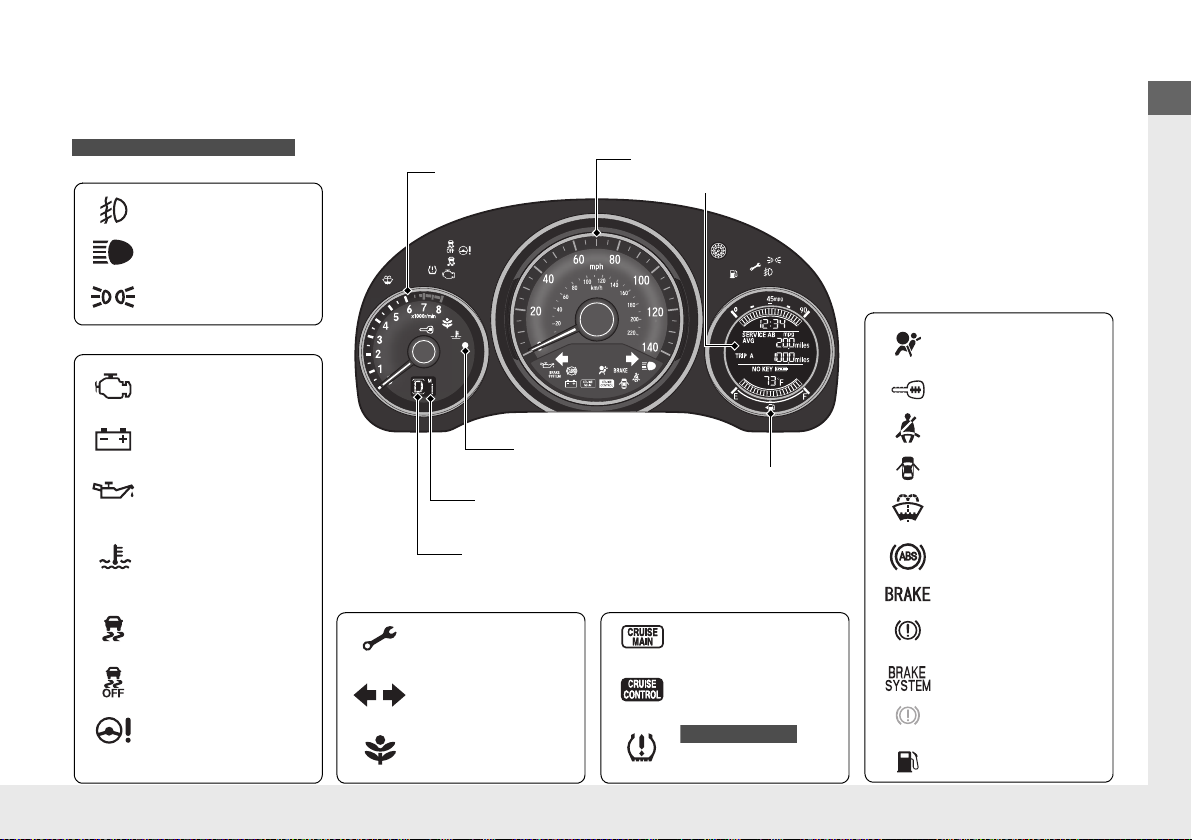
Instrument Panel (P75)
Lights Indicators
Malfunction
Indicator Lamp
Low Oil Pressure
Indicator
Anti-lock Brake
System (ABS)
Indicator
Vehicle Stability
Assist
TM
(VSA®)
System Indicator
VSA® OFF Indicator
Electric Power
Steering (EPS) System
Indicator
Lights On Indicator
High Beam Indicator
Immobilizer System
Indicator
Seat Belt Reminder
Indicator
System Indicators
CRUISE MAIN
Indicator
*
Supplemental
Restraint System
Indicator
Door and Tailgate
Open Indicator
Tachometer
Speedometer
Fuel Gauge
Security System
Alarm Indicator
Shift Lever Position Indicator
*
Low Fuel Indicator
Gauges
(P103)
/Information Display*
(P104)
Multi-Information Display
*
(P107)
/System Indicators
(P76)
Turn Signal and
Hazard Warning
Indicators
High Temperature
Indicator (Red)
System Indicators System Indicators
Low Tire Pressure/
TPMS Indicator
U.S. models only
Parking Brake
and Brake System
Indicator (Red)
CRUISE CONTROL
Indicator
*
System Indicators
Charging System
Indicator
U.S.
Washer Level
Indicator
*
ECON Mode
Indicator
*
Maintenance
Minder Indicator
Fog Light Indicator
*
Canada
Brake System
Indicator (Amber)
Canada
U.S.
M (7-speed manual shift mode)
Indicator/Shift Indicator
*
Information Display
Models with information display
Low Temperature
Indicator (Blue)
* Not available on all models
11
Page 14
Quick Reference Guide
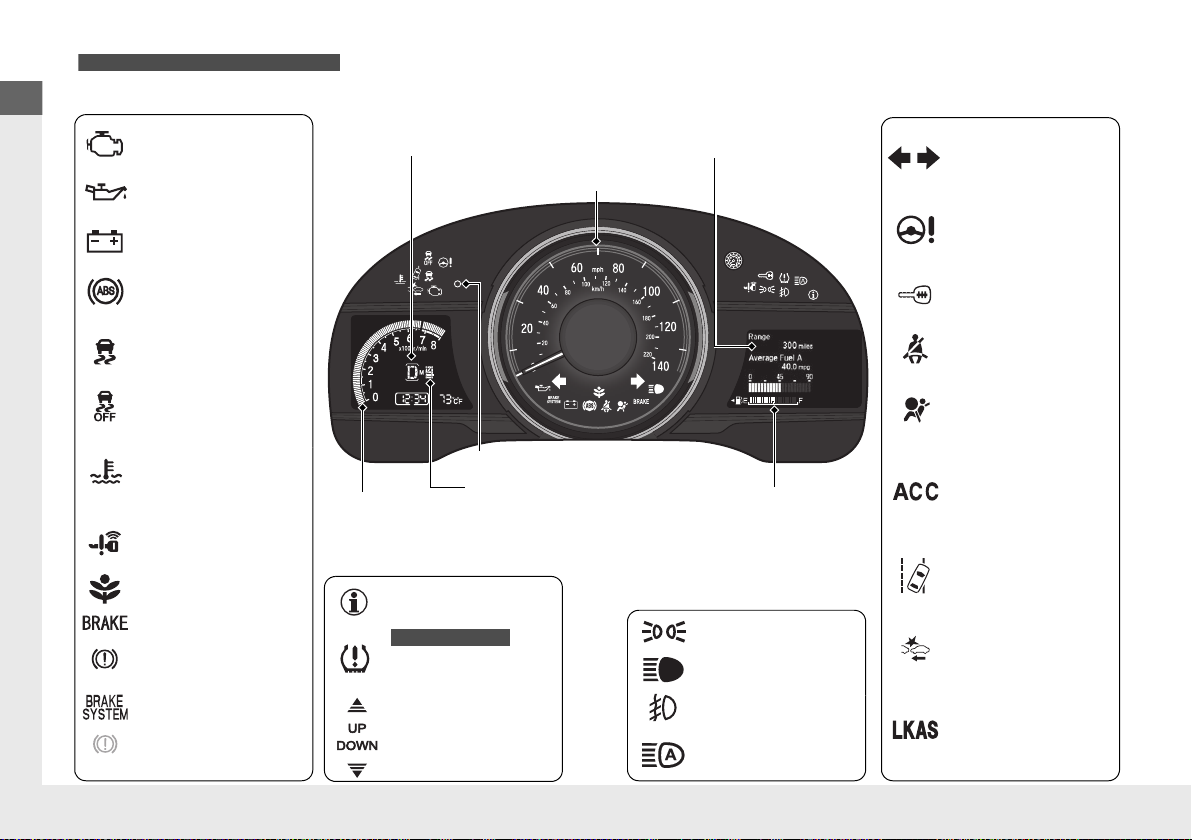
Lights On Indicator
System Indicators
Malfunction Indicator
Lamp
Low Oil Pressure
Indicator
Charging System
Indicator
Anti-lock Brake System
(ABS) Indicator
Vehicle Stability
Assist
TM
(VSA®) System
Indicator
VSA® OFF Indicator
Low Tire Pressure/
TPMS Indicator
U.S. models only
Electric Power
Steering (EPS) System
Indicator
Seat Belt Reminder
Indicator
System Indicators
Parking Brake and
Brake System
Indicator (Red)
Supplemental
Restraint System
Indicator
Tachometer
Speedometer
Fuel Gauge
Security System Alarm Indicator
Shift Lever Position Indicator
*
Immobilizer System
Indicator
ECON Mode Indicator
*
Turn Signal and
Hazard Warning
Indicators
Models with multi-information display
Brake System
Indicator (Amber)
System Indicators
High Temperature
Indicator (Red)
Low Temperature
Indicator (Blue)
Lights Indicators
High Beam Indicator
Fog Light Indicator
*
Adaptive Cruise
Control (ACC)
Indicator (Amber/
Green)
System Message
Indicator
Collision Mitigation
Braking System
TM
(CMBS
TM
) Indicator
Road Departure
Mitigation (RDM)
Indicator
Lane Keeping Assist
System (LKAS)
Indicator (Amber/
Green)
Smart Entry System
Indicator
*
U.S.
Canada
Canada
U.S.
Shift Up / Down
Indicator
*
Multi-information Display
Auto High-Beam
Indicator
M (7-speed manual shift mode)
Indicator/Shift Indicator
*
12
Page 15
Quick Reference Guide
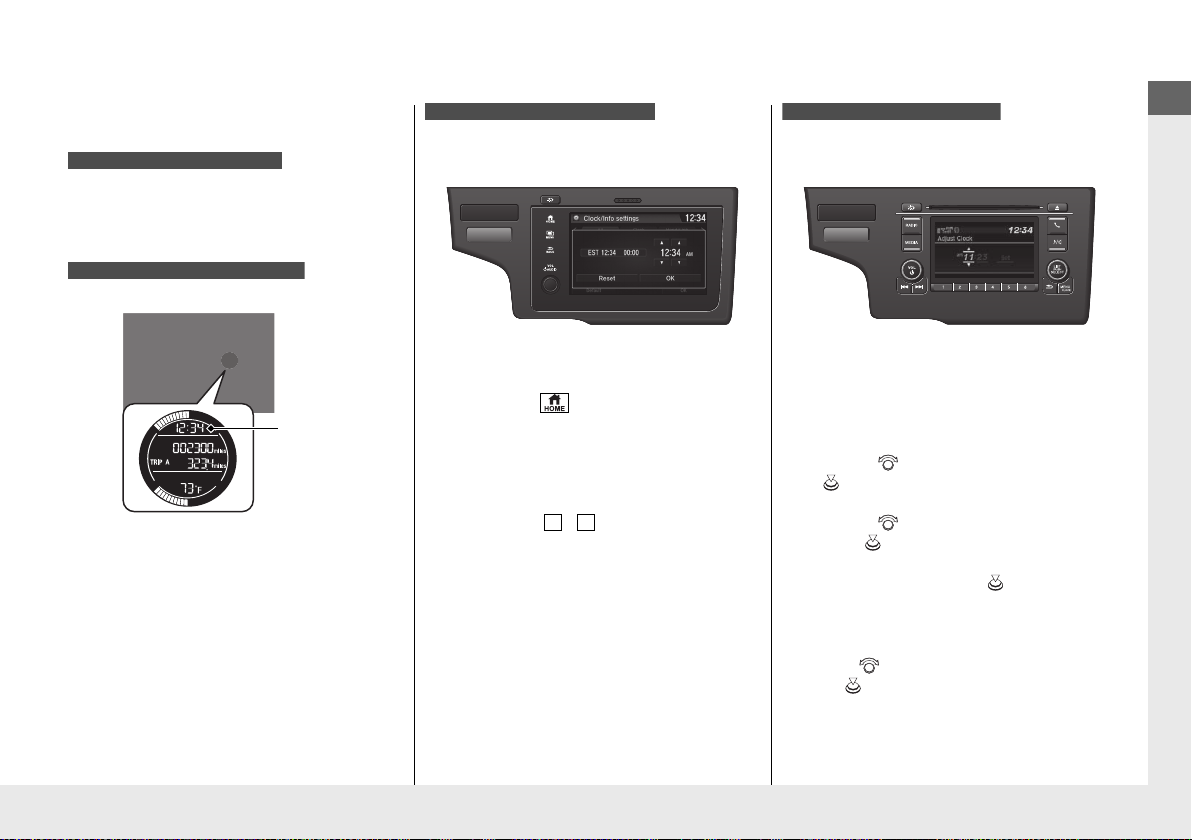
Controls (P121)
Models with navigation system
Models without navigation system
Clock
Models with display audio system
3
4
Models with color audio system
* Not available on all models
Clock (P122)
The navigation system receives signals from
GPS satellites, updating the clock
automatically.
The clock in the information display is
automatically updated along with the audio
system’s clock display.
a Select the (HOME) icon, then select
Settings.
b Select System, Clock/Info, then Clock
Adjustment.
c Touch the / icon to adjust the
numbers up or down.
d Select OK.
a Press and hold the MENU/CLOCK
button.
b Rotate to change hour, then press
.
c Rotate to change minute, then
press .
d Select SET, then press .
These indications are used to show how to
operate the LIST/SELECT (List/Selector) knob.
• Rotate to select.
• Press to enter.
13
Page 16
Quick Reference Guide
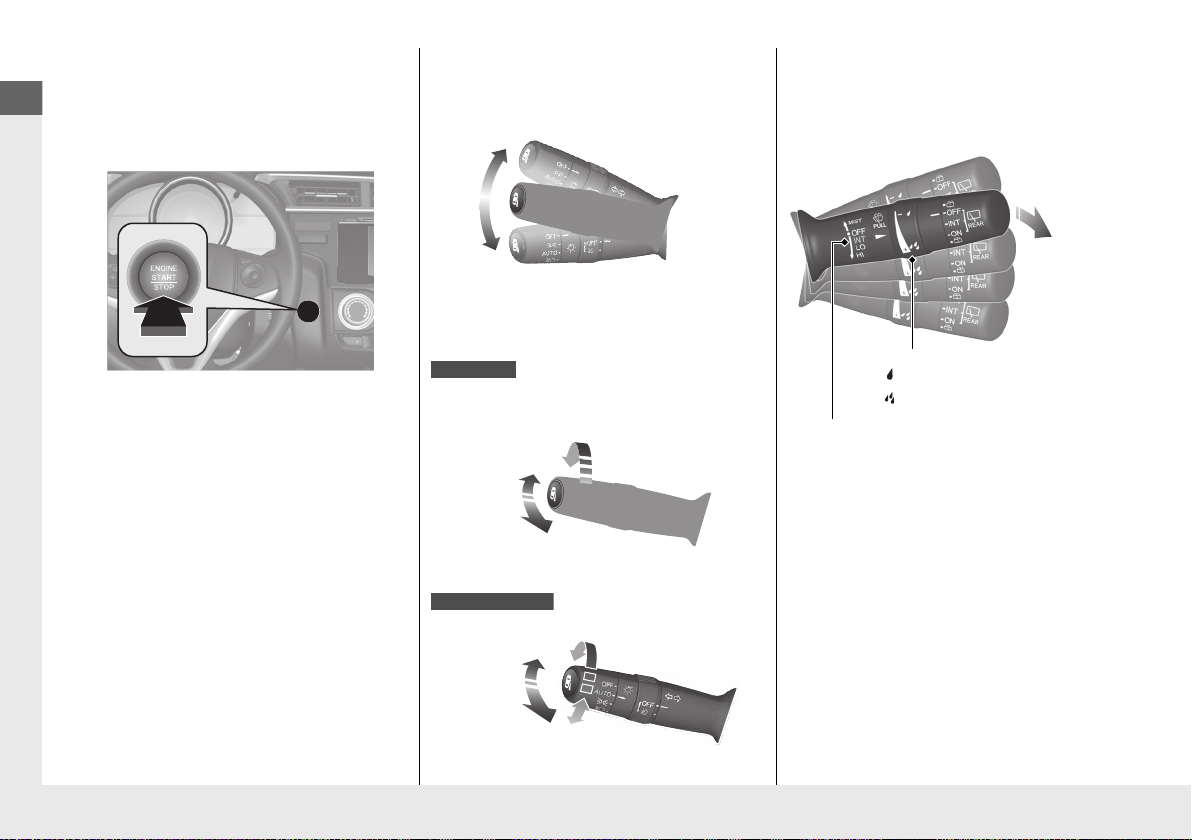
Engine START/STOP
Turn Signal Control Lever
Right
Left
U.S. models
Light Control Switches
Low Beam
High Beam
Flashing
Canadian models
Low Beam
High Beam
Flashing
Wiper/Washer Control Lever
MIST
OFF
INT: Low speed with intermittent
LO: Low speed wipe
HI: High speed wipe
Pull toward
you to spray
washer fluid.
Adjustment Ring
*
: Lower speed, fewer sweeps
: High speed, more sweeps
*
Button
Press the button to change the vehicle’s
power mode.
14
(P155)
Turn Signals (P159)
Lights (P160)
Wipers and Washers
(P168)
Page 17
Quick Reference Guide
To adjust
To lock
Models without smart entry system
Models with smart entry system
* Not available on all models
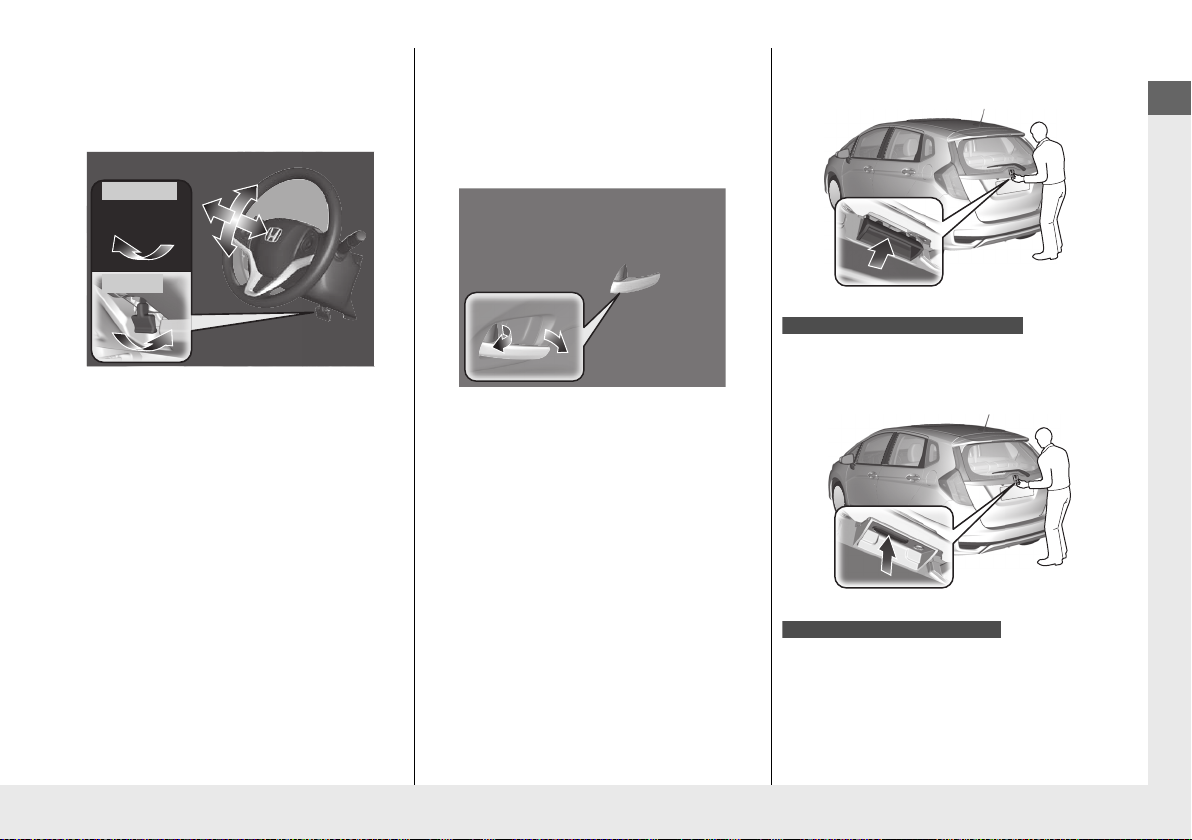
Steering Wheel (P172)
● To adjust, pull the adjustment lever
towards you, adjust to the desired
position, then lock the lever back in place.
Unlocking the Front
Doors from the Inside
(P136)
● Pull either front door inner handle to
unlock and open it in one motion.
● Unlocking and opening the driver’s door
from the inner handle unlocks all the
other doors.
Tailgate (P145)
● With all the doors unlocked, pull the
tailgate outer handle, and lift up to open it.
● With all the doors unlocked, push the
tailgate release button on the tailgate to
open it.
● Press the tailgate release button to
unlock and open the tailgate when you
carry the smart entry remote.
15
Page 18
Quick Reference Guide
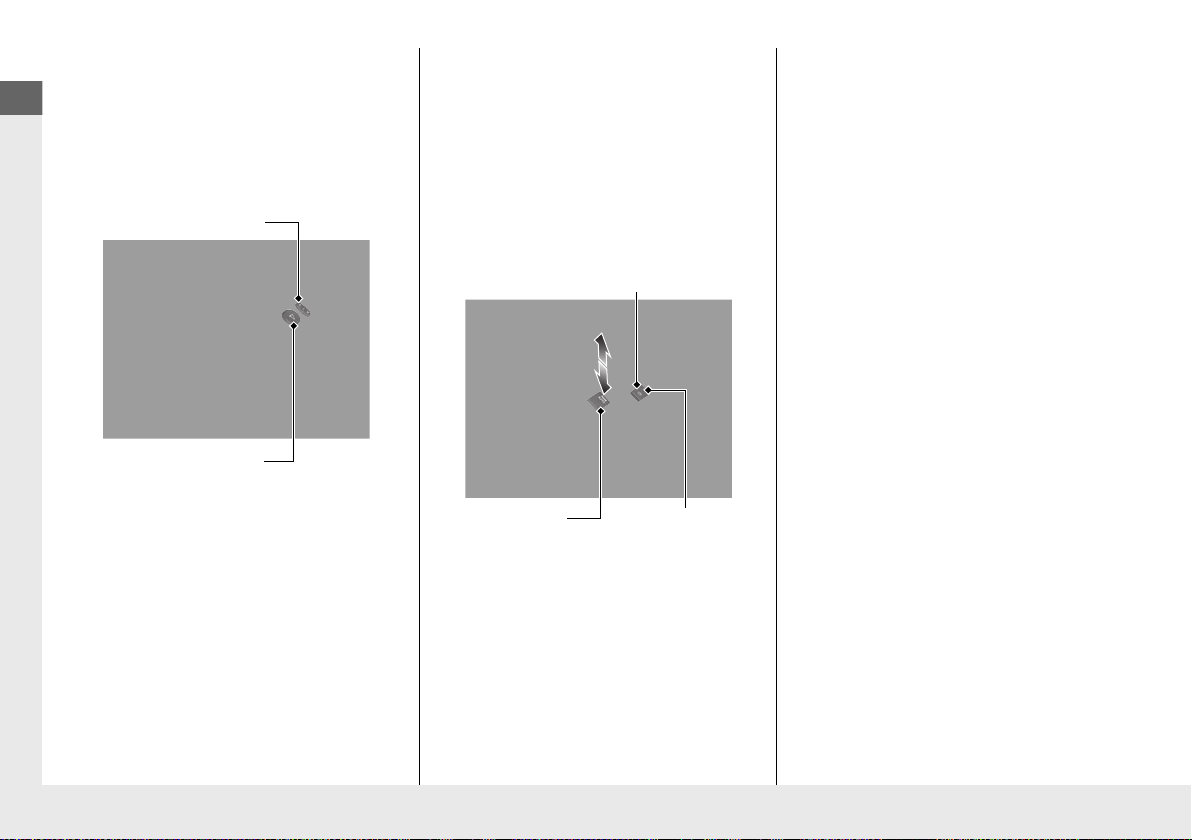
Power Door Mirrors
Selector Switch
Adjustment Switch
Power Window Lock Button
Window Switch
Indicator
(P173)
● With the ignition switch in ON
the selector switch to L or R.
● Push the appropriate edge of the
adjustment switch to adjust the mirror.
(w
*1
, move
Power Windows (P151)
*1
(w
● With the ignition switch in ON
and close the power windows.
● If the power window lock button is in the
off position, each passenger’s window
can be opened and closed with its own
switch.
● If the power window lock button is in the
on position (indicator on), each
passenger’s window switch is disabled.
, open
*1: Models with the smart entry system have an
ENGINE START/STOP button instead of an ignition
switch.
16
Page 19
Quick Reference Guide
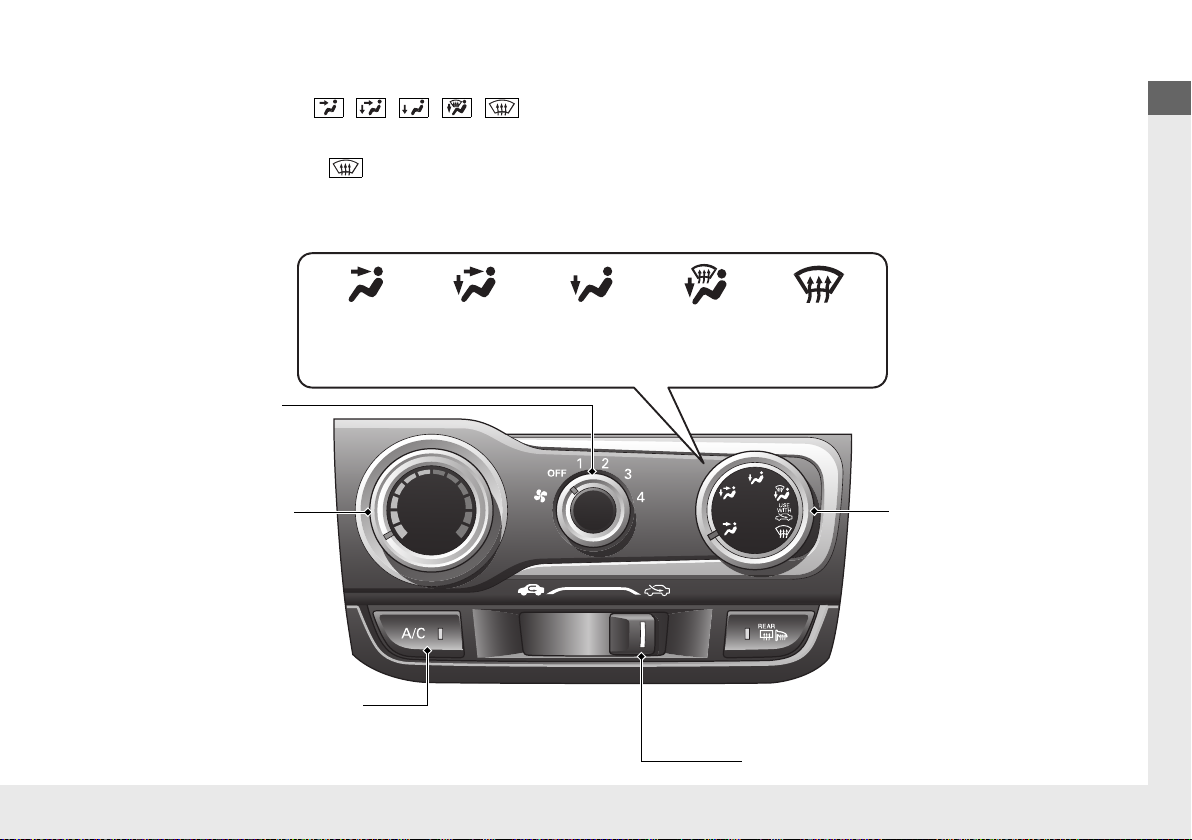
Fan Control Dial
A/C (Air Conditioning) Button
*
Air flows from
windshield
defroster
vents.
Air flows
from floor
vents.
Air flows from
floor and
dashboard
vents.
Air flows
from
dashboard
vents.
Temperature Control Dial
Air flows from
floor and
windshield
defroster vents.
Mode Control Dial
Fresh Air/Recirculation Lever
* Not available on all models
Heating and Cooling System
● Rotate the fan control dial to adjust the fan speed.
● Rotate the mode control dial ( / / / / ) to select the vents air flows from.
● Rotate the temperature control dial to adjust the temperature.
● Rotate the fan control dial to OFF to turn the system off.
● Rotate the mode control dial to to defrost the windshield.
*
(P196)
17
Page 20
Quick Reference Guide
Climate Control System
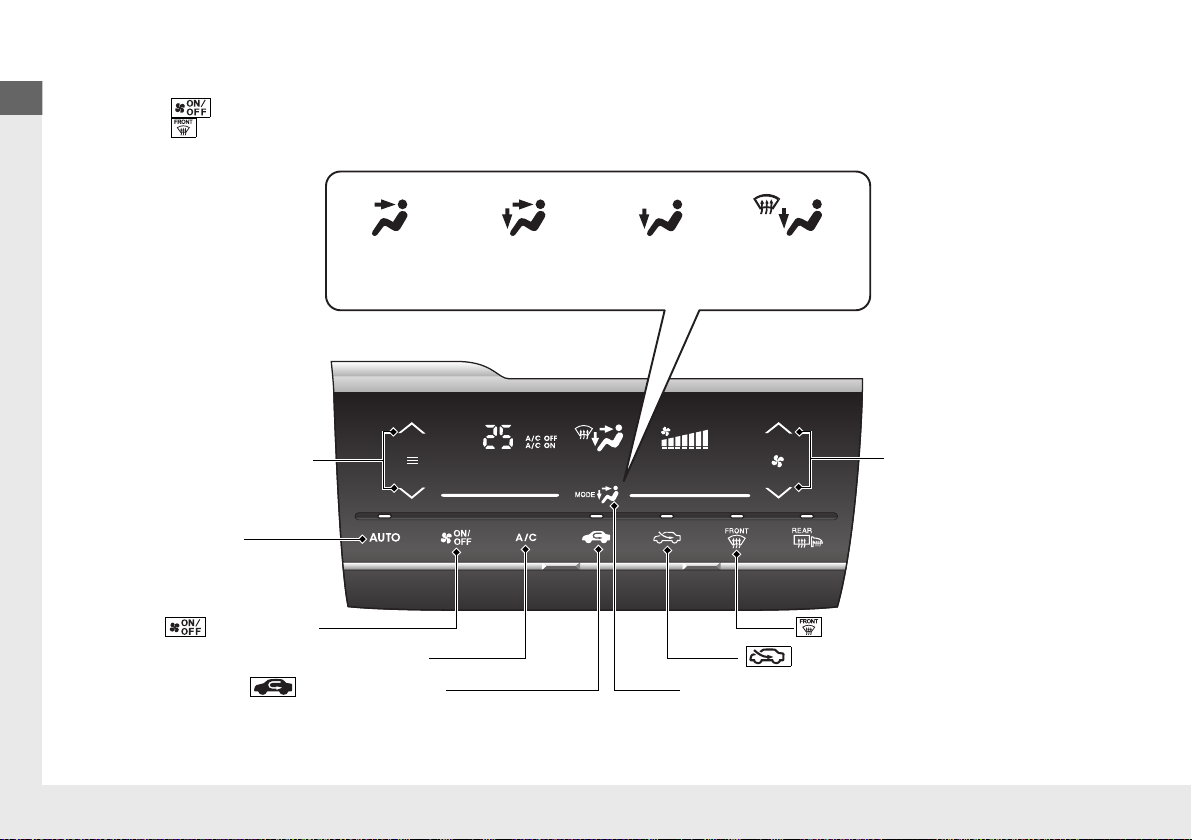
AUTO Icon
A/C (Air Conditioning) Icon
Air flows from
floor and
windshield
defroster vents.
Air flows from
floor vents.
Air flows from
floor and
dashboard vents.
Air flows from
dashboard
vents.
Temperature Control Icons Fan Control Icons
(Recirculation) Icon
(ON/OFF) Icon
(Fresh Air) Icon
Mode Control Icons
(windshield Defroster) Icon
● Select the AUTO icon to activate the climate control system.
● Select the icon to turn the system on or off.
● Select the icon to defrost the windshield.
*
(P199)
18
Page 21
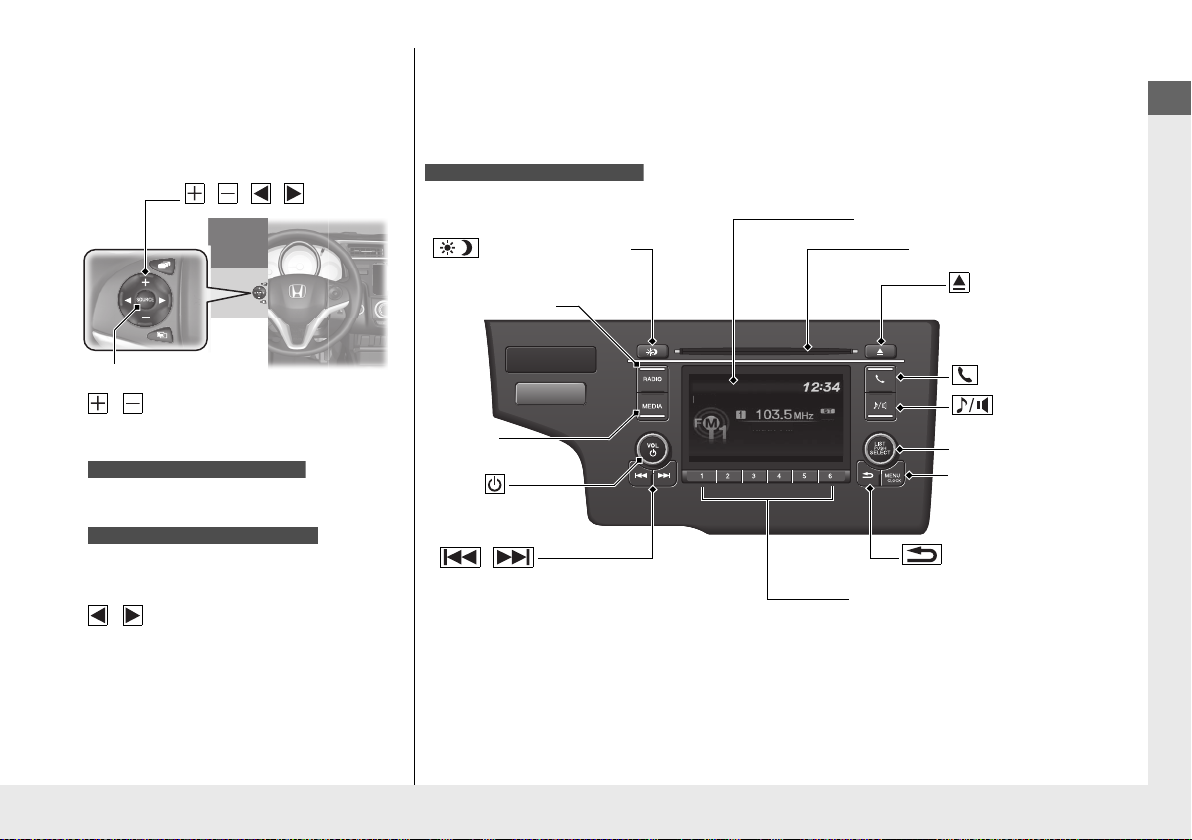
Quick Reference Guide
Features (P205)
/ / / Buttons
SOURCE Button
Models with color audio system
Models with display audio system
Models with color audio system
MENU/CLOCK Button
Selector Knob
(Day/Night) Button
(Back) Button
(Sound) Button
VOL /
(Volume/Power)
Knob
CD Slot
(CD Eject) Button
Preset Buttons (1-6)
(Phone) Button
RADIO Button
/
(Skip/Seek) Buttons
MEDIA
Button
Audio/Information Screen
* Not available on all models
Audio Remote Controls*
(P210)
● / Button
Press to adjust the volume up/down.
● SOURCE Button
Press to change the audio mode: FM/AM/
CD/USB/iPod/Bluetooth® Audio.
Press to change the audio mode: FM/AM/
SiriusXM
Apps/Apple CarPlay
● / Button
Radio:Press to change the preset station.
*
/USB device:
CD
®
/USB/iPod/
Press and hold to select the next or
previous strong station.
Press to skip to the beginning of
the next song or return to the
beginning of the current song.
Press and hold to change a folder.
Bluetooth® Audio/Pandora
TM
/Android AutoTM.
®*/
Audio System (P206)
For navigation system operation () See the Navigation System Manual
19
Page 22
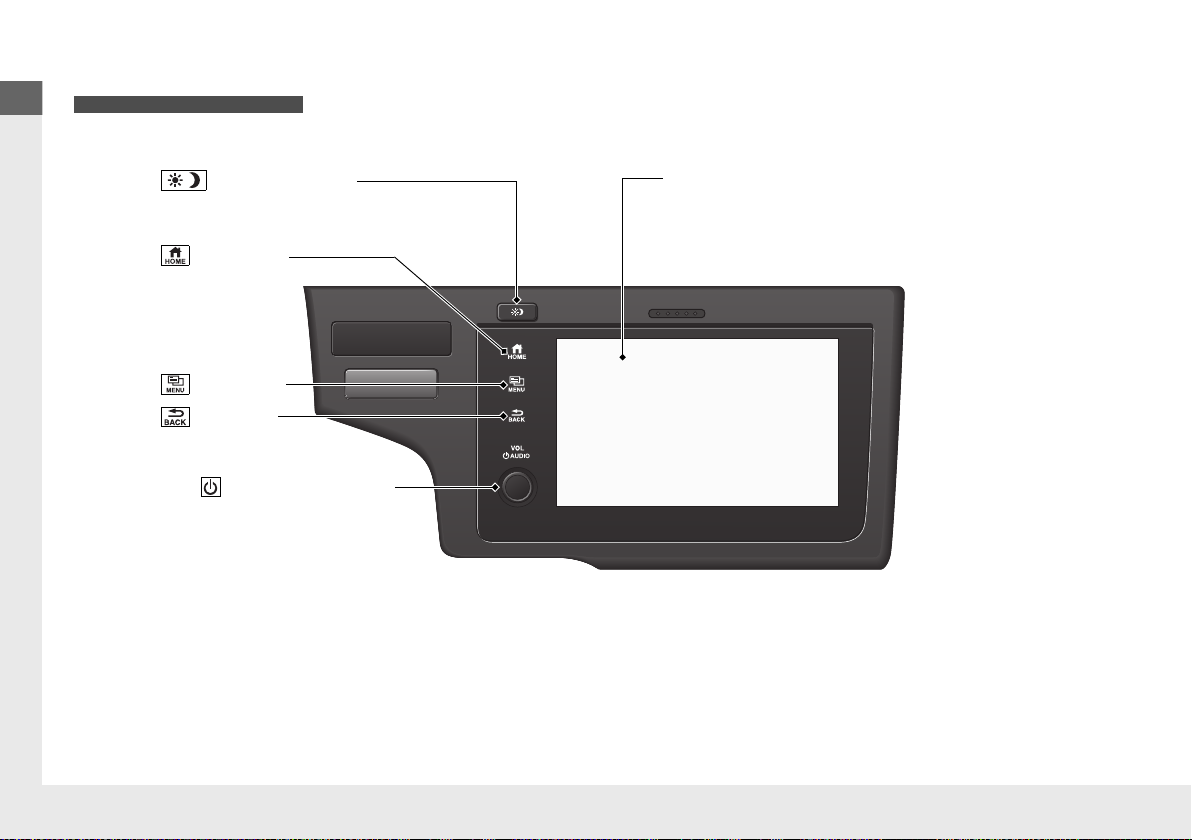
Quick Reference Guide
Models with display audio system
(Day/Night) Button Audio/Information Screen
(Back) Icon
VOL/ (Power/Volume) Knob
(Menu) Icon
(Home) Icon
20
Page 23
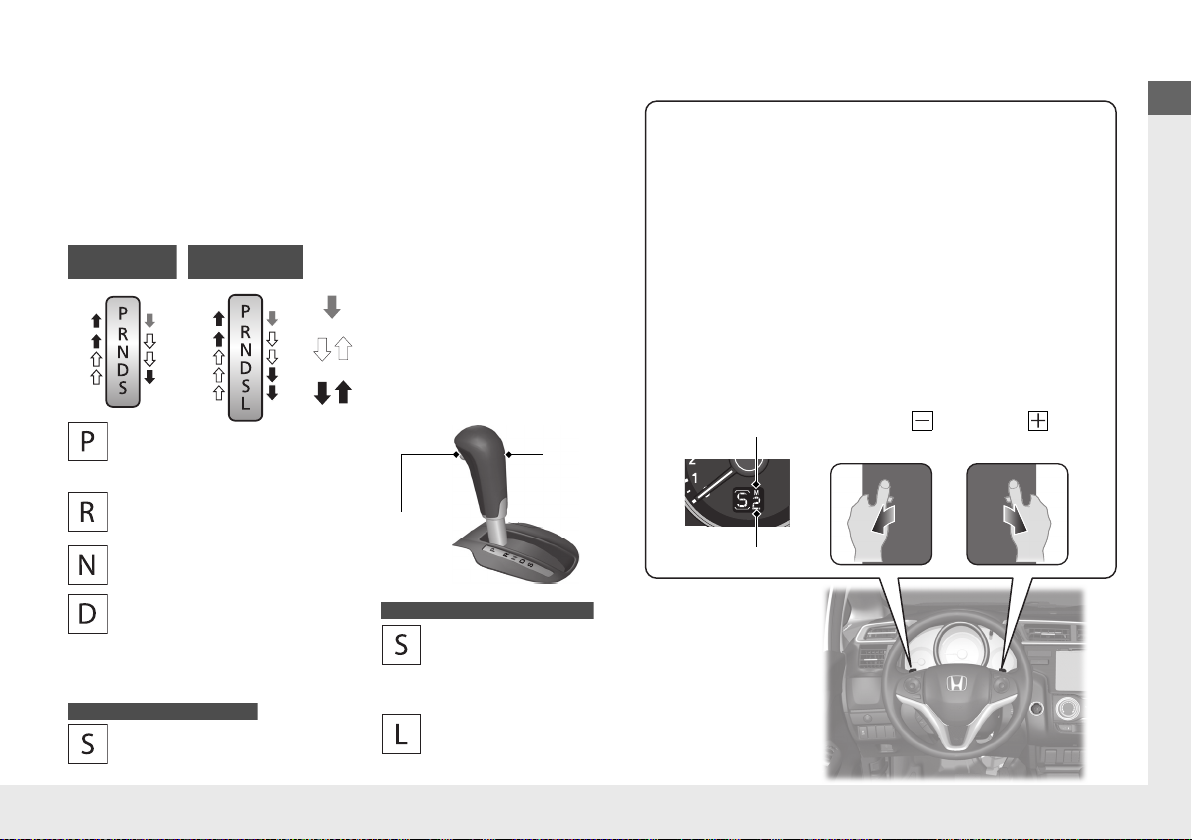
Quick Reference Guide
Driving (P399)
Depress the brake pedal and press
the release button to move out of
(P.
Manual Transmission* (P423)
Continuously Variable Transmission*
(P417, 419)
● Shift to
(P and depress the brake pedal when starting the engine.
Shifting
Reverse
Used when reversing.
Neutral
Transmission is not locked.
Drive
Normal driving.
On models with paddle shifters,
7-speed mode can be used
temporarily.
Drive (S)
●
Better acceleration
●
Used to increase engine braking
●
Used when going up or down hills
Low
●
Used to further increase engine braking
●
Used when going up or down hills
Drive (S)
7-speed manual shift mode can
be used.
Move the shift lever without
pressing the release button.
Press the release button to move
the shift lever.
7-Speed Manual Shift Mode* (P421)
● Allows you to manually shift the transmission up or
down without removing your hands from the steering
wheel.
When the shift lever is in (S
● Pulling a paddle shifter changes the mode from
continuously variable transmission to 7-speed manual
shift mode.
● The M indicator and the selected speed number are
displayed in the shift indicator.
When the shift lever is in (D
● Pulling a paddle shifter temporarily changes the mode
from continuously variable transmission to 7-speed
manual shift mode. The selected speed number is
displayed in the shift indicator.
Shift Down
Paddle Shifter
Shift Up
Paddle Shifter
M Indicator
Models with
paddle shifters
Models without
paddle shifters
Shift Lever
Release
Button
Shift Indicator
Park
Turn off or start the engine.
Transmission is locked.
Models with paddle shifters
Models without paddle shifters
* Not available on all models
21
Page 24

Quick Reference Guide
VSA® On and Off (P460)
U.S. models only
● The Vehicle Stability Assist
system helps stabilize the vehicle during
cornering, and helps maintain traction
while accelerating on loose or slippery
road surfaces.
● VSA® comes on automatically every time
you start the engine.
● To partially disable VSA functionality/
features, press and hold button until you
hear a beep.
Cruise Control* (P428)
● Cruise control allows you to maintain a
set speed without keeping your foot on
the accelerator pedal.
● To use cruise control, press the CRUISE
button, then press the -/SET button once
you have achieved the desired speed
(above 25 mph or 40 km/h).
TM
(VSA®)
CMBSTM On and Off*
(P476)
● When a possible collision is likely
unavoidable, the CMBS
reduce the vehicle speed and the severity
of the collision.
● The CMBS is turned on every time you
start the engine.
● To turn the CMBS
hold the button until you hear a beep.
TM
can help you to
TM
on or off, press and
Tire Pressure Monitoring
System (TPMS)
● Detects a change in tire conditions and
overall dimensions due to decrease in tire
pressures.
● TPMS is turned on automatically every
time you start the engine.
● A calibration procedure must be
performed when certain conditions arise.
(P463)
22
Page 25
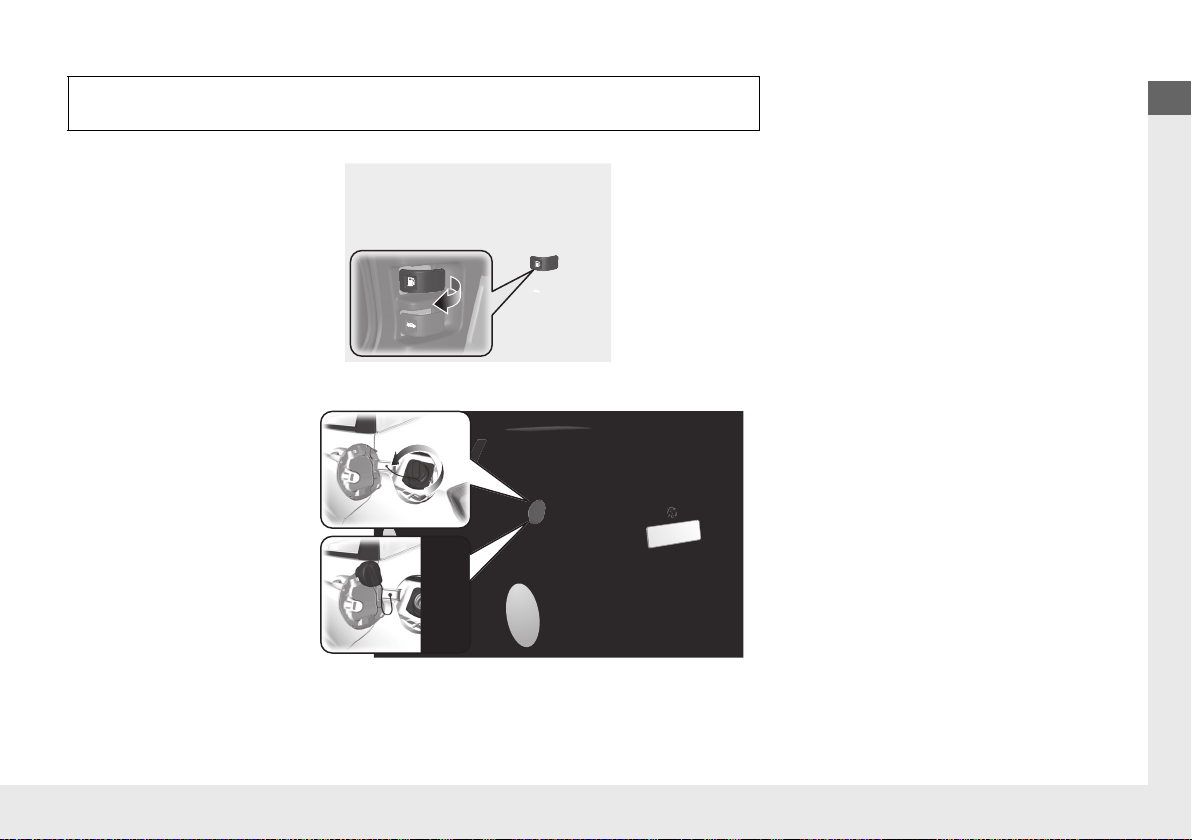
Quick Reference Guide
Refueling (P484)
a Pull the fuel fill door
release handle.
b Turn the fuel fill cap
slowly to remove the
cap.
c Place the cap in the
holder on the fuel fill
door.
d After refueling, screw
the cap back on until it
clicks at least once.
* Not available on all models
Fuel recommendation: Unleaded gasoline, pump octane number 87 or higher
Fuel tank capacity: 10.6 US gal (40 L)
23
Page 26
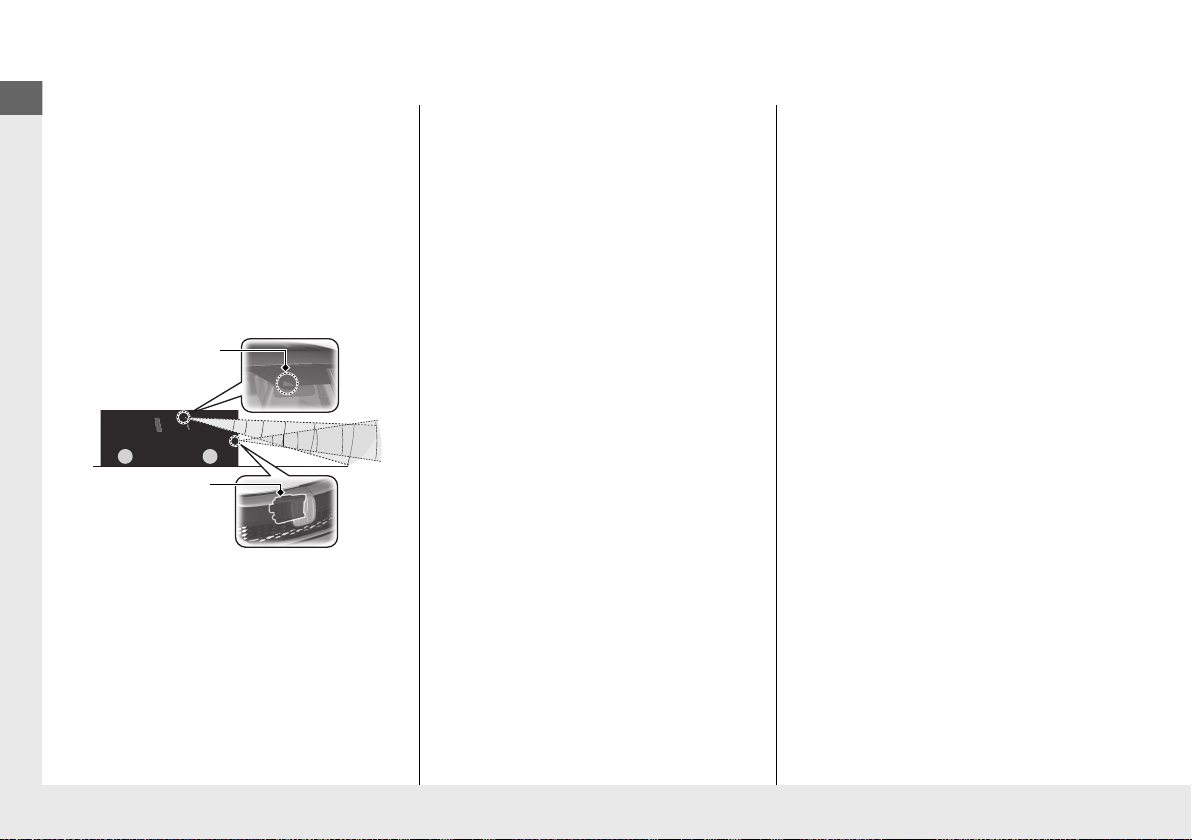
Quick Reference Guide
Honda Sensing®
Front Sensor
Camera
The camera is located
behind the rearview
mirror.
Radar Sensor
The radar sensor is in
the front grille.
*
Honda Sensing® is a driver support system
which employs the use of two distinctly
different kinds of sensors, a radar sensor
located at in the front grille and a front
sensor camera mounted to the interior side
of the windshield, behind the rearview
mirror.
Adaptive Cruise Control
(ACC)
Helps maintain a constant vehicle speed and
a set following-interval behind a vehicle
detected ahead of yours, without you
having to keep your foot on the brake or
the accelerator.
(P 433)
Road Departure
Mitigation (RDM) System
(P 447)
Alerts and helps to assist you when the
system detects a possibility of your vehicle
unintentionally crossing over detected lane
markings and/or leaving the roadway
altogether.
Lane Keeping Assist
System (LKAS)
Provides steering input to help keep the
vehicle in the middle of a detected lane and
provides tactile and visual alerts if the
vehicle is detected drifting out of its lane.
(P 452)
Collision Mitigation
TM
Braking System
TM
(CMBS
Can assist you when there is a possibility of
your vehicle colliding with a vehicle or a
pedestrian detected in front of yours. The
TM
CMBS
potential collision is determined, as well as
to reduce your vehicle speed to help
minimize collision severity when a collision is
deemed unavoidable.
) (P 473)
is designed to alert you when a
24
Page 27
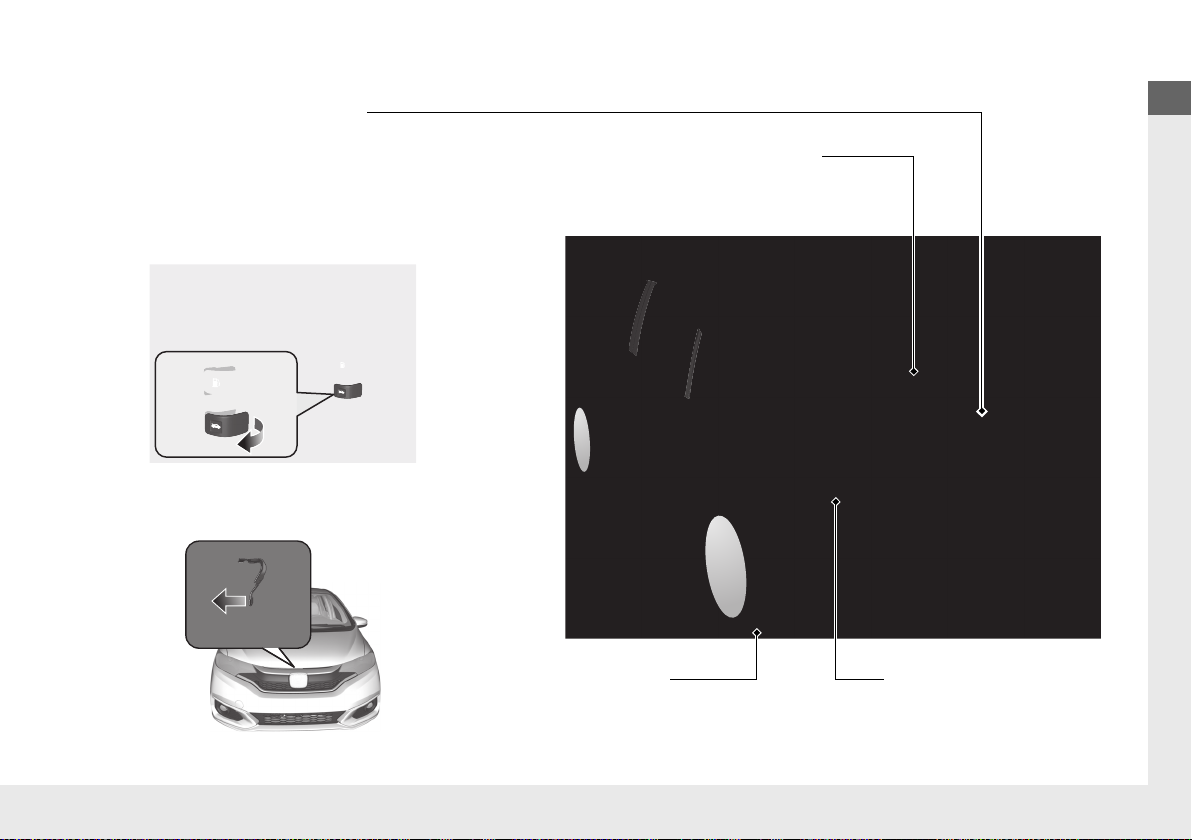
Quick Reference Guide
Maintenance (P489)
Under the Hood (P501)
● Check engine oil, engine coolant, and window washer
fluid. Add when necessary.
● Check brake/clutch
*
fluid
● Check the battery condition monthly.
a Pull the hood release handle under the corner of
the dashboard.
b Locate the hood latch lever, push it to the side, and
then raise the hood. Once you have raised the hood
slightly, you can release the lever.
c When finished, close the hood and make sure it is
firmly locked in place.
Lights (P513)
● Inspect all lights regularly.
Wiper Blades (P520)
● Replace blades if they leave streaks
across the windshield.
Tires (P524)
● Inspect tires and wheels regularly.
● Check tire pressures regularly.
● Install snow tires for winter
driving.
* Not available on all models
25
Page 28
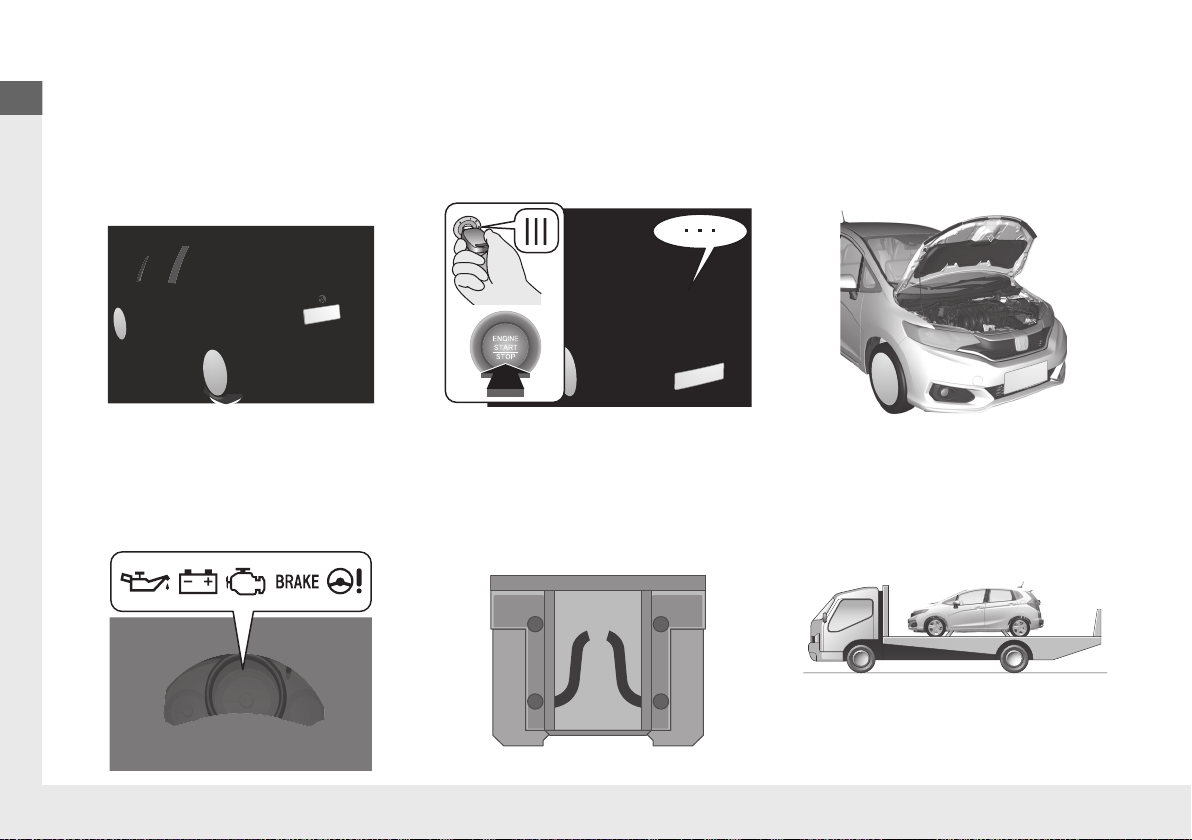
Quick Reference Guide
Handling the Unexpected (P545)
Flat Tire (P547)
● Park in a safe location and replace the
flat tire with the compact spare tire in the
cargo area.
Indicators Come On
(P562)
● Identify the indicator and consult the
owner’s manual.
Engine Won’t Start (P554)
● If the battery is dead, jump start using a
booster battery.
Blown Fuse (P566)
● Check for a blown fuse if an electrical
device does not operate.
Overheating (P560)
● Park in a safe location. If you do not see
steam under the hood, open the hood,
and let the engine cool down.
Emergency Towing (P571)
● Call a professional towing service if you
need to tow your vehicle.
26
Page 29
Quick Reference Guide
U.S. models with manual transmission
Canadian models
Models without smart entry system
Models with smart entry system
Continuously variable transmission
models without smart entry system
Continuously variable transmission
models with smart entry system
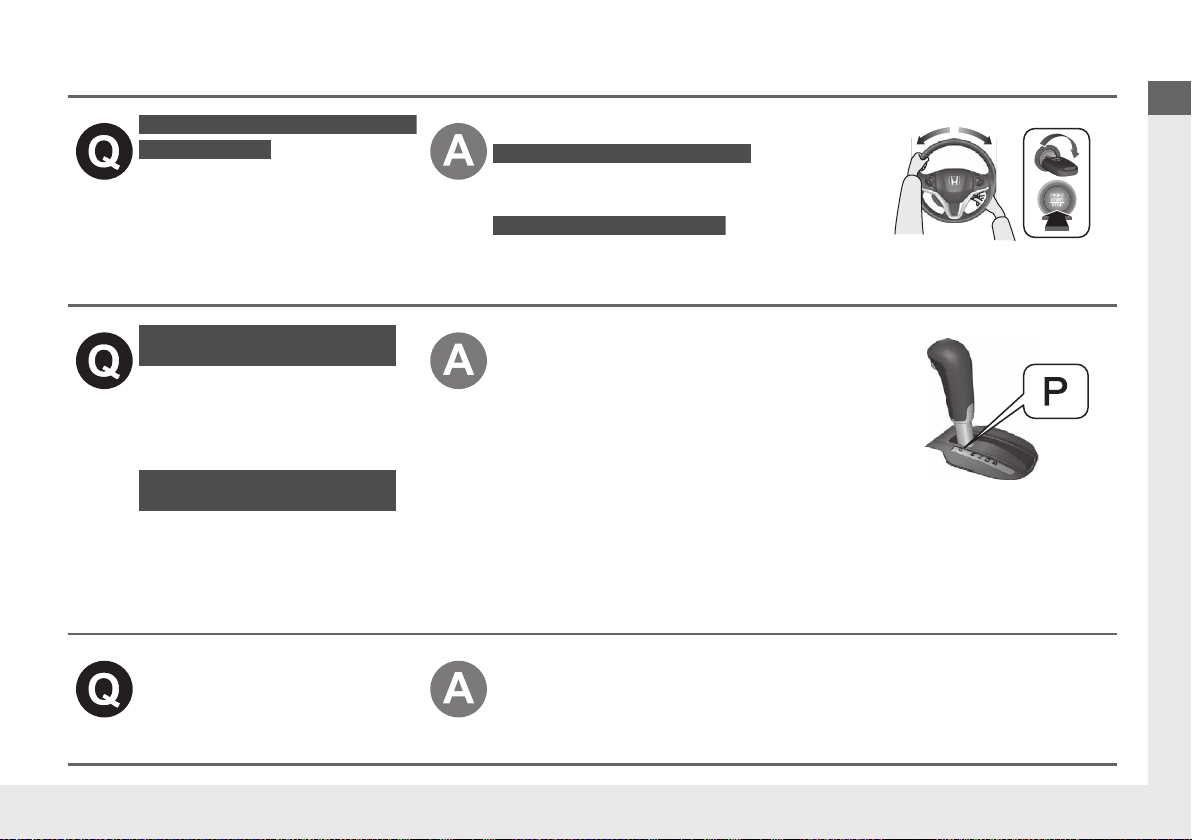
What to Do If
●
The steering wheel may be locked.
The ignition switch does
not turn from
(0 to (q
*1
.
Why?
The ignition switch does
not turn from
(q to (0 and
I cannot remove the key.
Why?
The power mode does not
change from ACCESSORY
to VEHICLE OFF (LOCK).
Why?
Why does the brake pedal
pulsate slightly when
applying the brakes?
●
Try to turn the steering wheel left and
right while turning the ignition key.
●
Move the steering wheel left and right
after pressing the ENGINE START/STOP.
The shift lever should be moved to (P.
This can occur when the ABS activates and does not indicate a
problem. Apply firm, steady pressure on the brake pedal. Never
pump the brake pedal.
2 Anti-lock Brake System (ABS) (P471)
*1: Models with the smart entry system have an ENGINE START/STOP button instead of an ignition switch.
27
Page 30
Quick Reference Guide
Models without smart entry system
Models with smart entry system
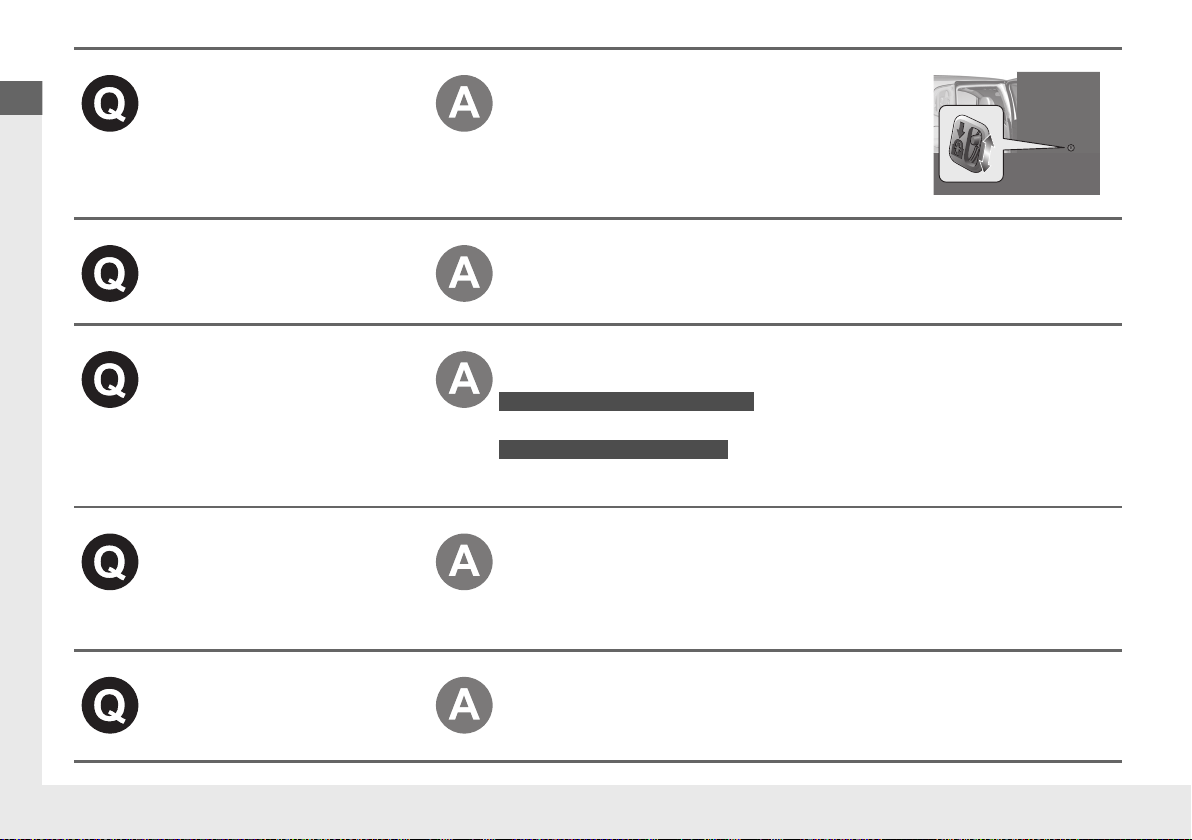
The rear door cannot be
opened from inside the
vehicle. Why?
Check if the childproof lock is in the
lock position. If so, open the rear door
with the outside door handle.
To cancel this function, push the lever
to the unlock position.
Why do the doors lock
after I unlocked the doors?
Why does the beeper
sound when I open the
driver’s door?
Why does a beeper sound
when I walk away from the
vehicle after I close the
door?
Why does the beeper
sound when I start driving?
28
If you do not open the doors within 30 seconds, the doors are
relocked automatically for security.
The beeper sounds when:
●
The exterior lights are left on.
●
The key is left in the ignition switch.
●
The power mode is in ACCESSORY.
The beeper sounds if you move outside the walk away auto
door lock operating range before the door completely closes.
2 Locking the vehicle (Walk away auto lock) (P129)
The beeper sounds when:
●
Driver and/or front passenger are not wearing their seat belts.
●
The parking brake lever is not fully released.
Page 31
Quick Reference Guide
U.S. models only
Why do I hear a screeching
sound when I apply the
brake pedal?
I’m seeing an amber
indicator of a tire with an
exclamation point. What is
that?
The brake pads may need to be replaced. Have your vehicle
inspected by a dealer.
The Tire Pressure Monitoring System (TPMS) needs attention. If
you recently inflated or changed a tire, you have to recalibrate
the system.
2 Tire Pressure Monitoring System (TPMS) (P 463)
29
Page 32

30
Page 33

Safe Driving
You can find many safety recommendations throughout this chapter, and throughout this manual.
For Safe Driving
Important Safety Precautions ............. 32
Your Vehicle’s Safety Features............ 34
Seat Belts
About Your Seat Belts........................ 36
Fastening a Seat Belt.......................... 40
Seat Belt Inspection............................ 45
Airbags
Airbag System Components............... 46
Types of Airbags ................................ 49
Front Airbags (SRS) ............................ 49
Side Airbags....................................... 53
Side Curtain Airbags .......................... 55
Airbag System Indicators.................... 57
Airbag Care ....................................... 59
Child Safety
Protecting Child Passengers ............... 60
Safety of Infants and Small Children.... 62
Safety of Larger Children ................... 71
Exhaust Gas Hazard
Carbon Monoxide Gas....................... 73
Safety Labels
Label Locations .................................. 74
31
Page 34
Safe Driving
For Safe Driving
1Important Safety Precautions
Some states, provinces and territories prohibit the use
of cell phones other than hands-free devices by the
driver while driving.
The following pages explain your vehicle’s safety features and how to use them
properly. The safety precautions below are ones that we consider to be among the
most important.
Important Safety Precautions
■ Always wear your seat belt
A seat belt is your best protection in all types of collisions. Airbags are designed to
supplement seat belts, not replace them. So even though your vehicle is equipped
with airbags, make sure you and your passengers always wear your seat belts, and
wear them properly.
■ Restrain all children
Children ages 12 and under should ride properly restrained in a back seat, not the
front seat. Infants and small children should be restrained in a child seat. Larger
children should use a booster seat and a lap/shoulder seat belt until they can use the
belt properly without a booster seat.
■ Be aware of airbag hazards
While airbags can save lives, they can cause serious or fatal injuries to occupants
who sit too close to them, or are not properly restrained. Infants, young children,
and short adults are at the greatest risk. Be sure to follow all instructions and
warnings in this manual.
■ Don’t drink and drive
Alcohol and driving don’t mix. Even one drink can reduce your ability to respond to
changing conditions, and your reaction time gets worse with every additional drink.
So don’t drink and drive, and don’t let your friends drink and drive, either.
32
Page 35

Safe Driving
■ Pay appropriate attention to the task of driving safely
Engaging in cell phone conversation or other activities that keep you from paying
close attention to the road, other vehicles, and pedestrians could lead to a crash.
Remember, situations can change quickly, and only you can decide when it is safe to
divert some attention away from driving.
■ Control your speed
Excessive speed is a major factor in crash injuries and deaths. Generally, the higher
the speed, the greater the risk, but serious injuries can also occur at lower speeds.
Never drive faster than is safe for current conditions, regardless of the maximum
speed posted.
■ Keep your vehicle in safe condition
Having a tire blowout or a mechanical failure can be extremely hazardous.
To reduce the possibility of such problems, check your tire pressures and condition
frequently, and perform all regularly scheduled maintenance.
■ Do not leave children unattended in the vehicle
Children left unattended in the vehicle may be injured if they activate one or more
of the vehicle controls. They may also cause the vehicle to move, resulting in a crash
in which the children and/or another person(s) can be injured or killed. Also,
depending on the ambient temperature, the temperature of the interior may reach
extreme levels, which can result in injury or death.
Even if the climate control system is on, never leave children in the vehicle
unattended as the climate control system can shut off at any time.
uuFor Safe DrivinguImportant Safety Precautions
33
Page 36
uuFor Safe DrivinguYour Vehicle’s Safety Features
Safe Driving
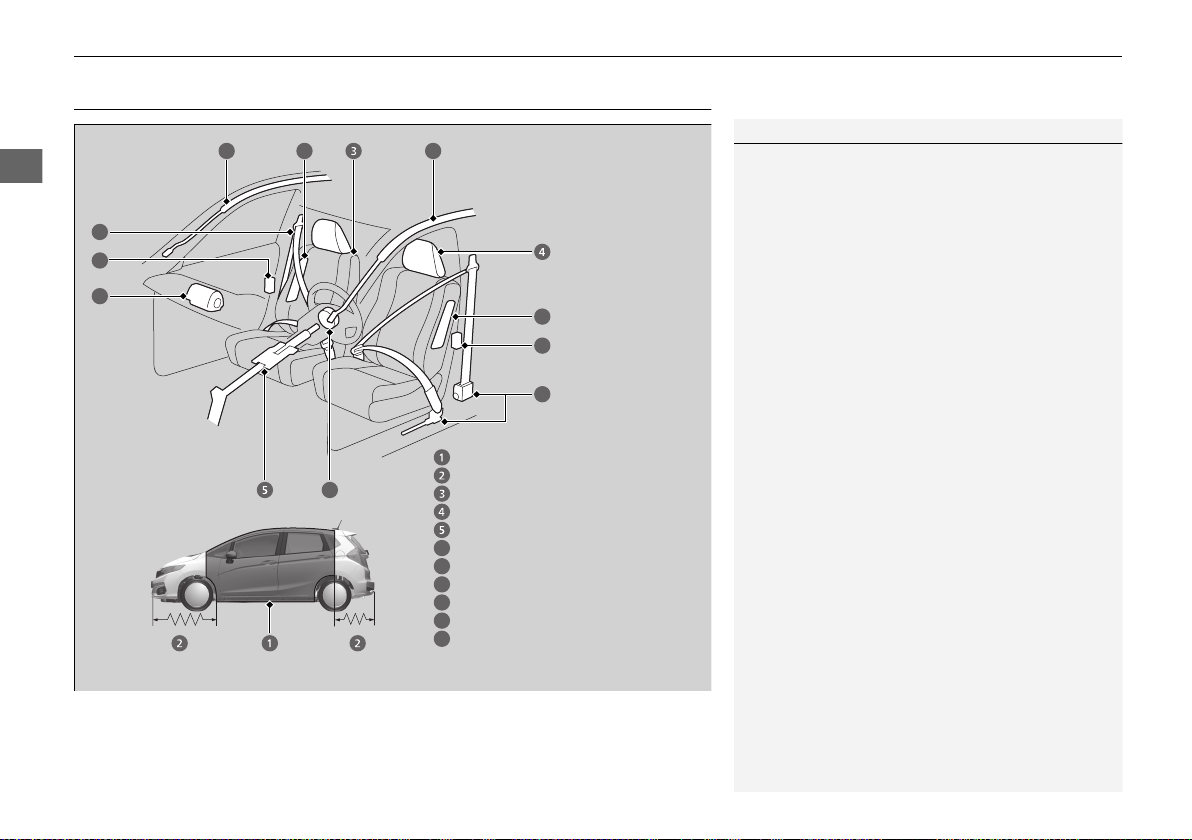
1Your Vehicle’s Safety Features
Your vehicle is equipped with many features that
work together help to protect you and your
passengers during a crash.
Some features do not require any action on your part.
These include a strong steel framework that forms a
safety cage around the passenger compartment,
front and rear crush zones, a collapsible steering
column, and tensioners that tighten the front seat
belts in a sufficient crash.
However, you and your passengers cannot take full
advantage of these features unless you remain seated
in the correct position and always wear your seat
belts. In fact, some safety features can contribute to
injuries if they are not used properly.
6
7
11
Safety Cage
Crush Zones
Seats and Seat-Backs
Head Restraints
Collapsible Steering Column
Seat Belts
Front Airbags
Side Curtain Airbags
Seat Belt Tensioners
Side Airbags
7
8
Door Locks
10
Your Vehicle’s Safety Features
9 9
8
6
10
7
The following checklist will help you take an active role in protecting yourself and
your passengers.
34
11
8
9
10
Page 37
Safe Driving
Safety Checklist
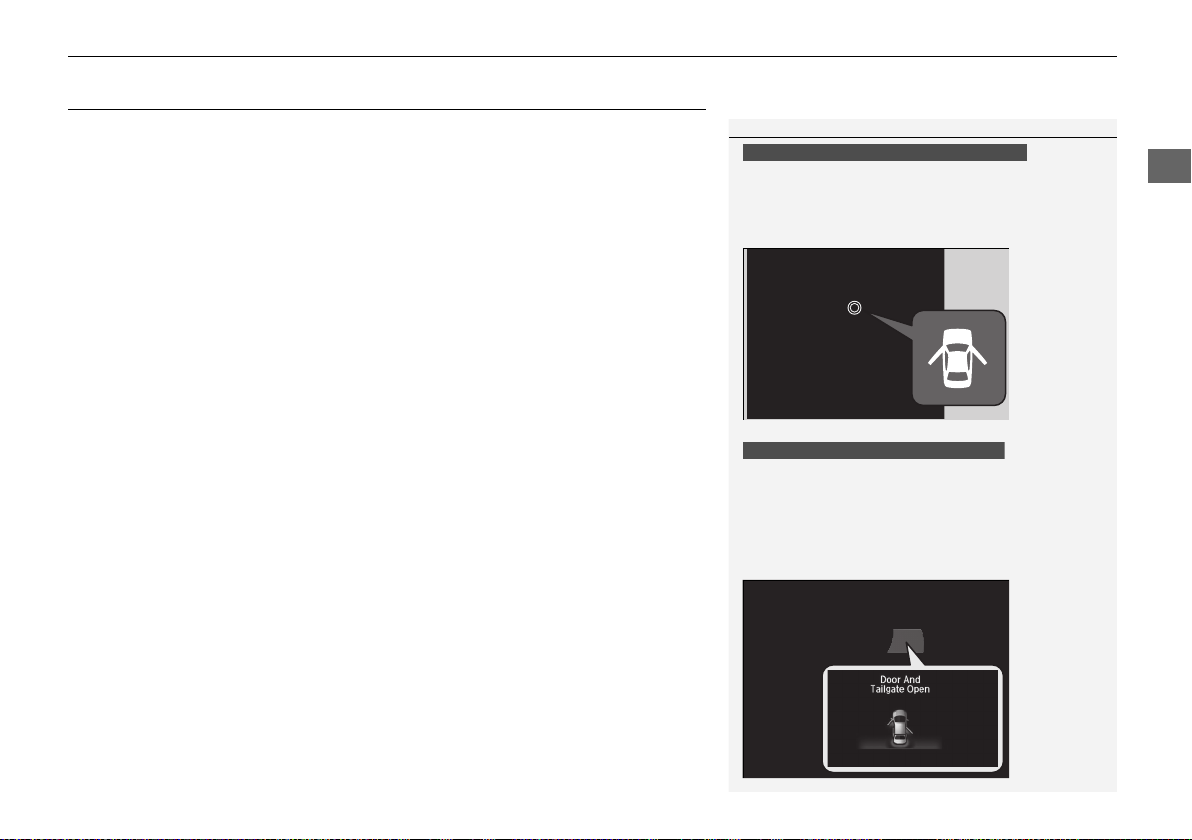
1Safety Checklist
If the door and tailgate open indicator is on, a door and/
or the tailgate is not completely closed. Close all doors
and the tailgate tightly until the indicator goes off.
2 Door and Tailgate Open Indicator
*
P. 82
If the door and/or tailgate open message appears on
the multi-information display (MID), a door and/or
the tailgate is not completely closed. Close all doors
and the tailgate tightly until the message disappears.
2 Multi-Information Display Warning and
Information Messages
*
P. 92
Models without multi-information display
Models with multi-information display
* Not available on all models
For the safety of you and your passengers, make a habit of checking these items
each time before you drive.
• After everyone has entered the vehicle, be sure all doors and the tailgate are
closed and locked. Locking the doors and the tailgate helps prevent an occupant
from being ejected and an outsider from unexpectedly opening a door or the
tailgate.
2 Locking/Unlocking the Doors from the Inside P. 135
• Adjust your seat to a position suitable for driving. Be sure the front seats are
adjusted as far to the rear as possible while allowing the driver to control the
vehicle. Sitting too close to a front airbag can result in serious or fatal injury in a
crash.
2 Adjusting the Seats P. 174
• Adjust head restraints to the proper position. Head restraints are most effective
when the center of the head restraint aligns with the center of your head. Taller
persons should adjust their head restraint to the highest position.
2 Adjusting the front head restraint positions P. 181
• Always wear your seat belt, and make sure you wear it properly. Confirm that any
passengers are properly belted as well.
2 Fastening a Seat Belt P. 40
• Protect children by using seat belts or child seats according to a child’s age, height
and weight.
2 Child Safety P. 60
uuFor Safe DrivinguSafety Checklist
35
Page 38
Safe Driving
Seat Belts
1About Your Seat Belts
If a rear seat passenger moves around and extends
the seat belt, the lockable retractor may activate. If
this happens, release the retractor by unfastening the
seat belt and allow the belt to retract completely.
Then refasten the belt.
If you extend the seat belt too quickly, it will lock in
place. If this happens, slightly retract the seat belt,
then extend it slowly.
Seat belts cannot completely protect you in every
crash. But in most cases, seat belts can reduce your
risk of serious injury.
Most states and all Canadian provinces and territories
require you to wear seat belts.
3
WARNING
Not wearing a seat belt properly increases
the chance of serious injury or death in a
crash, even though your vehicle has
airbags.
Be sure you and your passengers always
wear seat belts and wear them properly.
About Your Seat Belts
Seat belts are the single most effective safety device because they keep you
connected to the vehicle so that you can take advantage of many built-in safety
features. They also help keep you from being thrown against the inside of the
vehicle, against any passengers, or out of the vehicle. When worn properly, seat
belts also keep your body properly positioned in a crash so that you can take full
advantage of the additional protection provided by the airbags.
In addition, seat belts help protect you in almost every type of crash, including:
- frontal impacts
- side impacts
- rear impacts
- rollovers
■ Lap/shoulder seat belts
All five seating positions are equipped with lap/shoulder seat belts with emergency
locking retractors. In normal driving the retractor lets you move freely while keeping
some tension on the belt. During a collision or sudden stop the retractor locks to
restrain your body. The front passenger’s and rear seat belts also have a lockable
retractor for use with child seats.
2 Installing a Child Seat with a Lap/Shoulder Seat Belt P. 67
36
Page 39

Safe Driving
■ Proper use of seat belts
Follow these guidelines for proper use:
• All occupants should sit upright, well back in the seat, and remain in that position
• Never place the shoulder part of a lap/shoulder seat belt under your arm or
• Two people should never use the same seat belt. If they do, they could be very
• Do not put any accessories on the seat belts. Devices intended to improve comfort
uuSeat BeltsuAbout Your Seat Belts
for the duration of the trip. Slouching and leaning reduce the effectiveness of the
belt and can increase the chance of serious injury in a crash.
behind your back. This could cause very serious injuries in a crash.
seriously injured in a crash.
or reposition the shoulder part of a seat belt can reduce the protective capability
and increase the chance of serious injury in a crash.
Continued
37
Page 40
uuSeat BeltsuAbout Your Seat Belts
Safe Driving
1Seat Belt Reminder
The indicator will also come on if a front passenger
does not fasten their seat belt within six seconds after
the ignition switch is turned to ON
(w
*1
.
When no one is sitting in the front passenger’s seat,
the indicator will not come on and the beeper will not
sound.
The indicator also may not come on and the beeper
may not sound when the occupant is not heavy
enough to trigger the weight sensor. Such occupants
(e.g., infants and smaller children) should be moved
to a rear seat as a deploying front airbag likely will
injure or kill them.
2 Protecting Child Passengers P. 60
Models without multi-information
display
Models with multi-information display
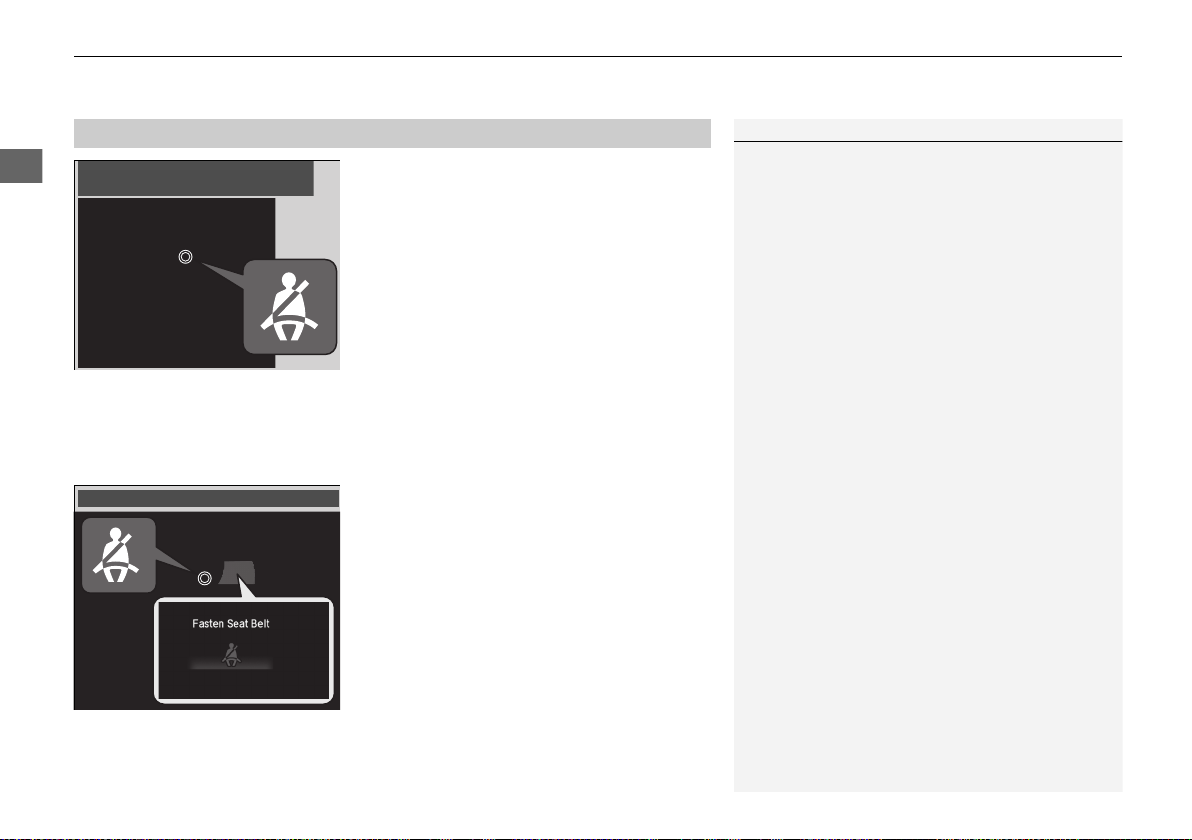
Seat Belt Reminder
■
The seat belt system includes an indicator on
the instrument panel to remind the driver or a
front passenger or both to fasten their seat
belts.
If the ignition switch is turned to ON
(w
*1
and
a seat belt is not fastened, a beeper will sound
and the indicator will blink. After a few
seconds, the beeper will stop and the
indicator will come on and remain illuminated
until the seat belt is fastened.
The beeper will periodically sound and the
indicator will blink while the vehicle is moving
until the seat belt is fastened.
*1: Models with the smart entry system have an ENGINE START/STOP button instead of an ignition switch.
38
Page 41
Safe Driving
Automatic Seat Belt Tensioners
1Automatic Seat Belt Tensioners
The seat belt tensioners can only operate once.
If a tensioner is activated, the SRS indicator will come
on. Have a dealer replace the tensioner and
thoroughly inspect the seat belt system as it may not
offer protection in a subsequent crash.
During a moderate-to-severe side impact, the
tensioner on that side of the vehicle also activates.
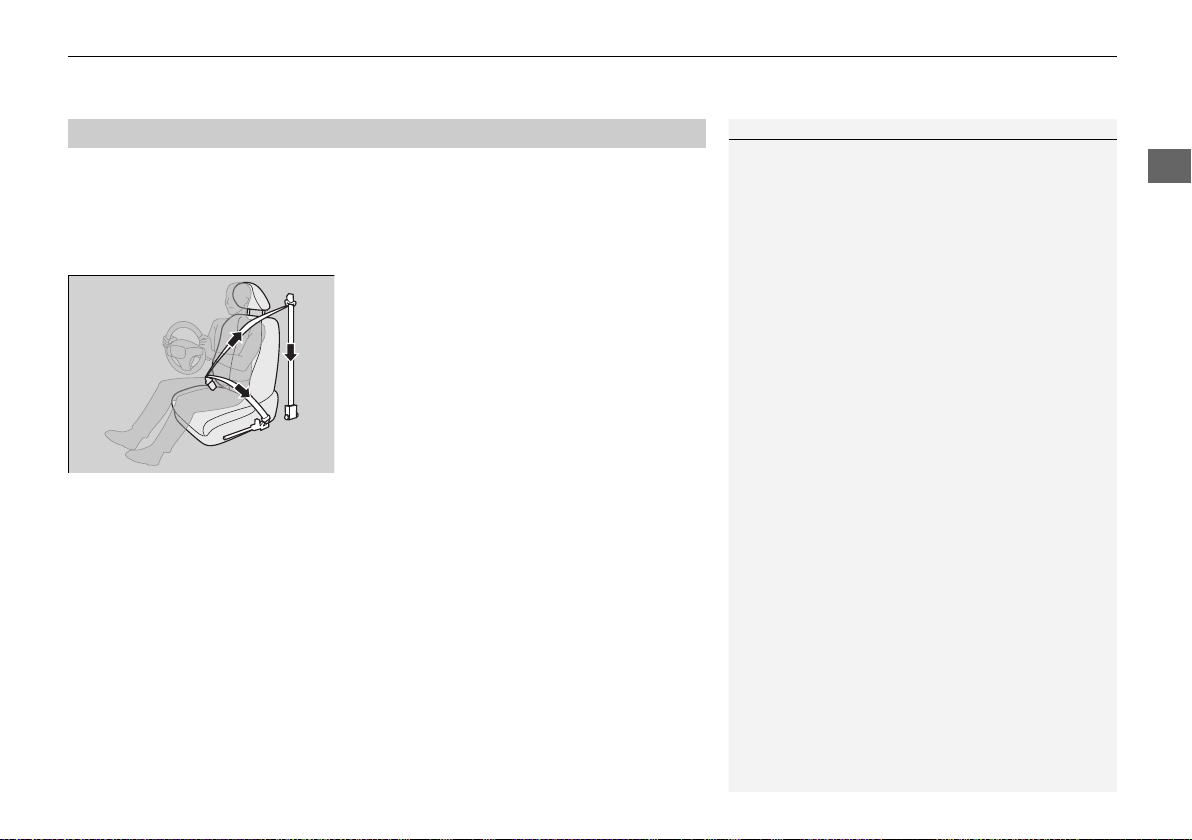
■
The front seats are equipped with automatic seat belt tensioners to enhance safety.
The tensioners automatically tighten the front seat belts during a moderate-tosevere frontal collision, sometimes even if the collision is not severe enough to
inflate the front airbags.
uuSeat BeltsuAbout Your Seat Belts
39
Page 42
uuSeat BeltsuFastening a Seat Belt
Safe Driving
1Fastening a Seat Belt
No one should sit in a seat with an inoperative seat
belt or one that does not appear to be working
correctly. Using a seat belt that is not working
properly may not protect the occupant in a crash.
Have a dealer check the belt as soon as possible.
If the seat belt appears to be locked in a fully
retracted position, firmly pull out on the shoulder belt
once, then push it back in. Then smoothly pull it out
of the retractor and fasten. If you are unable to
release the seat belt from a fully retracted position,
do not allow anyone to sit in the seat, and take your
vehicle to a dealer for repair.
2 About Your Seat Belts P. 36
2 Seat Belt Inspection P. 45
Pull out slowly.
Correct
Seated
Posture.
Latch
Plate
Buckle
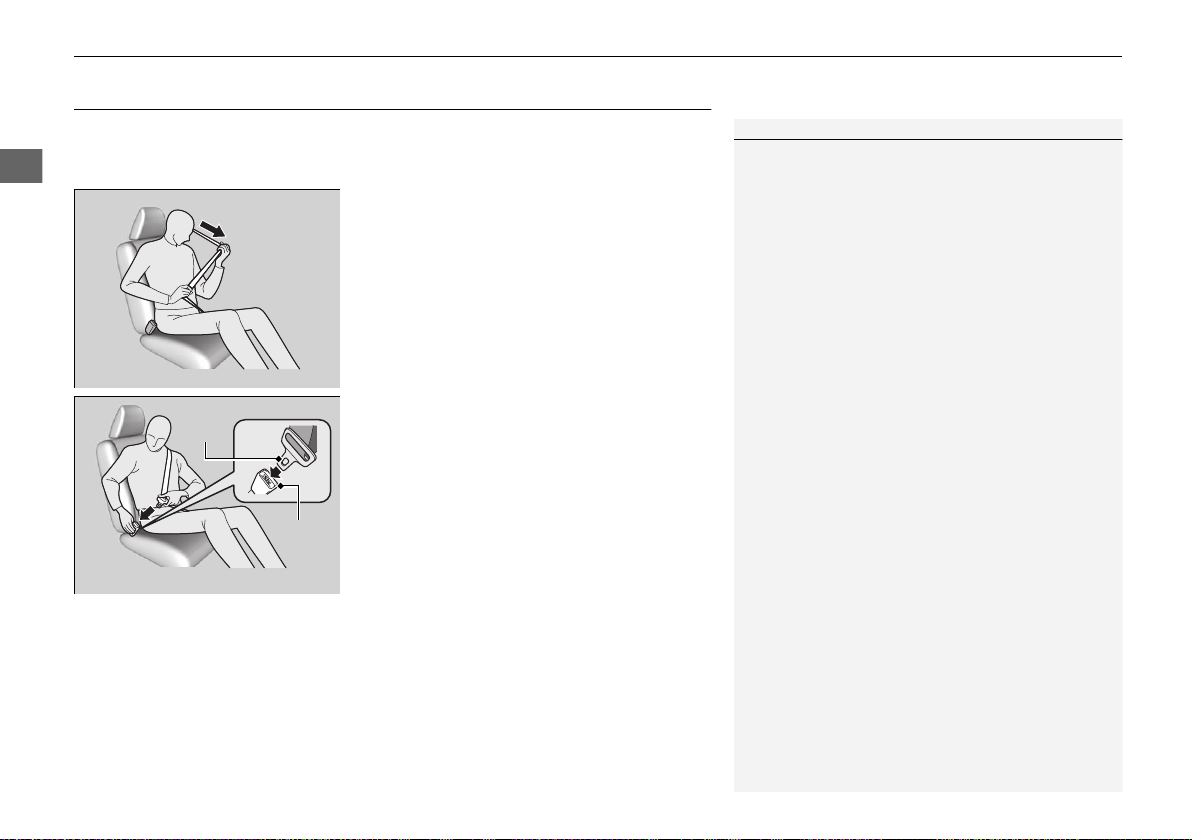
Fastening a Seat Belt
After adjusting a front seat to the proper position, and while sitting upright and well
back in the seat:
2 Adjusting the Seats P. 174
1. Pull the seat belt out slowly.
2. Insert the latch plate into the buckle, then
tug on the belt to make sure the buckle is
secure.
u Make sure that the belt is not twisted or
caught on anything.
40
Page 43
Safe Driving
1Fastening a Seat Belt
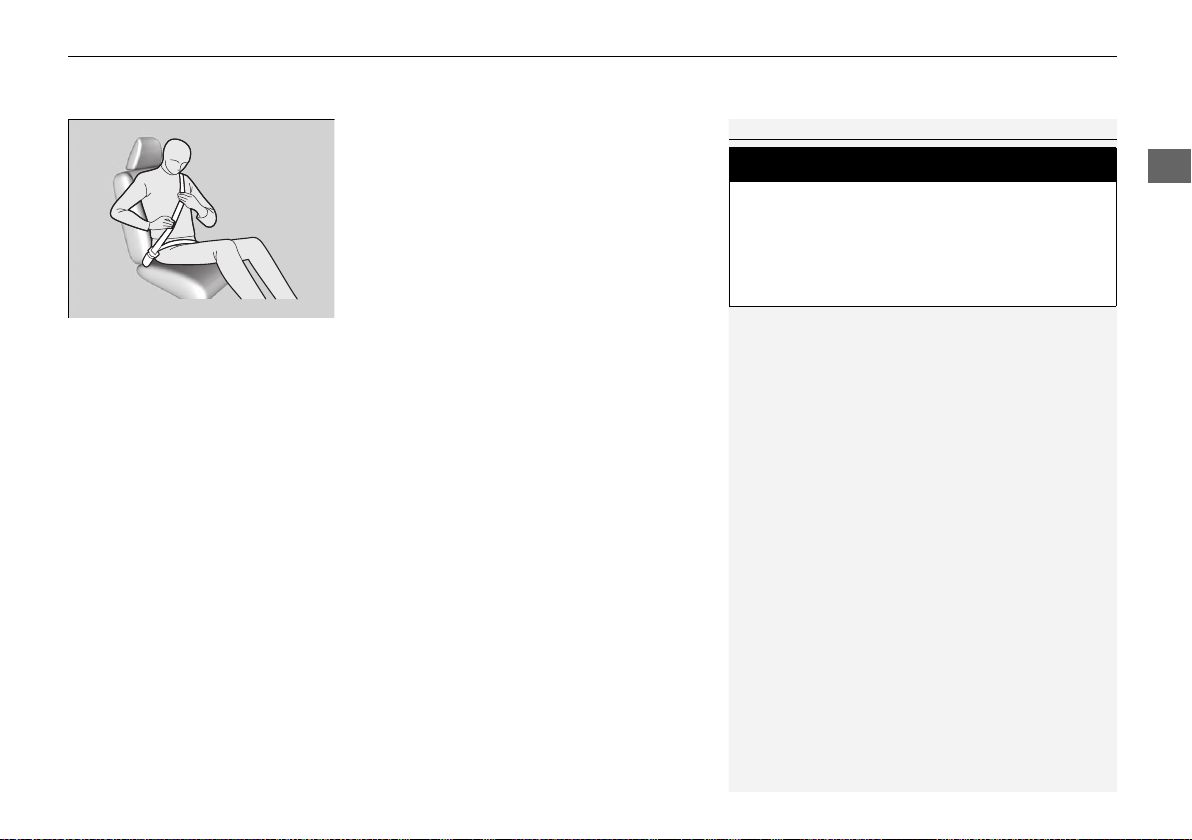
To release the belt, push the red PRESS button and
then guide the belt by hand until it has retracted
completely.
When exiting the vehicle, be sure the belt is properly
stowed so that it will not get caught in the closing
door.
Never insert any foreign objects into the buckle or
retractor mechanism.
3
WARNING
Improperly positioning the seat belts can
cause serious injury or death in a crash.
Make sure all seat belts are properly
positioned before driving.
Lap belt
as low as
possible
uuSeat BeltsuFastening a Seat Belt
3. Position the lap part of the belt as low as
possible across your hips, then pull up on
the shoulder part of the belt so the lap part
fits snugly. This lets your strong pelvic
bones take the force of a crash and reduces
the chance of internal injuries.
4. If necessary, pull up on the belt again to
remove any slack, then check that the belt
rests across the center of your chest and
over your shoulder. This spreads the forces
of a crash over the strongest bones in your
upper body.
Continued
41
Page 44
uuSeat BeltsuFastening a Seat Belt
Safe Driving
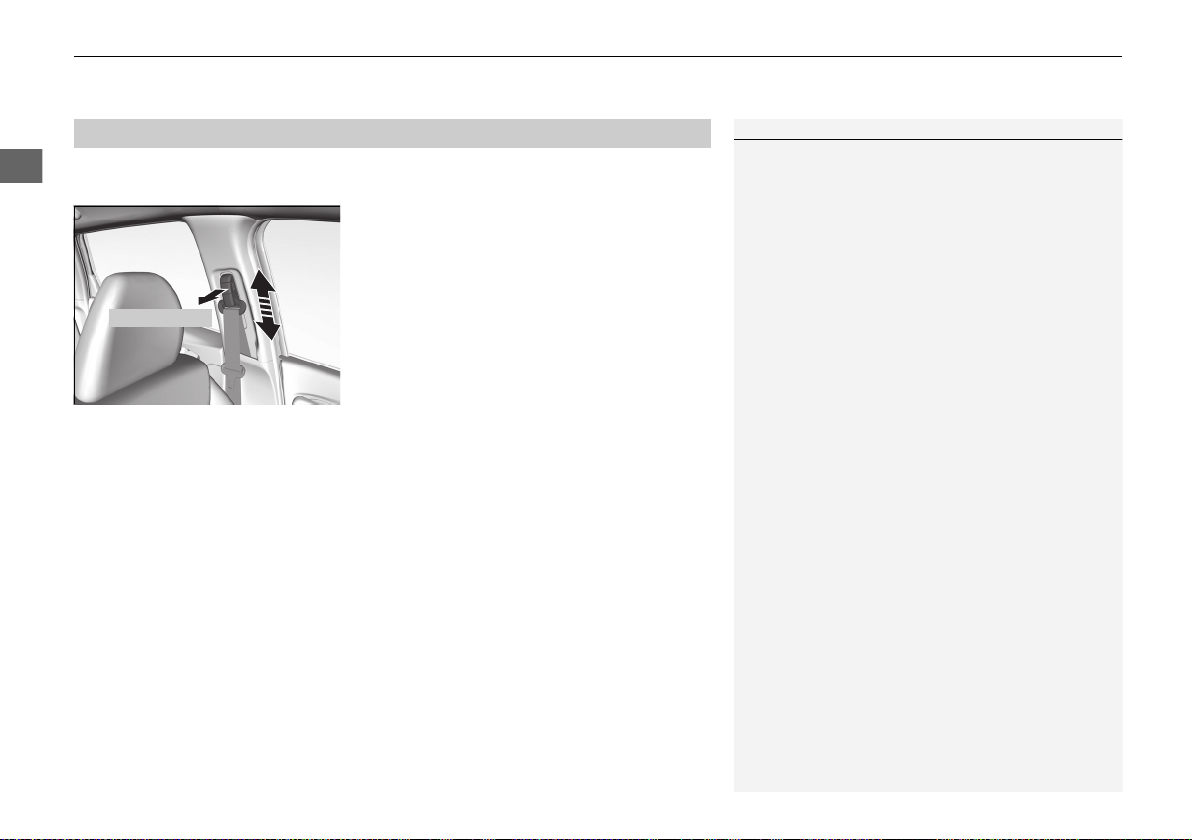
1Adjusting the Shoulder Anchor
The shoulder anchor height can be adjusted to four
levels. If the belt contacts your neck, lower the height
one level at a time.
After an adjustment, make sure that the shoulder
anchor position is secure.
Pull outward
Adjusting the Shoulder Anchor
■
The front seats have adjustable shoulder anchors to accommodate taller and shorter
occupants.
1. Move the anchor up and down while
pulling the release outward.
2. Position the anchor so that the belt rests
across the center of your chest and over
your shoulder.
42
Page 45
Safe Driving
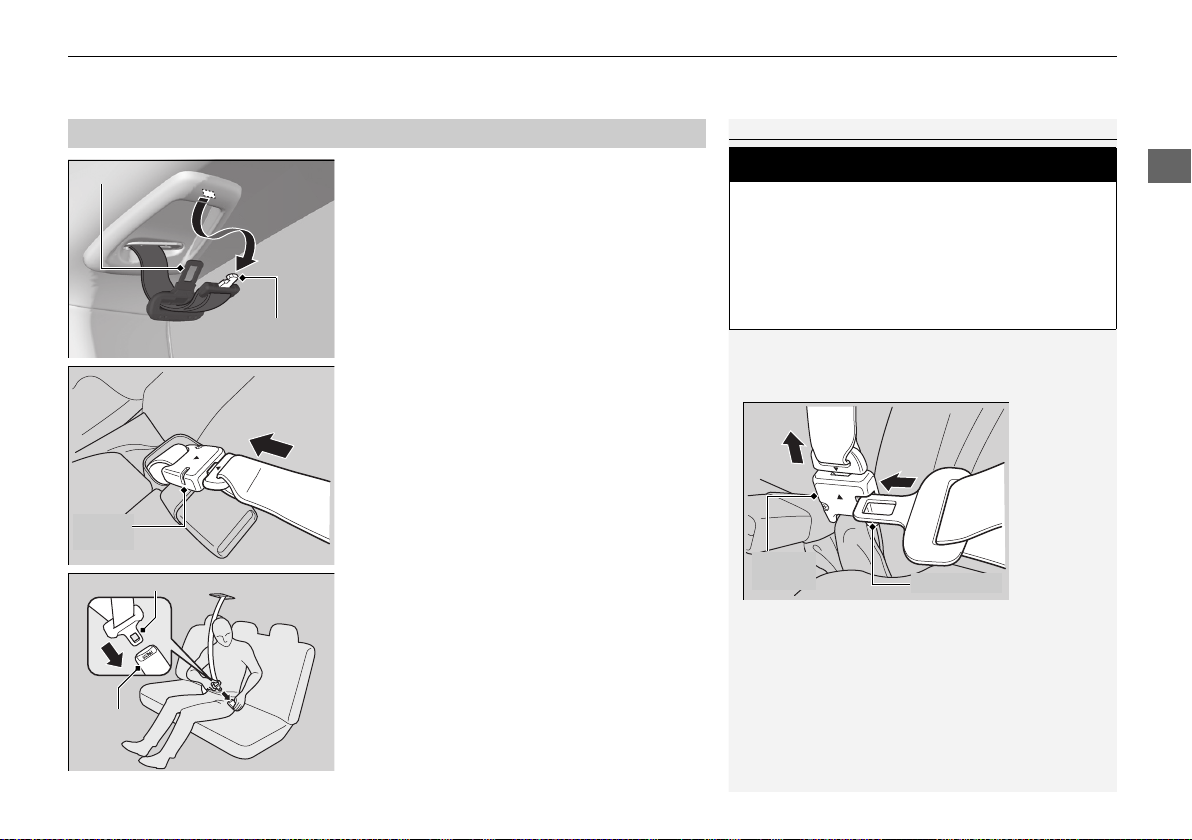
Seat Belt with Detachable Anchor
1Seat Belt with Detachable Anchor
To unlatch the detachable anchor, insert the latch
plate into the slot on the side of the anchor buckle.
3
WARNING
Using the seat belt with the detachable
anchor unlatched increases the chance of
serious injury or death in a crash.
Before using the seat belt, make sure the
detachable anchor is correctly latched.
Anchor
Buckle
Latch Plate
Small Latch
Plate
Latch Plate
Anchor
Buckle
Latch Plate
Buckle
■
uuSeat BeltsuFastening a Seat Belt
1. Pull out the seat belt’s small latch plate and
the latch plate from each holding slot in the
ceiling.
2. Line up the triangle marks on the small
latch plate and anchor buckle.
Make sure the seat belt is not twisted.
Attach the belt to the anchor buckle.
3. Insert the latch plate into the buckle.
Properly fasten the seat belt the same way
you fasten the lap/shoulder seat belt.
Continued
43
Page 46
uuSeat BeltsuFastening a Seat Belt
Safe Driving
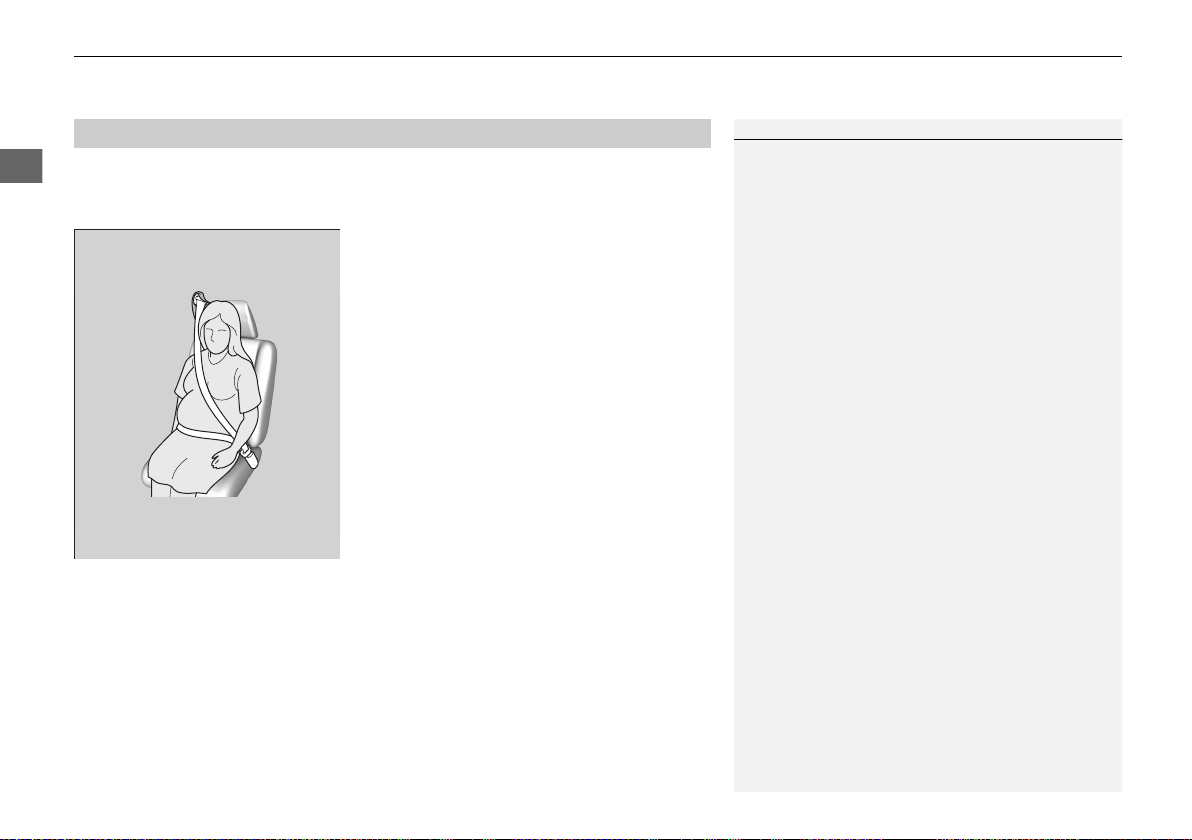
1Advice for Pregnant Women
Each time you have a checkup, ask your doctor if it is
okay for you to drive.
To reduce the risk of injuries to both you and your
unborn child that can be caused by an inflating front
airbag:
• When driving, sit upright and adjust the seat as far
back as possible while allowing full control of the
vehicle.
• When sitting in the front passenger’s seat, adjust
the seat as far back as possible.
Wear the shoulder belt
across the chest avoiding
the abdomen.
Wear the lap part of the
belt as low as possible
across the hips.
Advice for Pregnant Women
■
If you are pregnant, the best way to protect yourself and your unborn child when
driving or riding in a vehicle is to always wear a seat belt and keep the lap part of the
belt as low as possible across the hips.
44
Page 47
Safe Driving
Seat Belt Inspection
1Seat Belt Inspection
3
WARNING
Not checking or maintaining seat belts can
result in serious injury or death if the seat
belts do not work properly when needed.
Check your seat belts regularly and have
any problem corrected as soon as possible.
Regularly check the condition of your seat belts as follows:
• Pull each belt out fully, and look for frays, cuts, burns, and wear.
• Check that the latch plates and buckles work smoothly and the belts retract
easily.
u If a belt does not retract easily, cleaning the belt may correct the problem. Only
use a mild soap and warm water. Do not use bleach or cleaning solvents. Make
sure the belt is completely dry before allowing it to retract.
Any belt that is not in good condition or working properly will not provide proper
protection and should be replaced as soon as possible.
A belt that has been worn during a crash may not provide the same level of
protection in a subsequent crash. Have your seat belts inspected by a dealer after
any collision.
uuSeat BeltsuSeat Belt Inspection
45
Page 48
Safe Driving
Airbags
8
8
Airbag System Components
78 911810
6
8
8
46
Page 49

uuAirbags uAirbag System Components
Safe Driving
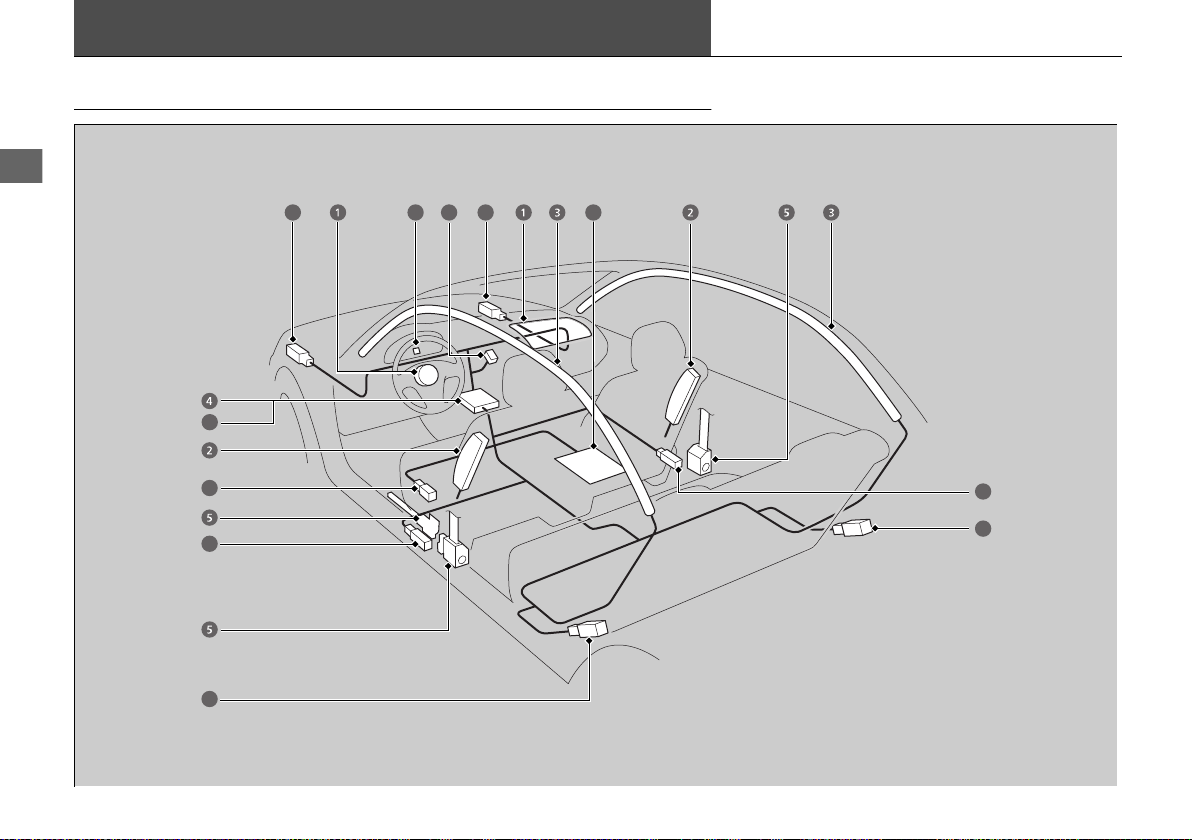
The front, front side, and side curtain
airbags are deployed according to the
direction and severity of impact. Both side
curtain airbags are deployed in a rollover.
The airbag system includes:
a Two SRS (Supplemental Restraint System)
b Two side airbags, one for the driver and
c Two side curtain airbags, one for each
front airbags. The driver’s airbag is stored
in the center of the steering wheel; the
front passenger’s airbag is stored in the
dashboard. Both are marked SRS
AIRBAG.
one for a front passenger. The airbags are
stored in the outer edges of the seatbacks. Both are marked SIDE AIRBAG.
side of the vehicle. The airbags are stored
in the ceiling, above the side windows.
The front and rear pillars are marked
SIDE CURTAIN AIRBAG.
d An electronic control unit that, when the
ignition switch is ON (w*1, continually
monitors information about the various
impact sensors, seat and buckle sensors,
rollover sensor, airbag activators, seat
belt tensioners, and other vehicle
information. During a crash event the
unit can record such information.
e Automatic front seat belt tensioners. In
addition, the driver’s and front
passenger’s seat belt buckles incorporate
sensors that detect whether or not the
belts are fastened.
f A driver’s seat position sensor. This
sensor determines the optimal force at
which the airbag will deploy in a crash.
g Weight sensors in the front passenger’s
seat. The front passenger’s airbag will be
turned off if the weight on the seat is
approximately 65 lbs (29 kg) or less (the
weight of an infant or small child).
h Impact sensors that can detect a
moderate-to-severe front or side impact.
i An indicator on the dashboard that alerts
you that the front passenger’s front
airbag has been turned off.
j An indicator on the instrument panel that
alerts you to a possible problem with your
airbag system or seat belt tensioners.
k A rollover sensor that can detect if your
vehicle is about to roll over and signal the
control unit to deploy both side curtain
airbags.
*1: Models with the smart entry system have an
ENGINE START/STOP button instead of an ignition
switch.
Continued
47
Page 50
uuAirbagsu Airbag System Components
Safe Driving
1Important facts about your airbags
Do not attempt to deactivate your airbags. Together,
airbags and seat belts provide the best protection.
When driving, keep hands and arms out of the
deployment path of the front airbag by holding each
side of the steering wheel. Do not cross an arm over
the airbag cover.
Important facts about your airbags
■
Airbags can pose serious hazards. To do their job, airbags must inflate with
tremendous force. So, while airbags help save lives, they can cause burns, bruises,
and other minor injuries, sometimes even fatal ones if occupants are not wearing
their seat belts properly and sitting correctly.
What you should do: Always wear your seat belt properly, and sit upright and as
far back from the steering wheel as possible while allowing full control of the
vehicle. A front passenger should move their seat as far back from the dashboard as
possible.
Remember, however, that no safety system can prevent all injuries or deaths that
can occur in a severe crash, even when seat belts are properly worn and the airbags
deploy.
Do not place hard or sharp objects between yourself and a front airbag.
Carrying hard or sharp objects on your lap, or driving with a pipe or other sharp
object in your mouth, can result in injuries if your front airbag inflates.
Do not attach or place objects on the front airbag covers. Objects on the
covers marked SRS AIRBAG could interfere with the proper operation of the airbags
or be propelled inside the vehicle and hurt someone if the airbags inflate.
48
Page 51
Safe Driving
Types of Airbags
1Types of Airbags
The airbags can inflate whenever the ignition switch
is in ON
(w
*1
.
After an airbag inflates in a crash, you may see a
small amount of smoke. This is from the combustion
process of the inflator material and is not harmful.
People with respiratory problems may experience
some temporary discomfort. If this occurs, get out of
the vehicle as soon as it is safe to do so.
1Front Airbags (SRS)
During a frontal crash severe enough to cause one or
both front airbags to deploy, the airbags can inflate
at different rates, depending on the severity of the
crash, whether or not the seat belts are latched, and/
or other factors. Frontal airbags are designed to
supplement the seat belts to help reduce the
likelihood of head and chest injuries in frontal
crashes.
Your vehicle is equipped with three types of airbags:
• Front airbags: Airbags in front of the driver’s and front passenger’s seats.
• Side airbags: Airbags in the driver’s and front passenger’s seat-backs.
• Side curtain airbags: Airbags above the side windows.
Each is discussed in the following pages.
Front Airbags (SRS)
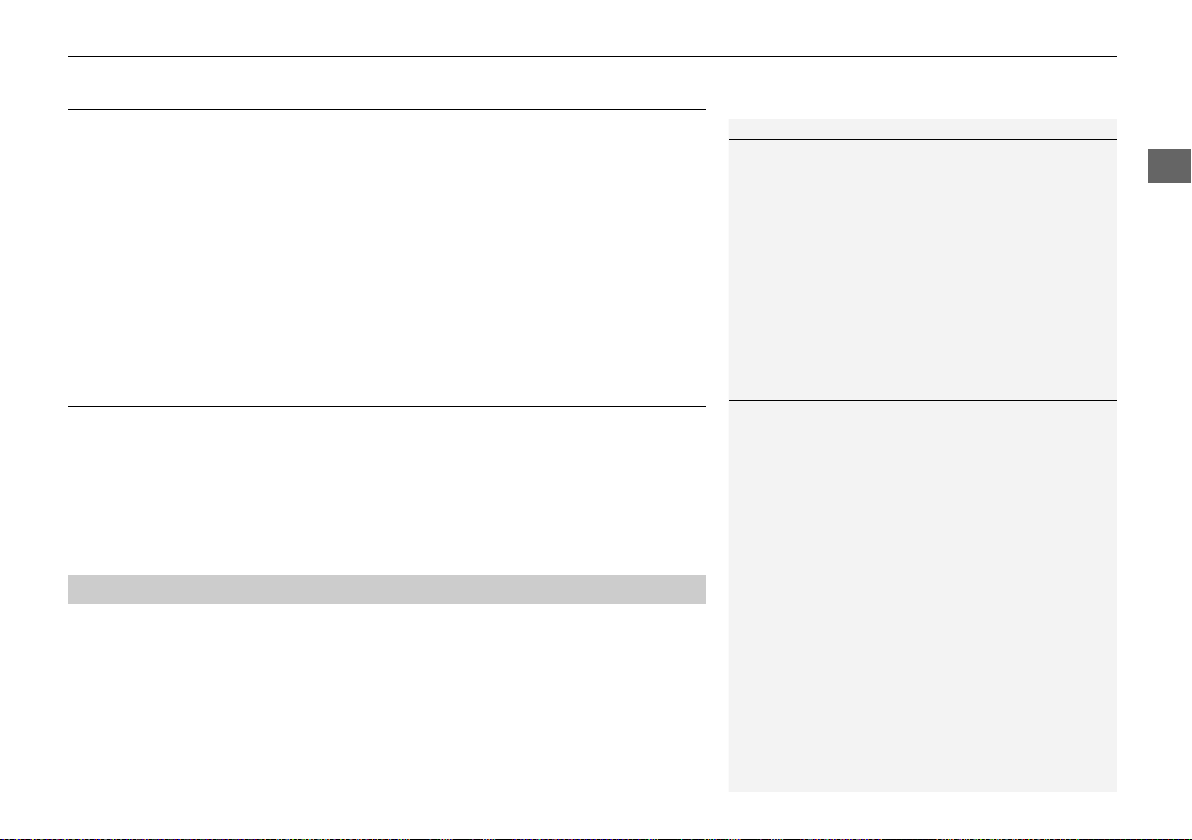
The front SRS airbags inflate in a moderate-to-severe frontal collision to help protect
the head and chest of the driver and/or front passenger.
uuAirbagsu Types of Airbags
SRS (Supplemental Restraint System) indicates that the airbags are designed to
supplement seat belts, not replace them. Seat belts are the occupant’s primary
restraint system.
Housing Locations
■
The front airbags are housed in the center of the steering wheel for the driver, and
in the dashboard for the front passenger. Both airbags are marked SRS AIRBAG.
*1: Models with the smart entry system have an ENGINE START/STOP button instead of an ignition switch.
Continued
49
Page 52
uuAirbagsu Front Airbags (SRS)
Safe Driving
1How the Front Airbags Work
Although the driver’s and front passenger’s airbags
normally inflate within a split second of each other, it
is possible for only one airbag to deploy. This can
happen if the severity of a collision is at the margin,
or threshold, that determines whether or not the
airbags will deploy. In such cases, the seat belt will
provide sufficient protection, and the supplemental
protection offered by the airbag would be minimal.
Operation
■
Front airbags are designed to inflate during moderate-to-severe frontal collisions.
When the vehicle decelerates suddenly, the sensors send information to the control
unit which signals one or both front airbags to inflate.
A frontal collision can be either head-on or angled between two vehicles, or when a
vehicle crashes into a stationary object, such as a concrete wall.
How the Front Airbags Work
■
The total time for inflation and deflation is so fast that most occupants are not
aware that the airbags deployed until they see them lying in front of them.
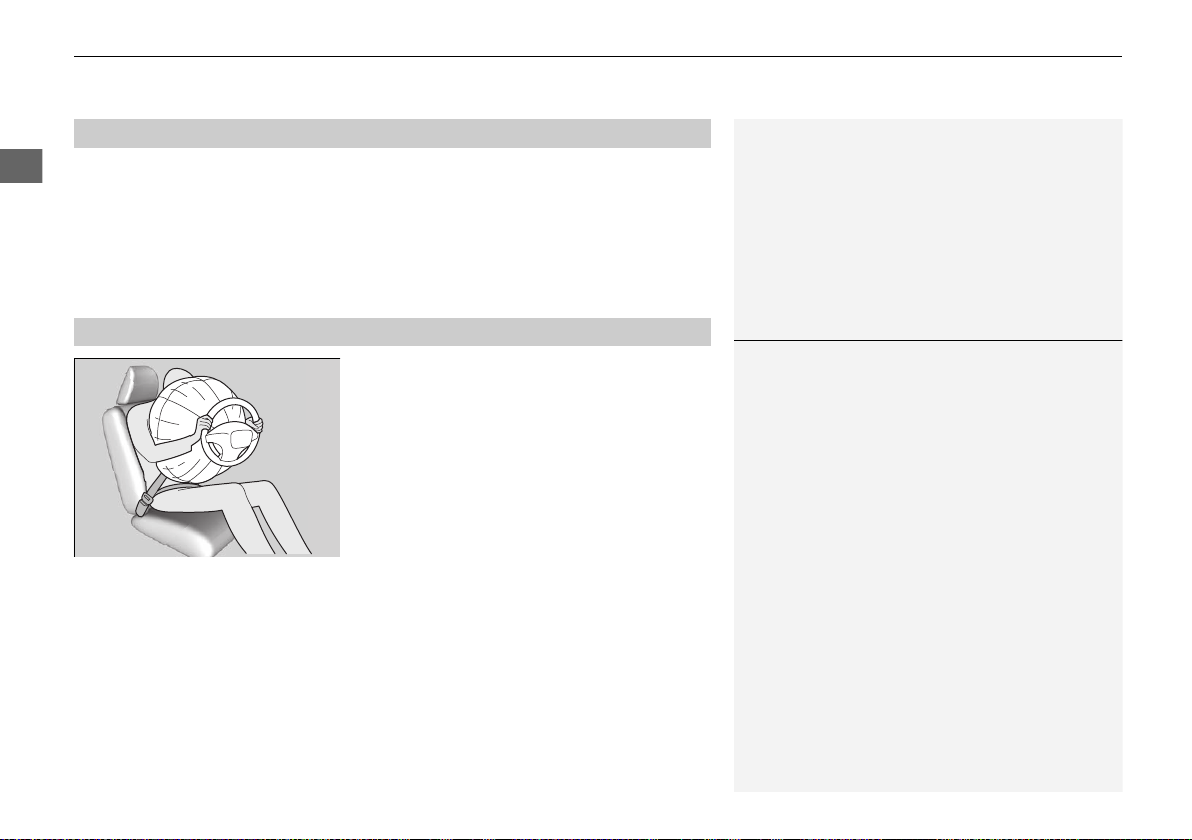
While your seat belt restrains your torso, the
front airbag provides supplemental protection
for your head and chest.
The front airbags deflate immediately so that
they won’t interfere with the driver’s visibility
or the ability to steer or operate other
controls.
50
Page 53

Safe Driving
■ When front airbags should not deploy
Minor frontal crashes: Front airbags were designed to supplement seat belts and
help to save lives, not to prevent minor scrapes, or even broken bones that might
occur during a less than moderate-to-severe frontal crash.
Side impacts: Front airbags can provide protection when a sudden deceleration
causes a driver or front passenger to move towards the front of the vehicle. Side
airbags and side curtain airbags have been specifically designed to help reduce the
severity of injuries that can occur during a moderate-to-severe side impact which
can cause the driver or passenger to move towards the side of the vehicle.
Rear impacts: Head restraints and seat belts are your best protection during a rear
impact. Front airbags cannot provide any significant protection and are not designed
to deploy in such collisions.
Rollovers: In a rollover, your best form of protection is a seat belt or, if your vehicle
is equipped with a rollover sensor, both a seat belt and a side curtain airbag. Front
airbags, however, are not designed to deploy in a rollover as they would provide
little if any protection.
■ When front airbags deploy with little or no visible damage
Because the airbag system senses sudden deceleration, a strong impact to the
vehicle framework or suspension might cause one or more of the airbags to deploy.
Examples include running into a curb, the edge of a hole, or other low fixed object
that causes a sudden deceleration in the vehicle chassis. Since the impact is
underneath the vehicle, damage may not be readily apparent.
■ When front airbags may not deploy, even though exterior damage
Since crushable body parts absorb crash energy during an impact, the amount of
visible damage does not always indicate proper airbag operation. In fact, some
collisions can result in severe damage but no airbag deployment because the airbags
would not have been needed or would not have provided protection even if they
had deployed.
uuAirbags u Front Airbags (SRS)
appears severe
Continued
51
Page 54
uuAirbagsu Front Airbags (SRS)
Safe Driving
1Advanced Airbags
If there is a problem with the driver’s seat position
sensor, the SRS indicator will come on, and in the
event of a crash, the airbag will deploy (regardless of
the driver’s seating position) with a force
corresponding to the severity of the impact.
For the advanced airbags to work properly:
• Do not spill any liquid on or under the seats.
• Do not put any object under the passenger’s seat.
• Make sure any objects are positioned properly on
the floor. Improperly positioned objects can
interfere with the advanced airbag sensors.
• All occupants should sit upright and wear their seat
belts properly.
• Do not cover the passenger’s side dashboard with
a cloth, towel, cover, etc.
2 Passenger Front Airbag Off Indicator
P. 58
Driver’s
Seat
Position
Sensor
Passenger’s
Seat
Weight
Sensors
Advanced Airbags
■
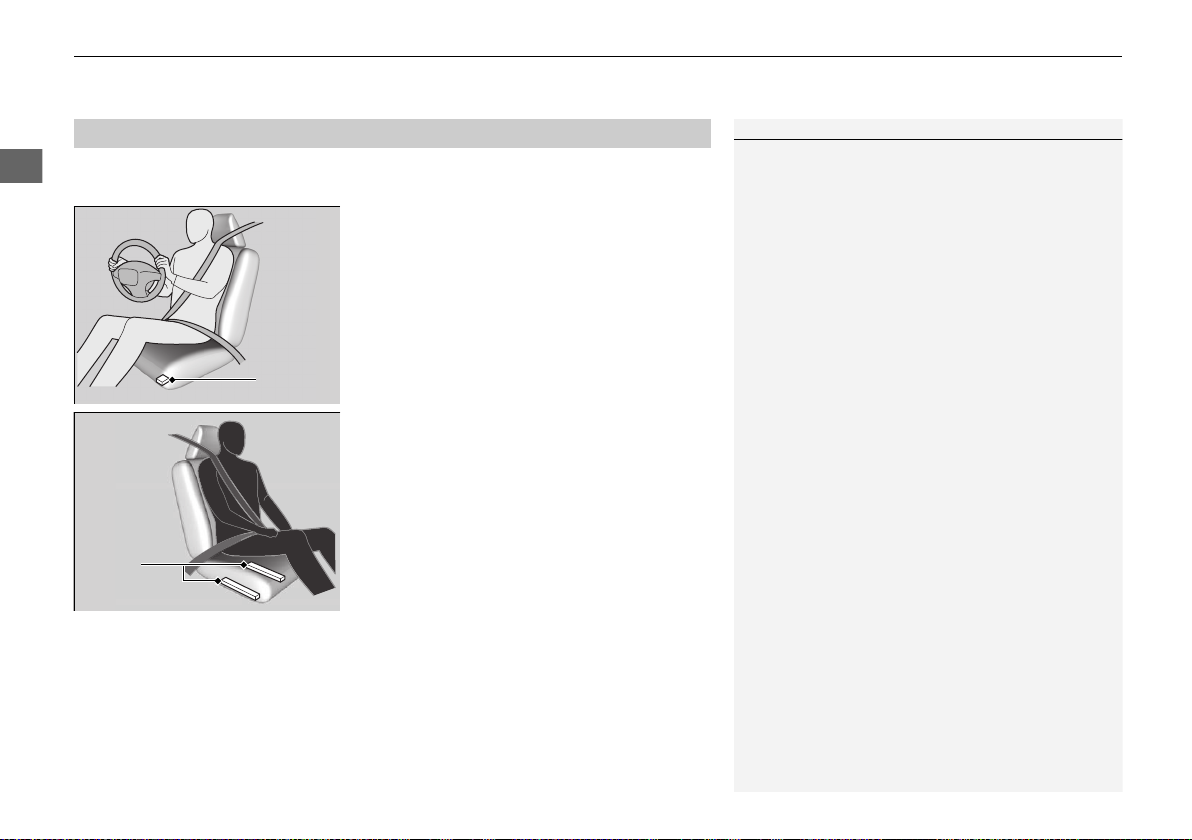
The airbags have advanced features to help reduce the likelihood of airbag related
injuries to smaller occupants.
The driver’s advanced airbag system includes a
seat position sensor.
Based on information from this sensor and the
severity of the impact, the advanced airbag
system determines the optimal deployment of
the driver’s airbag.
The front passenger’s advanced airbag system
has weight sensors.
52
We advise against allowing a child age 12 or
under to ride in the front passenger’s seat.
However, if you do allow a child age 12 or
under to ride in the front passenger’s
seat, note that the system will automatically
turn off the front passenger’s airbag if the
sensors detect that the child is approximately
65 lbs (29 kg) or less.
Page 55
Safe Driving
Side Airbags
1Side Airbags
Make sure you and your front seat passenger always
sit upright. Leaning into the path of a side airbag can
prevent the airbag from deploying properly and
increases your risk of serious injury.
Do not attach accessories on or near the side airbags.
They can interfere with the proper operation of the
airbags, or hurt someone if an airbag inflates.
Do not cover or replace the front seat-back covers
without consulting a dealer.
Improperly replacing or covering front seat-back
covers can prevent your side airbags from properly
deploying during a side impact.
Housing Location
When
inflated
Side Airbag
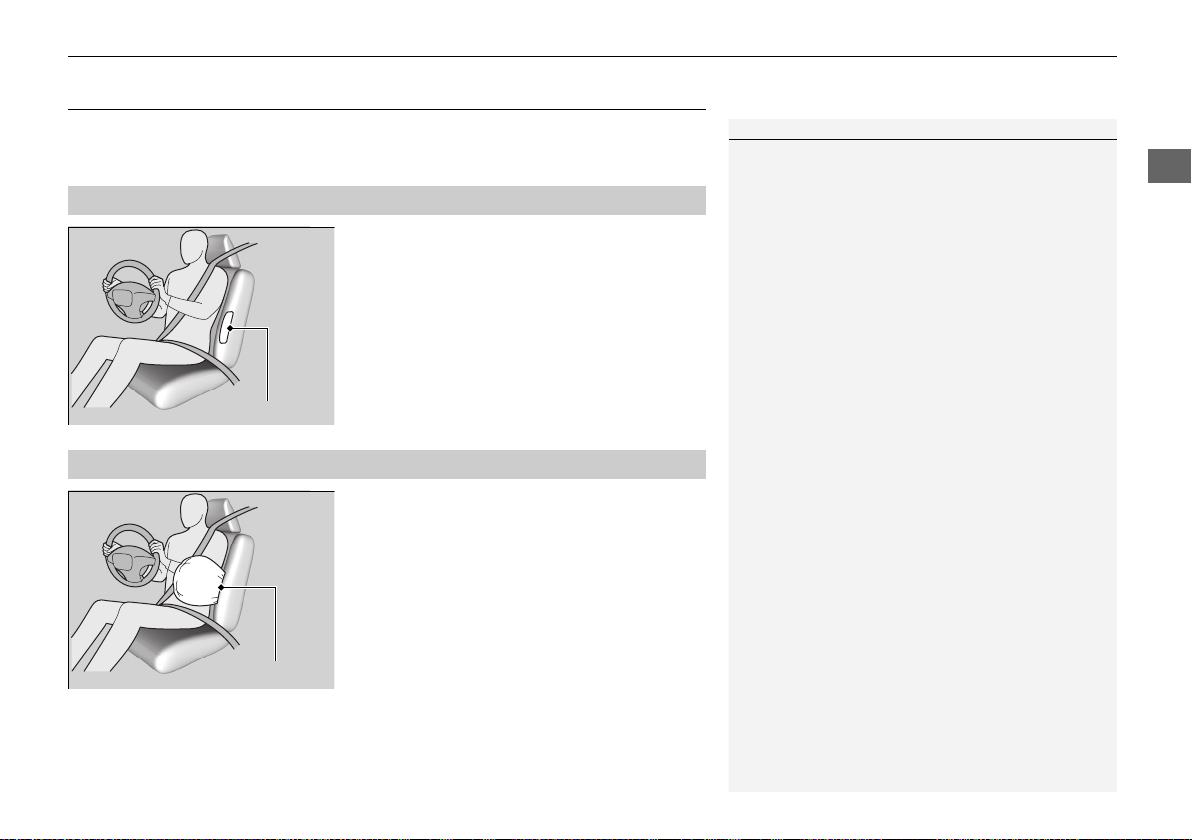
The side airbags help protect the torso and pelvis of the driver or a front passenger
during a moderate-to-severe side impact.
uuAirbags u Side Airbags
Housing Locations
■
Operation
■
The side airbags are housed in the outside
edge of the driver’s and passenger’s seatbacks.
Both are marked SIDE AIRBAG.
When the sensors detect a moderate-tosevere side impact, the control unit signals the
side airbag on the impact side to immediately
inflate.
Continued
53
Page 56

uuAirbagsu Side Airbags
Safe Driving
■ When a side airbag deploys with little or no visible damage
Because the airbag system senses sudden acceleration, a strong impact to the side
of the vehicle’s framework can cause a side airbag to deploy. In such cases, there
may be little or no damage, but the side impact sensors detected a severe enough
impact to deploy the airbag.
■ When a side airbag may not deploy, even though visible damage appears
severe
It is possible for a side airbag to not deploy during an impact that results in
apparently severe damage. This can occur when the point of impact was toward the
far front or rear of the vehicle, or when the vehicle’s crushable body parts absorbed
most of the crash energy. In either case, the side airbag would not have been
needed nor provided protection even if it had deployed.
54
Page 57
Safe Driving
Side Curtain Airbags
1Side Curtain Airbags
If the SRS control unit senses that your vehicle is
about to rollover, it immediately deploys both side
curtain airbags and activates both front seat belt
tensioners.
If the impact is on the passenger's side, the
passenger's side curtain airbag deploys even if there
are no occupants on that side of the vehicle.
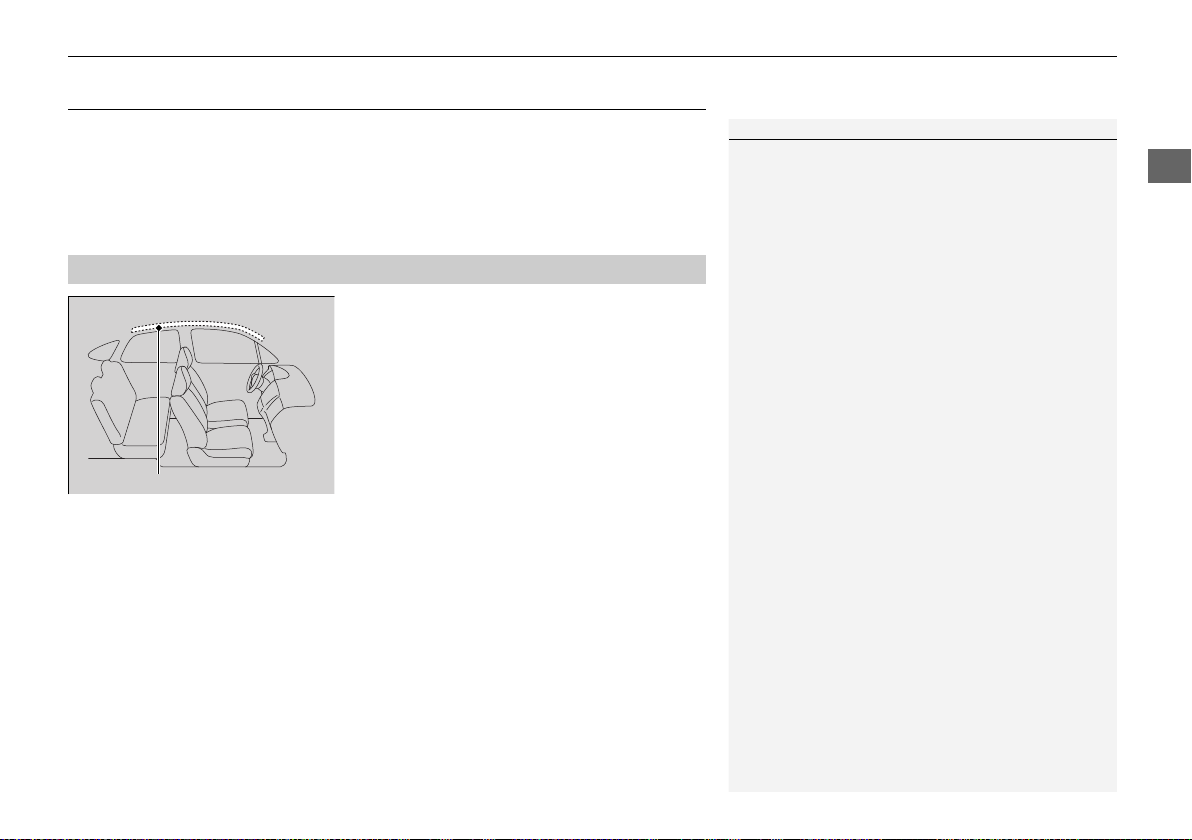
Side Curtain Airbag Storage
The side curtain airbags help protect the heads of the driver and passengers in the
outer seating positions during a moderate-to-severe side impact. The side curtain
airbags equipped in this vehicle are also designed to help reduce the likelihood of
partial and complete ejection of vehicle occupants through side windows in crashes,
particularly rollover crashes.
Housing Locations
■
uuAirbagsu Side Curtain Airbags
The side curtain airbags are located in the
ceiling above the side windows on both sides
of the vehicle.
Continued
55
Page 58
uuAirbagsu Side Curtain Airbags
Safe Driving
1Side Curtain Airbags
To get the best protection from the side curtain
airbags, occupants should wear their seat belts
properly and sit upright and well back in their seats.
Do not attach any objects to the side windows or roof
pillars as they can interfere with the proper operation
of the side curtain airbags.
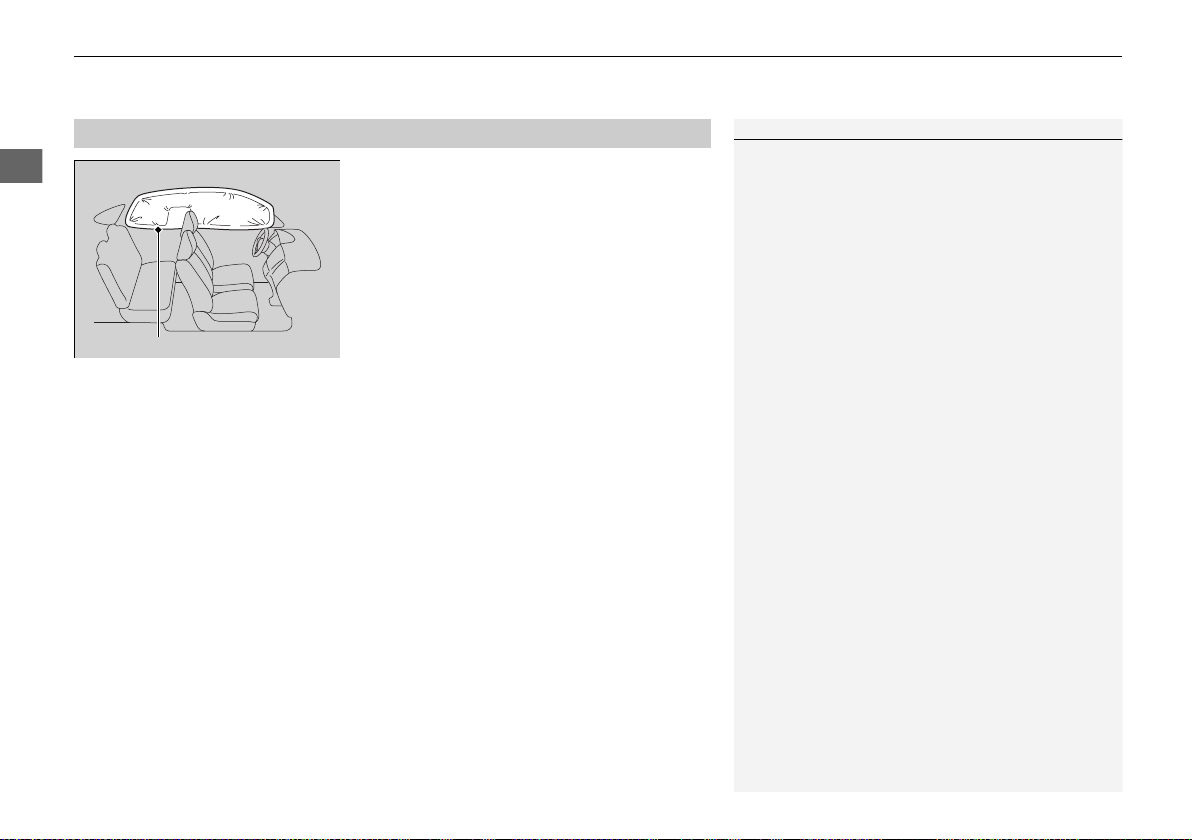
Deployed Side Curtain Airbag
Operation
■
The side curtain airbag is designed to deploy
in a rollover or a moderate-to-severe side
impact.
■ When side curtain airbags deploy in a frontal collision
One or both side curtain airbags may also inflate in a moderate-to-severe angled
frontal collision.
56
Page 59
Safe Driving
Airbag System Indicators
1Supplemental Restraint System (SRS) Indicator
3
WARNING
Ignoring the SRS indicator can result in
serious injury or death if the airbag systems
or tensioners do not work properly.
Have your vehicle checked by a dealer as
soon as possible if the SRS indicator alerts
you to a possible problem.
Models without multi-information
display
Models with multi-information display
* Not available on all models
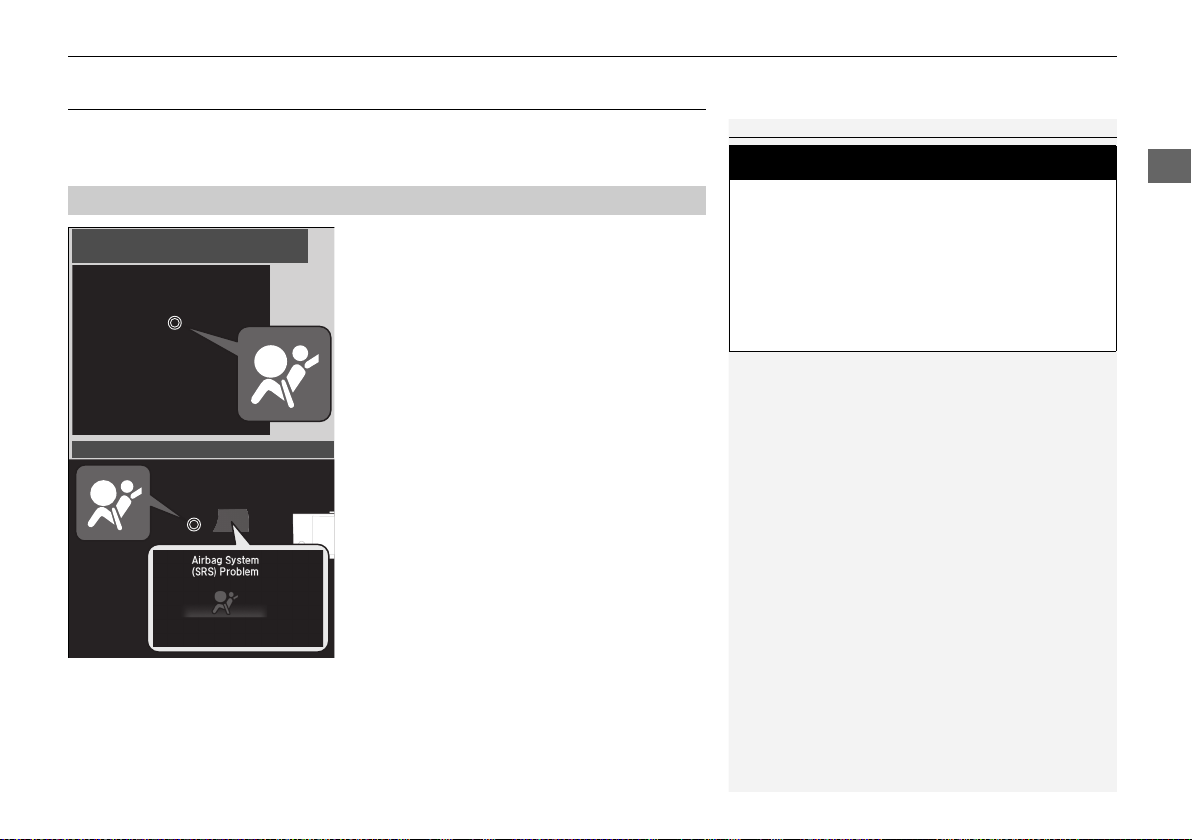
If a problem occurs in the airbag system, the SRS indicator will come on and a
message appears on the multi-information display*.
uuAirbagsu Airbag System Indicators
Supplemental Restraint System (SRS) Indicator
■
If the indicator comes on at any other time, or does not come on at all, have the
system checked by a dealer as soon as possible. If you don’t, your airbags and seat
belt tensioners may not work properly when they are needed.
*1: Models with the smart entry system have an ENGINE START/STOP button instead of an ignition switch.
■ When the ignition switch is turned to
*1
ON (w
The indicator comes on for a few seconds,
then goes off. This tells you the system is
working properly.
Continued
57
Page 60
uuAirbagsu Airbag System Indicators
Safe Driving
1Supplemental Restraint System (SRS) Indicator
If the indicator comes on with no front passenger and
no objects on the passenger’s seat, or with an adult
riding there, something may be interfering with the
weight sensors, such as:
• An object hanging on the seat or in the seat-back
pocket.
• A child seat or other object pressing against the
rear of the seat-back.
• A rear passenger pushing or pulling on the back of
the front passenger’s seat.
• The front seat or seat-back is forced back against
an object on the seat or floor behind it.
• An object placed under the front passenger’s seat.
If none of these conditions exist, have your vehicle
checked by a dealer as soon as possible.
The passenger airbag off indicator may come on and
go off repeatedly if the total weight on the seat is
near the airbag cutoff threshold.
U.S. models
Canadian models
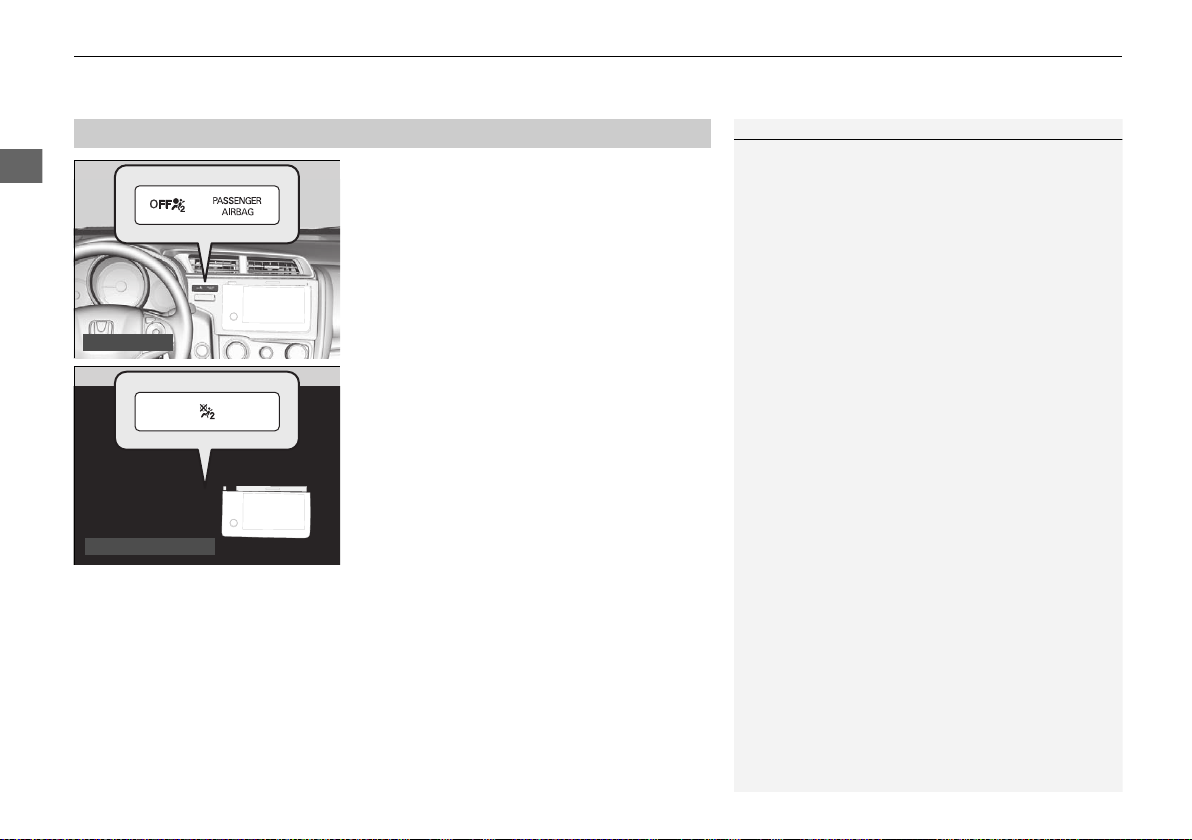
Passenger Front Airbag Off Indicator
■
■ When the passenger airbag off
indicator comes on
The indicator comes on to alert you that the
passenger’s front airbag has been turned off.
This occurs when the front passenger’s weight
sensors detect 65 lbs (29 kg) or less, the
weight of an infant or small child, on the seat.
Children age 12 or under should always ride properly restrained in a back seat.
2 Child Safety P. 60
Objects placed on the seat can also cause the indicator to come on.
If the front passenger seat is empty, the passenger’s front airbag will not deploy and
the indicator will not come on.
58
Page 61
Safe Driving
Airbag Care
1Airbag Care
We recommend against the use of salvaged airbag
system components, including the airbag, tensioners,
sensors, and control unit.
You do not need to, and should not, perform any maintenance on or replace any
airbag system components yourself. However, you should have your vehicle
inspected by a dealer in the following situations:
■ When the airbags have deployed
If an airbag has inflated, the control unit and other related parts must be replaced.
Similarly, once an automatic seat belt tensioner has been activated, it must be
replaced.
■ When the vehicle has been in a moderate-to-severe collision
Even if the airbags did not inflate, have your dealer inspect the following: the driver’s
seat position sensor, weight sensors in the passenger’s seat, front seat belt
tensioners, and each seat belt that was worn during the crash.
■ Do not remove or modify a front seat without consulting a dealer
This would likely disable or affect the proper operation of the driver’s seat position
sensor or the weight sensors in the passenger’s seat. If it is necessary to remove or
modify a front seat to accommodate a person with disabilities, contact a Honda
dealer, or for U.S. vehicles, American Honda Automobile Customer Service at
1-800-999-1009 and for Canadian vehicles, Honda Canada Customer Relations at
1-888-9-HONDA-9.
uuAirbags u Airbag Care
59
Page 62
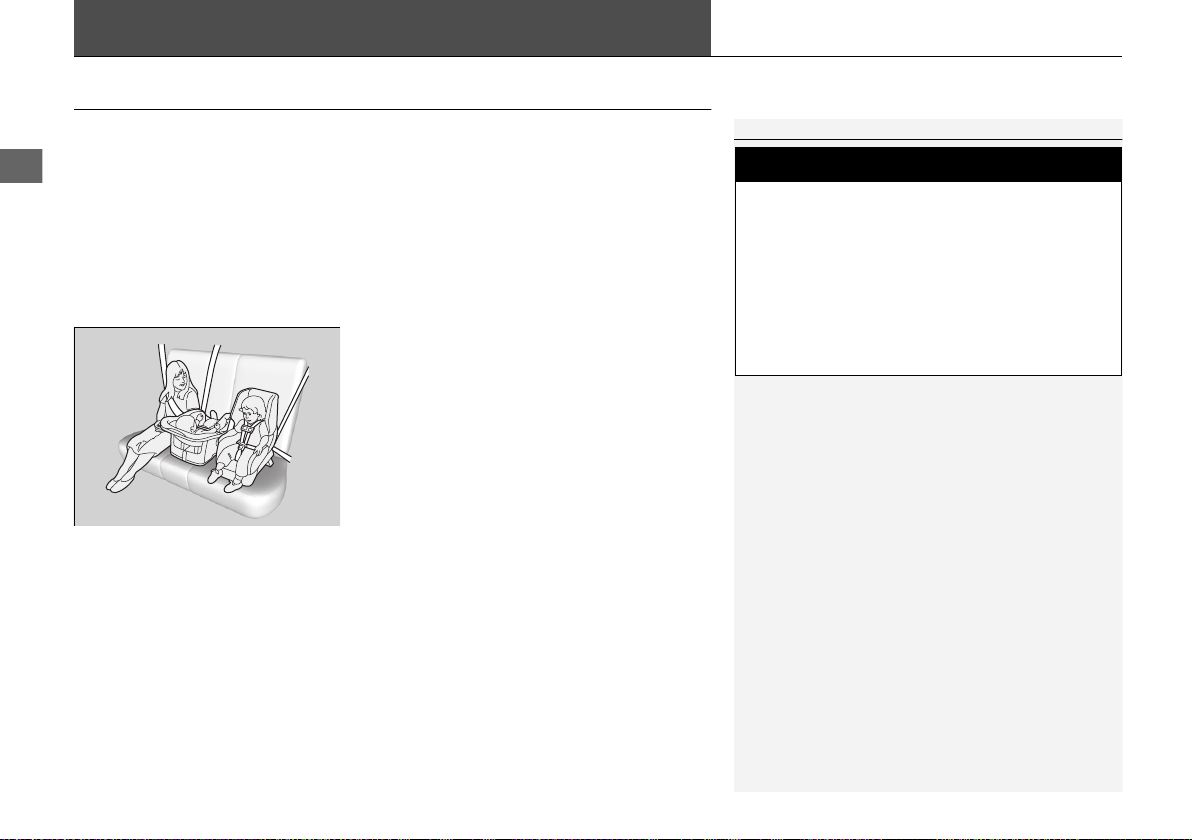
Safe Driving
Child Safety
1Protecting Child Passengers
The National Highway Traffic Safety
Administration and Transport Canada recommend
that all children ages 12 and under be properly
restrained in a rear seat. Some states or provinces/
territories have laws restricting where children may
ride.
3
WARNING
Children who are unrestrained or
improperly restrained can be seriously
injured or killed in a crash.
Any child too small for a seat belt should be
properly restrained in a child seat. A larger
child should be properly restrained with a
seat belt, using a booster seat if necessary.
Protecting Child Passengers
Each year, many children are injured or killed in vehicle crashes because they are
either unrestrained or not properly restrained. In fact, vehicle crashes are the
number one cause of death of children ages 12 and under.
To reduce the number of child deaths and injuries, every state, Canadian province
and territory requires that infants and children be properly restrained when they ride
in a vehicle.
Children should sit properly restrained in a rear seat. This is because:
• An inflating front or side airbag can injure
or kill a child sitting in the front seat.
• A child in the front seat is more likely to
interfere with the driver’s ability to safely
control the vehicle.
• Statistics show that children of all sizes and
ages are safer when they are properly
restrained in a rear seat.
60
Page 63
Safe Driving
• Any child who is too small to wear a seat belt correctly must be restrained in an
1Protecting Child Passengers
To deactivate a lockable retractor, release the buckle
and allow the seat belt to wind up all the way.
To remind you of the passenger’s front airbag
hazards and child safety, your vehicle has warning
labels on the dashboard (U.S. models) and on the
front visors. Please read and follow the instructions
on these labels.
2 Safety Labels P. 74
3
WARNING
Allowing a child to play with a seat belt or
wrap one around their neck can result in
serious injury or death.
Instruct children not to play with any seat
belt and make sure any unused seat belt a
child can reach is buckled, fully retracted,
and locked.
approved child seat that is properly secured to the vehicle using either seat belt or
the lower anchors of the LATCH system.
• Never hold a child on your lap because it is impossible to protect them in the
event of a collision.
• Never put a seat belt over yourself and a child. During a crash, the belt would
likely press deep into the child and cause serious or fatal injuries.
• Never let two children use the same seat belt. Both children could be very
seriously injured in a crash.
• Do not allow children to operate the doors, windows or seat adjustments.
• Do not leave children in the vehicle unattended, especially in hot weather when
the inside of the vehicle can get hot enough to kill them. They could also activate
vehicle controls causing it to move unexpectedly.
uuChild SafetyuProtecting Child Passengers
61
Page 64
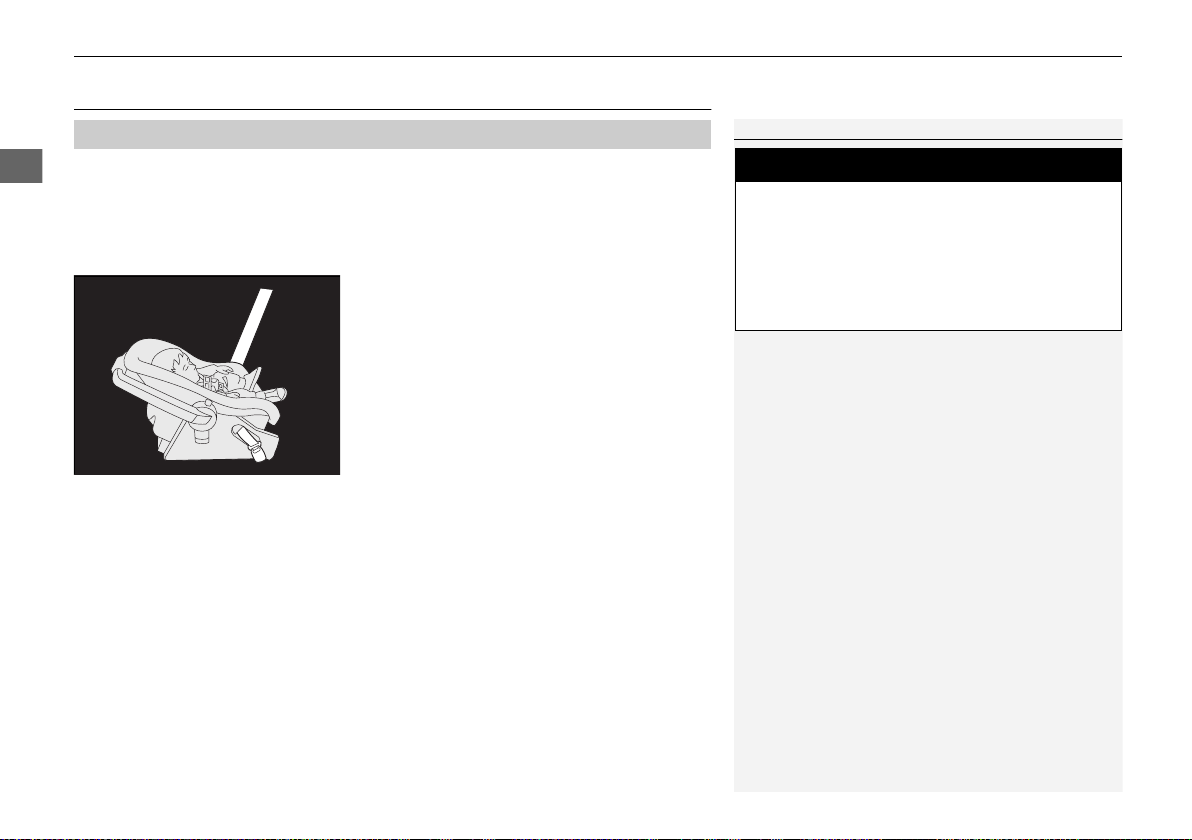
uuChild Safety u Safety of Infants and Small Children
Safe Driving
1Protecting Infants
Many experts recommend use of a rear-facing seat
for a child up to two years old if the child’s height and
weight are appropriate for a rear-facing seat.
Rear-facing child seats should never be installed in a
forward-facing position.
Always refer to the child seat manufacturer’s
instructions before installation.
Do not allow a front seat to rest against a child seat
installed in a rear seating position:
The weight sensor in the front seat may not correctly
detect the actual weight of the occupant.
3
WARNING
Placing a rear-facing child seat in the front
seat can result in serious injury or death
during a crash.
Always place a rear-facing child seat in the
rear seat, not the front.
Safety of Infants and Small Children
Protecting Infants
■
An infant must be properly restrained in a rear-facing, reclining child seat until the
infant reaches the seat manufacturer's weight or height limit for the seat, and the
infant is at least one year old. Many experts recommend use of a rear-facing seat for
a child up to two years old if the child’s height and weight are appropriate for a rearfacing seat.
■ Positioning a rear-facing child seat
Child seats must be placed and secured in a
rear seating position.
When properly installed, a rear-facing child seat may prevent the driver or a front
passenger from moving their seat all the way back, or from locking their seat-back
in the desired position. Make sure that there is no contact between the child seat
and the seat in front of it.
It can also interfere with proper operation of the passenger’s advanced front airbag
system.
2 Airbags P. 46
If this occurs, we recommend that you install the child seat directly behind the front
passenger’s seat, move the seat as far forward as needed, and leave it unoccupied.
Or, you may wish to get a smaller rear-facing child seat.
62
Page 65
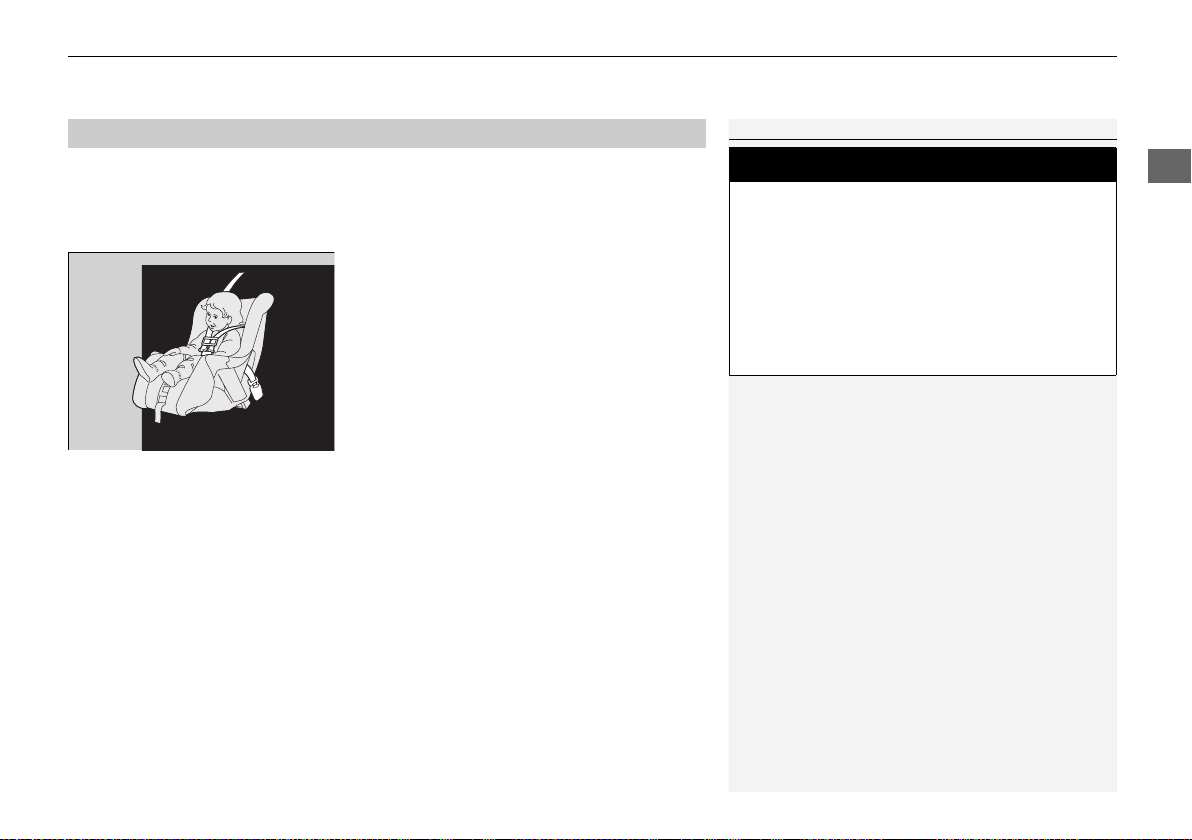
Safe Driving
Protecting Smaller Children
1Protecting Smaller Children
Educate yourself about the laws and regulations
regarding child seat use where you are driving, and
follow the child seat manufacturer’s instructions.
3
WARNING
Placing a forward-facing child seat in the
front seat can result in serious injury or
death if the front airbag inflates.
If you must place a forward-facing child
seat in front, move the vehicle seat as far
back as possible, and properly restrain the
child.
■
If a child is at least one year old and has exceeded the weight and height limitations
of a rearward facing child seat, the child should be properly restrained in a firmly
secured forward-facing child seat until they exceed the weight and height
limitations for the forward-facing child seat.
Placing a forward-facing child seat in the front seat can be hazardous, even with
advanced front airbags that automatically turn the passenger’s front airbag off. A
rear seat is the safest place for a child.
uuChild SafetyuSafety of Infants and Small Children
■ Forward-facing child seat placement
We strongly recommend placing a forwardfacing child seat in a rear seating position.
Continued
63
Page 66
uuChild Safety u Safety of Infants and Small Children
Safe Driving
1Selecting a Child Seat
Installation of a LATCH-compatible child seat is
simple.
LATCH-compatible child seats have been developed
to simplify the installation process and reduce the
likelihood of injuries caused by incorrect installation.
Selecting a Child Seat
■
Most child seats are LATCH-compatible (Lower Anchors and Tethers for CHildren).
Some have a rigid-type connector, while others have a flexible-type connector. Both
are equally easy to use. Some existing and previously owned child seats can only be
installed using the seat belt. Whichever type you choose, follow the child seat
manufacturer's use and care instructions as well as the instructions in this manual.
Proper installation is key to maximizing your child’s safety.
In seating positions and vehicles not equipped with LATCH, a LATCH-compatible
child seat can be installed using the seat belt and a top tether for added security.
This is because all child seats are required to be designed so that they can be secured
with a lap belt or the lap part of a lap/shoulder belt. In addition, the child seat
manufacturer may advise that a seat belt be used to attach a LATCH-compatible seat
once a child reaches a specified weight. Please read the child seat owner’s manual
for proper installation instructions.
■ Important consideration when selecting a child seat
Make sure the child seat meets the following three requirements:
• The child seat is the correct type and size for the child.
• The child seat is the correct type for the seating position.
• The child seat is compliant with Federal Motor Vehicle Safety Standard 213 or
Canadian Motor Vehicle Safety Standard 213.
64
Page 67
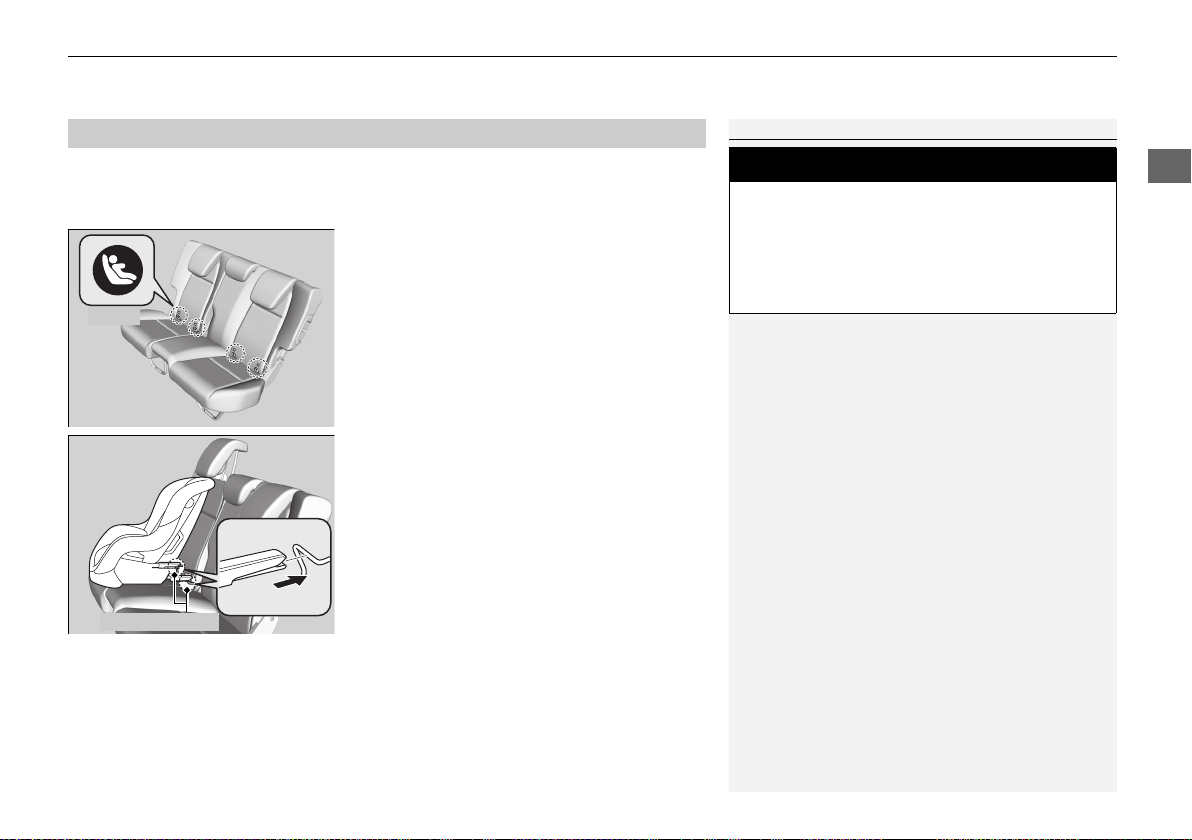
Safe Driving
Installing a LATCH-Compatible Child Seat
1Installing a LATCH-Compatible Child Seat
For your child’s safety, when using a child seat
installed using the LATCH system, make sure that the
child seat is properly secured to the vehicle. A child
seat that is not properly secured will not adequately
protect a child in a crash and may cause injury to the
child or other vehicle occupants.
3
WARNING
Never attach two child seats to the same
anchor. In a collision, one anchor may not
be strong enough to hold two child seat
attachments and may break, causing
serious injury or death.
Marks
Rigid Type
Lower Anchors
■
A LATCH-compatible child seat can be installed in either of the two outer rear seats.
A child seat is attached to the lower anchors with either the rigid or flexible type of
connectors.
uuChild SafetyuSafety of Infants and Small Children
1. Locate the lower anchors under the marks.
2. Raise the head restraint to its highest
position.
3. Place the child seat on the vehicle seat, then
attach the child seat to the lower anchors
according to the instructions that came
with the child seat.
u When installing the child seat, make sure
that the lower anchors are not
obstructed by the seat belt or any other
object.
Continued
65
Page 68
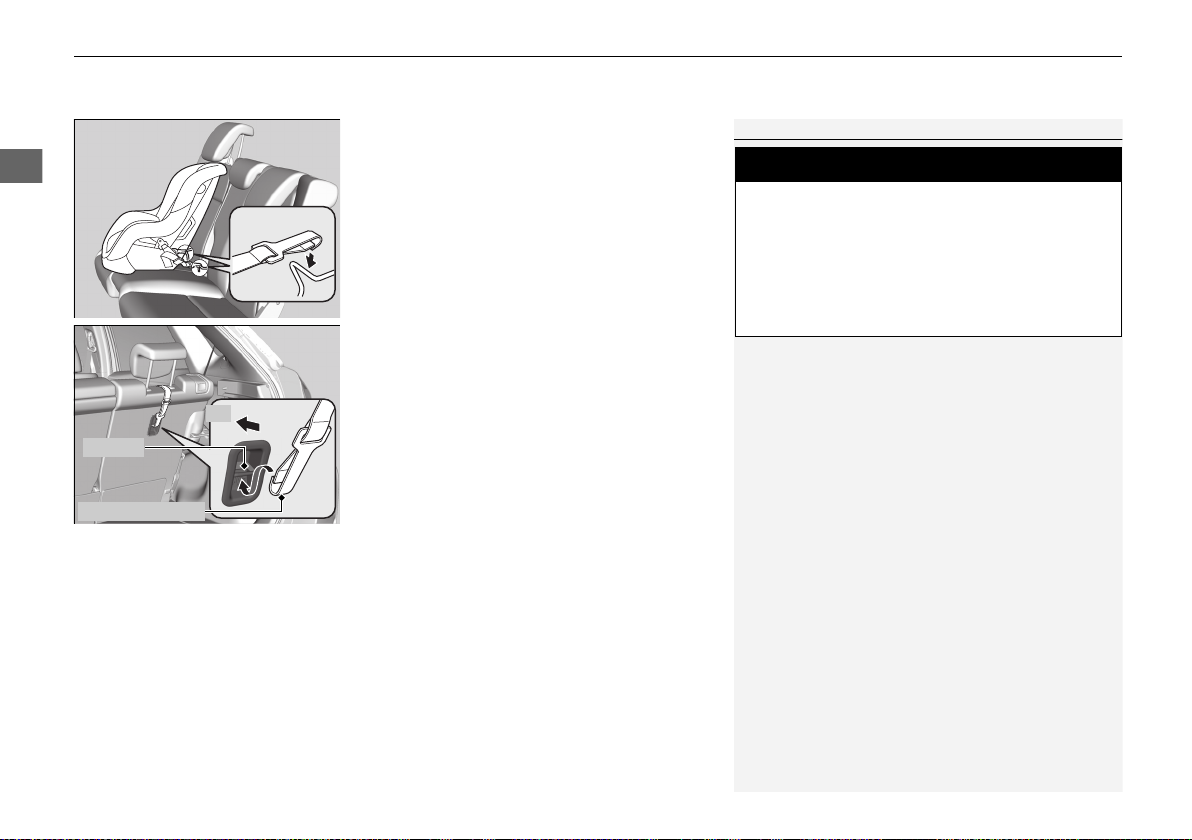
uuChild Safety u Safety of Infants and Small Children
Safe Driving
Flexible Type
1Installing a LATCH-Compatible Child Seat
Installing a LATCH-compatible child seat in the
rear center seat
Each outer rear seat is equipped with a pair of lower
anchors which are used to secure a LATCHcompatible child seat. The rear center seat, however,
is not equipped with anchors of any kind.
The inner and outer anchors are spaced apart at a
standard distance of 11 inches (280 mm). The
distance between the two inner anchors is
14.1 inches (357.8 mm).
LATCH-compatible restraint systems that are fitted
with rigid-type attachments cannot be installed in the
rear center seat. However, a system fitted with
flexible-type attachments can be installed in the
center seat, provided that the manufacturer’s
instructions for that system permit the use of the
inner anchors with the stated spacing.
Before seating a child, make sure that the system is
properly attached to both the lower anchors and
tether anchors.
3
WARNING
Do not use the lower inner anchors of the
outer rear seats to secure a LATCHcompatible child seat to the rear center
seat, unless the manufacturer’s instructions
for that system permit the use of inner
anchors with the stated spacing.
Anchor
Tether Strap Hook
FR
* Not available on all models
66
4. Remove the cargo area cover*.
2 Cargo Area Cover* P. 194
5. Route the tether strap between the head
restraint legs, and secure the tether strap
hook onto the anchor.
Make sure the strap is not twisted.
6. Tighten the tether strap as instructed by the
child seat manufacturer.
7. Make sure the child seat is firmly secured by
rocking it forward and back and side to
side; little movement should be felt.
8. Make sure any unused seat belt that a child
can reach is buckled, the lockable retractor
is activated, and the belt is fully retracted
and locked.
9. Reinstall the cargo area cover.
Page 69
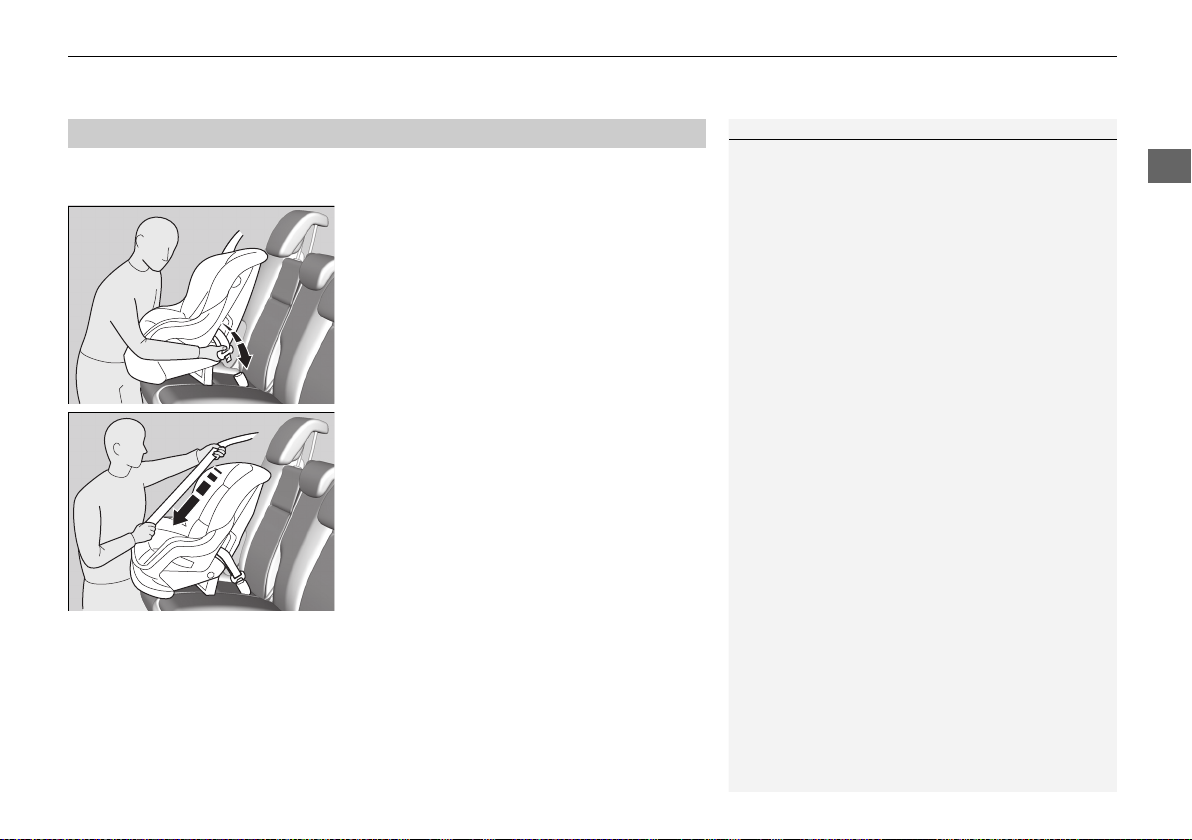
Safe Driving
■
1Installing a Child Seat with a Lap/Shoulder Seat Belt
A child seat that is not properly secured will not
adequately protect a child in a crash and may cause
injury to the child or other vehicle occupants.
A child seat can be installed with a lap/shoulder belt in any rear seat or, if absolutely
necessary, the front passenger seat.
uuChild SafetyuSafety of Infants and Small Children
Installing a Child Seat with a Lap/Shoulder Seat Belt
1. Raise the head restraint to its highest
position.
2. Place the child seat on the vehicle seat.
3. Route the seat belt through the child seat
according to the seat manufacturer's
instructions, and insert the latch plate into
the buckle.
u Insert the latch plate fully until it clicks.
4. Slowly pull the shoulder part of the belt all
the way out until it stops. This activates the
lockable retractor.
5. Let the seat belt completely wind up into
the retractor, then try to pull it out to make
sure the retractor is locked.
u If you are able to pull the shoulder belt
out, the lockable retractor is not
activated. Pull the seat belt all the way
out, and repeat steps 4 – 5.
Continued
67
Page 70
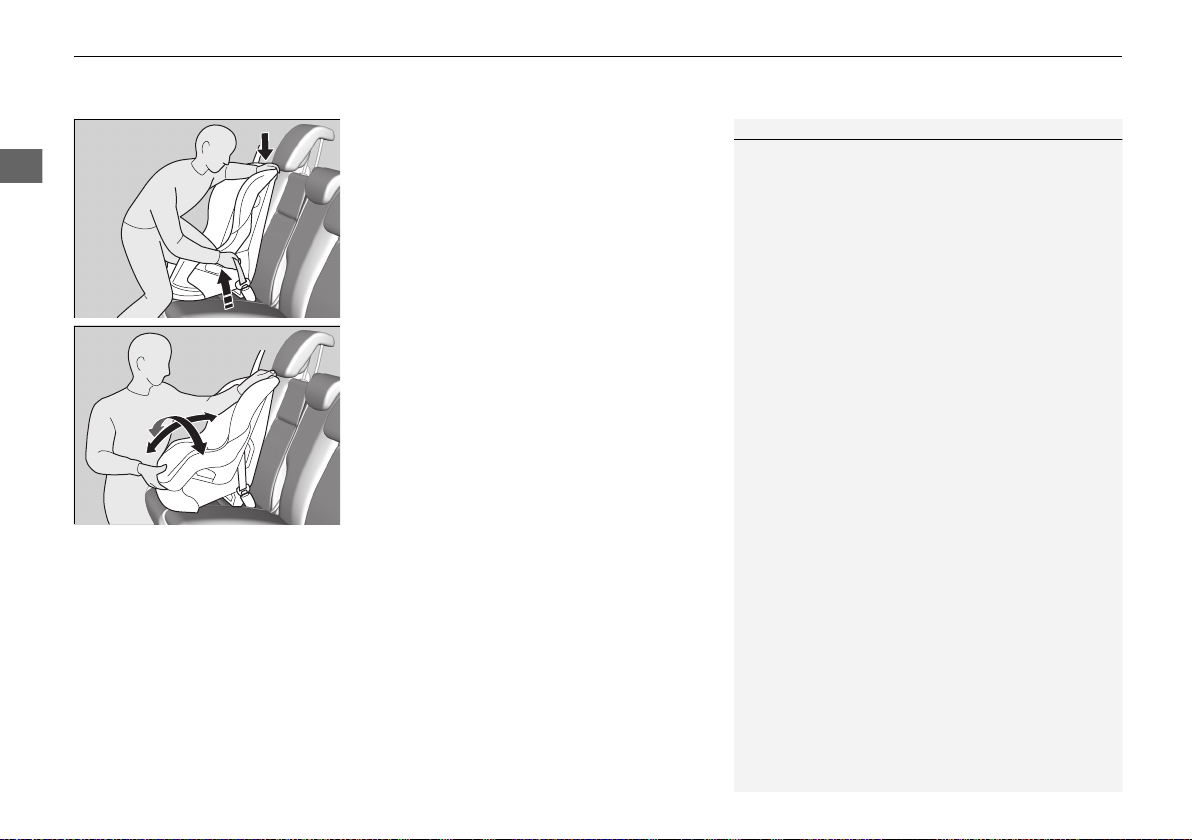
uuChild Safety u Safety of Infants and Small Children
Safe Driving
1Installing a Child Seat with a Lap/Shoulder Seat Belt
To deactivate a lockable retractor, release the buckle
and allow the seat belt to wind up all the way.
6. Grab the shoulder part of the seat belt near
the buckle, and pull up to remove any slack
from the lap part of the belt.
u When doing this, place your weight on
the child seat and push it into the vehicle
seat.
7. Make sure the child seat is firmly secured by
rocking it forward and back and side to
side; less than one inch of movement
should occur near the seat belt.
8. Make sure any unused seat belt that a child
can reach is buckled, the lockable retractor
is activated, and the belt is fully retracted
and locked.
68
Page 71
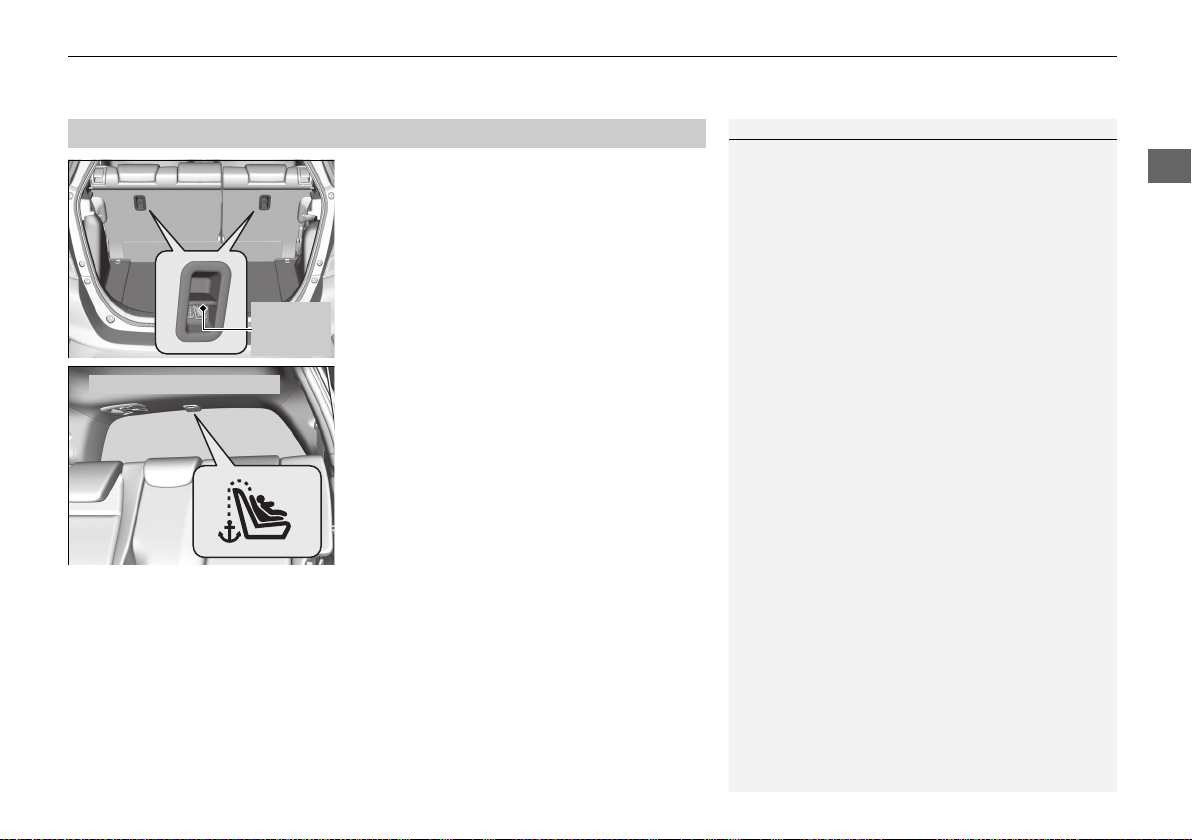
Safe Driving
■
1Adding Security with a Tether
Always use a tether for forward-facing child seats
when using the seat belt or lower anchors.
Tether
Anchorage
Points
Tether Anchorage Point
uuChild SafetyuSafety of Infants and Small Children
Adding Security with a Tether
A tether anchorage point is provided behind
each rear seating position.
If you have a child restraint system that comes
with a tether but can be installed with a seat
belt, the tether may be used for additional
security.
Continued
69
Page 72
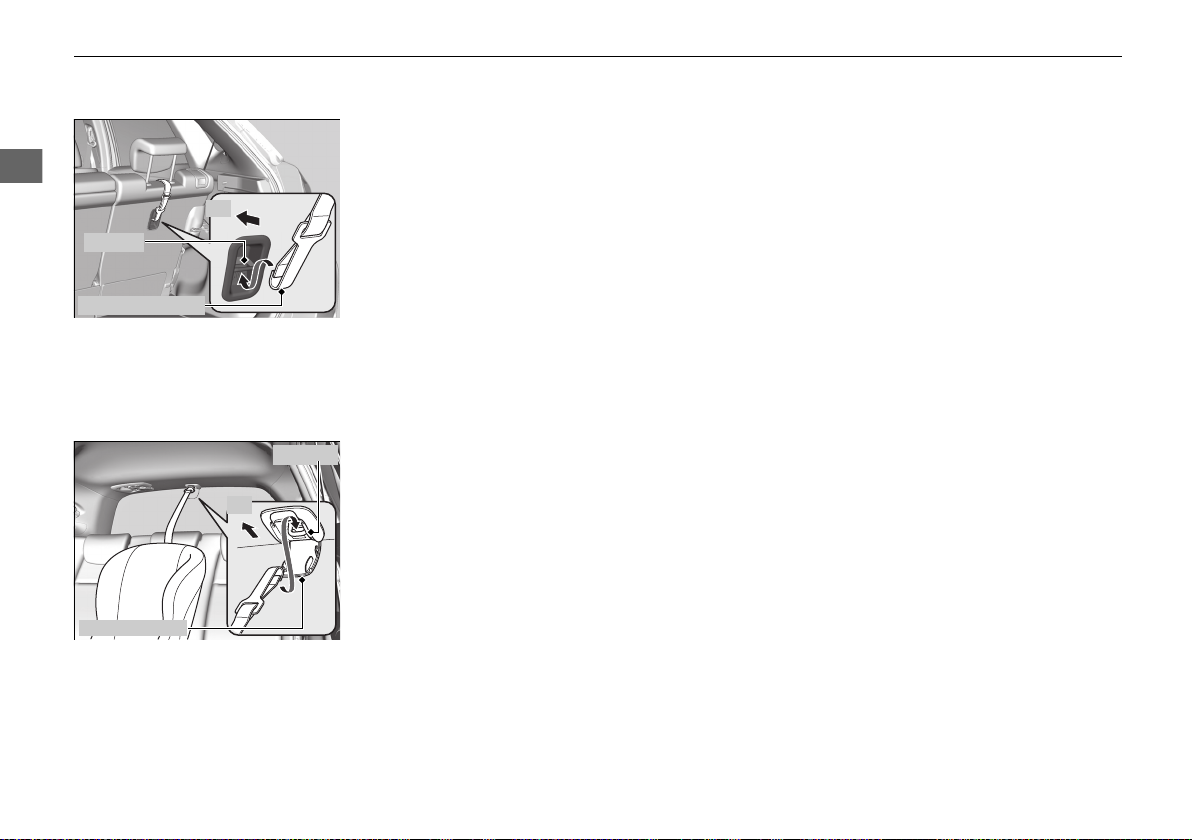
uuChild Safety u Safety of Infants and Small Children
Safe Driving
Anchor
Tether Strap Hook
FR
Anchor
Anchor Cover
FR
* Not available on all models
■ Using an outer anchor
1. Remove the cargo area cover*.
2 Cargo Area Cover* P. 194
2. Put the outer head restraint to its upper
most position, then route the tether strap
between the head restraint legs, and secure
the tether strap hook onto the anchor.
Make sure the strap is not twisted.
3. Secure the tether strap hook to the
anchorage.
4. Tighten the tether strap as instructed by the
child seat manufacturer.
5. Reinstall the luggage area cover.
■ Using the center anchor
1. Lower the head restraint to its lowest
position.
2. Open the anchor cover.
3. Route the tether strap over the head
restraint.
Make sure the strap is not twisted.
4. Secure the tether strap hook to the anchor.
5. Tighten the tether strap as instructed by the
child seat manufacturer.
70
Page 73
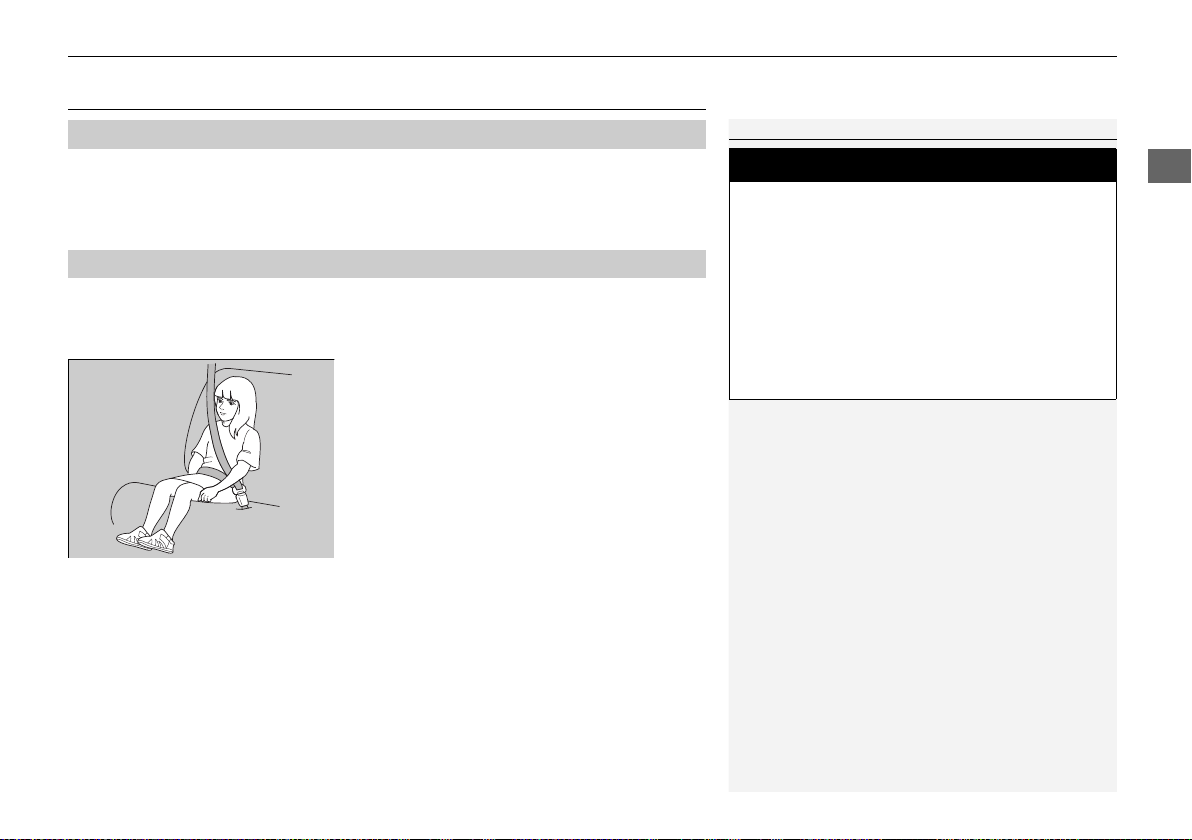
Safe Driving
Safety of Larger Children
1Safety of Larger Children
3
WARNING
Allowing a child age 12 or under to sit in
front can result in injury or death if the
passenger’s front airbag inflates.
If a larger child must ride in front, move the
vehicle seat as far to the rear as possible,
have the child sit up properly and wear the
seat belt properly, using a booster seat if
needed.
Protecting Larger Children
■
The following pages give instructions on how to check proper seat belt fit, what kind
of booster seat to use if one is needed, and important precautions for a child who
must sit in front.
Checking Seat Belt Fit
■
When a child is too big for a child seat, secure the child in a rear seat using the lap/
shoulder seat belt. Have the child sit upright and all the way back, then answer the
following questions.
If you answer yes to all these questions, the child is ready to wear the lap/shoulder
seat belt correctly. If you answer no to any question, the child needs to ride on a
booster seat until the seat belt fits properly without a booster seat.
uuChild Safetyu Safety of Larger Children
■ Checklist
• Do the child’s knees bend comfortably over
the edge of the seat?
• Does the shoulder belt cross between the
child’s neck and arm?
• Is the lap part of the seat belt as low as
possible, touching the child’s thighs?
• Will the child be able to stay seated like this
for the whole trip?
Continued
71
Page 74
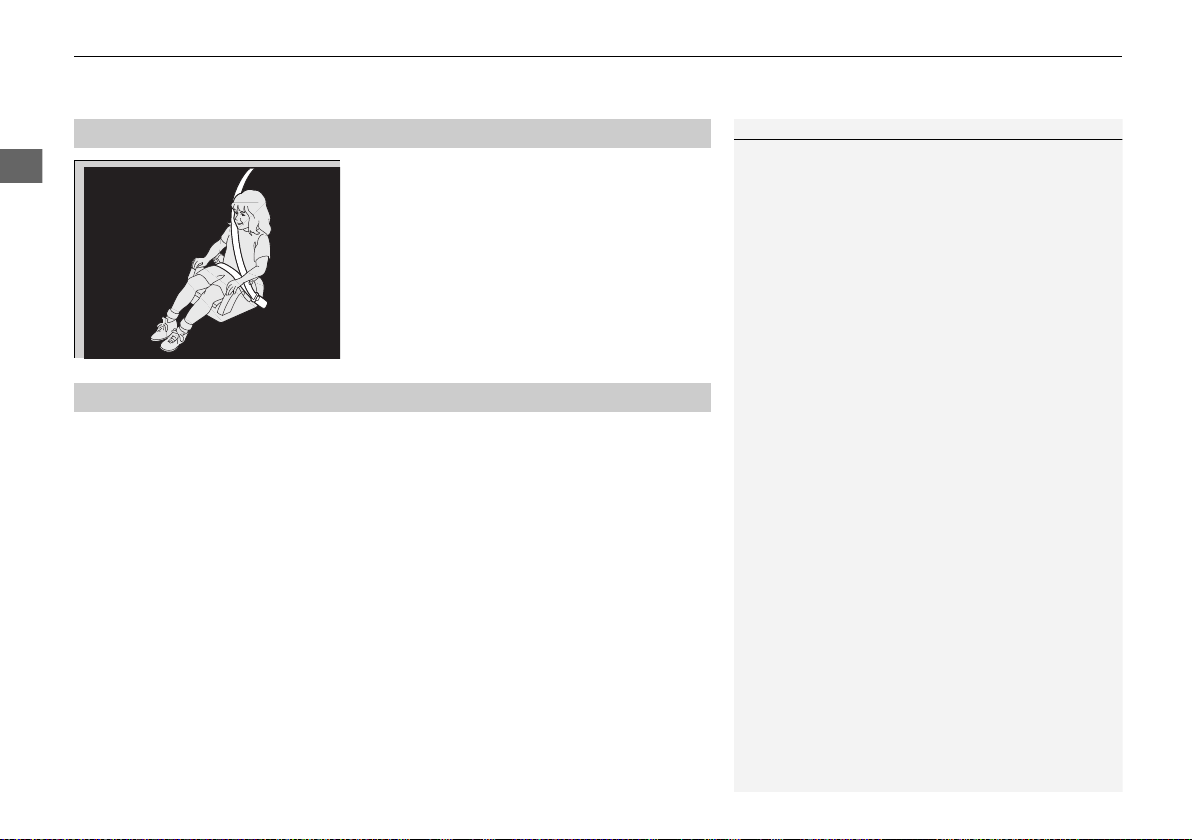
uuChild Safety u Safety of Larger Children
Safe Driving
1Booster Seats
When installing a booster seat, make sure to read the
instructions that came with it, and install the seat
accordingly.
There are high- and low-type booster seats. Choose a
booster seat that allows the child to wear the seat
belt correctly.
Some U.S. states and Canadian provinces and
territories require children to use a booster seat until
they reach a given age or weight (e.g. 6 years or 60
lbs). Be sure to check current laws in the state or
province, or territory where you intend to drive.
Booster Seats
■
Protecting Larger Children-Final Checks
■
Your vehicle has a rear seat where children can be properly restrained. If you ever
have to carry a group of children, and a child must ride in front:
• Make sure you read and fully understand the instructions and safety information
in this manual.
• Move the front passenger seat as far back as possible.
• Have the child sit upright and well back in the seat.
• Check that the seat belt is properly positioned so that the child is secure in the
seat.
If a lap/shoulder seat belt cannot be used
properly, position the child in a booster seat in
the rear seat. For the child’s safety, check that
the child meets the booster seat
manufacturer’s recommendations.
■ Monitoring child passengers
We strongly recommend that you keep an eye on child passengers. Even older, more
mature children sometimes need to be reminded to fasten their seat belts and sit up
properly.
72
Page 75
Safe Driving
Exhaust Gas Hazard
1Carbon Monoxide Gas
An enclosed area such as a garage can quickly fill up
with carbon monoxide gas.
Do not run the engine with the garage door closed.
Even when the garage door is open, drive out of the
garage immediately after starting the engine.
3
WARNING
Carbon monoxide gas is toxic.
Breathing it can cause unconsciousness and
even kill you.
Avoid any enclosed areas or activities that
expose you to carbon monoxide.
* Not available on all models
Carbon Monoxide Gas
The engine exhaust from this vehicle contains carbon monoxide, a colorless,
odorless, and highly toxic gas. As long as you properly maintain your vehicle, carbon
monoxide gas will not get into the interior.
■ Have the exhaust system inspected for leaks whenever
• The exhaust system is making an unusual noise.
• The exhaust system may have been damaged.
• The vehicle is raised for an oil change.
When you operate a vehicle with the tailgate open, airflow can pull exhaust gas into
the interior and create a hazardous condition. If you must drive with the tailgate
open, open all the windows and set the heating and cooling system
system* as shown below.
1. Select the fresh air mode.
2. Select the mode.
3. Set the fan speed to high.
4. Set the temperature control to a comfortable setting.
Adjust the heating and cooling system
if you sit in your parked vehicle with the engine running.
*
/climate control
*
/climate control system* in the same manner
73
Page 76
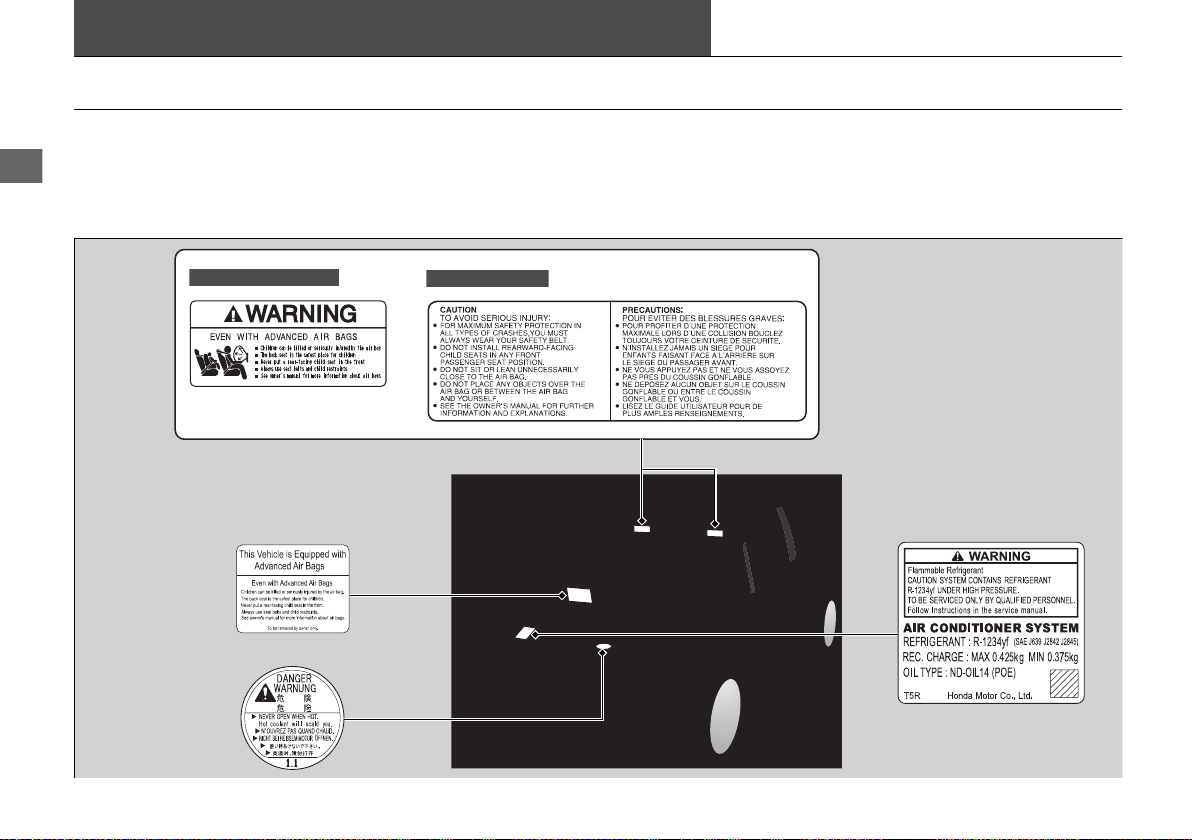
Safe Driving
Safety Labels
U.S. models only
Dashboard
Sun Visor
U.S. models
Canadian models
Radiator Cap
Sun Visor U.S. Models
Canadian Models
Air Conditioner System
U.S. models only
Label Locations
These labels are in the locations shown. They warn you of potential hazards that can cause serious injury or death. Read these labels
carefully.
If a label comes off or becomes hard to read (except for the U.S. dashboard label which may be removed by the owner), contact a dealer
for a replacement.
74
Page 77

Instrument Panel
* Not available on all models
This chapter describes the buttons, indicators, and gauges that are used while driving.
Indicators ............................................ 76
Information Display Warning and
Information Messages
Multi-Information Display Warning and
Information Messages
Gauges and Displays
Gauges............................................ 103
Information Display
Multi-Information Display
*
.................... 91
*
.................... 92
*
........................ 104
*
............... 107
75
Page 78
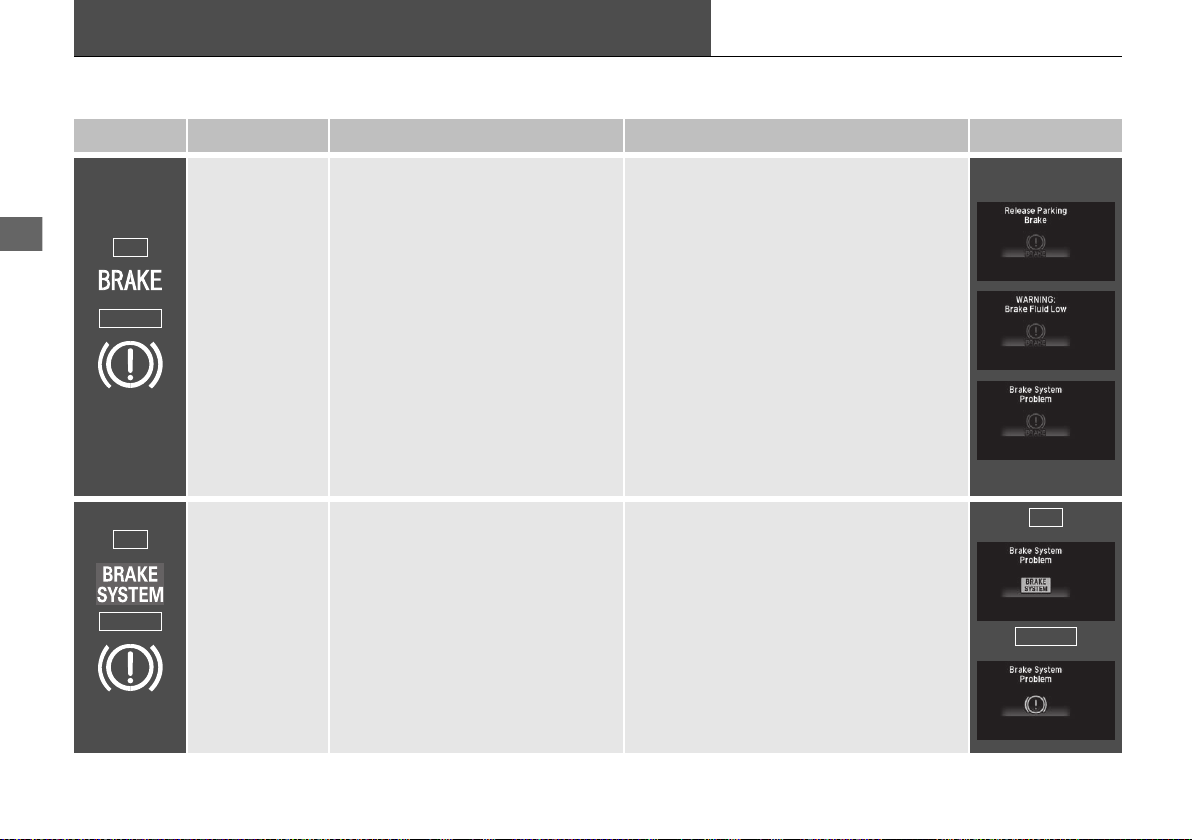
Instrument Panel
Indicators
U.S.
Canada
(Red)
U.S.
Canada
(Amber)
U.S.
Canada
* Not available on all models
Indicator Name On/Blinking Explanation Message
Parking Brake
and Brake
System Indicator
(Red)
●
Comes on for a few seconds when
you turn the ignition switch to ON
*1
(w
, then goes off if the parking
brake has been released.
●
Comes on when the parking brake
is applied, and goes off when it is
released.
●
Comes on when the brake fluid
level is low.
●
Comes on if there is a problem
●
Comes on while driving - Make sure
the parking brake is released. Check the
brake fluid level.
2 What to do when the indicator
●
comes on while driving P. 564
Comes on along with the ABS
indicator - Have your vehicle checked by
a dealer.
2 If the Brake System Indicator (Red)
Comes On P. 564
with the brake system.
●
The beeper sounds and the
indicator comes on if you drive
with the parking brake not fully
released.
Brake System
Indicator
(Amber)
●
Comes on for a few seconds when
you turn the ignition switch to ON
*1
(w
, then goes off.
●
Comes on if there is a problem
with a system related to braking
other than the conventional brake
system.
●
Stays on constantly - Have your vehicle
checked by a dealer.
*
*1:Models with the smart entry system have an ENGINE START/STOP button instead of an ignition switch.
76
Page 79
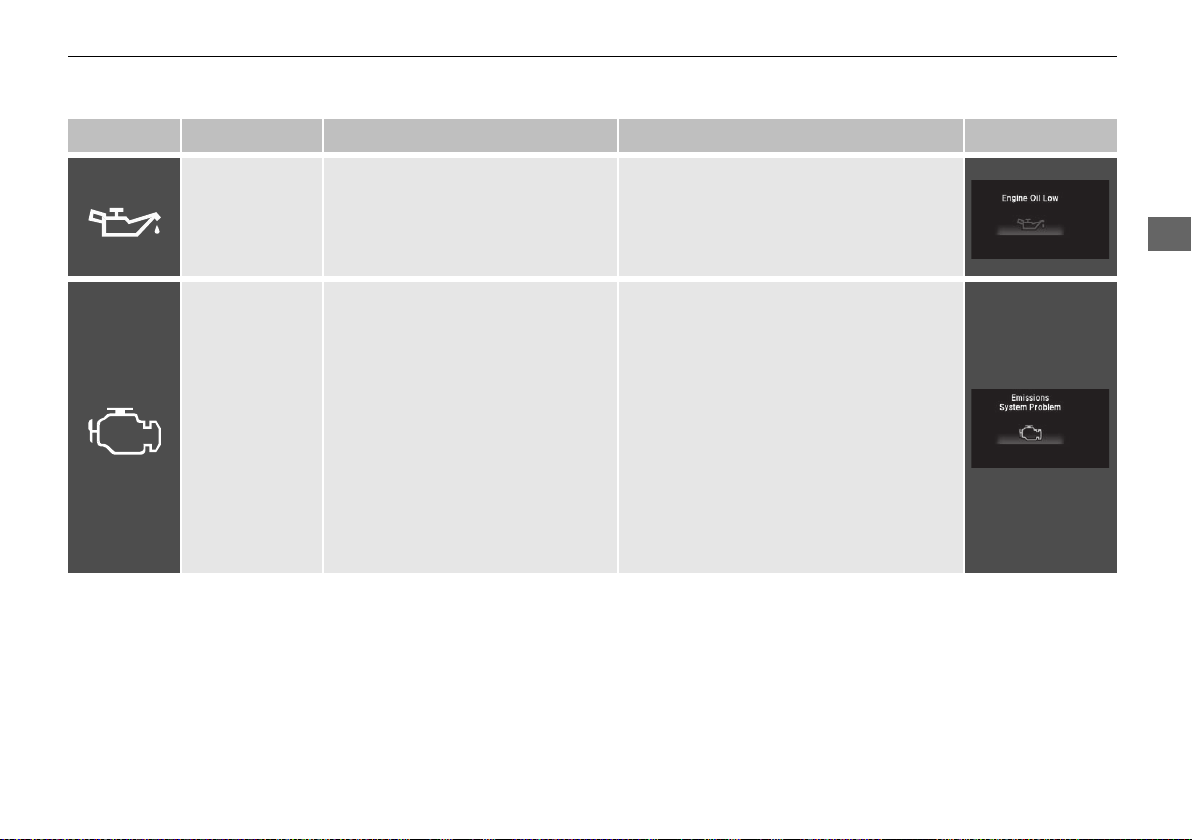
uuIndicatorsu
Instrument Panel
* Not available on all models
Indicator Name On/Blinking Explanation Message
Low Oil Pressure
Indicator
●
Comes on when you turn the
ignition switch to ON (w*1, and
goes off when the engine starts.
●
Comes on when the engine oil
●
Comes on while driving - Immediately
stop in a safe place.
2 If the Low Oil Pressure Indicator
Comes On P. 562
pressure is low.
Malfunction
Indicator Lamp
●
Comes on when you turn the
ignition switch to ON
(w
*1
, and
goes off either when the engine
starts or after several seconds if the
engine did not start. If “readiness
codes” have not been set, it blinks
five times before it goes off.
●
Comes on if there is a problem
with the emissions control system.
●
Blinks when a misfire in the
engine’s cylinders is detected.
●
Readiness codes are part of the on board
diagnostics for the emissions control
systems.
2 Testing of Readiness Codes P. 581
●
Comes on while driving - Have your
vehicle checked by a dealer.
●
Blinks while driving - Stop in a safe
place where there are no flammable
objects. Stop the engine for 10 minutes
or more, and wait for it to cool down.
Then, take your vehicle to a dealer.
2 If the Malfunction Indicator Lamp
Comes On or Blinks P. 563
*1:Models with the smart entry system have an ENGINE START/STOP button instead of an ignition switch.
*
Continued
77
Page 80
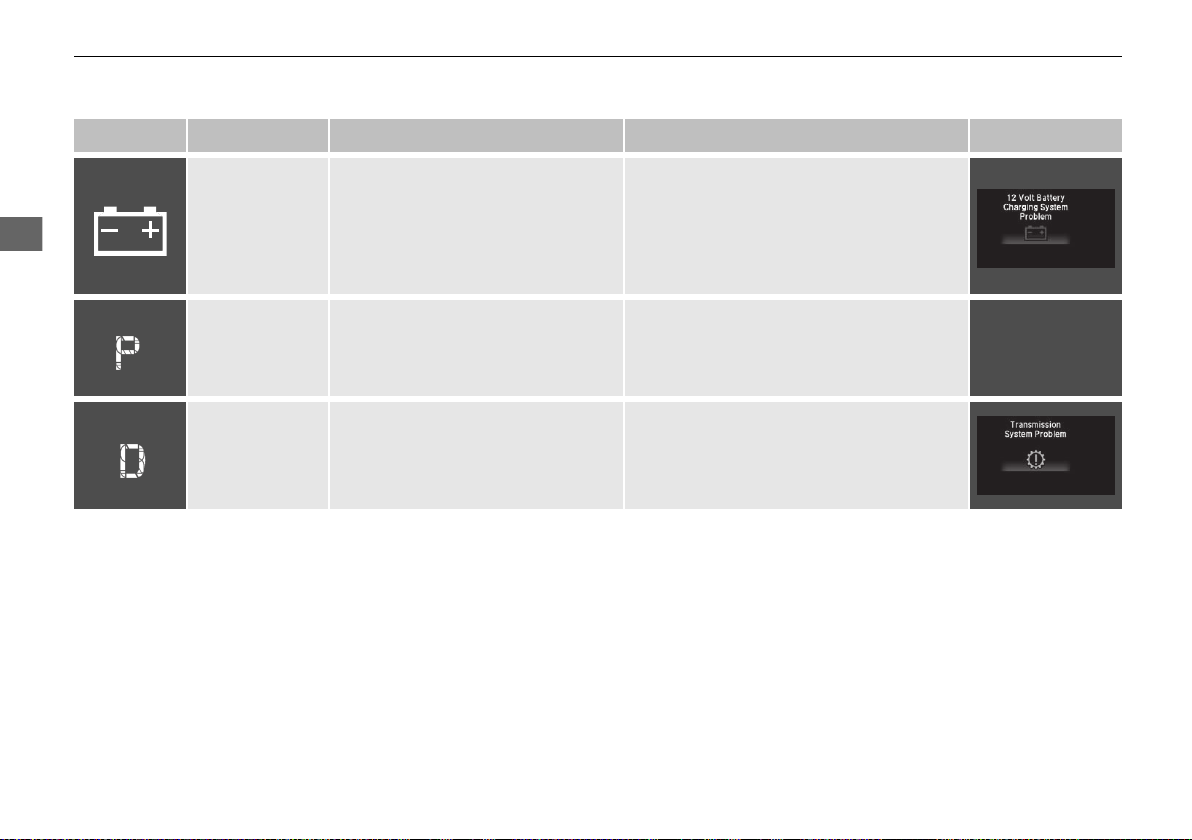
uuIndicatorsu
Instrument Panel
* Not available on all models
Indicator Name On/Blinking Explanation Message
Charging System
Indicator
Shift Lever
Position
Indicator
*
Transmission
Indicator
*
●
Comes on when you turn the
ignition switch to ON (w*1, and
goes off when the engine starts.
●
Comes on when the battery is not
charging.
●
Indicates the current shift lever
position.
●
Blinks if the transmission system
has a problem.
●
Comes on while driving - Turn off the
heating and cooling system*/climate
*
control system
and rear defogger in
order to reduce electricity consumption.
2 If the Charging System Indicator
Comes On P. 562
2 Shifting P. 417, 419
●
Blinks while driving - Avoid sudden
starts and acceleration and have your
vehicle checked by a dealer immediately.
*1:Models with the smart entry system have an ENGINE START/STOP button instead of an ignition switch.
*
—
78
Page 81
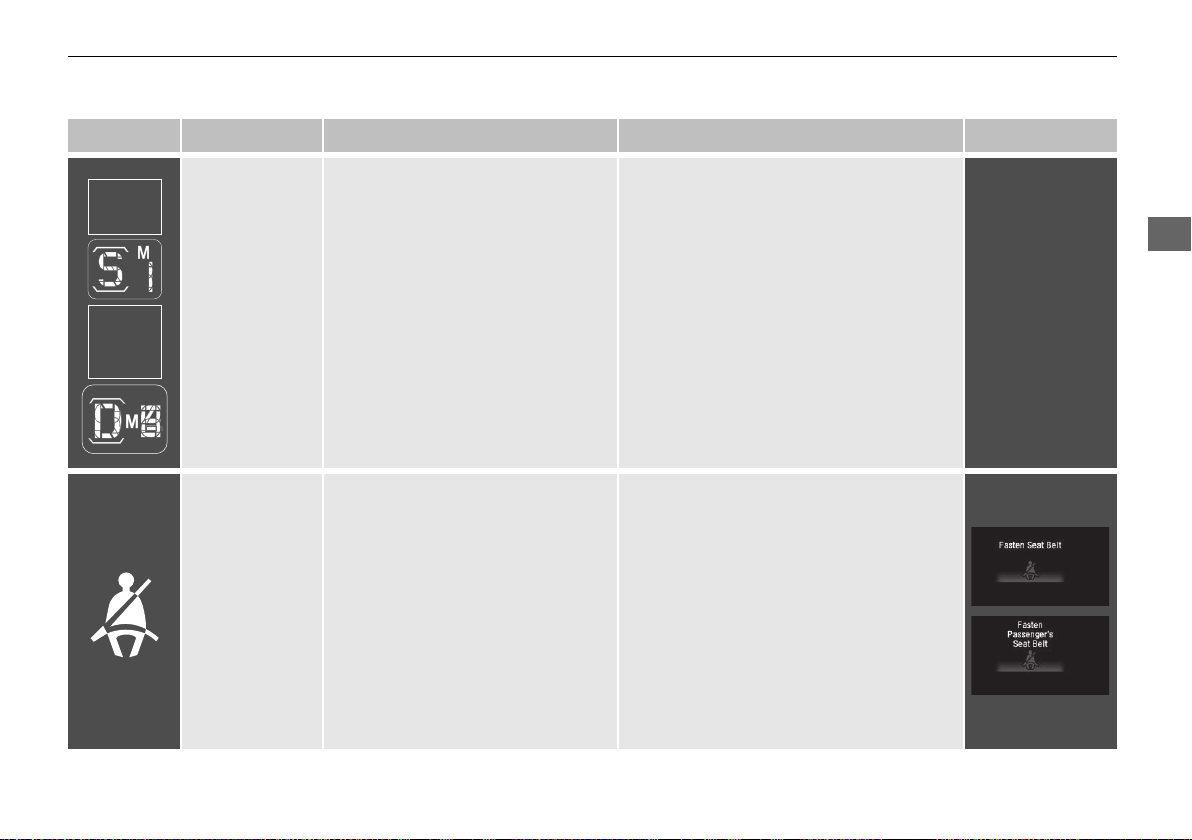
uuIndicatorsu
Instrument Panel
Models with
information
display
Models with
multiinformation
display
* Not available on all models
Indicator Name On/Blinking Explanation Message
M (7-speed
manual shift
mode) Indicator/
Shift Indicator
Seat Belt
Reminder
Indicator
*1:Models with the smart entry system have an ENGINE START/STOP button instead of an ignition switch.
●
Comes on when 7-speed manual
shift mode is applied.
*
●
Comes on and the beeper sounds
if you are not wearing a seat belt
when you turn the ignition switch
*1
(w
to ON
●
If the front passenger is not
.
wearing a seat belt, the indicator
comes on a few seconds later.
●
Blinks while driving if either you or
the front passenger has not
fastened a seat belt. The beeper
sounds and the indicator blinks at
regular intervals.
2 7-Speed Manual Shift Mode P. 421
●
The beeper stops and the indicator goes
off when you and the front passenger
fasten their seat belts.
●
Stays on after you or the front
passenger has fastened the seat belt
- A detection error may have occurred in
the sensor. Have your vehicle checked by
a dealer.
2 Seat Belt Reminder P. 38
—
Continued
*
79
Page 82
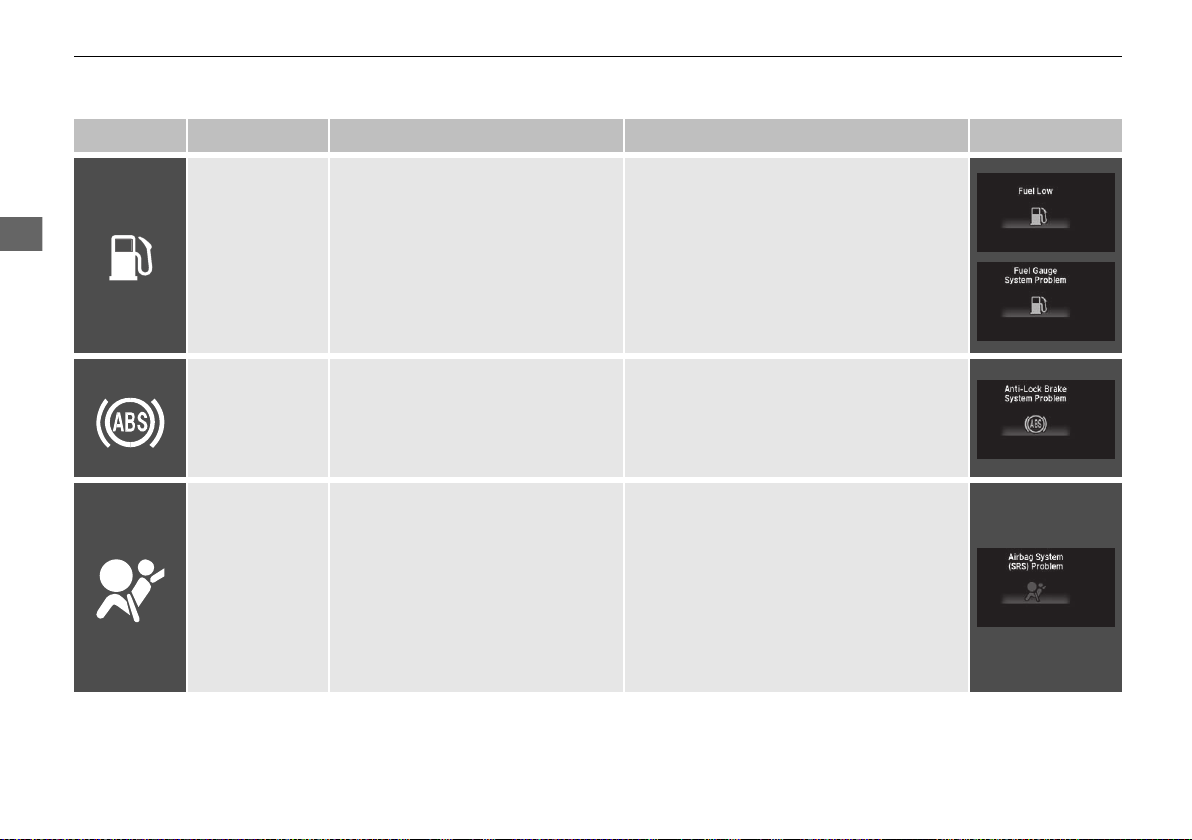
uuIndicatorsu
Instrument Panel
* Not available on all models
Indicator Name On/Blinking Explanation Message
Low Fuel
Indicator
*
Anti-lock Brake
System (ABS)
Indicator
Supplemental
Restraint System
Indicator
●
Comes on when the fuel reserve is
running low (approximately 1.59
U.S. gal./6.0 Liter left).
●
Blinks if there is a problem with the
fuel gauge.
●
Comes on for a few seconds when
you turn the ignition switch to ON
*1
(w
, then goes off.
●
If it comes on at any other time,
there is a problem with the ABS.
●
Comes on for a few seconds when
you turn the ignition switch to ON
*1
(w
, then goes off.
●
Comes on if a problem with any of
the following is detected:
- Supplemental restraint system
●
Comes on - Refuel your vehicle as soon
as possible.
●
Blinks - Have your vehicle checked by a
dealer.
●
Stays on constantly - Have your vehicle
checked by a dealer. With this indicator
on, your vehicle still has normal braking
ability but no anti-lock function.
2 Anti-lock Brake System (ABS) P. 471
●
Stays on constantly or does not come
on at all - Have your vehicle checked by a
dealer.
- Side airbag system
- Side curtain airbag system
- Seat belt tensioner
*1:Models with the smart entry system have an ENGINE START/STOP button instead of an ignition switch.
*
80
Page 83
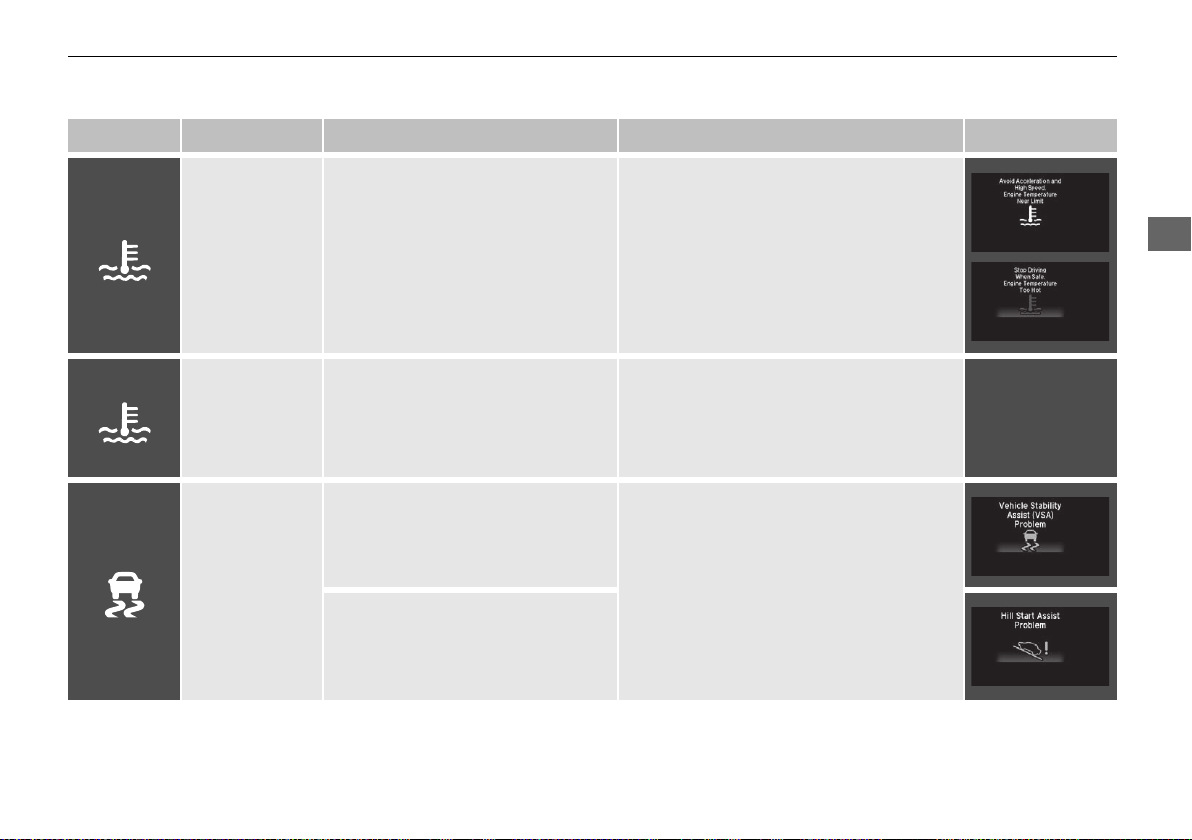
uuIndicatorsu
Instrument Panel
* Not available on all models
Indicator Name On/Blinking Explanation Message
●
Goes off, then comes on blue when the
engine coolant temperature is low.
●
Blinks while driving - Drive slowly to
prevent overheating.
●
Stays on while driving - Immediately
stop in a safe place and allow the engine
to cool.
2 Overheating P. 560
●
If the indicator stays on after the engine
has reached normal operating
temperature, there may be a problem
with the temperature sensors. Have your
vehicle inspected by a dealer.
●
Stays on constantly - Have your vehicle
checked by a dealer.
2 Vehicle Stability AssistTM (VSA®), aka
Electronic Stability Control (ESC),
System P. 459
—
High
Temperature
Indicator
(Red)
Low
Temperature
Indicator
(Blue)
Vehicle Stability
TM
(VSA®)
Assist
System Indicator
●
Comes on for a few seconds when
you turn the ignition switch to ON
*1
(w
, then goes off.
●
Blinks when the engine coolant
temperature goes up, and stays on
if the temperature continues to
rise.
●
Comes on when the engine
coolant temperature is low.
●
Comes on for a few seconds when
you turn the ignition switch to ON
*1
(w
, then goes off.
●
Blinks when VSA® is active.
●
Comes on if there is a problem
with the VSA® system or hill start
assist system.
*
*1:Models with the smart entry system have an ENGINE START/STOP button instead of an ignition switch.
Continued
81
Page 84
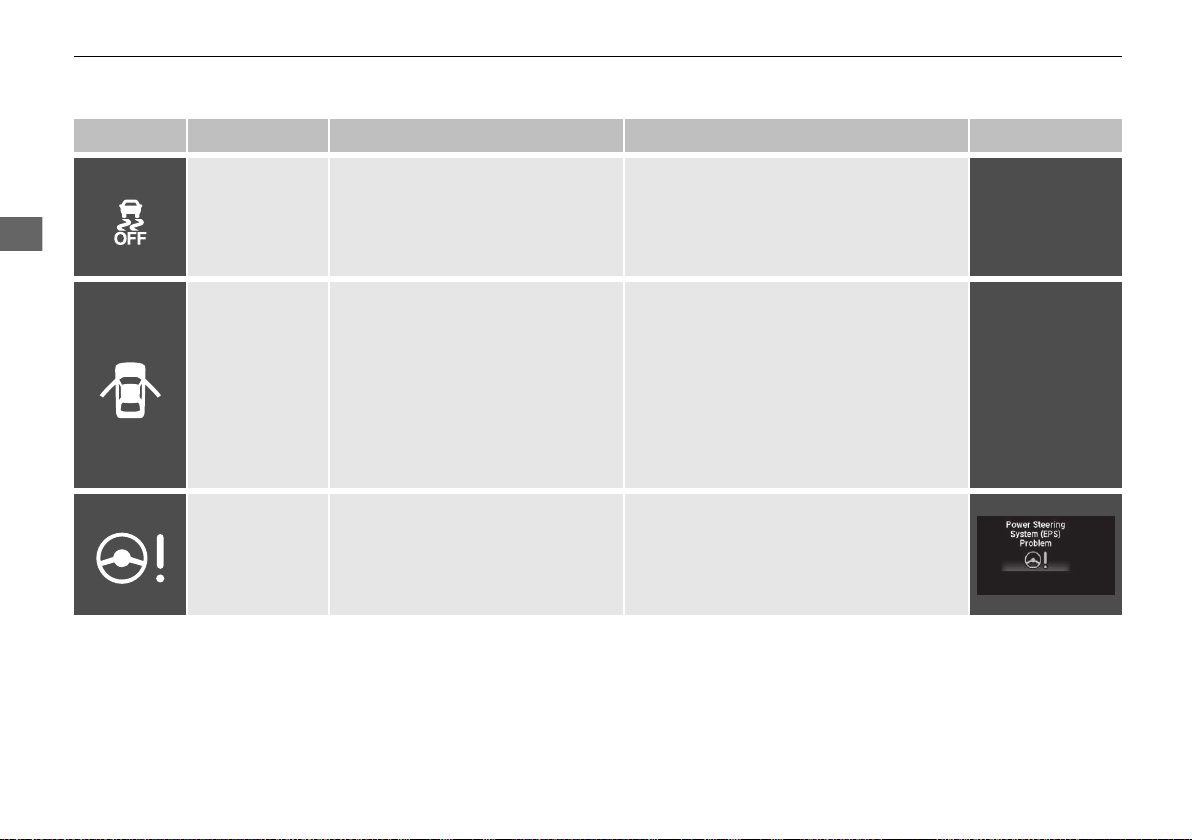
uuIndicatorsu
Instrument Panel
* Not available on all models
Indicator Name On/Blinking Explanation Message
●
Comes on for a few seconds when
Vehicle Stability
TM
(VSA®)
Assist
OFF Indicator
Door and
Tailgate Open
Indicator
*
you turn the ignition switch to ON
*1
(w
, then goes off.
●
Comes on when you deactivate
VSA®.
●
Comes on for a few seconds if you
turn the ignition switch to ON
*1
(w
, then goes off.
●
Comes on if any door or the
tailgate is not completely closed.
●
The beeper sounds and the
2 VSA® On and Off P. 460
●
Goes off when all doors and the tailgate
are closed.
indicator comes on if any door or
the tailgate is opened while
driving.
Electric Power
Steering (EPS)
System Indicator
●
Comes on when you turn the
ignition switch to ON (w*1, and
goes off when the engine starts.
●
Comes on if there is a problem
with the EPS system.
●
Stays on constantly or does not come
on at all - Have your vehicle checked by a
dealer.
2 If the Electric Power Steering (EPS)
System Indicator Comes On P. 564
*1:Models with the smart entry system have an ENGINE START/STOP button instead of an ignition switch.
*
—
—
82
Page 85
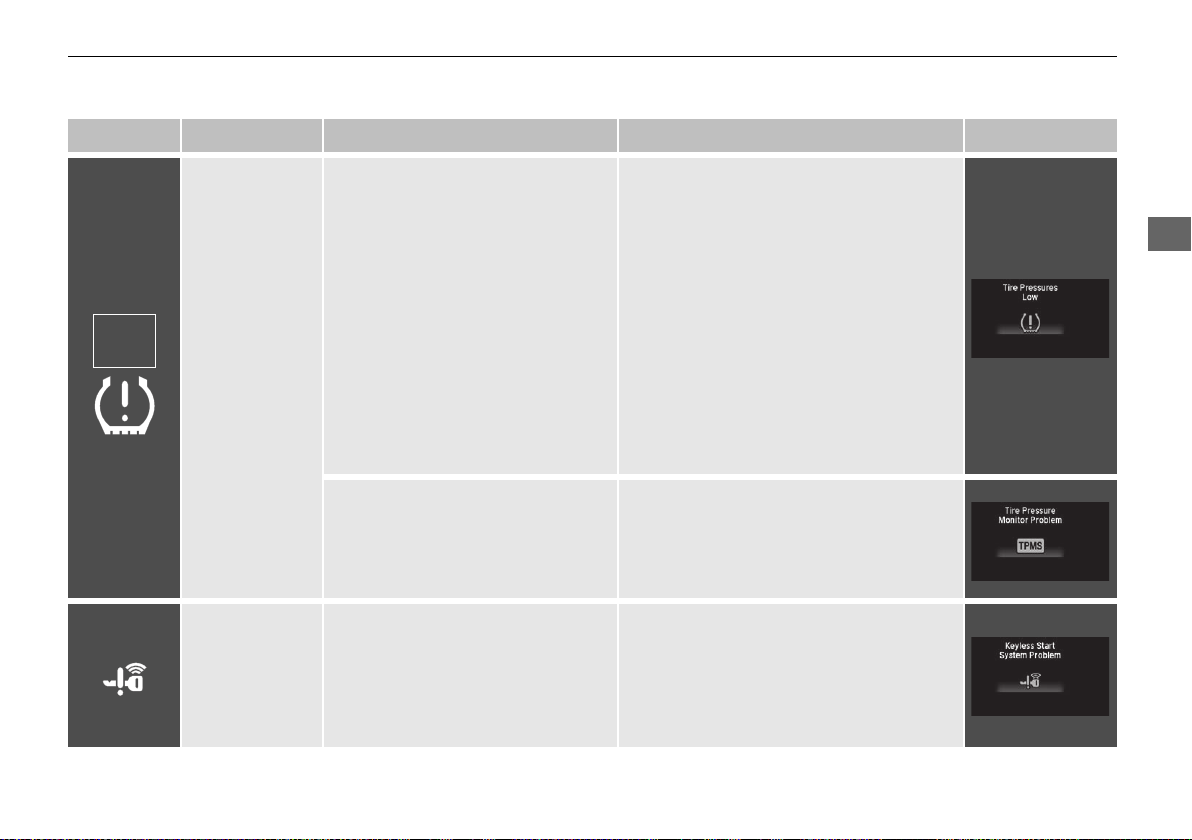
uuIndicatorsu
Instrument Panel
U.S.
models
only
* Not available on all models
Indicator Name On/Blinking Explanation Message
Low Tire
Pressure/TPMS
Indicator
Smart Entry
System
Indicator
*1:Models with the smart entry system have an ENGINE START/STOP button instead of an ignition switch.
*
●
Comes on for a few seconds when
you turn the ignition switch to ON
*1
(w
, then goes off.
●
May come on briefly if the ignition
switch is turned to ON (w*1 and
the vehicle is not moved within 45
seconds, to indicate the calibration
●
Comes on while driving - Stop in a safe
place, check tire pressures, and inflate the
tire(s) if necessary.
●
Stays on after the tires are inflated to
the recommended pressures - The
system needs to be calibrated.
2 TPMS Calibration P. 464
process is not yet complete.
●
Comes on and stays on when:
- One or more tires’ pressures are
determined to be significantly
low.
- The system has not been
calibrated.
●
Blinks for about one minute, and
then stays on if there is a problem
with the TPMS, or when a compact
spare tire is temporarily installed.
●
Blinks and remains on - Have your
vehicle checked by a dealer. If the vehicle
is fitted with a compact spare, get your
regular tire repaired or replaced and put
back on your vehicle as soon as you can.
●
Comes on for a few seconds when
you change the power mode to
ON.
●
*
Comes on as soon as a problem is
●
Stays on constantly or does not come
on at all - Have your vehicle checked by
a dealer.
detected in the smart entry system
or push button starting system.
Continued
83
Page 86
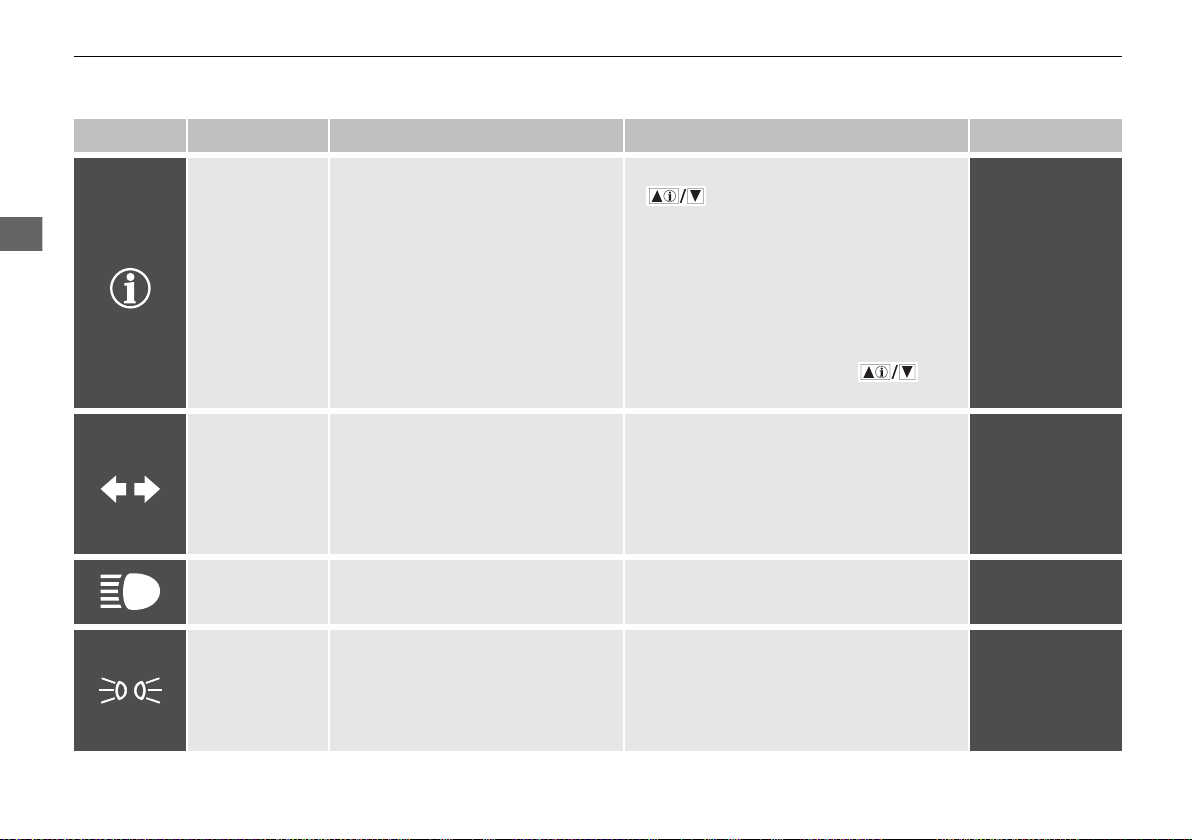
uuIndicatorsu
Instrument Panel
* Not available on all models
Indicator Name On/Blinking Explanation Message
System Message
Indicator
*
●
Comes on for a few seconds when
you turn the ignition switch to ON
*1
(w
, then goes off.
●
Comes on along with a beep when
a problem is detected. A system
message on the driver information
interface appears at the same time.
●
While the indicator is on, press the
(information) button to see the
message again.
●
Refer to the Indicators information in this
chapter when a system message appears
on the multi-information display. Take
the appropriate action for the message.
●
The multi-information display does not
return to the normal screen unless the
warning is canceled, or the
button is pressed.
Turn Signal and
Hazard Warning
Indicators
●
The turn signal indicators blink
when you operate the turn signal
lever.
●
If you press the hazard warning
button, both indicators and all turn
●
Does not blink or blinks rapidly - A
turn signal light bulb has blown. Change
the bulb immediately.
2 Replacing Light Bulbs P. 514, 517
signals blink at the same time.
●
High Beam
Indicator
Lights On
Indicator
Comes on when the high beam
headlights are on.
●
Comes on whenever the light
switch is on, or in AUTO
*
when
the exterior lights are on.
— —
●
If you remove the key from the ignition
switch*, or set the power mode* to
VEHICLE OFF (LOCK) while the exterior
lights are on, a chime sounds when the
driver’s door is opened.
*1:Models with the smart entry system have an ENGINE START/STOP button instead of an ignition switch.
*
—
—
—
84
Page 87
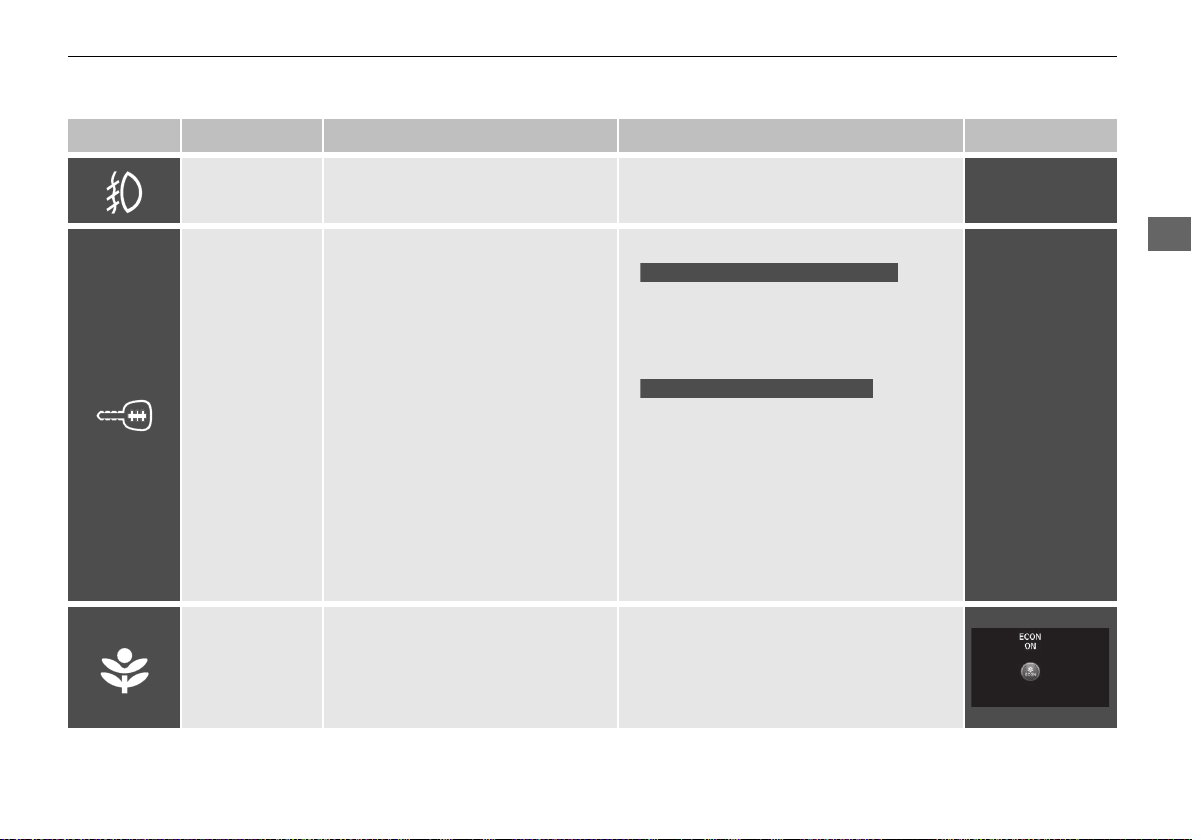
uuIndicatorsu
Instrument Panel
Models without smart entry system
Models with smart entry system
* Not available on all models
Indicator Name On/Blinking Explanation Message
●
Fog Light
Indicator
*
Comes on when the fog lights are
on.
●
Comes on briefly when you turn
●
Blinks -
— —
the ignition switch to ON (w*1,
Immobilizer
System Indicator
then goes off.
●
Comes on if the immobilizer
system cannot recognize the key
information.
You cannot start the engine. Turn the
ignition switch to LOCK (0, pull the key
out, and then insert the key and turn it to
(w again.
ON
You cannot start the engine. Set the
power mode to VEHICLE OFF (LOCK),
—
then select the ON mode again.
●
Repeatedly blinks - The system may be
malfunctioning. Have the vehicle checked
by a dealer.
●
Do not attempt to alter this system or add
other devices to it. Electrical problems can
occur.
●
Comes on for a few seconds when
ECON Mode
Indicator
*
you turn the ignition switch to ON
*1
(w
, then goes off.
●
Comes on when you press the
2 ECON Button* P. 427
ECON button.
*
*1:Models with the smart entry system have an ENGINE START/STOP button instead of an ignition switch.
Continued
85
Page 88
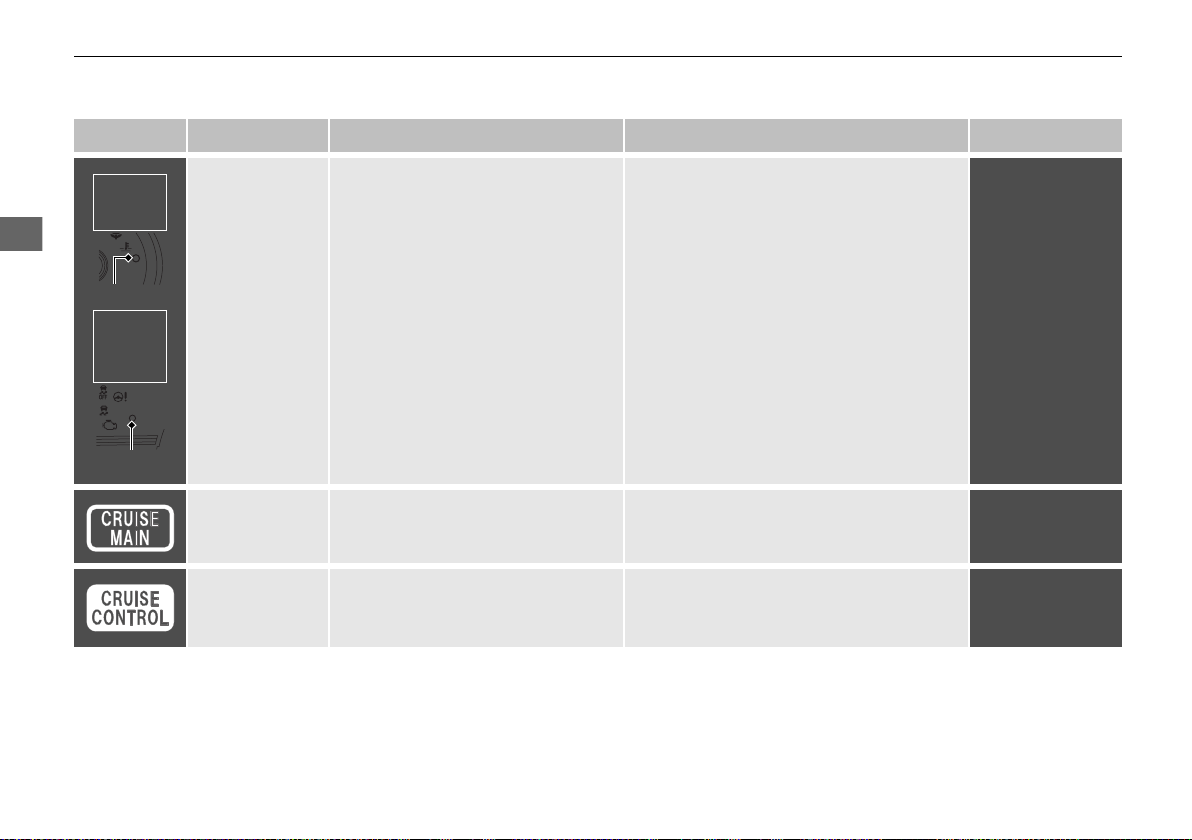
uuIndicatorsu
Instrument Panel
Indicator
Models with
information
display
Models with
multiinformation
display
Indicator
* Not available on all models
Indicator Name On/Blinking Explanation Message
●
Blinks when the security system
alarm has been set.
Security System
Alarm Indicator
CRUISE MAIN
Indicator
*
CRUISE
CONTROL
Indicator
*
●
Comes on when you press the
CRUISE button.
●
Comes on if you have set a speed
for cruise control.
2 Security System Alarm P. 148
2 Cruise Control* P. 428
2 Cruise Control* P. 428
—
—
—
*
86
Page 89
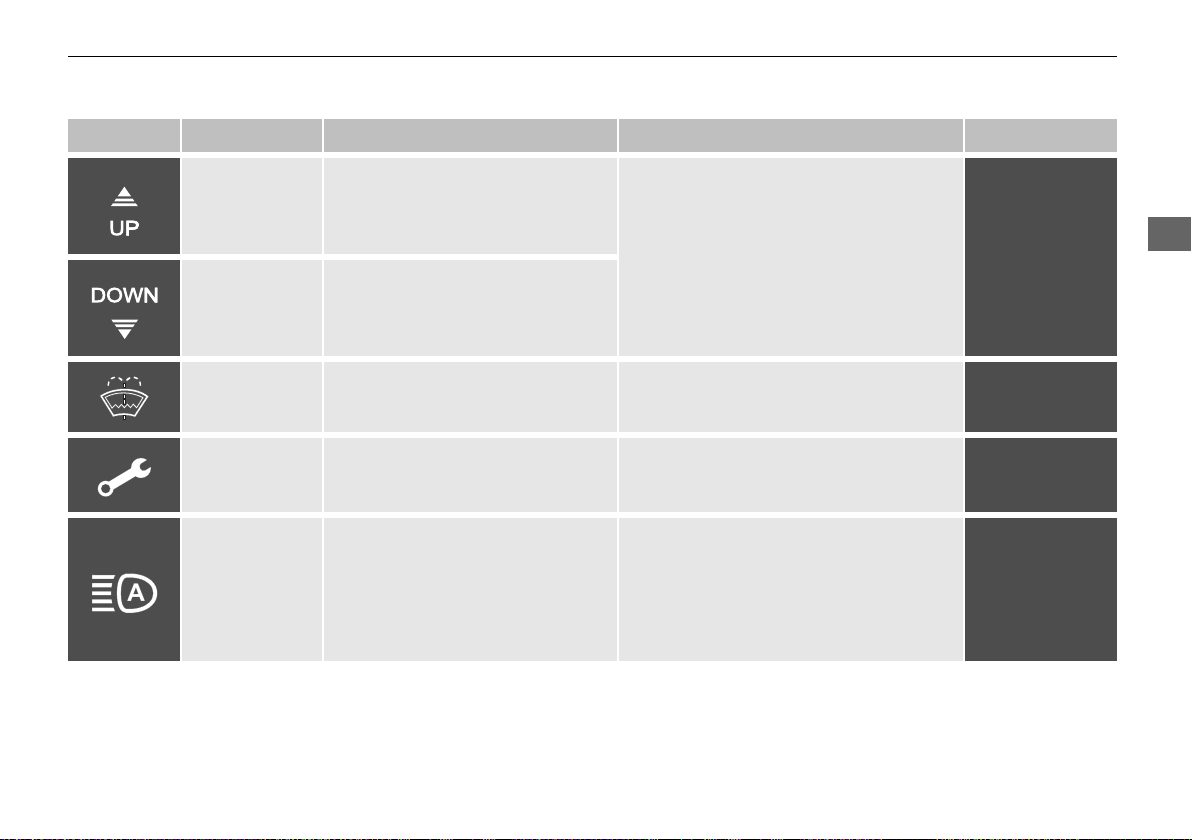
uuIndicatorsu
Instrument Panel
* Not available on all models
Indicator Name On/Blinking Explanation Message
●
Comes on briefly when you turn
Shift Up
Indicator
*
the ignition switch to ON (w*1.
●
Comes on when shifting up is
recommended.
2 Shift Up/Down Indicators* P. 426
Shift Down
Indicator
*
●
Comes on briefly when you turn
the ignition switch to ON (w*1.
●
Comes on when shifting down is
recommended.
●
Washer Level
Indicator
*
Maintenance
Minder
Indicator
*
●
Comes on when the washer fluid is
low.
●
Comes on when the scheduled
maintenance is due soon.
●
Comes on for a few seconds when
Refill washer fluid.
2 Refilling Window Washer Fluid
P. 512
2 Maintenance MinderTM P. 493
you turn the ignition switch to ON
Auto High-Beam
Indicator
*
*1
(w
, then goes off.
●
Comes on when all the operating
2 Auto High-Beam* P. 164
conditions of the auto high-beam
are met.
*1:Models with the smart entry system have an ENGINE START/STOP button instead of an ignition switch.
*
—
—
—
—
Continued
87
Page 90
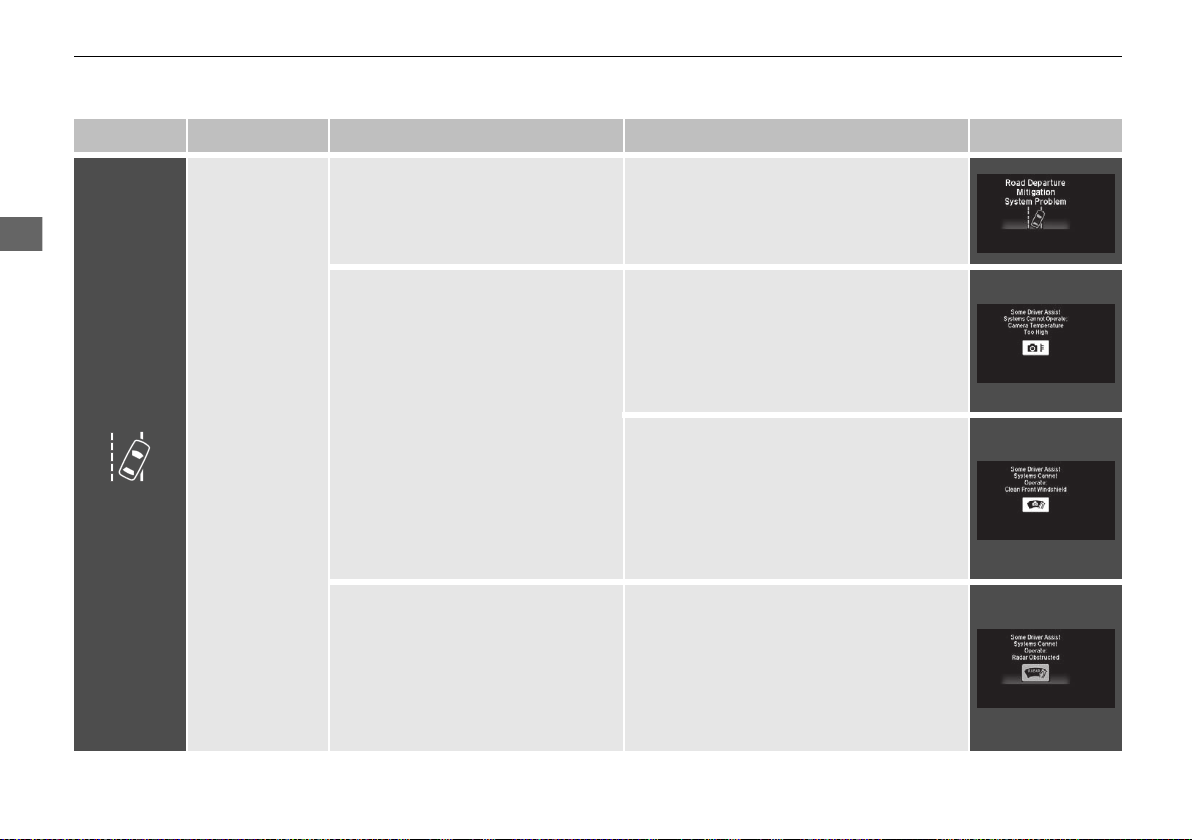
uuIndicatorsu
Instrument Panel
* Not available on all models
Indicator Name On/Blinking Explanation Message
●
Comes on for a few seconds when
you turn the ignition switch to ON
*1
(w
, then goes off.
●
Comes on if there is a problem
with the RDM system.
●
Comes on when the RDM system
shuts itself off.
●
Stays on constantly - Have your vehicle
checked by a dealer.
●
Stays on - The temperature inside the
camera is too high.
Use the climate control system to cool
down the camera.
The system activates when the temperature
inside the camera cools down.
2 Front Sensor Camera* P. 431
Road Departure
Mitigation
(RDM) Indicator
*
●
Stays on - The area around the camera is
blocked by dirt, mud, etc. Stop your
vehicle in a safe place, and wipe it off
with a soft cloth.
●
Have your vehicle checked by a dealer if the
indicator and message come back on after
you cleaned the area around the camera.
2 Front Sensor Camera* P. 431
●
Comes on if anything covers the
radar sensor cover and prevents
the sensor from detecting a vehicle
in front.
●
May come on when driving in bad
weather (rain, snow, fog, etc.)
●
LKAS has been automatically
canceled.
●
When the radar sensor gets dirty, stop
your vehicle in a safe place, and wipe off
dirt using a soft cloth. Indicator may take
some time to go off after the radar sensor
is cleaned.
●
Have your vehicle checked by a dealer if
the indicator does not go off even after
you clean the sensor cover.
*1:Models with the smart entry system have an ENGINE START/STOP button instead of an ignition switch.
*
88
Page 91
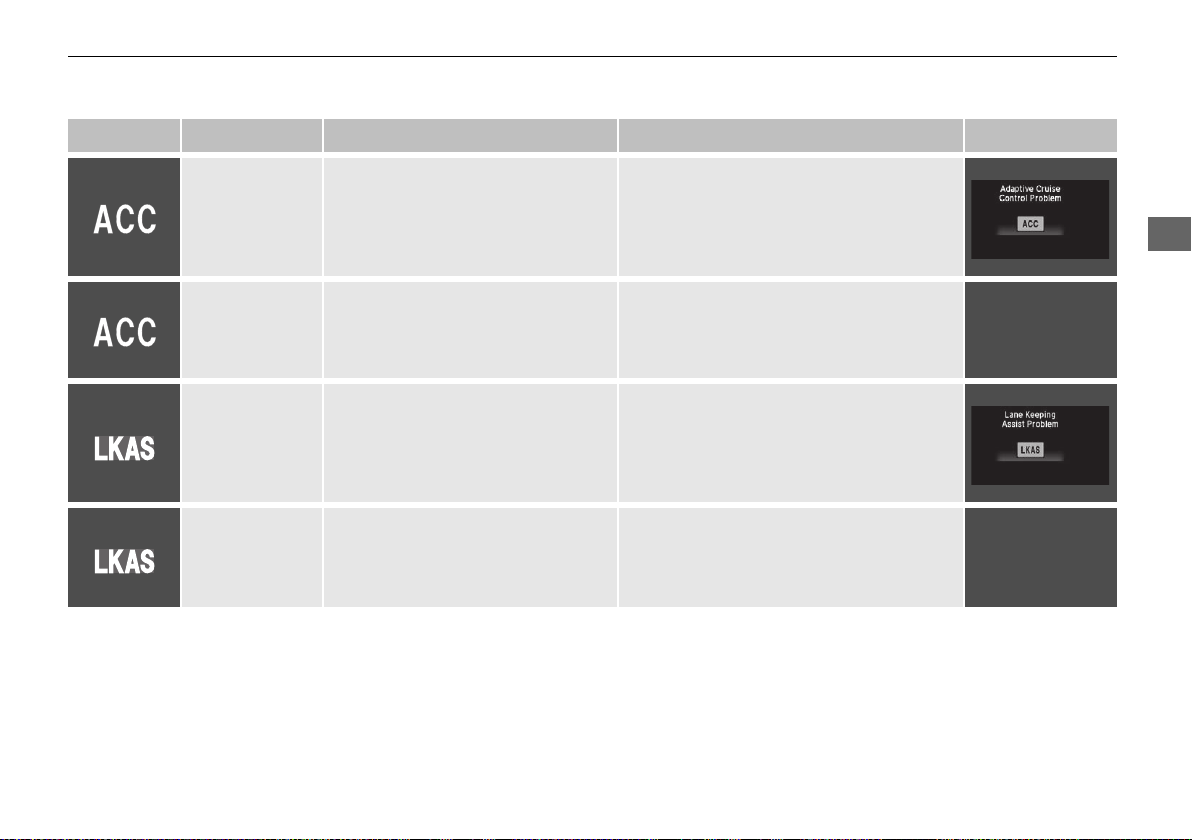
uuIndicatorsu
Instrument Panel
* Not available on all models
Indicator Name On/Blinking Explanation Message
Adaptive Cruise
Control (ACC)
Indicator
(Amber)
*
Adaptive Cruise
Control (ACC)
Indicator
*
(Green)
Lane Keeping
Assist System
(LKAS) Indicator
(Amber)
*
Lane Keeping
Assist System
(LKAS) Indicator
*
(Green)
●
Comes on for a few seconds when
you turn the ignition switch to ON
*1
(w
, then goes off.
●
Comes on if there is a problem
with ACC.
●
Comes on when you press the
MAIN button.
●
Comes on for a few seconds when
you turn the ignition switch to ON
*1
(w
, then goes off.
●
Comes on if there is a problem
with the LKAS.
●
Comes on when you press the
MAIN button.
●
Comes on while driving - Have your
vehicle checked by a dealer.
2 Adaptive Cruise Control (ACC)*
P. 433
●
Stays on constantly - Have your vehicle
checked by a dealer.
2 Lane Keeping Assist System (LKAS)*
P. 452
*1:Models with the smart entry system have an ENGINE START/STOP button instead of an ignition switch.
*
—
—
Continued
89
Page 92
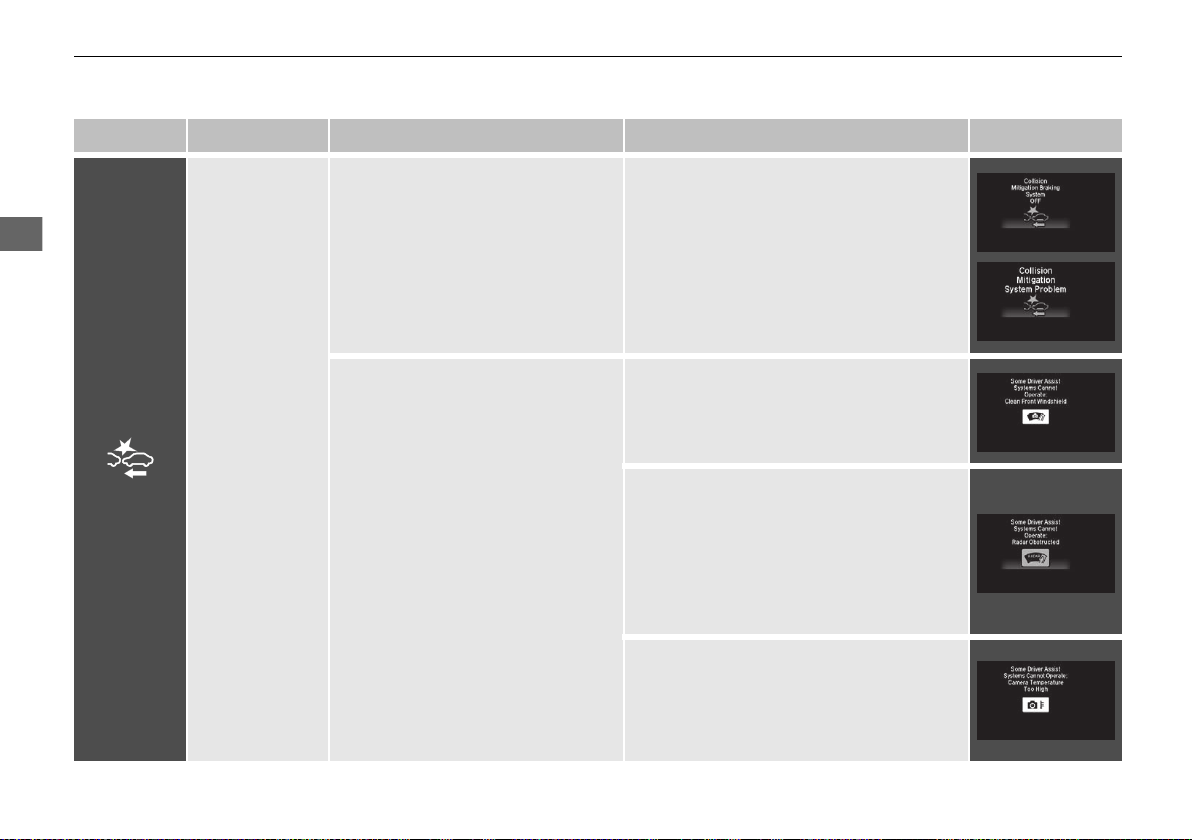
uuIndicatorsu
Instrument Panel
* Not available on all models
Indicator Name On/Blinking Explanation Message
Collision
Mitigation
Braking
System
(CMBS
Indicator
*1:Models with the smart entry system have an ENGINE START/STOP button instead of an ignition switch.
90
*
●
Comes on for a few seconds when
you turn the ignition switch to ON
*1
(w
, then goes off.
●
Comes on when you deactivate
the CMBSTM. A multi-information
display message appears for five
seconds.
●
Comes on if there is a problem
●
Stays on constantly without the
CMBSTM off - Have your vehicle checked
by a dealer.
2 Collision Mitigation Braking
System
TM
(CMBSTM)* P. 473
with the CMBSTM.
●
Comes on when the CMBSTM
system shuts itself off.
●
Stays on - The area around the camera is
blocked by dirt, mud, etc. Stop your
vehicle in a safe place, and wipe it off
with a soft cloth.
TM
TM
)
*
2 Front Sensor Camera* P. 431
●
When the radar sensor gets dirty, stop your
vehicle in a safe place, and wipe off dirt using
a soft cloth. Indicator may take some time to
go off after the radar sensor is cleaned.
●
Have your vehicle checked by a dealer if the
message does not disappear even after you
clean the sensor cover.
2 Collision Mitigation Braking
●
Stays on
TM
System
(CMBSTM)* P. 473
- The temperature inside the
camera is too high. Use the climate control
system to cool down the camera. The
system activates when the temperature
inside the camera cools down.
2 Front Sensor Camera* P. 431
Page 93
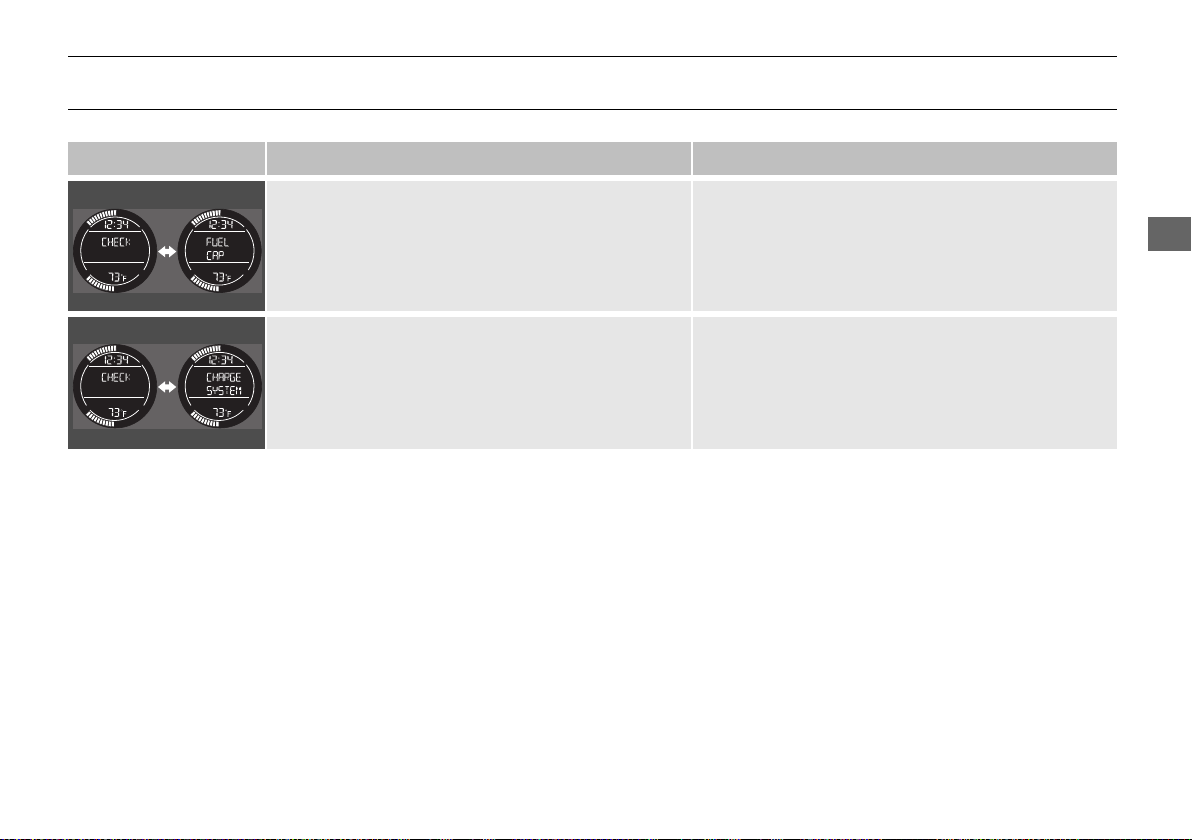
uuIndicatorsuInformation Display Warning and Information Messages
Instrument Panel
* Not available on all models
*
Information Display Warning and Information Messages
The following messages appear only on the information display.
Message Condition Explanation
●
Appears when the fuel fill cap is loose or is not
installed.
2 Check/Tighten Fuel Cap Message P. 563
●
Appears when there is a problem with the sensor on
the battery.
●
Stays on constantly - Have your vehicle checked
by a dealer.
*
91
Page 94
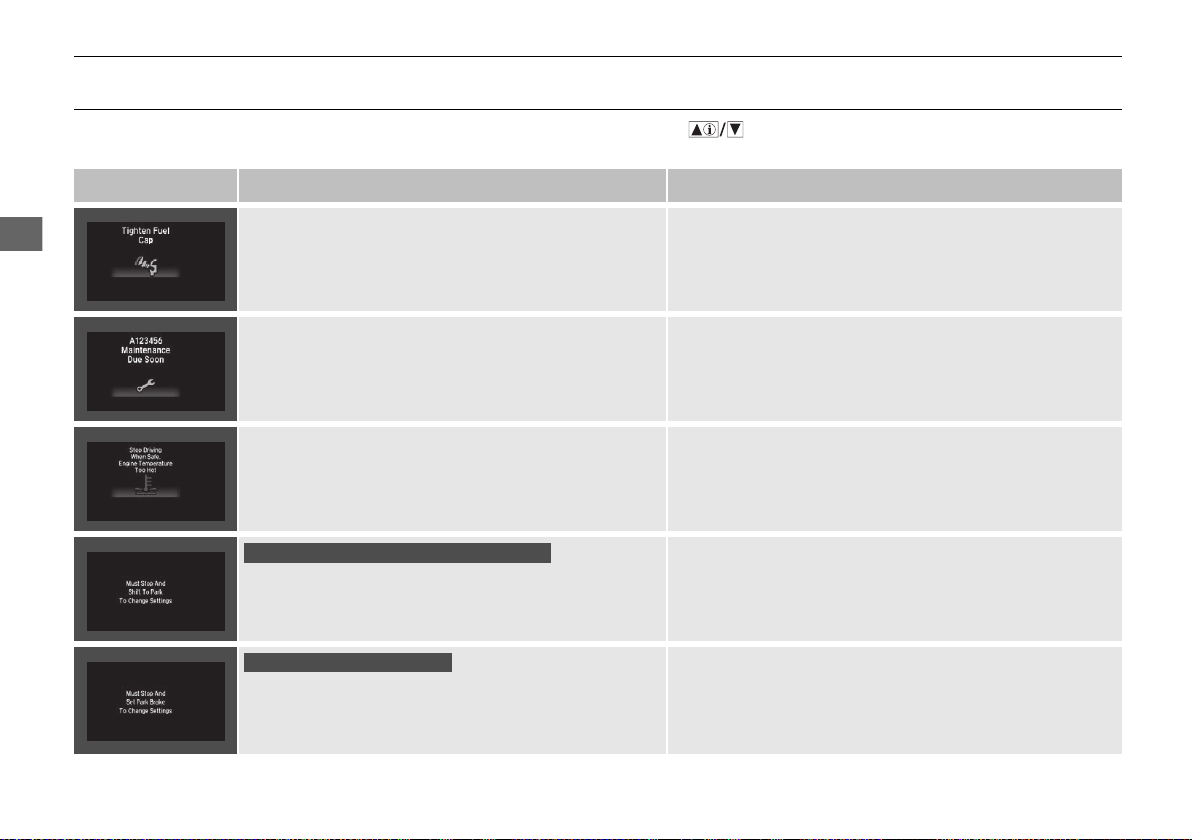
uuIndicatorsuMulti-Information Display Warning and Information Messages
Instrument Panel
Continuously variable transmission models
Manual transmission models
* Not available on all models
*
Multi-Information Display Warning and Information Messages
*
The following messages appear only on the multi-information display. Press the (information) button to see the message again
with the system message indicator on.
Message Condition Explanation
●
Appears when the fuel fill cap is loose or is not
installed.
●
Appears when the scheduled maintenance is due
soon.
u Consequently, Maintenance Due Now and
2 Check/Tighten Fuel Cap Message P. 563
2 Maintenance Minder Messages on the Multi-
Information Display P. 498
Maintenance Past Due follow.
●
Appears when the engine coolant temperature gets
abnormally high.
●
Appears while you are customizing the settings and
the shift lever is moved out of (P.
2 Overheating P. 560
2 Customized Features P. 111
●
Appears while you are customizing the settings and
the parking brake is released.
92
2 Customized Features P. 111
Page 95
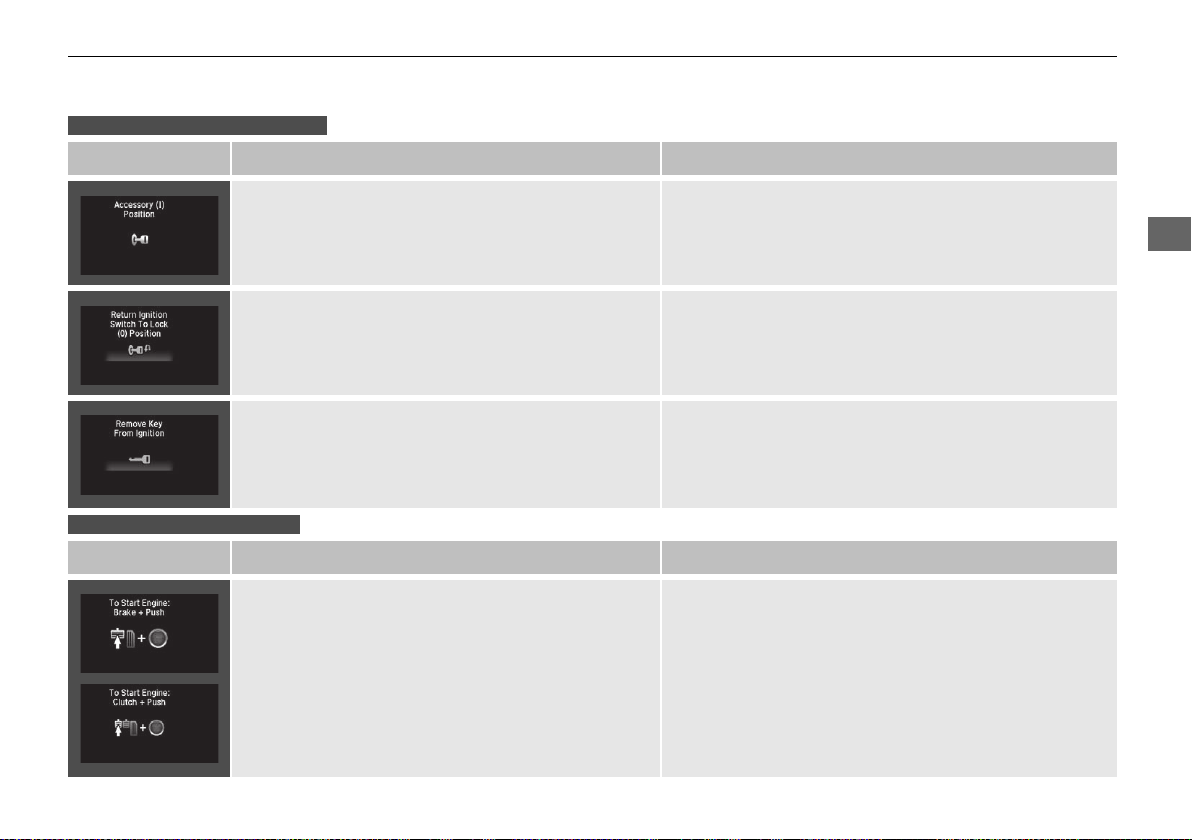
Instrument Panel
Models without smart entry system
Models with smart entry system
uuIndicatorsuMulti-Information Display Warning and Information Messages
Message Condition Explanation
●
Appears when the ignition key is turned to
ACCESSORY (q from ON (w. (The driver’s door is
closed.)
—
*
Message Condition Explanation
●
Appears when you open the driver’s door while the
ignition key is in ACCESSORY
●
Appears when you open the driver’s door while the
(q.
ignition key is in LOCK (0.
●
Appears after you unlock and open the driver’s door.
●
Turn the ignition switch to LOCK (0 , then remove the
key.
●
Remove the key from the ignition switch.
2 Starting the Engine P. 411
Continued
93
Page 96
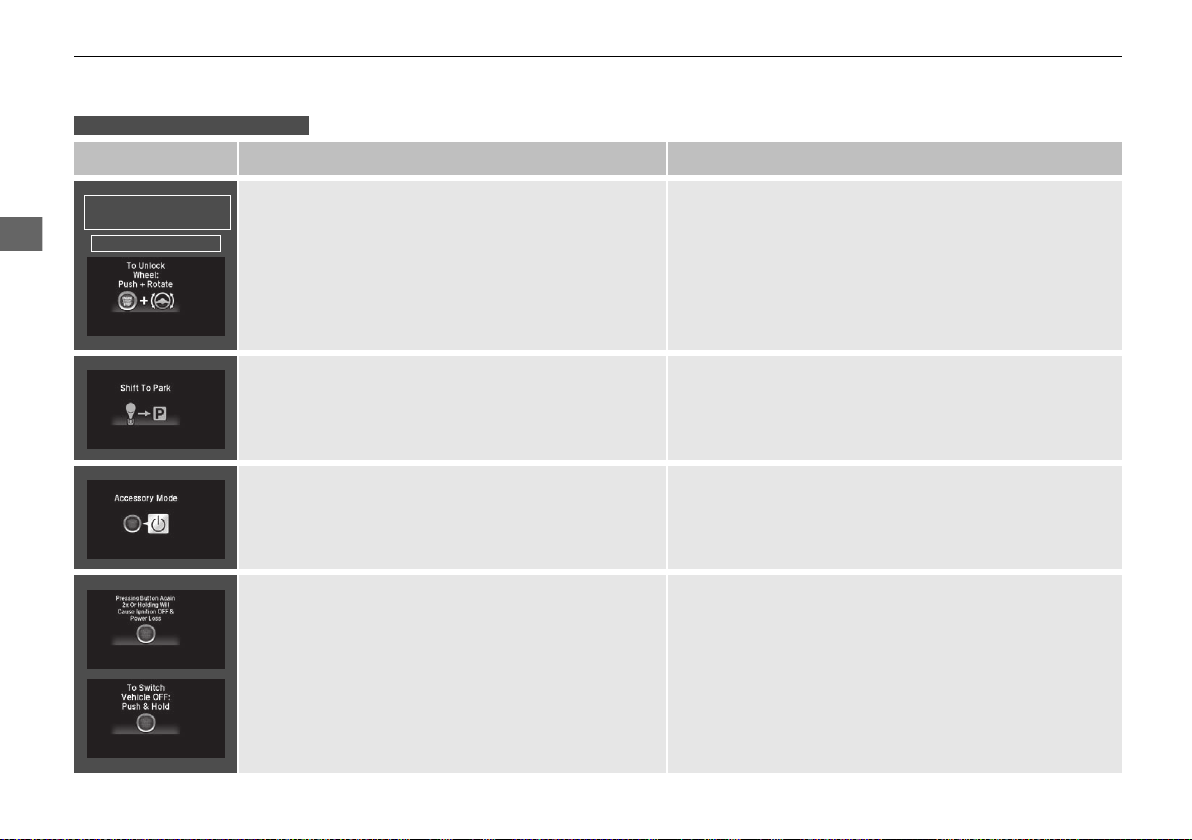
uuIndicatorsuMulti-Information Display Warning and Information Messages
Instrument Panel
Models with smart entry system
U.S. manual
transmission models
Canadian models
Message Condition Explanation
●
Appears when the steering wheel is locked.
*
●
Move the steering wheel left and right while pressing
the ENGINE START/STOP button.
94
●
Appears if you push the ENGINE START/STOP
button to turn the engine off without the shift lever
(P.
in
●
Appears when the power mode is in ACCESSORY.
●
Appears when you set the power mode to ON while
driving.
●
Move the shift lever to (P . The power mode changes to
VEHICLE OFF.
—
2 Emergency Engine Stop P. 556
Page 97
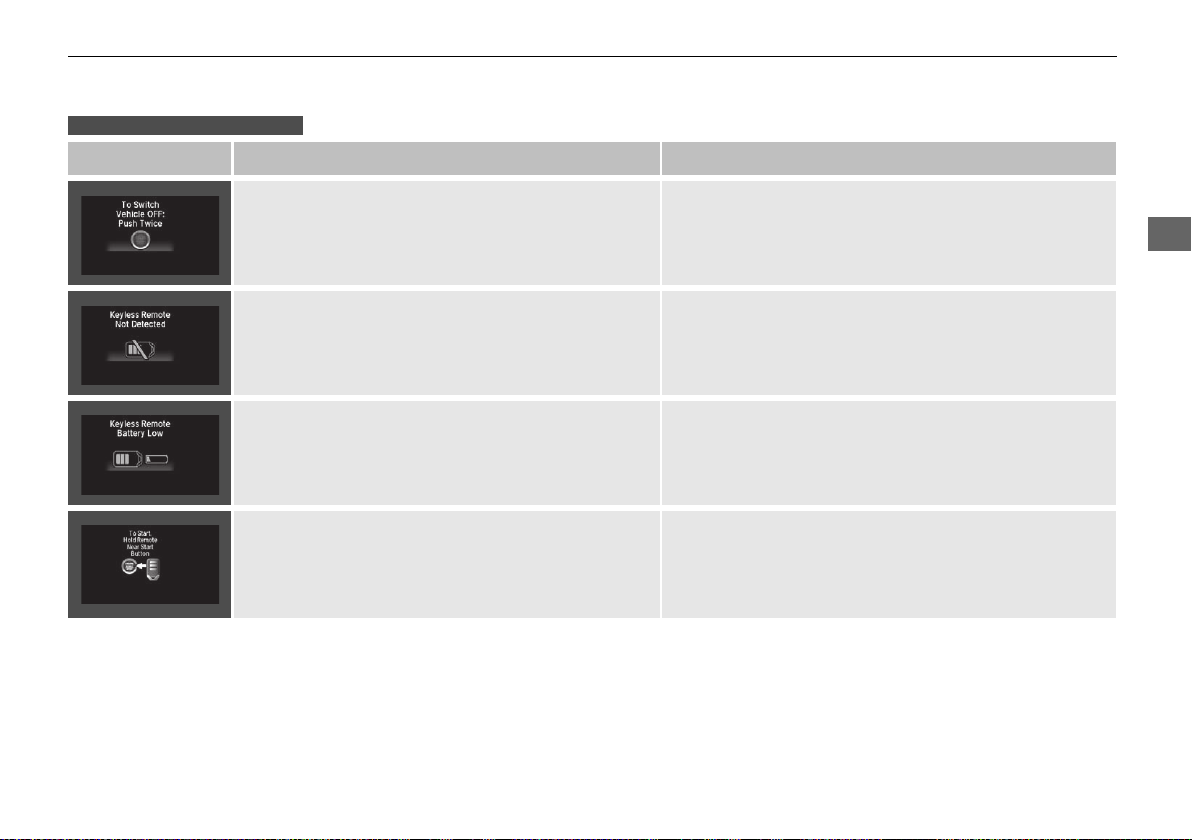
Instrument Panel
Models with smart entry system
uuIndicatorsuMulti-Information Display Warning and Information Messages
Message Condition Explanation
●
Appears after the driver’s door is opened when the
power mode is in ACCESSORY.
●
Press the ENGINE START/STOP button twice with your
foot off the brake pedal and clutch pedal (manual
transmission only), to change the power mode to
VEHICLE OFF (LOCK).
*
●
Appears when you close the door with the power
mode in ON without the smart entry remote inside
the vehicle.
●
Appears when the smart entry remote battery
becomes weak.
●
Appears if the smart entry remote battery is too
weak to start the engine or the key is not within
operating range to start the engine. A beeper
sounds six times.
●
Goes off when you bring the smart entry remote back
inside the vehicle and close the door.
2 Smart Entry Remote Reminder P. 157
●
Replace the battery as soon as possible.
2 Replacing the Button Battery P. 536
●
Bring the smart entry remote in front of the ENGINE
START/STOP button to be touched with.
2 If the Smart Entry Remote Battery is Weak P. 555
Continued
95
Page 98
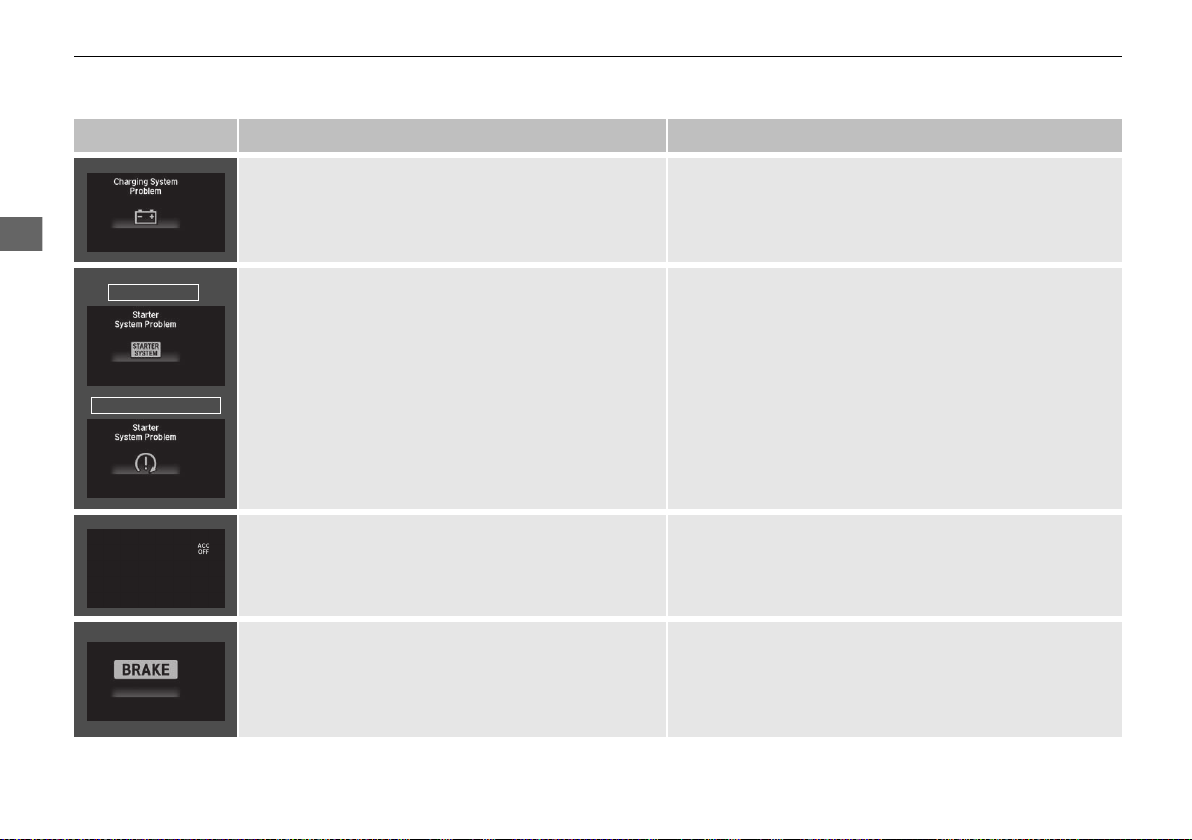
uuIndicatorsuMulti-Information Display Warning and Information Messages
Instrument Panel
U.S. models
Canadian models
* Not available on all models
*
Message Condition Explanation
●
Appears when there is a problem with the sensor on
the battery.
●
Have your vehicle checked by a dealer.
2 Checking the Battery P. 534
96
●
Appears when the starter system has a problem.
●
Appears for about three seconds when ACC has
been automatically canceled.
●
Flashes when the system senses a likely collision with
a vehicle in front of you.
●
As a temporary measure, press and hold the ENGINE
START/STOP button for up to 15 seconds while
pressing the brake pedal and clutch pedal (manual
transmission only), and manually start the engine.
Have your vehicle checked by a dealer.
●
You can resume the set speed after the condition that
caused ACC to cancel improves. Press the RES/+
button.
2 Adaptive Cruise Control (ACC)* P. 433
●
Take appropriate action to prevent a collision (apply the
brakes, change lanes, etc.).
2 Adaptive Cruise Control (ACC)* P. 433
2 Collision Mitigation Braking System
P. 473
TM
(CMBSTM)*
Page 99
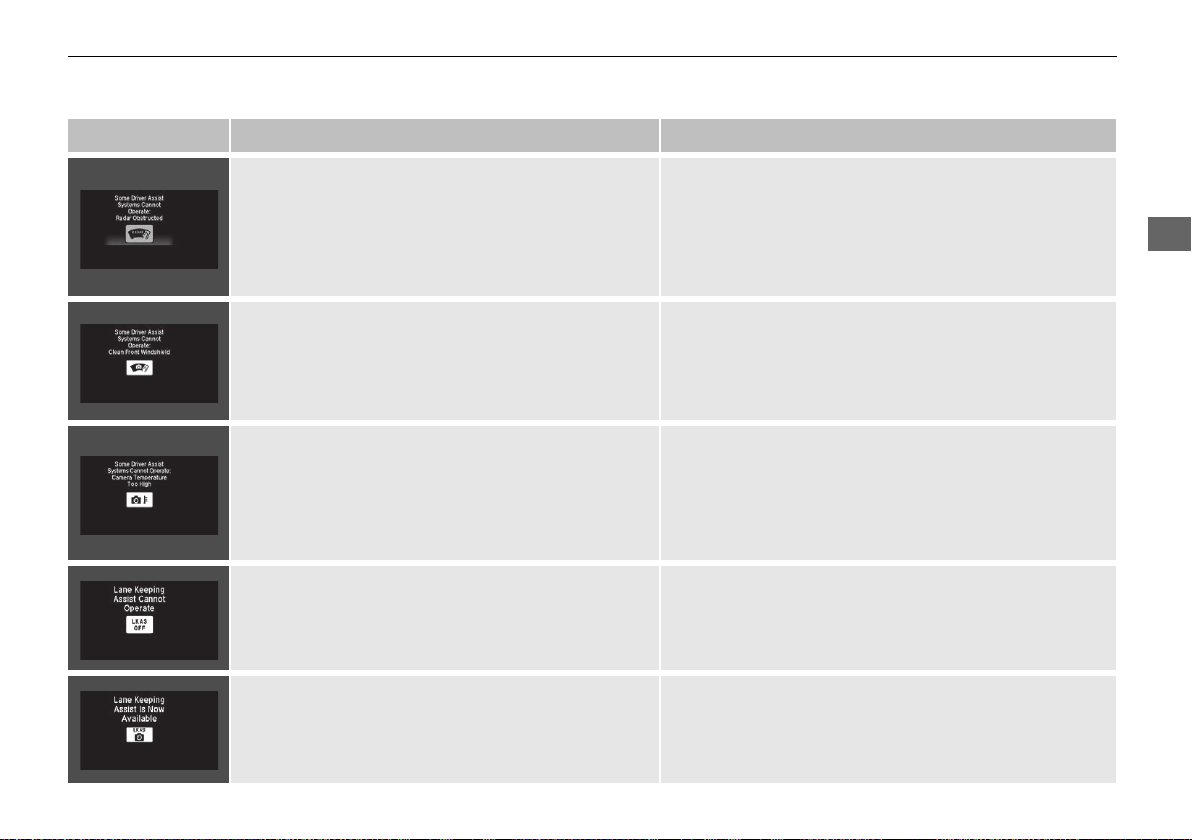
Instrument Panel
* Not available on all models
uuIndicatorsuMulti-Information Display Warning and Information Messages
Message Condition Explanation
●
Appears if anything covers the radar sensor cover
and prevents the sensor from detecting a vehicle in
front.
●
May appear when driving in bad weather (rain,
snow, fog, etc.).
●
Appears when the area around the camera is
blocked by dirt, mud, etc. Stop your vehicle in a safe
place, and wipe it off with a soft cloth.
●
May appear when driving in bad weather (rain,
●
When the radar sensor gets dirty, stop your vehicle in a
safe place, and wipe off dirt using a soft cloth.
●
Have your vehicle checked by a dealer if the message
does not disappear even after you clean the sensor
cover.
2 Adaptive Cruise Control (ACC)* P. 433
●
Have your vehicle checked by a dealer if the message
appears again after you cleaned the area around the
camera.
snow, fog, etc.).
●
Appears if the temperature inside the camera is too
high.
●
ACC/LKAS has been automatically canceled.
●
Appears when the LKAS is in operation, or the LKAS
button is pressed, but there is a problem with a
system related to the LKAS. The LKAS cancels
●
Use the climate control system to cool down the camera.
●
Goes off - The camera has been cooled down. Pressing
the MAIN/LKAS button can resume the system.
2 Front Sensor Camera* P. 431
2 Adaptive Cruise Control (ACC)
2 Lane Keeping Assist System (LKAS)
●
If any other system indicators come on, such as the
VSA®, ABS and brake system, take appropriate action.
2 Indicators P. 76
automatically. The beeper sounds simultaneously.
*
P. 433
*
P. 452
*
●
Appears when the camera has been cooled down
and LKAS is available.
●
Pressing the MAIN/LKAS button can resume the
system.
2 Front Sensor Camera* P. 431
Continued
97
Page 100
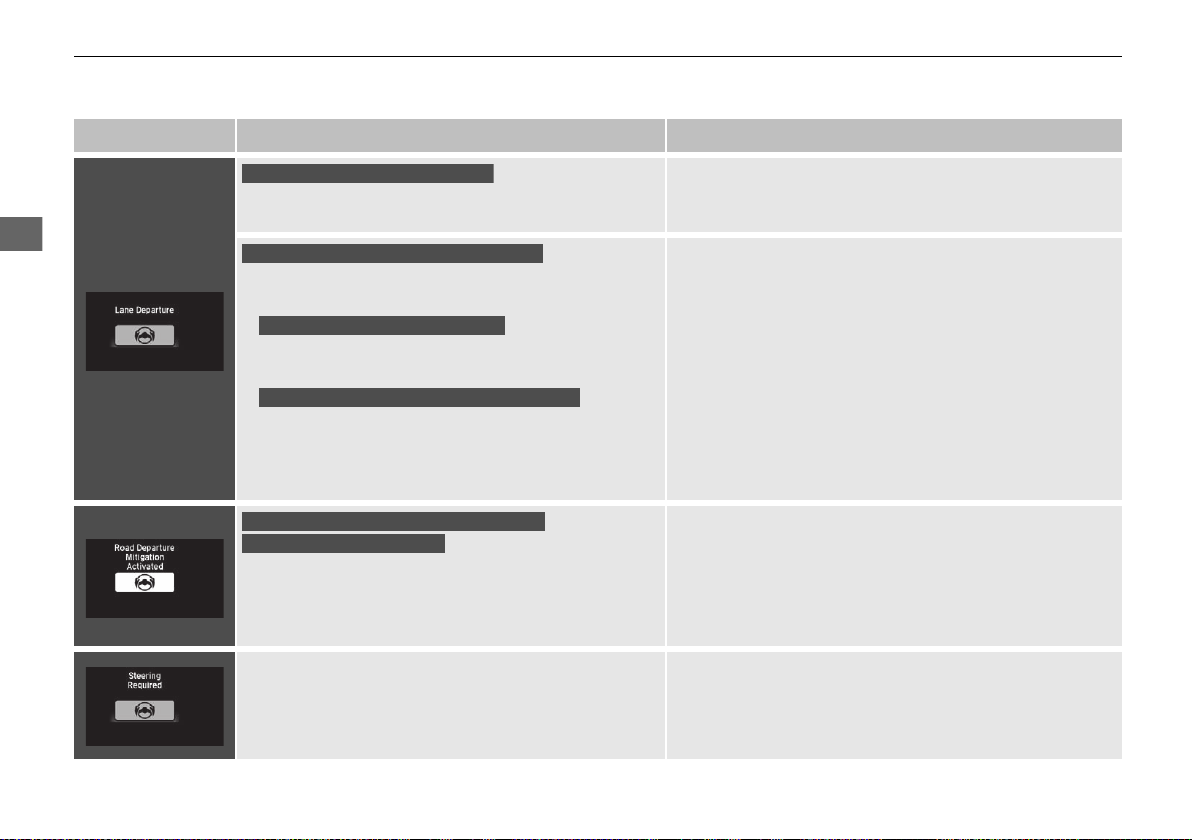
uuIndicatorsuMulti-Information Display Warning and Information Messages
Instrument Panel
Lane Keeping Assist System (LKAS)
Road Departure Mitigation (RDM) System
When you selected Warning Only
When you selected Narrow, Normal or Wide
Road Departure Mitigation (RDM) System
When you selected Narrow
* Not available on all models
Message Condition Explanation
●
Appears when the vehicle is driving out of a detected
line. The steering wheel vibrates rapidly.
●
Appears when the vehicle is driving out of a detected
line.
- The steering wheel vibrates rapidly when the
vehicle is drifting out of a detected line.
- The steering wheel vibrates rapidly when the
vehicle is drifting out of a detected line. The system
also steers the vehicle to help you remain within
your driving lane.
●
Appears when the vehicle is likely to drive out of a
detected line.
- The system steers the vehicle to help you remain
within your driving lane.
●
Blinks when you fail to steer the vehicle. The beeper
sounds simultaneously.
*
●
Keep the vehicle within the lane you are driving.
2 Lane Keeping Assist System (LKAS)* P. 452
●
Keep the vehicle within the lane you are driving.
2 Road Departure Mitigation (RDM) System* P. 447
●
You can change the setting for the road departure
mitigation system. Narrow, Normal, Wide, and
Warning Only can be selected.
2 Customized Features P. 111
—
●
Operate the steering wheel to resume the LKAS.
98
 Loading...