


INTRODUCTION
Thank you for purchasing a Honda mini-tiller.
This manual covers the operation and maintenance of the Honda FG110 mini-tiller.
We want to help you get the best results from your new tiller and to operate it safely. This manual contains the information on how to do that; please read it carefully.
This manual should be considered a permanent part of the tiller and should remain with it if it is resold.
If you have a problem or questions concerning the tiller, contact your supplying dealer.
We recommend that you read the warranty policy to fully understand your rights and responsibilities. The warranty policy is a separate document provided by your dealer.
Honda Power Equipment Mfg., Inc. reserves the right to make changes at any time without notice and without incurring any obligation.
No part of this publication may be reproduced without written permission.
SAFETY MESSAGES
Your safety and the safety of others are very important. And using this tiller is an important responsibility.
To help you make informed decisions about safety, we have provided operating procedures and other information on labels and in this manual. This information alerts you to potential hazards that could hurt you or others.
Of course, it is not practical or possible to warn you about all the hazards associated with operating or maintaining a tiller. You must use your own good judgment.
Pay special attention to statements preceded by the following words:
B DANGER
B WARNING
B CAUTION
You WILL be KILLED or SERIOUSLY HURT if you don’t follow instructions.
You CAN be KILLED or SERIOUSLY HURT if you don't follow instructions.
You CAN be HURT if you don't follow instructions.
Each message tells you what the hazard is, what can happen, and what you can do to avoid or reduce injury.
Damage Prevention Messages
You will also see other important messages that are preceded by the following word:
|
Your mini-tiller or other property can be |
|
NOTICE |
||
damaged if you don’t follow instructions. |
||
|
The purpose of these messages is to help prevent damage to your mini-tiller, other property, or the environment.
© 2004–2009 American Honda Motor Co., Inc.—All Rights Reserved
39V25012 |
|
|
|
POM39V25012 |
|
K1 |
EM5 |
IPC |
XXXXX.2009.01 |
||
00X39-V25-0120 |
|||||
PRINTED IN U.S.A. |
|||||
|
|
|
|||
OWNER’S MANUAL
FG110
BWARNING: B
The engine exhaust from this product contains chemicals known to the State of California to cause cancer, birth defects, or other reproductive harm.
CONTENTS
INTRODUCTION .......................... |
1 |
SAFETY MESSAGES................... |
1 |
TILLER SAFETY........................... |
2 |
IMPORTANT SAFETY |
|
INFORMATION........................ |
2 |
ATTACHMENTS AND |
|
MODIFICATIONS .................... |
2 |
IMPORTANT MESSAGE TO |
|
EMPLOYERS .......................... |
2 |
IMPORTANT MESSAGE TO |
|
PARENTS................................ |
2 |
SAFETY LABEL LOCATION ... |
3 |
CONTROL LOCATIONS .............. |
3 |
SETTING UP YOUR NEW TILLER4 |
|
BEFORE OPERATION................. |
4 |
ARE YOU READY TO OPERATE |
|
THE TILLER? .......................... |
4 |
IS YOUR WORKING AREA |
|
READY? .................................. |
4 |
IS YOUR TILLER |
|
READY TO GO?...................... |
4 |
OPERATION................................. |
5 |
SAFE OPERATING |
|
PRECAUTIONS....................... |
5 |
STARTING THE ENGINE........ |
6 |
STOPPING THE ENGINE ....... |
6 |
TILLER OPERATION .............. |
7 |
SERVICING YOUR TILLER ......... |
7 |
|
MAINTENANCE SAFETY........ |
8 |
|
MAINTENANCE SCHEDULE |
.. 8 |
|
ENGINE MAINTENANCE........ |
8 |
|
REFUELING .......................... |
|
11 |
TRANSMISSION LUB ............ |
12 |
|
TRANSPORTING ....................... |
|
13 |
STORAGE .................................. |
|
13 |
TAKING CARE OF UNEXPECTED |
||
PROBLEMS................................ |
|
14 |
TECHNICAL INFORMATION ..... |
15 |
|
SERIAL NUMBER LOC ........... |
15 |
|
CARBURETOR |
|
|
MODIFICATION FOR HIGH |
|
|
ALTITUDE OPERATION ....... |
15 |
|
EMISSION CONTROL |
|
|
SYSTEM ............................... |
|
15 |
SPECIFICATIONS................. |
|
16 |
CONSUMER INFORMATION .... |
16 |
|
CUSTOMER SERVICE |
|
|
INFORMATION...................... |
|
16 |
DEALER LOCATOR |
|
|
INFORMATION................... |
LAST PAGE |
|
ENGLISH
ENGLISH
FRANÇAIS
ESPAÑOL
DEUTSCH
NEDERLANDS ITALIANO
1

TILLER SAFETY
IMPORTANT SAFETY INFORMATION
Most injuries or property damage can be prevented if you follow all instructions in this manual and on the tiller. The most common hazards are discussed below, along with the best way to protect yourself and others.
Honda Tiller Usage
Honda tillers are designed to give safe and dependable service if operated according to instructions and intended use.
Honda tillers are intended to be used by an experienced, trained operator who is familiar with the use of power equipment. Do not allow a child or an inexperienced, untrained operator to use this tiller. Operating this equipment requires special effort on your part to ensure your safety and the safety of others. Read and understand this owner’s manual.
Avoid Rotating Tines
The rotating tines can cause injury. Keep away from the tine shield whenever the engine is running. If you need to adjust the tines or work around the tines for any reason, always stop the engine. Disconnect the spark plug cap if you need to clean or handle the tines.
Clear Tilling Area
The tiller tines can throw rocks and other objects with enough force to cause injury. Before tilling, carefully inspect the area and remove all large debris.
Keep Shields in Place
Guards and shields are designed to protect you from being hit by thrown objects. They also help protect you from hot engine parts and moving components. For your safety and the safety of others, keep all guards and shields in place when operating the tiller.
Refuel with Care
Petrol is extremely flammable and petrol vapor can explode. Refuel only outdoors, in a well-ventilated area, with the engine off. Never smoke near petrol, and keep other flames and sparks away. Always store petrol in an approved container.
Wear Protective Clothing
Wearing protective clothing will reduce your risk of injury. Long pants and eye protection reduce the risk of injuries from thrown objects. Sturdy shoes with aggressive soles will help protect your feet and give you better traction on slopes or uneven ground. Clothing worn by the operator should be close-fitting. Loose clothing should not be permitted because it may get caught in moving parts. Tie up or restrain long hair.
Turn Engine Off When Not Tilling
If you need to leave the tiller for any reason, even just to inspect the area ahead, always stop the engine.
ATTACHMENTS AND MODIFICATIONS
Do not make any modifications to your tiller. Modifying your tiller, or installing non-Honda attachments, can make your tiller unsafe.
If you need attachments for your tiller, use only Honda Genuine attachments. These products have been designed for your tiller.
Non-Honda attachments are usually designed for universal applications. Although aftermarket attachments may fit on your tiller, they may not meet factory specifications and could make your tiller unsafe.
IMPORTANT MESSAGE TO EMPLOYERS
As an employer, you have special responsibilities to the people who work for you.
Before you ask anyone to operate this tiller, you need to determine whether the person is old enough, large enough, and strong enough to safely handle and control the tiller.
If you decide the person is, make sure the employee reads and understands all instructions and warnings in this manual, and on the labels before operating the tiller.
Allow adequate time for hands-on training by a qualified instructor, and personally supervise practice sessions until you feel sure the employee is ready to operate the tiller.
Also be sure employees wear proper clothing and have eye protection and any other gear that may be required by local ordinances or your insurance company.
Remember, too, that you are responsible for keeping the tiller properly maintained and in safe operating condition.
Your commitment to safety on the job can help prevent injuries and result in longer and more productive years of service.
IMPORTANT MESSAGE TO PARENTS
Your child’s safety is very important to Honda. Read this message if you decide to permit your child to operate this tiller. Tillers are tools, not toys. As with any equipment, bad judgements can result in serious injuries. You can prevent injuries by making good decisions about if, when, and how your child operates this equipment.
The first question you’ll need to ask is whether your child is capable of operating this tiller safely. Remember, young people vary widely, and AGE IS NOT THE ONLY FACTOR. Physically, a child must be LARGE ENOUGH AND STRONG ENOUGH to easily start the tiller and control its direction. The child also needs enough size, strength, and coordination to comfortably reach and operate the controls.
Another, tougher question you need to ask is if your child has enough MATURITY AND RESPONSIBILITY to safely operate this tiller. Does the young person think through problems and come to logical solutions? Anyone who takes unnecessary risks and does not obey rules should not operate this tiller.
If you decide that your child can handle the tiller safely, carefully read the owner’s manual with him or her. Make sure you both understand all instructions and safety information. Also, be sure your child wears sturdy shoes and other protective clothing when operating or handling the tiller.
SUPERVISION is also very important. Walk with your child during the first few minutes of tilling. Even after he or she has become confident with the tiller, do not let the child use the tiller without good adult supervision. An adult should also be present during refueling and maintenance. In fact, it’s up to the adult owner to make sure the tiller is properly maintained and kept in safe operating condition.
By always placing safety first, your child will acquire useful skills and a sense of accomplishment. And you’ll both get the best results from your tiller.
2 |
ENGLISH |

SAFETY LABEL LOCATION |
|
CONTROL LOCATIONS |
|
||||
The label shown here contains important safety information. Please |
|
|
|||||
read it carefully. This label is considered a permanent part of your |
|
|
|||||
tiller. If the label comes off or becomes hard to read, contact your |
[12] PAGE 6 |
[13] |
|||||
authorized Honda servicing dealer for a replacement. |
|||||||
|
|
||||||
|
|
|
|
|
[11] PAGE 6 |
|
|
Letter |
Markings |
Meaning |
|
||||
|
|
|
|
|
|
|
|
|
|
|
|
|
|
|
|
A |
|
|
|
|
[10] PAGE 11 |
|
|
|
|
|
|
|
|
|
|
|
|
Read and understand |
|
[1] PAGE 6 |
|
|
|
|
|
the owner’s manual |
|
|
|
|
|
|
|
and the operation of all |
|
|
|
|
|
|
|
controls before using |
|
|
|
|
|
|
|
the machine. |
|
|
|
|
|
|
|
Carbon monoxide gas |
|
|
|
|
|
|
|
is toxic. Breathing it can |
|
|
|
|
|
|
|
cause |
|
|
|
|
|
|
|
unconsciousness and |
|
|
|
|
|
|
|
even kill you. Never run |
|
|
|
|
|
|
|
the engine in a closed, |
|
|
|
|
|
|
|
or even partly closed, |
|
[2] PAGE 7 |
[3] PAGE 4 |
|
|
|
|
area where people may |
|
|
|
||
|
|
be present. |
|
|
|
|
|
|
|
Contact with rotating |
|
|
|
|
[9] PAGE 8 |
|
|
tines will cause serious |
|
|
|
|
|
|
|
injury. Keep hands, |
|
|
|
|
|
|
|
feet, and clothing away |
|
[A] |
|
|
|
|
|
while the engine is |
|
|
|
|
|
|
|
|
|
|
|
|
|
|
|
running. |
|
|
|
|
|
|
|
|
[4] PAGE 5 |
|
|
[8] |
|
PRODUCT IDENTIFICATION PLATE |
|
|
|
|
|
||
1. Permissible sound power |
|
4. Year of manufacture |
[5] PAGE 9 |
|
|
|
|
level according to Directive |
5. Weight in kilograms |
|
|
|
|||
|
|
|
|
|
|||
2000/14/EC |
|
6. Serial number |
|
|
|
|
|
2. Conformity mark, according |
7. Model |
|
[B] |
|
|
|
|
8. Manufacturer’s name and |
|
|
|
|
|||
to the EEC/89/392 modified |
|
|
|
[7] |
|||
address |
|
|
|
|
|||
Directive |
|
|
|
|
|
||
3. Nominal power in kilowatts |
|
|
[6] PAGE 5 |
|
|
||
|
|
|
|
|
|
||
|
|
8 |
|
|
|
|
|
|
|
7 |
|
|
|
|
|
B |
|
6 |
|
|
|
|
|
|
5 |
|
|
|
|
|
|
|
|
4 |
A |
Safety label |
|
B |
Identification plate |
|
|
|
|
||||
1 |
2 |
3 |
1 |
Engine switch |
7 |
Tine shield |
|
|
|
|
|||||
|
|
|
2 |
Throttle lever |
8 |
Carrying handle |
|
|
|
|
3 |
Handlebar knobs |
9 |
Engine oil filler cap/dipstick oil |
|
|
|
|
|
|
|
|
drain |
|
|
|
4 |
Transport wheels |
10 |
Fuel cap |
|
|
|
|
|
(drag bar not shown) |
|
|
|
|
|
|
5 |
Air cleaner |
|
11 |
Priming bulb |
|
|
|
6 |
Tilling tines |
|
12 |
Choke lever |
|
|
|
|
|
|
13 |
Recoil starter grip |
|
|
ENGLISH |
|
|
|
3 |
|
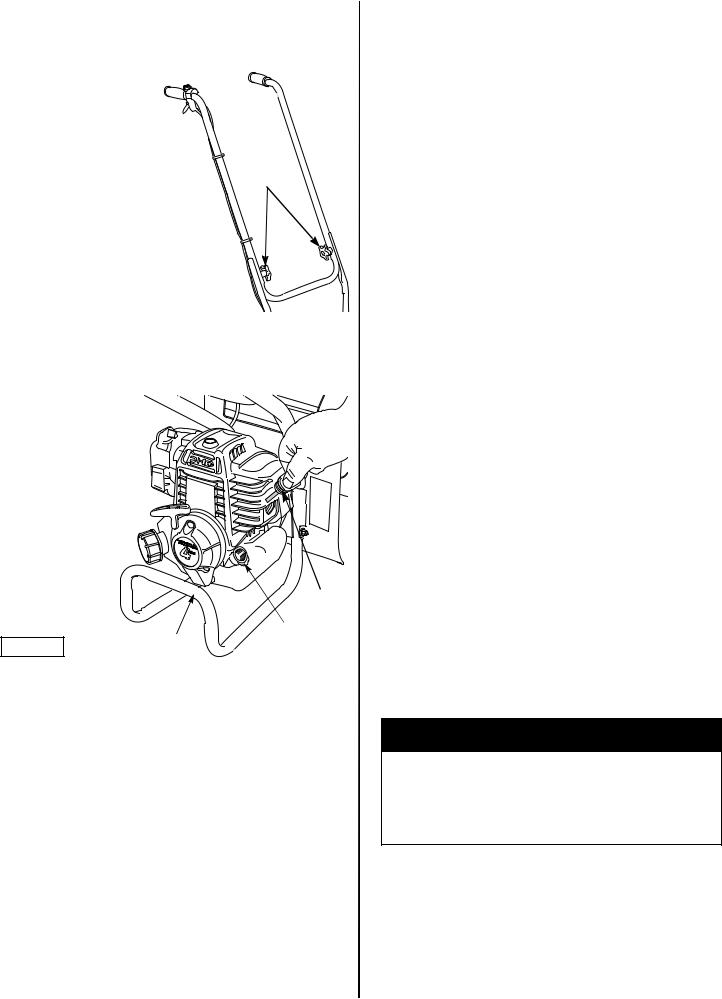
SETTING UP YOUR NEW TILLER BEFORE OPERATION
UNPACKING |
|
|
ARE YOU READY TO OPERATE THE TILLER? |
|
1. Carefully remove the tiller |
|
|
Your safety is your responsibility. A little time spent in preparation will |
|
from the carton. |
|
|
significantly reduce your risk of injury. |
|
2. Unfold the tiller upper handle |
|
|
Read and understand this manual. Know what the controls do and |
|
to the operating position as |
|
|
how to operate them. |
|
shown. Be careful not to |
|
|
Familiarize yourself with the tiller and its operation before you begin |
|
crimp or pinch the engine |
|
|
||
|
|
using it. Know how to quickly shut off the engine in case of an |
||
switch wires and throttle |
|
|
||
|
[1] |
emergency. |
||
cable. |
|
|||
|
|
You must be alert and in good physical condition to operate the tiller. |
||
3. Tighten the handle knobs [1] |
|
|
||
|
|
Do not operate the tiller if you are tired, ill, or under the influence of |
||
to secure the handle in the |
|
|
alcohol, medication, or any substance that might impair your vision, |
|
correct operating position. |
|
|
dexterity, or judgment. |
|
|
|
|
If you have any physical problem that may be aggravated by |
|
|
|
|
strenuous work, consult your physician before operating the tiller. |
|
|
|
|
Wearing protective clothing will reduce your risk of injury. Do not wear |
|
ADDING OIL |
|
|
loose clothing, jewelry, short pants, sandals, or go barefoot. Secure |
|
|
|
hair so it is above shoulder level. |
||
The tiller is shipped WITHOUT OIL in the engine. |
|
Wear gloves, a long-sleeved shirt, and long pants made of heavy |
||
|
material. Clothing should fit closely but allow freedom of movement, |
|||
Add oil to the tiller before attempting to start the engine. See page 9 |
||||
and should have no strings, straps, etc. that could catch on brush or |
||||
for engine oil recommendation. |
|
|
||
|
|
the tiller. Keep clothing fastened. |
||
1. Working on a level |
|
|
||
|
|
Wear sturdy work boots with good toe protection and nonslip soles. |
||
surface, tip the tiller |
|
|
||
|
|
IS YOUR WORKING AREA READY? |
||
on its carrying |
|
|
||
handlebar [2] as |
|
|
Objects thrown by the tiller can cause serious injury. Before operating |
|
shown. |
|
|
||
2. Remove the oil filler |
|
|
the tiller, carefully inspect the area, and remove all objects that could |
|
|
|
be thrown by, or entangled in, the tilling attachment, such as rocks, |
||
cap/dipstick [4]. |
|
|
||
|
|
broken glass, nails, wire, or string. |
||
|
|
|
||
3. Slowly add the |
|
|
Never operate the tiller without good visibility or light. |
|
recommended oil |
|
|
Clear the area of children, bystanders, and pets. Keep all children, |
|
(page 9) to the |
|
|
||
|
|
bystanders, and pets at least 15 meters away from where the tiller is |
||
bottom edge of the |
|
|
||
|
|
being operated. |
||
oil fill hole [3]. Do |
|
|
||
|
|
If anyone approaches you while you are operating the tiller, release |
||
not overfill, as the |
|
|
||
engine oil tank |
|
[4] |
the throttle lever and stop the engine. |
|
capacity is small. |
|
[3] |
IS YOUR TILLER READY TO GO? |
|
|
[2] |
|||
NOTICE |
|
For your safety, and to maximize the service life of your equipment, it |
||
|
|
|||
Running the engine |
|
|
is very important to take a few moments before you operate the tiller |
|
with too little or too much oil can cause engine damage. This type |
to check its condition. Be sure to take care of any problem you find, or |
|||
of damage is not covered under warranty. |
|
have your servicing dealer correct it, before you operate the tiller. |
||
4. Screw in the oil filler cap/dipstick [4] securely. |
|
B WARNING |
||
FUEL |
|
|
||
Refer to page 11. |
|
|
Improperly maintaining this tiller, or failing to correct a |
|
BEFORE USING YOUR TILLER |
|
problem before operation, could cause a malfunction in which |
||
|
you could be seriously injured. |
|||
Before using the tiller, all tiller operators must read the following |
Always perform a pre-operation inspection before each |
|||
chapters and sections: |
|
|
operation, and correct any problem. |
|
• TILLER SAFETY (page 2).
• CONTROL LOCATIONS (page 3).
• BEFORE OPERATION (page 4).
• OPERATION (page 5).
• MAINTENANCE SCHEDULE (page 8).
4 |
ENGLISH |
Safety Inspection |
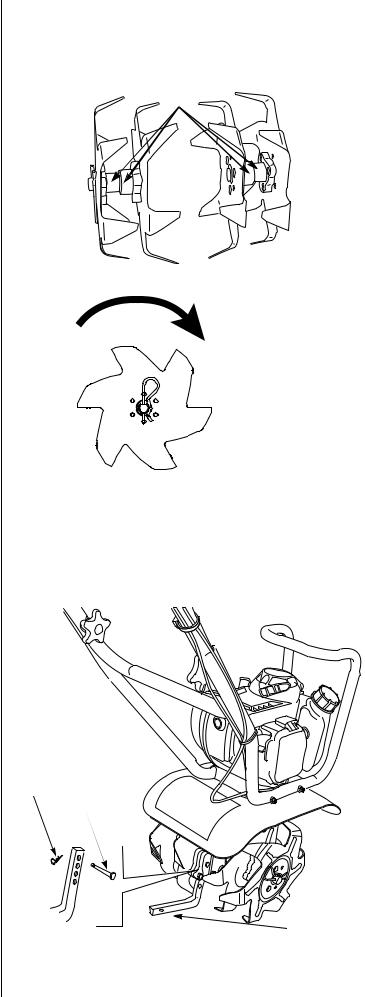
Tine Installation |
|
• Look around the engine for signs of oil or petrol leaks. Wipe up any |
Make sure the tines are installed properly with the blades angled |
|
spills before starting the engine. |
inward and the tine spacers [1] facing each other. The leading edge of |
|
• Replace any damaged parts. |
each blade is slanted. |
|
Viewed from the front. |
||
• Check that all fasteners are in place and secure. Tighten as |
||
|
||
necessary. |
[1] |
Tiller Tine Inspection
•Look for signs of damage to the tilling tines (or any accessory installed). Replace any tiller tines and parts that are worn out, bent,
cracked, chipped, or damaged in any way.
•When using an accessory, make sure it is properly installed and securely fastened (see attachment installation instructions).
•Check that the debris shield is securely installed and in good condition.
Maintenance Inspection
•Check the oil level (page 8). Running the engine with a low oil level can cause engine damage.
•Check the air filter (page 9). A dirty air filter will restrict air flow to the carburetor, reducing engine and tiller performance.
•Check throttle operation (page 11). The throttle must operate smoothly for good throttle control.
• Check the fuel level (page 11). Starting with a full tank will |
FORWARD |
|
help to eliminate or reduce operating interruptions for |
||
|
||
refueling. |
|
|
OPERATION |
|
|
SAFE OPERATING PRECAUTIONS |
Drag Bar Installation |
|
Before operating the tiller for the first time, please review |
||
1. Make sure the engine is OFF before installing the drag bar. |
||
IMPORTANT SAFETY INFORMATION (page 2) and BEFORE |
||
2. Remove the lock pin [1] and the 6 x 25 mm clevis pin [2]. |
||
OPERATION (page 4). |
||
Even if you have operated other tillers, take time to become familiar |
3. Install the drag bar [3] angled to the rear. Adjust the height to one |
|
with the operation of this tiller’s controls and handling. |
of 4 height positions and insert the 6 x 25 mm clevis pin. Secure |
|
For your safety, avoid starting or operating the engine in an enclosed |
with the lock pin. |
|
|
||
area, such as a garage. Your engine’s exhaust contains poisonous |
|
|
carbon monoxide gas which can collect rapidly in an enclosed area |
|
|
and cause illness or death. |
|
|
If the tiller starts to shake or vibrate, stop the engine immediately. |
|
|
After the tiller tines have completely stopped, inspect them to |
|
|
determine the cause of the vibration. Sudden vibration is a sign of a |
|
|
hazardous problem, such as a loose or damaged tilling tines (or tiller |
|
|
attachment), hidden objects in the soil, or the ground that is too hard |
|
|
to till. Do not operate the tiller until the problem is corrected. |
|
|
Prolonged exposure to vibration may cause hand/arm vibration |
|
|
syndrome (HAVS). Symptoms include loss of skin color in the hands |
|
|
and numbness or a painful tingling sensation in the fingers, hands, |
[1] |
|
and arms. Regular users of any power equipment may feel the |
[2] |
|
numbness or pain spontaneously, at any time, not just after using the |
|
|
equipment. If any of these symptoms occur, see a physician |
|
|
immediately. |
|
[3]
When your tilling job is completed, reinstall the transport wheels onto the drag bar.
ENGLISH |
5 |
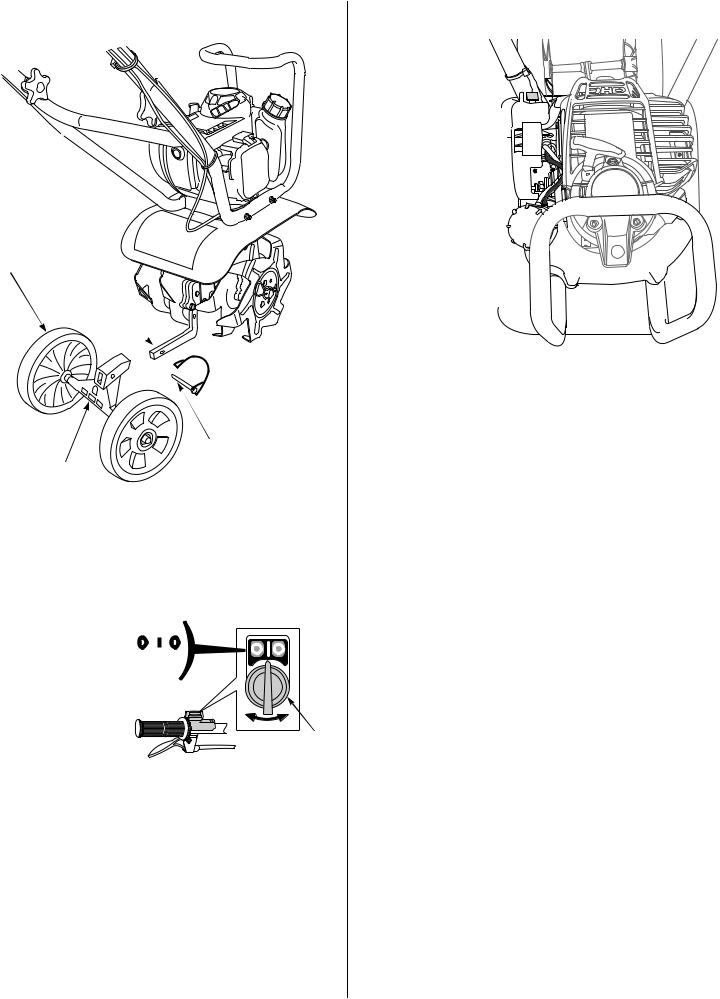
Moving the Tiller
Do not transport the tiller with the engine running.
[1][3]
To restart a warm engine, leave the choke lever down in the OPEN position.
[2]
[3]
[4]
[5]
[6]
[4]
[2]
The tiller has transport wheels [1] to allow easy maneuvering to and from the work area. Install the transport wheels by inserting the wheel mount [2] onto the drag bar [3]. Secure with the locking clevis pin [4].
See TILLER OPERATION (page 7) for additional information. Before tilling, remove the transport wheels from the drag bar.
STARTING THE ENGINE
1. Move the engine switch [1] to the ON position.
OFF ON OFF
[1]
2.To start a cold engine, move the choke lever [2] up to the CLOSED (E) position.
3.To start a cold engine, or after refueling an engine that has run out of fuel, press the priming bulb [4] repeatedly until fuel can be seen in the clear-plastic fuel-return tube [5].
To restart a warm engine, it is not necessary to press the priming bulb.
4.Place your left hand on the carrying handle [6] and hold it firmly. Make sure your feet are away from the tiller tines. With your right hand, pull the starter grip [3] lightly until you feel resistance, then pull briskly. Return the starter grip gently.
5.If the choke lever was moved to the CLOSED (E) position, gradually move it to the OPEN position as the engine warms up.
Allow the engine to warm up for a few moments after starting a cold engine.
The tiller tines should not rotate with the engine idling. If there is rotation at idle, adjust the idle speed (page 11) before using the tiller.
STOPPING THE ENGINE
1. Release the throttle lever [2].
2. Move the engine switch [1] to
OFFON OFF
the OFF position.
 [1]
[1]  [2]
[2]
6 |
ENGLISH |
 Loading...