

Page 1
Quick Reference Guide
Kurzanleitung
Guide d‘initiation rapide
ND 280
Mai 2009
Page 2
ND 280
mm
Tolerancing ISO 8015
ISO 2768 - m H
< 6 mm: ±0.2 mm
10°
127
ID 654 020-01
Page 3
ND 280
1 2 3 X32 X31 X1
Page 4
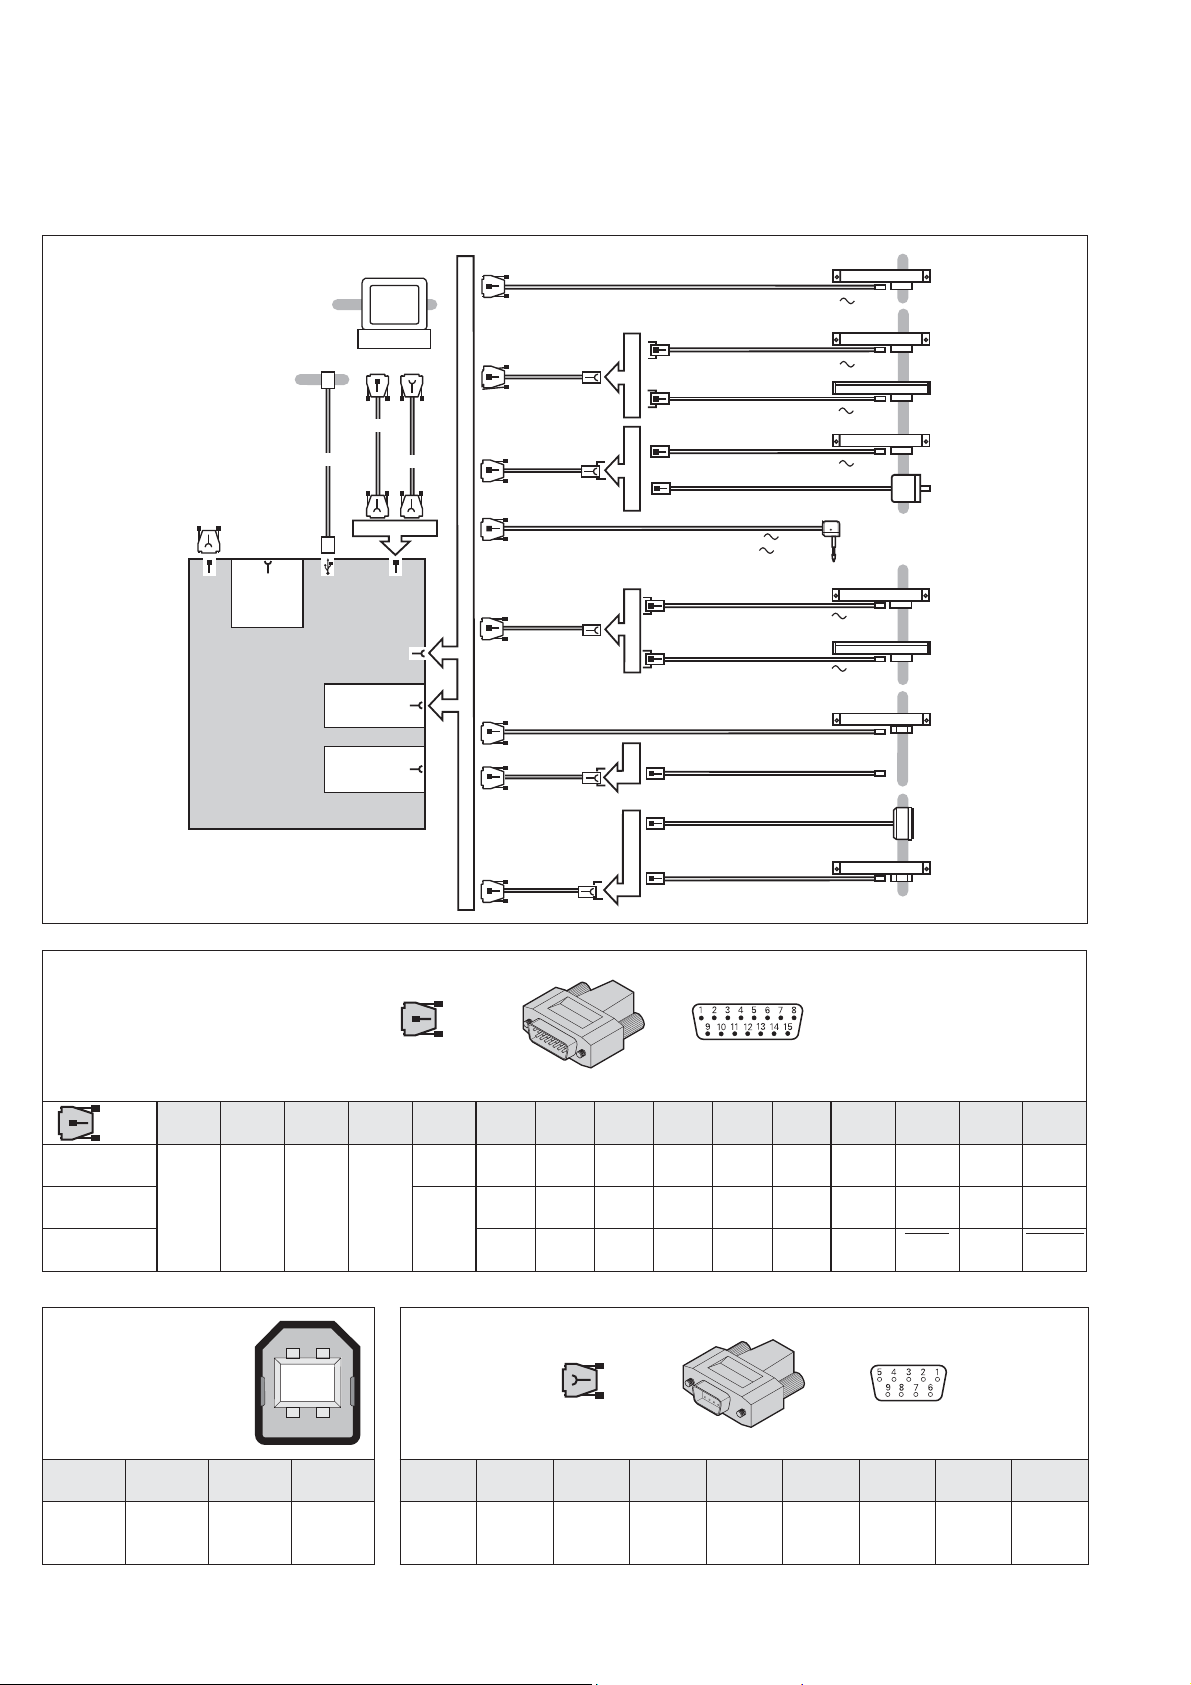
ND 280
Switching inputs/outputs
315 650-06
2)
X41
Ethernet
module
654 019-01
X26
ND 280
ND 287
2)
only for ND 287
3)
Option, only for ND 287
5m
354 770-xx
3)
USB
Typ B
X2
X2
20m
X32
2. Encoder
module
654 017-01
654 018-01
25-pin 9-pin
368 017-xx
9-pin
V.24/
RS-232-C
oder
Analog module
PC
366 964-xx
X31
X1
3)
3)
15-pin
309 784-xx
310 196-xx
653 231-xx
524 599-xx
324 544-xx
12-pin
12-pin
LS 303:
LS 603:
9-pin
619 884-xx
8-pin
17-pin
387 287-xxLS:
344 228-xx
LS:
344 451-xx MSS
310 127-xx
LB:
310 126-xx MSS
360 645-xxLS:
310 125-xx
310 124-xx MSS
310 573-xx
310 731-xx MSS
533 661-xx
533 631-xx
11 µA
1)
1)
1 V
9m
1 V
PP
30m
1 V
PP
1 V
PP
1 V
PP
PP
PP
1)
11 µA
1)
11 µA
LC x83
EnDat
1m
EnDat
LC x83
EnDat
30m
PP
PP
20m
30m
X1
» 1 V
PP
» 11 µA
EnDat / / / / / / DATA
X32
USB (Type B; UART)
1234
V
CC
+ 5 V
412210619311147513815
UPSensor
U
PP
P
0 V Sensor
0 V
/A+A–B+B–R+R–/ / / /
Inside
I
I
I
I
I
1+
1–
2+
2–
I
0+
0–
////
shield
12
43
X31
V.24/RS-232-C
123456789
D– D+ GND
/ RXD TXD DTR Signal
DSR RTS CTS /
GND
DATA CLOCK CLOCK
Page 5

ND 280
Setup
For detailed description, see www.heidenhain.de
Before Switch-On
Electrical connection
Line voltage 100 - 240 Vac
Power frequency 50 - 60 Hz (± 2 Hz)
Power consumption † 30 W
Line fuse 2 x T500 mA
Wiring the power connector
L N
L: Phase (brown)
N: Neutral (blue)
: Grounding conductor (yellow/green)
Caution: Changes to the power
cable may be made only by an
electrical technician.
Danger of electrical shock!
Do not open the unit.•
The protective ground connection •
must never be interrupted, not even if
a network adapter is used.
Danger to internal components
Do not engage or disengage any •
connecting elements while the unit is
under power.
Use only original fuses.•
Connections
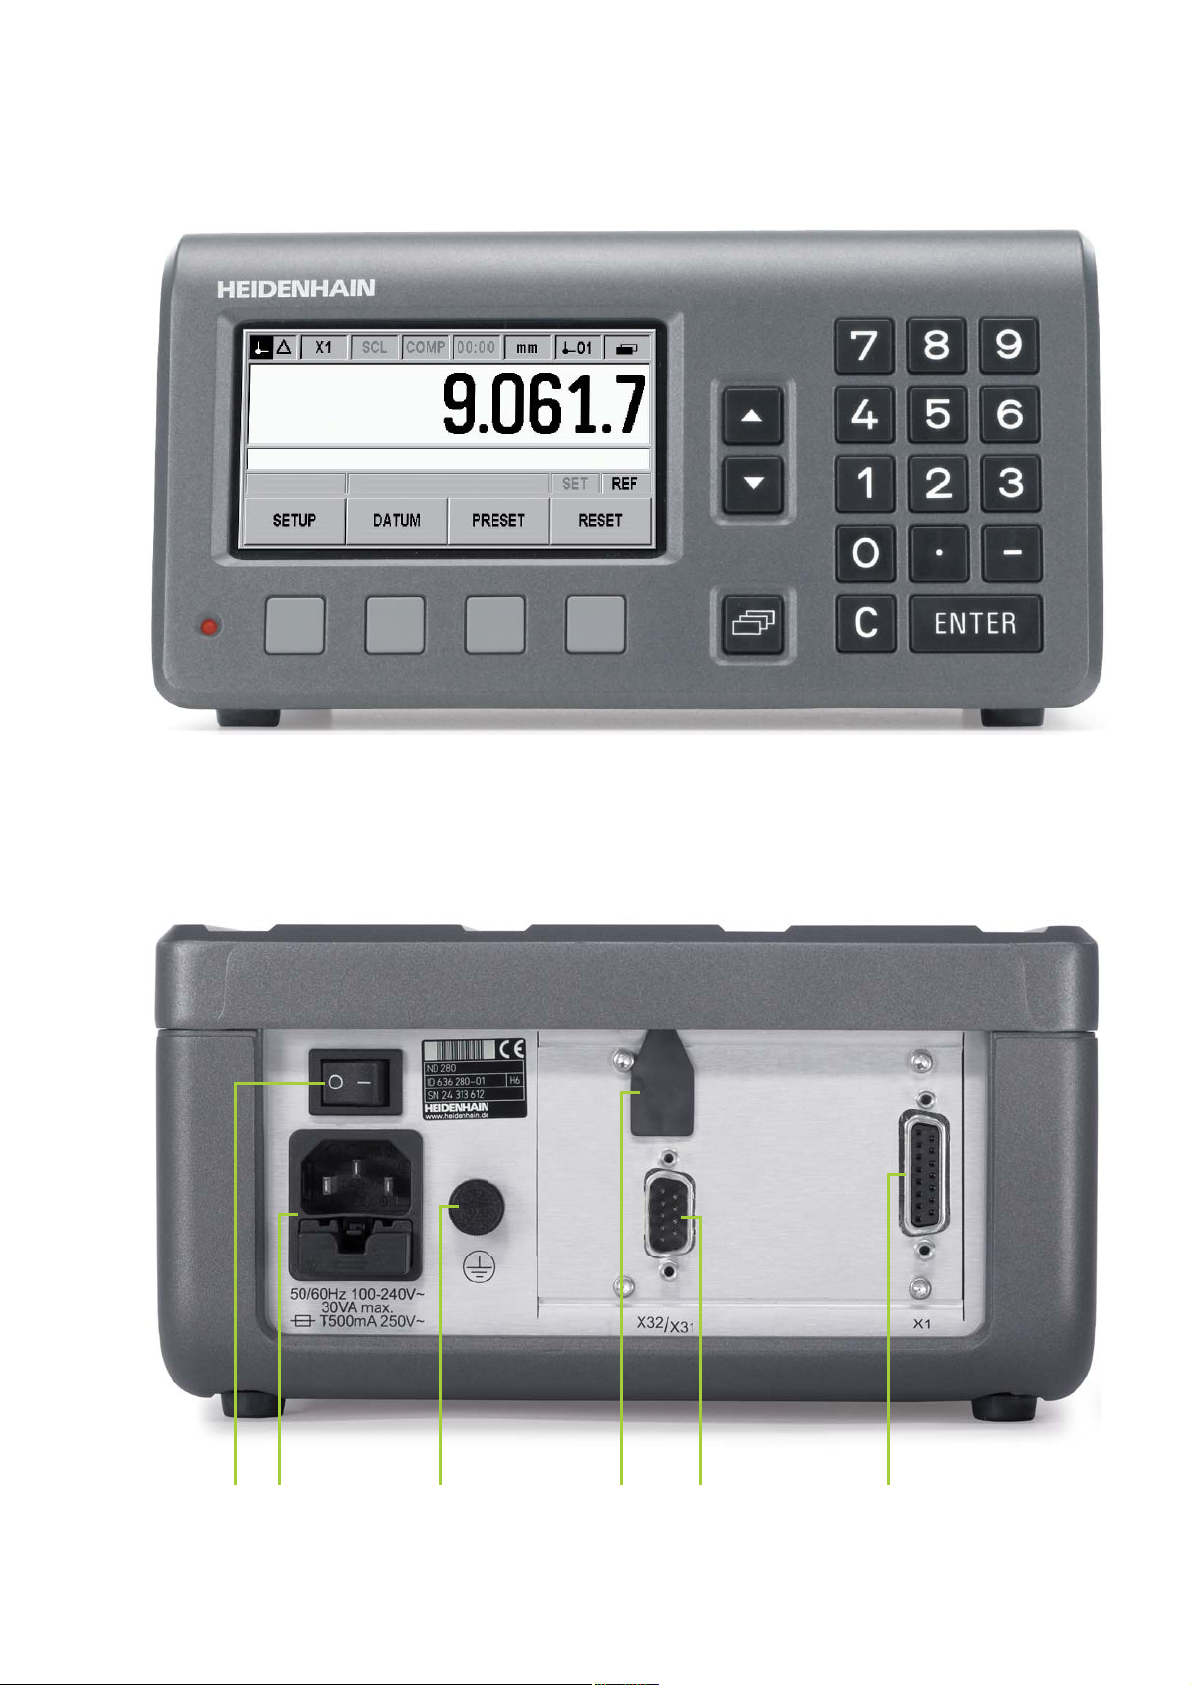
Controls and Displays
Position display
1.
2. Soft keys for functions
3. Message line for displaying
information, error messages, and
information on samples or temperature
Confi rms an entry and returns
to the previous screen.
Deletes an entry, acknowledges
an error message, or returns
to the previous screen.
Moves through the soft-key
pages.
4. Status bar
Operating mode: Actual Value
(active) – Distance-To-Go
(selectable by soft key)
Input: X1
Scale factor (inactive; can be
activated via Job Setup)
Error compensation (inactive;
can be activated via Installation
Setup)
Stopwatch (inactive; can be
activated via Job Setup)
Unit of measure: mm (active),
inch, DEG, DMS or rad
(selectable by soft key)
Very important
Please note
For your information
Initial Operation
The position display unit must be
set up properly during initial operation,
or when an encoder is exchanged.
Only this way the unit can be adapted
to the encoder requirements in order
to ensure that the movements are
displayed correctly.
Power Up
1. Connect the components.
2. Connect the ND to the network.
3. Press the power switch to switch the
ND on. The initial screen appears:
4. Select the language.
Press the soft key repeatedly until the
proper language appears. Press the
HELP soft key to call the integrated
help system in your language. The help
system provides support for all further
entries and functions.
Integrated Help System
Power switch
1
2 Power connection with fuse
3 Ground (protective ground)
X1 Encoder input for HEIDENHAIN
encoder with 11-µApp, 1-Vpp or
EnDat-2.2 interface
X31 RS-232-C/V.24 interface
X32 USB Type B (UART) interface
Datum point 1 (active) or 2
(selectable by soft key)
Soft-key page (page 1 active,
3 pages are available, use the
navigation key to move
through the pages)
5. Status display
Datum setting (fl ashes when a
value is entered)
Reference-mark evaluation
(active)
Press the HELP soft key to call the
integrated help system. It provides
information and assistance (in the
language of your country) for the current
operation in any situation.
Press the LIST OF TOPICS soft key to
view information on any topic.
Use the PAGE UP/DOWN soft keys to
scroll one page up or down, and the
arrow keys to move one line up or
down. Press the C key to return to the
previous screen.
1
Page 6

ND 280
Setup
For detailed description, see www.heidenhain.de
Installation Setup
1. Press the soft key shown in the
fi gure above.
2. Press the soft key shown in the fi gure
above and enter the passcode 95148.
Operating Parameters
Important parameters are in bold type.
1. Encoder Setup
Encoder Type• (linear, rotary).
Encoder Signal: Automatically •
determined.
Signal Period:• Depends on the
encoder.
Reference Mark:• Depends on the
encoder.
Count Direction:• Select the proper
count direction.
Error Monitor (as required).•
2. Display Confi guration
Set the display resolution.•
3. Counter Settings
Lock or release the keypad.•
Second decimal point (after 3 decimal •
places).
Reset all parameters to factory default •
settings.
Job Setup
Press the SETUP soft key to open the
menu.
1. Units
Select mm or inches, or degrees/minutes/
seconds (DMS), decimal degrees (DEG)
or rad (display in status bar).
2. Scale Factor
Deactivate the scale factor, or select the
desired scale factor (display in status bar).
3. Value for Datum Point
Enter numerical value for datum setting
over switching input or with PRESET
soft key.
4. Stopwatch
Start the stopwatch (elapsed time is
displayed in status bar).
5. Console Adjustment
Select the brightness and activate the
display saver.
6. Language
Select the proper conversational
language.
Before starting a measurement
Ensure that the distance or angle
actually traversed matches the displayed
value and direction. Deviations may be
due to the following causes:
Signal period•
Counting direction •
Error compensation•
Scale factor•
Distance-to-go display•
Functions
REF Reference Mark Evaluation
The ND 280's REF reference mark
evaluation feature automatically
re-establishes the relationship between
axis-slide or measuring-probe positions
and display values that you last defi ned
by setting the datum.
If you do not use the REF feature,
the datums will be lost once the ND is
switched off.
Actual Value/Distance-To-Go
In the Actual Value operating mode, the
ND always displays the current actual
position of the encoder, relative to the
active datum.
In the Distance-To-Go operating mode,
you enter the desired nominal position
and simply traverse to the display value
zero.
The distance-to-go is displayed with
a reversed algebraic sign. For example,
the distance-to-go has a positive sign if
the axis direction from the actual towards
the nominal position is negative.
I: Actual position
S: Nominal position
R: Distance-to-go
4. Error Compensation
Error Compensation:• Select OFF,
Linear or Non-linear, and enter the
data.
5. Interface Settings
As required.
6. Diagnostics
As required.
2
DR. JOHANNES HEIDENHAIN GmbH
Dr.-Johannes-Heidenhain-Straße 5
83301 Traunreut, Germany
{ +49 (8669) 31-0
| +49 (8669) 5061
E-mail: info@heidenhain.de
www.heidenhain.de
Page 7

ND 280
Einrichten
Ausführliche Beschreibung siehe www.heidenhain.de
Vor dem Einschalten
Elektrischer Anschluss
Netzspannung 100 bis 240 V~
Netzfrequenz 50 bis 60 Hz
(± 2 Hz)
Leistungs aufnahme † 30 W
Netzsicherung 2 x T500 mA
Anschluss des Netzsteckers
L N
L: Phase (braun)
N: Nullleiter (blau)
: Schutzleiter (gelb/grün)
Achtung: Änderungen am Netz-
kabel nur durch Elektrofachkraft!
Stromschlaggefahr!
Gerät nicht öffnen.•
Schutzleiter darf nie unterbrochen •
sein, auch nicht bei Anschluss über
Netzadapter.
Gefahr für interne Bauteile
Steckverbindungen nur bei ausge-•
schaltetem Gerät herstellen oder lösen.
Nur Originalsicherungen verwenden.•
Anschlüsse
Anzeige- und Bedienelemente
Positionsanzeige
1.
2. Softkeys für Funktionen
3. Hinweiszeile für Hinweise, Stich-
probenanzeige, Temperatur, Fehlermeldungen
4. Statutsleiste
Bestätigen der Eingabe und
Rückkehr zum vorherigen Bildschirm
Löschen des Eintrags, Quittie-
ren der Fehlermeldung oder
Rückkehr zum vorherigen Bildschirm
Umschalten der Softkey-
Ebenen
Betriebsart: Istweg (aktiv) –
Restweg (umschalten über
Softkey)
Eingangsanzeige: X1
Skalierfaktor (inaktiv; aktivie-
ren über BEARBEITUNG EINRICHTEN)
Fehlerkorrektur (inaktiv; akti-
vieren über SYSTEM EINRICHTEN)
Stoppuhr (inaktiv; aktivieren
über BEARBEITUNG EINRICHTEN)
unbedingt beachten
wichtig
informativ
Erstinbetriebnahme
Bei Erstinbetriebnahme und
Messgeräte-Wechsel ist es zwingend
notwendig, die Positionsanzeige einzurichten. Erst damit wird sie an das
Messgerät angepasst und die Bewegungen werden richtig angezeigt.
Gerät einschalten
1. Komponenten anschließen
2. ND an Netz anschließen
3. ND über Netzschalter einschalten.
Es erscheint der Start-Bildschirm:
4. Sprache wählen
Softkey solange betätigen, bis Ihre Landessprache erscheint. Jetzt steht Ihnen
für alle weiteren Eingaben und Funktionen unter der Softkey HILFE das inte-
grierte Hilfe-System in Ihrer Sprache
zur Verfügung.
Integriertes Hilfesystem
Netzschalter
1
2 Netzanschluss mit Sicherung
3 Erdungsanschluss
(Schutzerdung)
X1 Messgeräte-Eingang für
HEIDENHAIN-Messgerät mit
11-µAss-, 1-Vss- oder
EnDat-2.2-Schnittstelle
X31 Schnittstelle V.24/RS-232-C
X32 Schnittstelle USB Typ B (UART)
Maßeinheit: mm (aktiv), inch,
GRD, GMS oder rad (umschalten über Softkey)
Bezugspunkt 1 (aktiv) oder 2
(umschalten über Softkey)
Softkey-Ebene (Ebene 1 aktiv,
3 vorhanden; umschalten über
Taste)
5. Statusanzeige
Bezugspunkt setzen (blinkt bei
Eingabe eines Wertes)
Referenzmarkenauswertung
(aktiv)
Das integrierte Hilfesystem rufen Sie mit
den Softkey HILFE auf. Es liefert Ihnen
in Ihrer Landessprache in jeder Situation
die passenden Informationen zum aktuellen Vorgang.
Über den Softkey THEMENLISTE können Sie beliebige Themen anzeigen.
Mit den Softkeys BILD NACH UNTEN
bzw. BILD NACH OBEN blättern Sie seitenweise, mit den Pfeiltasten zeilenweise. Über die Taste C kehren Sie wieder
zum Ausgangsbildschirm zurück.
1
Page 8

ND 280
Einrichten
Ausführliche Beschreibung siehe www.heidenhain.de
System einrichten
1. Softkey betätigen
2. Softkey betätigen und Schlüsselzahl
95148 eingeben.
Die Betriebsparameter
Wichtige Parameter sind fett gestellt.
Bearbeitung einrichten
Öffnen des Menüs über den Softkey
EINRICHTEN
1. Maßeinheit
mm oder inch bzw. Grad/Minuten/Sekunden (GMS), Dezimalgrad (GRD) oder
rad wählen (Anzeige in Status leiste)
2. Maßfaktor
Ausschalten oder Faktor wählen (Anzeige in Statusleiste)
3. Wert für Bezugspunkt
Für externes Setzen über Schalteingang
oder schnelles Setzen über Tastatur.
4. Stoppuhr
Starten (Anzeige in Statusleiste)
5. Bildschirm anpassen
Helligkeit wählen und Bildschirmschoner
aktivieren
6. Sprache
Dialogsprache nachträglich ändern
Funktionen
Referenzmarkenauswertung
REF
Mit der Referenzmarkenauswertung
REF ermittelt der ND 280 automatisch
wieder die Zuordnung zwischen der
Achsschlitten- oder Messtaster-Position
und dem Anzeigewert, die Sie zuletzt
vor dem Ausschalten festgelegt haben.
Wenn Sie ohne REF arbeiten,
gehen mit dem Ausschalten der ND die
gesetzten Bezugspunkte verloren.
Istwert-/Restweg-Anzeige
In der Betriebsart Istwert zeigt der ND
immer die aktuelle Ist-Position des
Messgeräts bezogen auf den aktiven
Bezugspunkt an.
In der Betriebsart Restweg tippen Sie
die gewünschte Zielposition ein und verfahren dann den restlichen Weg einfach
auf den Anzeigewert 0.
Der Restweg wird mit umgekehrten
Vorzeichen angezeigt. So hat z.B. der
Restweg ein positives Vorzeichen beim
Verfahren in negativer Achsrichtung.
1. Messgerät defi nieren
Messgeräte-Typ wählen• (Längen-,
Winkelmessgerät)
Messgeräte-Signal: wird automatisch •
erkannt und eingetragen
Signalperiode• abhängig vom Mess-
gerät
Referenzmarke• abhängig vom Mess-
gerät
Zählrichtung• wählen
Fehlerüberwachung (nach Bedarf)•
2. Anzeige konfi gurieren
Anzeigeschritt festlegen•
3. Anwendung einstellen
Tastatursperre•
Dezimalpunkt (zusätzlich nach 3 Stel-•
len)
Rücksetzen in Auslieferungszustand•
Vor dem Messen
Vergleichen Sie vor dem Messen,
ob der tatsächlich verfahrene Weg
bzw. Winkel in Größe und Richtung mit
der Anzeige übereinstimmt. Überprüfen
Sie als mögliche Ursachen für Abweichungen:
Signalperiode•
Zählrichtung •
Fehlerkorrektur•
Maßfaktor•
Restweg-Anzeige•
4. Fehlerkorrektur
Fehlerkorrektur• wählen (aus, linear,
nichtlinear) und Werte eingeben
5. Schnittstelle einrichten
Nach Bedarf
I: Istposition
S: Sollposition
R: Restweg
6. Diagnose
Nach Bedarf
2
DR. JOHANNES HEIDENHAIN GmbH
Dr.-Johannes-Heidenhain-Straße 5
83301 Traunreut, Germany
{ +49 (8669) 31-0
| +49 (8669) 5061
E-mail: info@heidenhain.de
www.heidenhain.de
Page 9

ND 280
Confi guration
Description détaillée cf. www.heidenhain.de
Avant la mise sous tension
Raccordement électrique
Tension d‘alimentation 100 à 240 V~
Fréquence secteur 50 à 60 Hz
(± 2 Hz)
Consommation † 30 W
Fusibles 2 x T500 mA
Raccordement de la prise secteur
L N
Affi chage et éléments de
commande
Affi chage de position
1.
2. Softkeys pour les fonctions
3. Ligne de remarques pour remarques,
affi chage d‘échantillons, de la température, des messages d‘erreur
Validation de l‘introduction et
retour à l‘écran précédent
Effacer la valeur, acquitter le
message d‘erreur ou retour à
l‘écran précédent
Changer de barre de softkeys
à respecter absolument
important
à titre d‘information
Première mise en route
A la première mise en route et
pour changer de système de mesure,
confi gurer impérativement la visualisation de cotes. Nécessaire pour l‘adapter au système de mesure et affi cher
correctement les déplacements.
Mettre l‘appareil sous tension
1. Raccorder les éléments
2. Raccorder le ND au secteur
3. Mettre le ND sous tension (commu-
tateur). L‘écran de démarrage s‘affi che:
L: Phase (braun)
N: Conducteur neutre (bleu)
: Conducteur terre (jaune/vert)
Attention: Modifi cations câble
secteur seulement par professionnel!
Risque de décharge électrique!
Ne pas ouvrir l‘appareil.•
Ne pas couper le conducteur de terre, y •
com pris avec raccordement via un adaptateur secteur.
Danger pour composants internes
Ne brancher/débrancher connecteurs •
qu‘après mise hors-tension de l‘appareil.
N‘utiliser que des fusibles d‘origine.•
Raccordement
Commutateur d‘alimentation
1
2 Raccordement secteur avec
fusible
3 Mise à la terre (terre de
protection)
X1 Entrée système de mesure
pour système de mesure
HEIDENHAIN avec interface
11 µAcc, 1 Vcc ou EnDat-2.2
X31 Interface V.24/RS-232-C
4. Barre d‘état
Mode: Valeur effective (actif) –
Chemin restant (commutation
par softkey)
Affi chage entrée: X1
Facteur échelle (inactiv;
activation avec PARAMETRER
USINAGE)
Correction d‘erreurs (inactive;
activer avec PARAMETRER
SYSTEME)
Chronomètre (inactif;
activer avec PARAMETRER
USINAGE)
Unité de mesure: mm (active),
inch, GRD, GMS ou rad
(commutation par softkey)
Point d‘origine 1 (actif) ou 2
(commutation par softkey)
Barres de softkeys (barre 1
active, 3 en tout; commutation
par touche)
5. Affi chage d‘état
Initialisation du point d‘origine
(clignote lors de l‘introduction
d‘une valeur)
4. Sélectionner la langue
Appuyer sur la softkey jusqu‘à ce que
votre langue s‘affi che. Vous disposez
maintenant avec la softkey AIDE du sys-
tème d‘aide intégrée dans votre langue
pour introduire toutes les données et
pour toutes les fonctions.
Système d‘aide intégrée
Vous appelez le système d‘aide intégrée
avec la softkey AIDE. Quelle que soit la
situation, il vous renseigne dans votre
langue sur l‘étape en cours.
Avec la softkey LISTE DES RUBRIQUES,
vous pouvez affi cher tous les thèmes
que vous désirez.
X32 Interface USB type B (UART)
Exploitation des marques de
référence (active)
Avec les softkeys PAGE ARRIERE ou
PAGE AVANT, feuilletez page à page et
avec les touches fl échées, passez d‘une
ligne à une autre. Avec la touche C,
retournez à l‘écran précédent.
1
Page 10

ND 280
Confi guration
Description détaillée cf. www.heidenhain.de
Paramétrer le système
1. Appuyer sur la softkey
2. Appuyer sur la softkey et introduire le
code 95148.
Paramètres de fonctionnement
Principaux paramètres en caractères gras.
Paramétrer l‘usinage
Ouvrir menu avec softkey PARAMETRES
1. Unité de mesure
Sélectionner mm ou pouces ou degrés/
minutes/secondes (DMS), degré décimal
(GRD) ou rad (affi chage sur la barre d‘état)
2. Facteur échelle
Désactiver ou sélectionner le facteur
échelle (affi chage sur la barre d‘état)
3. Valeur pour le point d‘origine
pour initialisation externe via l’entrée à
commutation ou rapide avec le clavier.
4. Chronomètre
Start (affi chage sur la barre d‘état)
5. Réglages de l‘écran
Choisir la luminosité et activer
l‘économiseur d‘écran
6. Langue
Modifi er après-coup la langue du dialogue
Fonctions
Exploitation des marques de
référence REF
Grâce à l’exploitation des marques de
référence REF, le ND 280 rétablit automatiquement les relations entre la position du chariot ou du palpeur de mesure
et la valeur d’affi chage que vous aviez
défi nie avant la mise hors tension.
Si vous travaillez sans REF, les
points d‘origine initialisés sont perdus
lorsque le ND est mis hors tension.
Valeur effective/Chemin restant
En mode Valeur effective, le ND 280
affi che toujours la position effective du
système de mesure par rapport au point
d’origine actif.
En mode Chemin restant, vous introduisez la position-cible et parcourez simplement la course restante jusqu‘à la valeur
d‘affi chage 0.
Le chemin restant est affi ché avec
le signe inversé. Par exemple, le signe
du chemin restant est positif pour un déplacement dans le sens négatif.
1. Défi nir le système de mesure
Sélectionner le • type de système de
mesure (linéaire, angulaire)
Signal du système de mesure: Il est •
détecté et inscrit automatiquement
Période de signal• en fonction du
système de mesure
Marque de référence• en fonction du
système de mesure
Sélectionner le • sens de comptage
Contrôle d‘erreurs (si nécessaire)•
2. Paramétrer l‘affi chage
Défi nir la résolution d‘affi chage•
3. Confi gurer le compteur
Verrouillage du clavier•
Autre point décimal (après 3 digits) •
Réinitialisation à la confi guration usine•
4. Correction d‘erreurs
Sélectionner • la correction d‘erreurs
(OFF, linéaire, non-linéaire) et introduire les valeurs
5. Confi gurer l‘interface
Si nécessaire
Avant la mesure
Avant la mesure, vérifi ez si la
course réellement parcourue (ou l‘angle)
correspond bien à l‘affi chage au niveau
de la valeur et de la direction. S‘il y a une
différence, vérifi ez les causes possibles:
Période de signal•
Sens de comptage •
Correction d‘erreurs•
Facteur échelle•
Affi chage Chemin restant•
I: Position effective
S: Position nominale
R: Chemin restant
6. Diagnostic
Si nécessaire
2
HEIDENHAIN FRANCE sarl
2 avenue de la Cristallerie
92310 Sèvres, France
{ 0141 143000
| 0141 143030
E-Mail: info@heidenhain.fr
www.heidenhain.fr
Page 11

DR. JOHANNES HEIDENHAIN GmbH
Dr.-Johannes-Heidenhain-Straße 5
83301 Traunreut, Germany
{ +49 (8669) 31-0
| +49 (8669) 5061
E-mail: info@heidenhain.de
Technical support | +49 (8669) 32-1000
Measuring systems { +49 (8669) 31-3104
E-mail: service.ms-support@heidenhain.de
TNC support { +49 (8669) 31-3101
E-mail: service.nc-support@heidenhain.de
NC programming { +49 (8669) 31-3103
E-mail: service.nc-pgm@heidenhain.de
PLC programming { +49 (8669) 31-3102
E-mail: service.plc@heidenhain.de
Lathe controls { +49 (8669) 31-3105
E-mail: service.lathe-support@heidenhain.de
www.heidenhain.de
Page 12

DR. JOHANNES HEIDENHAIN GmbH
Dr.-Johannes-Heidenhain-Straße 5
83301 Traunreut, Germany
{ +49 (8669) 31-0
| +49 (8669) 5061
E-mail: info@heidenhain.de
www.heidenhain.de
DE HEIDENHAIN Technisches Büro Nord
12681 Berlin, Deutschland
{ (030) 54705-240
E-Mail: tbn@heidenhain.de
HEIDENHAIN Technisches Büro Mitte
08468 Heinsdorfergrund, Deutschland
{ (03765) 69544
E-Mail: tbm@heidenhain.de
HEIDENHAIN Technisches Büro West
44379 Dortmund, Deutschland
{ (0231) 618083-0
E-Mail: tbw@heidenhain.de
HEIDENHAIN Technisches Büro Südwest
70771 Leinfelden-Echterdingen, Deutschland
{ (0711) 993395-0
E-Mail: tbsw@heidenhain.de
HEIDENHAIN Technisches Büro Südost
83301 Traunreut, Deutschland
{ (08669) 31-1345
E-Mail: tbso@heidenhain.de
AR NAKASE SRL.
B1653AOX Villa Ballester, Argentina
{ +54 (11) 47684242
E-mail: nakase@nakase.com
AT HEIDENHAIN Techn. Büro Österreich
83301 Traunreut, Germany
{ +49 (8669) 31-1337
E-mail: tba@heidenhain.de
AU FCR Motion Technology Pty. Ltd
Laverton North 3026, Australia
{ +61 (3) 93626800
E-mail: vicsales@fcrmotion.com
BE HEIDENHAIN NV/SA
1760 Roosdaal, Belgium
{ +32 (54) 343158
E-mail: sales@heidenhain.be
BG ESD Bulgaria Ltd.
Sofi a 1172, Bulgaria
{ +359 (2) 9632949
E-mail: info@esd.bg
BR DIADUR Indústria e Comércio Ltda.
04763-070 – São Paulo – SP, Brazil
{ +55 (11) 5696-6777
E-mail: diadur@diadur.com.br
BY Belarus − RU
CA HEIDENHAIN CORPORATION
Mississauga, Ontario L5T2N2, Canada
{ +1 (905) 670-8900
E-mail: info@heidenhain.com
CH HEIDENHAIN (SCHWEIZ) AG
8603 Schwerzenbach, Switzerland
{ +41 (44) 8062727
E-mail: verkauf@heidenhain.ch
CN DR. JOHANNES HEIDENHAIN
(CHINA) Co., Ltd.
Beijing 101312, China
{ +86 10-80420000
E-mail: sales@heidenhain.com.cn
CS Serbia and Montenegro − BG
CZ HEIDENHAIN s.r.o.
106 00 Praha 10, Czech Republic
{ +420 272658131
E-mail: heidenhain@heidenhain.cz
DK TP TEKNIK A/S
2670 Greve, Denmark
{ +45 (70) 100966
E-mail: tp-gruppen@tp-gruppen.dk
ES FARRESA ELECTRONICA S.A.
08028 Barcelona, Spain
{ +34 934092491
E-mail: farresa@farresa.es
FI HEIDENHAIN Scandinavia AB
02770 Espoo, Finland
{ +358 (9) 8676476
E-mail: info@heidenhain.fi
FR HEIDENHAIN FRANCE sarl
92310 Sèvres, France
{ +33 0141143000
E-mail: info@heidenhain.fr
GB HEIDENHAIN (G.B.) Limited
Burgess Hill RH15 9RD, United Kingdom
{ +44 (1444) 247711
E-mail: sales@heidenhain.co.uk
GR MB Milionis Vassilis
17341 Athens, Greece
{ +30 (210) 9336607
E-mail: bmilioni@otenet.gr
HK HEIDENHAIN LTD
Kowloon, Hong Kong
{ +852 27591920
E-mail: service@heidenhain.com.hk
HR Croatia − SL
HU HEIDENHAIN Kereskedelmi Képviselet
1239 Budapest, Hungary
{ +36 (1) 4210952
E-mail: info@heidenhain.hu
ID PT Servitama Era Toolsindo
Jakarta 13930, Indonesia
{ +62 (21) 46834111
E-mail: ptset@group.gts.co.id
IL NEUMO VARGUS MARKETING LTD.
Tel Aviv 61570, Israel
{ +972 (3) 5373275
E-mail: neumo@neumo-vargus.co.il
IN HEIDENHAIN Optics & Electronics
India Private Limited
Chennai – 600 031, India
{ +91 (44) 3023-4000
E-mail: sales@heidenhain.in
IT HEIDENHAIN ITALIANA S.r.l.
20128 Milano, Italy
{ +39 02270751
E-mail: info@heidenhain.it
JP HEIDENHAIN K.K.
Tokyo 102-0073, Japan
{ +81 (3) 3234-7781
E-mail: sales@heidenhain.co.jp
KR HEIDENHAIN LTD.
Gasan-Dong, Seoul, Korea 153-782
{ +82 (2) 2028-7430
E-mail: info@heidenhain.co.kr
MK Macedonia − BG
MX HEIDENHAIN CORPORATION MEXICO
20235 Aguascalientes, Ags., Mexico
{ +52 (449) 9130870
E-mail: info@heidenhain.com
MY ISOSERVE Sdn. Bhd
56100 Kuala Lumpur, Malaysia
{ +60 (3) 91320685
E-mail: isoserve@po.jaring.my
NL HEIDENHAIN NEDERLAND B.V.
6716 BM Ede, Netherlands
{ +31 (318) 581800
E-mail: verkoop@heidenhain.nl
NO HEIDENHAIN Scandinavia AB
7300 Orkanger, Norway
{ +47 72480048
E-mail: info@heidenhain.no
PH Machinebanks` Corporation
Quezon City, Philippines 1113
{ +63 (2) 7113751
E-mail: info@machinebanks.com
PL APS
02-489 Warszawa, Poland
{ +48 228639737
E-mail: aps@apserwis.com.pl
PT FARRESA ELECTRÓNICA, LDA.
4470 - 177 Maia, Portugal
{ +351 229478140
E-mail: fep@farresa.pt
RO Romania − HU
RU OOO HEIDENHAIN
125315 Moscow, Russia
{ +7 (495) 931-9646
E-mail: info@heidenhain.ru
SE HEIDENHAIN Scandinavia AB
12739 Skärholmen, Sweden
{ +46 (8) 53193350
E-mail: sales@heidenhain.se
SG HEIDENHAIN PACIFIC PTE LTD.
Singapore 408593,
{ +65 6749-3238
E-mail: info@heidenhain.com.sg
SK Slovakia − CZ
SL Posredništvo HEIDENHAIN
SAŠO HÜBL s.p.
2000 Maribor, Slovenia
{ +386 (2) 4297216
E-mail: hubl@siol.net
TH HEIDENHAIN (THAILAND) LTD
Bangkok 10250, Thailand
{ +66 (2) 398-4147-8
E-mail: info@heidenhain.co.th
TR T&M Mühendislik San. ve Tic. LTD. ŞTİ.
34728 Ümraniye-Istanbul, Turkey
{ +90 (216) 3141111
E-mail: info@tmmuhendislik.com.tr
TW HEIDENHAIN Co., Ltd.
Taichung 40768, Taiwan R.O.C.
{ +886 (4) 23588977
E-mail: info@heidenhain.tw
UA Ukraine − RU
US HEIDENHAIN CORPORATION
Schaumburg, IL 60173-5337, USA
{ +1 (847) 490-1191
E-mail: info@heidenhain.com
VE Maquinaria Diekmann S.A.
Caracas, 1040-A, Venezuela
{ +58 (212) 6325410
E-mail: purchase@diekmann.com.ve
VN AMS Advanced Manufacturing
Solutions Pte Ltd
HCM City, Viêt Nam
{ +84 (8) 9123658 - 8352490
E-mail: davidgoh@amsvn.com
ZA MAFEMA SALES SERVICES C.C.
Midrand 1685, South Africa
{ +27 (11) 3144416
E-mail: mailbox@mafema.co.za
Zum Abheften hier falzen! / Fold here for fi ling!
646 227-91 · 10 · 5/2009 · H · Printed in Germany
Vollständige Adressen siehe www.heidenhain.de
For complete addresses see www.heidenhain.de
 Loading...