


AVR10 engelsk 11/01/98 10:10 Side 1
harman / kardon AVR 10
Power Headphones
harman/kardon |
Service and Parts Office: |
|
|
|
|
|
|
||
|
|
|
||
|
80 Crossways Park West, Woodbury, New York (800) 422-8027 |
|
|
|
|
8500 Balboa Blvd, Northridge CA 91329 |
|
|
|
|
A Harman International Company |
|
|
|
1111-AVR10-1 Printed in Korea
230 Volt - 11 Language Version
9007017870

AVR10 engelsk 11/01/98 10:10 Side 2
AVR10
Volume
|
|
Tune/Preset |
|
PRESET |
Seek Stereo |
|
MEM |
|
FM |
|
|
MHz |
|
Memory Tune/Preset |
|
|
|
|
VCR1 |
CD |
FM |
Surround Off |
Surround |
Tape Mon |
|
|
|
|
TV/VCR 2 |
Aux |
AM |
Bass |
Treble |
Balance |
VCR 2
harman/kardon
Audio Video Receiver |
OWNER’S MANUAL |
Audio und Video Receiver |
BEDIENUNGSANLEITUNG |
Ampli-tuner audio/vidéo |
MODE D’EMPLOI |
Receptor de audio y video |
MANUAL DEL USUARIO |
Audio/video ontvanger |
GEBRUIKSAANWIJZING |
Receptor de Audio/video |
MANUAL DE INSTRUÇÕES |
Sintoamlificatore Audio/Video |
ISTRUZIONI PER L’USO |
ƒ·‰ИФВУИЫ¯˘Щ‹˜ Audio/Video |
¢ ° ™ à ™ ™ §§ ¡ |
Audio-och videomottagare |
BRUKSANVISNING |
Audioog videoreceiver |
BRUGSANVISNING |
Audio/videovahvistin |
KÄYTTÖOPAS |

AVR10 engelsk 11/01/98 10:10 Side 1
ENGLISH |
Harman Kardon AVR10
Date of purchase
Purchased from
Address of business purchased from
Installed by
Date Installed
Serial No.
NOTE TO CATV SYSTEM INSTALLER:
This reminder is provided to call the CATV system installer’s attention to Article 820-40 of the NEC that provides guidelines for proper grounding and, in particular, specifies that the cable ground shall be connected to the grounding system of the building, as close to the point of cable entry as practical.
Thank you for choosing a Harman |
Save all packing material. |
Kardon Audio/Video Receiver. |
It is essential for shipping should you |
Your new Unit is an exceptionally |
move, or in the event the unit needs |
well-engineered product that will give |
repair. |
you years of superb performance. |
|
1
AVR10 engelsk 11/01/98 10:10 Side 2
HANDLE THE POWER
CORD GENTLY
■To disconnect the plug from the AC outlet, pull on the plug itself, not on the cord.
■Disconnect the plug from the AC outlet whenever the unit is to be left unused for an extended period of time.
■Do not place furniture or other heavy objects on the cord, and avoid dropping heavy objects on it. Also do not make a knot in the cord.
PLACE THE UNIT ON
A FIRM AND LEVEL SURFACE
Avoid installing it:
■In moist or humid places
■Close to heating equipment or in places exposed to direct sunlight
■In a direct draft from an air conditioner or in other very cold locations
■In places subject to excessive vibration or dust
■In poorly ventilated places
MOVING THE UNIT
Before moving the unit, be sure to unplug the power cord from the AC outlet and disconnect all wires to antennas and other components.
DO NOT OPEN THE CABINET
Do not attempt to service this unit. Tampering with internal components can cause fire or shock, and may void your guarantee. If water or a small object enters the unit, unplug the power cord immediately and consult an authorized Harman Kardon service center. Using the unit under such conditions may cause a fire or shock hazard.
CLEANING
Remove dust by wiping the unit with a soft, dry cloth. If necessary, use a soft cloth lightly dampened with mild soapy water; then wipe with a dry cloth. Never use benzene, thinner, alcohol or other volatile agents, and avoid spraying insecticides near the unit.
TABLE OF CONTENTS |
|
ENGLISH |
|
Front Panel Controls |
3 |
||
|
|||
Rear Panel Connections . . . . . . . . . . . . . . . . . . . . . . . . . . . . . . . . . . . . . |
5 |
|
Surround Sound Effects . . . . . . . . . . . . . . . . . . . . . . . . . . . . . . . . . . . . . 10
Operation . . . . . . . . . . . . . . . . . . . . . . . . . . . . . . . . . . . . . . . . . . . . . . . . 12
AVR10 System Remote Control . . . . . . . . . . . . . . . . . . . . . . . . . . . . . . . 14
Trouble Shooting . . . . . . . . . . . . . . . . . . . . . . . . . . . . . . . . . . . . . . . . . . .16
Specifications . . . . . . . . . . . . . . . . . . . . . . . . . . . . . . . . . . . . . . . . . . . . .17
FCC INFORMATION
This equipment has been tested and found to comply with the limits for a Class B digital device, pursuant to Part 15 of the FCC Rules. These limits are designed to provide reasonable protection against harmful interference in a residential installation. This equipment generates, uses and can radiate radio frequency energy and, if not installed and used in accordance with the instructions, may cause harmful interference to radio communications. However, there is no guarantee that interference will not occur in a particular installation. If this equipment does cause harmful interference to radio or television reception, which can be determined by turning the equipment off and on, the user is encouraged to try to correct the interference by one or more of the following measures:
•Reorient or relocate the receiving antenna.
•Increase the separation between the equipment and receiver.
•Connect the equipment into an outlet on a circuit different from that to which the receiver is connected.
•Consult the dealer or an experienced radio TV technician for help.
CAUTION: Any changes or modifications in construction of this device which are not expressly approved by the party responsible for compliance could void the user’s authority to operate the equipment.
2
AVR10 engelsk 11/01/98 10:10 Side 3
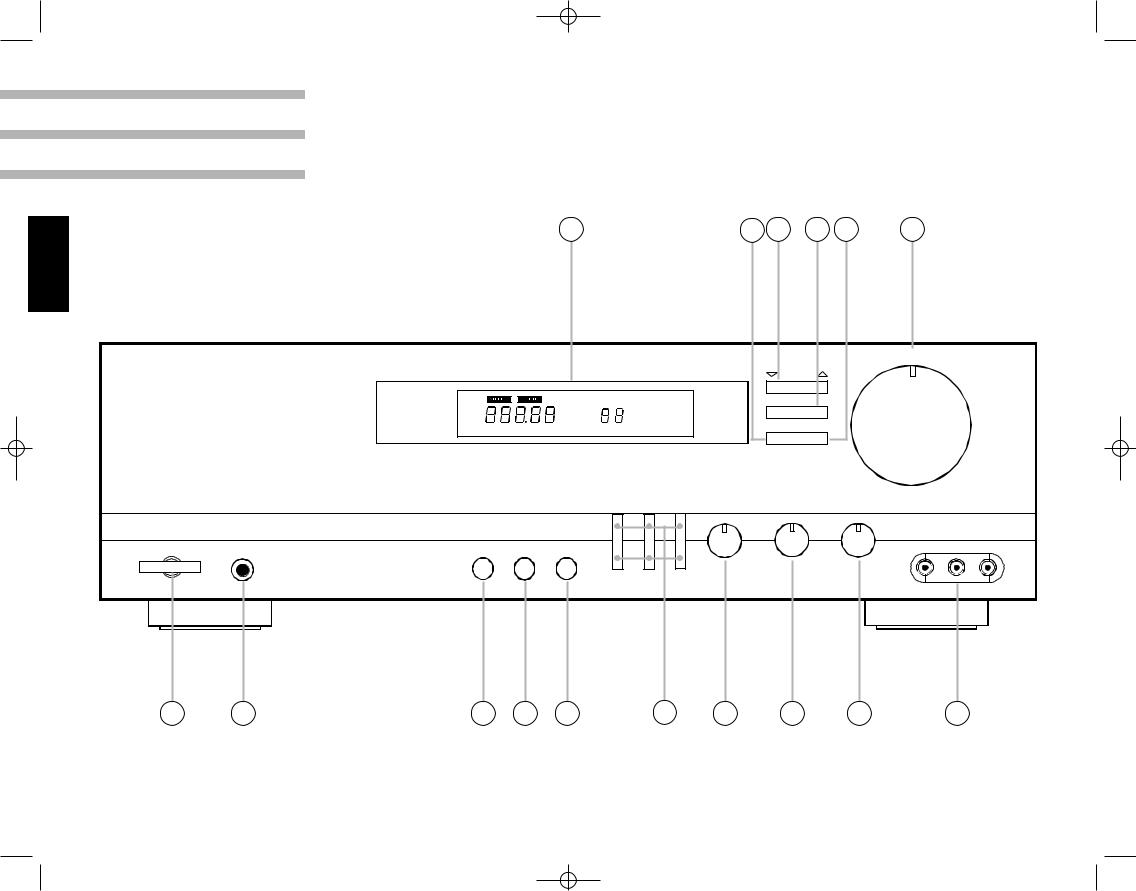
Front Panel Controls
16 |
13 |
11 |
14 |
12 |
15 |
ENGLISH
harman / kardon AVR 10 |
|
|
Volume |
|
|
|
Tune/Preset |
|
|
PRESET |
Seek Stereo |
|
|
MEM |
|
|
FM |
|
|
|
MHz |
|
Memory Tune/Preset |
|
|
|
|
|
VCR1 |
CD |
FM |
Bass |
Treble |
Balance |
Power |
Headphones |
Surround Off Surround Tape Mon |
|
|
|
|
VCR 2 |
|
|
VCR 2 |
TV/Aux |
AM |
|
|
|
1 |
2 |
7 |
6 |
9 |
8 |
3 |
4 |
5 |
10 |
3
AVR10 engelsk 11/01/98 10:10 Side 4
1. POWER BUTTON
Press this button to turn the power on. Press again to turn the power off (Stand by). If you connect the other components to the switched outlet, it can also be used as a system power button.
2. HEADPHONE JACK
Stereo headphones can be plugged into this jack for private listening. Headphone impedance should be between 8 ohms and 2K ohms with best results between 200 and 400 ohms.
3. BASS CONTROL
Modifies the low-frequency sound of the left and right channels as much as ±10dB. Set this control at a suitable position for your taste and room acoustics.
4. TREBLE CONTROL
Modifies the high-frequency sound of the left and right channels as much as ±10dB. Set this control at a suitable position for your taste and room acoustics.
Front Panel Controls
5.BALANCE CONTROL
This control is used for balancing the relative sound volume of the left and right channel speakers. Clockwise rotation reduces the volume from the left speaker, counterclockwise rotation reduces the volume from the right speaker.
6. SURROUND MODE SELECTOR
Press this button to select the desired surround mode. The mode is changed between normal DOLBY Pro-Logic and DOLBY 3-STEREO.
7. BYPASS SELECTOR
Defeats all surround modes.
8. INPUT FUNCTION SELECTOR BUTTONS
Press these buttons to select the desired input source.
9. TAPE MONITOR BUTTON
Press this button to select input from a tape deck and listen to its monitor function (with 3 head decks).
10. VCR2 INPUT JACKS
Connect these jacks to the corresponding output jacks of a VCR or Camcorder (only playback) (Yellow: Video, Red/White: Audio).
11. TUNE / PRESET
UP/DOWN BUTTONS
When PRESET and AUTO is not lit, the Tune/Preset UP/DOWN buttons will allow you to tune to a station manually.
12. TUNE / PRESET BUTTON
Press this Tune/Preset button to light up the preset mode then use the up/down buttons (11) momentarily to scan the preset station frequencies. The receiver stops at each preset location from 1-30 that has been entered in memory. Hold the buttons (11) down to skip through the presets quickly. In the TUNE mode (selected by the TUNE/PRESET button (12)) press these buttons to change selected frequencies.
13. MEMORY BUTTON
Use this button to store an AM or FM frequency. Press this button and select one of 30 preset locations to store the frequency with the UP / DOWN buttons while the memory indicator blinks, press MEMORY again to store preset station.
NOTE: When you store a frequency in a memory location that already contains a frequency, you replace the previous frequency. If your receiver is disconnected from AC power for more than about 2 weeks, it loses all stored frequencies.
14. SEEK STEREO BUTTON
Press this button, “Auto” will illuminate in the display. Then press the uP or DOWN button. The tuner will automatically seek for stations upwards or downwards in your area that have enough signal strength to be listenable. The tuner will stop on stations until the Seek Stereo button is pressed again.
15. VOLUME CONTROL
Turn the VOLUME clockwise to increase the volume and counterclockwise to decrease it. The volume of the front, center, and rear channels is changed at the same time.
16. DISPLAY WINDOW
This window shows the state of operation for easier control of the receiver. It also contains the IR Remote Sensor.
ENGLISH
4
 Loading...