


Harman kardon AVR 1710, AVR 171/230, AVR 171/230C, AVR 1610, AVR 161/230 User Manual [ru]
...AVR 1710,AVR 171/230,AVR 171/230C, AVR 1610,AVR 161/230,AVR 161/230C, AVR 1510,AVR 151/230,AVR 151/230C
Audio/Video Receiver
Quick-Start Guide
AVR
Introduction, AVR Placement,
Speaker Placement and Connections
Introduction
Thank you for choosing a Harman Kardon® product!
This quick-start guide contains all the information you need to connect and set up your new Harman Kardon audio/video receiver (AVR).
To conserve our natural resources, your AVR does not include a printed owner’s manual. An owner’s manual containing complete information about operating all of your new AVR’s features is available at our Web site. Go to www.harmankardon.com and download the AVR 1710, AVR 171/230, AVR 171/230C, AVR 1610, AVR 161/230, AVR 161/230C Owner’s Manual or the AVR 1510, AVR 151/230, AVR 151/230C Owner’s Manual.
Place the AVR
•Place the AVR on a firm and level surface. Be certain that the surface and any mounting hardware can support the AVR’s weight.
•Provideproperspaceabove,below,behindandtothesidesoftheAVRforventilation.Maintain a clearance of at least 12" (30cm) on each side of, above and behind the unit.
•IfyouinstalltheAVRinacabinetorotherenclosedarea,providecoolingairwithinthecabinet.
Under some circumstances, a fan may be required.
•Do not obstruct the ventilation slots on the top of theAVR or place objects directly over them.
•Do not place theAVR directly on a carpeted surface.
•Do not place theAVR in moist or humid locations,in extremely hot or cold locations,in areas near heaters or heat registers, or in direct sunlight.
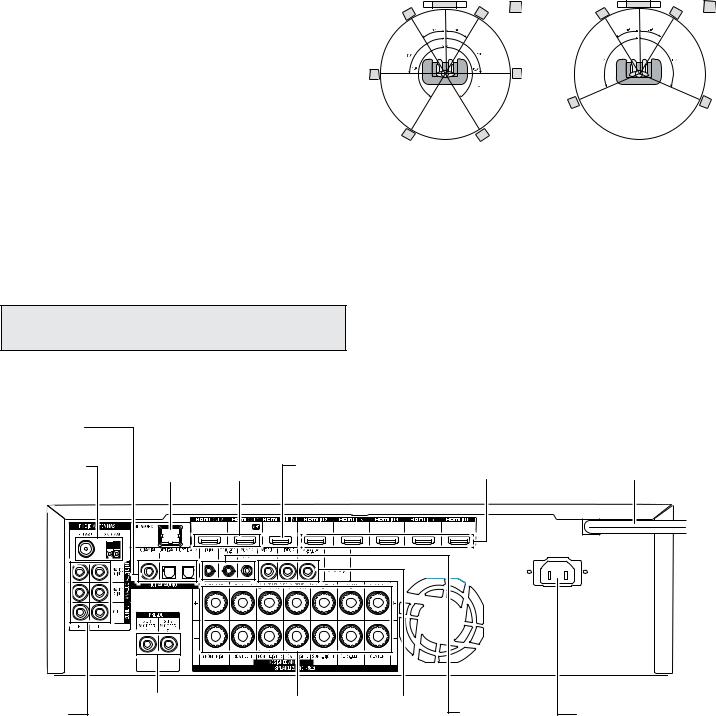
Place Your Speakers
Determine the locations for your system’s speakers according to their manufacturer’s directions and the layout of your listening room. Use the illustrations below as a guide for 7.1-channel and 5.1-channel systems.
TV C |
SUB |
TV C |
SUB |
FL |
FR |
FL |
FR |
SL |
|
SR |
|
|
|
SL |
SR |
SBL |
SBR |
|
|
Speaker Positioning for |
Speaker Positioning for |
||
7.1-Channel Systems |
|
5.1-Channel Systems |
|
For more detailed speaker placement information, including the use of front height speakers with the Dolby® Pro Logic® IIz mode, download the complete AVR 1710, AVR 171/230, AVR 171/230C, AVR 1610, AVR 161/230, AVR 161/230C Owner’s Manual or the AVR 1510, AVR 151/230, AVR 151/230C Owner’s Manual from www.harmankardon.com.
Connections
CAUTION:Before making any connections to theAVR,ensure that theAVR’sAC cord is unplugged from theAVR and theAC outlet.Making connections with theAVRplugged in and turned on could damage the speakers.
AVR 1710/AVR 171 |
|
|
|
|
|
|
Digital Audio |
|
|
|
|
|
|
Connectors |
|
|
|
|
|
|
Radio Antenna |
Network |
HDMI® Output |
HDMI/MHL/ |
|
HDMI Input |
Power Cord |
Connectors |
Connector |
Connectors |
Input Connector |
|
Connectors |
(AVR 1710) |
Analog Audio |
Subwoofer |
|
Speaker |
Analog Video |
IR and Trigger |
AC Input |
Pre-Out |
|
Connectors |
Connectors |
Connector |
||
Connectors |
|
Connectors |
||||
Connectors |
|
|
|
(AVR 171) |
||
|
|
|
|
|
2

AVR
Connections
AVR 1610/AVR 161 |
|
|
|
|
|
|
|
|
|
|
|
|
|
|
|
|
|
|
|
|
|
|
|
|
|
|
|
|
|
|
|
|
|
|
|
|
|
|
|
|
|
||||
Digital Audio |
|
|
|
Network |
HDMI Output |
|
|
|
|
|
HDMI/MHL/ |
|
|
|
|
HDMI Input |
|||||||||||||||||||||||||||||
Connectors |
|
|
|
Connector |
Connector |
|
|
|
|
|
Input Connector |
|
|
|
|
Connectors |
|||||||||||||||||||||||||||||
|
|
|
|
|
|
|
|
|
|
|
|
|
|
|
|
|
|||||||||||||||||||||||||||||
|
|
|
|
|
|
|
|
|
|
|
|
|
|
|
|
|
|
|
|
|
|
|
|
|
|
|
|
|
|
|
|
|
|
|
|
|
|
|
|
|
|
|
|
|
|
|
|
|
|
|
|
|
|
|
|
|
|
|
|
|
|
|
|
|
|
|
|
|
|
|
|
|
|
|
|
|
|
|
|
|
|
|
|
|
|
|
|
|
|
|
|
|
|
|
|
|
|
|
|
|
|
|
|
|
|
|
|
|
|
|
|
|
|
|
|
|
|
|
|
|
|
|
|
|
|
|
|
|
|
|
|
|
|
|
|
|
|
|
|
|
|
|
|
|
|
|
|
|
|
|
|
|
|
|
|
|
|
|
|
|
|
|
|
|
|
|
|
|
|
|
|
|
|
|
|
|
|
|
|
|
|
|
|
|
|
|
|
|
|
|
|
|
|
|
|
|
|
|
|
|
|
|
|
|
|
|
|
|
|
|
|
|
|
|
|
|
|
|
|
|
|
|
|
|
|
|
|
|
|
|
|
|
|
|
|
|
|
|
|
|
|
|
|
|
|
|
|
|
|
|
|
|
|
|
|
|
|
|
|
|
|
|
|
|
|
|
|
|
|
|
|
|
|
|
|
|
|
|
|
|
|
|
|
|
|
|
|
|
|
|
|
|
|
|
|
|
|
|
|
|
|
|
|
|
|
|
|
|
|
|
|
|
|
|
|
|
|
|
|
|
|
|
|
|
|
|
|
|
|
|
|
|
|
|
|
|
|
|
|
|
|
|
|
|
|
|
|
|
|
|
|
|
|
|
|
|
|
|
|
|
|
|
|
|
|
|
|
|
|
|
|
|
|
|
|
|
|
|
|
|
|
|
|
|
|
|
|
|
|
|
|
|
|
|
|
|
|
|
|
|
|
|
|
|
|
|
|
|
|
|
|
|
|
|
|
|
|
|
|
|
|
|
|
|
|
|
|
|
|
|
|
|
|
|
|
|
|
|
|
|
|
|
|
|
|
|
|
|
|
|
|
|
|
|
|
|
|
|
|
|
|
|
|
|
|
|
|
|
|
|
|
|
|
|
|
|
|
|
|
|
|
|
|
|
|
|
|
|
|
|
|
|
|
|
|
|
|
|
|
|
|
|
|
|
|
|
|
|
|
|
|
|
|
|
|
|
|
|
|
|
|
|
|
|
|
|
|
|
|
|
|
|
|
|
|
|
|
|
|
|
|
|
|
|
|
|
|
|
|
|
|
|
|
|
|
|
|
|
|
|
|
|
|
|
|
|
|
|
|
|
|
|
|
|
|
|
|
|
|
|
|
|
|
|
|
|
|
|
|
|
|
|
|
|
|
|
|
|
|
|
|
|
|
|
|
|
|
|
|
|
|
|
|
|
|
|
|
|
|
|
|
|
|
|
|
|
|
|
|
|
|
|
|
|
|
|
|
|
|
|
|
|
|
Radio Antenna |
|
Subwoofer |
Speaker |
Analog Video |
AC Input |
Power Cord |
||
|
|
Pre-Out |
Connectors |
Connectors |
Connector |
(AVR 1610) |
||
Connectors |
|
|
|
|||||
|
|
|
|
Connector |
|
|
(AVR 161) |
|
Analog Audio |
|
|
IR and Trigger |
|
|
|
||
Connectors |
|
|
Connectors |
|
|
|
||
AVR 1510/AVR 151 |
|
|
|
|
|
|
|
|
|
|
|
|
|
|
|
|
|
|
|
|
|
|
|
|
|
|
|
|
|
|
|
|
|
|
|
|
|
|
|
|
|
|||
Digital Audio |
|
|
|
|
|
|
|
|
|
|
|
Network |
|
HDMI Input |
|
|
|
|
|
HDMI Output |
||||||||||||||||||||||||
Connectors |
|
|
|
|
|
|
|
|
|
|
|
Connector |
|
Connectors |
|
|
|
|
|
|
Connector |
|||||||||||||||||||||||
|
|
|
|
|
|
|
|
|
|
|
|
|
|
|
|
|
|
|
|
|
|
|
|
|
|
|
|
|
|
|
|
|
|
|
|
|
|
|
|
|
|
|
|
|
|
|
|
|
|
|
|
|
|
|
|
|
|
|
|
|
|
|
|
|
|
|
|
|
|
|
|
|
|
|
|
|
|
|
|
|
|
|
|
|
|
|
|
|
|
|
|
|
|
|
|
|
|
|
|
|
|
|
|
|
|
|
|
|
|
|
|
|
|
|
|
|
|
|
|
|
|
|
|
|
|
|
|
|
|
|
|
|
|
|
|
|
|
|
|
|
|
|
|
|
|
|
|
|
|
|
|
|
|
|
|
|
|
|
|
|
|
|
|
|
|
|
|
|
|
|
|
|
|
|
|
|
|
|
|
|
|
|
|
|
|
|
|
|
|
|
|
|
|
|
|
|
|
|
|
|
|
|
|
|
|
|
|
|
|
|
|
|
|
|
|
|
|
|
|
|
|
|
|
|
|
|
|
|
|
|
|
|
|
|
|
|
|
|
|
|
|
|
|
|
|
|
|
|
|
|
|
|
|
|
|
|
|
|
|
|
|
|
|
|
|
|
|
|
|
|
|
|
|
|
|
|
|
|
|
|
|
|
|
|
|
|
|
|
|
|
|
|
|
|
|
|
|
|
|
|
|
|
|
|
|
|
|
|
|
|
|
|
|
|
|
|
|
|
|
|
|
|
|
|
|
|
|
|
|
|
|
|
|
|
|
|
|
|
|
|
|
|
|
|
|
|
|
|
|
|
|
|
|
|
|
|
|
|
|
|
|
|
|
|
|
|
|
|
|
|
|
|
|
|
|
|
|
|
|
|
|
|
|
|
|
|
|
|
|
|
|
|
|
|
|
|
|
|
|
|
|
|
|
|
|
|
|
|
|
|
|
|
|
|
|
|
|
|
|
|
|
|
|
|
|
|
|
|
|
|
|
|
|
|
|
|
|
|
|
|
|
|
|
|
|
|
|
|
|
|
|
|
|
|
|
|
|
|
|
|
|
|
|
|
|
|
|
|
|
|
|
|
|
|
|
|
|
|
|
|
|
|
|
|
|
|
|
|
|
|
|
|
|
|
|
|
|
|
|
|
|
|
|
|
|
|
|
|
|
|
|
|
|
|
|
|
|
|
|
|
|
|
|
|
|
|
|
|
|
|
|
|
|
|
|
|
|
|
|
|
|
|
|
|
|
|
|
|
|
|
|
|
|
|
|
|
|
|
|
|
|
|
|
|
|
|
|
|
|
|
|
|
|
|
|
|
|
|
|
|
|
|
|
|
|
|
|
|
|
|
|
|
|
|
|
|
|
|
|
|
|
|
|
|
|
|
|
|
|
|
|
|
|
|
|
|
|
|
|
|
|
|
|
|
|
|
|
|
|
|
|
|
|
|
|
|
|
|
|
|
|
|
|
|
|
|
|
|
|
|
|
|
|
|
|
|
|
|
|
|
|
|
|
|
|
|
|
|
|
|
|
|
|
|
|
|
|
|
|
|
|
|
|
|
|
|
|
|
|
|
|
|
|
|
|
|
|
|
|
|
|
|
|
|
|
|
|
|
|
|
|
|
|
|
|
|
|
|
|
Radio Antenna |
|
Subwoofer |
Speaker |
Analog Video |
AC Input |
Power Cord |
||
Connectors |
|
|
|
Pre-Out |
Connectors |
Connectors |
Connector |
(AVR 1510) |
|
||||||||
|
|
|
|
Connector |
|
|
(AVR 151) |
|
Analog Audio |
|
|
IR and Trigger |
|
|
|
||
Connectors |
|
|
Connectors |
|
|
|
||
|
|
|
|
|
||||
3
AVR
Connections
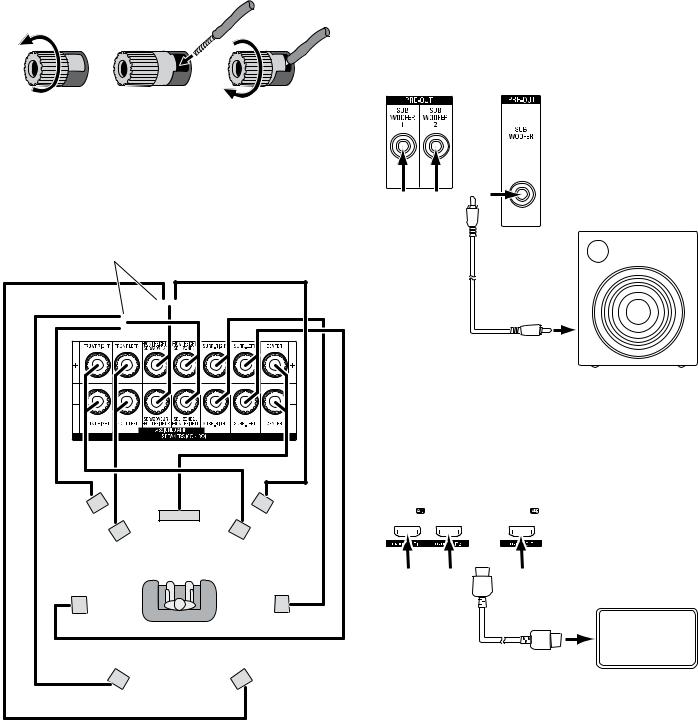
Connect Your Speakers
How to use the AVR speaker terminals:
1. Unscrew Cap |
2. Insert Bare Wire |
3. Tighten Cap |
Always connect the colored (+) terminal on the AVR to the (+) terminal on the speaker (usually red), and the black (–) terminal on the AVR to the (–) terminal on the speaker (usually black).
IMPORTANT:Make sure the ( + ) and ( – ) bare wires do not touch each other or the other terminal. Touching wires can cause a short circuit that can damage your AVR.
Connect the speakers as shown in the illustration.
AVR 1710/AVR 171 Only:
Connect Surround Back L/R Speakers -OR- Front Height L/R Speakers Here
FHL |
C |
FHR |
|
|
|
FL |
|
FR |
SL |
|
SR |
SBL |
SBR |
Connect Your Subwoofer
Use a single RCA audio cable to connect your subwoofer to AVR’s Subwoofer
Pre-Out connector, as shown in the illustration below. (For the AVR 1710/AVR 171 you can use either the Subwoofer 1 or Subwoofer 2 connector when you’re using a single subwoofer, or you may connect two subwoofers for increased bass performance in larger listening rooms.) Consult your subwoofer’s user manual for specific information about making connections to it.
AVR 1710/ |
AVR 1610/AVR1510/ |
AVR 171 |
AVR 161/AVR 151 |
Use either
connector Powered Subwoofer
Single
RCA Audio Cable (not supplied)
Connect Your TV or Video Display
If your TV has an HDMI connector: Use an HDMI cable (not included) to connect it to the AVR’s HDMI Out connector. (For the AVR 1710/AVR 171 you can use either HDMI Out connector.) You do not need to make any other connections to your TV from the AVR or from any of your video source components.
|
|
|
|
|
|
AVR 1610/AVR 161/ |
||||
AVR 1710/AVR 171 |
AVR 1510/AVR 151 |
|||||||||
|
|
|
|
|
|
|
|
|
|
|
|
|
|
|
|
|
|
|
|
|
|
|
|
|
|
|
|
|
|
|
|
|
|
|
|
|
|
|
|
|
|
|
|
Use either connector
HDMI Cable |
TV |
|
|
(not supplied) |
|
AVR 1710/AVR 171 only: Connect a singleTV to the HDMI Out 1 connector.If you have a secondTV you can connect it to theAVR’s HDMI Out 2 connector.BothTVs will display the same picture, but the HDMI Out 2 connector will not output the AVR’s on-screen display and does not have Audio Return Channel capability (see below).
Note: If your TV is equipped with the HDMI Audio Return Channel function, you can feed its sound to the AVR via the HDMI Out connector’s Audio Return Channel, and it will not require additional audio connections to the AVR. (For the AVR 1710/AVR 171 the ARC is available only on the HDMI Out 1 connector.)
4
 Loading...