


AVR 700/AVR 70/AVR 70C
Audio/video receiver
Owner’s Manual
AVR 700/AVR 70/AVR 70C
Table of Contents
Introduction |
3 |
Supplied Accessories |
3 |
Important Safety Information |
3 |
Place the AVR |
3 |
Front-Panel Controls |
4 |
Rear-Panel Connectors |
5 |
System Remote Control Functions |
6 |
Introduction to Home Theater |
8 |
Typical Home Theater System |
8 |
Multichannel Audio |
8 |
Surround Modes |
8 |
Place Your Speakers |
8 |
Placing the Left, Center and Right Speakers |
8 |
Placing the Surround Speakers |
8 |
Placing the Subwoofer |
8 |
Types of Home Theater System Connections |
9 |
Speaker Connections |
9 |
Subwoofer Connections |
9 |
Source Device Connections |
9 |
Video Connections |
10 |
Radio Connections |
10 |
USB Port |
10 |
Making Connections |
11 |
Connect Your Speakers |
11 |
Connect Your Subwoofer |
11 |
Connect Your TV or Video Display |
11 |
Connect Your Source Devices |
11 |
Connect the Radio Antennas |
13 |
Connect to AC Power |
13 |
INSTALL BATTERIES IN the Remote Control |
13 |
Set Up the AVR |
14 |
Turn On the AVR |
14 |
Using the On-Screen Menu System |
14 |
Configure the AVR for Your Speakers |
15 |
Additional Setup Menu Items |
15 |
Operating Your AVR |
16 |
Controlling the Volume |
16 |
Muting the Sound |
16 |
Listening Through Headphones |
16 |
Selecting a Source |
16 |
Video Troubleshooting Tips |
16 |
Listening to FM and AM Radio |
16 |
Listening to Media on a USB Device |
16 |
Selecting a Surround Mode |
17 |
Advanced Functions |
17 |
Audio Processing and Surround Sound |
17 |
Adjusting the Channel Volumes |
17 |
Recording |
17 |
Sleep Timer |
18 |
Processor Reset |
18 |
Memory |
18 |
Troubleshooting |
19 |
Specifications |
20 |
Appendix |
21 |
2
AVR 700/AVR 70/AVR 70C |
Introduction, Supplied Accessories, |
Important Safety Information and Place the AVR |
Introduction
Thank you for choosing this Harman Kardon product!
For more than fifty years, the Harman Kardon mission has been to share a passion for music and entertainment, using leading-edge technology to achieve premium performance. Sidney Harman and Bernard Kardon invented the receiver, a single component designed to simplify home entertainment without compromising performance. Over the years, Harman Kardon products have become easier to use while offering more features and sounding better than ever.
The AVR 70, AVR 700 and AVR 70C 5.1-channel digital audio/video receivers (AVRs) continue this tradition with some of the most advanced audio and video processing capabilities yet and a wealth of listening and viewing options.
To obtain the maximum enjoyment from your new AVR, please read this manual and refer back to it as you become more familiar with its features and their operation.
If you have any questions about this product, its installation or its operation, please contact your Harman Kardon retailer or custom installer, or visit our Web site at www. harmankardon.com.
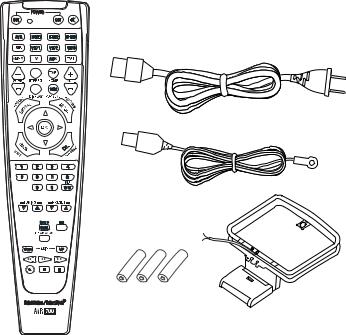
Supplied Accessories
The following accessory items are supplied with your AVR. If any of these items are missing, please contact your Harman Kardon dealer, or Harman Kardon customer service at www.harmankardon.com.
•IR remote control
•AM loop antenna
•FM wire antenna
•Three AAA batteries
•AC power cord
IMPORTANT SAFETY INFORMATION
Verify Line Voltage Before Use
The AVR 700 has been designed for use with 120-volt alternating current (AC). The AVR 70 and AVR 70C have been designed for use with 220 – 240-volt AC. Connection to a line voltage other than that for which your AVR is intended can create a safety and fire hazard, and may damage the unit. If you have any questions about the voltage requirements for your specific model or about the line voltage in your area, contact your selling dealer before plugging the unit into a wall outlet.
Do Not Use Extension Cords
To avoid safety hazards, use only the power cord supplied with your unit. We do not recommend that extension cords be used with this product. As with all electrical devices, do not run power cords under rugs or carpets, or place heavy objects on them. Damaged power cords should be replaced immediately by an authorized service center with a cord meeting factory specifications.
Handle the AC Power Cord Gently
When disconnecting the power cord from an AC outlet, always pull the plug; never pull the cord. If you do not intend to use your AVR for any considerable length of time, disconnect the plug from the AC outlet.
Do Not Open the Cabinet
There are no user-serviceable components inside this product. Opening the cabinet may present a shock hazard, and any modification to the product will void your warranty. If water or any metal object such as a paper clip, wire or staple accidentally falls inside the unit, disconnect it from the AC power source immediately, and consult an authorized service center.
CATV or Antenna Grounding (AVR 700)
If an outside antenna or cable system is connected to this product, be certain that it is grounded so as to provide some protection against voltage surges and static charges. Section 810 of the United States National Electrical Code, ANSI/NFPA No. 70-1984, provides information with respect to proper grounding of the mast and supporting structure, grounding of the lead-in wire to an antenna discharge unit, size of grounding conductors, location of antenna discharge unit, connection to grounding electrodes and requirements of the grounding electrode.
NOTE TO CATV SYSTEM INSTALLER: This reminder is provided to call the CATV (cable TV) system installer’s attention to article 820-40 of the NEC, which provides guidelines for proper grounding and, in particular, specifies that the cable ground shall be connected to the grounding system of the building, as close to the point of cable entry as possible.
Place the AVR
•Place the AVR on a firm and level surface. Be certain that the surface and any mounting hardware can support the AVR’s weight.
•Provide proper space above and below the AVR for ventilation. Recommended clearance distances are 30cm above the unit, 10cm behind the unit and 20cm on each side of the unit.
•If you install the AVR in a cabinet or other enclosed area, provide cooling air within the cabinet. Under some circumstances, a fan may be required.
•Do not obstruct the ventilation slots on the top of the AVR or place objects directly over them.
•Do not place the AVR directly on a carpeted surface.
•Do not place the AVR in moist or humid locations, in extremely hot or cold locations, in areas near heaters or heat registers, or in direct sunlight.
3
AVR 700/AVR 70/AVR 70C
Front-Panel Controls
Front-Panel Controls
|
|
|
Standby |
IR |
Message |
Memory/Folder |
Volume |
|
Power On Indicator |
|||||||
|
|
Indicator |
Sensor |
Display |
Button |
Control |
|
|
(inside Volume Control ring) |
|||||||
|
|
|
|
|
|
|
|
|
|
|
|
|
|
|
|
|
|
|
|
|
|
|
|
|
|
|
|
|
|
|
|
|
|
|
|
|
|
|
|
|
|
|
|
|
|
|
|
|
|
|
|
|
|
|
|
|
|
|
|
|
|
|
|
|
|
|
|
|
|
|
|
|
|
|
|
|
|
|
|
|
|
|
|
|
|
|
|
|
|
|
|
|
|
|
|
|
|
|
|
|
|
|
|
|
|
|
|
|
|
|
|
|
|
|
|
|
|
|
|
|
|
|
|
|
|
|
|
|
|
|
|
|
|
|
|
|
|
|
|
|
|
|
|
|
|
|
|
|
|
|
|
|
|
|
|
|
|
|
|
|
|
|
|
|
|
|
|
|
|
|
|
|
|
|
|
|
|
|
|
|
|
|
|
|
|
|
Main Power |
On/Standby |
Surround Mode |
AM/FM |
|
Switch |
Switch |
Select Buttons |
Button |
|
|
Stereo Mode |
Tuning Up/Down |
Preset Selector |
|
|
Button |
|
Button |
Buttons |
Source Select |
Buttons |
|
|
|
|
|
|
|
|
|
|
|
|
|
|
|
|
|
|
|
|
|
|
|
|
|
|
|
USB |
|
|
Video 3 |
|||||
Port |
|
|
Audio and Video |
|||||
|
|
|||||||
|
|
|
|
|
|
Input Connectors |
||
Headphone
Connector
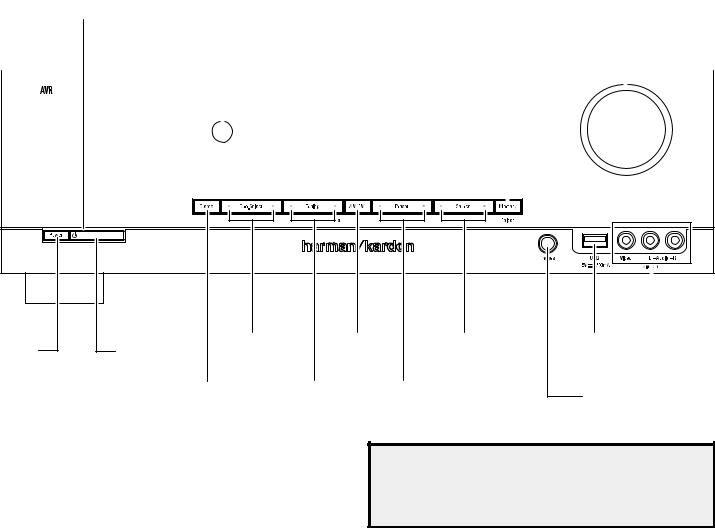
Main Power switch: This mechanical switch turns the AVR’s power supply on or off. It is usually left on and cannot be turned on or off using the remote control.
Standby indicator: This LED glows amber to indicate that the AVR is in the Standby mode.
Power On/Standby button: Press this button to turn the AVR on and put it into the Standby mode. When the AVR is on the Power On indicator glows blue and the Standby indicator turns off.
Stereo Mode button: Places the AVR in the stereo listening mode.
IR Sensor: This sensor receives infrared (IR) commands from the remote control. It is important to ensure that the sensor is not blocked.
Surround Mode Select buttons: Press these buttons to select a surround listening mode. Surround-mode availability depends on the nature of the source input signal, i.e., digital versus analog, and the number of channels encoded within the signal.
Tuning Up/Down buttons: Use these buttons to tune radio stations according to the setting of the AM/FM button (see below).
AM/FM button: Press this button to listen to the radio. Pressing this button when the radio is in use will select among the FM Stereo, FM Mono and AM bands. See Listening to FM and AM Radio, on page 16, for more information.
Message display: Various messages appear in this display in response to commands and changes in the incoming signal. In normal operation, the current source device name, surround mode and active input appear. When the on-screen display menu system (OSD) is in use, the current menu settings appear.
IMPORTANT NOTE: If the PROTECT message ever appears on the Message Display, turn off the AVR and unplug it from the AC outlet. Check all speaker wires for a possible short circuit (the “+” and “–” conductors touching each other or both touching the same piece of metal). If a short circuit is not found, bring the unit to an authorized Harman Kardon service center for inspection and repair before using it again.
Preset Selector buttons: When the radio is in use, press these buttons to cycle through your preset radio stations.(See Listening to FM and AM Radio, on page 16, for more information.) NOTE: When you're listening to files on a USB device, the Tuning Up/Down buttons and the Preset Selector buttons serve as the USB device’s transport control buttons.(See Playing Files on a USB Device, on page 16, for more information.)
Source Select buttons: Press these buttons to select the active source device.
Memory/Folder button: When the radio is in use, press this button to set the current station as a preset. See Listening to FM and AM Radio, on page 16, for more information. When a USB device is the active source deivce, press this button to display the contents of the current folder or to display all of the folders in the current directory level. See Playing files on a USB Device, on page 16, for more information.
Headphone connector: Connect a 1/4" stereo headphone plug to this jack for private listening
USB Port: Insert a flash drive or HDD disk drive with a USB Standard-A cable to this port. Volume control: Turn this knob to raise or lower the volume.
Video 3 Audio and Video Input connectors: Connect an auxiliary audio/video source component that will be used only temporarily, such as a camcorder, portable music player or game console, here.
4
AVR 700/AVR 70/AVR 70C
Rear-Panel Connectors
Rear-Panel Connectors
|
|
|
|
|
|
|
|
|
Digital Audio |
|
|
HDMI® |
|
|
Composite Video |
|
|
|
|
|
AC Input |
|
|||||||||||||||||||||||
|
|
|
|
|
|
|
|
|
Connectors |
|
Connectors |
|
|
Connectors |
|
|
|
|
|
Connector |
|
||||||||||||||||||||||||
|
|
|
|
|
|
|
|
|
|
|
|
|
|
|
|
|
|
|
|
|
|
|
|
|
|
|
|
|
|
|
|
|
|
|
|
|
|
|
|
|
|
|
|
|
|
|
|
|
|
|
|
|
|
|
|
|
|
|
|
|
|
|
|
|
|
|
|
|
|
|
|
|
|
|
|
|
|
|
|
|
|
|
|
|
|
|
|
|
|
|
|
|
|
|
|
|
|
|
|
|
|
|
|
|
|
|
|
|
|
|
|
|
|
|
|
|
|
|
|
|
|
|
|
|
|
|
|
|
|
|
|
|
|
|
|
|
|
|
|
|
|
|
|
|
|
|
|
|
|
|
|
|
|
|
|
|
|
|
|
|
|
|
|
|
|
|
|
|
|
|
|
|
|
|
|
|
|
|
|
|
|
|
|
|
|
|
|
|
|
|
|
|
|
|
|
|
|
|
|
|
|
|
|
|
|
|
|
|
|
|
|
|
|
|
|
|
|
|
|
|
|
|
|
|
|
|
|
|
|
|
|
|
|
|
|
|
|
|
|
|
|
|
|
|
|
|
|
|
|
|
|
|
|
|
|
|
|
|
|
|
|
|
|
|
|
|
|
|
|
|
|
|
|
|
|
|
|
|
|
|
|
|
|
|
|
|
|
|
|
|
|
|
|
|
|
|
|
|
|
|
|
|
|
|
|
|
|
|
|
|
|
|
|
|
|
|
|
|
|
|
|
|
|
|
|
|
|
|
|
|
|
|
|
|
|
|
|
|
|
|
|
|
|
|
|
|
|
|
|
|
|
|
|
|
|
|
|
|
|
|
|
|
|
|
|
|
|
|
|
|
|
|
|
|
|
|
|
|
|
|
|
|
|
|
|
|
|
|
|
|
|
|
|
|
|
|
|
|
|
|
|
|
|
|
|
|
|
|
|
|
|
|
|
|
|
|
|
|
|
|
|
|
|
|
|
|
|
|
|
|
|
|
|
|
|
|
|
|
|
|
|
|
|
|
|
|
|
|
|
|
|
|
|
|
|
|
|
|
|
|
|
|
|
|
|
|
|
|
|
|
|
|
|
|
|
|
|
|
|
|
|
|
|
|
|
|
|
|
|
|
|
|
|
|
|
|
|
|
|
|
|
|
|
|
|
|
|
|
|
|
|
|
|
|
|
|
|
|
|
|
|
|
|
|
|
|
|
|
|
|
|
|
|
|
|
|
|
|
|
|
|
|
|
|
|
|
|
|
|
|
|
|
|
|
|
|
|
|
|
|
|
|
|
|
|
|
|
|
|
|
|
|
|
|
|
|
|
|
|
|
|
|
|
|
|
|
|
|
|
|
|
|
|
|
|
|
|
|
|
|
|
|
|
|
|
|
|
|
|
|
|
|
|
|
|
|
|
|
|
|
|
|
|
|
|
|
|
|
|
|
|
|
|
|
|
|
|
|
|
|
|
|
|
|
|
|
|
|
|
|
|
|
|
|
|
|
|
|
|
|
|
|
|
|
|
|
|
|
|
|
|
|
|
|
|
|
|
|
|
|
|
|
|
|
|
|
|
|
|
|
|
|
|
|
|
|
|
|
|
|
|
|
|
|
|
|
|
|
|
|
|
|
|
|
|
|
|
|
|
|
|
|
|
|
|
|
|
|
|
|
|
|
|
|
|
|
|
|
|
|
|
|
|
|
|
|
|
|
|
|
|
|
|
|
|
|
|
|
|
|
|
|
|
|
|
|
|
|
|
|
|
|
|
|
|
|
|
|
|
|
|
|
|
|
|
|
|
|
|
|
|
|
|
|
|
|
|
|
|
|
|
|
|
|
|
|
|
|
|
|
|
|
|
|
|
|
|
|
|
|
|
|
|
|
|
|
|
|
|
|
|
|
|
|
|
|
|
|
|
|
|
|
|
|
|
|
|
|
|
|
|
|
|
|
|
|
|
|
|
|
|
|
|
|
|
|
|
|
|
|
|
|
|
|
|
|
|
|
|
|
|
|
|
|
|
|
|
|
|
|
|
|
|
|
|
|
|
|
|
|
|
|
|
|
|
|
|
|
|
|
|
|
|
|
|
|
|
|
|
|
|
|
|
|
|
|
|
|
|
|
|
|
|
|
|
|
|
|
|
|
|
|
|
|
|
|
|
|
|
|
|
|
|
|
|
|
|
|
|
|
|
|
|
|
|
|
|
|
|
|
|
|
|
|
|
|
|
|
|
|
|
|
|
|
|
|
|
|
|
|
|
|
|
|
|
|
|
|
|
|
|
|
|
|
|
|
|
|
|
|
|
|
|
|
|
|
|
|
|
|
|
|
|
|
|
|
|
|
|
|
|
|
|
|
|
|
|
|
|
|
|
|
|
|
|
|
|
|
|
|
|
|
|
|
|
|
|
|
|
|
|
|
|
|
|
|
|
|
|
|
|
|
|
|
|
|
|
|
|
|
|
|
|
|
|
|
|
|
|
|
|
|
|
|
|
|
|
|
|
|
|
|
|
|
|
|
|
|
|
|
|
|
|
|
|
|
|
|
|
|
|
|
|
|
|
|
|
|
|
|
|
|
|
|
|
|
|
|
|
|
|
|
|
|
|
|
|
|
|
|
|
|
|
|
|
|
|
|
|
|
|
|
|
|
|
|
|
|
|
|
|
|
|
|
|
|
|
|
|
|
|
|
|
|
|
|
|
|
|
|
|
|
|
|
|
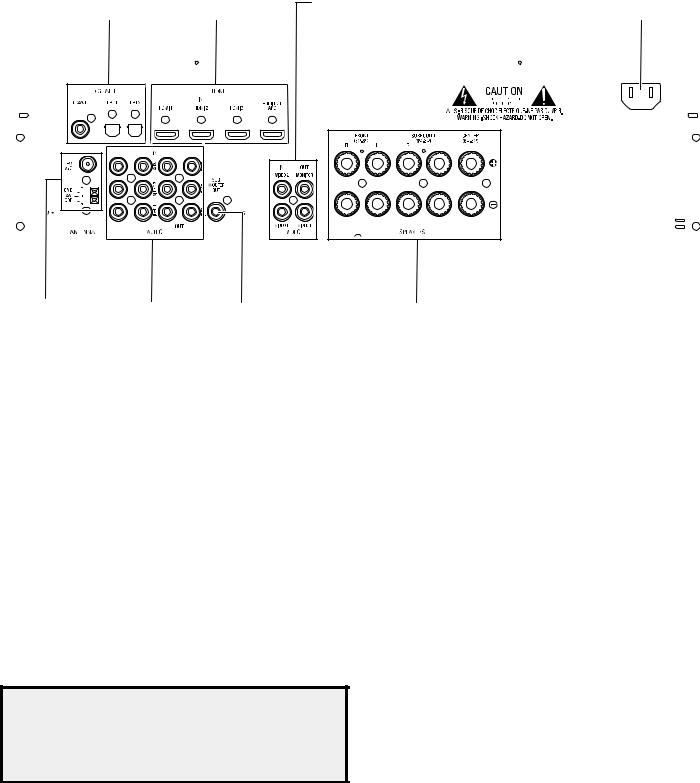
Radio Antenna |
Analog Audio |
Subwoofer |
Speaker |
Connectors |
Connectors |
Connector |
Connectors |
Radio Antenna connectors: Connect the included AM and FM antennas to their respective terminals for radio reception. See Connect the Radio Antennas, on page 13, for more information.
Digital Audio connectors: If your non-HDMI source devices have digital outputs, connect them to the AVR’s digital audio connectors. See Connect Your Source Devices, on page 11, for more information.
Analog Audio connectors: Use the AVR’s Analog Audio connectors for source devices that don’t have HDMI or digital audio connectors. Use the Video 1 Out, Video 2 Out and Tape Out connectors to connect to the audio inputs of VCRs, tape decks or other analog recorders. See Connect Your Source Devices, on page 11, for more information.
HDMI connectors: The HDMI (High-Definition Multimedia Interface®) feature is a connection for transmitting digital audio and video signals between devices. If your source devices and TV have HDMI connectors, using them will provide the best possible video and audio performance quality. Since the HDMI cable carries both digital video and digital audio signals, you do not have to make any additional audio connections for devices you connect via HDMI connections. See Connect Your Source Devices, on page 11, for more information.
Notes on using the HDMI Out connector:
•When connecting a DVI-equipped display to the HDMI Monitor Out connector, use an HDMI-to-DVI adapter and make a separate audio connection.
•Make sure the HDMI-equipped display is HDCP-compliant. If it isn’t, do not connect it via HDMI; use an analog video connection instead and make a separate audio connection.
Subwoofer connector: Connect this jack to a powered subwoofer that has a line-level input connector. See Connect Your Subwoofer, on page 11, for more information.
Composite Video connectors: Use composite video connectors for video source devices and a TV that don’t have HDMI connectors. You will also need to make audio connections from the source devices to the AVR. See Connect Your Source Devices, on page 11, for more information.
IMPORTANT: The AVR’s on-screen display (OSD) only appears through the Composite Monitor Out connector. If you want to use the AVR’s OSD menus you need to connect its Composite Monitor Out connector to your TV even if you are not connecting any composite video source devices to the AVR.
Speaker connectors: Use two-conductor speaker wire to connect each set of terminals to the correct speaker. See Connect Your Speakers, on page 11, for more information.
AC Input connector: After you have made all other connections, plug the supplied AC power cord into this receptacle and into an unswitched wall outlet.
5

AVR 700/AVR 70/AVR 70C
System Remote Control Functions
Remote Control Functions
IR Transmitter Lens
Power On Button
AVR Button
Stereo Mode Button
Surround Mode Select Buttons
Display Mode Button
Audio Input Select Button
Back/Exit Button
Tuning Up/Down Buttons
Sleep/Clear Button
Track Skip Up/Down Buttons
Mute Button
Power Off Button
Source Selector Buttons
Tone Controls Button
Volume Up/Down Buttons
Test Tone Sequence Button
Setup Menu Button
 OK Button
Channel Level Button
Left/Right/Up/Down Buttons
Number Buttons
Memory Button
Preset Station Up/Down Buttons
Display Dim Button
Repeat/Random Button
Transport Control Buttons
6
AVR 700/AVR 70/AVR 70C System Remote Control Functions, continued
Remote Control Functions, continued
In addition to controlling the AVR, the AVR remote can also control a Harman Kardon Bluray Disc® or DVD player that is connected to the HDMI 1 connector. The remote control buttons will have different functions depending on if the remote is controlling the AVR or a Blu-ray Disc or DVD player. Appendix A5, Remote Control Function List, on page 25, provides a list of the different remote control button functions when controlling a Blu-ray Disc or DVD player.
IR Transmitter lens: As buttons are pressed on the remote, infrared codes are emitted through this lens.
Power On/Off buttons: Press these buttons to turn the AVR on and off. The Main Power switch on the AVR’s front panel must be on for these buttons to turn the AVR on and off.
Mute button: Press this button to mute the AVR’s speaker-output connectors and Headphone jack. To restore the sound, press this button or adjust the volume.
AVR button: Press this button to switch the remote’s control mode to operate the AVR. Pressing this button when the AVR is in the Standby mode will turn it on.
Source Selector buttons: Press one of these buttons to select a source device. This action will also turn on the AVR and switch the AVR to the selected input.
•Pressing the TV Source Selector button plays the sound from the HDMI Audio Return
Channel, so you can listen to sources connected directly to the TV or to the TV itself through the AVR. See Additional Setup Menu Items: HDMI Set, on page 15, for more information.
•The first press of the Radio Source Selector button switches the AVR to the last-used tuner band (AM or FM). Successive presses cycle through AM, FM stereo and FM mono.
Stereo Mode button: Press this button to switch to the stereo listening mode.
Tone Controls button: Press this button to activate or bypass the bass and treble controls. When the tone controls are set to “ON”, use the up, down, left and right arrow buttons to vary the tone quality by adjusting the bass and treble.
Surround Mode Select buttons: Press these buttons to select a surround listening mode. Surround-mode availability depends on the nature of the source input signal, i.e., digital versus analog, and the number of channels encoded within the signal. See
Selecting a Surround Mode and Audio Processing and Surround Sound, on page 17, for more information.
Volume Up/Down buttons: Press these buttons to raise or lower the volume.
Display Mode button: Press this button to display the active surround mode and current volume control setting on the AVR’s Message Display. After five seconds the display will revert back to showing the currently-active source.
Test Tone sequence button: Press this button to activate the test tone for calibrating channel volume levels by ear.
Audio Input Select button: Press this button to select the specific digital audio input (or analog audio input) to which the current source is connected. Each press of the button advances through the following inputs: Optical Digital 1, Optical Digital 2, Coaxial Digital, HDMI (for HDMI 1 – HDMI 3 only) and Analog. This button does not function for the AM/ FM and USB sources.
Setup Menu button: Press this button to activate the setup menus. See Set Up the AVR, on page 14, for more information.
OK button: This button is used to select items from the menu system.
Back button: When you’re using the setup menus, press this button to return to the previous menu screen.
Channel Level button: Press this button to activate the individual channel-level adjustment. It lets you easily change the channel balance while you’re listening to suit different programs or seating arrangements. See Set Up the AVR, on page 14, for more information.
Left/Right/Up/Down buttons: These buttons are used to navigate the menu system.
Number buttons: Use these buttons to enter numbers for radio-station frequencies or to select station presets.
Memory button: To save the currently tuned radio station as a preset, press this button, then a Number button.
Tuning Up/Down buttons: Press these buttons to tune a radio station. When you’re listening to an FM station, each press will either change one tuning frequency increment at a time or seek the next higher or lower station with acceptable signal strength, depending on whether you are listening in FM mono or FM stereo.
Preset Station Up/Down buttons: Press these buttons to cycle through your preset radio stations.
Sleep/Clear button: Press this button to activate the Sleep Timer function. See Sleep Timer, on page 18, for more information. When controlling a Harman/Kardon Blu-ray Disc or DVD player, press this button to clear an entry.
Display Dimmer button: Press this button to dim the AVR’s front-panel display partially or fully.
Repeat/Random button: This button has no effect on the AVR but can be used to activate the repeat function when you’re listening to media on a device inserted into the AVR’s USB port and the repeat and random functions on a Harman Kardon Blu-ray Disc or DVD player. See Listening to Media on a USB Device, on page 16, for more information.
Track Skip Up/Down buttons: These buttons have no effect on the AVR but are used to change tracks or chapters when you’re listening to media on a device inserted into the AVR’s USB port, or on a Harman Kardon Blu-ray Disc or DVD player.
Transport Control buttons: These buttons have no effect on the AVR but are used to control a Harman Kardon Blu-ray Disc player or DVD player or a device inserted in the AVR’s USB port.
7
AVR 700/AVR 70/AVR 70C
Introduction to Home Theater and Place Your Speakers
Introduction to Home Theater
This introductory section will help you to familiarize yourself with some basic concepts unique to multichannel surround-sound AVRs, which will make it easier for you to set up and operate your AVR.
Typical Home Theater System
A home theater typically includes an audio/video receiver (AVR), which controls the system and supplies amplification for the loudspeakers; a disc player; a source component for television broadcasts (cable box, satellite dish AVR, HDTV tuner or antenna connected to the TV); a TV or video display; and multiple loudspeakers.
Multichannel Audio
The main benefit of a home theater system is its ability to produce “surround sound.” Surround sound uses multiple speakers and amplifier channels to immerse you in the audio/video presentation for a dramatically increased sense of realism.
Your AVR can have up to five main speakers connected directly to it, plus a subwoofer. Each main speaker is powered by its own amplifier channel inside the AVR. A system with more than two speakers is called a multichannel system. The different main speaker types in a home theater system are:
•Front Left and Right: The front left and right speakers are used as in a 2-channel system. In many surround-sound modes, these speakers are secondary, while the main action, especially dialogue, is reproduced by the center speaker.
•Center: When you are watching movies and television programs, the center speaker reproduces most of the dialogue and other soundtrack information that occurs on the screen, anchoring it with the picture. When you are listening to a musical program, the center speaker helps to create a seamless front soundstage, creating a more realistic “you-are-there” listening experience.
•Surround Left and Right: The surround left and right speakers produce ambient sounds that help create a realistic and immersive surround-sound environment. They also help recreate directional sound effects such as aircraft flyovers.
Many people expect the surround speakers to play as loudly as the front speakers. Although you will calibrate all of the speakers in your system to sound equally loud at the listening position, most artists use the surround speakers for ambient effects only, and they create their programs to steer relatively little sound to these speakers.
•Subwoofer: A subwoofer is designed to play only the lowest frequencies (the deep bass). It augments smaller, limited-range main speakers that are usually used for the other channels. Many digital-format programs, such as movies recorded in Dolby Digital, contain a low-frequency effects (LFE) channel that is directed to the subwoofer. The LFE channel packs the punch of a rumbling train or airplane, or the power of an explosion, adding realism and excitement to your home theater. Some people use two subwoofers for additional power and for even distribution of the sound.
Surround Modes
There are different theories as to the best way to present surround sound and to distribute the individual channel information to the surround-sound system’s speakers. A variety of algorithms have been developed in an effort to recreate the way we hear sounds in the real world, resulting in a rich variety of options. Several companies have developed different surround-sound technologies, all of which can be accurately reproduced by your AVR:
•DolbyLaboratories:Dolby TrueHD, Dolby Digital Plus, Dolby Digital, Dolby Pro Logic II, Dolby Pro Logic.
•DTS: DTS-HD™ High Resolution Audio, DTS-HD Master Audio™, DTS, DTS 96/24™, DTS Neo: 6.
•HARMAN International: Analog Surround Modes (Theater Hall, Stadium, Club, Arena).
•Stereo Modes: 2-channel stereo and 5-channel stereo.
Appendix Table A4, on page 22, contains detailed explanations of the different surroundsound options available on your AVR. Digital surround-sound modes, such as Dolby Digital and DTS systems, are available only with specially encoded programs, such as those available via HDTV, DVD and Blu-ray Disc media and digital cable or satellite television. Other surround modes may be used with digital and analog signals to create a different surround presentation or to use a different number of speakers. Surround-mode selection depends upon the number of speakers in your system, the programs you are watching or listening to, and your personal tastes.
Place Your Speakers
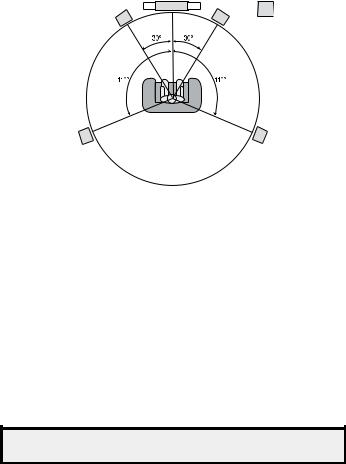
Determine the locations for your system’s speakers according to their manufacturer’s directions and the layout of your listening room. Use the illustration below as a guide for 5.1-channel systems.
To create the most realistic surround-sound environment possible, you should place your speakers in a circle with the listening position at its center. You should angle each speaker so it directly faces the listening position. Use the diagram below as a guide.
TV |
SUB |
C |
|
FL |
FR |
SL |
SR |
Placing the Left, Center and Right Speakers
Place the center speaker either on top of, below or mounted on the wall above or below the TV or video-display screen. Place the front left and right speakers along the circle, about 30 degrees from the center speaker and angled toward the listener.
Place the front left, front right and center speakers at the same height, preferably at about the same height as the listener’s ears. The center speaker should be no more than 2 feet (0.6m) above or below the left/right speakers. If you’re using only two speakers with your AVR, place them in the front left and front right positions.
Placing the Surround Speakers
You should place the left and right surround speakers approximately 110 degrees from the center speaker, slightly behind and angled toward the listener. Alternatively, you can place them behind the listener, with each surround speaker facing the opposite-side front speaker. You should place the surround speakers 2 feet – 6 feet (0.6m – 1.8m) higher than the listener’s ears.
NOTE: Your AVR will sound its best when the same model or brand of loudspeaker is used for all positions.
Placing the Subwoofer
Because a room’s shape and volume can have a dramatic effect on a subwoofer’s performance, it is best to experiment with placement so that you will find the location that produces the best results in your particular listening room. With that in mind, these rules will help you get started:
•Placing the subwoofer next to a wall generally will increase the amount of bass in the room.
•Placing the subwoofer in a corner generally will maximize the amount of bass in the room.
•In many rooms, placing the subwoofer along the same plane as the left and right speakers can produce the best integration between the sound of the subwoofer and that of the left and right speakers.
•In some rooms, the best performance could even result from placing the subwoofer behind the listening position.
A good way to determine the best location for the subwoofer is by temporarily placing it in the listening position and playing music with strong bass content. Move around to various locations in the room while the system is playing (putting your ears where the subwoofer would be placed), and listen until you find the location where the bass performance is best. Place the subwoofer in that location.
8
 Loading...