


Contents
Chapter 1: Checking Out Your Jukebox . . . . . . 1
Package contents . . . . . . . . . . . . . . . . . . . . . . . . . . . . . . . . 1
System requirements . . . . . . . . . . . . . . . . . . . . . . . . . . . . . 2
Front . . . . . . . . . . . . . . . . . . . . . . . . . . . . . . . . . . . . . . . . . . 3
Top . . . . . . . . . . . . . . . . . . . . . . . . . . . . . . . . . . . . . . . . . . . 5
Bottom . . . . . . . . . . . . . . . . . . . . . . . . . . . . . . . . . . . . . . . . . 6
Left . . . . . . . . . . . . . . . . . . . . . . . . . . . . . . . . . . . . . . . . . . . 7
Back . . . . . . . . . . . . . . . . . . . . . . . . . . . . . . . . . . . . . . . . . . 8
Accessories . . . . . . . . . . . . . . . . . . . . . . . . . . . . . . . . . . . . . 9
Specifications . . . . . . . . . . . . . . . . . . . . . . . . . . . . . . . . . . . 9
Chapter 2: Getting Started . . . . . . . . . . . . . . . . . 11
Charging the battery . . . . . . . . . . . . . . . . . . . . . . . . . . . . . 11
Turning on your jukebox . . . . . . . . . . . . . . . . . . . . . . . . . . 15
Plugging in the headphones . . . . . . . . . . . . . . . . . . . . . . . 16
Using the control buttons . . . . . . . . . . . . . . . . . . . . . . . . . 17
Using the menu buttons . . . . . . . . . . . . . . . . . . . . . . . 17
i

Using the playback buttons . . . . . . . . . . . . . . . . . . . 18
Locking control buttons . . . . . . . . . . . . . . . . . . . . . . . 19
Playing music . . . . . . . . . . . . . . . . . . . . . . . . . . . . . . . . . 20
Adjusting volume . . . . . . . . . . . . . . . . . . . . . . . . . . . 22
Viewing photos . . . . . . . . . . . . . . . . . . . . . . . . . . . . . . . . 23
Chapter 3: Playing Music . . . . . . . . . . . . . . . . . . 25
Playing a song . . . . . . . . . . . . . . . . . . . . . . . . . . . . . . . . 25
Viewing the Now Playing screen . . . . . . . . . . . . . . . 27
Adjusting volume . . . . . . . . . . . . . . . . . . . . . . . . . . . . . . . 28
Setting advanced playing modes . . . . . . . . . . . . . . . . . . 29
Setting the equalizer . . . . . . . . . . . . . . . . . . . . . . . . . 29
Setting shuffle mode . . . . . . . . . . . . . . . . . . . . . . . . . 29
Setting repeat mode . . . . . . . . . . . . . . . . . . . . . . . . . 30
Disabling expired music messages . . . . . . . . . . . . . 31
Viewing the music visualization . . . . . . . . . . . . . . . . 32
Creating playlists . . . . . . . . . . . . . . . . . . . . . . . . . . . . . . . 33
Creating a jukebox playlist . . . . . . . . . . . . . . . . . . . . 33
Creating a Windows Media Player playlist . . . . . . . . 34
Editing playlists . . . . . . . . . . . . . . . . . . . . . . . . . . . . . . . . 35
ii

Adding a track or album to a playlist . . . . . . . . . . . . . 35
Deleting a track from a playlist . . . . . . . . . . . . . . . . . 35
Deleting a playlist . . . . . . . . . . . . . . . . . . . . . . . . . . . . 36
Getting more music . . . . . . . . . . . . . . . . . . . . . . . . . . . . . 37
Installing the software . . . . . . . . . . . . . . . . . . . . . . . . 37
Creating files for your jukebox . . . . . . . . . . . . . . . . . . 37
Moving files to your jukebox . . . . . . . . . . . . . . . . . . . 48
Chapter 4: Viewing Photos . . . . . . . . . . . . . . . . 53
Viewing a photo . . . . . . . . . . . . . . . . . . . . . . . . . . . . . . . . 53
Copying photos to your jukebox . . . . . . . . . . . . . . . . . . . . 54
Copying photos from your computer . . . . . . . . . . . . . 54
Copying photos from your digital camera . . . . . . . . . 55
Copying photos from yo ur card reader or flash dr ive 58
Organizing photos . . . . . . . . . . . . . . . . . . . . . . . . . . . . . . . 60
Creating a photo folder . . . . . . . . . . . . . . . . . . . . . . . 60
Moving a photo into a folder . . . . . . . . . . . . . . . . . . . 61
Deleting a photo . . . . . . . . . . . . . . . . . . . . . . . . . . . . . 62
Working with slideshows . . . . . . . . . . . . . . . . . . . . . . . . . 63
Creating slideshows . . . . . . . . . . . . . . . . . . . . . . . . . . 63
iii

Editing slideshows . . . . . . . . . . . . . . . . . . . . . . . . . . 64
Playing slideshows . . . . . . . . . . . . . . . . . . . . . . . . . . 65
Getting more photos . . . . . . . . . . . . . . . . . . . . . . . . . . . . 66
Creating text notes . . . . . . . . . . . . . . . . . . . . . . . . . . . . . 67
Chapter 5: Settings and Options . . . . . . . . . . . 69
Setting the backlight . . . . . . . . . . . . . . . . . . . . . . . . . . . . 69
Setting the clock and calendar . . . . . . . . . . . . . . . . . . . . 70
Accessing the settings shortcut menu . . . . . . . . . . . . . . 70
Resetting the jukebox to its defaults . . . . . . . . . . . . . . . . 71
Chapter 6: Maintenance and Troubleshooting 73
Troubleshooting . . . . . . . . . . . . . . . . . . . . . . . . . . . . . . . . 73
Technical support . . . . . . . . . . . . . . . . . . . . . . . . . . . . . . 77
Telephone support . . . . . . . . . . . . . . . . . . . . . . . . . . 77
Internet . . . . . . . . . . . . . . . . . . . . . . . . . . . . . . . . . . . 77
Maintaining your jukebox . . . . . . . . . . . . . . . . . . . . . . . . 78
Cleaning . . . . . . . . . . . . . . . . . . . . . . . . . . . . . . . . . . 78
Replacing the battery . . . . . . . . . . . . . . . . . . . . . . . . 79
iv

Maintaining battery life . . . . . . . . . . . . . . . . . . . . . . . . 81
Updating the firmware . . . . . . . . . . . . . . . . . . . . . . . . . . . 81
Chapter 7: Safety and Legal Notices . . . . . . . . 83
Important safety information . . . . . . . . . . . . . . . . . . . . . . . 83
Regulatory compliance statements . . . . . . . . . . . . . . . . . 84
Notices . . . . . . . . . . . . . . . . . . . . . . . . . . . . . . . . . . . . . . . 86
Warranty . . . . . . . . . . . . . . . . . . . . . . . . . . . . . . . . . . . . . . 87
v

vi

Chapter 1: Checking Out Your Jukebox
Pac kage contents
Your package includes:
■ Gateway GCM-4 MP3 Photo Jukebox
■ Ear bud stereo headphones
■ USB 2.0 connector cables (2 )
■ AC powe r adapter
■ Soft cover carrying case
■ Quick start poster
■ This user guide
■ Software instal lation CD
1

System requirements
To connect to your jukebox, your computer must have the following
minimum requirements:
■ Microsoft
■ Microsoft Windows Media
■ Intel
■ 80 MB available hard drive space
■ 128 MB memory
2
®
Wind ows® XP (Service Pack 1)
®
Pentium III 333 M Hz processor
®
Player 10
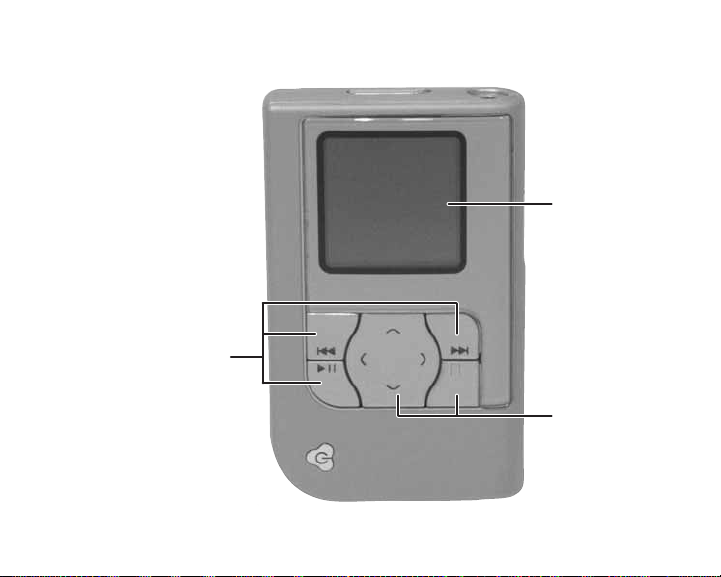
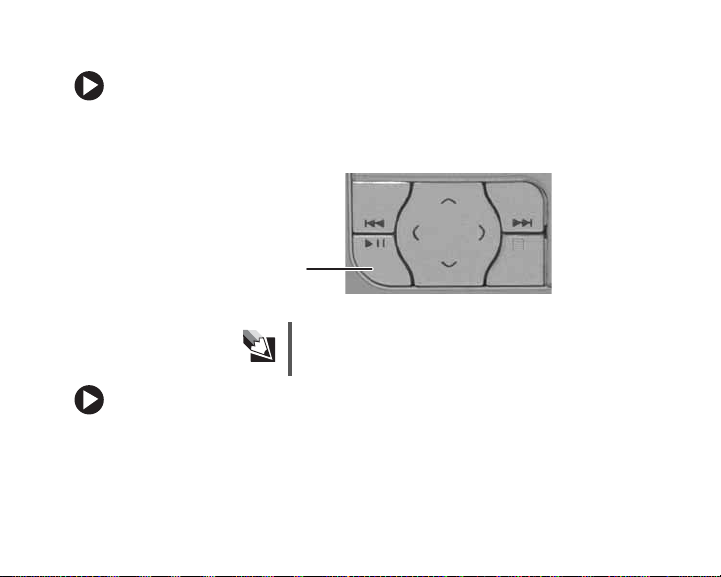
Front
Playback control
buttons
LCD panel
Menu control
buttons
3

Component Description
LCD panel Displays menus, music visualizations, and digital photos. For more
Playback
control buttons
Menu control
buttons
information, see “Playing music” on pag e 20 and “Viewing pho tos”
on page 23.
Control audio playback. The play/pause button doubles as a power
button. For more information , see “ Using the playback buttons” o n
page 18 and “Turning on your jukebox” on page 15.
Let you select menus and choices within m enus. For more
information, see “Using the menu buttons” on pa ge 17.
4
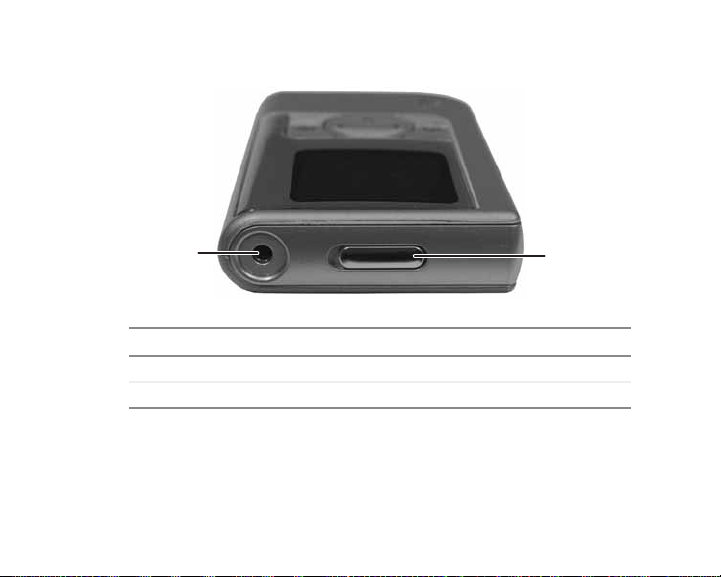
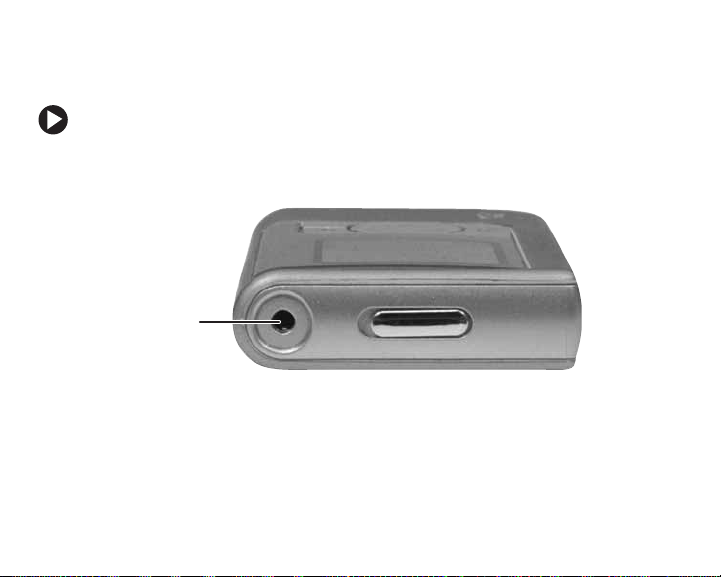
Top
Headphone
jack
Component Description
Headphone jack Plug headphones o r amplified sp eakers into this ja ck.
Control lock Slide to lock all jukebox control buttons.
Control lock
5

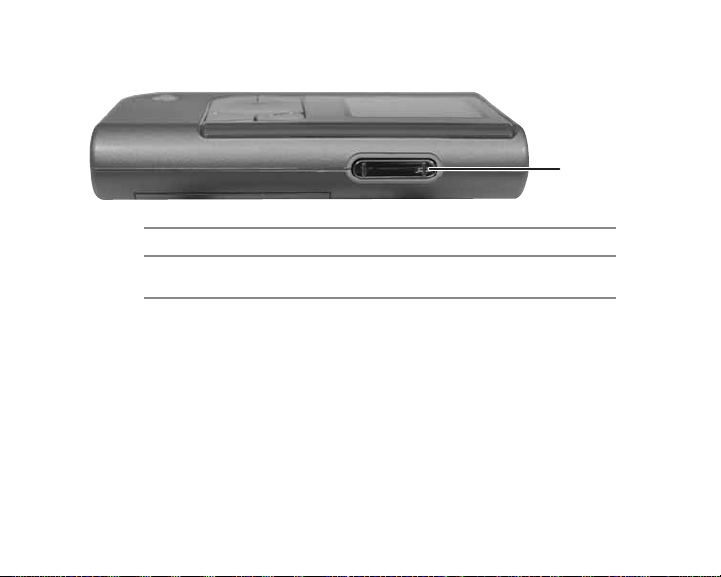
Bottom
USB/docking
connector
Component Description
USB/docking
connector
Reset button Press with a straighte ned paper clip or pin to restar t your
6
Connect the USB combo ca ble to this conne ctor and to th e
USB port o n your computer for moving music or ph otos to
your jukebox. You can also connect the camera USB cable
for downloading photos directly from your digital camera. For
more information, s ee “Charging t he batter y” on page 11,
“Moving files to your jukebox” on page 48 , and “Copying
photos from your digi tal camera” on page 55.
jukebox.
Reset button
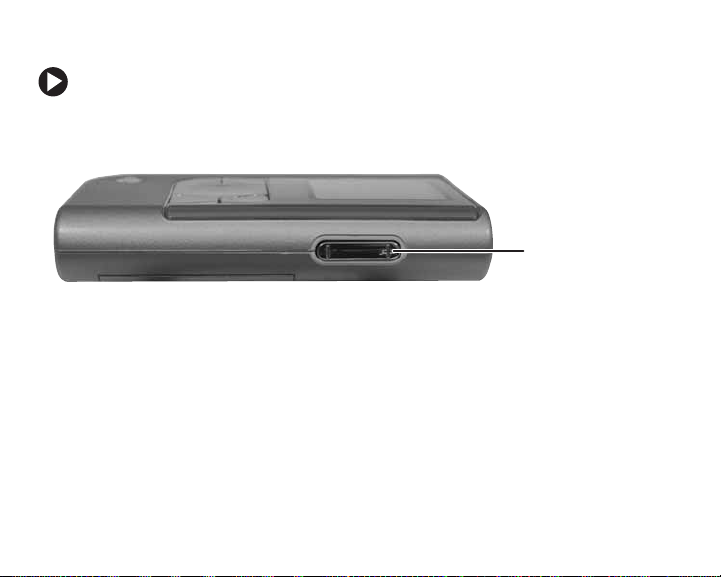
Left
Volume button
Control Description
Volume Press the + side (top) of the button to i ncr eas e volume,
and press the – side (bo ttom) to decrease volume.
7
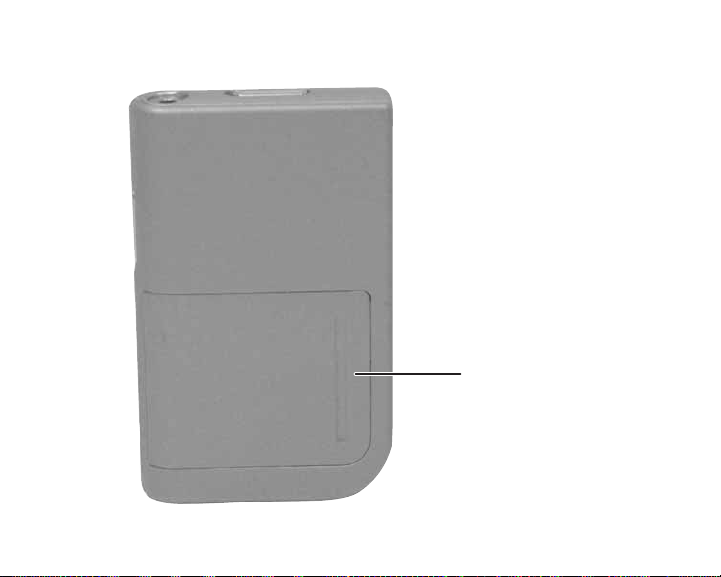
Back
8
Battery cover

Accessories
Accessories are available on Gateway’s Web site at
www.gateway.com/photojukeboxextras
Specifications
■ Dimensions: 2.3×3.8×0.7inches (59×96×17mm)
■ Display: 128 × 1 28 pixels, 16-bit (65,536 colo rs), TFT Transflective,
1.6-inch
■ Battery: 820 mAh, rechargeable Li-ion, prismat ic, 3.7V, removable
■ Hard drive: 4 GB, 1 inch, Compact Flash Type II
■ Memory: 32 MB SDRAM, 1 MB flash
■ Power: input 100~240VAC, 50-60 Hz (normal), ou tput 5V 1.6A
■ Compatible media: MP3, WMA, WAV, JPG/JPEG
■ Data transfer rate: Up to 480 Mbps using USB 2.0
■ Audio jacks: Audio line out (headp hones)
■ Camera interface cable: USB 2.0, 22-pin
■ Combo cable: USB 2.0, 22-pin
.
9

10
Chapter 2: Getting Started
Charging the battery
Fully charge the battery to maximize playing time. However, it is not
necessary to fully charge or completely discharge the battery each time.
You can charge the battery by connecting the jukebox either to the
AC power adapter (fastest) or to a USB port on the computer.
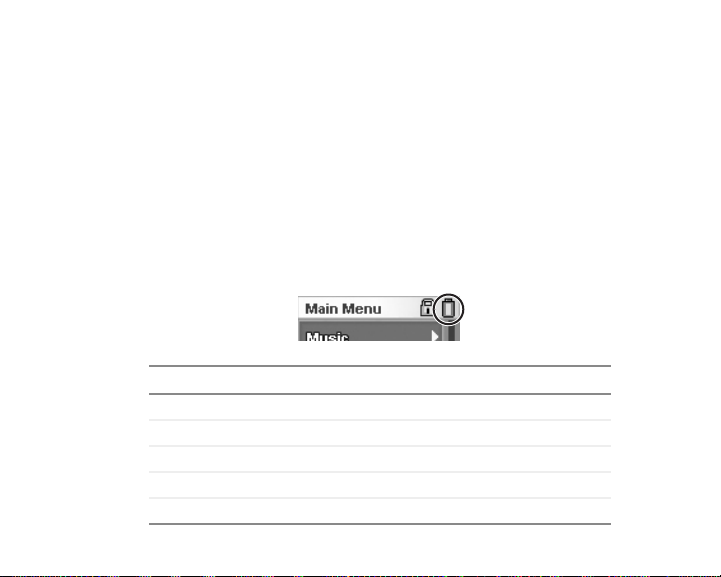
The battery icon in the upper right corner of the screen indicates the
remaining battery charge.
If the power icon is... the battery is...
Green Full
Yellow Medium
Red Low
Red with an exclamation point Critically low
A power plug Charging
11
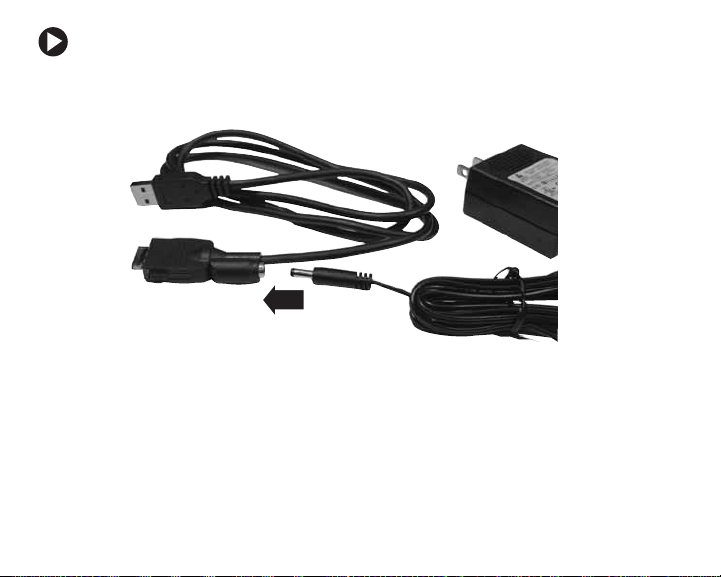
To charge the battery:
1 Connect the USB combo cable to the AC power adapter, then plug
the power adapte r into an AC po wer out let.
- OR Connect the USB combo cable to the computer.
12
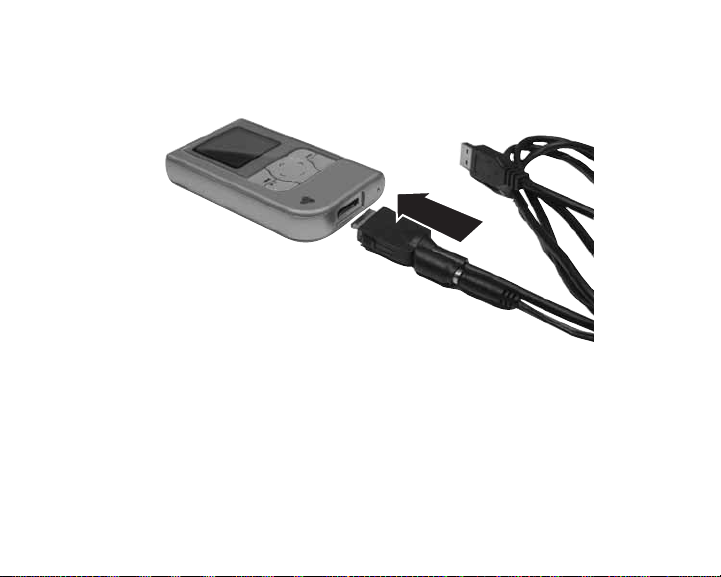
2
Plug the combo cable into the jukebox. Make sure that the top of
the plug (the side with the arrows) is facing the same way as the front
of the jukebox.
13
14
3
If you are charging your jukebox from the computer’ s USB cable, turn
your jukebox off. If your jukebox is on, it cannot charge from the
computer’s USB cable.
Important
If the jukebox is on, the power cord icon appears in the upper right
corner of the display. The keypad’s backlight turns on while the
battery charges, then turns off when the battery is fully charged.
If you are charging your jukebox from the ACpower adapter,
you can leave your jukebox on as it charges, but it will take
longer to charge.
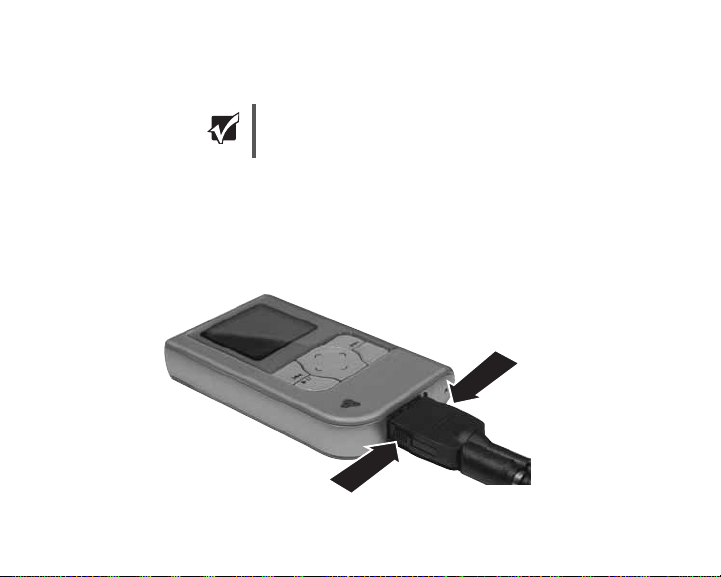
4 When your jukebox battery is finished charging, pinch the two side
buttons on the plug, then pull the plug out of the jukebox.
T urning on your jukebo x
To turn on your jukebox:
■ Press the power button. The jukebox turns on, and the Main Menu
appears after a few seconds.
Powe r b ut to n
Tips & Tricks
To avoid turning the jukebox on accide ntally, use the control
lock. For more information, see “Locking contro l buttons” on
page 19.
To turn off your jukebox:
■ Press and hold the power button until the display tur ns off (about
two seconds).
15
Plugging in the headphones
You can plug headphones and speakers into your jukebox.
To plug in headphones or speakers:
■ Plug the headphone or speaker plug into the headphone jack on the
top of you r jukebox .
Headphone/
speaker jack
16
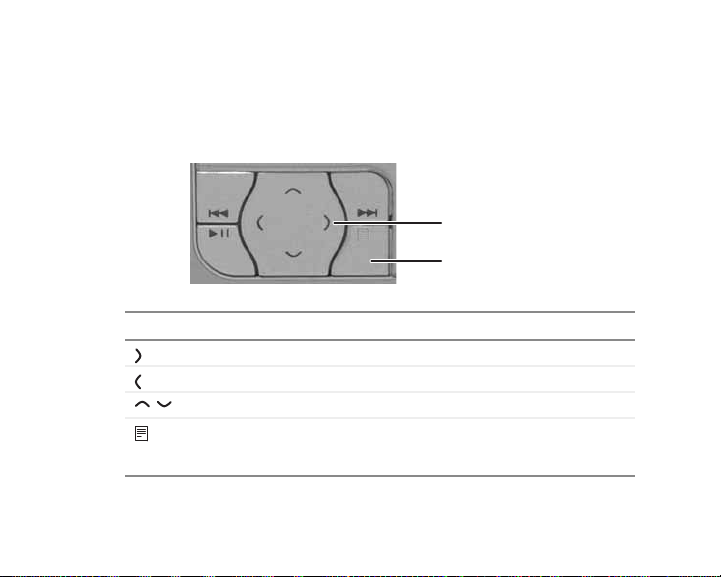
Using the control b uttons
Using the menu buttons
The menu buttons let you open menus and ch ange settings.
Directional buttons
Option button
Press this... To...
(right arrow) Select the current option or open the next menu.
(left arrow) Open the previous m enu.
(up and down arrows) Select the menu choice s and change settings.
(option button) Display the choices or option s of the curre ntly
For more information about jukebox menus, see “Chapter 5: Settings and
Options” on page 69.
highlighted menu item , and to crea te playlists,
turn on shuffle mode, or create slideshows.
17

Using the playback buttons
During playback, use the playback control buttons to skip to the next track,
skip to a previous track, or pause the playback or slideshow. Holding down
the previo us track o r next tr ack butt ons acts as rewind and fast forwa rd,
respectively.
18
Previous track
Play/pause
Important
Next track
If the jukebox does not respond when you pre ss a button, it
may be pausing for several seconds while loading the next file.
If the jukebox does not respond af ter waiting for several
seconds, press the res et button. For th e lo catio n of the re set
button, see “Bottom” on page 6.
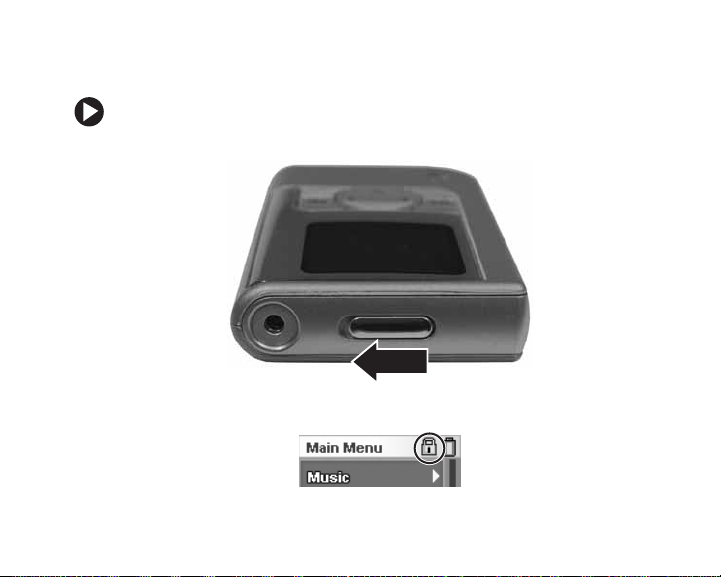
Locking control b uttons
You can lock your jukebox so its buttons are not accidentally pressed.
To lock all jukebox buttons:
■ Move the control lock to the Locked position (where red is showing).
When the buttons are locked, a lock icon appears on the screen.
19

Playing music
To play music:
1 Plug in the headphones and turn on your jukebox. The Main Menu
opens.
2 Press or to highlight Music, then press to open the Music
menu.
3 Press or to highlight Playlists, Artists, Albums, Genres, All Music,
or
Now Playing, then press to open the submenu.
4 Continue to select the submenus (such as playlist number and artist
name), then press when your final selection is made to play the
music. Information about the song and play mode appears on the
screen.
Do more
Yo u c a n al s o :
■ Create a playlist
■ Change equalizer settings
■ Change shuffle or repeat settings
For more information, see “Chapter 3: Playing Music” on page 25.
20

Pre-loaded music
For your immediate listening enjoyment, your jukebox comes pre-loaded
with player-exclusive content from three artists, Renato Grinberg, Mac
Lopez, and Lee Johnson.
Renato Gri nberg Tracks included
Born and raised in Brazil, Renato Grinberg is a refined
guitarist and composer who blends the popul ar
Brazilian acoustic guitar style with contemporary jazz
and pop music. His work includes three solo albums:
■
Without Frontiers
■
Caetano, Sem Palavras
■
So Far...So Close
Mac Lopez with Lee Johnson Tracks included
Born and raised in Southern California, Mac Lopez is
a well-regarded Native American flute performer and
composer of Shosho ne heritage. H is work include s
four CD compilations:
■
Footprints of Our Ancestor s
■
Wind Messengers (wi th Lee Johns on)
■
Keepers of the Moon
■
Story of the Redtail Hawk (his latest release)
Tracks from his CD
Without Frontiers
1 Sem Compromisso
2 D o Outro Lado
3 Sem Fronteiras
Learn more a bout this ar tist at
www.renatogrinberg.com
Tracks from their CD
1 Wind Messengers
2 T he Hawk and the Raven
3 Waterfall Song
Learn more about these a rtis ts at
www.whirlwindstudios.com
.
Wind Messengers
.
:
:
21
Adjusting volume
To adjust volume:
1 Press the + side (top) of the volume button to increase volum e, and
press the – side (bottom) to decrease volume.
22
Volume button

Viewing photos
To view photos:
1 Turn o n y o u r j uk e b o x . T h e Main Me nu opens.
2 Press or to highlight Pictures, then press to open the Pictures
menu.
3 Press or to highlight a photo folder, then press to open the
folder.
4 Press or to highlight a photo, then press to view the photo.
To view other photos in the same folder as the photo being viewed,
press or .
5 To return to the Main Menu, press .
Do more
Yo u c a n al s o :
■ Create new folders
■ Create a slideshow
■ Copy, paste, or delete photos
■ Change slideshow settings such as time interval and transition type
For more information, see “Chapter 4: Viewing Photos” on page 53.
23

Pre-loaded photos
So you can view photos on your jukebox righ t away, photographs from
different parts of the world have been included. Photos are provided
courtesy of the employees of Gateway.
24

Chapter 3: Playing Music
Playing a song
To play music:
1 Plug in the headphones and turn on your jukebox. The Main Menu
opens.
2 Press or to highlight Music, then press to open the Music
menu.
3 Press or to highlight any of the options below, t hen press to
open the submenu. When you see the list of songs, highlight the song
you want to play, then press .
■ Playlists
■ Artists
■ Albums
■ Genres
■ All M usic
■ Now Playing
25

Play mode
Track title
Equalizer
visualization
Elapsed track time
4 If at any point you want to add a song or an entire category to a
26
Information about the song and play modes appears on the
Now Playing screen.
Lock indicator
Shuffle
Battery meter
Repeat mode
Elapsed track time
Equalizer setting
playlist, highlight the song, artist, album, or other category, press
to open the option me nu, highlight Add to Playl ist, then press .

Viewing the Now Playing screen
After moving within menus, you can quickly return to the Now Playing
screen from the Main Menu.
To return to the Now Playing screen:
1 From the Main Menu, press to open the options menu.
2 Press or to highlight Now Playing, then press to open the
Now Playing screen.
27

Adjusting volume
You can adjust volume at any time, regardless of the current menu or
screen.
To adjust volume:
1 Press the + side (top) of the volume button to increase volume, and
press the – side (bottom) to decrease volume.
28
Volume button

Setting ad van ced pla ying modes
Setting the equalizer
To set the equalizer:
1 From the Main Menu, press or to highlight Settings, then
press to open the Settings menu.
2 Highlight Audio, then press to open the Audio Setting menu.
3 Highlight EQ, then press to open the EQ Mode menu.
4 Highlight the equalizer setting you want to use, then press to select
it. The equalizer setting immediately becomes active.
Setting shuffle mode
To set the shuffle mode:
1 From the Main Menu, press or to highlight Settings, then
press to open the Settings menu.
2 Highlight Audio, then press to open the Audio Setting menu.
29

3
Highlight Shuffle, then press to open the Shuffle Mode menu.
4 Highlight ON or OFF, then press to change the setting. The shuffle
mode immediately becomes active.
Tips & Tricks
Setting repeat mode
To set the repeat mode:
1 From the Main Menu, press or to highlight Settings, then
press to open the Settings menu.
2 Highlight Audio, then press to open the Audio Setting menu.
3 Highlight Repeat Mode, then p ress to open the Repeat Mode menu.
4 Highlight the repeat setting you want to use, then press to select
it. The repeat setting immediately becomes active.
30
To access the shu ffle mo de se tting wh ile in the
screen, press , then sele ct Shuffle.
Now Playing

Disabling expired m usic messages
If you use a music service where music can be played for a limited amount
of time (such as Napster T o Go), the music will eventuall y become disabled
on your jukebox. When you try to play a disabled track on your jukebox,
you get the message “To play this track, you must sync your device to
your PC.”
Although re-syncing with your computer will quickly enable you to access
the track again, you may want to disable the expiration warning message
if it is too distract ing.
To disable messages for disabled music:
1 From the Main Menu, press or to highlight Settings, then
press to open the Settings menu.
2 Highlight Expired Song Message, then press t o open the Expired
Song Message menu.
3 Highlight Disabled, then press to select it. When you attempt to
play a disabled track, the jukebox does not play it and gives you no
warning message.
31

Viewing the music visualization
While music is playing, you can choose to display a visualization of the
sound. The visualization is similar to visualizations you may see in
Windows Media Player on your computer.
To view the music visualization:
1 In the Now Playing screen, press to open the options menu.
2 Highlight Visual, then press . The Visual menu opens.
3 Highlight OFF, then press . The visualization turns on.
4 To turn the visualization off, in the same menu highlight ON, then
press .
32

Creating playlists
Y ou can create playlists on the jukebox, or you can create them in Windows
Media Player and copy them to your jukebox by syncing your jukebox with
the computer.
Creating a jukebox playlist
To create a playlist on the jukebox:
1 On your jukebox, select a song and play it.
2 In the Now Playing screen, press to open the options menu,
highlight Ad d to Pla ylist, th en press . The New Playlist menu opens.
3 Highlight <Name Playlist> or the default playlist name (Playlist1,
Playlist2, and so on), then press .
4 If you selected the default playlist name, the new playlist is created
and you are done.
- OR If you selected <Name Playlist>, the Select first character menu opens.
5 Highlight the first character of your playlist, then press . Continue
selecting characters until the naming is complete, then enter two
spaces to complete the naming. The new playlist is created.
33

Creating a Windows Media Player playlist
To create a playlist in Windows Media Player:
1 In Windows Media Player on your computer, click the Library tab,
then click and drag the files to add to your playlist from the library
list to the playlis t window on the ri ght.
2 Click Now Playing List, then click Save Playlist As.
3 Type a f il en am e , t he n c li ck Save. Your playlist is created.
34

Editing playlists
Adding a track or alb um to a playlis t
To add to a playlist:
1 On your jukebox, press or to highlight Music, then press to
open the Music menu.
2 Highlight Playlists, Ar tists , Albums, Genres, All Music, or Now Playing,
then press to open the submenu.
3 In the submenu, highlight the item (a p articular art ist, album, genre,
or song), then press to open the options menu.
4 Highlight Add to Playlist, then press . A list of play lists opens.
5 Highlight the playlist to add the item to, then press . Th e item is
added to the playlist.
Deleting a track from a play list
To delete a track from a playlist:
1 On your jukebox, press or to highlight Mu sic, then press to
open the Music menu.
2 Highlight Playlists, then press .
35

3
Highlight the playlist containing the track you want to delete, then
press .
4 Highlight the track you want to delete, then press to open the
options menu.
5 Highlight Delete Song, then press . The prompt “Remove song
from playlist?” appears.
6 Press . The song is deleted from the playlist.
Deleting a playlist
To delete a playlist:
1 On your jukebox, press or to highlight Mu sic, then press to
open the Music menu.
2 Highlight Playlists, then press .
3 Highlight the playlist you want to delete, then press to open the
options menu.
4 Highlight Delete Playlist, then press . The prompt “Delete Playlist?”
appears.
5 Press . The playlist is d eleted.
36

Getting more music
Installing the software
To copy music and digital photo files to your jukebox from your computer,
you must first install Windows Media Player 10 on your computer.
To install the software:
1 Insert the Gateway MP3 Photo Jukebox Installation CD into your
computer’s CD or DVD drive, then follow the o n-screen instructi ons.
Tips & Tricks
2 After the installation is finished, click Finish, then restart your
computer.
Creating files for your jukebo x
Before you connect your jukebox to your computer , you should have some
digital music and photo files ready on th e computer. After files are ready,
you can copy them to your juke box.
If you are unable to locate your in stallation CD, you can
download Windows M edia Player 10 from
http://www.microsoft.com/windows/windowsmedi
download/download.aspx
a/player/
37

■ To create digital music files, you need to either copy (rip) them from
a CD or buy them from an online digital music service, such as
Napster. For more information, see “Ripping music files” on page38
or “Buying digital music files” on page 41.
■ To create digital photos, you must either take them with a digital
camera and transfer the files to your computer or scan photographic
prints and negatives using a scanner. For more information, see your
camera’s or scanner’s documentation.
Ripping music files
To rip music tracks from a CD:
1 Insert the music CD into your computer’s CD or DVD drive.
2 Click Start, All Programs, Accessories, Entertainment, then click
Windows Media Player. Windows Media Player opens.
38

3
Click the Rip tab. The list of tracks on your music CD appears. If your
computer is connected to the Internet, the album and tracks are listed
by name.
4 Right-click the title bar, click Tools, then click Options.
5 Click the Rip Music tab.
39

40
6
Click the Format box, click MP3 or WMA, then click OK. You only
have to select the format once, so the next time you rip music, you
do not need to perform this step.

7
Click the check box next to each track you want to copy, then click
Rip Music. The tracks are copied to your computer and are added to
your Media Player Library.
Buying digital music files
Y ou can buy digital music from several online music services. To play music
from these services on your jukebox, you must buy music in MP3 or WMA
format.
Plays For Sure is a Microsoft program that ensures compatibility between
compatible media players and participating music providers. Your jukebox
is compatible with Plays For Sure, so you know that the music you buy
from a Plays For Sure music provider will work on your jukebox. For a
complete list of participating Plays For Sure music providers, see
www.playsforsure.com
.
41

Napster
With the Napster To Go™ online music service, you can transfer an
unlimited amount of music to your jukebox for a low monthly free. Fill
your player, listen to all the music, then fill it up again from your choice
of over a million tracks. Napster is a Plays For Sure music provider.
To download music from Napster To Go:
1 Click the Store icon (the multicolored butterfly) in the upper right
corner of Windows Media Player , then clic k Napster. The Registration
screen opens.
2 Click the Redeem Napster Card or Promo Code link in the upper
right cor ner.
42

3
Type your member name, a password, and your e-mail address, then
type your Promo Code in the space provided.
4 Click to select the Review Terms & Conditions check box, then click
Next Step.
5 Type your billing information, then click Submit.
Important
If you cancel at any time before the end of your trial pe riod,
you will not be charged.
43

44
6
Type the member name and password you chose, then click Sign In.
7 Find some music you woul d like to download. By c licking the Search
boxes in the upper right corner, you can search by artist, track, or
album. You can also click Browse to access Napster's browse features.
8 When you locate the track you want, click to select it, then click
Download on the bottom left. You can use the S
to select multiple tracks.
HIFT and CTRL keys

9
Connect your jukebox to your computer. You are prompted to set
up how yo u want to sync your player.
■ If yo u select Automatic, all of your tracks will sync to your
jukebox automatically each time you connect your jukebox to
the computer.
■ If you selec t Automatic and check the Custom check box, you
can select the playlists you want to sync automatically.
■ If you select Manual, you manually select tracks and start sync
to transfe r them to your juke box.
10 When the sync is complete, you can disconnect your juke box and
take Napster music anywhere you go.
Preparing files
Before you move your files to your jukebox, you should set them up in
Media Pla yer so th ey can be automa tically synced with (moved to) your
jukebox th e next ti me you co nnect it to your c omputer.
45

To prepare files for syncing with your jukebox:
1 Click Start, All Programs, Accessories, Entertainment, then click
Windows Media Player. Windows Media Player opens.
2 Click the Sync tab.
3 Click Edit Playlist.
46

4
In the Edit Playlist dialog box, right-click the album or artist you want
to add to the Sync List, then click Add t o Playlist.
- OR Click the album to open its list of tracks, then click each track you
want to add to the Sync List.
5 Click OK when you have finished adding tracks to the Sync List.
47

Moving files to your jukebox
To move files to your jukebox:
1 Click Start, All Programs, Accessories, Entertainment, then click
Windows Media Player. Windows Media Player opens.
2 Click the Sync tab.
3 Turn o n y o u r j uk e b o x .
48

4
Plug the USB combo cable into the jukebox. The power adapter does
not need to be plugged into the combo cable.
49

50
5
Plug the other end of the combo cable into a USB port on your
computer. Your computer recognizes the attached player, and
“Connected” appears on the jukebox display.
On your computer, the Device Setup dialog box opens.
6 Click Manual, then click Finish. Your sync settings are saved.
Tips & Tricks
You can also select Automatic, so your jukebox and Media
Player automatically sync each time you connect your jukebox
to the computer.

7
Click the Sync tab, then click Start Sync. The files are moved to your
jukebox.
8 Click the Safely Remove Hardware icon on the Windows taskbar,
then click Safely remove USB Mass Storage Device. The prompt
“Safe To Remove Hardware” appears.
9 Unplug the USB cable from the computer. Your jukebox restarts. If
your jukebox is finished charging, you can also unplug the combo
cable from the jukebox.
10 To unplug the combo cable from the jukebox, pinch the two side
buttons on the plug, then pull the plug out of the jukebox.
51

52

Chapter 4: Viewing Photos
Viewin g a photo
To view photos:
1 Turn o n y o u r j uk e b o x . T h e Main Me nu opens.
2 Highlight Pictures, then press to open the Pictures menu.
3 Highlight a photo folder, then press to open the folder.
4 Highlight a photo, then press to view the photo. To view other
photos in the same folder as the photo being viewed, highlight them.
5 To return to the Main Menu, press .
53

Copying photos to your jukebox
Copying photos from your computer
You can transfer any digital image from your computer to your jukebox.
To copy photos from your computer to your jukebox:
1 Turn on your jukebox, then connect it to the computer using the
USB combo cable.
2 On your computer, right-click the Start button on the Windows
taskbar, then cl ick Explore. Windows Explorer opens.
3 Open the folder on your computer containing photos, then click the
photo you want to copy to your jukebox. To select multiple photos,
press and hold C
4 Click Edit, then click Copy.
5 Open the folder on the drive for your jukebox, click Edit, then click
Paste. (Your jukebox appears in Windows Explorer as an additional
drive.) The photos are copied to your jukebox.
To copy photos from your jukebox to the computer, use the same
procedure, but in Windows Explorer you must copy from the jukebox
and paste to the comp uter.
54
TRL while clicking.

Copying photos from your digital camera
You can also transfer photos directly from your camera to your jukebox.
This feature is convenient for emptying your camera’s memory card while
you have no access to a computer for permanent storage.
To copy photos from your camera to your jukebox:
1 Connect y our came ra’s USB cable to the juk ebox’s USB ca mera
interface cable.
55

56
2
Turn your jukebox on, then connect the USB cable t o your juk ebox.
Your jukebox detects the camera and asks to upload all files.

■
Important
Press to copy all files to your jukebox. Copying may take several
3
To determine whe ther a ca me ra is supported for direct file
copying to your jukebox, see
www.gateway.com/photojukebox
listed, use a memor y card reader to transfer images to the
jukebox. For more information, see “Copying photos from
your card reader or flash drive” on page 58.
■
If your jukebox battery is low, the jukebox cannot copy files
from your camera and a USB Disabled icon appears in the
lower right corner of the screen .
. If your camera is not
minutes.
4 After the copying is complete, unplug your jukebox and camera from
the USB cable.
After verifying that the files have been copied to your jukebox, you
can erase them from your camera.
57

Copying photos from your car d reader or flash drive
Y ou can tr ansfer pho tos from a USB memo ry card reader or USB fl ash drive
by connecting the reader’s USB cable or the flash drive itself to your
jukebox’s USB camera interface cable.
Important
To determine whether your memory card reader is supported
for direct file copying to your jukebox, see
www.gateway.com/photojukebox
you may need to first copy the photos to a computer, then copy
the photos from the computer to to your jukebox.
To copy photos from your memory device to your jukebox:
1 Connect your card reader’s USB cable or your flash drive to the
jukebox’s USB camera interface cable.
2 If you are using a memory card reader, insert your memory card.
3 Connect the cable to your jukebox. Y o ur jukebox detects the memory
device and asks if you want to upload all files.
Important
4 Press to copy all files to your jukebox. Copying may take several
minutes.
58
If your jukebox battery is low, the jukebox cannot copy files
from your card reader or flash dr ive.
. If your reader is not li sted,

5
After the copying is complete, unplug your jukebox and memory
device from the USB cable.
After verifying that the files have been copied to your jukebox, you
can erase them from your memory device.
59

Organizing photos
Creating a photo folder
To create a photo folder:
1 From the Main Menu, highlight Pictures, then press to open the
Pictures menu.
2 Press to open the options menu, highlight New Folder, then
press . The New F older menu opens.
3 Highlight <Name Folder> or the defa ult new f older na me, then
press .
4 If you selected the default folder name, the new fol der is created and
you are done.
- OR If you selected <Name Folder>, the Sele ct first charac ter menu opens.
5 Highlight the first character of your folder name, then press .
Continue selecting characters until the naming is complete, then
press . The new folder is created.
60

Moving a photo into a folder
To move a photo into a folder:
1 From the Main Menu, press or to highlight Pictures, then
press to open the Pictures menu.
2 Highlight a photo folder, then press to open the folder.
3 Highlight a photo, then press to open the options menu.
4 Highlight Cut, then press . The file is deleted from that folder.
5 Press to return to the folder menu, highlight the target folder, then
press to open that folder.
6 Press to open the options menu, highlight Paste, then press .
The photo is pasted into that folder.
Tips & Tricks
You can also copy (instead o f c ut) a ph oto f rom a fold er, and
you can cut and paste a folder into anothe r folder.
61

Deleting a photo
To delete a photo:
1 From the Main Menu, press or to highlight Pictures, then
press to open the Pictures menu.
2 Highlight a photo folder, then press to open the folder.
3 Highlight the photo you want to delete, then press to open the
options menu.
4 Highlight Delete Photo, then press to delete the photok or
press to cancel.
62

W orking with slideshows
Creating slideshows
A slideshow includes all photos within the folder you selected.
To create a slidesh ow:
1 From the Main Menu, highlight Pictures, then press to open the
Pictures menu.
2 Highlight a photo folder, then press to open the folder.
3 Highlight any phot o, then press to open the op tions menu.
Important
4 Highlight New Slideshow, then press . The Select Music menu o pens.
5 Highlight the music you want to play as background or none, then
press . The New Slideshow menu opens.
6 Highlight <Name Slideshow> or the d efault n ew slid eshow n ame,
then press .
7 If you selected the default slideshow name, the new slideshow is
created and you are done.
- OR -
Regardless of which p hoto you select, al l photos wit hin that
photo’s folder are added to the sl ideshow.
63

If you selected <Name Slideshow>, the Sel ect first character menu
opens.
8 Highlight the first character of your slideshow name, then press .
Continue selecting characters until the naming is complete, then
press . The new slideshow is created.
Editing slideshows
Deleting a slideshow
To delete a slideshow:
1 From the Main Menu, highlight Slideshows, then press to open the
List menu.
2 Highlight the slideshow you want to delete, then press to open
the options menu.
3 Highlight Delete Slid eshow, then press . The “Delete Slideshow?”
prompt appears.
4 Press to delete the slideshow, or press to cancel.
64

Setting slideshow options
To set slideshow options:
1 From the Main Menu, highlight Slideshows, then press to open the
List menu.
2 Highlight the slideshow you want to change settings for, then
press to open the options menu.
3 Highlight T ime Interval to change the time between slide tran sitions,
or highlight Transition to change the type of slide transitions, then
press .
4 Highlight the settings you want, then press to save your changes.
Playing slideshows
To play a slideshow:
1 From the Main Menu, highlight Slideshows, then press to open the
List menu.
2 Highlight the slideshow you want to watch, then press to start the
slideshow.
65

Getting more photos
Y our jukebox can display any digital image in JPG format. Sources for your
digital im ages m ay inclu de:
■ Digital cameras
See your camera documentation for information on how to transfer
files from the camera to the computer. You can also transfer photos
directly from the camera to your jukebox . Fo r more i nforma tio n, see
“Copying photos f rom your digital cam era” on page 55.
■ Desktop scanners
See your scanner documentation fo r information on how to scan and
save images, and the file formats it can save.
■ Graphics programs
See your graphics program’s documentation for information on the
file formats it can save.
■ Internet
Y ou can download most images you see in your Internet Web browser
by right-clicking the image, then clicking Save As.
Tips & Tricks
66
For viewing on the jukebox, a digital image does not n eed to
be any larger than 1 28 pixels wid e or ta ll . P h oto s la rge r tha n
2048 × 1536 will cause delays before viewing .

Creating text notes
You can even use your jukebox as a reference pad by saving text as an
image. This example uses Microsoft Paint, but you can use any image
editing software.
67

To create a text not e:
1 Click Start, All Programs, Accessories, then click Paint. Microsoft
Paint opens.
2 Click the square at the lower-right corner of the drawing area, then
drag it until the status bar shows the drawing area dimensions of
128x110.
3 Click the text tool button , then type the text you want.
4 Save the image as a JPG, then transfer it to your jukebox. For more
information on transferr ing files, see “Copying p hotos from your
computer” on page 54.
68

Chapter 5: Settings and Options
Setting the backlight
You can change the length of time the backlight stays on after you press
a button.
To set the backlight time:
1 From the Main Menu, press or to highlight Settings, then
press to open the Settings menu.
2 Highlight Backlight, then press to open the Backlight menu.
3 Highlight the length of time you want the backlight to stay on, then
press to select it.
69

Setting the cloc k and calendar
Your jukebox keeps track of the current time and date.
To set clock and calendar:
1 From the Main Menu, press or to highlight Settings, then
press to open the Settings menu.
2 Highlight Time, then pr ess to open the Date & Time menu.
3 Press and to select the time or date fields, then press or
to change the value in the selected field.
Accessing the settings shortcut menu
In the Now Playing screen, you can ac cess the most commo nly changed
settings.
To access the settings shortcut menu:
1 In the Now Playing screen, press to open the options menu.
2 Highlight an option (EQ, Visual, Shuffle, or Repeat Mode), then
press to open the respective menu.
70

Resetting the jukebox to its defaul ts
You can reset all custom settings in your jukebox to return it to its factory
configuration.
To reset the jukebox to its defaults:
1 From the Main Menu, press or to highlight Settings, then
press to open the Settings menu.
2 Highlight Reset All, then press . The prompt “Do you want to reset
all?” appears.
3 Press to reset the jukebox, or press to cancel.
71

72

Chapter 6: Maintenance and Troubleshooting
This chapter describes how to solve common issues you ma y experience
with your jukebox.
Troubleshooting
Buttons do not work
Make sure that the control lock is not in the LOCK position. Check for a
lock icon on the screen. If the control lock is in the LOCK position, move
it to the UNLOCK position. For more information, see “Locking control
buttons” on page 19.
Files cannot be transferred
■ Make sure that the USB cable is connected correctly to your computer
and jukebox. For more information, see “Moving files to your
jukebox” on page 48.
■ Make sure that t he AC power ad apter is plug ged in to you r jukeb ox
and a power outlet and that your jukebox is turned on.
73

Firmware update fails
If the firmware update utility is unable to update your jukebox firmware:
74
Caution
Before updating or trou bleshooting your jukebox fir mware,
make sure that your music and photo files are backed up.
1 Turn on your jukebox and connect it to your computer using the
USB combo cable.
2 Click Start, All Programs, Gateway MP3 Photo Jukebox, then click
Firmware Utility.
3 Click Reinstall. The jukebox’s original firmware is reinstalled.

4
You can also click:
■ Recover. Use this when files on the jukebox seem to disappear,
although you have not deleted them. The Recover option
attempts to fix the database on the jukebox so that files will
no longer disappear.
■ Format (Disk Maintenance). Use this when Recover does not
fix the problem. The Format option backs up and re-formats
the jukebox’s hard drive. After the drive is re-formatted, the
backed-up data is restored to the jukebox. The Format process
takes much longer than the Recover process.
5 After the update is finished, disconnect the ju kebox from the
computer.
I hear no sound
■ Adjust the volume level by pressing the volume buttons on your
jukebox.
■ Make sure that the headphones are plugged in all the way.
Jukebox does not turn on
Make sure that the battery still has power. For more information, see
“Charging the battery” on page 11.
75

Jukebox does not appear in Windo ws Media Play er
■ Make sure that you have Windows Media Player version 10 installed.
You can install ver sion 10 fr om the installa tion CD .
■ Check your version of Microsoft Windows XP. Your computer must
have Service Pack 1 installed for Windows Media Player 10 to work
correctly.
T ransferred musi c does not play
If you transfer music with Windows Explorer instead of Windows Media
Player, the jukebox wil l not rec ogniz e the music. To transfer music to your
jukebox, you must use Windows Media Player.
When I try to play a song, I get the message “T o play this trac k,
you must sync y our device to your PC.”
If you use a music service where music can be played for a limited amou nt
of time (such as Napster To Go), the music will eventually “expire” on your
jukebox. Re-sync with your computer to access the track again. For more
information on syncing with your computer, see “Moving files to your
jukebox” on page 48.
76

T echnical support
T elephone support
If you need non-tutorial help with your player, contact Gateway at
(605) 232-2118, Monday th rough Friday, 7:00 a.m. through 9:00 p.m.
Central Time.
Internet
For technical support, go to the Gateway Support Web site at
support.gateway.com
For more information about your jukebox, go to
w
ww.gateway.com/photojukebox .
.
77

Maintaining your jukebox
Cleaning
■ Do not drop your jukebox or leave it under heavy objects.
■ Do not allow liquids to come into contact with your jukebox. If this
happens, wipe the jukebox with a dry cloth.
■ Do not leave the jukebox where it will be subjected to prolonged
exposure to direct sunlight, extreme temperatures (such as inside a
parked automobile), moisture, vibration, excessive dust, and sand.
■ Avoid areas with strong magnetic fields.
■ Do not use thinner, alcohol, or benzene when cleaning the jukebox.
■ To avoid electrical shock, do not disassemble the case. If your jukebox
needs service, contact Gateway at s
■ Do not use the headphones with the unit while driving, cycling, or
operating any motorized vehicle. This could create a traffic hazard
and is illegal in many areas. It could also be dangerous to play music
at a high volume while walking, especially at pedestrian crossings.
■ Prolonged use of headp hones at high volume m ay cause hearing
damage or ringing in your ears.
78
upport.gateway.com .

Replacing the ba ttery
For extended listening time without recharging, you can install a spare
battery. With an extra battery or two, you can increase the jukebox play
time from 8-10 hours to 16-20 or 24-30 hours. To buy additional batteries,
see www.gateway.com/photojukeboxextras
To replace the battery:
1 Turn off the jukebox.
2 Turn the jukebox over, then slide off the battery cover.
.
79

3
Press the battery toward the far side of the jukebox, then lift the
battery out of the jukebox .
80
Caution
Never shake the jukebox to remove the battery. Shaking the
jukebox will damage its hard drive.
4 Insert the replacement battery into the battery bay, making sure the
contacts on the battery align with the contacts in the battery bay.
5 Replace the battery cover.

Maintaining battery life
Over time, your battery may take much longer to charge, and it may hold
that charge for a shorter time. If this happens with your jukebox’s battery,
you should buy a replacement from
www.gateway.com/photojukeboxextras
.
Updating the firmware
Caution
Before updating your jukebox firm ware, make sure that your
music and photo files are backed up.
To update your jukebox firmware:
1 Turn on your jukebox and connect it to your computer using the
USB combo cable.
2 Go to support.gateway.com, then find the support page for the
MP3 Photo Jukebox GCM-4.
3 Follow the support page’s instructions for downloading the mo st
recent firmware and saving it to your computer. Take note of where
the firmware update file is saved to.
4 On the Windo ws task bar, right-c lick Start, th en click Explore.
Windows Explorer opens.
81

82
5
Open the folder you saved the firmware update to, then double-click
the firmware update file. The jukebox firmware utility opens .
6 Click Update. The program updates your jukebox firmware.
7 After the update is finished, disconnect the ju kebox from the
computer.
If you experience difficulty updating your jukebox firmware, see the
troubleshooting steps for “Firmware update fails” on page 74.

Chapter 7: Safety and Legal Notices
Important safety information
■
Do not drop your jukebox or leave it under heavy objects.
■
Do not allow liquids to come into contact with your jukebox. If this happens wipe the jukebox
with a dry cloth.
■
Do not leave the juke box where it w ill be subject ed to prolon ged exp osure to dire ct sun light,
extreme temperatu res (such as inside a p arked automob ile) moisture , vibratio n, excessive du st,
and sand.
■
Avoid areas with strong magnetic fields.
■
Do not use thinner , alcohol , or benzene w hen clea ning t he jukeb ox.
■
To avoi d elec trical s hock, do not disassem ble th e case. If you r jukeb ox needs service, contact
Gateway at: support.gateway.com .
■
Do not use the headphones with the unit while driving, cycling, or operating any motorized
vehicle. This could create a traffic hazard and is illegal in many areas. It could also be dangerous
to play music at a high volume while walking, especially at pedestrian crossings.
■
Prolonged use of headphones at high volume may cause temp orary or permanent hea ring
damage.
83

Regulatory compliance statements
FCC
This equipment has been tested and found to comply with the limitations for a Class B digital
device, pursua nt to Part 15 of the FCC ru les and r egulati ons. These limitati ons are de signed to
provide reasonable protection against harmful interference within a residential installation.
This equipment generates, uses, and can radiate radio frequency energy and, if not installed and
used in accordance with the instructions, may cause harmful interference to radio
communications. However, there is no guarantee that interference will not occur in a particular
installation.
If this equipmen t does cause h armful interferen ce to radio a nd/or te levision reception, which can
be determined by turning the equip ment off and on, the use r is encoura ged to try to cor rect the
interference by o ne or more o f the followin g mea sures:
■
Reorient or relocate the receiving antenna.
■
Increase the sep aration be tween the eq uipmen t and the rece iver .
■
Connect the equip ment to an ou tlet on a cir cuit dif ferent fro m the one to whi ch the receiv er is
connected.
■
Consult the dealer or an experienced radio and/or television technician for assistance.
FCC declaration of confo rmity
Responsible party:
Gateway Companies, Inc.
610 Gateway Drive, North Sio ux City , SD 57049
(605) 232-2000 Fax: (605) 232-2023
Product:
■
Gateway GCM-4
This device compl ies with Pa rt 15 of the FC C Rules. Oper ation of thi s product i s subject to the
following two conditions: (1) this device may not cause harmful interference, and (2) this device
must accept any interference received, including interference that may cause undesired operation.
84

Caution
Changes or modifications not expressly approved by Gateway
could void the FCC compliance and ne gate your au thor ity to
operate the product.
California Proposition 65 Warning
Warning
This product contains chemicals, including lead, known to the
State of California to cause cance r and/or bir th defects or
reproductive har m.
85

Notices
Copyright © 2004 Gateway,Inc.
All Rights Reserv ed
14303 Gateway Pla ce
Poway, CA92064 USA
All Rights Reserved
This public ation is p rotec ted by cop yri ght a nd a ll rig hts a re res erved . No part of it ma y be
reproduced or transmitted by any means or in any form, without prior consent in writing from
Gateway.
The informat ion i n thi s man ual ha s b een car efu lly chec ked and i s be lieve d to b e acc urate . How ever ,
changes are made p eriodica lly. These changes are in corporat ed in newer pub lication editions.
Gateway may improve and/or change products described in this publication at any time. Due to
continuing sys tem impr ovements , Gateway is not resp onsibl e for inaccu rate inf ormatio n which
may appear in th is manu al. For the la test pr oduct up dates, consul t the Gateway W eb site a t
www.gateway.com. In no event will Gateway be liable for direct, indirect, special, exemplary,
incidental, or consequential damages resulting from any defect or omission in this manual, even if
advised of the possibility of such damages.
In the interest of continue d produc t develop ment, Ga teway rese rves the rig ht to make
improvements in this man ual and th e produc ts it desc ribes at any time, without noti ces or
obligation.
T rademark Acknowledgments
Gateway and the black-and-white spot design are trademarks or registered trademarks of
Gateway, Inc.
Intel and Pentium are registered trademarks of Intel Corporation. Microsoft, MS, MS-DOS, and
Windows are trademarks or registered trademarks of Microsoft Corporation. All other product
names mentioned herein are used for identific ation purposes only , and may be the trad emarks or
registered tradema rks of their re spective comp anies.
86

Warranty
GA TEW AY LIMITED WARRANTY AGREEMENT
This Agreement applies to Gateway and eMachines branded
products and services purchased by you from Gateway , Inc.
or any of its subsidiaries or affiliates (“Gateway”) or a
Gateway-authorized reseller (“Reseller”), unless you enter
into a separate written agreement with Gateway. THIS
AGREEMENT APPLIES TO YOU UNLESS YOU NOTIFY
GATEWAY IN WRITING THAT YOU DO NOT AGREE TO
THIS AGREEMENT WITHIN 15 DAYS AFTER YOU RECEIVE
THIS AGREEMENT AND YOU RETURN YOUR PRODUCT
OR CANCEL SERVICES UNDER EITHER GATEWAY’S OR
THE RESELLER’S REFUND POLICY, AS APPLICABLE. THIS
AGREEMENT CONTAINS A DISPUTE RESOLUTION
CLAUSE. PLEASE SEE SECTION 5 BELOW.
1. PC Technical Support. Gateway will provide technical
support for PC products for ninety (90) days from the date
of purchase by the original end user. Please note that when
87

contacting Gateway via telephone, long distance and other
charges may apply, depending upon your calling area. The
scope of technical support consists of helping you reinstall
the factory-installed operating system and software and
restore it to the original factory configuration. In addition,
for thirty (30) days from the date of pur chase by the original
end user Gateway will assist you with (i) installation of any
network operating system (“NOS”) purchased from
Gateway; (ii) configuration of the NOS software so that it
works with the networked Gateway computers you
purchased; (iii) setup of the NOS software so that it is fully
integrated with other products you purchased from
Gateway; and (iv) troubleshooting issues associated with the
NOS software and assistance with NOS error messages.
Gateway provides technical support via on-line, telephone,
and other methods. Gateway m ay change the means
through which it provides technical support at any time.
Gateway does not guarantee that software will be free from
errors, either in isolation or in combination with hardware.
88

2. Product Limited Warranty. Gateway warrants that its
products will be free from defects in materials and
workmanship for ninety (90) days from the date of purchase
by the original end user. During the warranty period,
Gateway will, at its option: (1) provide replacement parts
necessary to repair the product, (2) repair the product or
replace it with a comparable product, or (3) refund the
amount you paid for the product, LESS DEPRECIATION,
upon its return. You must assist Gateway in diagnosing
issues with your product and follow Gateway’s warranty
processes. You must obtain warranty service from Gateway.
Gateway will not reimburse you for service performed by
others. You may be required to deliver your product to and
from an authorized service facility at your expense.
Replacement parts and products will be new or serviceably
used, comparable in function and performance to the
original part, and warranted for the remainder of the
original warranty period or, if longer, 90 days after they are
shipped to you. If Gateway asks you to return defective parts
or products, you must do so within 7 days after you receive
89

the replacement parts or products. Gateway will charge you
for replacement parts or products if you fail to do so. If yo u
live outside the United States, the details of your warranty
service may vary as described below. THIS LIMITED
WARRANTY DOES NOT COVER MISUSE OR MINOR
IMPERFECTIONS WITHIN DESIGN SPECIFICATIONS OR
THAT DO NOT MATERIALLY ALTER FUNCTIONALITY.
GATEWAY DOES NOT WARRANT AND IS NOT
RESPONSIBLE FOR DAMAGES CAUSED BY MISUS E, ABUSE,
ACCIDENTS, VIRUSES, UNAUTHORIZED SERVICE OR
PARTS, OR THE COMBINATION OF GATEWAY OR
EMACHINES BRANDED PRODUCTS WITH OTHER
PRODUCTS. THIS LIMITED W ARRANTY DOES NOT COVER
SOFTWARE, NON-GATEWAY BRANDED, OR NONEMACHINES BRANDED PRODUCTS. ANY WARRANTY
APPLICABLE TO SOFTWARE, NON-GATEWAY BRANDED,
OR NON-EMACHINES BRANDED PRODUCTS IS PROVIDED
BY THE ORIGINAL MANUFACTURER.
90

3. Services and Service Limited Warranty. The terms of
services provided to you by Gateway consist of this
Agreement and the additional terms stated in separate
services descriptions provided by Gateway. For a period of
90 days after services are performed, Gateway warrants that
services provided by it were performed in a professional and
workmanlike manner. You should back up all files before
services are performed and remove any data from parts or
products returned to Gateway. GATEWAY IS NOT
RESPONSIBLE FOR ANY LOSS OF YOUR DATA.
4. Disclaimer of W arranties; Limitation of Lia bility. EXCEPT
FOR THE WARRANTIES EXPRESSED IN THIS AGREEMENT,
GATEWAY DISCLAIMS ALL OTHER WARRANTIES, EITHER
EXPRESS OR IMPLIED, INCLUDING IMPLIED WARRANTIES
OF MERCHANTABILITY OR FITNESS FOR A PARTICULAR
PURPOSE, OTHER THAN THOSE W ARRANTIES IMPLIED BY
AND INCAPABLE OF EXCLUSION, RESTRICTION OR
MODIFICATION UNDER APPLICABLE LAW . THE TERM OF
ANY IMPLIED WARRANTIES THAT CANNOT BE
91

DISCLAIMED ARE LIMITED TO THE TERM OF THIS
AGREEMENT. GATEWAY’S AND YOUR MAXIMUM
LIABILITY TO THE OTHER IS LIMITED TO THE PURCHASE
PRICE YOU PAID FOR PRODUCTS OR SERVICES PLUS
INTEREST AS ALLOWED BY LAW. NEITHER YOU NOR
GATEWAY IS LIABLE TO THE OTHER IF YOU OR IT ARE
UNABLE TO PERFORM DUE TO EVENTS YOU OR IT ARE
NOT ABLE TO CONTROL, SUCH AS ACTS OF GOD, OR F OR
PROPERTY DAMAGE, PERSONAL INJURY, LOSS OF USE,
INTERRUPTION OF BUSINESS, LOST PROFITS, LOST DATA
OR OTHER CONSEQUENTIAL, PUNITIVE OR SPECIAL
DAMAGES, HOWEVER CAUSED, WHETHER FOR BREACH
OF WARRANTY, CONTRACT, TORT (INCLUDING
NEGLIGENCE), STRICT LIABILITY OR OTHERWISE, OTHER
THAN THOSE DAMAGES THAT ARE INCAPABLE OF
LIMITATION, EXCLUSION OR RESTRICTION UNDER
APPLICABLE LA W . THIS AGREEMENT GIVES YOU SPECIFIC
LEGAL RIGHTS, AND YOU MAY ALSO HAVE OTHER
RIGHTS THAT VARY FROM JURISDICTION TO
JURISDICTION. SOME JURISDICTIONS DO NOT ALLOW
92

LIMITATIONS ON HOW LONG AN IMPLIED WARRANTY
LASTS OR THE EXCLUSION OR LIMITATION OF
INCIDENTAL OR CONSEQUENTIAL DAMAGES, SO THE
ABOVE LIMITATIONS OR EXCLUSIONS MAY NOT APPLY
TO YOU.
5. Dispute Resolution. You and Gateway agree that any
Dispute between You and Gateway will be resolved
exclusively and finally by arbitration administered by the
National Arbitration Forum (NAF) and conducted under its
rules, except as otherwise provided below. You and Gateway
will agree on another arbitration forum if NAF ceases
operations. The arbitration will be conducted before a single
arbitrator, and will be limited solely to the Dispute between
You and Gateway . The arbitrati on, or any portion of it, will
not be consolidated with any other arbitration and will not
be conducted on a class-wide or class action basis. The
arbitration shall be held at any reasonable loca tion near
your residence by submission of documents, by tele phone,
online or in person whichever method of presentation You
93

choose. If You prevail in the arbitratio n of any Dispute with
Gateway , Gateway will reimburse You for any fees you paid
to NAF in connection with the arbitration. Any decision
rendered in such arbitration proceedings will be final and
binding on the parties, and judgme nt may be entered
thereon in any court of competent jurisdiction. Should
either party bring a Dispute in a forum other than NAF , the
arbitrator may award the other party its reasonable costs and
expenses, including attorneys' fees, incurred in staying or
dismissing such other proceedings or in otherwise enforcing
compliance with this dispute resolution provision. You
understand that, in the absence of this provision, Y ou would
have had a right to litigate disputes through a court,
including the right to litigate claims on a class-wide or classaction basis, and that You have expressly and knowing ly
waived those rights and agreed to resolve any Disputes
through binding arbitration in accordance with the
provisions of this paragraph. This arbitration provision shall
be governed by the Federal Arbitration Act, 9 U.S.C. Section
1, et seq. For the purposes of this provision, the term
94
 Loading...