FUJIFILM DMP-2800 User Guide

FUJIFILM
Dimatix
Materials
Printer
FUJIFILM Dimatix Materials Printer
DMP-2800 Series
User Manual

ii |
Dimatix Materials Printer |
1.0About this Manual
Throughout this manual a variety of conventions are used to highlight essential information that is important for the overall safety and understanding of issues in using this product. These include:
1.1Warnings
WARNING
!
This symbol identifies information about procedures, practices or conditions that can result in damage to the product, economic loss, personal injury, or death.
(Dieses Symbol kennzeichnet Hinweise zu Handlungsweisen, Methoden oder Zuständen die zu Schäden am Produkt, wirtschftlichem Verlußt, Personenschäden oder zum Tode führen können.)
1.2Cautions
CAUTION
!
This symbol identifies information about practices or circumstances that may lead to damage to the product or other economic loss.
(Dieses Symbol kennzeichnet Hinweise zu Handlungsweisen oder Umstände die zu Schäden am Produkt oder anderen wirtschaftlichen Schäden führen können.)
1.3 ESD Advisory ESD = Electrostatic Sensitive Device (EGB = elektrostatisch gefährdetes Bauteil)
This symbol identifies where there may be risk of damage to the product due to Electrostatic Discharge.
(Dieses Symbol kennzeichnet Punkte an denen das Produkt durch elektrostatische Entladung beschädigt werden könnte.)
Doc. # PM000040 Rev. 05 |
FUJIFILM Dimatix, Inc. Confidential Information |
December 8, 2010 |
|

Dimatix Materials Printer |
iii |
1.4Wheelie Bin Symbol
This symbol identifies parts that should be reclaimed as part of the Waste Electrical and Electronic Equipment (WEEE) Directive.
1.5 |
Important |
|
|
|
|
|
|
|
|
|
This symbol identifies information that is essential |
|
|
IMPORTANT |
|
|
|
to the understanding and correct use of this product. |
|
|
|
|
|
|
|
|
|
|
|
|
(Dieses Symbol kennzeichnet, für das Verständnis |
|
|
|
und den richtigen Umgang mit dem Gerät, |
|
|
|
wesentliche Hinweise.) |
|
|
|
|
1.6 Notes
Note: Used for emphasizing additional information that aids in the understanding and use of the product.
FUJIFILM Dimatix, Inc. Confidential Information |
Doc. # PM000040 Rev. 05 |
|
December 8, 2010 |

iv |
Dimatix Materials Printer |
2.0Important Safety Information (Wichtige Sicherheitshinweise)
2.1Safety (Sicherheit)
WARNING
!
Only qualified, service-trained personnel who are aware of the hazards involved should perform calibration, maintenance, or repair of the product. Only these qualified personnel should remove the covers from the product.
(Kalibrierungen, Wartungen oder Reparaturen am Produkt sollten nur von qualifiziertem Servicepersonal, das sich den bestehenden Gefahren bewusst ist, vorgenommen werden. Nur qualifiziertes Servicepersonal sollte die Abdeckungen am Produkt entfernen.)
WARNING
!
For continued protection against fire, replace the line fuses only with fuses of the specified type and rating.
(Ersetzen Sie die Eingangssicherung nur mit Sicherungen des spezifizierten Typs und der spezifizierten Leistung, um einen sicheren Betrieb zu gewährleisten und Bränden vorzubeugen.)
WARNING
!
Modification or misuse of the product or components can cause harm to the user and will void any warranty.
(Veränderungen oder Missbrauch des Produkts, oder Veränderungen oder Missbrauch von Komponenten können den Benutzer oder Dritte schädigen und führen zum Garantieverlußt.)
Doc. # PM000040 Rev. 05 |
FUJIFILM Dimatix, Inc. Confidential Information |
December 8, 2010 |
|

Dimatix Materials Printer |
v |
WARNING
!
The product must be connected to a protective earth conductor via the three-wire power cable. The power plug shall be inserted only into a grounded outlet. Do not defeat the protective action by using an extension cord without a grounded conductor.
(Das Produkt muß durch den Betrieb mit einem dreiadrigen Stromkabel geerdet werden. Der Stecker darf nur in eine geerdete Steckdose gesteckt werden. Benutzten sie nur dreiadrige Verlängerungskabel mit Erdung.)
WARNING
!
For Dimatix Materials Printer (DMP-2800) serial numbers less than 2831-0646-XXXX-XXXXXXXXX: Fluid used in this product must have a fire point greater than 125 °C.
(Beachten sie bei Dimatix Material Druckern (DMP2800) mit einer Seriennummer kleiner als 2831-0646- XXXX-XXXXXXXXX: Fluide die in diesem Produkt benutzt werden müssen einen Flammpunkt grösser als 125 °C aufweisen.)
WARNING
!
Do not overfill the ink cartridge. Its maximum capacity is 1.5 milliliters.
(Überfüllen sie die Druckerpatrone nicht. Das maximale Fassungsvermögen der Druckerpatrone beträgt 1,5 Milliliter.)
FUJIFILM Dimatix, Inc. Confidential Information |
Doc. # PM000040 Rev. 05 |
|
December 8, 2010 |

vi |
Dimatix Materials Printer |
WARNING
!
Do not operate the product in an explosive atmosphere. Do not operate the product in the presence of inflammable gases or fumes. Operation of any electrical instrument in such an environment clearly constitutes a safety hazard.
(Benutzten sie das Gerät nicht in explosiver Atmosphäre. Benutzen sie das Gerät nicht in der Nähe von entflammbaren Gasen oder Dämpfen. Der Einsatz jeglicher elektronischer Geräte in einer solchen Umgebung stellt eine eindeutige Sicherheitsgefährdung dar.)
WARNING
!
Care must be used when jetting multiple fluids. It may be possible for reactions to occur in the absorbent pads where multiple and or incompatible fluids may come in contact with each other.
(Vorsicht ist beim Umgang und Druck mehrerer verschiedener Flüssigkeiten geboten. Es ist möglich, dass Reaktionen in den Absorberkissen stattfinden, wenn inkompatible Flüssigkeiten miteinander in Kontakt geraten können.)
WARNING
!
The platen can reach temperatures of 60 °C, which is hot to the touch. It can melt some materials if placed on it while hot, and it can cause volatile materials to evaporate faster if placed on the platen when hot.
(Die Substratplatte kann Temperaturen von bis zu 60 °C erreichen. Dies ist zu heiss, um sie gefahrlos zu berühren. Diese Temperatur kann Materialien zum schmelzen bringen, wenn diese auf die Platte gestellt werden. Ausserdem verdampfen flüchtige Materialien schneller wenn sie auf die heisse Platte gestellt werden.)
Doc. # PM000040 Rev. 05 |
FUJIFILM Dimatix, Inc. Confidential Information |
December 8, 2010 |
|

Dimatix Materials Printer |
vii |
|
The cartridge can reach temperatures of 70 °C, which is |
|
WARNING |
||
hot to the touch, and it can cause volatile materials to boil |
||
|
||
|
!off faster. Care must be taken that the cartridge settings are appropriate when installing a cartridge with volatile fluids.
(Das Cartridge kann Temperaturen von bis zu 70 °C erreichen. Dies ist zu heiss, um es zu berühren. Ausserdem verdampfen flüchtige Materialien schneller wenn sie das heisse Cartridge berühren. Die Cartridge Einstellungen müssen sehr sorgfältig gewählt werden, wenn mit leicht flüchtigen Materialien im Cartridge gearbeitet wird.)
2.2Important (Wichtig)
|
All moving parts are interlocked to the printer lid. The |
|
IMPORTANT |
||
machine will stop if the lid is lifted during operation. |
||
|
||
|
||
|
(Alle beweglichen Teile sind mit der Drucker-Klappe |
|
|
gekoppelt. Die Maschine bleibt stehen wenn die Klappe |
|
|
im Betrieb geöffnet wird.) |
|
|
|
|
Replaceable pads capture and hold virtually all ink jetted |
|
IMPORTANT |
||
into them. In many cases this may then be considered |
||
|
||
|
||
|
“solid waste” rather than “liquid waste.” Please dispose of |
|
|
properly. |
(Die austauschbaren Absorberkissen können fast alle Tinten aufnehmen. In vielen Fällen gilt dies ehr als „Fester Abfall“ und nicht als „Flüssiger Abfall“, bitte entsorgen sie diesen fachgerecht.)
FUJIFILM Dimatix, Inc. Confidential Information |
Doc. # PM000040 Rev. 05 |
|
December 8, 2010 |

viii |
Dimatix Materials Printer |
|
This product complies with INSTALLATION |
|
IMPORTANT |
||
CATEGORY II and POLLUTION DEGREE 2 in |
||
|
||
|
||
|
IEC61010-1. This product is an INDOOR USE product. |
(Dieses Produkt erfüllt die Forderungen der „Installation Category II“ und „Pollution Degree 2“ nach IEC61010-1. Dieses Produkt ist ein Produkt für den Gebrauch in trockenen Räumen.)
|
The LEDs within this product are Class 1 in accordance |
|
IMPORTANT |
||
with IEC60825-1, CLASS 1 LED PRODUCT. |
||
|
||
|
||
|
(Die LEDs in diesem Produkt entsprechen Class 1 nach |
|
|
IEC60825-1, Class 1 LED Product.) |
|
|
|
Do not dispose this product as unsorted municipal waste. Collection of such waste separately for special treatment is necessary.
(Entsorgen sie dieses Produkt nicht als unsortierten Hausmüll. Eine fachgerechte Entsorgung ist nötig.)
Note: This equipment has been tested and complies with the limits for a Class A digital device, pursuant to part 15 of the FCC Rules. These limits are designed to provide reasonable protection against harmful interference when the equipment is operated in a commercial environment. This equipment generates, uses, and can radiate radio frequency energy and, if not installed and used in accordance with the instruction manual, may cause harmful interference to radio communications. Operation of this equipment in a residential area is likely to cause harmful interference in which case the user will be required to correct the interference at one’s own expense.
Note: This product complies with the radio interference requirements of the European Union.
Doc. # PM000040 Rev. 05 |
FUJIFILM Dimatix, Inc. Confidential Information |
December 8, 2010 |
|

Table of Contents
FUJIFILM Dimatix Materials Printer
About this Manual . . . . . . . . . . . . . . . . . . . . . . . . . . . . . . . . . . . . . . . . . . . . . . . . . . . . . . . . . . ii Warnings . . . . . . . . . . . . . . . . . . . . . . . . . . . . . . . . . . . . . . . . . . . . . . . . . . . . . . . . . . . . . . ii Cautions . . . . . . . . . . . . . . . . . . . . . . . . . . . . . . . . . . . . . . . . . . . . . . . . . . . . . . . . . . . . . . . ii
ESD Advisory ESD = Electrostatic Sensitive Device (EGB = elektrostatisch gefährdetes Bauteil). . . . . . . . . . . . . . . . . . . . . . . . . . . . . . . . . . . . . . . . . . . . . . . . . . . . . . . . . . . . . . . . ii
Wheelie Bin Symbol . . . . . . . . . . . . . . . . . . . . . . . . . . . . . . . . . . . . . . . . . . . . . . . . . . . . iii Important . . . . . . . . . . . . . . . . . . . . . . . . . . . . . . . . . . . . . . . . . . . . . . . . . . . . . . . . . . . . . iii Notes . . . . . . . . . . . . . . . . . . . . . . . . . . . . . . . . . . . . . . . . . . . . . . . . . . . . . . . . . . . . . . . . iii
Important Safety Information (Wichtige Sicherheitshinweise) . . . . . . . . . . . . . . . . . . . . . . . iv Safety (Sicherheit) . . . . . . . . . . . . . . . . . . . . . . . . . . . . . . . . . . . . . . . . . . . . . . . . . . . . . . iv Important (Wichtig) . . . . . . . . . . . . . . . . . . . . . . . . . . . . . . . . . . . . . . . . . . . . . . . . . . . . . vii
Chapter 1 – Introduction
System Accessories . . . . . . . . . . . . . . . . . . . . . . . . . . . . . . . . . . . . . . . . . . . . . . . . . . . . . . . . . 2
System Requirements. . . . . . . . . . . . . . . . . . . . . . . . . . . . . . . . . . . . . . . . . . . . . . . . . . . . . . . . 2
System Identification . . . . . . . . . . . . . . . . . . . . . . . . . . . . . . . . . . . . . . . . . . . . . . . . . . . . . . . . 3
Chapter 2 – Set-Up and Installation
Unpacking . . . . . . . . . . . . . . . . . . . . . . . . . . . . . . . . . . . . . . . . . . . . . . . . . . . . . . . . . . . . . . . . 5 DMP . . . . . . . . . . . . . . . . . . . . . . . . . . . . . . . . . . . . . . . . . . . . . . . . . . . . . . . . . . . . . . . . . . 5 PC. . . . . . . . . . . . . . . . . . . . . . . . . . . . . . . . . . . . . . . . . . . . . . . . . . . . . . . . . . . . . . . . . . . . 7
PC Start up . . . . . . . . . . . . . . . . . . . . . . . . . . . . . . . . . . . . . . . . . . . . . . . . . . . . . . . . . . . . . . . . 9 Starting Your DMP . . . . . . . . . . . . . . . . . . . . . . . . . . . . . . . . . . . . . . . . . . . . . . . . . . . . . . . . . 9 Dimatix Drop Manager . . . . . . . . . . . . . . . . . . . . . . . . . . . . . . . . . . . . . . . . . . . . . . . . . . . . . . 9
Chapter 3 – Initial Start-Up Operation
Install Cartridge . . . . . . . . . . . . . . . . . . . . . . . . . . . . . . . . . . . . . . . . . . . . . . . . . . . . . . . . . . . 11
Select Pattern . . . . . . . . . . . . . . . . . . . . . . . . . . . . . . . . . . . . . . . . . . . . . . . . . . . . . . . . . . . . . 14
Load/Unload Substrate . . . . . . . . . . . . . . . . . . . . . . . . . . . . . . . . . . . . . . . . . . . . . . . . . . . . . 15
Print Set-Up . . . . . . . . . . . . . . . . . . . . . . . . . . . . . . . . . . . . . . . . . . . . . . . . . . . . . . . . . . . . . . 17
FUJIFILM Dimatix, Inc. Confidential Information |
Doc. #PM000040 Rev. 05 |
|
December 8, 2010 |

x |
DMP 2800 |
Nozzle Test Pattern . . . . . . . . . . . . . . . . . . . . . . . . . . . . . . . . . . . . . . . . . . . . . . . . . . . . . 18
Chapter 4 – Screen Descriptions
Main Screen. . . . . . . . . . . . . . . . . . . . . . . . . . . . . . . . . . . . . . . . . . . . . . . . . . . . . . . . . . . . . . 19 File Menu . . . . . . . . . . . . . . . . . . . . . . . . . . . . . . . . . . . . . . . . . . . . . . . . . . . . . . . . . . . . 20 Tools Menu . . . . . . . . . . . . . . . . . . . . . . . . . . . . . . . . . . . . . . . . . . . . . . . . . . . . . . . . . . . 20 Help menu . . . . . . . . . . . . . . . . . . . . . . . . . . . . . . . . . . . . . . . . . . . . . . . . . . . . . . . . . . . 21
Cartridge Settings . . . . . . . . . . . . . . . . . . . . . . . . . . . . . . . . . . . . . . . . . . . . . . . . . . . . . . . . . 22 Waveform Tab. . . . . . . . . . . . . . . . . . . . . . . . . . . . . . . . . . . . . . . . . . . . . . . . . . . . . . . . . 23 Cartridge Tab. . . . . . . . . . . . . . . . . . . . . . . . . . . . . . . . . . . . . . . . . . . . . . . . . . . . . . . . . . 25 Cleaning Cycles Tab . . . . . . . . . . . . . . . . . . . . . . . . . . . . . . . . . . . . . . . . . . . . . . . . . . . . 26
Cleaning Cycle Editor . . . . . . . . . . . . . . . . . . . . . . . . . . . . . . . . . . . . . . . . . . . . . . . . . . . . . . 27
Waveform Editor. . . . . . . . . . . . . . . . . . . . . . . . . . . . . . . . . . . . . . . . . . . . . . . . . . . . . . . . . . 30 Individual Segment Controls. . . . . . . . . . . . . . . . . . . . . . . . . . . . . . . . . . . . . . . . . . . . . . 31 Overall Waveform Controls . . . . . . . . . . . . . . . . . . . . . . . . . . . . . . . . . . . . . . . . . . . . . . 31 Non-Jetting Waveform . . . . . . . . . . . . . . . . . . . . . . . . . . . . . . . . . . . . . . . . . . . . . . . . . . 32 Jetting Waveform vs. Non-Jetting Waveform. . . . . . . . . . . . . . . . . . . . . . . . . . . . . . . . . 32
Replacing Cleaning Pad . . . . . . . . . . . . . . . . . . . . . . . . . . . . . . . . . . . . . . . . . . . . . . . . . . . . 32
Chapter 5 – Pattern Printing
Select Pattern. . . . . . . . . . . . . . . . . . . . . . . . . . . . . . . . . . . . . . . . . . . . . . . . . . . . . . . . . . . . . 38
Predefined Standard Patterns . . . . . . . . . . . . . . . . . . . . . . . . . . . . . . . . . . . . . . . . . . . . . 39
Create Your Own Pattern . . . . . . . . . . . . . . . . . . . . . . . . . . . . . . . . . . . . . . . . . . . . . . . . . . . 39
Substrate . . . . . . . . . . . . . . . . . . . . . . . . . . . . . . . . . . . . . . . . . . . . . . . . . . . . . . . . . . . . . 40
Pattern Block Array. . . . . . . . . . . . . . . . . . . . . . . . . . . . . . . . . . . . . . . . . . . . . . . . . . . . . 42
Drop Position Array . . . . . . . . . . . . . . . . . . . . . . . . . . . . . . . . . . . . . . . . . . . . . . . . . . . . 43
Draw feature . . . . . . . . . . . . . . . . . . . . . . . . . . . . . . . . . . . . . . . . . . . . . . . . . . . . . . . 43
Drop Spacing. . . . . . . . . . . . . . . . . . . . . . . . . . . . . . . . . . . . . . . . . . . . . . . . . . . . . . . . . . 46
Bitmap File Printing . . . . . . . . . . . . . . . . . . . . . . . . . . . . . . . . . . . . . . . . . . . . . . . . . . . . . . . 47
Substrate Tab. . . . . . . . . . . . . . . . . . . . . . . . . . . . . . . . . . . . . . . . . . . . . . . . . . . . . . . . . . 48
Placement . . . . . . . . . . . . . . . . . . . . . . . . . . . . . . . . . . . . . . . . . . . . . . . . . . . . . . . . . . . . 50
Tiling . . . . . . . . . . . . . . . . . . . . . . . . . . . . . . . . . . . . . . . . . . . . . . . . . . . . . . . . . . . . . . . . 51
Reference Point . . . . . . . . . . . . . . . . . . . . . . . . . . . . . . . . . . . . . . . . . . . . . . . . . . . . . . . . 51
Print Preview . . . . . . . . . . . . . . . . . . . . . . . . . . . . . . . . . . . . . . . . . . . . . . . . . . . . . . . . . . . . . 54
Cartridge Mounting Angle . . . . . . . . . . . . . . . . . . . . . . . . . . . . . . . . . . . . . . . . . . . . . . . . . . 57
Chapter 6 – Drop Watcher
Drop Watcher . . . . . . . . . . . . . . . . . . . . . . . . . . . . . . . . . . . . . . . . . . . . . . . . . . . . . . . . . . . . 61
Doc. #PM000040 Rev. 05 |
FUJIFILM Dimatix, Inc. Confidential Information |
December 8, 2010 |
|

DMP 2800 |
xi |
Jetting Nozzle Box . . . . . . . . . . . . . . . . . . . . . . . . . . . . . . . . . . . . . . . . . . . . . . . . . . . . . . 62
Calibrate Nozzle View . . . . . . . . . . . . . . . . . . . . . . . . . . . . . . . . . . . . . . . . . . . . . . . . . . . 63
Cleaning Box . . . . . . . . . . . . . . . . . . . . . . . . . . . . . . . . . . . . . . . . . . . . . . . . . . . . . . . . . . 65
Motion Control Box . . . . . . . . . . . . . . . . . . . . . . . . . . . . . . . . . . . . . . . . . . . . . . . . . . . . . 65
Drop Watcher Pad. . . . . . . . . . . . . . . . . . . . . . . . . . . . . . . . . . . . . . . . . . . . . . . . . . . . . . . 66
Viewing Modes. . . . . . . . . . . . . . . . . . . . . . . . . . . . . . . . . . . . . . . . . . . . . . . . . . . . . . . . . 66
Tools Tab . . . . . . . . . . . . . . . . . . . . . . . . . . . . . . . . . . . . . . . . . . . . . . . . . . . . . . . . . . . . . 73
Chapter 7 – Fiducial Camera
Features. . . . . . . . . . . . . . . . . . . . . . . . . . . . . . . . . . . . . . . . . . . . . . . . . . . . . . . . . . . . . . . . . . 81
Alignment Procedures. . . . . . . . . . . . . . . . . . . . . . . . . . . . . . . . . . . . . . . . . . . . . . . . . . . . . . . 84
Setting the Print Origin . . . . . . . . . . . . . . . . . . . . . . . . . . . . . . . . . . . . . . . . . . . . . . . . . . . 85
Setting the Reference Point. . . . . . . . . . . . . . . . . . . . . . . . . . . . . . . . . . . . . . . . . . . . . . . . 86
Tools Menu in the Fiducial Camera Window . . . . . . . . . . . . . . . . . . . . . . . . . . . . . . . . . 87
Options menu in the Fiducial Camera Window . . . . . . . . . . . . . . . . . . . . . . . . . . . . 103
Chapter 8 – Fluid Requirements
Dimatix Model Fluid . . . . . . . . . . . . . . . . . . . . . . . . . . . . . . . . . . . . . . . . . . . . . . . . . . . . . . 105
Drop Formation. . . . . . . . . . . . . . . . . . . . . . . . . . . . . . . . . . . . . . . . . . . . . . . . . . . . . . . . . . . 106
Performance . . . . . . . . . . . . . . . . . . . . . . . . . . . . . . . . . . . . . . . . . . . . . . . . . . . . . . . . . . . . . 107
Drop Velocity vs. Frequency . . . . . . . . . . . . . . . . . . . . . . . . . . . . . . . . . . . . . . . . . . . . . 108
Drop Velocity vs. Voltage with different Viscosities. . . . . . . . . . . . . . . . . . . . . . . . . . . 108
Voltage vs. Drop Mass . . . . . . . . . . . . . . . . . . . . . . . . . . . . . . . . . . . . . . . . . . . . . . . . . . 109
Chapter 9 – Waveform Basics
Waveform Editor Window Explanation . . . . . . . . . . . . . . . . . . . . . . . . . . . . . . . . . . . . . . . . 112
Chapter 10 – Cartridge
Fluid Module Filling. . . . . . . . . . . . . . . . . . . . . . . . . . . . . . . . . . . . . . . . . . . . . . . . . . . . . . . 118
Fill Syringe . . . . . . . . . . . . . . . . . . . . . . . . . . . . . . . . . . . . . . . . . . . . . . . . . . . . . . . . . . 118
Assembly . . . . . . . . . . . . . . . . . . . . . . . . . . . . . . . . . . . . . . . . . . . . . . . . . . . . . . . . . . . . . . . 120
Attach Fluid Module to Jetting Module . . . . . . . . . . . . . . . . . . . . . . . . . . . . . . . . . . . . . 120
Cartridge Maintenance . . . . . . . . . . . . . . . . . . . . . . . . . . . . . . . . . . . . . . . . . . . . . . . . . . . . . 121
Cleaning Function Definitions . . . . . . . . . . . . . . . . . . . . . . . . . . . . . . . . . . . . . . . . . . . . 122
Failure Modes, Prevention and Recovery. . . . . . . . . . . . . . . . . . . . . . . . . . . . . . . . . . . . . . . 123
FUJIFILM Dimatix, Inc. Confidential Information |
Doc. #PM000040 Rev. 05 |
|
December 8, 2010 |

xii |
DMP 2800 |
Chapter 11 – Print Quality Troubleshooting |
|
Misdirected Nozzles . . . . . . . . . . . . . . . . . . . . . . . . . . . . . . . . . . . . . . . . . . . |
. . . . . . . . . . . 125 |
Corrective actions:. . . . . . . . . . . . . . . . . . . . . . . . . . . . . . . . . . . . . . . . . . |
. . . . . . . . . . . 127 |
Non-Jetting Nozzles . . . . . . . . . . . . . . . . . . . . . . . . . . . . . . . . . . . . . . . . . . . |
. . . . . . . . . . . 127 |
Corrective actions:. . . . . . . . . . . . . . . . . . . . . . . . . . . . . . . . . . . . . . . . . . |
. . . . . . . . . . . 128 |
Non-Matched Velocities . . . . . . . . . . . . . . . . . . . . . . . . . . . . . . . . . . . . . . . . |
. . . . . . . . . . . 129 |
Corrective action: . . . . . . . . . . . . . . . . . . . . . . . . . . . . . . . . . . . . . . . . . . |
. . . . . . . . . . . 130 |
Cartridge Alignment & Drop Offset . . . . . . . . . . . . . . . . . . . . . . . . . . . . . . . |
. . . . . . . . . . . 130 |
Corrective action: . . . . . . . . . . . . . . . . . . . . . . . . . . . . . . . . . . . . . . . . . . |
. . . . . . . . . . . 132 |
Things to remember . . . . . . . . . . . . . . . . . . . . . . . . . . . . . . . . . . . . . . . . . . . |
. . . . . . . . . . . 133 |
System Faults . . . . . . . . . . . . . . . . . . . . . . . . . . . . . . . . . . . . . . . . . . . . . . . . |
. . . . . . . . . . . 133 |
Faults . . . . . . . . . . . . . . . . . . . . . . . . . . . . . . . . . . . . . . . . . . . . . . . . . . . . |
. . . . . . . . . . . 133 |
System Diagnostics . . . . . . . . . . . . . . . . . . . . . . . . . . . . . . . . . . . . . . . . . . . . |
. . . . . . . . . . . 135 |
Preventative Maintenance . . . . . . . . . . . . . . . . . . . . . . . . . . . . . . . . . . . . . . . |
. . . . . . . . . . . 139 |
Reference Information. . . . . . . . . . . . . . . . . . . . . . . . . . . . . . . . . . . . . . . . . . |
. . . . . . . . . . . 140 |
Chapter 12 – Remote Control |
|
Remote Control . . . . . . . . . . . . . . . . . . . . . . . . . . . . . . . . . . . . . . . . . . . . . . . |
. . . . . . . . . . . 141 |
Appendix A – Specifications |
|
System Description . . . . . . . . . . . . . . . . . . . . . . . . . . . . . . . . . . . . . . . . . . . . |
. . . . . . . . . . . 145 |
Mechanical System . . . . . . . . . . . . . . . . . . . . . . . . . . . . . . . . . . . . . . . . . |
. . . . . . . . . . . 146 |
Cartridge . . . . . . . . . . . . . . . . . . . . . . . . . . . . . . . . . . . . . . . . . . . . . . . . . . . . |
. . . . . . . . . . . 146 |
Control PC and Application Software. . . . . . . . . . . . . . . . . . . . . . . . . . . . . . |
. . . . . . . . . . . 146 |
Replaceable Items . . . . . . . . . . . . . . . . . . . . . . . . . . . . . . . . . . . . . . . . . . . . . |
. . . . . . . . . . . 147 |
Options . . . . . . . . . . . . . . . . . . . . . . . . . . . . . . . . . . . . . . . . . . . . . . . . . . . . . |
. . . . . . . . . . . 147 |
Appendix B – Returning a DMP to Dimatix |
|
Return Authorization . . . . . . . . . . . . . . . . . . . . . . . . . . . . . . . . . . . . . . . . . . |
. . . . . . . . . . . 149 |
DMP-2800 Cleaning Procedures . . . . . . . . . . . . . . . . . . . . . . . . . . . . . . . . . |
. . . . . . . . . . . 150 |
Packing up the DMP . . . . . . . . . . . . . . . . . . . . . . . . . . . . . . . . . . . . . . . . . . . |
. . . . . . . . . . . 150 |
Appendix C – Technical Support
Online Tech Support . . . . . . . . . . . . . . . . . . . . . . . . . . . . . . . . . . . . . . . . . . . . . . . . . . . . . . 151
Index . . . . . . . . . . . . . . . . . . . . . . . . . . . . . . . . . . . . . . . . . . . . . . . . . . . . . . . . . . . . . . . . . . 153
Doc. #PM000040 Rev. 05 |
FUJIFILM Dimatix, Inc. Confidential Information |
December 8, 2010 |
|

Chapter 1
Introduction
The Dimatix Materials Printer (DMP) is a laboratory and limited production tool that enables researchers, scientists, and engineers to evaluate the use of ink jetting technology for new manufacturing and analytical processes. It is designed to be convenient and easy to use to carry out “proof of concept” and development work using ink jet technology. It does have extensive capabilities to allow increased experimental sophistication to optimize process parameters for the user’s applications as the user gains familiarity with the system.
Sheet substrate scanning ink jet deposition system with drop observation, spot location, and variable printing resolution
User-fillable piezo-based jetting cartridges:
Fluid module with syringe filling system
16 nozzles at 254 µm spacing
PC-controlled operation, including visual monitoring of ink jetting and printed pattern inspection
FUJIFILM Dimatix, Inc. Confidential Information |
Doc. # PM000040 Rev. 05 |
|
December 8, 2010 |

2 |
Chapter 1 - Introduction |
1.0System Accessories
Personal Computer (supplied)
2.8 GHz CPU minimum
One USB 2.0 ports on computer (shows up as “Standard Enhanced PCI to USB Host Controller” in device manager).
1920 x 1200 screen resolution
2 GB DRAM minimum
At least 200 MB free disk space
Windows 7 operating system
Starter Kit – consists of (1) DMC-11610 cartridge, (1) 30 ml bottle of model fluid, (1) fill tip, (1) cleaning pad, (1) drop watcher pad, (1) filter and (1) syringe
Syringes
Filters
Fill tips
Drop watcher pads
Cleaning pads
Substrate location and positioning system (fiducial camera system) – Optional
2.0System Requirements
Power: 100-120 / 200-240 VAC 50/60Hz 375W maximum
Environment: It is recommended that the DMP be used in a reasonably controlled temperature and humidity environment to aid in uniform test results. Atmospheric conditions can affect the materials used in jetting trials.
Operating:
–Temperature range 15 to 40 C
–Humidity range 5-95% RH, non-condensing
Doc. # PM000040 Rev. 05 |
FUJIFILM Dimatix, Inc. Confidential Information |
December 8, 2010 |
|
Chapter 1 - Introduction |
3 |
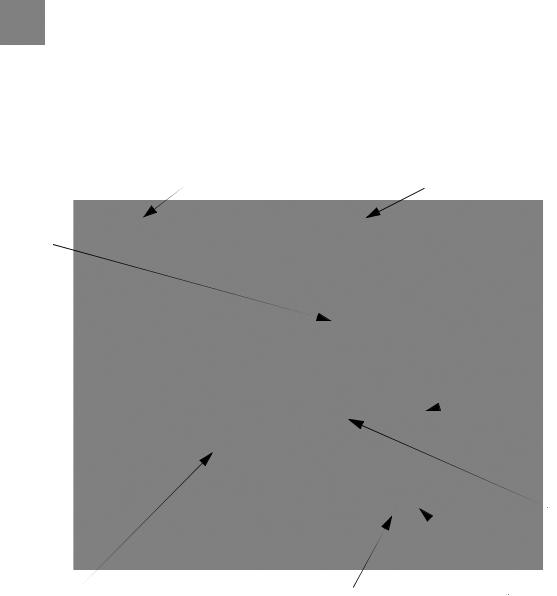
3.0System Identification
The following diagram shows the major components of the Dimatix Materials Printer.
Lid Closed Sensor |
Lid |
Carriage
Drop
 Watcher
Platen
Maintenance Station Blotting Pad |
Power Switch |
Indicator Light |
Figure 1 - 1 DMP 2800
FUJIFILM Dimatix, Inc. Confidential Information |
Doc. # PM000040 Rev. 05 |
|
December 8, 2010 |
4 |
Chapter 1 - Introduction |
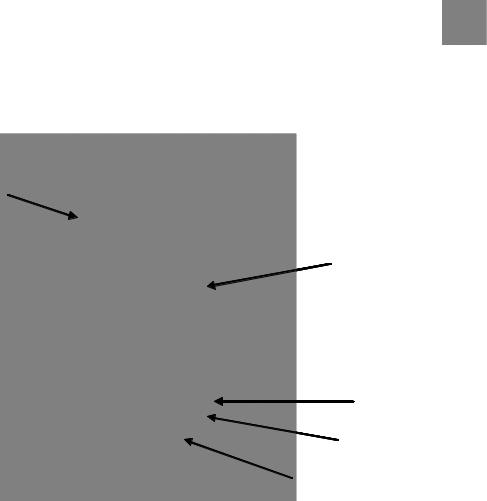
The following diagram shows the major components of the DMP Printer Carriage.
Print Carriage
Fiducial Camera
Cartridge Cable
Skew Plate
Holder Latch
Cartridge Holder
Figure 1 - 2 Print Carriage
Doc. # PM000040 Rev. 05 |
FUJIFILM Dimatix, Inc. Confidential Information |
December 8, 2010 |
|

Chapter 2
Set-Up and Installation
1.0Unpacking
1.1DMP
The DMP is shipped in a wooden crate and weighs approximately 45 kg (100 lbs). At a minimum two people are required to lift it out of the crate and place it onto a surface sturdy enough to support it without excessive vibrations or oscillations. Be careful not to put fingers into fan covers on the DMP bottom when lifting.
1.Remove the following items from the box:
Starter Kit
Cartridges
User Manual
Cables
Figure 2 - 1 DMP items in box
2.Verify contents with checklist
3.Place DMP on an appropriate surface.
FUJIFILM Dimatix, Inc. Confidential Information |
Doc. # PM000040 Rev. 05 |
|
December 8, 2010 |

6 |
Chapter 2 - Set-Up and Installation |
Note: Consider the air flow pattern for proper ventilation.
Figure 2 - 2 DMP air flow
4.Remove shrink wrap from DMP
5.Free items that have been secured for shipping
Figure 2 - 3 DMP Packing material locations
a.Remove packing material from under carriage assembly
b.Remove packing material from front and side of platen
Doc. # PM000040 Rev. 05 |
FUJIFILM Dimatix, Inc. Confidential Information |
December 8, 2010 |
|

Chapter 2 - Set-Up and Installation |
7 |
1.2PC
The PC system is shipped in its original boxes.
1. Remove them from their boxes and set them next to the DMP
Figure 2 - 4 PC placed next to DMP
2.Check back of the DMP for USB, S-video, and power connections. Identify appropriate cables.
FUJIFILM Dimatix, Inc. Confidential Information |
Doc. # PM000040 Rev. 05 |
|
December 8, 2010 |

8 |
Chapter 2 - Set-Up and Installation |
3.Connect all cables
a.Power cables to DMP, PC and monitor.
b.USB cable from PC to DMP.
|
Do not connect DMP to PC through a USB hub. |
|
CAUTION |
||
|
!Do not use USB cables longer than 2 meters.
c.S-video cable from DMP to PC.
d.Monitor video cable to PC.
|
Do not use video cables longer than 2 meters. |
|
CAUTION |
||
|
!
e. Keyboard and mouse cables.
Figure 2 - 5 DMP and PC cabling
Doc. # PM000040 Rev. 05 |
FUJIFILM Dimatix, Inc. Confidential Information |
December 8, 2010 |
|

Chapter 2 - Set-Up and Installation |
9 |
2.0PC Start up
1.Turn on power to PC
2.Allow PC to go through complete start up
|
Do not change the country settings or the regional |
|
CAUTION |
||
settings in the Windows 7 Operating System. The |
||
|
!software will not operate properly.
3.0Starting Your DMP
1.Make sure DMP lid is closed and all shipping foam is removed
2.Turn on power to DMP
a. The light next to the power switch should go on.
Figure 2 - 6 DMP Indicator light
b. Wait at least 5 seconds
4.0Dimatix Drop Manager
1.The DMP 2800 icon is on the PC desktop.
2.Select the DMP 2800 icon on the screen.
Dimatix Drop Manager
Figure 2 - 7 Drop Manager icon on PC screen
FUJIFILM Dimatix, Inc. Confidential Information |
Doc. # PM000040 Rev. 05 |
|
December 8, 2010 |

10 |
Chapter 2 - Set-Up and Installation |
3.Double click to initiate the Dimatix Drop Manager application.
4.After initiating the program, click OK to allow the DMP to run through its initialization sequence.
Figure 2 - 8 Unobstructed platen dialogue
Doc. # PM000040 Rev. 05 |
FUJIFILM Dimatix, Inc. Confidential Information |
December 8, 2010 |
|

Chapter 3
Initial Start-Up Operation
1.0Install Cartridge
The following steps tell you how to install the Dimatix Model Fluid Cartridge.
Figure 3 - 1 Install cartridge - Open Lid
1.Prepare the Dimatix Model Fluid Cartridge from the Starter Kit. See Cartridge Filling instructions in Chapter 10.
FUJIFILM Dimatix, Inc. Confidential Information |
Doc. # PM000040 Rev. 05 |
|
December 8, 2010 |

12 |
Chapter 3 - Initial Start-Up Operation |
2. Lift the DMP lid until it is fully open.
Figure 3 - 2 Install Cartridge
3.Insert the cartridge into the cartridge holder on the carriage with the electrical connection pads towards the back of the machine matching the connector of the holder. There is only one way for it to fit. Push it down firmly so that it “clicks” into place.
4.Pull the cartridge holder latch forward and down until you hear it click and locks into place. Check to see that the cartridge is sitting flat in the holder.
Doc. # PM000040 Rev. 05 |
FUJIFILM Dimatix, Inc. Confidential Information |
December 8, 2010 |
|

Chapter 3 - Initial Start-Up Operation |
13 |
Figure 3 - 3 Installing the cartridge
5.After the cartridge is installed, close the lid. You should hear a pump turn on to control the meniscus pressure.
6.The following window displays.
Figure 3 - 4 Confirm load cartridge settings window
7.Click Yes to load the settings for Dimatix Model Fluid.
8.After clicking Yes, the screen advances to the Select Pattern Screen.
FUJIFILM Dimatix, Inc. Confidential Information |
Doc. # PM000040 Rev. 05 |
|
December 8, 2010 |

14 |
Chapter 3 - Initial Start-Up Operation |
2.0Select Pattern
The Select Pattern window lets you select a pattern for printing.
Figure 3 - 5 Select Pattern screen
1.The Dimatix test pattern is auto-selected. This is a general use pattern which lets you see that the system is operating correctly.
2.Click on the Next button to proceed.
3.This takes you to the Load/Unload Substrate screen.
Doc. # PM000040 Rev. 05 |
FUJIFILM Dimatix, Inc. Confidential Information |
December 8, 2010 |
|

Chapter 3 - Initial Start-Up Operation |
15 |
3.0Load/Unload Substrate
The Load/Unload Substrate tab is where you set the platen temperature and vacuum. It is also where you must enter the thickness for the intended substrate.
Figure 3 - 6 Load/Unload Substrate screen
1.To start, use the enclosed piece of glossy ink jet paper to run the test pattern. This paper is about 250 micrometers thick. Enter 250 (µm) in the box either by using the up or down arrows on the box or placing the cursor in the box and typing in the number. The system automatically adjusts the height of the cartridge to about 1.0 mm above the substrate.
WARNING
!
Make sure that you always enter the correct thickness. Entering a number that is smaller than the actual thickness can make the carriage crash into or drag across the substrate causing damage to the substrate and/or the machine.
FUJIFILM Dimatix, Inc. Confidential Information |
Doc. # PM000040 Rev. 05 |
|
December 8, 2010 |

16 |
Chapter 3 - Initial Start-Up Operation |
2.Open the lid and place the substrate on the platen. Register it to the marks in the back left corner of the platen which is a general substrate registration position. This is important to note since it is the approximate location from which the patterns to be jetted are referenced initially.
3.After placing the substrate on the platen, turn on the platen vacuum by selecting the Vacuum On button. If your substrate is not very flat, stiff, or smaller than the platen you may need to cover some of the open vacuum holes with mylar, adhesive tape, or other material to direct more vacuum to your substrate.
4.If you want to heat the platen, you can enter the temperature in the box by typing or using the arrows. The system does not print until the platen reaches the desired temperature. This may take up to 20 minutes for a setting of 60°C. To run the platen at ambient temperature, click on the down arrow on the box until you get to a line in the box which represents a setting of “notemperature.”
5.Click on the Next button to go to the Print Set-Up tab.
Doc. # PM000040 Rev. 05 |
FUJIFILM Dimatix, Inc. Confidential Information |
December 8, 2010 |
|

Chapter 3 - Initial Start-Up Operation |
17 |
4.0Print Set-Up
The Print Set-Up screen summarizes the previously made selections. This screen displays the Print Pattern, the Substrate Settings, and the Cartridge Settings.
Figure 3 - 7 Print Set-Up screen
Now you are finally ready to start jetting. The pattern has been selected, the Substrate Settings have been entered, and the Cartridge Settings have been entered.
FUJIFILM Dimatix, Inc. Confidential Information |
Doc. # PM000040 Rev. 05 |
|
December 8, 2010 |

18 |
Chapter 3 - Initial Start-Up Operation |
1.Click on the Print button and the Print Preview window opens. This window shows where the print origin is on the platen, where the image to be printed is and the number of nozzles used to print.
Figure 3 - 8 Print Preview screen
2.Click on the Print button to print the pattern. Your DMP jets the test pattern.
4.1Nozzle Test Pattern
A 16 line test pattern can be run to see the performance of each nozzle individually. This is done from the Print Set-Up screen.
1.Set the Cartridge to 90 degrees.
2.Hold down the Ctrl key on the keyboard while clicking on the Print button at the bottom right of the screen.
You have successfully completed a print sequence.
Doc. # PM000040 Rev. 05 |
FUJIFILM Dimatix, Inc. Confidential Information |
December 8, 2010 |
|
 Loading...