

Page 1
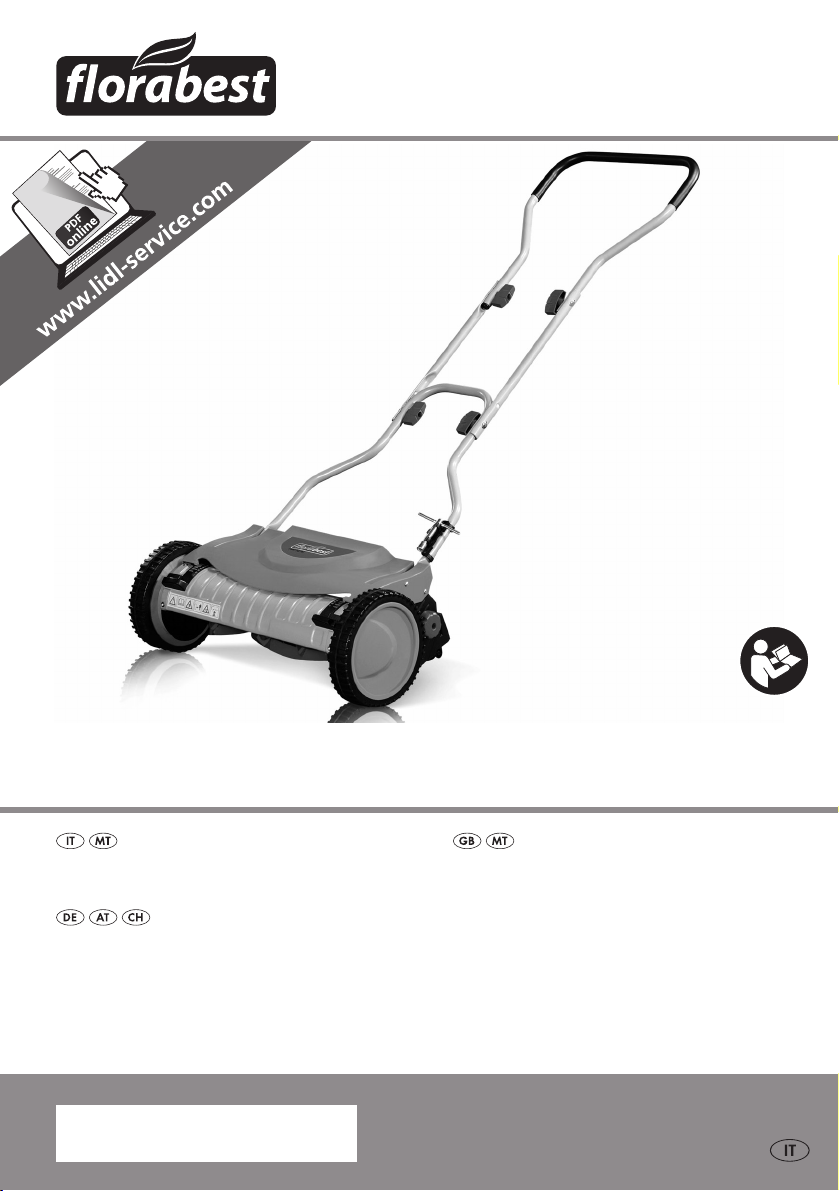
®
Tagliaerba manuale FHm 38 a1
Tagliaerba manuale
Traduzione delle istruzioni d’uso originali
HandrasenmäHer
Originalbetriebsanleitung
lawnmower
Translation of original operation manual
IAN 79826
Page 2

Prima di leggere aprire la pagina con le immagini e prendere confidenza con le diverse funzioni
dell’apparecchio.
Before reading, unfold the page containing the illustrations and familiarise yourself with all functions of the
device.
Klappen Sie vor dem Lesen die Seite mit den Abbildungen aus und machen Sie sich anschließend mit allen
Funktionen des Gerätes vertraut.
IT / MT Traduzione delle istruzioni d’uso originali Pagina 4
GB / MT Translation of original operation manual Page 11
DE / AT / CH Originalbetriebsanleitung Seite 17
Page 3
6
1
7
16
15
14
13
12
11
14
10
2
3
4
5
6
7
8
9
4
15
15
1
2
3
5
6
7
12 9
10
3
811
Page 4
IT MT
Indice
Introduzione ...............................4
Campi d’impiego .........................4
Descrizione generale ....................4
Contenuto della confezione ................4
Descrizione del funzionamento ........... 4
Panoramica .....................................5
Dati tecnici ...................................5
Indicazioni di sicurezza ................5
Simboli nelle istruzioni ......................5
Simboli graci sull’apparecchio ..........5
Indicazioni di sicurezza generali ........5
Montaggio del manico .................6
Regolazione dell’altezza di taglio ...6
Indicazioni di lavoro ....................7
Pulizia e manutenzione ................7
Pulizia .............................................7
Regolazione del gioco tra i taglienti .... 7
Stoccaggio ...................................8
Smaltimento/tutela dell’ambiente ..8
Pezzi di ricambio / Accessori ........8
Garanzia .....................................9
Service-Center ............................10
Filiale di assistenza tecnica .........10
Vista esploso ...............................25
Introduzione
Congratulazioni per l’acquisto del
Suo nuovo apparecchio.
Ha scelto un prodotto altamente pregiato.
Le istruzioni per l’uso costituiscono parte
integrante di questo prodotto. Contengono
indicazioni importanti per la sicurezza,
l’uso e lo smaltimento. Prima dell’uso del
prodotto, si raccomanda di familiarizzare
con tutte le indicazioni di comando e di
sicurezza. Usare il prodotto solo come descritto e per i campi d’impiego specicati.
Conservare le istruzioni in un luogo sicuro
e consegnare la documentazione in caso
di cessione del prodotto a terzi.
Campi d’impiego
L’apparecchio è destinato alla rasatura di
prati e superci erbose nel settore domestico.
Questo apparecchio non è adatto per l’uso
industriale. In caso di un impiego per uso
industriale decade la garanzia.
L’utilizzatore o utente è responsabile per
eventuali incidenti o danni ad altre perso-
ne o alla proprietà delle medesime.
Il fabbricante declina ogni responsabilità
per danni causati da un uso improprio o
da un comando errato.
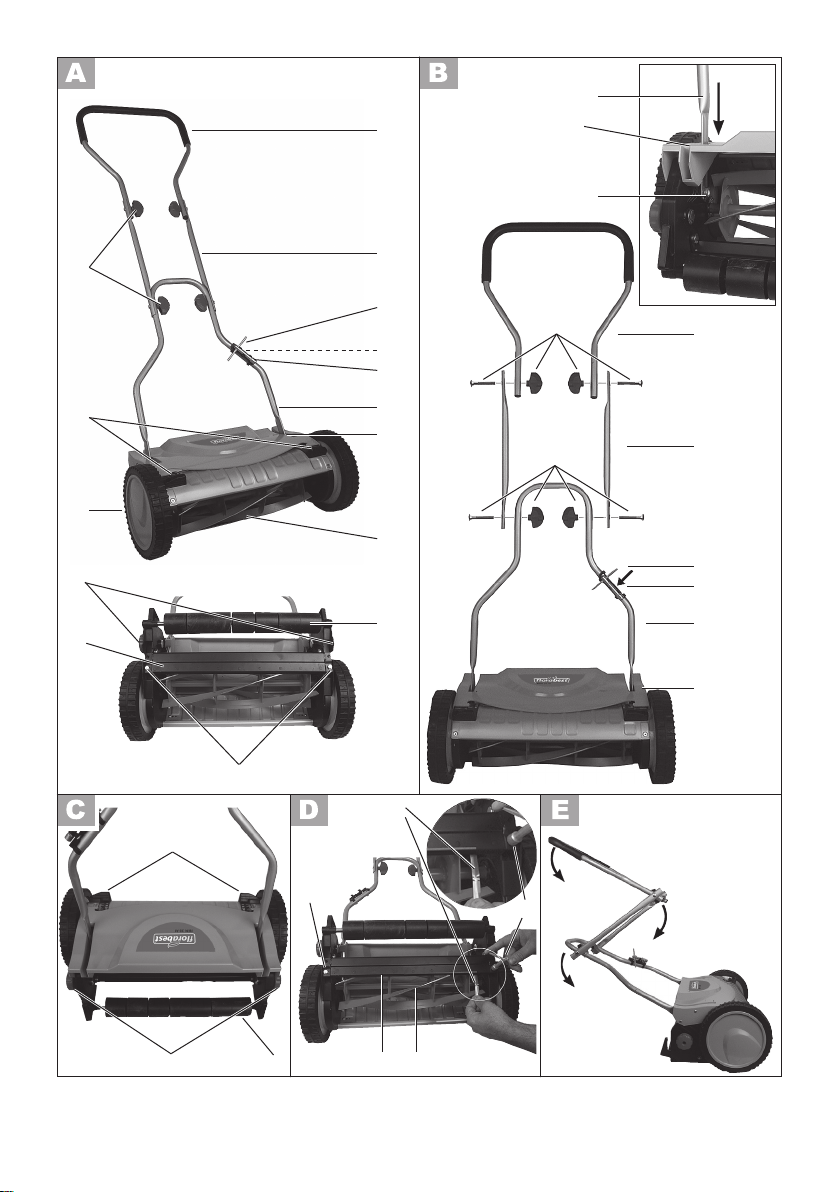
Descrizione generale
Le gure si trovano sul lato
frontale pieghevole.
Contenuto della confezione
Rimuovere l’apparecchio dalla confezione e
controllare se è completo. Smaltire il materiale di imballaggio secondo le disposizioni.
- Tagliaerba
- Parte superiore del manico
- Parte inferiore del manico
- 2 traverse intermedie
- 4 viti
- 4 dadi ad aletta
- Schiave utensili
- Portautensili con striscia di nastro me-
tallico (sonda)
- Istruzioni per l’uso
Descrizione del funzionamento
Il tagliaerba è dotato di un cilindro a
coltelli con 5 lame arcuate. Inoltre l’apparecchio ha una regolazione dell’altezza
continua ed è dotato di ruote facili da
manovrare.
La funzione delle parti di comando è riportata sulle seguenti descrizioni.
4
Page 5
IT MT
Panoramica
1 Parte superiore manico
2 2 traverse intermedie
3 Chiave utensili
4 Striscia di nastro metallico (sonda)
5 Supporto utensili
6 Parte inferiore del manico
7 Sede manico
8 Cilindro a coltelli
9 Ruote
10 2 viti per la regolazione delle lame
11 Lama inferiore
12 2 dadi di serraggio
13 2 ruota
14 2 manici regolabili e scale per la
regolazione dell’altezza
15 4 viti e 4 dadi ad aletta per il
montaggio del manico
Dati tecnici
No di serie . . 201211000001-201301042076
Larghezza lame ............................38 cm
Altezza di taglio ................... 14 - 43 mm
Numero di lame ...................................5
Peso .......................................... 8,5 kg
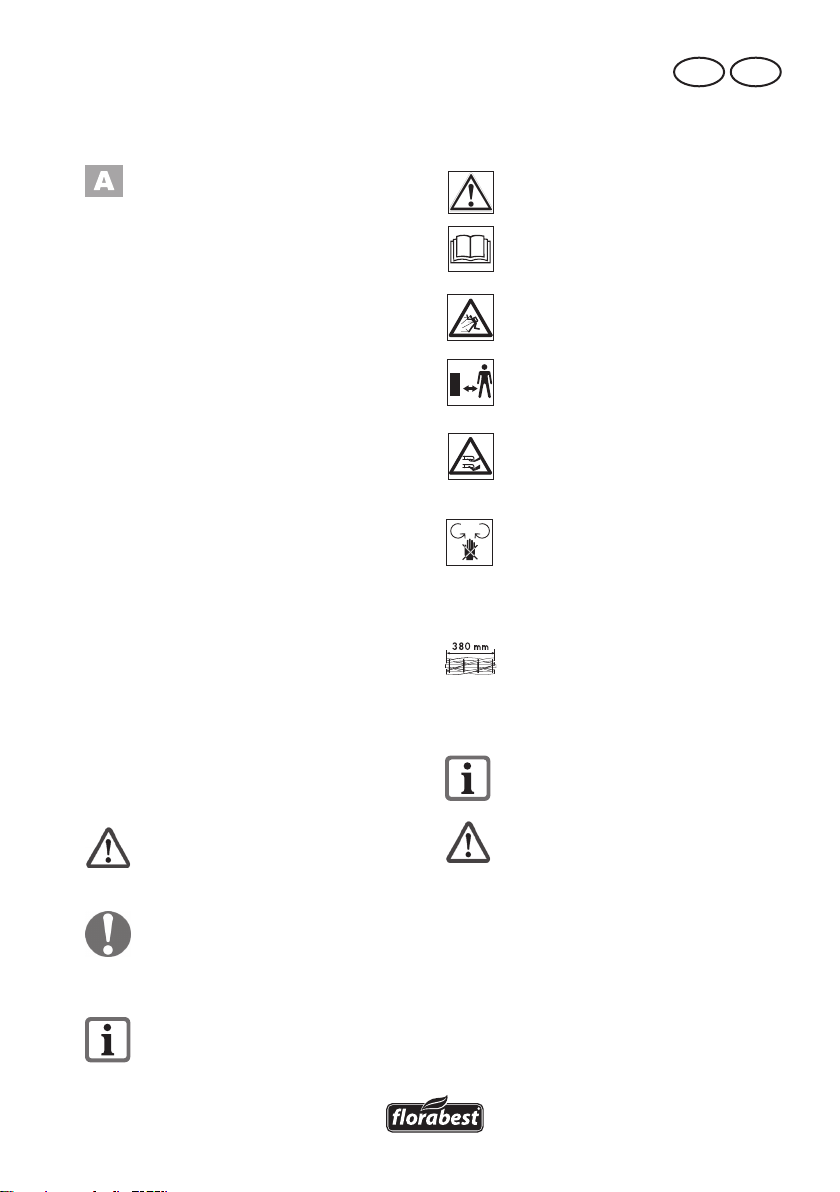
Indicazioni di sicurezza
Simboli nelle istruzioni
Simboli graci sull’apparecchio
Attenzione!
Leggere attentamente le istruzioni
d’uso.
Pericolo di lesioni a causa di parti
catapultate.
Tenere lontane le persone dal tosa-
erba.
Attenzione – Lame da taglio af-
late! Tenere lontani piedi e mani.
Pericolo di lesioni!
Attenzione! Pericolo di lesioni a
causa del cilindro a lame rotanti!
Tenere mani e piedi lontano dalle
apertura durante l’uso dell‘apparec-
chio.
Larghezza lame
Indicazioni di sicurezza generali
Osservare disposizioni antirumore
e le norme locali.
Simboli di pericolo con indica-
zioni relative alla prevenzione
di danni a persone o cose.
Simboli di divieto (al posto del
punto esclamativo il divieto viene
delucidato) con indicazioni relative
alla prevenzioni di danni.
Simboli di avvertenza con informa-
zioni per un uso migliore dell’apparecchio.
Attenzione: in questo modo si evitano
incidenti e lesioni:
• Bambini e adolescenti sotto i 16 anni e
persone che non hanno familiarizzato
con le presenti istruzioni, non devono
lavorare con l’apparecchio.
• Non impiegare mai l’apparecchio
quando in presenza di persone, in
particolare bambini o animali nelle
vicinanze.
• Persone con disturbi motori non devo-
5
Page 6
IT MT
no mettere in funzione l’apparecchio
senza un accompagnatore.
• Non usare l’apparecchio scalzi o con
sandali aperti. Condurre l’apparecchio
con passo cadenzato.
• Durante il lavoro fare attenzione che
l’apparecchio abbia una posizione
stabile, soprattutto sui pendii. Lavorare
sempre trasversalmente al pendio, mai
su e giù. Procedere con particolare
cautela quando si inverte la direzione
sul pendio. Non lavorare sui pendii
eccessivamente ripidi.
• Durante l’impostazione dell’apparecchio, evitare che mani e piedi vengano
intrappolati tra le lame mobili e le parti
sse dell’apparecchio.
• Non trasportare mai l’apparecchio dal
cilindro.
Attenzione! In questo modo si evi-
tano danneggiamento all’apparecchio ed eventuali danni consequenziali a persone:
• Controllare l’area nella quale viene
impiegato l’apparecchio e rimuovere
pietre, bastoncini, li metallici o altri
corpi estranei che potrebbero essere
catturati e catapultati.
• Assicurarci che l’apparecchio si trovi in
condizioni di lavoro sicure. Sostituire
parti logorate o danneggiate.
• Proteggere l’apparecchio dagli agenti
atmosferici (umidità, gelo).
Montaggio del manico
2. Posizionare i fori alle estremità
sui due mandrini (16).
3. Avvitare la parte superiore
dell’impugnatura (1) ai due ma-
nici centrali (2) con l’ausilio delle
viti e dei dadi ad aletta forniti.
4. Avvitare i manici centrali (2) alla
parte inferiore dell’impugnatura
(6) con l’ausilio delle viti e dei
dadi ad aletta forniti.
Per adattare il manico all’altezza
individuale, le traverse intermedie
possono essere avvitate in due posi-
zioni.
5. Inserire il portautensili (5) fornito
nella parte inferiore del manico
(6) e ssarvi la chiave utensili (3).
Regolazione
dell’altezza di taglio
L’altezza di taglio può essere regolata in
continuo da 14 a 43 mm:
1. Allentare i dadi di serraggio (12)
su ambo i lati dell’apparecchio.
2. Poggiare un piede sulle ruote (9)
e regolare l’altezza di taglio desiderata con entrambe le mani sui
manici di regolazione (14).
Fare attenzione che l’apparec-
chio sia regolato su ambo i lato
sulla stessa altezza.
3. Avvitare nuovamente le manopole di ssaggio (12).
1. Comprimere le due estremità
della parte inferiore del manico
(6) e inserirle diagonalmente
attraverso la sede del manico (7)
sull’apparecchio.
6
L’altezza di taglio deve essere rego-
lata in modo tale che il cilindro a
coltelli non tocca il suolo anche in
presenza di dislivelli.
Page 7
IT MT
Indicazioni di lavoro
Prima dell’uso controllare l’apparec-
chio per vericare l’eventuale presenza di difetti evidenti come parti
allentate, consumate o danneggiate.
Controllare la corretta sede di tutti i
dadi, bulloni e viti.
Una rasatura regolare stimola una formazione rafforzata di foglie dell’erba, e al
contempo causa la distruzione di erbacce.
Per questo motivo il prato diventa più tto
dopo ogni processo di rasatura e si ottiene
un prato omogeneo.
• Condurre l’apparecchio con passo cadenzato possibilmente lungo percorsi
lineari. Per una rasatura omogenea le
corsie dovrebbero essere sempre appena sovrapposte di alcuni centimetri.
• Lavorare solo trasversalmente ai pendii.
• Selezionare per la prima fase della
stagione un’altezza di taglio superiore
e abbassare l’altezza nelle fasi successive a circa 20 mm.
Pulizia e manutenzione
I lavori non descritti nelle se-
guenti istruzioni devono essere eseguiti da un centro servizio clienti da noi autorizzato.
Usare solo parti originali.
In questo modo si evitano
danni all’apparecchio ed
eventuali danni consequenziali a persone.
Indossare guanti di protezione du-
rante la manipolazione della lama.
Pericolo di ferite da taglio.
• Controllare le coperture e i dispositivi
di protezione per vericare la presenza di eventuali danneggiamenti e la
corretta sede. Eventualmente provvedere alla sostituzione dei medesimi.
Pulizia
Non spruzzare l’apparecchio con
acqua e non pulirlo sotto acqua
corrente.
• Tenere l’apparecchio sempre pulito.
Per la pulizia usare una spazzola o un
panno, ma non detergenti o solventi.
• Dopo la rasatura rimuovere residui di
piante aderenti dalle ruote e dalla
zona lame.
• Pulire le lame dei coltelli con un panno
oleoso oppure spruzzare uno spray
per la cura del metallo.
• A causa della speciale geometria di
taglio le lame del cilindro a coltelli
non possono essere aflate. Il cilindro
a coltelli e le lame inferiore devono
quindi essere sostituiti nel set completo.
Fare eseguire il montaggio del cilindro
a coltelli da un’ofcina specializzata.
Regolazione del gioco tra i
taglienti
Le lame del cilindro a coltelli devono essere regolati, quando l’erba non viene più
tagliata in modo pulito e omogeneo.
1. Rimuovere la chiave utensili (3) e
la striscia di nastro metallico (son-
da) (4) dal supporto utensili (vedi
5).
2. Spostare la striscia di nastro
metallico (4) tra una lama del
cilindro a coltelli (8) e la lama
inferiore (11).
7
Page 8
IT MT
3. Girare le viti a testa esagonale
(10) a destra e a sinistra dell’apparecchio in piccoli passi in
senso orario no a quando la
striscia di nastro di metallo si incastra leggermente.
4. Controllare la regolazione mediante rotazione del cilindro a
coltelli. Nessuna delle lame del
cilindro a coltelli deve venire a
contatto con la lama inferiore e
slittare.
5. Riposizionare la chiave utensili
(3) e la striscia di nastro metallico
(sonda) (4) nel portautensili (vedi
5) .
Quando il gioco tra i taglienti non
può più essere regolato, il cilindro
a coltelli e la lama inferiore devono essere sostituiti nel set.
Stoccaggio
• Conservare l’apparecchio in un luogo
asciutto e fuori dalla portata di bambini.
ciclate. A tale proposito chiedere informazioni al nostro centro di assistenza.
• L’erba tagliata non deve essere introdotta nel cassonetto, ma nel composto
oppure distribuita come strato di pacciame sotto ai cespugli e gli alberi.
Pezzi di ricambio /
Accessori
Per l’acquisto di ricambi usare l’indirizzo
di assistenza o il numero di fax specicato. Sull’ordine deve essere tassativamente
specicato il numero d’ordine.
Cestino raccoglierba ....cod. art. 76101130
Per tutti gli altri ricambi, specicare sull’ordine tassativamente il tipo di macchine e
il codice ricambio riportato sul disegno
esploso.
Per una conservazione con scarso
ingombro allentare i dadi ad aletta
e ripiegare il manico.
Smaltimento/tutela
dell’ambiente
Smaltire l’apparecchio, gli accessori e l’imballaggio nelle sedi di riciclaggio
• Apparecchi non devono essere smaltiti
insieme ai riuti domestici. Consegnare l’apparecchio ad una sede di
riciclaggio. Le parti di plastica e di metallo utilizzate possono essere smaltite
nella raccolta differenziata e quindi ri-
8
Page 9

IT MT
Garanzia
Gentile cliente,
Su questo apparecchio Le viene concessa
una garanzia di 3 anni a partire dalla
data di acquisto.
In caso di difetti di questo prodotto può
avanzare diritti legali nei confronti del
venditore del prodotto. Tali diritti legali non
vengono limitati dalla nostra garanzia qui
di seguito rappresentata.
Condizioni di garanzia
Il termine di garanzia inizia con la data di
acquisto. La preghiamo di conservare in
un luogo sicuro lo scontrino scale originale. Questo documento viene richiesto come
prova d’acquisto.
Qualora subentrasse un difetto di materiale
o di fabbricazione entro tre anni a partire
dalla data di acquisto di questo prodotto,
il prodotto verrà riparato o sostituito – a
nostra discrezione - gratuitamente da noi.
Questa prestazione di garanzia presuppone che venga presentato entro il termine di
tre anni l’apparecchio difettoso e la prova
d’acquisto (scontrino scale) e descritto
brevemente per iscritto in che cosa consiste
il difetto e quando si è vericato.
Se il difetto è coperto dalla nostra garanzia, riceverà il prodotto riparato oppure
un prodotto nuovo. Con la riparazione o
la sostituzione del prodotto non inizia un
nuovo periodo di garanzia.
Tempo di garanzia e diritti legali
per vizi della cosa
Il periodo di garanzia non viene prolungato. Questo vale anche per parti sostituite
e riparate. Difetti e vizi presenti già al momento dell’acquisto devono essere segnalati
immediatamente dopo la rimozione dall’imballaggio. Riparazioni che accorrono dopo
il periodo di garanzia sono a pagamento.
Volume di garanzia
L’apparecchio è stato prodotto accurata-
mente secondo severe direttive di qualità
e controllato con coscienza prima della
consegna.
La prestazione di garanzia vale per difetti
di materiale o di fabbricazione. Questa
garanzia non si estende ai componenti del
prodotto che sono soggetti a normale usura e che quindi possono essere visti come
parti di usura (p. es. cilindro a coltelli e
lama inferiore) oppure per danneggiamenti delle parti fragili (p. es. interruttori, accumulatori o elementi di vetro).
Questa garanzia decade se il prodotto è
stato danneggiato, non usato correttamente o non manutenuto. Per un uso corretto
del prodotto devono essere osservate tutte
le indicazioni riportate nelle istruzioni per
l’uso. Destinazioni d’uso e azioni sconsigliate nelle istruzioni d’uso o dalle quali
si viene avvertiti, sono tassativamente da
evitare.
Il prodotto è destinato esclusivamente all’uso commerciale. In caso di uso improprio,
esercizio della forza e interventi non effettuati dalla nostra liale di assistenza tecnica autorizzata, decade la garanzia.
Svolgimento in caso di garanzia
Per garantire una rapida elaborazione della Sua pratica, La preghiamo di seguire le
seguenti indicazioni:
• per tutte le richieste tenere a portata di
mano lo scontrino scale e il codice articolo (p. es. IAN 12345) come prova
d’acquisto.
• I codici articolo sono riportati sulla
targhetta del tipo, sulla copertina delle
istruzioni (in basso a sinistra) oppure
come adesivo sulla parte posteriore o
inferiore.
• Nel caso in cui si dovessero vericare
9
Page 10

IT MT
difetti funzionali o altri vizi, La preghiamo di contattare telefonicamente o per
e-mail. Riceverà ulteriori informazioni
sullo svolgimento del Suo reclamo.
• Un prodotto rilevato come difettoso
può essere inviato con porto franco
all’indirizzo di assistenza comunicato,
previa consultazione del nostro servizio di assistenza tecnica, allegando
la prova d‘acquisto (scontrini scali)
e l’indicazione, in che cosa consiste
il difetto e quando si è vericato. Per
evitare problemi di accettazione e costi
aggiuntivi, usare tassativamente solo
l’indirizzo che Le è stato comunicato.
Assicurarsi che la spedizione non avvenga in porto assegnato, con merce
ingombrante, corriere espresso o altro
carico speciale. Spedire l’apparecchio
inclusi tutti gli accessori forniti insieme
al momento dell’acquisto e garantire
un imballaggio di trasporto sufcientemente sicuro.
Service-Center
Assistenza Italia
IT
Tel.: 02 36003201
E-Mail: grizzly@lidl.it
IAN 79826
Assistenza Malta
MT
Tel.: 80062230
E-Mail: grizzly@lidl.com.mt
IAN 79826
Filiale di assisten-
za tecnica
Non dimenticare che il seguente indirizzo
non è un indirizzo di assistenza tecnica.
Contattare prima di tutto il centro di assistenza tecnica sopra nominato.
Garden Italia SPA
IT
Via Zaccarini, 8
29010 San Nicolò a Trebbia (PC)
Grizzly Service Malta
MT
Fax: 0049 6078 780670
10
Page 11

MTGB
Content
Introduction ...............................11
Intended Purpose .......................11
General description ....................11
Scope of Delivery ............................ 11
Functionality ................................... 11
Summary .......................................12
Technical Specications ..............12
Safety Instructions......................12
Symbols in the Instructions ................12
Symbols on the device .....................12
General Safety Information ...............12
Fitting the Handle .......................13
Adjusting the Cut Height.............13
Working Instructions ..................13
Cleaning and Maintenance .........14
Cleaning ........................................14
Adjusting the Cutting Clearance ........ 14
Storage ......................................15
Disposal / Environmental
Protection ..................................15
Replacement Parts / Accessories ..15
Guarantee .................................15
Service-Center ............................16
Service Branch ...........................16
Exploded Drawing .......................25
Introduction
Congratulations on the purchase of
your new device. With it, you have
chosen a high quality product.
The operating instructions constitute part of
this product. They contain important information on safety, use and disposal.
Before using the product, familiarise yourself with all of the operating and safety
instructions. Use the product only as described and for the applications specied.
Keep this manual safely and in the event
that the product is passed on, hand over
all documents to the third party.
Intended Purpose
The device is intended only for mowing
lawns and grass areas in the domestic
domain.
This equipment is not suitable for commercial use. Commercial use will invalidate the
guarantee.
The operator or user is responsible for accidents or injury to other people or damage
to their property.
The manufacturer shall not be liable for
damages caused by improper use or incorrect operation.
General description
The illustrations can be found
on the front foldout page.
Scope of Delivery
Carefully unpack the appliance and check
that it is complete. Dispose of the packaging material correctly.
- Mower
- Handle top
- Handle bottom
- 2 centrepieces
- 4 screws
- 4 wing nuts
- Machine key
- Tool holder with metal strip (feeler
gauge)
- Instruction manual
Functionality
The lawn mower has a reel blade cylinder
containing 5 bow-shaped blades. Its cutting height is innitely adjustable, and its
wheels turn smoothly.
Read the sections below to learn more
about each operating element’s function.
11
Page 12

GB MT
Summary
1 Handle top
2 2 centrepieces
3 Machine key
4 Metal strips (feeler gauge)
5 Machine holder
6 Handle bottom
7 Handle holder
8 Blade cylinder
9 Castors
10 2 screws for adjusting the blades
11 Sub-blade
12 2 locknuts
13 2 wheels
14 2 adjustable handles and scales
for height adjustment
15 4 screws and 4 wing nuts for the
handle xing
Technical Specications
Serial no. 201211000001-201301042076
Blade width ..................................38 cm
Cut height ............................ 14 - 43 mm
Number of blades ................................ 5
Weight ....................................... 8.5 kg
Safety Instructions
Symbols on the device
Caution!
Read the operating instructions ca-
refully.
Risk of injury from parts being
thrown up.
Keep nearby people away from the
mower.
Caution – sharp cutting blade!
Keep feet and hands away. Risk of
injury!
Caution! Risk of injury by rotating
blade cylinder!
Keep hands and feet away from
the openings when operating the
mower.
Blade width
General Safety Information
Observe the noise protection and
local regulations.
Symbols in the Instructions
Warning signs with informa-
tion for the prevention of injuries or damage property.
Mandatory signs (instead of the
exclamation mark, the command is
explained) with information for the
prevention of damage.
Information signs with information for
better handling of the machine.
12
Caution: to avoid accidents and inju-
ries:
• Children and young people under the
age of 16 and people who are not
familiar with these instructions must not
work with the machine.
• Never turn the machine on when people and particularly children or animals
are nearby.
• People with motor disorders are not to
operate the machine without supervision.
• Do not use the machine with bare feet
or when wearing open sandals. Only
Page 13

MTGB
run the machine at walking pace.
• When working, ensure a rm foothold,
particularly on slopes. Always work
across the slope, never up or downwards. Take particular care when changing the direction of travel on the slope.
Do not work on excessively steep slopes.
• When switching the machine on, avoid
feet or hands being trapped between
the moving blades and the xed parts
of the machine.
• Never carry the machine by the blade
cylinder.
Caution! To avoid damaging the
machine and potential injury as a
consequence:
• Check the terrain on which the machine
is used and remove stones, sticks, wires
or other foreign bodies that may be
picked up and ung outwards.
• Ensure that the machine is in a safe operating condition. Replace worn or damaged parts.
• Protect the machine from the effects of
weathering (damp, frost).
Fitting the Handle
1. Press both ends of the handle bottom (6) together and insert them
vertically through the handle
holder (7) on the machine.
2. Push the holes at the ends over
the two holder bolts (16).
3. Use the screws and wing nuts
from the package to mount the
top part of the handle (1) on the
two cross bars (2).
4. Use the screws and wing nuts
from the package to mount the
cross bars (2) on the bottom part
of the handle (6).
The two centre bars can be secured
in two positions to adjust the handle
bar to your height.
5. Mount the tool holder (5) from
the package to the bottom part of
the handle (6) and snap on the
machine key (3) to it.
Adjusting the Cut Height
The cut height is innitely adjustable from
14–43 mm:
1. Loosen the locknuts (12) on both
sides of the machine.
2. Place one foot on the castors (9)
and set the desired cut height with
both hands on the adjusting handles (14).
Ensure that the machine is set to
the same height on both sides.
3. Retighten the locking screws (12).
Set the cut height no lower than to
where the blade cylinder does not
touch the ground even where it is
uneven.
Working Instructions
Before each use, check the machine
for obvious defects, such as loose,
worn or damaged parts. Check that
all nuts, bolts and screws are sitting
rmly.
Regular mowing stimulates the stronger
formation of leaves in the grass as well as
allowing weeds to die off at the same time.
Thus, the lawn becomes thicker each time it
is mowed and a lawn with even resilience
is produced.
13
Page 14

GB MT
• Run the machine at walking pace, in
strips that are a straight as possible.
For seamless mowing, the strips should
always overlap by a few centimetres.
• On slopes, always work across the
slope.
• For the rst cut of the season, choose
a high the cut height and reduce the
height to around 20 mm for the subsequent cuts.
Cleaning and
Maintenance
Have work that is not de-
scribed in these instructions
carried out by one of our
authorised customer service
centres. Use only original
components. In this way you
avoid damage to the appliance and possible injury to
people.
Wear gloves when dealing with the
blades. Risk of cuts.
• Check covers and safety devices for
damage and check that these are sitting
correctly. Replace if necessary.
Cleaning
Neither hose down nor use running
water to clean the mower.
them with a metal maintenance spray.
• Due to the special cutting geometry,
the blade cylinder blades cannot be
re-sharpened. If necessary, the blade
cylinder and sub-blade must therefore
be replaced as a set. Have a specialist
workshop carry out the installation of
the blade cylinder.
Adjusting the Cutting
Clearance
The blade cylinder blades must be adjusted if the grass is no longer being cut
evenly and cleanly.
1. Remove the machine key (3) and
metal strips (feeler gauge) (4) from
the machine holder (cf.
2. Push the metal strip (4) between a
blade cylinder (8) blade and the
sub-blade (11).
3. Turn the hex bolts (10) to the right
then to the left on the machine,
in small steps in the clockwise
direction until the metal strip sticks
slightly.
4. Check the setting by turning the
blade cylinder. None of the blade
cylinder blades should be in
contact and grinding on the subblade.
5. Return the machine key (3) and
the metal strip (feeler gauge) (4) to
the tool holder (cf.
5).
5).
• Always keep the machine clean. For
cleaning, use a brush or cloth, but no
cleaning agents or solvents.
• After mowing, remove any plant
remains stuck to the wheels and the
blade area.
• Rub the blades with an oil rag or spray
14
If it is no longer possible to adjust
the cutting clearance, the blade
cylinder and sub-blade must be replaced as a set.
Page 15

MTGB
Storage
• Keep the machine dry and out of reach
of children.
For space-saving storage, loosen
the wing nuts and fold the handle
bar together.
Disposal / Environmental Protection
Recycle the device, accessories and packaging in an environmentally friendly manner.
• Machines do not belong in domestic
waste. Take the machine to a recycling point. The plastic and metal
components used can be separated by
type and therefore recycled. Ask your
dealer about this.
• Do not dispose of cut grass in the dustbin; use it for composting or spread it as
a mulch layer under shrubs and trees.
Replacement Parts /
Accessories
For the subsequent purchase of replacement parts, use the service address or fax
number given. Always give the order number when ordering.
Grass collection box ....order no. 76101130
When ordering any other replacement parts,
always give the machine type and the component number from the blown-up drawing.
Guarantee
Dear Customer,
This equipment is provided with a 3-year
guarantee from the date of purchase.
In case of defects, you have statutory rights
against the seller of the product. These
statutory rights are not restricted by our
guarantee presented below.
Terms of Guarantee
The term of the guarantee begins on the
date of purchase. Please retain the original
receipt. This document is required as proof
of purchase.
If a material or manufacturing defect occurs within three years of the date of purchase of this product, we will repair or replace – at our choice – the product for you
free of charge. This guarantee requires the
defective equipment and proof of purchase
to be presented within the three-year period with a brief written description of what
constitutes the defect and when it occurred.
If the defect is covered by our guarantee,
you will receive either the repaired product
or a new product. No new guarantee period begins on repair or replacement of the
product.
Guarantee Period and Statutory
Claims for Defects
The guarantee period is not extended by
the guarantee service. This also applies for
replaced or repaired parts. Any damages
and defects already present at the time of
purchase must be reported immediately after unpacking. Repairs arising after expiry
of the guarantee period are chargeable.
Guarantee Cover
The equipment has been carefully produced in accordance with strict quality
15
Page 16

GB MT
guidelines and conscientiously checked
prior to delivery.
The guarantee applies for all material and
manufacturing defects. This guarantee
does not extend to cover product parts that
are subject to normal wear and may therefore be considered as wearing parts (e.g.
blade cylinder and sub-blade) or to cover
damage to breakable parts (e.g. switches,
batteries).
This guarantee shall be invalid if the product has been damaged, used incorrectly or
not maintained. Precise adherence to all of
the instructions specied in the operating
manual is required for proper use of the
product. Intended uses and actions against
which the operating manual advises or
warns must be categorically avoided.
The product is designed only for private
and not commercial use. The guarantee
will be invalidated in case of misuse or
improper handling, use of force, or interventions not undertaken by our authorised
service branch.
Processing in Case of Guarantee
To ensure quick handling of you issue,
please follow the following directions:
• Please have the receipt and item number (e.g. IAN 12345) ready as proof
of purchase for all enquiries.
• Please nd the item number on the
rating plate, an engraved plate on the
front page of your manual (bottom left)
or as a sticker on the back or bottom.
• Should functional errors or other defects occur, please initially contact the
service department specied below by
telephone or by e-mail. You will then
receive further information on the processing of your complaint.
• After consultation with our customer
service, a product recorded as defec-
tive can be sent postage paid to the
service address communicated to you,
with the proof of purchase (receipt)
and specication of what constitutes
the defect and when it occurred. In order to avoid acceptance problems and
additional costs, please be sure to use
only the address communicated to you.
Ensure that the consignment is not sent
carriage forward or by bulky goods,
express or other special freight. Please
send the equipment inc. all accessories
supplied at the time of purchase and
ensure adequate, safe transport packaging.
Service-Center
Service Great Britain
GB
Tel.: 0871 5000 720
(£ 0.10/Min.)
E-Mail: grizzly@lidl.co.uk
IAN 79826
Service Malta
MT
Tel.: 80062230
E-Mail: grizzly@lidl.com.mt
IAN 79826
Service Branch
Please note that the following address is
not a service address. Please initially contact the service centre specied above.
DES UK Ltd.
GB
Unit B7
Oxford Street Industrial Park
Vulcan Road
Bilston, West Midlands WV14 7LF
Grizzly Service Malta
MT
e-mail: service@grizzly.biz
16
Page 17

DE AT CH
Inhalt
Einleitung ...................................17
Verwendungszweck ................... 17
Allgemeine Beschreibung ...........17
Lieferumfang..................................17
Funktionsbeschreibung .................... 17
Übersicht ......................................18
Technische Daten ........................18
Sicherheitshinweise ....................18
Symbole in der Anleitung ................18
Symbole auf dem Gerät ..................18
Allgemeine Sicherheitshinweise .......18
Griff montieren ..........................19
Schnitthöhe einstellen .................19
Arbeitshinweise .........................20
Reinigung und Wartung .............20
Reinigung .....................................20
Schneidspalt einstellen ....................20
Lagerung ...................................21
Entsorgung / Umweltschutz ........21
Ersatzteile / Zubehör .................21
Garantie ....................................22
Service-Center ............................23
Service-Niederlassung ................23
Explosionszeichnung ......................25
Einleitung
Herzlichen Glückwunsch zum Kauf
Ihres neuen Gerätes.
Sie haben sich damit für ein hochwertiges
Gerät entschieden. Die Betriebsanleitung ist
Bestandteil dieses Gerätes. Sie enthält wichtige Hinweise für Sicherheit, Gebrauch und
Entsorgung. Machen Sie sich vor der Benutzung des Gerätes mit allen Bedien- und
Sicherheitshinweisen vertraut. Benutzen Sie
das Gerät nur wie beschrieben und für die
angegebenen Einsatzbereiche. Bewahren
Sie die Betriebsanleitung gut auf und händigen Sie alle Unterlagen bei Weitergabe des
Gerätes an Dritte mit aus.
Verwendungszweck
Das Gerät ist nur für das Mähen von
Rasen- und Grasächen im häuslichen Bereich bestimmt. Dieses Gerät ist nicht zur
gewerblichen Nutzung geeignet. Bei gewerblichem Einsatz erlischt die Garantie.
Der Bediener oder Nutzer ist für Unfälle
oder Schäden an anderen Menschen oder
deren Eigentum verantwortlich.
Der Hersteller haftet nicht für Schäden, die
durch bestimmungswidrigen Gebrauch oder
falsche Bedienung verursacht wurden.
Allgemeine Beschreibung
Die Abbildungen nden Sie auf
der vorderen Ausklappseite.
Lieferumfang
Packen Sie das Gerät aus und kontrollieren
Sie, ob es vollständig ist.
Entsorgen Sie das Verpackungsmaterial
ordnungsgemäß.
- Handrasenmäher
- Griffoberteil
- Griffunterteil
- 2 Mittelholme
- 4 Schrauben
- 4 Flügelmuttern
- Werkzeugschlüssel
- Werkzeughalterung mit Metallbandstreifen (Fühlerlehre)
- Betriebsanleitung
Funktionsbeschreibung
Der Rasenmäher besitzt eine Spindel-Messerwalze mit 5 geschwungenen Messern.
Zusätzlich ist das Gerät stufenlos höhenverstellbar und hat leichtgängige Räder.
Die Funktion der Bedienteile entnehmen Sie
bitte den nachfolgenden Beschreibungen.
17
Page 18

DE AT CH
Übersicht
1 Griffoberteil
2 2 Mittelholme
3 Werkzeugschlüssel
4 Metallbandstreifen (Fühlerlehre)
5 Werkzeughalterung
6 Griffunterteil
7 Griffaufnahme
8 Messerwalze
9 Laufrollen
10 2 Schrauben zum Einstellen der
Messer
11 Untermesser
12 2 Feststellmuttern
13 2 Räder
14 2 Verstellgriffe und Skalen zur
Höheneinstellung
15 4 Schrauben und 4 Flügelmuttern
für die Griffmontage
Technische Daten
Seriennr. 201211000001-201301042076
Messerbreite ................................38 cm
Schnitthöhe .......................... 14 - 43 mm
Anzahl der Messer ...............................5
Gewicht ...................................... 8,5 kg
Sicherheitshinweise
Symbole in der Anleitung
Symbole auf dem Gerät
Achtung!
Lesen Sie die Betriebsanleitung auf-
merksam durch.
Verletzungsgefahr durch wegge-
schleuderte Teile.
Umstehende Personen von dem Ge-
rät fern halten.
Vorsicht - Scharfe Schneidmesser!
Füße und Hände fernhalten.
Verletzungsgefahr!
Achtung! Verletzungsgefahr durch
rotierende Messerwalze! Hände
und Füße außerhalb der Öffnungen
halten bei Einsatz des Gerätes.
Messerbreite
Allgemeine
Sicherheitshinweise
Beachten Sie den Lärmschutz und
örtliche Vorschriften.
Vorsicht: So vermeiden Sie Unfälle
und Verletzungen:
Gefahrenzeichen mit Anga-
ben zur Verhütung von Personen- oder Sachschäden.
Gebotszeichen (anstelle des Aus-
rufungszeichens ist das Gebot erläutert) mit Angaben zur Verhütung
von Schäden.
Hinweiszeichen mit Informationen zum
besseren Umgang mit dem Gerät.
18
• Kinder und Jugendliche unter 16 Jahren
sowie Personen, die nicht mit dieser
Betriebsanleitung vertraut sind, dürfen
nicht mit dem Gerät arbeiten.
• Setzen Sie das Gerät niemals ein, während Personen, insbesondere Kinder,
oder Tiere in der Nähe sind.
• Personen mit motorischen Störungen
dürfen das Gerät nie ohne Begleitperson in Betrieb nehmen.
• Benutzen Sie das Gerät nicht, wenn Sie
Page 19

DE AT CH
barfuß gehen oder offene Sandalen
tragen. Führen Sie das Gerät nur im
Schritttempo.
• Achten Sie beim Arbeiten auf einen sicheren Stand, insbesondere an Hängen.
Arbeiten Sie immer quer zum Hang,
niemals auf- oder abwärts. Seien Sie
besonders vorsichtig, wenn Sie die Fahrtrichtung am Hang ändern. Arbeiten Sie
nicht an übermäßig steilen Hängen.
• Vermeiden Sie beim Einstellen des Gerätes, dass Füße oder Hände zwischen
den beweglichen Messern und den
feststehenden Teilen des Gerätes festgeklemmt werden.
• Tragen Sie das Gerät niemals an der
Messerwalze.
Vorsicht! So vermeiden Sie Geräte-
schäden und eventuell daraus resultierende Personenschäden:
• Überprüfen Sie das Gelände, auf dem
das Gerät eingesetzt wird und entfernen
Sie Steine, Stöcke, Drähte oder andere
Fremdkörper, die erfasst und weggeschleudert werden können.
• Sorgen Sie dafür, dass das Gerät in einem sicheren Arbeitszustand ist. Wechseln Sie abgenutzte oder beschädigte
Teile aus.
• Schützen Sie das Gerät vor Witterungseinüssen (Feuchtigkeit, Frost).
Griff montieren
1. Drücken Sie die beiden Enden
des Griffunterteils (6) zusammen
und stecken Sie diese senkrecht
durch die Griffaufnahme (7) am
Gerät.
2. Schieben Sie die Bohrungen an
den Enden über die beiden Aufnahmebolzen (16).
3. Schrauben Sie das Griffoberteil
(1) mit Hilfe der beiliegenden
Schrauben und Flügelmuttern (15)
an den beiden Mittelholmen (2)
fest.
4. Schrauben Sie die Mittelholme
(2) mit Hilfe der beiliegenden
Schrauben und Flügelmuttern (15)
an das Griffunterteil (6) an.
Um den Griffholm Ihrer individu-
ellen Größe anzupassen, können
Sie die Mittelholme in zwei Positionen anschrauben.
5. Stecken Sie die beiliegende
Werkzeughalterung (5) an das
Griffunterteil (6) und klemmen Sie
den Werkzeugschlüssel (3) daran
fest.
Schnitthöhe einstellen
Die Schnitthöhe lässt sich stufenlos von
14 - 43 mm einstellen:
1. Lösen Sie die Feststellmuttern (12)
auf beiden Seiten des Gerätes.
2. Stellen Sie einen Fuß auf die
Laufrollen (9) und stellen Sie die
gewünschte Schnitthöhe mit beiden Händen an den Verstellgriffen ein (14).
Achten Sie darauf, dass das
Gerät auf beiden Seiten auf die
gleiche Höhe eingestellt ist.
3. Schrauben Sie die Feststellmuttern
(12) wieder fest.
Die Schnitthöhe darf nur so tief ein-
gestellt werden, dass die Messerwalze auch bei Unebenheiten den
Boden nicht berührt.
19
Page 20

DE AT CH
Arbeitshinweise
Kontrollieren Sie das Gerät vor
jedem Gebrauch auf offensichtliche
Mängel wie lose, abgenutzte oder
beschädigte Teile. Prüfen Sie den
festen Sitz aller Muttern, Bolzen und
Schrauben.
Regelmäßiges Mähen regt die Graspanze
zu einer verstärkten Blattbildung an, lässt
aber gleichzeitig Unkrautpanzen absterben. Daher wird der Rasen nach jedem
Mähvorgang dichter und es entsteht ein
gleichmäßig belastbarer Rasen.
• Führen Sie das Gerät im Schritttempo in
möglichst geraden Bahnen. Für ein lückenloses Mähen sollten sich die Bahnen
immer um wenige Zentimeter überlappen.
• Arbeiten Sie an Hängen immer quer zum
Hang.
• Wählen Sie für den ersten Schnitt in der
Saison eine hohe Schnitthöhe und senken die Höhe bei den Folgeschnitten auf
etwa 20 mm.
Reinigung und Wartung
Lassen Sie Arbeiten, die nicht
in dieser Betriebsanleitung
beschrieben sind, von einer
von uns ermächtigten Kundendienststelle durchführen.
Verwenden Sie nur Originalteile. So vermeiden Sie
Geräteschäden und eventuell
daraus resultierende Personenschäden.
Tragen Sie beim Umgang mit dem
Messer Handschuhe. Gefahr von
Schnittverletzungen.
• Überprüfen Sie Abdeckungen und Schutzeinrichtungen auf Beschädigungen und
korrekten Sitz. Tauschen Sie diese gegebenenfalls aus.
Reinigung
Spritzen Sie das Gerät nicht mit
Wasser ab und reinigen Sie es nicht
unter ießendem Wasser.
• Halten Sie das Gerät stets sauber. Verwenden Sie zum Reinigen eine Bürste
oder ein Tuch, aber keine Reinigungsbzw. Lösungsmittel.
• Entfernen Sie nach dem Mähen anhaftende Panzenreste von den Rädern und
dem Messerbereich.
• Reiben Sie die Messerschneiden mit einem öligen Lappen ab oder sprühen Sie
diese mit einem Metall-Pegespray ein.
• Aufgrund der besonderen Schneidgeometrie können die Messer der Messerwalze nicht nachgeschliffen werden.
Messerwalze und Untermesser müssen
daher bei Bedarf als Satz ausgetauscht
werden. Lassen Sie den Einbau der
Messerwalze von einer Fachwerkstätte
durchführen.
Schneidspalt einstellen
Die Messer der Messerwalze müssen nachgestellt werden, wenn das Gras nicht mehr
gleichmäßig und sauber geschnitten wird.
1. Nehmen Sie den Werkzeugschlüssel (3) und den Metallbandstreifen (Fühlerlehre) (4) aus der
Werkzeughalterung (siehe
2. Schieben Sie den Metallbandstreifen (4) zwischen ein Messer
5).
20
Page 21

DE AT CH
der Messerwalze (8) und das
Untermesser (11).
3. Drehen Sie die Sechskantschrauben (10) rechts und dann links
am Gerät in kleinen Schritten im
Uhrzeigersinn, bis der Metallbandstreifen leicht klemmt.
4. Prüfen Sie die Einstellung, indem
Sie die Messerwalze durchdrehen. Keines der Messer der Messerwalze sollte mit dem Untermesser Kontakt haben und schleifen.
5. Setzen Sie den Werkzeugschlüssel (3) und den Metallbandstreifen (Fühlerlehre) (4) wieder in die
Werkzeughalterung (siehe
ein.
Wenn sich der Schneidspalt nicht
mehr einstellen lässt, müssen Messerwalze und Untermesser als Satz
ausgetauscht werden.
5)
Lagerung
• Bewahren Sie das Gerät trocken und
außerhalb der Reich weite von Kindern
auf.
Entsorgung / Umweltschutz
Führen Sie Gerät, Zubehör und Verpackung
einer umweltgerechten Wiederverwertung
zu.
• Das Gerät gehört nicht in den Hausmüll.
Geben Sie das Gerät an einer Verwertungsstelle ab. Die verwendeten Kunststoff- und Metallteile können sortenrein
getrennt werden und so einer Wiederverwertung zugeführt werden. Fragen
Sie hierzu Ihren Händler.
• Werfen Sie Gras nicht in die Mülltonne,
sondern führen Sie es der Kompostierung
zu oder verteilen Sie es als Mulchschicht
unter Sträuchern und Bäumen.
Ersatzteile / Zubehör
Verwenden Sie zum Nachkauf von Ersatzteilen die angegebene Service-Adresse
oder Fax-Nummer. Geben Sie bitte bei der
Bestellung den Maschinentyp und die Bestellnummer an.
Grasfangkorb ...........Bestellnr. 76101130
Zur Platz sparenden Aufbewahrung
lockern Sie die Flügelmuttern und
klappen Sie den Griffholm zusammen.
Geben Sie für alle weiteren Ersatzteile bei
der Bestellung unbedingt den Maschinentyp
und die Teilenummer in der Explosionszeichnung an.
21
Page 22

DE AT CH
Garantie
Sehr geehrte Kundin, sehr geehrter Kunde,
Sie erhalten auf dieses Gerät 3 Jahre Garantie ab Kaufdatum.
Im Falle von Mängeln dieses Gerätes
stehen Ihnen gegen den Verkäufer des
Gerätes gesetzliche Rechte zu. Diese
gesetzlichen Rechte werden durch unsere
im Folgenden dargestellte Garantie nicht
eingeschränkt.
Garantiebedingungen
Die Garantiefrist beginnt mit dem Kaufdatum. Bitte bewahren Sie den Original Kassenbon gut auf. Diese Unterlage wird als
Nachweis für den Kauf benötigt.
Tritt innerhalb von drei Jahren ab dem Kaufdatum dieses Gerätes ein Material- oder
Fabrikationsfehler auf, wird das Gerät von
uns – nach unserer Wahl – für Sie kostenlos
repariert oder ersetzt. Diese Garantieleistung setzt voraus, dass innerhalb der DreiJahres-Frist das defekte Gerät und der Kaufbeleg (Kassenbon) vorgelegt und schriftlich
kurz beschrieben wird, worin der Mangel
besteht und wann er aufgetreten ist.
Wenn der Defekt von unserer Garantie
gedeckt ist, erhalten Sie das reparierte oder
ein neues Gerät zurück. Mit Reparatur oder
Austausch des Gerätes beginnt kein neuer
Garantiezeitraum.
Garantiezeit und gesetzliche
Mängelansprüche
Die Garantiezeit wird durch die Gewährleistung nicht verlängert. Dies gilt auch
für ersetzte und reparierte Teile. Eventuell
schon beim Kauf vorhandene Schäden und
Mängel müssen sofort nach dem Auspacken gemeldet werden. Nach Ablauf der
Garantiezeit anfallende Reparaturen sind
kostenpichtig.
Garantieumfang
Das Gerät wurde nach strengen Qualitätsrichtlinien sorgfältig produziert und vor
Anlieferung gewissenhaft geprüft.
Die Garantieleistung gilt für Material- oder
Fabrikationsfehler. Diese Garantie erstreckt
sich nicht auf Geräteteile, die normaler
Abnutzung ausgesetzt sind und daher als
Verschleißteile angesehen werden können
(z.B. Messerwalze, Untermesser) oder für
Beschädigungen an zerbrechlichen Teilen
(z.B. Schalter, Akkus).
Diese Garantie verfällt, wenn das Gerät
beschädigt, nicht sachgemäß benutzt oder
nicht gewartet wurde. Für eine sachgemäße
Benutzung des Gerätes sind alle in der Betriebsanleitung aufgeführten Anweisungen
genau einzuhalten. Verwendungszwecke
und Handlungen, von denen in der Betriebsanleitung abgeraten oder vor denen gewarnt
wird, sind unbedingt zu vermeiden.
Das Gerät ist lediglich für den privaten
und nicht für den gewerblichen Gebrauch
bestimmt. Bei missbräuchlicher und unsachgemäßer Behandlung, Gewaltanwendung
und bei Eingriffen, die nicht von unserer
autorisierten Service-Niederlassung vorgenommen wurden, erlischt die Garantie.
Abwicklung im Garantiefall
Um eine schnelle Bearbeitung Ihres Anliegens zu gewährleisten, folgen Sie bitte den
folgenden Hinweisen:
• Bitte halten Sie für alle Anfragen den
Kassenbon und die Artikelnummer (z.B.
IAN12345) als Nachweis für den Kauf
bereit.
• Die Artikelnummer entnehmen Sie bitte
dem Typenschild, einer Gravur, auf dem
Titelblatt Ihrer Betriebsanleitung (unten
links) oder als Aufkleber auf der Rückoder Unterseite.
22
Page 23

DE AT CH
• Sollten Funktionsfehler oder sonstige
Mängel auftreten kontaktieren Sie zunächst die nachfolgend benannte Serviceabteilung telefonisch oder per E-Mail.
Sie erhalten dann weitere Informationen
über die Abwicklung Ihrer Reklamation.
• Ein als defekt erfasstes Gerät können
Sie, nach Rücksprache mit unserem Kundenservice, unter Beifügung des Kaufbelegs (Kassenbons) und der Angabe,
worin der Mangel besteht und wann er
aufgetreten ist, für Sie portofrei an die
Ihnen mitgeteilte Service-Anschrift übersenden. Um Annahmeprobleme und Zusatzkosten zu vermeiden, benutzen Sie
unbedingt nur die Adresse, die Ihnen
mitgeteilt wird. Stellen Sie sicher, dass
der Versand nicht unfrei, per Sperrgut,
Express oder sonstiger Sonderfracht
erfolgt. Senden Sie das Gerät bitte inkl.
aller beim Kauf mitgelieferten Zubehörteile ein und sorgen Sie für eine ausreichend sichere Transportverpackung.
Service-Center
Service Deutschland
DE
Tel.: 01805772033
(0,14 EUR/Min. aus dem dt. Festnetz,
Mobilfunk max. 0,42 EUR/Min.)
E-Mail: grizzly@lidl.de
IAN 79826
Service Österreich
AT
Tel.: 0820 201 222
(0,15 EUR/Min.)
E-Mail: grizzly@lidl.at
IAN 79826
Service Schweiz
CH
Tel.: 0842 665566
(0,08 CHF/Min.,
Mobilfunk max. 0,40 CHF/Min.)
E-Mail: grizzly@lidl.ch
IAN 79826
Service-
Niederlassung
Bitte beachten Sie, dass die folgende
Anschrift keine Serviceanschrift ist. Kontaktieren Sie zunächst das oben genannte
Service-Center.
Grizzly Gartengeräte
DE
GmbH & CO KG
Kundenservice
AT
Georgenhäuser Str. 1
64409 Messel
DEUTSCHLAND
Homepage: www.grizzly.biz
ASA Marina AG
CH
Postfach 04
6949 Comano
23
Page 24

24
Page 25

Vista esplosa • Exploded Drawing
Explosionszeichnung
2013-01-07_rev02_gs
informativo, informative, informativ
25
Page 26

GRIZZLY GARTENGERÄTE GMBH & CO. KG
Am Gewerbepark 2
D-64823 Gr oß-Umstadt
Versione delle informazioni · Last Information Update · Stand der
Informationen: 10 / 2012 · Ident.-No.: 76001727102012-IT
IAN 79826
 Loading...