

Page 1

ElECtriC PolE
PrunEr
FHE 550
E l Ectric PolE PrunEr
Operation and Safety Notes
®
E l Ektrisk grEnsav til
højtsiddEndE grEnE
Brugs- og sikkerhedsanvisninger
3C
Page 2

Before reading, unfold the page containing the illustrations and familiarise yourself with all functions
of the device.
Før du læser, vend siden med billeder frem og bliv bekendt med alle apparatets funktioner.
GB / IE Operation and Safety Notes Page 5
DK Betjenings- og sikkerhedsvejledning Side
17
Page 3

3
15
a)
b)
1
10
11
12
13
14
15
2
4
5
6
7
8
9
A
B
C
H
I
10
◄
►
11
3
12
13
8
7
14
9
Page 4

4
D
E
16
17
18
19
20
21
F
G
23
24
J
2
6
1
2
6
25
2
4
5
26
22
4
4
4
12
1
Page 5

5
GB IE
Contents
Intended purpose .......................................6
Enclosed parts ............................................6
Notes on safety ...........................................6
Symbols used in the instructions ............6
Symbols used on the saw ......................6
General notes on safety.........................7
Electric safety .........................................7
Precautions against spring-back ............9
General description ....................................9
Fitting ...........................................................9
Assembling the round handle ...............10
Attaching the shoulder strap ................10
Installing the blade ...............................10
Fitting the saw chain ............................10
Tensioning the saw chain .....................10
Chain lubrication ..................................11
Operation startup .....................................11
Adjusting the telescopic handle ............12
Handle adjustment ...............................12
Resharpening of the saw chain...............12
Working safely ..........................................12
Accessories Enclosed .............................12
Sawing techniques ...................................13
Transport ...................................................14
Cleaning and storage ...............................14
Waste disposal and environmental
protection ..................................................14
Guarantee ..................................................14
Spare parts ................................................15
Technical Data ..........................................15
Maintenance Interval Table ......................16
Trouble shooting ......................................16
CE Declaration of Conformity .................29
Exploded Drawing ....................................30
Grizzly Service-Center .............................31
Translation of the original
instructions for use
Page 6

6
GB IE
FHE550-101109op
Intended purpose
The high pruning saw is intended for pruning
work on tree branches.
It is not designed for extensive sawing work,
tree felling and cutting materials such as masonry, plastic or food.
The device is designed for use by adults.
Young people over 16 years old may use the
high pruning saw under supervision only.
It is essential to ensure that you are standing
in a safe position, in order to prevent accidents.
The equipment is not intended for use by people of restricted physical, sensory or mental
ability. This is also fundamentally applicable
for children.
The manufacturer is not liable for damages,
which were caused through use in
applications for which it was not designed, or
incorrect operation.
The high pruning saw is designed for
employment in the do-it-yourselfer sector. It
was not designed for continuous employment
in the commercial sector.
Enclosed parts:
- High pruning saw
- Chain bar
- Saw chain
- Blade cover
- Shoulder strap
- Round handle
- 60 ml Grizzly-Bio-Oil
Notes on safety
This section deals with the basic safety
regulations while working with the high
pruning saw.
An high pruning saw is a dangerous
device, which can cause serious or
even fatal injuries with incorrect or
careless use. Thus, for your own safety and the safety of others, you should
always take note of the instructions on
safety and, in case of difculties, consult a specialist for advice.
Symbols used in the instructions
Hazard symbols with information on
prevention of personal injury and
property damage.
Precaution symbol (explanation of pre-
caution instead of exclamation mark)
with information on prevention of harm
/ damage.
Notice symbol with information on how
to handle the device properly.
Symbols used on the saw
Make yourself familiar with all control
elements before any work. Practice
handling the saw and have explained
the functions, operating methods and
sawing techniques by a practiced user
or specialist.
Read and take note of the operating
manual belonging to the machine!
Wear personal protective equipment.
Basically, wear protective goggles or,
even better, face protection, ear protection, safety helmet, cut-protection
working clothes, cut-protection gloves,
and cut-protection safety boots with
anti-slip soles.
Beware of falling objects.
Keep the equipment away from nearby
people.
Do not expose the machine to the rain.
Do not allow the equipment to become
damp or operate it in a damp environment.
Page 7
7
GB IE
Danger of death by electrocution!
Keep at least 10m away from power
lines.
Caution! Remove the plug immediately
from the plug socket in case of damage or cutting through of the mains
cable
104
Information of the acoustic power level
L
WA
in dB.
Safety class II
Machines do not belong with domestic
waste.
General notes on safety
Before you do any work with the high
pruning saw, make yourself familiar
with all operating parts. Practise using
the saw (sawing logs on a sawhorse)
and get an experienced user or a specialist to explain to you the function of
the saw, the way of working, the techniques of sawing and the personal protection equipment.
Also, read the following safety instruc-
tions in order to prevent injury to people and damage to property:
Observe noise protection and other local
regulations.
Electric safety:
Read the safety instructions in order to
avoid injuries and material damage.
Protection against of electric shock:
• Connect the high pruning saw only to a
plug socket with leakage-current-operated
circuit breaker (l.c.o. circuit breaker) with a
rated current of not more than 30 mA.
• Make sure that the mains voltage agrees
with the information of the label.
• Protect the device against moisture. The
device must not be wet and should not be
operated in a moist environment.
• Check the device and the power cable with
plug for damage before every use. Avoid
body contact with earthed parts (e.g. metal
fences, metal posts).
• Employ only extension cords, which are
stipulated for use in the open air. The ex-
ible lead cross-section of the extension
cord must be at least 1.0 mm
2
. Always roll
a cable drum completely out before use.
Check the cable for damages.
• Damaged cables, coupling and plugs or
connecting leads, not corresponding to the
specications, must be not be employed.
Remove the plug immediately from the plug
socket in case of damage or cutting through
of the mains cable.
• If the power cable for this equipment is
damaged, it must be replaced by the
manufacturer, a customer service agent of
the same or a similarly qualied person in
order to prevent hazards.
Working with the high pruning saw:
• When felling timber, observe noise protection and other local regulations.
Local rules may render necessary a suit-
ability test. Ask the forest administration for
details.
• Do not work with the high pruning saw
when you are tired or after the consumption of alcohol or medication. Always take a
break in good time.
• Always wear suitable working clothes during
working, which allow freedom of movement.
Included with this are a safety helmet, ear
muffs, protective goggles or face protection,
gloves with cut-protection, safety shoes with
cut-protection and solid soles and protective
trousers with saw protection.
• The high pruning saw is designed for two-
handed operation. Never work with one
hand or above shoulder height.
10 m
Page 8

8
GB IE
FHE550-101109op
• Basically the mains cable is dragged behind
the operator. The cable must always lead
away from the high pruning saw towards
the rear.
• Keep your working area tidy. Only start work
if your working area is free from obstruction
and you have planned a safe path of escape when felling timber.
• Ensure no people or animals are located
near the eld of action. Pay particular atten-
tion to children.
• Ensure you have a secure stance during
sawing. Do not work on a ladder, in the tree
or on unstable locations. Be very cautious
carrying out work on a slope.
• Never start the high pruning saw before
the chain bar, saw chain and sprocket chain
wheel covering are correctly assembled.
• Ensure, before the switch-on, that the
chainsaw is not in contact with any objects.
Switch off the chainsaw before you relocate
it.
• Do not work in the rain, bad weather or in
a moist environment. Work only with good
lighting.
• Ensure that the grips are dry and clean during work.
• Work only within the indicated range of performance. Do not employ any low-powered
devices for difcult work. Do not use tools
for purposes for which they are not intended.
• Do not work with an high pruning saw
which is damaged, incomplete or changed
without approval of the manufacturer. Never
use the high pruning saw with defective
protective equipment. Do not use any tools
where the switch cannot be turned on and
off. Check the safety status of the high
pruning saw, in particular the chain bar ,
chain brake and the chain, before use.
• Damaged protection ttings and parts must
be properly repaired or replaced at our
Service-Center (see P. 31 for the address),
unless otherwise stated in the manual.
• Pull out the power plug in case of non-use
of the device, before maintenance, cleaning
or replacement of accessories. Ensure the
chainsaw is switched off when you stick the
plug into the plug socket.
• All maintenance operations, which are not
indicated in these directions, may be carried
out only by the customer service for chainsaws.
• Use only those accessories which are recommended in these directions.
• Place the claw stop securely with every cut
and do not begin with the sawing before
this.
• Be extremely careful during sawing small
bushes and branches. The thin branch
thicket can snag in the saw and whip in your
direction or make you unbalanced.
• Carefully follow the maintenance, control
and service instructions in this operating
manual.
• Avoid sawing thin wood and trimmed timber.
• Pay attention to a possible spring-back dur-
ing the sawing of a branch which is under
stress, if the stress force of the wood is suddenly released. Danger of injury exists.
• Ensure during any location change that the
saw chain is secured with the chain brake
and the chainsaw is switched off and the
nger does not contact the On/Off switch.
Carry the high pruning saw with the chain
and chain bar pointing to the rear. Attach the
chain guard for transporting the high pruning saw.
• Do not use the high pruning saw near inammable liquids or gases. With nonobser-
vance, re or explosion danger exists.
Handling the device with care:
• Do not carry the device by the cable. Do not
use the cable in order to pull the plug from
the plug socket. Protect the cable against
heat, oil and sharp edges.
• Keep the saw chain sharp and clean, in order
to be able to work better and more safely.
• Keep unused devices in a dry, closed location and out of the reach of children.
Page 9
9
GB IE
• Put on the blade protection cover when
transporting the high pruning saw.
• Do not cut wood that is lying on the ground.
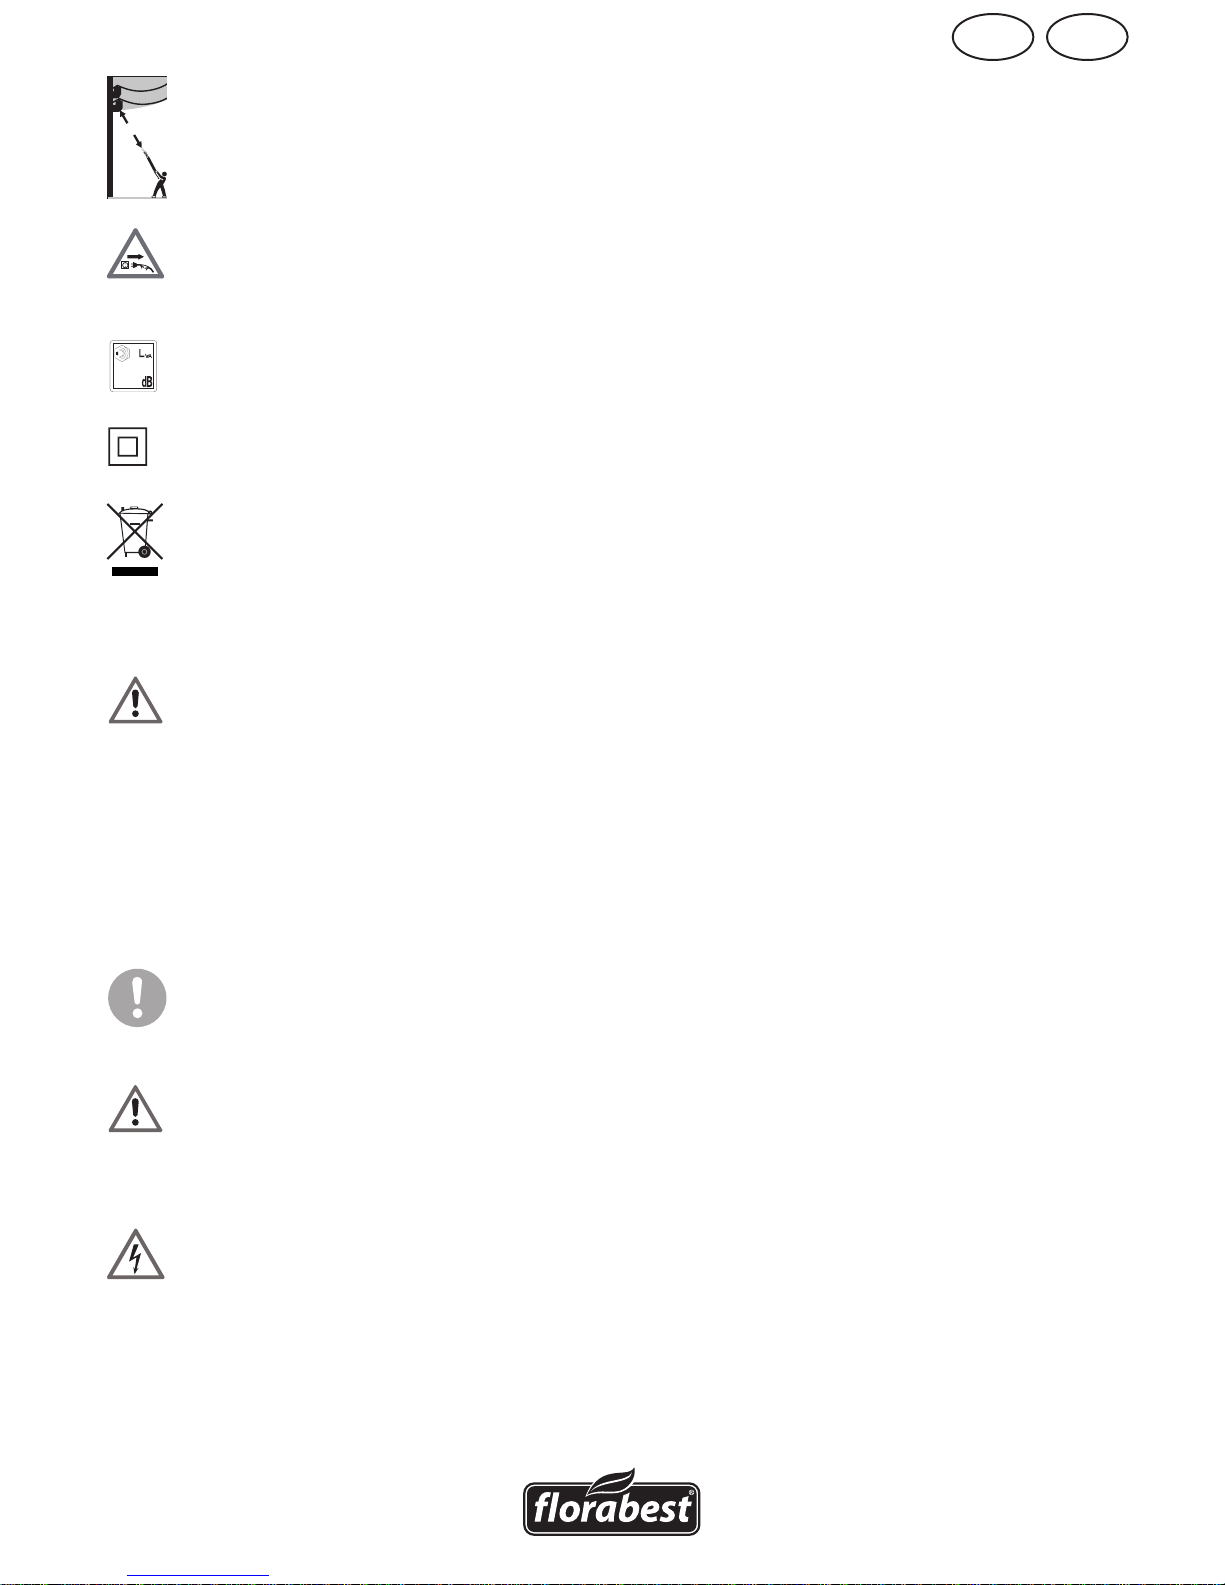
Precautions against spring-back
Beware of spring-back! Be careful of
spring-back of the machine during work.
There is danger of injury here. You can
avoid spring-backs by exercising caution
and using a correct sawing technique.
Spring-back is the designation for a lightningfast backwards impulse of the high pruning
saw and the chain bar from the sawed object.
It occurs if the rebound area (see Fig. 1, a) on
the point of the blade is in contact with an object
or if the wood jams the high pruning saw during
cutting.
When a spring-back occurs, the user receives a
strong backward shock from the high pruning
saw and the chain bar. The result can be that he
loses control of the high pruning saw and seriously injures
• Always grip the power saw rmly with
both hands, with the right hand to the rear
and with the left hand on the front handle.
Thumb and nger must close over the handles securely .
• Do not saw with the point of the blade (see
Fig. 1, b) or above shoulder height. Do not
lean over too far during the sawing operation.
• You have better control when you saw with
the bottom side of the chain bar and not
with the top side of the chain bar.
• Be especially careful during the removal of
branches. Ensure that there are no objects
lying around on the ground that you can trip
over.
• Pay attention to the instructions for sharpening and maintenance of the power saw.
(b)
(a)
Bild 1
General description
The operation and maintenance illustra
tions are on the front fold-out page.
1. Saw chain
2. Chain bar
3. Bumber
4. Blade xing screw
5. Chain adjustment ring
6. Sprocket chain wheel covering
7. Brake arm
8. Pivotal centre (not visible)
9. Adjustable handle
10. On/off switch
11. Safety lock (not visible)
12. Shoulder strap
13. Eye (for shoulder strap)
14. Round handle
15. Quick release (for telescopic handle)
Fitting
• Pull out the power plug before doing any
work on the high pruning saw itself
-– injury hazard!
• Alwayas wear cut-protection gloves
• In case of difculties, consult a specialist
for advice.
A
Page 10
10
GB IE
FHE550-101109op
B
Before using the high pruning saw, you must:
- assebling the round handle
- attaching the shoulder strap
- tting the blade
- tting the saw chain
- tensioning the saw chain
- ll up with chain oil
Assembling the round handle
1. Set round handle 14 to the desired position on the telescopic handle.
2. Place brake arm 7 on the telescopic handle.
3. Screw together round handle 14 and
brake arm 7.
4. The height or holding angle of round
handle 14 can be adjusted at any time by
slightly loosening the screws, pushing/
turning, and retightening the screws.
Attaching the shoulder strap
Fix the spring hook on shoulder strap 12 into
lifting lug 13 on the telescopic handle of the
equipment.
Installing the blade
1. Loosen blade xing screw 4 and remove
chain wheel cover 6.
2. Insert blade 2 with the central longitudinal
hole over central blade guide 16.
Fitting the saw chain
1. Lay out saw chain 1 such that the bevelled
cutting edges of the chain links point in
a clockwise direction. See the detailed illustration.
2. Place saw chain 1 in blade groove 2 and on
chain wheel 18.
3. Replace chain wheel cover 6 and screw on
blade xing 4. Blade xing screw 4 is simply to be tightened lightly by hand.
Hole 20 on the blade is the holder for chain
tensioning pin 21.
Thread 19 is the holder for blade xing screw
4.
Ensure that chain tensioning pin 21
is positioned in hole 20 on the blade.
The pin must be completely inserted
into the hole.
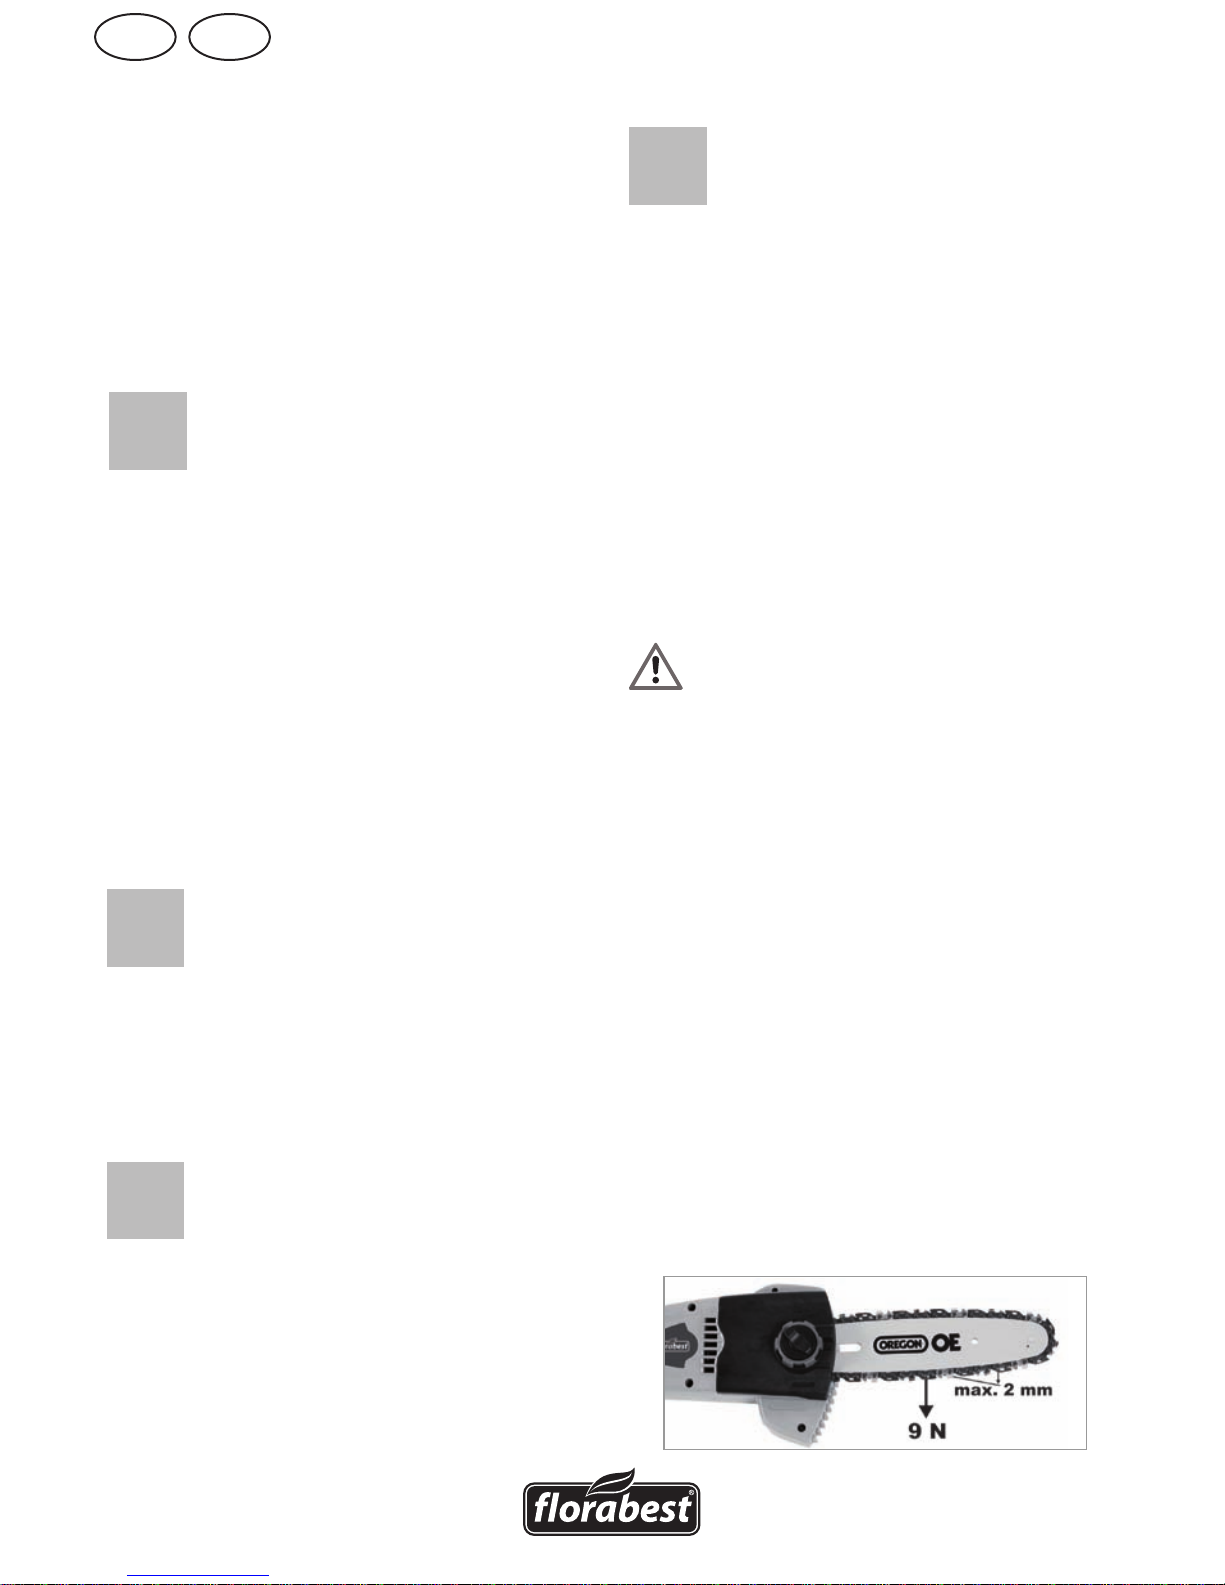
Tensioning the saw chain
The tension of saw chain 1 is important both
for your safety and for the function of the high
pruning saw. A correctly tensioned saw chain
will increase the lifetime of your equipment.
Saw chain 1 is correctly tensioned if it can
be pulled around blade 2 by hand (wearing
gloves) without sagging.
When the saw chain is tensioned with 9 N
(approx. 1 kg), the gap between the saw
chain and the guide rail may not be more than
2 mm.
C
D
E
Page 11

11
GB IE
1. Turn blade xing screw 4 anticlockwise to
slightly loosen blade 2.
2. Set the tension of saw chain 1 using chain
tensioning device 5.
Turn this quick tensioning device clockwise
to increase the tension.
In the same way, the tension of saw chain
1 can be decreased by turning anticlockwise.
3. Turn blade xing screw 4 clockwise to
retighten blade 2.
Where saw chain 1 has been newly tensioned, readjust the chain tension after a
short period in operation.
Check the chain tension before each
use of the high pruning saw.
Chain lubrication
Blade 2 and saw chain 1 must always
be oiled. Non-observance of this will
result in increased wear on the blade
and saw chain.
The high pruning saw is equipped with an oil
automatic system. As soon as the motor is
speeded up, the oil also ows faster to the
chain bar 2.
A full tank will last for approx. 10
minutes of continuous opera
tion.
Check the oil level in good time.
• Check the oil ll level and regularly top
up with oil. The oil tank holds 70 ml oil.
G
• Use Grizzly bio-oil; this product contains
additives that reduce wear and tear and
does not damage the pump system. bio-oil
is available from our Service-Center (see
P. 31 for the address).
• If you have no Grizzly bio-oil available, use
chain lubrication oil with low adhesive additive content.
1. Unscrew the oil ll cap (23) and ll
up with chain oil.
2. Wipe off any spilled oil and close the
cap again.
Note that the saw can re-oil.
Operation startup
Observe the country-specic and municipal
regulations.
Do not work with the high pruning saw during
general ordinary or prescribed quiet periods.
1. Before starting, check:
- The tension of saw chain 1
- The oil level
- All nuts and screws are sitting rmly
- Only remove blade cover 24 at the last
minute
- Set the working length of the telescopic
arm before switching on the equipment
- Check that shoulder strap 12 is in a com-
fortable position that eases your hold on
the high pruning saw
- Ensure that you are wearing protective
clothing
- Check that you are standing safely
- Check your working surroundings
2. Switching on
- Connect the equipment to a power supply
with the supply voltage specied on the
rating plate.
- Hold the equipment rmly in a relaxed and
safe manner. Operate starting lock 11 and
10 min
F
Page 12

12
GB IE
FHE550-101109op
I
switch on the pruning saw at on/off switch
10.
- The equipment will switch off again when
you release on/off switch 10.
- For safety reasons, a lockable continuous
operation setting is not possible.
Adjusting the telescopic handle
The telescopic handle can be innitely adjusted using quick release 15. Push the lever
forward as shown in the illustration then push
and pull to adjust the handle length.
Pull back the lever and so x the desired
working length of the telescopic handle.
Handle adjustment
• Loosen pivotal centre 8 and and xing the
adjustable handle 9 on position.
• Replace the pivotal centre 8 to xation.
Resharpening of the saw
chain
Leave the resharpening of a saw chain to an
expert or proceed according to the instructions of your saw chain sharpener. Resharpening a saw chain takes some practice. If in
doubt, replacing the saw chain is preferable.
Working Safely
Observe the specied working angle (see
illustration above), in order to guarantee safe
working.
Do not use the high pruning saw when stand
ing on a ladder or in an unsafe position.
Do not be tempted to make unconsidered
cuts. Doing so may endanger both yourself
and others.
Children must be supervised to ensure that
they do not play with the equipment.
Accessories Enclosed
24 Blade cover
12 Shoulder strap
25 60 ml Grizzly-Bio-Oil
H
J
Page 13

13
GB IE
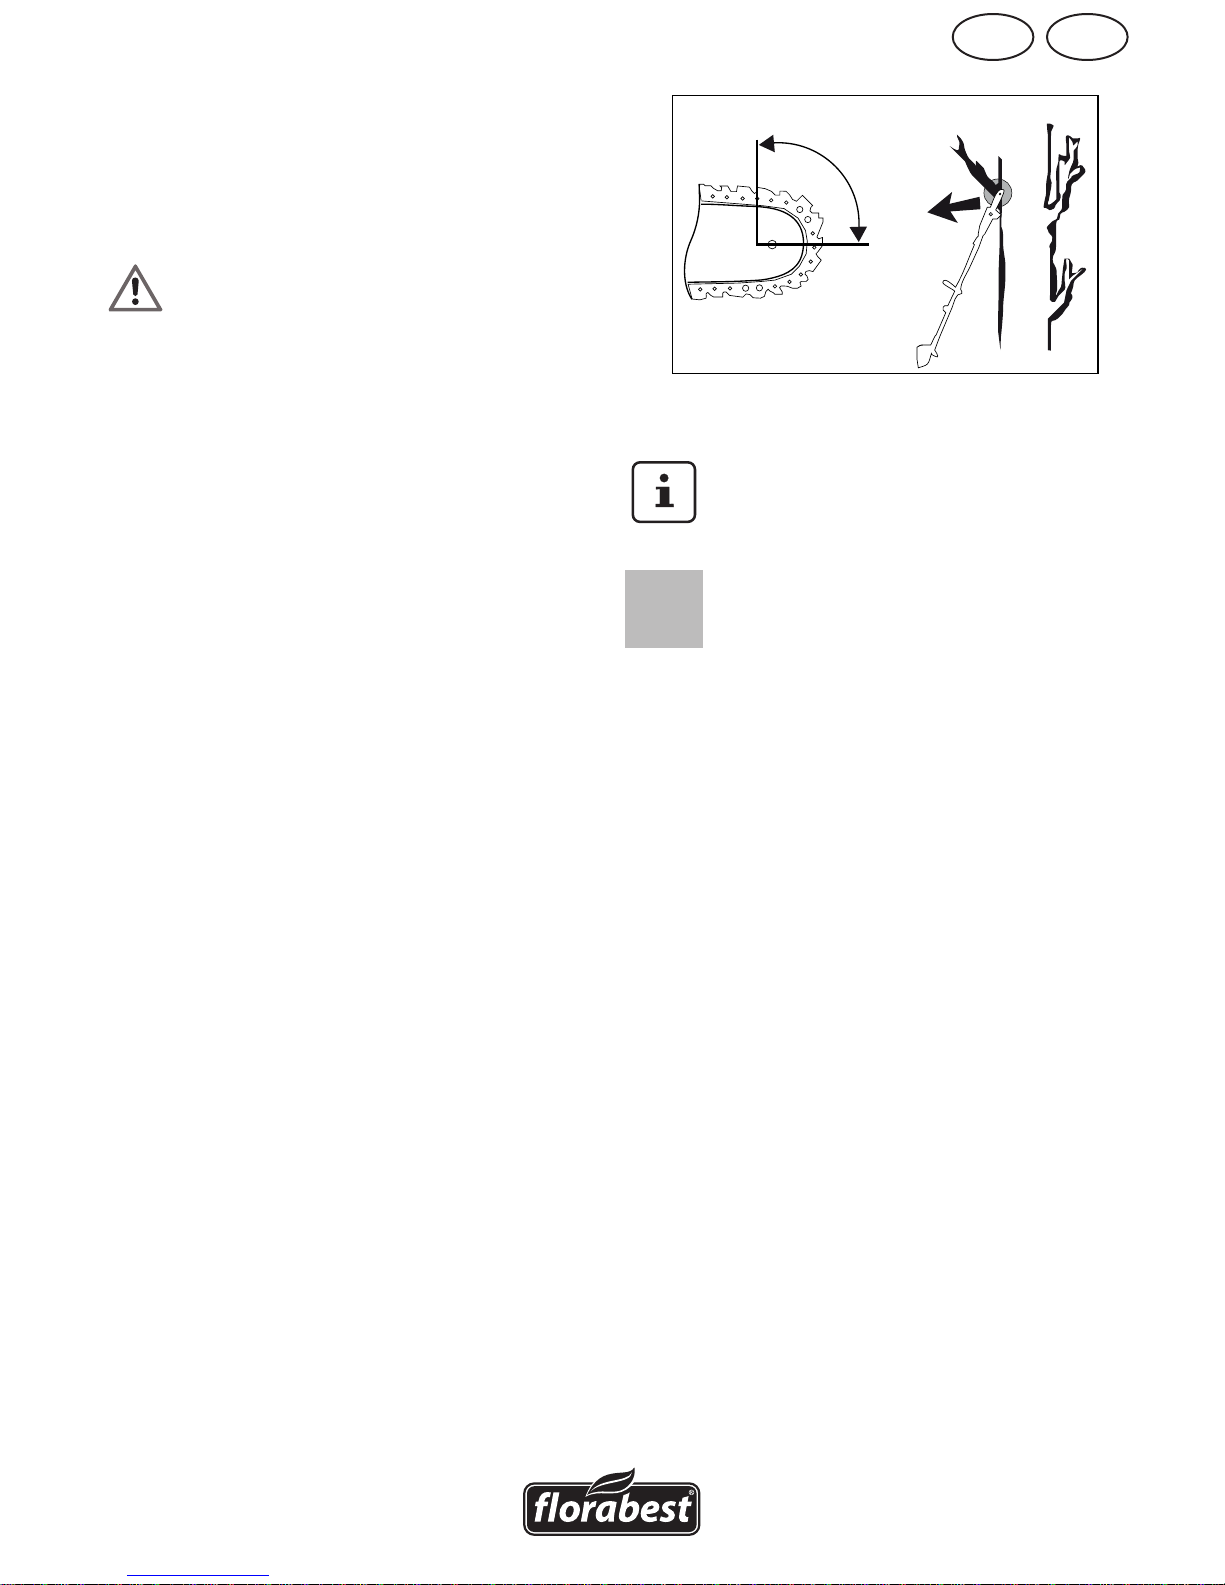
Sawing Off Small Branches
Set your saw cut from top to bottom, as illustrated below.
Be aware of early breaking of the branch if
you have underestimated the size and weight.
Be completely aware of the falling cut material
Sawing Off Larger Branches
For controlled sawing of larger branches, rst
select a relief cut.
This – labelled a in the adjacent illustration –
is made from below.
Saw a notch in the lower third of the branch.
The actual length cut (b) is again made from
the top, as far as possible in line with the rst
cut so that the two cuts meet.
Sawing Off Parts
For large/long branches, sawing off in parts is
recommended.
This is the only way to safely ensure the point
of impact of the cut material.
Clear away from the area in which you are
standing any parts that have already been cut
and are lying on the ground.
Sawing techniques
Be thoroughly aware of the danger of rebounding branches.
Page 14

14
GB IE
FHE550-101109op
Transport
• Put on blade cover 24.
• Ensure that you do not switch on the
equipment when carrying it.
Cleaning and storage
Clean the equipment before putting it away.
Do not use solvents or petrol to do this. A dry
cloth or slightly soapy water are adequate.
Saw chain 1 is to be wiped only with a dry
cloth.
Put on blade cover 24.
The storage location must be frost free and
dry.
Avoid direct sunlight.
The storage location must be out of reach of
children.
Waste disposal and
environmental protection
Do not dispose of used oil in the sewage
system or drains. Dispose of used oil in an
environmentally correct manner - bring it to a
waste disposal center.
Be environmentally friendly. Return the tool,
accessories and packaging to a recycling
centre when you have nished with them.
Machines do not belong with domestic
waste.
Empty the oil tank carefully and hand in your
electric chainsaw at a disposal center.
The plastic and metal parts employed
can be separated out and thus recycled use can be implemented. Ask our
Service-Center for details (see P. 31
for the address).
Guarantee
This unit has a guarantee period of 36 months,
or 12 months for units used on a commercial
basis or for replacement units according to the
statutory regulations.
Damages, which can be attributed to natural
wear, overloading or inappropriate use,
are excluded from the guarantee. Certain
component parts are subject to a normal
wear and are excluded from the guarantee.
In particular, these include: Saw chain,
chain bar, sprocket chain wheel and carbon
brushes, provided that the complaints
cannot be attributed to aws in the materials
themselves. Also, all damage to the machine,
the saw chain and the chain bar, which can
be attributed to inadequate lubrication, are
excluded from the guarantee.
Furthermore, a condition of the guarantee
services is that the maintenance intervals,
indicated in the operating instruction, have
been adhered to and the instructions on
the cleaning, care and maintenance have
been followed. Damages, which originate
due to material or manufacturer faults, will
be repaired free of charge by replacement
delivery or repair. This is conditional on the
saw being returned to the dealer complete
with purchase receipt and proof of guarantee.
Unqualied attempts at repairing the unit or
dismantling/opening the motor casing result in
loss of guarantee.
This is conditional upon the device being
returned in one piece complete with proof of
purchase and guarantee to our service centre
(see address on p. 31).
Our Service-Center will also carry out any
non-guarantee repair work for a charge. We
will be happy to give you a quote.
We will only work on units that have been sent
in with the appropriate packaging, postage
paid.
You can avoid paying extra for bulk postage
or increased shipping costs by dismantling the
bar and chain, and packing them together with
Page 15

15
GB IE
the motor block in the rear part of the original
box. Cut off the thinner front part, making sure
that the box keeps its rectangular form, and
carefully seal up the box on this side.
The sender carries the costs of postage and
packing.
Caution: Please, in no case, send defective
devices with lled oil tank. Completely empty
the tank. Possible material damages (oil runs
out if device is placed on its side or upside
down!) and/or re damages during transport
are borne at the expense of the sender.
Devices sent in with freight collect - by
bulk freight, express or with other special
freight - are not accepted.
If you have a justied guarantee claim, please
contact our service centre by telephone,
which will then advise you on how the claim
will be processed.
We will dispose of tools free of charge.
Spare parts
The following spares are available from Grizzly
Service-Center (see P. 31 for the address).
Please indicate the machine type and the
number of the spare part with your order.
Saw chain ...................................... 3009 1400
Chain bar ....................................... 3010 0100
Bio chain oil 1 liter ......................... 3023 0001
Bio chain oil 5 liter ......................... 3023 0002
If further spare parts should be necessary , please
nd the part number on the exploded drawings.
High pruning saw ...........................FHE 550
Rated input voltage................... 230V~, 50 Hz
Input power ...........................................550 W
Safety class ..............................................
II
Chain speed ......................................10,8 m/s
Weight (without guide rail and chain) ....3,7 kg
Weight (with guide rail and chain) .........4,1 kg
Oiltank ....................................................70 ml
Chain ..................................Oregon 91 P040X
Chain pitch....................................................3/8“
Chain bar .........10“ Oregon OE 100SDEA041
Number of chain drive links ...........................40
Chain width .........................................1,3 mm
Teeth of the sprocket chain wheel ................ 6
Sawing length (max.) ......................... 260 mm
Guaranteed sound power level....104,0 dB(A)
Measured sound power level.......102,2 dB(A)
Acoustic pressure level.....................88 dB(A)
Vibration (ISO 7505) .......................... 3,0 m/s
2
Noise and vibration values were determined
according to the standards and stipulations
mentioned in the declaration of conformity.
Technical and optical changes can be carried out in the course of further development
without notice. All dimensions, references
and information of this instruction manual are
therefore without guarantee. Legal claims,
which are made on the basis of the instruction
manual, cannot thus be considered as valid.
Technical Data
Page 16

16
GB IE
FHE550-101109op
Machine part Action Before
every use
After Each
Use
Complete Machine Check the condition, replace damaged
parts if required
Accessible screws
and nuts
Retighten
Sprocket chain wheel Check, replace if required
Saw chain Check, regrind or replace if required
Saw chain Clean
(also oil after a longer period out of use)
Guide bar Check
Guide bar Clean
(also oil after a longer period out of use)
Oiltank Check, ll up chain oil if required
Maintenance Interval Table
D
Trouble shooting
Problem Possible cause Fault correction
Device does not start
Mains voltage defective
House protection fuse activated
Check plug socket, cable, line and
plug, where appropriate, repair by
electrical specialist.
Check house protection fuse, see
note
Defective On/Off switch Repair by customer service
Worn carbon brushes Repair by customer service
Defective motor Repair by customer service
Inferior cutting
performance
Incorrectly mounted saw chain Mount saw chain correctly
Saw chain blunt
Sharpen cutting teeth or place on
new chain
Chain tension insufcient Check chain tension
Saw runs with difculty,
chain comes off
Chain tension insufcient Check chain tension
Chain becomes hot,
smoke development
during sawing,
discoloration of the rail
Too little chain oil
Check oil level and, where
appropriate, rell with chain oil,
check oil automatic system and,
where appropriate, clean oil outow
duct 17 or have repaired by
customer service
Check ne-tuning for lubrication
system (oil regulation button).
Page 17

17
DK
Oversættelse
af den originale
betjeningsvejledning
Indhold
Anvendelsesformål ..................................18
Leveringsomfang......................................18
Sikkerhedsanvisninger ............................18
Symboler i vejledningen .......................18
Påskrifter på maskinen .........................18
Generelle sikkerhedshenvisninger .......19
Sikkerhedsforanstaltninger mod
returslag ...............................................21
Generel beskrivelse..................................21
Montage .....................................................21
Montering af rundgreb ..........................22
Påsætning af skulderrem .....................22
Montering af sværdet ...........................22
Monter savkæde ..................................22
Spænd savkæden ...............................22
Kædesmøring .......................................22
Idriftsættelse .............................................23
Justering af teleskopstangen ...............23
Indstilling af håndtag ............................24
Sikkert arbejde ...................................24
Transport ..............................................24
Rengøring og opbevaring .....................24
Slib tænderne .......................................24
Saveteknikker ...........................................25
Bortskaffelse/miljøbeskyttelse ................26
Vedlagt tilbehør .........................................26
Garanti .......................................................26
Reservedele ..............................................26
Tekniske data ............................................27
Tabel vedligeholdelsesintervaller ...........27
Fejlsøgning ...............................................28
EF-overensstemmelseserklæring ..............29
Eksplosionstegning .................................30
Grizzly Service-Center .............................31
Page 18

18
DK
10 m
Anvendelsesformål
Teleskopsaven er beregnet til afgrening af
træer.
Den er ikke beregnet til større saveopgaver,
træfældning og savning i materialer som murværk, plast eller fødevarer.
Unge mennesker over 16 år må kun benytte
kædesaven under opsyn.
For at forebygge ulykker, skal der altid sørger
for en stabil ståposition.
Maskinen er ikke beregnet til at blive brugt
af personer, der har begrænsede fysiske,
sensoriske eller mentale evner. Dette gælder
principielt også for
børn.
Producenten påtager sig intet ansvar for
skader, som følge forkert brug eller forkert
betjening. Kædesaven er dimensioneret til
hobbyarbejde. Den er ikke konciperet til erhvervsmæssig permanent anvendelse.
Leveringsomfang
- Teleskopsaven
- Sværd
- Savkæde
- Sværdbeskyttelseshylster
- Skulderrem
- Rundgreb
- 60 ml Grizzly Bio-olie
Sikkerhedsanvisninger
Dette afsnit omhandler de grundlæggende
sikkerhedsforanstaltninger under arbejdet
med den elektriske kædesav.
En elektrisk kædesav er et farligt
værktøj, som ved forkert eller uagtsom
brug kan medføre alvorlige eller endda
livsfarlige kvæstelser. Derfor bør du
for din egen sikkerheds skyld samt
andres sikkerhed altid overholde de
nedenstående sikkerhedshenvisninger
og spørge en fagmand til råds hvis du
skulle være i tvivl om noget.
Symboler i vejledningen
Faresymboler med oplysninger om
forebyggelse af person- eller materielle skader.
Påbudstegn (i stedet for udråbstegnet
forklares påbuddet) med oplysninger om
forebyggelse af skader..
Henvisningstegn med informationer om
bedre håndtering af udstyret.
Påskrifter på maskinen
Før du starter med arbejdet bør du
gøre dig fortrolig med alle betjeningselementer. Øv dig i omgangen med
saven og få forklaret funktioner, virkemåde og saveteknikker af en fagmand
Læs og overhold maskinens betje-
ningsvejledning!
Bær personlige værnemidler. Bær altid
beskyttelsesbriller eller ansigtsværn,
høreværn, beskyttelseshjelm, snitsikker arbejdsbeklædning, snitsikre handsker, og snitsikre sikkerhedsstøvler
med skridsikker sål.
Bær handsker ved håndtering af knivene
Vær opmærksom på nedfaldende genstande.
Hold eventuelle tilskuere på afstand fra
maskinen.
Udsæt ikke saven for regn. Maskinen
må hverken udsættes for fugt eller anvendes i fugtige omgivelser.
Livsfare pga. strømstød!
Hold em mindsteaftand på 10m fra
stærkstrømledninger
Page 19

19
DK
NB! Træk stikket ud med det samme
hvis det konstateres at kablet er beskadiget eller klippet over.
Garanteret lydtryksniveau
Beskyttelsesklasse II
Det elektriske værktøj må ikke smides
ud sammen med husholdningsaffaldet.
Generelle sikkerhedsanvisninger
Før arbejdet med den elektriske kæde-
sav påbegyndes, bedes du gøre dig
fortrolig med alle betjeningselementer.
Øv dig i omgangen med saven (afkortning af rundtømmer på en savbuk) og
få forklaret funktion, virkemåde, saveteknikker og personligt sikkerhedsudstyr af en erfaren bruger eller fagmand
Læs nedenstående sikkerhedsinforma-
tioner for at undgå person- og tingskader.
Vær opmærksom på støjbeskyttelse
og lokale forskrifter.
Beskyttelse mod elektriske stød:
• Tilslut kun kædesaven til en stikdåse med
et HFI-relæ med en mærkestrøm på maksimalt 30 mA.
• Sørg for at spændingen overholder angivelserne på typeskiltet.
• Beskyt apparatet mod fugt. Apparatet må
hverken blive fugtigt eller drives i fugtige
omgivelser.
• Kontroller apparat og kabel med stik for
skader før hver anvendelse. Undgå berø-
ring med jordede dele (f.eks. metalhegn,
metalstolper).
• Anvend kun en forlængerledninger, som er
dimensioneret til brug i det fri. Forlængerledningens trådtværsnit skal mindst udgøre
1,0 mm². Rul altid kabeltromlen helt ud før
brug. Kontroller kablet for skader.
• Beskadiget kabel, kobling og stik eller forbindelseskabler, der ikke opfylder bestemmelserne, må ikke anvendes. Træk stikket
ud med det samme hvis det konstateres, at
kablet er beskadiget eller klippet over.
Arbejde med den elektriske kædesav:
• Vær opmærksom på støjbeskyttelse og
lokale forskrifter vedrørende træfældning.
Lokale bestemmelser kan kræve en egnet-
hedsprøve. Spørg efter hos skovstyrelse.
• Den elektriske kædesav må ikke anvendes, hvis du er træt eller har indtaget
alkohol eller medikamenter. Sørg altid for
rettidige pauser under arbejdet.
• Bær altid egnede personlige værnemidler,
som sørger for bevægelsesfrihed. Hertil
hører beskyttelseshjelm, øreværn, beskyttelsesbrille eller ansigtsværn, handsker
med snitbeskyttelse, sikkerhedssko med
snitbeskyttelse samt faste såler og beskyttelsesbukser med savbeskyttelse.
• Kædesaven er dimensioneret til to-hånds
drift. Arbejd aldrig kun med én hånd eller
over skulderhøjde.
• Sørg altid for at stå godt fast under savningen. Stå ikke på en stige, i træet eller
på ustabile underlag. Vær meget forsigtig
under arbejde på skråninger. Du kan nemt
miste balancen.
• Hold orden på arbejdspladsen. Start først
når arbejdsområdet er fri for forhindringer
og når der er planlagt en sikker ugtvej
under træfældningen.
• Sørg for at der ikke opholder sig mennesker eller dyr i nærheden af arbejdsområdet. Pas især på børn.
• Start aldrig den elektriske kædesav, før
sværd, savkæde og kædehjulsafdækning
er korrekt monterede.
• Før altid kablet bag om brugeren. Kablet
skal altid føre væk fra og bag kædesaven.
• Kontroller at saven under opstart og under
Page 20

20
DK
arbejdet ikke kommer i berøring med jord,
sten, tråde og andre fremmedlegemer. Sluk
for kædesaven, før du stiller den fra dig.
• Arbejd ikke når det regner, ved dårligt
vejrlig eller i fugtige omgivelser. Arbejd
kun med god belysning.
• Sørg for at grebene altid er tørre og rene
under arbejdet.
• Arbejd kun inden for det anførte effektområde. Anvend ingen svage apparater til krævende arbejde. Værktøjet må ikke anvendes
til andre formål end dem, det er beregnet til.
• Arbejd ikke med en beskadiget, ufuldstændig eller ændret (uden producentens
tilladelse) kædesav . Anvend aldrig den
elektriske kædesav med en defekt beskyttelsesudstyr. Værktøjet må ikke anvendes, hvis kontakten ikke kan slå korrekt
til eller fra. Kontroller før brugen om den
elektriske kædesav er sikker, især med
hensyn til sværd, kædebremse og kæde.
• Overhold omhyggeligt vedligeholdelses-,
kontrol- og serviceanvisningerne i denne
betjeningsvejledning.
• Beskadigede beskyttelsesanordninger
eller komponenter skal repareres eller
udskiftes af vores kundeservice (se adressen på side 31), hvis intet andet er anført i
betjeningsvejledningen.
• Træk stikket ud hvis apparatet ikke skal
anvendes, samt før vedligeholdelsesarbejder, rengøring eller udskiftning af
tilbehør. Kontroller at der er slukket for
kædesaven, når stikket sættes i igen.
• Samtlige vedligeholdelsesarbejder, som
ikke er anført i denne vejledning, må kun
udføres af kundeservice til kædesave.
• Anvend kun tilbehørsdele, der er anbefalet i denne vejledning.
• Sæt anslagskloen fast ved hvert snit og
begynd først derefter med savningen.
• Vær meget forsigtigt under savningen af
mindre buske og grene. Tynde grene kan
sætte sig fast i saven og slå i din retning
eller få dig til at miste balancen.
• Undgå savning af tyndt træ eller opskåret
tømmer.
• Vær under savningen opmærksom på
grene der er under spænding ikke svirper
tilbage, når spændingen pludselig giver
efter. Der er risiko for kvæstelser.
• Når du skifter position bedes du være
opmærksom på at savkæden er sikret
med kædebremsen og at kædesaven er
slukket og ngeren ikke berører start-/
stopkontakten. Bær aldrig den elektriske
kædesav med kæde og sværd der vender
bagud.Sæt sværdbeskyttelsen på teleskopsaven under transport.
• Den elektriske kædesav må ikke anvendes
i nærheden af antændelige væsker eller
gasser. Hvis dette ikke overholdes er der
risiko for brand eller eksplosioner.
Apparatet skal altid behandles omhyggeligt:
• Apparatet må ikke bæres i kablet. Kablet
må ikke anvendes til at trække stikket ud
af stikdåsen. Beskyt kablet mod varme,
olie og skarpe kanter.
• Hold savkæden skarp og ren, så der kan
arbejdes bedre og mere sikkert med den.
• Opbevar ikke anvendte apparater på et
tørt, lukket sted og utilgængeligt for børn.
• Sav ikke i træ, der ligger på jorden.
Pas på! Save kan miste olie
Du bedes være opmærksom på at saven ofte
mister olie efter brug, hvis den lagres på siden
eller på hovedet. Dette er helt normalt, betinget
af de nødvendige luftåbninger øverst på tankens kant og er ingen grund til reklamation. Da
alle save kontrolleres og testes med olie under
fremstillingen, kan der til trods for tømningen
af tanken være en smule olie tilbage til tanken,
som snavser kabinettet til under transporten.
Kabinettet bør så rengøres med en klud.
Page 21

21
DK
Sikkerhedsforanstaltninger mod
returslag
Pas på returslag! Vær opmærksom
på eventuelle returslag fra maskinen.
Der er risiko for kvæstelser. Returslag
undgås ved påpasselighed og korrekt
saveteknik.
Returslag er en betegnelse for en lynhurtigt
returnering af den elektriske kædesav samt
sværdet fra en genstand. Det sker, når spidsen
af sværdet, returslagsområdet (se billede 1/ ill.
a) rammer en genstand eller når træet klemmer kædesaven fast under snittet. Ved et returslag udsættes brugeren for et kraftigt stød fra
den elektriske kædesav og sværdet. Det kan
medføre at brugeren mister kontrollen over den
elektriske kædesav og bliver kvæstet.
• Hold derfor godt om motorsaven med
begge hænder, med den ene hånd om
det bagerste og den anden hånd om det
forreste håndgreb. Tommelnger og ngre
skal holde fast om håndgrebet.
• Sav ikke med sværdspidsen (se billede 1/ill.
b) eller over skulderhøjde. Bøj dig ikke for
langt fremefter under savningen.
• Du har bedre kontrol over saven, hvis du
saver med sværdets underside og ikke
med oversiden.
• Følg anvisningerne om slibning og vedligeholdelse af motorsaven.
(b)
(a)
Bild 1
Generel beskrivelse
Illustrationerne vedrørende betje-
ning og vedligeholdelse ndes på
den forreste klapside.
1. Savkæde
2. Sværd (føringsskinne)
3. Anslagsklo
4. Sværdmonteringsskrue
5. Kædespændering
6. Kædehjulsafdækning
7. Modholder
8. Stjernegreb (ikke synligt)
9. Indstilleligt håndtag
10. Tænd/sluk-kontakt
11. Tilkoblingsspærring (ikke synligt)
12. Skulderrem
13. øje (til skulderrem)
14. Rundgreb
15. Samling (til teleskopstang)
Montage
Bær altid beskyttelseshandsker under
arbejdet med savkæden og anvend
kun originale komponenter. Træk
stikket ud, før der udføres arbejde
på kædesaven. Der er risiko for
kvæstelser.
Inden teleksopsaven tages i brug
skal:
- Montering af rundgreb
- Påsætning af skulderrem
- Montering af sværdet
- Monter savkæde
- Spænd savkæden
- Påfyld kædeolie
A
Page 22

22
DK
F
B
Montering af rundgreb
1. Sæt holdegreb 14 på den ønskede
position på teleskopstangen.
2. Sæt modholder 7 på
teleskopstangen.
3. Skru holdegreb 14 og
modholder 7 sammen.
4. Ved at løsne begge skruer
kan du altid indstille højde eller
holdevinklen på holdegreb 14 ved
at skubbe eller dreje og
derefter stramme skruerne igen.
Påsætning af skulderrem
Fastgør skulderremmens karabinhage 12 i
bæreøjet 13 på
savens teleskopstang.
Montering af sværdet
1. Løsn sværdmonteringsskrue
4 og tag kædehjulafskærmning
6 af.
2. Læg sværd 2 med den lange udsparing
i midten over midten af sværdstyringen
16.
Monter savkæde
1. Spred savkæde 1 således at de
skrå savkanter på kædens led
vender i urets retning.
..
Sml. detaljetegning
2. Sæt savkæden 1 ind i sværdets not 2
og på kædehjulet 18.
3. Sæt kædehjulafskærmningen 6
igen på og skru
sværdksering 4 på.
Skruen på sværdkseringen 4 skal
kun strammes med håndkraft.
Boringen 20 i sværdet tjener som holder
for kædespændestiften 21.
Gevindet 19 tjener som holder for
sværdkseringsskruen 4.
Vær opmærksom på kædespænde stiftens position 21 i
boring 20 i sværdet. Stiften
skal helt gå ind i boringen
Spænd savkæden
Savkædens 1 spænding er vigtig for din
sikkerhed og teleksopsavens funktion. En korrekt spændt savkæde forlænger maskinens
levetid.
Savkæden 1 er spændt korrekt, hvis den kan
trækkes med hånden
(bær arbejdshandsker) rundt om sværdet 2.
• Når savkæden spændes med 9 N (ca. 1
kg) må savkæden og sværdet ikke have en
afstand større end 2 mm.
1. Drej sværdkseringsskrue 4
mod uret for at løsne sværd 2 let.
.
2. Reguler savkædens spænding 1
via kædestrammer 5.
Drej denne spændingsanordning
med uret for at øge spændingen
.
C
D
E
Page 23

23
DK
Tilsvarende kan savkædens spænding 1
reduceres ved at dreje mod uret
.
3. Drej sværdkseringsskrue 4
med uret for at montere
sværd 2 igen.
Ved nyspændte savkæder 1 skal kædespændingen efterjusteres efter kort tids drift.
Kontroller kædespændingen hver
gang inden teleskopsaven bruges.
Kædesmøring
Sværd 2 og savkæde 1 må aldrig være
uden olie. Overholdes dette ikke, slides sværd og savkæde hurtigt.
Kædesaven er udstyret med olieautomatik. Når
motoren er i gang, løber der olie til sværdet 2.
En tankfyldning er nok til ca.
10 minutter konstant drift.
Kontroller oliestanden
rettidigt.
Påfyld kædeolie:
• Kontroller med jævne mellemrum olieniveauviseren 22 og fyld efter når ”Minimummarkeringen” er nået. Olietanken indeholder 70 ml olie.
• Anvend Grizzly Bio-Öl, som indeholder
tilsætninger til reducering af friktion og
slid. Denne kan bestilles via vores servicecenter (se adressen på side 44).
• Er der ingen Grizzly Bio-Öl, kan du anvende en kædesmøreolie med ringe andel
af tilsætninger.
1. Skru olietankklappen (23) af og fyld
kædeolien i tanken.
2. Tør eventuelt spildt olie af og luk
klappen igen.
G
Vær opmærksom på at saven efterfølgende
kan tabe lidt olie.
Idriftsættelse
Overhold landespecikke og
kommunale forskrifter.
Der bør ikke arbejdes med teleskopsave
under de sædvanlige eller foreskrevne
hviletider.
1. Kontroller inden start:
- savkædens spænding 1
- oliestanden
- alle møtrikker og skruers faste position
- Fjern først sværdafskærmningen 24 kort
inden brug
- Indstil teleskopstangens arbejdslængde
inden maskinen tændes.
- Kontroller skulderselen 12 for en behagelig
position, der letter arbejdet med
teleskopsaven.
- Bær korrekt arbejdstøj
- Kontroller sikker ståposition
- Kontroller arbejdsområdet
2. Start
Forbind saven med et el-stik der har den net-
spænding, der er angivet på typeskiltet.
Hold saven afslappet, men sikkert. Udløs
startspærre 11 og start teleskopsaven med til/
fra-knap 10.
Når til/fra-knap 10 slippes, slukker maskinen
automatisk.
En låsning til konstant drift er ikke mulig af
sikkerhedsårsager.
Justering af teleskopstangen
Teleskopstangen kan justeres trinløst via
samling 15. Vip armen fremad som vist på
10 min
H
Page 24

24
DK
I
billedet og stanlængden kan
ændres ved at skubbe eller trække.
Vip armen tilbage igen og lås dermed den
ønskede arbejdslængde
på teleskopstangen.
Indstilling af håndtag
• Løsn stjernegreb 8
• Sæt håndtag 9 på den ønskede
position
• Fastgør stjernegreb 8
Sikkert arbejde
Overhold den korrekte arbejdsvinkel (se
ovenstående billede) for at garantere arbejds-
sikkerheden.
Brug teleskopsaven ikke stående på en stige
eller på ikke stabil undergrund.
Foretag inden uovervejede snit.
. Dette ville bringe dig selv og
andre i fare.
Bør skal være under opsyn for at forhindre at
de lejer med maskinen.
Transport
Bær aldrig den elektriske kædesav med kæde
og sværd der vender bagud.
Sæt sværdbeskyttelsen på teleskopsaven under transport.
Sørg for at maskinen ikke kan tændes når du
bærer den.
Rengøring og opbevaring
Maskinen skal rengøres inden den
opbevares.
Brug dertil ingen opløsningsmidler eller benzin. En tør klud eller en
mild sæbeopløsning er nok.
Savkæden 1 tørres kun af med en tør klud.
Monter sværdafskærmningen 24 igen.
Opbevaringsstedet skal være tørt og frostfrit.
Direkte sollys bør undgås.
Opbevaringsstedet skal være utilgængeligt for
børn.
Slib tænderne
Slibning af savkæden bør udføres af en
fagmand eller ske i henhold til kædeslibningsudstyrets brugsvejledning. Slibning af
savkæden kræver en del øvelse. Ved tvivl er
en udskiftning af savkæden at foretrække.
Page 25

25
DK
Savning af små grene
Sæt savsnittet oppefra og nedefter, som vist
på siden.
Vær opmærksom på at grene kan knække
hurtigt, hvis du har fejlvurderet deres størrelse
og vægt.
Vær altid opmærksom på nedfaldende,
afskåret træ.
Savning af større grene
Vælg ved større grene først et aastningssnit
for en bedre kontrol med savningen.
Dette snit, som på siden er kendetegnet ved
a, udføres nedefra.
Sav et snit i den nederste tredjedel af grenen.
Det egentlige snit (b) saves nu igen oppefra
og helst i en linje med det første snit for at
ramme dette.
Savning i delstykker
Ved store eller lange gene anbefales det at
save i delstykker.
Kun på denne måde kan det sikkert påvirkes,
hvor materialet falder ned.
Fjern de allerede savede delstykker fra det
område du står.
Saveteknikker
Vær altid opmærksom på faren for tilbagesstødende grene
Page 26

26
DK
J
Bortskaffelse/
miljøbeskyttelse
Aever maskine, tilbehør og emballage til miljøvenligt genbrug.
Apparater må ikke bortskaffes med
husholdningsaffald.
Aever apparatet på en genbrugsstation. De
anvendte plast- og metaldele kan sorteres ef-
ter materiale og således aeveres til genbrug.
Spørg i denne forbindelse vort servicecenter
(se adressen på side 31).
Vedlagt tilbehør
24 Sværdbeskyttelseshylster
12 Skulderrem
25 60 ml Grizzly Bio-olie
Garanti
Saven har en garanti på 36 måneder. Garantien forkortes ved erhvervsmæssig brug samt
for ombytningsapparater til 12 måneder iht. de
gældende bestemmelser.
Skader, som skyldes naturligt slid, overbelastning eller ukorrekt betjening, er ikke dækket
af garantien. Nogle komponenter underligger
et normalt slid og er ikke dækket af garantien.
Dette gælder især for: Savkæde, sværd, kædehjul og kulbørster, for så vidt at reklamationer ikke skyldes materialefejl. Ligeledes dækkes samtlige skader på maskine, på savkæde
og på sværdet ikke af garantien, som skyldes
utilstrækkelig smøring.
Forudsætningen for garantien er ligeledes at
de vedligeholdelsesintervaller der er anført i
betjeningsvejledningen overholdes og henvisningerne om rengøring, vedligeholdelse og
istandsættelse iagttages. Skader, som opstår
som følge af materiale- eller fabrikationsfejl,
erstattes eller repareres gratis. Forudsætning
herfor er at apparatet ikke er adskilt og leve-
res med købs- og garantibevis til vores servicecenter (se adressen på side 31).
Reparationer, som ikke er underlagt garantien,
kan udføres mod vederlag i vores servicecenter. Bed om en omkostningsoverslag.
Vi kan kun bearbejde apparater, som blev godt
emballeret samt tilstrækkeligt frankeret.
Omfangsrigt gods og høje transportomkostninger kan undgås, hvis kæden og sværdet afmonteres og disse dele pakkes ned sammen
med motorblokken i den bagerste del af den
originale karton. Den forreste, tynde del i kar-
tonen skæres af, så kartonen får en rkantet
form; klæb kartonen godt sammen her.
Transportrisikoen påhviler afsenderen.
NB: Defekte apparater må under ingen omstændigheder tilbagesendes med fyldt olietank. Tøm altid tanken forinden. Eventuelle
tingskader (der løber olie ud, når apparatet
ligger på siden eller på hovedet!) eller brandskader under transporten skal dækkes af
afsenderen.
Apparater der indsendes uden frankering
– som stort gods, per ekspres eller med
specialfragt - afvises.
Når der foreligger et garantitilfælde bedes du
kontakte vores servicecenter telefonisk. Her
får du så yderligere informationer om reklamationsbearbejdningen.
Vi bortskaffer apparatet gratis.
Reservedele
De nedenstående reservedele kan bestilles
via vores Grizzly servicecenter (se adressen
på side 31). Angiv maskintype og reservedelens nummer ved bestillingen.
Savkæde ..........................3009 1400
Sværd ..............................3010 0100
Bio-Kettenöl 1 l .................3023 0001
Bio-Kettenöl 5 l ................3023 0002
Kræves der yderligere reservedele, ses numrene af eksplosionstegningerne
Page 27

27
DK
Tekniske data
Elektrisk kædesav .......................... FHE 550
Nom. indgangsspænding.......... 230V~, 50 Hz
Effektforbrug .........................................550 W
Beskyttelsesklasse ....................................
II
Kædehastighed .................................10,8 m/s
Vægt (uden sværd og kæde).................3,7 kg
Vægt (med sværd og kæde)..................4,1 kg
Olieta n k e n i n d e h o l d e r..............................70 ml
Kæde .................................Oregon 91 P040X
Kædedeling...............................................3/8“
Sværd ...............10“Oregon OE 100SDEA041
Antal kædedrivled .......................................40
Kædetykkelse ..................................... 1,3 mm
Kædehjulets fortanding.................................6
Knivlængde (max.) ............................ 260 mm
Garanteret lydtryksniveau...........104,0 dB (A)
Lydeffekt, målt .............................102,2 dB(A)
Støjniveau ....................................88,0 dB (A)
Vibration (ISO 7505) .......................... 3,0 m/s
2
Der tages forbehold for tekniske og optiske
ændringer i forbindelse med den tekniske
udvikling.
Alle mål, henvisninger og oplysninger i denne
betjeningsvejledning er derfor uden garanti.
Retlige krav, som stilles på baggrund af denne
betjeningsvejledning, kan derfor ikke gøres
gældende.
Tabel vedligeholdelsesintervaller
Maskindel Aktion Før hver
brug
Hver gang
efter brug
Komplet maskine Kontroller tilstand, udskift beskadigede
dele efter bug.
Tilgængelige skruer
og møtrikker
Efterspænd
Kædehju Kontroller, udskift efter behov
Savkæde Kontroller, slib efter eller udskift efter
behov
Savkæde Rengør (hvis ikke brugt i længere tid
også smøring)
Sværd Kontroller
Sværd Rengør (hvis ikke brugt i længere tid
også smøring)
Olietanken Kontroller, efter behov etter med olie
Page 28

28
DK
D
Fejlsøgning
Problem Mulig årsag Afhjælpning af fejl
Apparatet starter ikke
Spænding mangler
Sikringen er udløst
Kontroller stikdåse, kabel, ledning,
stik, evt. reparation gennem fagmand.
Kontroller sikring, se henvisning
Start-/stopkontakt defekt Reparation af kundeservice
Kulbørster slidte Reparation af kundeservice
Motor defekt Reparation af kundeservice
Dårlig skæreeffekt
Savkæde forkert monteret Monter savkæden rigtigt
Savkæde stump
Slib tænderne eller sæt en ny
kæde på
Kædespænding ikke nok Kontroller kædespændingen
Saven løber tungt,
kæden springer af
Kædespænding ikke nok Kontroller kædespændingen
Kæden bliver varm,
røgudvikling under
savningen, misfarvning af
skinne
For lidt kædeolie
Kontroller olieniveau og fyld evt.
efter med kædeolie,
kontroller olieautomatik og rengør
evt. olieåbningen 17 eller reparation gennem kundeservice
kontroller olienindstilling (oliereguleringsknap)
Page 29

29
EU declaration
of conformity
EF-overensstemmelses-
erklæring
We hereby conrm that the
High pruning saw
Design Series FHE 550
Hermed bekræfter vi, at
Teleskopsaven af serien
FHE 550
conforms with the following applicable relevant
version of the EU guidelines as of model year
2008:
ra byggeår 2008 opfylder følgende gældende EF-direktiver i deres respektive gyldige
version:
2006/42/EC • 2004/108/EC • 2000/14/EC
In order to guarantee consistency, the following
harmonised standards as well as national standards and stipulations have been applied:
For at sikre overensstemmelsen, blev følgende harmoniserede standarder samt nationale standarder og regler anvendt:
We additionally conrm the following in accordance with the 2000/14/EC emissions guideline:
Guaranteed sound power level: 104,0 dB(A)
Measured sound power level: 102,2 dB(A)
Compliance evaluation process carried out in accordance with Appendix V, 2000/14/EC
Yderligere bekræftes ifølge direktivet
2000/14 EC om støjemission:
Lydeffektniveau:
Garanteret:
104,0 dB(A)
Målt: 102,2 dB(A)
Anvendt metode for overensstemmelses-
vurdering iht. tillæg V / 2000/14/EC
EN 62233:2008
ISO 11680-1:2008
EN 60335-1/A13:2008
EN 55014-1:2006
EN 55014-2/A2:2008
EN 61000-3-2:2006
EN 61000-3-3:2008
Labelled with CE identication mark in 2010 Placering af CE-mærket 2010
Grizzly Gartengeräte GmbH & Co. KG
Am Gewerbepark 2
D-64823 Groß-Umstadt / 28.11.09
GB IE
i.A.
DK
(Andreas Gröschl, Techn. director and
Documentation Representative)
Page 30

30
4
3
5
7
9
10
27
28
33 34
3536373839
40
41
42
43
44
45
46
474849
50
51
52
53
55
56
57
58
59
60
54
61
63
68
67
69
70
87
88
86
90
89
91
92
93
94
71
72
74
75
76
77
78
79
80
81
82
83
84
85
65
64
66
62
1
2
6
8
11
12
13
15
16
17
18
19
23
29
30
31
32
14
20
21
22
24
25
26
73
95
Exploded Diagram • Eksplosjonstegning
Page 31

31
Grizzly Service-Center
2009-11-30-rev02-op
DES UK Ltd.
Unit B7
Oxford Street Industrial Park
Vulcan Road
Bilston, West Midlands WV14 7LF
Tel: 0870 7876177
Tel from Ireland: 0044 870 787 6177
Fax: 0870 7876168
Fax from Ireland: 0044 870 787 6168
Email: grizzly@deslimited.com
GB
IE
DK
Grizzly Service Denmark
e-mail: service.danmark@grizzly.biz
Tel.: 70288811
Page 32

IAN 38028
Grizzly Gartengeräte GmbH & Co. KG
A m Gewerbepark 2
D-64823 Groß-Umstadt
Last Information Update · Tilstand af information: 10 / 2009
Ident.-No.: 75010038102009-3C
a
3C
 Loading...