


XP-2101
Table of contents
 Loading...
XP-2101 User's Guide


Contents
XP-2101 User's Guide................................................................................................................................ 11
Product Basics .......................................................................................................................................... 12
Control Panel Buttons and Lights ....................................................................................................... 12
Product Parts Locations ..................................................................................................................... 13
Product Parts - Front ..................................................................................................................... 13
Product Parts - Inside .................................................................................................................... 14
Product Parts - Back...................................................................................................................... 16
Changing the Default Paper Size in the Control Panel ....................................................................... 16
The Power Off and Sleep Timers ....................................................................................................... 17
Changing the Power Off and Sleep Timer Settings - Windows...................................................... 17
Changing the Power Off and Sleep Timer Settings - Mac.............................................................. 18
Epson Connect Solutions for Smartphones, Tablets, and More ......................................................... 19
Using Epson Email Print ............................................................................................................... 19
Using the Epson iPrint Mobile App ................................................................................................ 20
Using Epson Remote Print ........................................................................................................... 20
Using Google Cloud Print................................................................................................................... 21
Setting Up Google Cloud Print on a Chromebook .............................................................................. 22
Using the Mopria Print Service .......................................................................................................... 23
Android Printing Using the Epson Print Enabler ................................................................................ 23
Using Fire OS Printing ....................................................................................................................... 24
Using Windows 10 Mobile Printing .................................................................................................... 24
Wi-Fi Networking ....................................................................................................................................... 26
Network Security Recommendations ................................................................................................. 26
Wi-Fi Infrastructure Mode Setup......................................................................................................... 27
Wi-Fi Direct Mode Setup .................................................................................................................... 28
Enabling Wi-Fi Direct Mode........................................................................................................... 28
Wi-Fi Protected Setup (WPS)............................................................................................................. 29
Using WPS to Connect to a Network ............................................................................................. 29
Printing a Network Status Sheet......................................................................................................... 30
Printing a Network Connection Report ............................................................................................... 30
3

Network Connection Report Codes and Messages ....................................................................... 31
Changing or Updating Network Connections ..................................................................................... 36
Accessing the Web Config Utility................................................................................................... 36
Changing a USB Connection to a Wi-Fi Connection...................................................................... 37
Connecting to a New Wi-Fi Router ................................................................................................ 37
Disabling Wi-Fi Features ............................................................................................................... 38
Loading Paper ........................................................................................................................................... 39
Loading Paper in the Rear Paper Feed .............................................................................................. 39
Paper Loading Capacity..................................................................................................................... 42
Compatible Epson Papers.................................................................................................................. 43
Borderless Paper Type Compatibility ................................................................................................. 45
Paper or Media Type Settings - Printing Software.............................................................................. 46
Placing Originals on the Product ............................................................................................................. 47
Placing Originals on the Scanner Glass ............................................................................................. 47
Copying ...................................................................................................................................................... 50
Copying Documents or Photos........................................................................................................... 50
Printing from a Computer ......................................................................................................................... 51
Printing with Windows ........................................................................................................................ 51
Selecting Basic Print Settings - Windows ...................................................................................... 52
Print Quality Options - Windows ............................................................................................... 54
Multi-Page Printing Options - Windows..................................................................................... 54
Selecting Double-sided Printing Settings - Windows ..................................................................... 55
Double-sided Printing Options - Windows................................................................................. 57
Selecting Additional Layout and Print Options - Windows ............................................................. 57
Custom Color Correction Options - Windows............................................................................ 59
Image Options and Additional Settings - Windows.................................................................... 60
Header/Footer Settings - Windows ........................................................................................... 61
Selecting a Printing Preset - Windows........................................................................................... 62
Selecting Extended Settings - Windows ........................................................................................ 64
Extended Settings - Windows ................................................................................................... 65
Printing Your Document or Photo - Windows................................................................................. 66
Checking Print Status - Windows.............................................................................................. 68
4

Selecting Default Print Settings - Windows.................................................................................... 68
Changing the Language of the Printer Software Screens ......................................................... 69
Changing Automatic Update Options ............................................................................................ 70
Printing with the Built-in Epson Driver - Windows 10 S....................................................................... 71
Selecting Print Settings - Windows 10 S........................................................................................ 72
Printing on a Mac ............................................................................................................................... 75
Selecting Basic Print Settings - Mac .............................................................................................. 76
Print Quality Options - Mac ....................................................................................................... 80
Print Options - Mac ................................................................................................................... 80
Selecting Page Setup Settings - Mac ............................................................................................ 81
Selecting Print Layout Options - Mac............................................................................................. 82
Managing Color - Mac ................................................................................................................... 82
Color Matching and Color Options - Mac .................................................................................. 83
Selecting Printing Preferences - Mac ............................................................................................ 84
Printing Preferences - Mac........................................................................................................ 85
Printing Your Document or Photo - Mac ........................................................................................ 86
Checking Print Status - Mac...................................................................................................... 87
Printing From a Chromebook ............................................................................................................. 87
Cancelling Printing Using a Product Button........................................................................................ 88
Scanning .................................................................................................................................................... 89
Starting a Scan................................................................................................................................... 89
Starting a Scan Using the Product Buttons.................................................................................... 89
Changing Default Scan Job Settings ........................................................................................ 89
Starting a Scan Using the Epson Scan 2 Icon ............................................................................... 90
Starting a Scan from a Scanning Program..................................................................................... 92
Starting a Scan from a Smart Device............................................................................................. 94
Scanning in Epson Scan 2 ................................................................................................................. 94
Additional Scanning Settings - Main Settings Tab ......................................................................... 97
Additional Scanning Settings - Advanced Settings Tab................................................................. 98
Saving Scanned Documents as a Searchable PDF Using Epson Scan 2 ..................................... 99
Image Format Options................................................................................................................. 100
Scan Resolution Guidelines ........................................................................................................ 101
5

Replacing Ink Cartridges ........................................................................................................................ 103
Check Cartridge Status .................................................................................................................... 103
Checking Cartridge Status Lights ................................................................................................ 103
Checking Cartridge Status - Windows ......................................................................................... 104
Checking Cartridge Status - Mac................................................................................................. 107
Purchase Epson Ink Cartridges........................................................................................................ 108
Ink Cartridge Part Numbers......................................................................................................... 108
Removing and Installing Ink Cartridges............................................................................................ 109
Replacing Ink Cartridges Using a Computer Utility........................................................................... 115
Printing with Black Ink and Expended Color Cartridges ................................................................... 116
Printing with Expended Color Cartridges - Windows ................................................................... 117
Printing with Expended Color Cartridges - Mac ........................................................................... 118
Conserving Low Black Ink with Windows ......................................................................................... 119
Adjusting Print Quality............................................................................................................................ 121
Print Head Maintenance................................................................................................................... 121
Print Head Nozzle Check............................................................................................................. 121
Checking the Nozzles Using the Product Buttons................................................................... 122
Checking the Nozzles Using a Computer Utility...................................................................... 123
Print Head Cleaning .................................................................................................................... 125
Cleaning the Print Head Using the Product Buttons................................................................ 126
Cleaning the Print Head Using a Computer Utility................................................................... 126
Print Head Alignment ....................................................................................................................... 129
Aligning the Print Head Using a Computer Utility......................................................................... 129
Cleaning the Paper Path .................................................................................................................. 130
Cleaning and Transporting Your Product ............................................................................................. 132
Cleaning Your Product ..................................................................................................................... 132
Cleaning the Print Head Path ........................................................................................................... 132
Transporting Your Product ............................................................................................................... 135
Solving Problems .................................................................................................................................... 140
Checking for Software Updates........................................................................................................ 140
Product Light Status ......................................................................................................................... 141
Running a Product Check ................................................................................................................ 144
Resetting Network Settings .............................................................................................................. 145
6

Solving Setup Problems ................................................................................................................... 145
Product Does Not Turn On or Off................................................................................................. 146
Noise After Ink Installation ........................................................................................................... 146
Software Installation Problems .................................................................................................... 146
Solving Network Problems ............................................................................................................... 147
Product Cannot Connect to a Wireless Router or Access Point .................................................. 147
Network Software Cannot Find Product on a Network................................................................. 149
Product Does Not Appear in Mac Printer Window ....................................................................... 150
Cannot Print Over a Network....................................................................................................... 151
Cannot Scan Over a Network ...................................................................................................... 152
Wireless Network Connection is Unstable on a Mac ................................................................... 153
Solving Copying Problems ............................................................................................................... 153
Product Makes Noise, But Nothing Copies.................................................................................. 154
Product Makes Noise When It Sits for a While............................................................................. 154
Solving Paper Problems................................................................................................................... 154
Paper Feeding Problems............................................................................................................. 154
Paper Jam Problems ................................................................................................................... 155
Paper Ejection Problems ............................................................................................................. 158
Solving Problems Printing from a Computer..................................................................................... 159
Nothing Prints.............................................................................................................................. 159
Product Icon Does Not Appear in Windows Taskbar ................................................................... 160
Printing is Slow ............................................................................................................................ 161
Solving Page Layout and Content Problems.................................................................................... 162
Inverted Image............................................................................................................................. 163
Too Many Copies Print ................................................................................................................ 163
Blank Pages Print ........................................................................................................................ 163
Incorrect Margins on Printout....................................................................................................... 164
Border Appears on Borderless Prints .......................................................................................... 164
Incorrect Characters Print............................................................................................................ 165
Incorrect Image Size or Position.................................................................................................. 165
Slanted Printout........................................................................................................................... 166
Solving Print Quality Problems......................................................................................................... 167
White or Dark Lines in Printout .................................................................................................... 167
7

Blurry or Smeared Printout .......................................................................................................... 168
Faint Printout or Printout Has Gaps ............................................................................................. 169
Grainy Printout............................................................................................................................. 170
Incorrect Colors ........................................................................................................................... 171
Solving Scanning Problems ............................................................................................................. 172
Scanning Software Does Not Operate Correctly ......................................................................... 172
Cannot Start Epson Scan 2 ......................................................................................................... 172
Scanning is Slow ......................................................................................................................... 173
Solving Scanned Image Quality Problems ....................................................................................... 174
Scanned Image Quality Problems ............................................................................................... 174
Image Consists of a Few Dots Only............................................................................................. 175
Line of Dots Appears in All Scanned Images............................................................................... 176
Straight Lines in an Image Appear Crooked ................................................................................ 176
Image Colors are Patchy at the Edges ........................................................................................ 176
Ripple Patterns Appear in an Image ............................................................................................ 177
Scanned Image Edges are Cropped ........................................................................................... 177
Uninstall Your Product Software....................................................................................................... 177
Uninstalling Product Software - Windows.................................................................................... 177
Uninstalling Product Software - Mac............................................................................................ 178
Where to Get Help............................................................................................................................ 179
Technical Specifications ........................................................................................................................ 182
Windows System Requirements ...................................................................................................... 182
Mac System Requirements .............................................................................................................. 182
Paper Specifications ........................................................................................................................ 183
Printable Area Specifications ........................................................................................................... 185
Scanning Specifications ................................................................................................................... 187
Ink Cartridge Specifications.............................................................................................................. 187
Dimension Specifications ................................................................................................................. 188
Electrical Specifications ................................................................................................................... 189
Interface Specifications .................................................................................................................... 189
Network Interface Specifications ...................................................................................................... 189
Safety and Approvals Specifications ................................................................................................ 190
8

Notices ..................................................................................................................................................... 192
Important Safety Instructions............................................................................................................ 192
General Product Safety Instructions ............................................................................................ 192
Ink Cartridge Safety Instructions.................................................................................................. 194
Wireless Connection Safety Instructions ..................................................................................... 195
FCC Compliance Statement............................................................................................................. 195
Binding Arbitration and Class Waiver ............................................................................................... 196
Trademarks...................................................................................................................................... 199
Copyright Notice............................................................................................................................... 200
libTIFF Software Acknowledgment.............................................................................................. 200
A Note Concerning Responsible Use of Copyrighted Materials................................................... 201
Copyright Attribution.................................................................................................................... 201
9


XP-2101 User's Guide
Welcome to the XP-2101 User's Guide.
For a printable PDF copy of this guide, click here.
11
Product Basics
See these sections to learn about the basic features of your product.
Control Panel Buttons and Lights
Product Parts Locations
Changing the Default Paper Size in the Control Panel
The Power Off and Sleep Timers
Epson Connect Solutions for Smartphones, Tablets, and More
Using Google Cloud Print
Setting Up Google Cloud Print on a Chromebook
Using the Mopria Print Service
Android Printing Using the Epson Print Enabler
Using Fire OS Printing
Using Windows 10 Mobile Printing
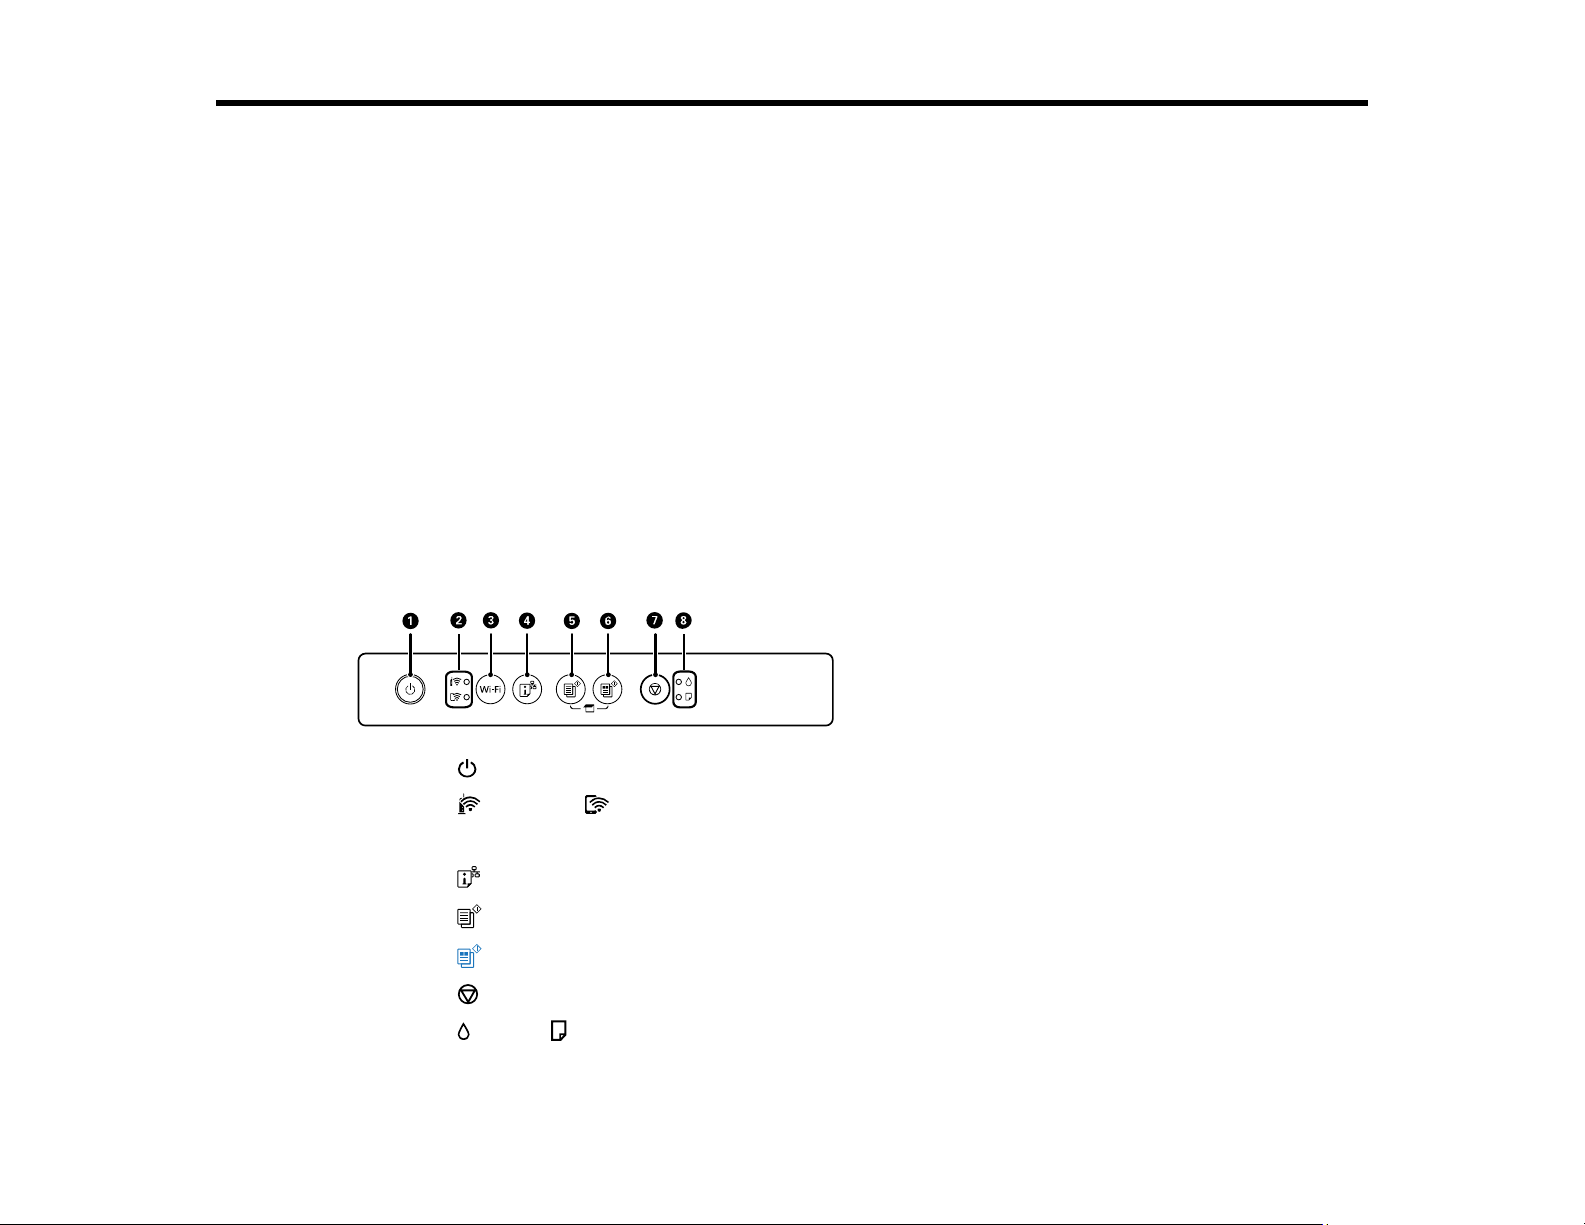
Control Panel Buttons and Lights
1
The power button and light
2
The Wi-Fi and Wi-Fi Direct network status lights
3 The Wi-Fi button
4
The network status button
5
The B&W copy button
6
The color copy button
7
The stop button
8
The ink and paper lights
12
Parent topic: Product Basics
Related references
Product Light Status
Product Parts Locations
See these sections to identify the parts on your product.
Product Parts - Front
Product Parts - Inside
Product Parts - Back
Parent topic: Product Basics
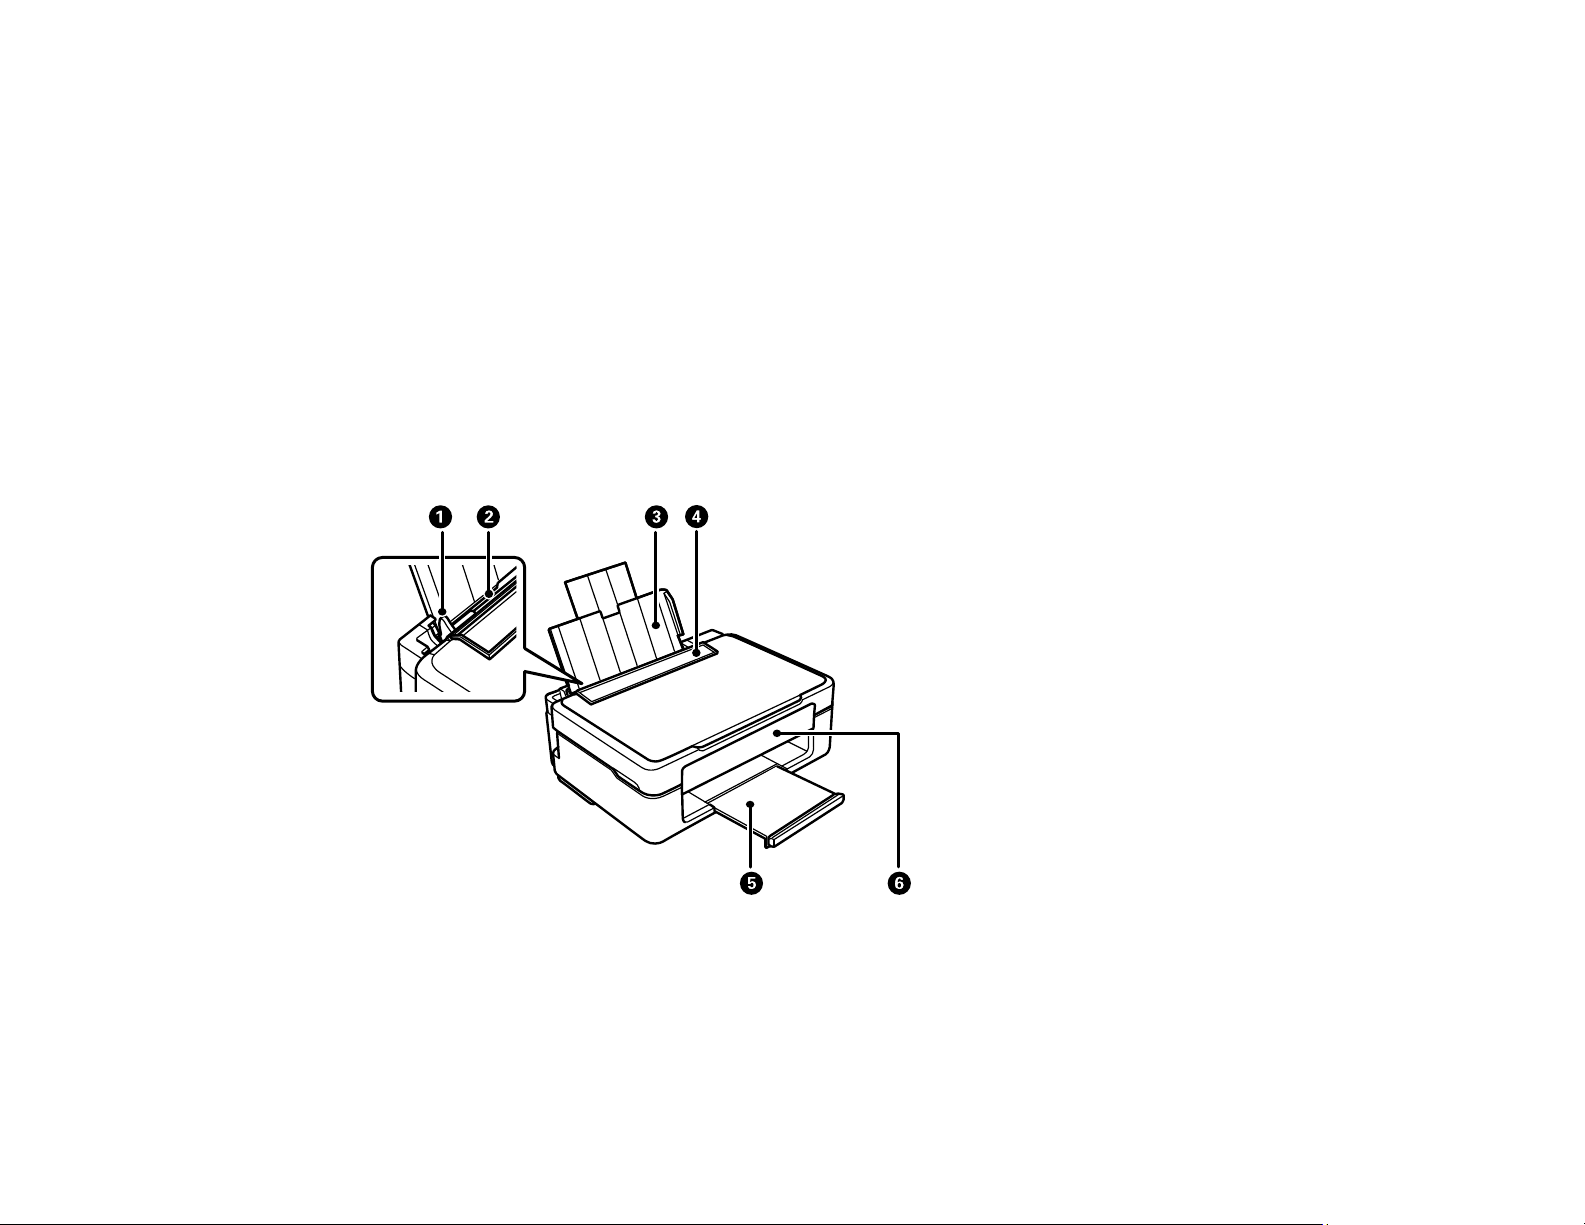
Product Parts - Front
1 Edge guide
2 Rear paper feed
3 Paper support
13
4 Feeder guard
5 Output tray
6 Control panel
Parent topic: Product Parts Locations
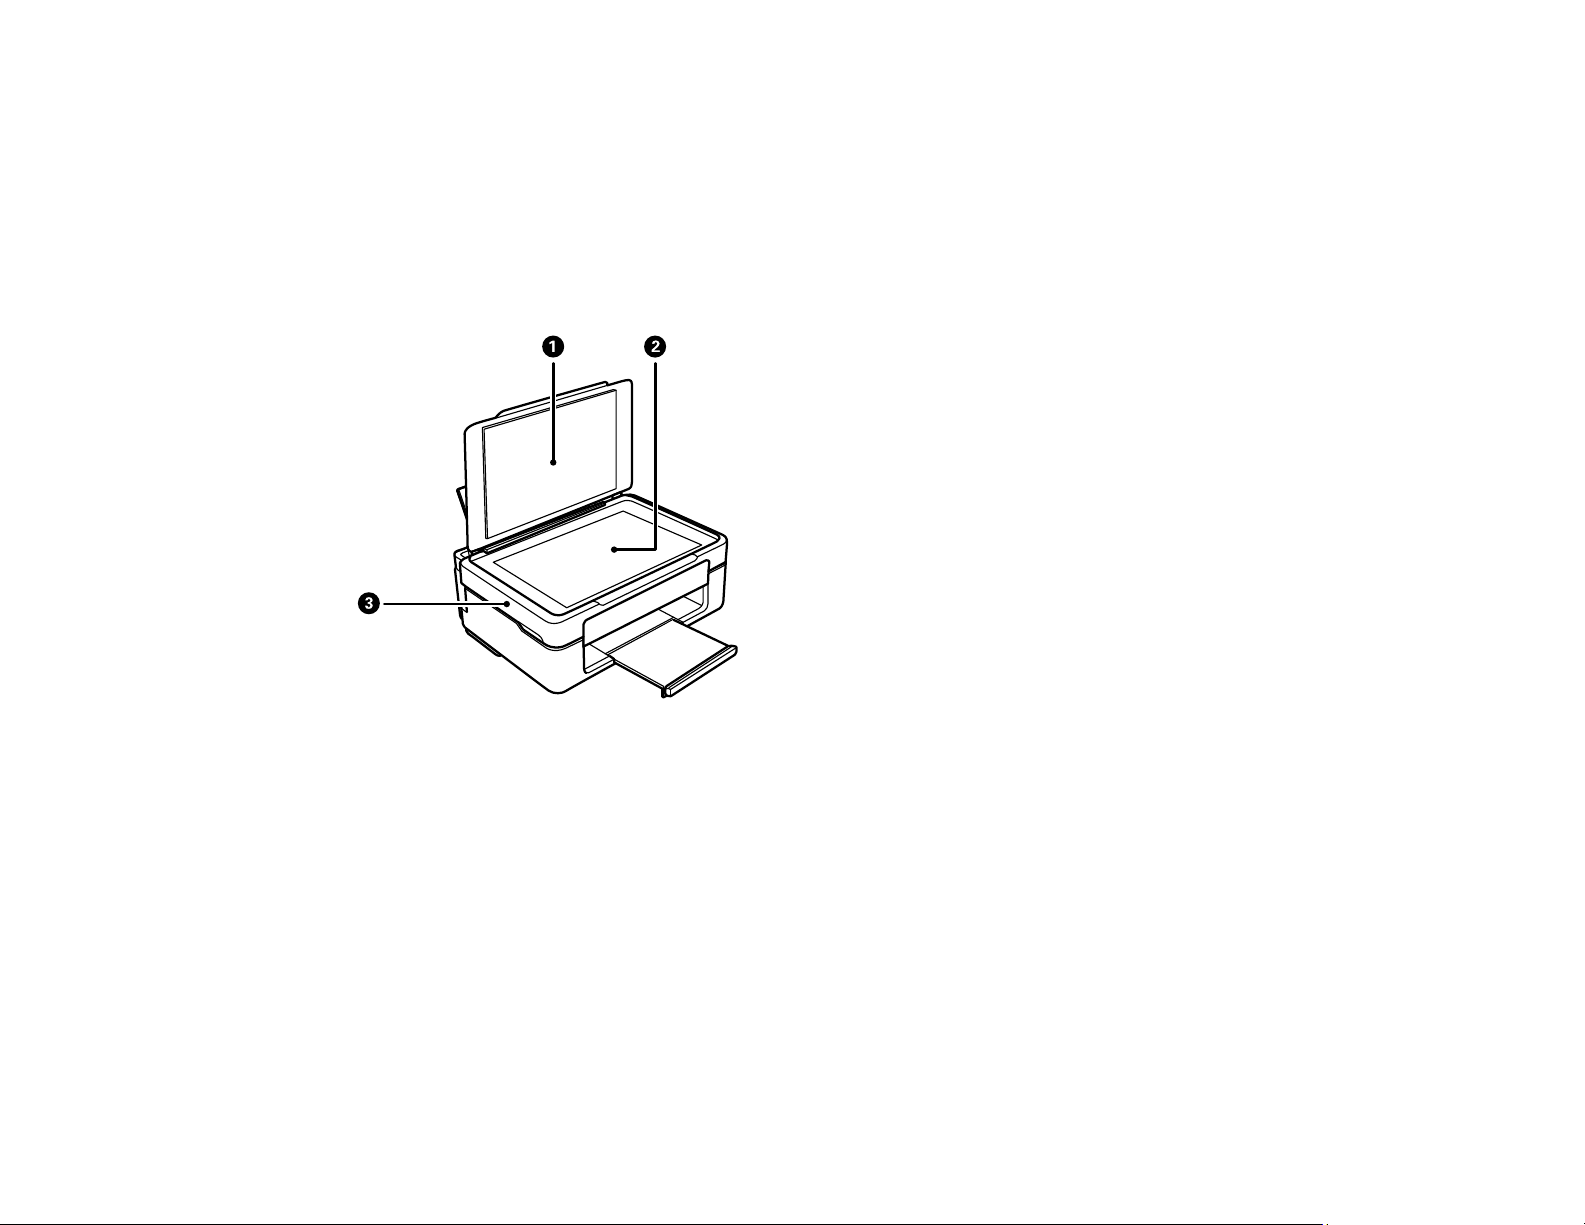
Product Parts - Inside
1 Document cover
2 Scanner glass
14
3 Scanner unit
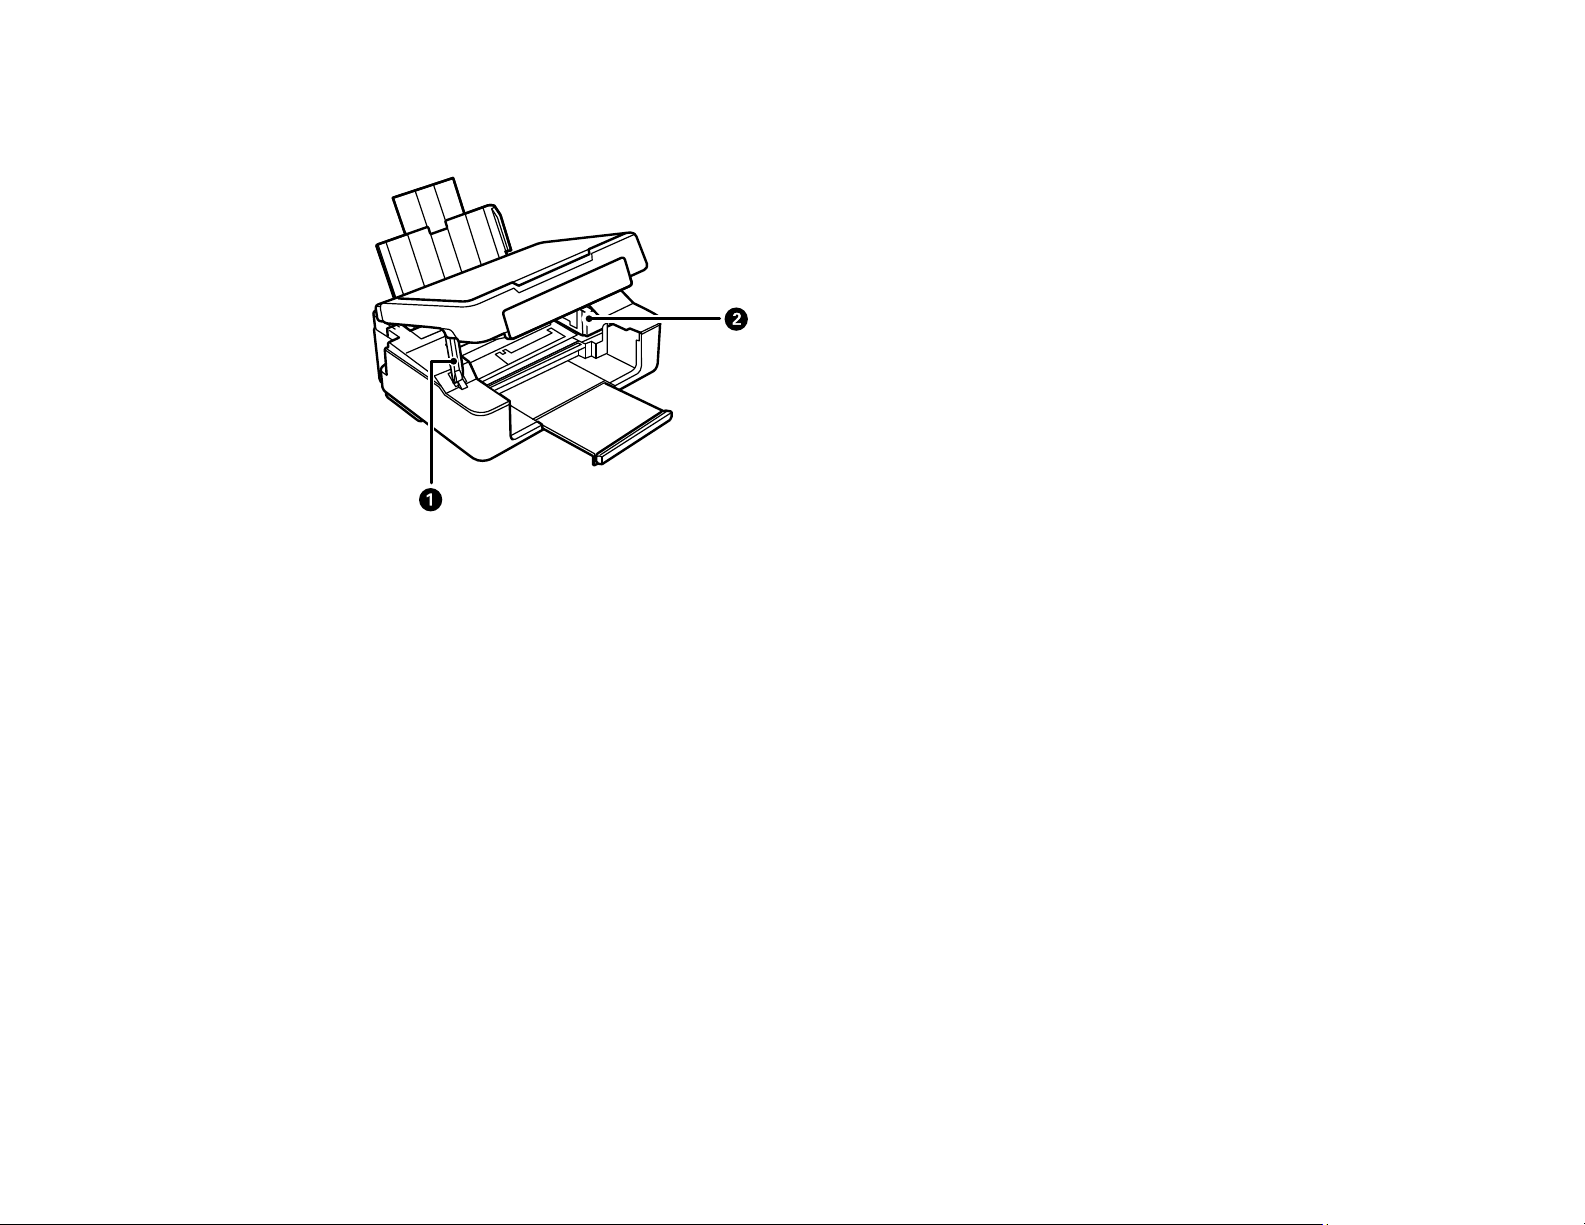
1 Scanner unit support
2 Ink cartridge holder
Parent topic: Product Parts Locations
15
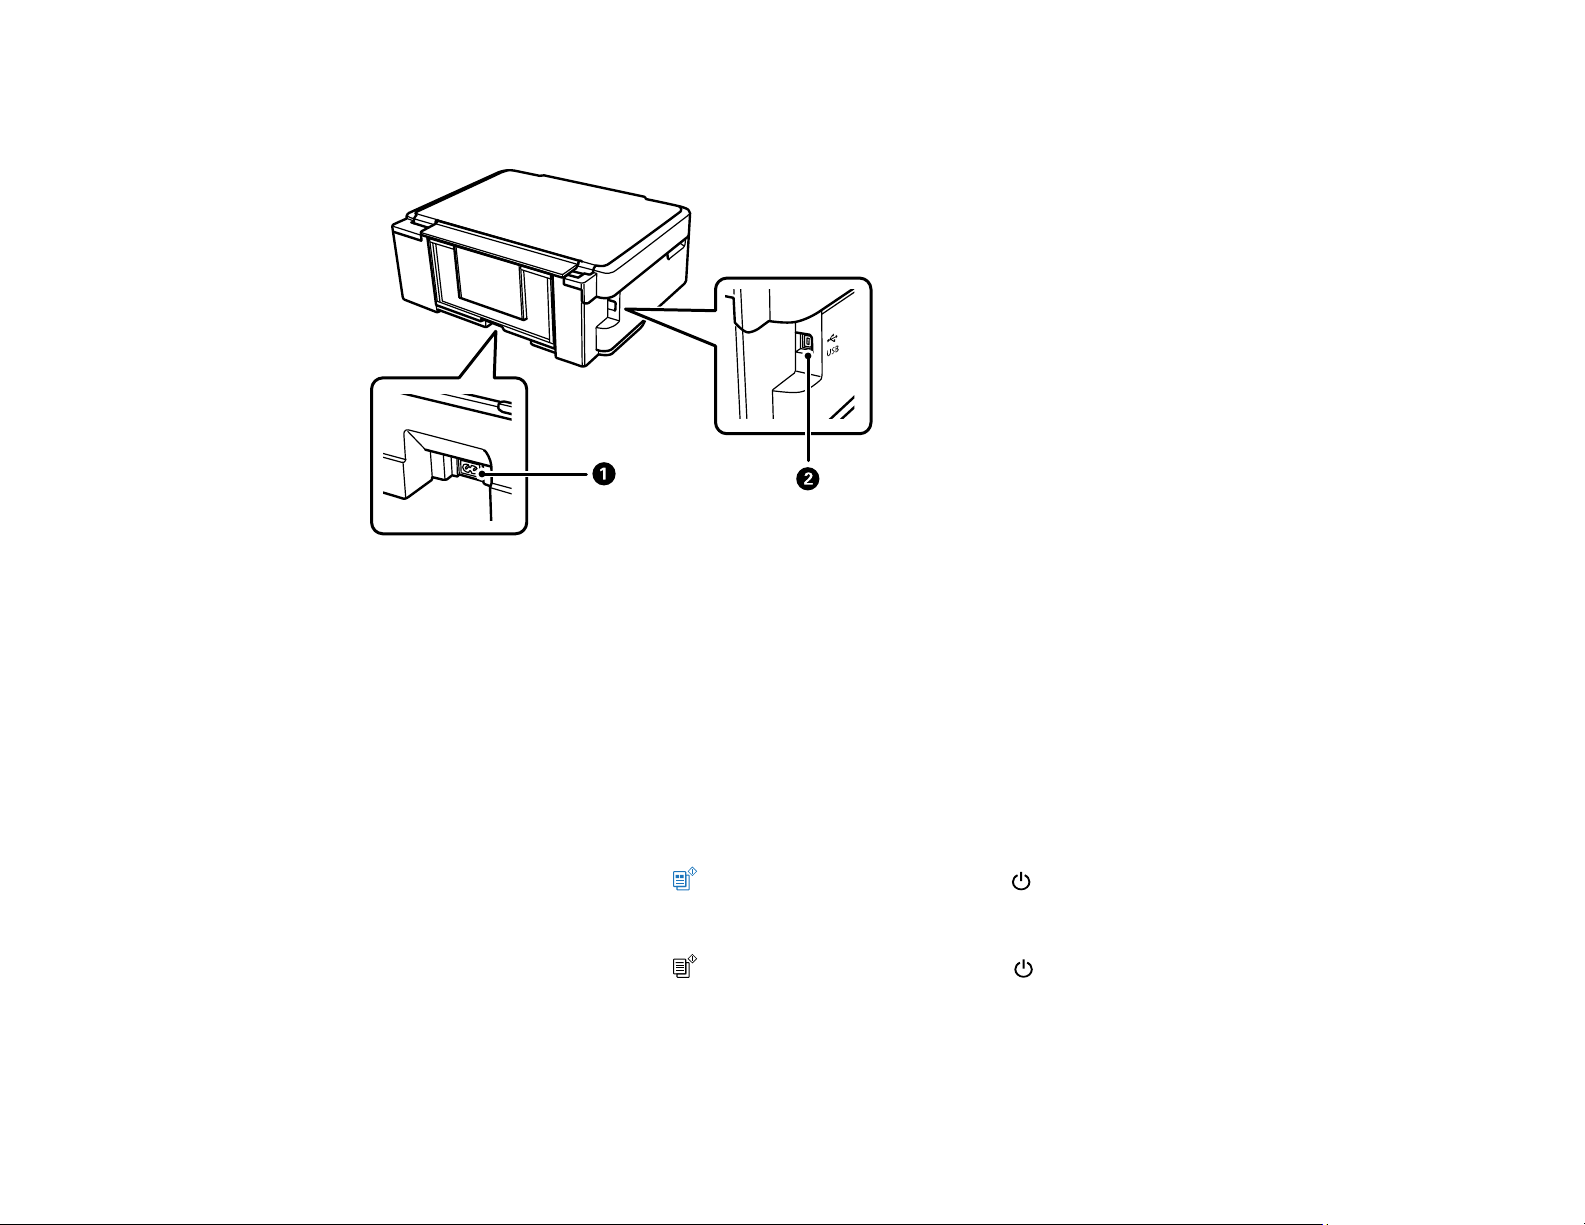
Product Parts - Back
1 AC inlet
2 USB port
Parent topic: Product Parts Locations
Changing the Default Paper Size in the Control Panel
Depending on your region, the default paper size for copies is either A4 (8.3 × 11.7 inches
[210 × 297 mm]) or Letter (8.5 × 11 inches [216 × 279 mm]).
• To change the default paper size to A4 (8.3 × 11.7 inches [210 × 297 mm]), make sure the product is
turned off, then hold down the color copy button and press the power button to turn the product
on. When the product turns on, release both buttons.
• To change the default paper size to Letter (8.5 × 11 inches [216 × 279 mm]), make sure the product is
turned off, then hold down the B&W copy button and press the power button to turn the product
on. When the product turns on, release both buttons.
Parent topic: Product Basics
16
The Power Off and Sleep Timers
The product enters sleep mode or turns off automatically if it is not used for a period of time. You can
adjust the time period before power management begins, but increasing the time reduces the product's
energy efficiency.
Changing the Power Off and Sleep Timer Settings - Windows
Changing the Power Off and Sleep Timer Settings - Mac
Parent topic: Product Basics
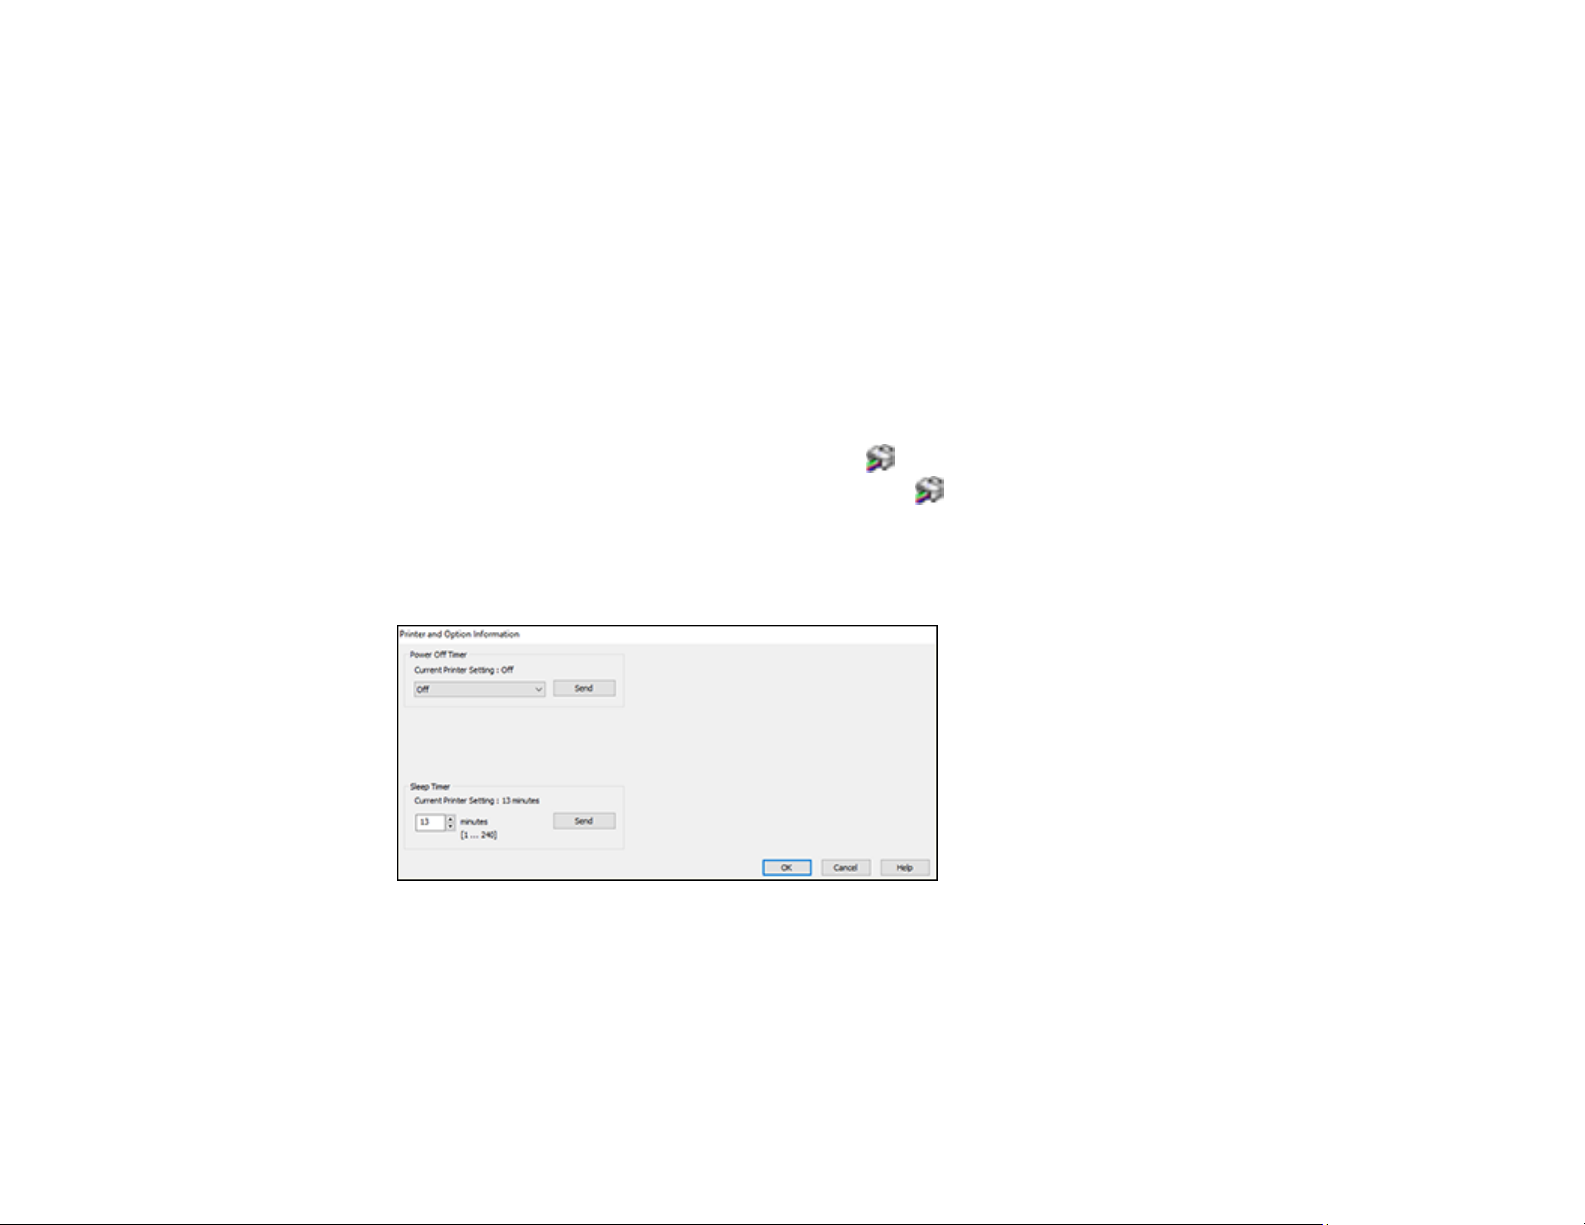
Changing the Power Off and Sleep Timer Settings - Windows
You can use the printer software to change the time period before the printer enters sleep mode or turns
off automatically.
1. Access the Windows Desktop and right-click the icon for your product in the right side of the
Windows taskbar, or click the up arrow and right-click . Select Printer Settings and click the
Maintenance tab.
2. Click the Printer and Option Information button.
You see this window:
3. Select the time period you want as the Power Off Timer setting.
4. Click Send.
5. Select the time period you want as the Sleep Timer setting.
6. Click Send.
17

7. Click OK to close the open program windows.
Parent topic: The Power Off and Sleep Timers
Changing the Power Off and Sleep Timer Settings - Mac
You can use the printer software to change the time period before the printer enters sleep mode or turns
off automatically.
1. In the Apple menu or the Dock, select System Preferences. Select Print & Fax, Print & Scan, or
Printers & Scanners, select your product, and select Options & Supplies. Select Utility and select
Open Printer Utility.
2. Select Printer Settings.
You see this screen:
3. Select the time period you want as the Power Off Timer setting.
4. Select the time period you want as the Sleep Timer setting.
5. Click Apply.
6. If you see the confirmation message, click Yes, and close the Printer Settings window.
Parent topic: The Power Off and Sleep Timers
18

Epson Connect Solutions for Smartphones, Tablets, and More
Use your smartphone, tablet, or computer to print and scan documents, photos, emails, and web pages
from your home, office, or even across the globe.
Note: If you are using your Epson product with the Windows 10 S operating system, you cannot use the
software described in this section. You also cannot download and install any Epson product software
from the Epson website for use with Windows 10 S; you must obtain software only from the Windows
Store.
Print from anywhere with these Epson Connect solutions:
• Epson Email Print
• Epson iPrint Mobile App
• Epson Remote Print
Scan and send a file as an email or upload it to an online service directly from your Epson product with
the Epson iPrint Mobile App.
Using Epson Email Print
Using the Epson iPrint Mobile App
Using Epson Remote Print
Parent topic: Product Basics
Related tasks
Using Google Cloud Print
Related topics
Wi-Fi Networking
Using Epson Email Print
With Epson Email Print, you can print from any device that can send email, such as your smartphone,
tablet, or laptop. Just activate your product's unique email address. When you want to print, attach a
PDF, Microsoft Office document, or photo to an email and send it to your product. Both the email and the
attachments will print automatically.
1. Connect your product to your network. See the link below.
2. If you did not already set up Email Print when you installed your product software, visit
epsonconnect.com to learn more about Email Print, create your Epson Connect account, and
register your product to the Epson Connect service.
19

3. Now you are ready to send and print emails to your product's Email Print address.
Note: Go to epsonconnect.com and log into your Epson connect account to personalize your product's
email, adjust print settings, and set up other Epson Connect services.
Parent topic: Epson Connect Solutions for Smartphones, Tablets, and More
Related topics
Wi-Fi Networking
Using the Epson iPrint Mobile App
Use this free Apple and Android app to print and scan with networked Epson products. Epson iPrint lets
you print PDFs, Microsoft Office documents, photos, and web pages over a wireless network. You can
scan and save a file on your device, send it as an email, or upload it to an online service such as Box,
Dropbox, Evernote, or Google Drive.
1. Connect your product to your wireless network. See the link below.
2. Visit epson.com.jm/connect to learn more about Epson iPrint and check the compatibility of your
mobile device.
3. Download Epson iPrint from the Apple App Store or Google Play.
4. Connect your mobile device to the same wireless network as your product.
5. Open Epson iPrint and select your Epson product.
Now you are ready to print or scan with your mobile device and your Epson product.
Parent topic: Epson Connect Solutions for Smartphones, Tablets, and More
Related topics
Wi-Fi Networking
Using Epson Remote Print
With Epson Remote Print software, you can print from your laptop or desktop computer to an Epson
Email-enabled product anywhere in the world.
1. Connect your Epson product to your wireless network. See the link below.
20

2. If you did not already set up an Epson Connect account when you installed your product software,
visit epsonconnect.com to create your account and register your product to the Epson Connect
service.
Note: Make a note of your product's email address.
3. Visit epsonconnect.com to learn more about Remote Print and how to download the Remote Print
Driver software.
4. Download and install the Remote Print software.
5. Enter the email address and optional access key of your Epson product during Remote Print setup.
6. Now you are ready to print remotely. Select the print command in your laptop or desktop computer
application and choose the Remote Print option for your Epson product.
Parent topic: Epson Connect Solutions for Smartphones, Tablets, and More
Related topics
Wi-Fi Networking
Using Google Cloud Print
With a Google Account, you can print from your Apple or Android device to your Epson product. You can
also print from Chromebooks and the Google Chrome browser without drivers or cables.
1. Connect your Epson product to your wireless network. See the link below.
2. Note your product's IP address by checking your network status. See the link below.
3. Connect your computer or your mobile device to the same wireless network as your Epson product.
4. Enter your product's IP address into the address bar of a web browser.
5. Select the Google Cloud Print Services option.
Note: If you don't see the Google Cloud Print Services option, turn your product off and back on. If
the option still doesn't appear, select the Firmware Update option and follow the on-screen
instructions to update your product.
6. Click Register.
7. Select the checkbox to agree to the Usage Advisory and click Next.
8. Click OK to launch the sign-in page.
A separate browser window opens.
21

9. Enter your Google Account username and password and click Sign in, or, if you don't have an
account, click Sign up for a new Google Account and follow the on-screen instructions.
10. Click Finish printer registration to complete setup and print a test page.
Your product is now linked to your Google Account and can be accessed from any Chromebook,
computer, Apple or Android device with Internet access. For more information on using Google Cloud
Print and for a list of supported apps, visit the Google Cloud Print site.
Parent topic: Product Basics
Related tasks
Printing a Network Status Sheet
Related topics
Wi-Fi Networking
Setting Up Google Cloud Print on a Chromebook
With a Google Account, you can print from a Chromebook without drivers or cables.
1. Connect your Epson product to your wireless network. See the link below.
2. Turn on your Chromebook and connect it to the same wireless network as your product.
Note: See your Chromebook's documentation for details on connecting to a network.
3. Do one of the following:
• Click Add to Cloud Print in the notification that appears in the corner of your Chromebook
screen.
Note: If you do not see a notification, check to see if a number appears in the status area at the
lower-right corner of the screen. Click this number to open the notifications menu, then click Add
to Cloud Print.
• Open a web browser and enter chrome://devices in the address bar. Skip to step 5.
• If you see a registration confirmation screen instead, click Register.
4. Click Add Device.
5. Click the Register button that appears next to your product.
6. Click Register on the confirmation screen.
22

7. Select OK or press the OK button on your product to confirm the Google Cloud Print connection and
print a test page.
Your product is now linked to your Google Account and can be accessed from any Chromebook, iPhone,
or Android phone with Internet access. For more information on using Google Cloud Print and for a list of
supported apps, visit the Google Cloud Print site.
Parent topic: Product Basics
Related topics
Wi-Fi Networking
Using the Mopria Print Service
You can use the Mopria Print Service to print from your Android phone or tablet (Android v4.4 or later) to
your Epson product or any Mopria-certified product from other manufacturers. You can download the
Mopria Print Service from Google Play.
1. Connect your Epson product to your wireless network. See the link below.
2. On your Android device, download the Mopria Print Service app from Google Play.
Note: On some Samsung Galaxy devices, Mopria may come preinstalled.
3. Go to Settings on your Android device, select Printing, and enable the Mopria Print Service, if
necessary.
4. Connect your Android device to the same wireless network as your product.
5. Now you are ready to print. From an Android application such as Chrome or Gmail, tap the menu
icon and select Print. Then select All printers, select your Epson product, adjust your print settings,
and print.
Parent topic: Product Basics
Related topics
Wi-Fi Networking
Android Printing Using the Epson Print Enabler
You can wirelessly print your documents, emails, photos, and web pages right from your Android phone
or tablet (Android v4.4 or later). With a few taps, your Android device will discover your nearby Epson
product and print.
1. Connect your Epson product to your wireless network. See the link below.
23

2. On your Android device, download the Epson Print Enabler plug-in from Google Play.
3. Go to Settings on your Android device, select Printing, and enable the Epson plug-in, if necessary.
4. Connect your Android device to the same wireless network as your product.
5. Now you are ready to print. From an Android application such as Chrome or Gmail, tap the menu
icon and print whatever is on the screen.
Note: If you do not see your product, tap All Printers and select your product.
Parent topic: Product Basics
Related topics
Wi-Fi Networking
Using Fire OS Printing
You can wirelessly print from Amazon Fire tablets and phones to your nearby networked Epson product.
There is no software to download, no drivers to install, and no cables to connect. With just a few taps in
Email, Calendar, Contacts, and WPS Office, you can send whatever is on the screen to an Epson
product.
1. Connect your Epson product to your wireless network. See the link below.
2. Connect your Amazon device to the same wireless network as your product.
3. Now you are ready to print. From your Amazon application, tap the print option and select your
product to print whatever is on the screen.
Note: If you see a message telling you that a plug-in is required, tap OK and tap Download. If your
Amazon Fire product uses Fire OS 5 and above, your device automatically uses the built-in Mopria
Print Service app to print.
Parent topic: Product Basics
Related topics
Wi-Fi Networking
Using Windows 10 Mobile Printing
You can wirelessly print from Windows 10 Mobile tablets and phones to your nearby networked Epson
product. There is no software to download, no drivers to install, and no cables to connect. Look for the
print option in your Windows 10 application to send whatever is on the screen to an Epson product.
24

1. Connect your Epson product to your wireless network. See the link below.
2. Connect your Windows 10 Mobile device to the same wireless network as your product.
3. Now you are ready to print. From your Windows 10 application, tap the print option and select your
product to print whatever is on the screen.
Parent topic: Product Basics
Related topics
Wi-Fi Networking
25

Wi-Fi Networking
See these sections to use your product on a Wi-Fi network.
Network Security Recommendations
Wi-Fi Infrastructure Mode Setup
Wi-Fi Direct Mode Setup
Wi-Fi Protected Setup (WPS)
Printing a Network Status Sheet
Printing a Network Connection Report
Changing or Updating Network Connections
Network Security Recommendations
To help deter unauthorized access to your product over a network, you should protect your network
environment using appropriate security measures.
Security measures such as these can help deter threats such as loss of user data, use of telephone and
fax lines, and other intrusions:
• Enable security on your wireless LAN
Enable the appropriate security on the wireless LAN you plan to use with your product. Network
security such as a network password can deter interception of traffic over the wireless LAN. Your
router may already have a default password enabled by your Internet service provider (ISP). See your
ISP and router documentation for instructions on how to change the default password and better
secure your network.
• Connect your product only to a network protected by a firewall
Connecting your product directly to the Internet may leave it vulnerable to security threats. Instead,
connect it to a router or other network connection protected by a firewall. Your router may already
have a firewall set up by your Internet service provider; check with your ISP for confirmation. For best
results, set up and use a private IP address for your network connection.
• Change the default administrator password on your product
If your product has an option to set an administrator password, change the default administrator
password to deter access by unauthorized users to personal data stored on your product, such as IDs,
passwords, and contact lists.
Parent topic: Wi-Fi Networking
26
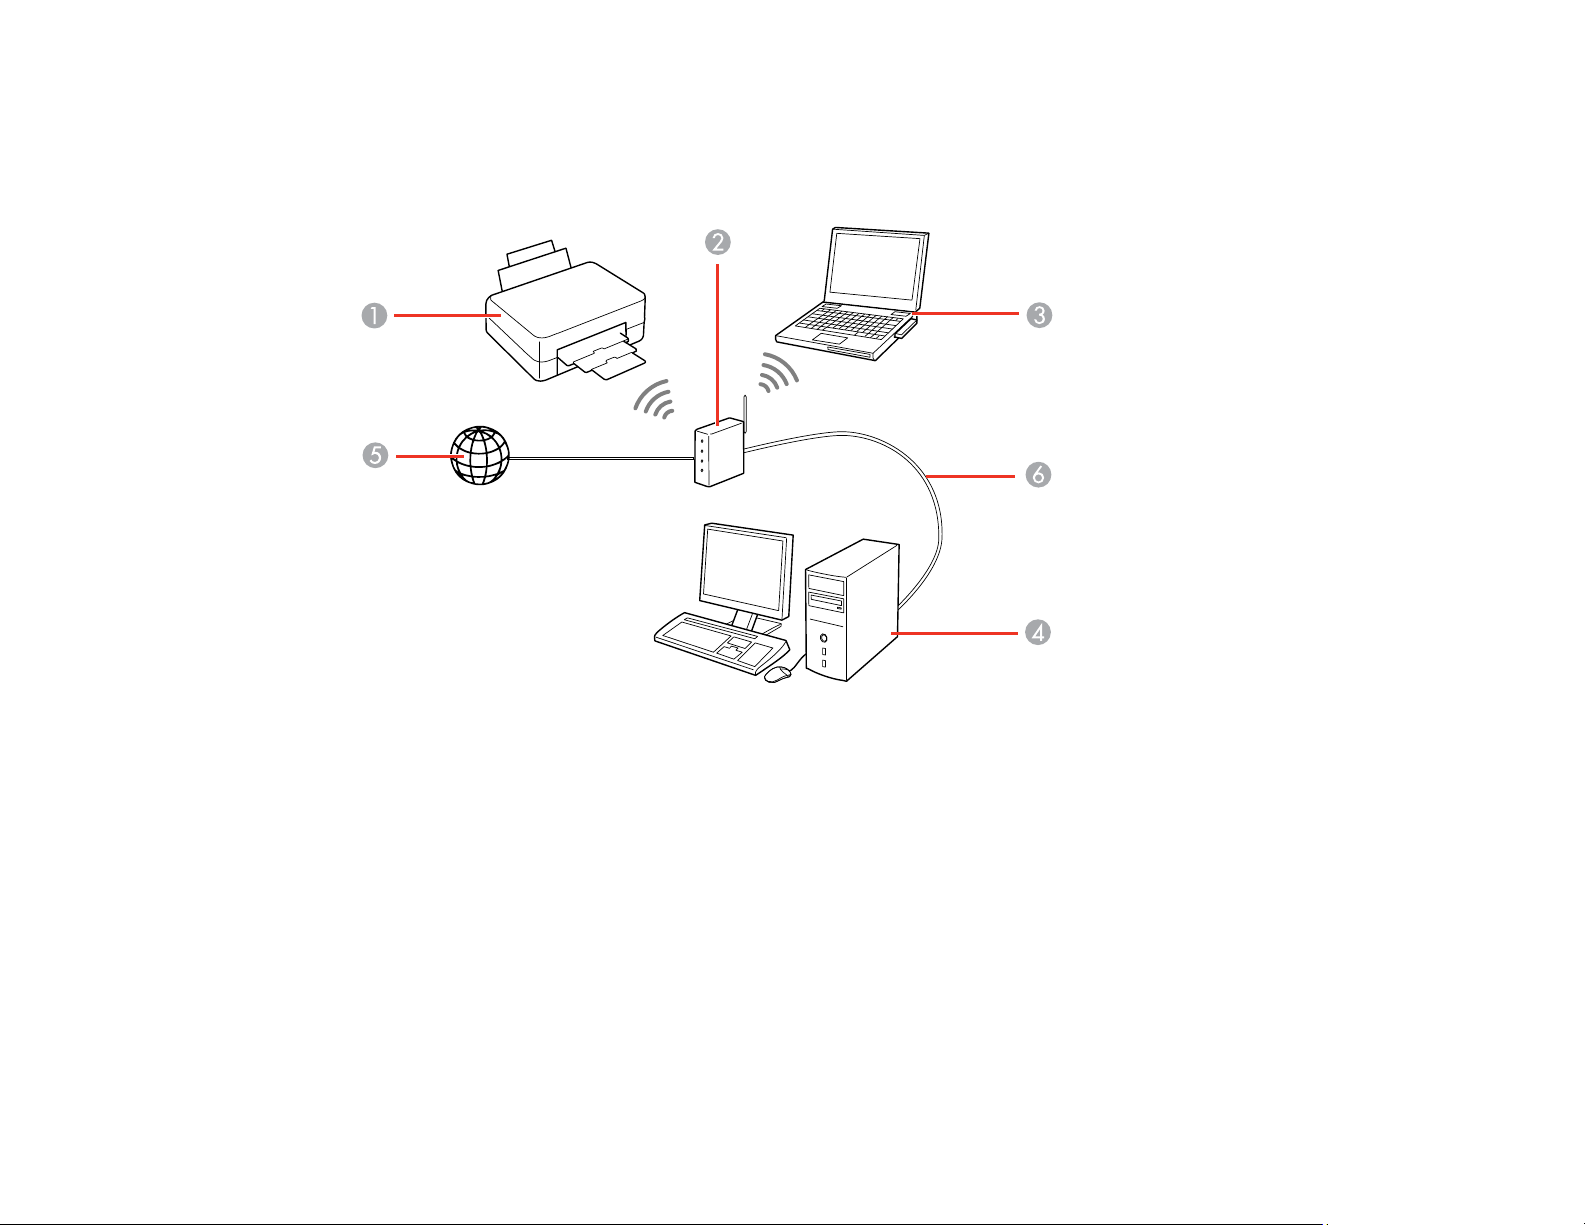
Wi-Fi Infrastructure Mode Setup
You can set up your product to communicate with your computer using a wireless router or access point.
The wireless router or access point can be connected to your computer over a wireless or wired network.
1 Epson product
2 Wireless router or access point
3 Computer with a wireless interface
4 Computer
5 Internet
6 Ethernet cable (used only for wired connection to the wireless router or access point)
Parent topic: Wi-Fi Networking
27
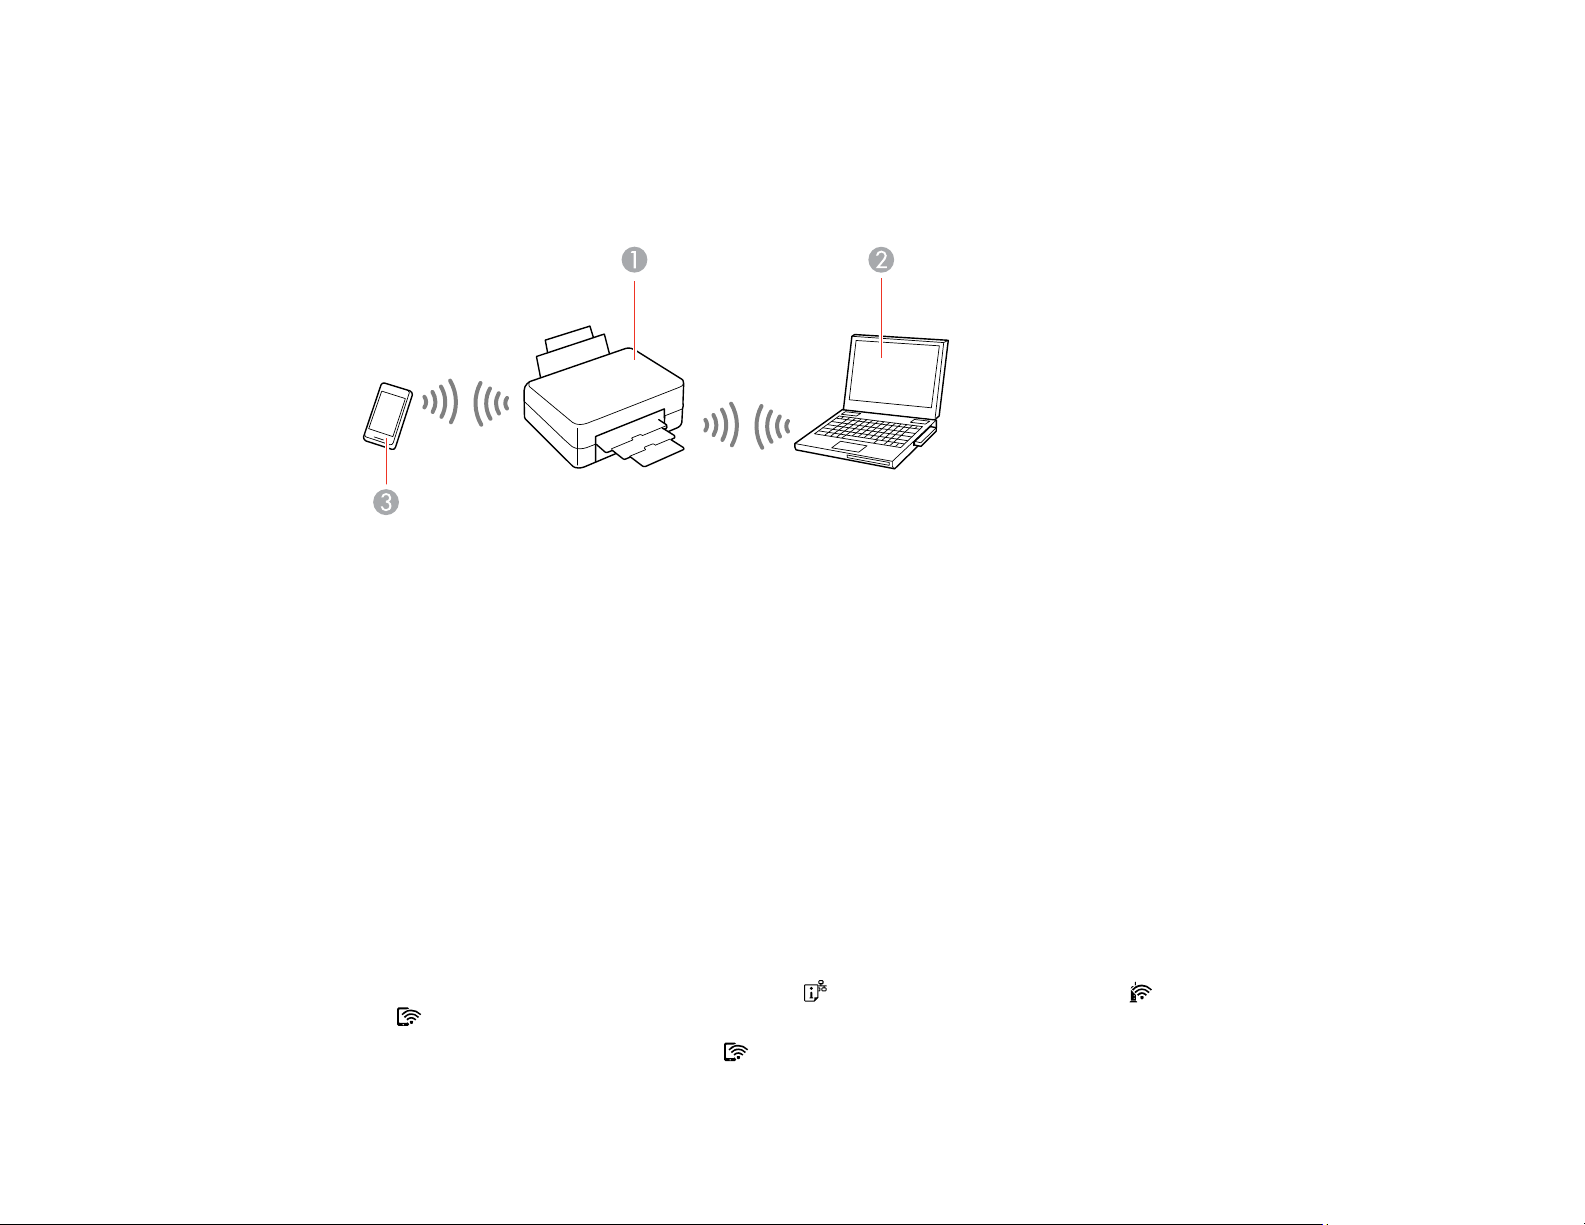
Wi-Fi Direct Mode Setup
You can set up your product to communicate directly with your computer or another device without
requiring a wireless router or access point. In Wi-Fi Direct Mode, the product itself acts as a network
access point for up to 8 devices.
1 Epson product
2 Computer with a wireless interface
3 Other wireless device
Enabling Wi-Fi Direct Mode
Parent topic: Wi-Fi Networking
Enabling Wi-Fi Direct Mode
You can enable Wi-Fi Direct mode to allow direct communication between your product and computer or
other devices without a wireless router or access point. Make sure paper is loaded before you begin.
Note: If you are printing from a computer, make sure you installed the network software as described on
the Start Here sheet.
1. Hold down the Wi-Fi button and press the network status button until the Wi-Fi light and
Wi-Fi Direct light flash alternately. Then release both buttons.
After both lights stop flashing, the Wi-Fi Direct light remains on.
28

2. Hold down the network status button on the product for at least five seconds to print a network
status sheet.
Note: If you release the button before five seconds has passed, a network connection report is
printed instead of a network status sheet. The network connection report may be printed in a
different language depending on your region, and cannot be changed.
3. Use your computer or wireless device to select the Wi-Fi network name (SSID) and enter the
password listed in the Wi-Fi Direct section of the network status sheet.
Note: If you are connecting an Android device, the Wi-Fi and Wi-Fi Direct lights flash
simultaneously. Do one of the following:
• Press the Wi-Fi button to connect the device, if necessary.
• Press the stop button to cancel the connection request.
You should now be able to print to your product directly from your computer or device. If you cannot
print successfully, repeat the process above and make sure you enter the password exactly as
written on the network status sheet.
Parent topic: Wi-Fi Direct Mode Setup
Related tasks
Printing a Network Status Sheet
Wi-Fi Protected Setup (WPS)
If your network uses a WPS-enabled wireless router or access point, you can quickly connect your
product to the network using Wi-Fi Protected Setup (WPS).
Note: To check if your router is WPS-enabled, look for a button labeled WPS on your router or access
point. If there is no hardware button, there may be a virtual WPS button in the software for the device.
Check your network product documentation for details.
Using WPS to Connect to a Network
Parent topic: Wi-Fi Networking
Using WPS to Connect to a Network
If you have a WPS-enabled router or access point, you can use Wi-Fi Protected Setup (WPS) to connect
your device to the network.
29

Note: To check if your router is WPS-enabled, look for a button labeled WPS on your router or access
point. If there is no hardware button, there may be a virtual WPS button in the software for the device.
Check your network product documentation for details.
1. Press the WPS button on your router or access point.
2. Hold down the Wi-Fi button on your product for about five seconds until the Wi-Fi light and WiFi Direct light flash alternately.
The Wi-Fi light turns green to indicate a successful connection.
Note: Be sure to press and hold the Wi-Fi button on your product within 2 minutes of pressing the
WPS button on your router or access point.
Parent topic: Wi-Fi Protected Setup (WPS)
Printing a Network Status Sheet
You can print a network status sheet to help you determine the causes of any problems you may have
using your product on a network.
To print the status sheet, hold down the network status button on the product for at least five seconds.
Note: If you release the button before five seconds has passed, a network connection report is printed
instead of a network status sheet. The network connection report may be printed in a different language
depending on your region, and cannot be changed.
Examine the settings shown on the network status sheet to diagnose any problems you may have.
Parent topic: Wi-Fi Networking
Related tasks
Printing a Network Connection Report
Printing a Network Connection Report
You can print a network connection report to view solutions to any problems you may have using your
product on a network.
To print the report, press the network status button on the product.
Examine the error codes and solutions shown on the network connection report.
Network Connection Report Codes and Messages
30
Loading...