


 Loading...
XP-400
Small-in-OneTM Printer
Quick Guide
Your XP-400 . . . . . . . . . . . . . . . . . . . . . . . . . . . . . . . . . . . . . . . . . . . . . . . . . . . 2 Using Special Papers . . . . . . . . . . . . . . . . . . . . . . . . . . . . . . . . . . . . . . . . . . . . 4 Copying a Document or Photo . . . . . . . . . . . . . . . . . . . . . . . . . . . . . . . . . . . . . 6 Printing From a Memory Card . . . . . . . . . . . . . . . . . . . . . . . . . . . . . . . . . . . . . 7 Printing From Your Computer. . . . . . . . . . . . . . . . . . . . . . . . . . . . . . . . . . . . . . 9 Scanning a Document or Photo . . . . . . . . . . . . . . . . . . . . . . . . . . . . . . . . . . . 13 Maintaining Your Printer . . . . . . . . . . . . . . . . . . . . . . . . . . . . . . . . . . . . . . . . . 16 Solving Problems . . . . . . . . . . . . . . . . . . . . . . . . . . . . . . . . . . . . . . . . . . . . . . 22 Notices . . . . . . . . . . . . . . . . . . . . . . . . . . . . . . . . . . . . . . . . . . . . . . . . . . . . . . 26
Your XP-400
After you set up your XP-400 (see the Start Here sheet), turn to this Quick Guide and your online User’s Guide for instructions on using your product.
Features |
Where to find information |
Wireless printing from mobile devices with |
See www.epson.com/connect. |
EPSON Connect™ |
|
Print photos without a computer |
See page 7 for instructions. |
|
|
Crop photos and print in various layouts directly |
See the online User’s Guide for instructions. |
from your camera’s memory card |
|
|
|
Get high-quality copies with one touch |
See page 6 for instructions. |
|
|
Restore faded colors in old photos as you copy |
See the online User’s Guide for instructions. |
|
|
Share the product on your wireless network |
See the Start Here sheet and the online |
|
User’s Guide. |
|
|
Individual ink cartridges available in different |
See page 18 for instructions. |
sizes and colors |
|
|
|
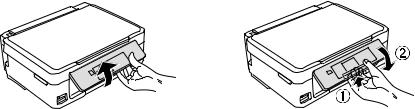
Using the Control Panel
The control panel is adjustable. Squeeze the release bar underneath to raise or lower it as shown.
Caution: The touch panel responds only to direct finger touch. Make sure you press the touch panel gently with the tip of your finger, and do not use any objects such as a pencil or pen.
Note: To turn off the “beep” heard when you press a button, select F Setup > Printer Setup > Sound > Off.
2 Your XP-400

The control panel makes it easy to use all the features of your product. To save energy, the control panel goes dark after several minutes of inactivity. Press any button to wake it up.
|
|
|
|
|
|
LCD |
Arrow buttons and OK button |
|||||||||
Power button |
|
|
|
|
|
screen |
|
|
|
|
|
|
|
|
Stop button |
|
|
|
|
|
|
|
|
|
|
|
|
|
|||||
|
|
|
|
|
|
|
|
|
|
|
|
|
|
|
||
|
|
|
|
|
|
|
|
|
|
|
|
|
|
|
||
|
|
|
|
|
|
|
|
|
|
|
|
|
|
|
||
|
|
|
|
|
|
|
|
|
|
|
|
|
|
|
||
|
|
|
|
|
|
|
|
|
|
|
|
|
|
|
||
|
|
|
|
|
|
|
|
|
|
|
|
|
|
|
|
|
WiFi light |
|
|
|
|
|
|
|
|
|
|
|
|
|
|
||
|
|
|
|
|
|
|
|
|
|
|||||||
|
|
|
|
|
|
|
|
|
|
|
|
|
||||
|
|
|
|
|
|
|
|
|
|
|
|
|
|
|
|
|
|
|
|
|
Home button |
Back button Start |
button |
||||||||||
Here’s how the buttons and light work:
Button Description
PTurn the product on or off
Green light indicates that the product is connected to your wireless network
Return to the Home screen
+Select a photo to print, or increase the number of copies
–Decrease the number of copies
yStop the current operation or reset settings
l, r, Access more options or display more photos u, d
OK Confirm your selection
yCancel the current operation and return to the previous screen
xStart printing, copying, or scanning
Using the Control Panel 3
Using Special Papers
Epson offers a wide array of high quality papers, making it easy to maximize the impact of your photos, presentations, and creative projects.
You can purchase genuine EPSON ink and paper at EPSON® Supplies Central® at www.epson.com/ink3 (U.S. sales) or www.epson.ca (Canadian sales). You can also purchase supplies from an EPSON authorized reseller. To find the nearest one, call 800-GO-EPSON (800-463-7766).
|
|
|
Part |
Sheet |
|
Paper type |
Size |
number |
count |
||
EPSON Ultra Premium Photo Paper |
4 |
× 6 inches (102 × 152 mm) |
S042181 |
60 |
|
Glossy |
|
|
S042174 |
100 |
|
|
|
|
|
|
|
|
5 |
× 7 inches (127 × 178 mm) |
S041945 |
20 |
|
|
|
|
|
|
|
|
8 |
× 10 inches (203 × 254 mm) |
S041946 |
20 |
|
|
|
|
|
||
|
Letter (8.5 × 11 inches |
S042182 |
25 |
||
|
[216 × 279 mm]) |
S042175 |
50 |
||
|
|
|
|
|
|
EPSON Premium Photo Paper Glossy |
4 |
× 6 inches (102 × 152 mm) |
S041808 |
40 |
|
|
|
|
S041727 |
100 |
|
|
|
|
|
|
|
|
5 |
× 7 inches (127 × 178 mm) |
S041464 |
20 |
|
|
|
|
|
|
|
|
8 |
× 10 inches (203 × 254 mm) |
S041465 |
20 |
|
|
|
|
|
||
|
Letter (8.5 × 11 inches |
S042183 |
25 |
||
|
[216 × 279 mm]) |
S041667 |
50 |
||
|
|
|
|
|
|
EPSON Premium Photo Paper Semi- |
4 |
× 6 inches (102 × 152 mm) |
S041982 |
40 |
|
gloss |
|
|
|
|
|
Letter (8.5 × 11 inches |
S041331 |
20 |
|||
|
|||||
|
[216 × 279 mm]) |
|
|
||
|
|
|
|
||
EPSON Photo Paper Glossy |
4 × 6 inches (102 × 152 mm) |
S041809 |
50 |
||
|
|
|
S042038 |
100 |
|
|
|
|
|
||
|
Letter (8.5 × 11 inches |
S041141 |
20 |
||
|
[216 × 279 mm]) |
S041649 |
50 |
||
|
|
|
S041271 |
100 |
|
|
|
|
|
||
EPSON Bright White Paper |
Letter (8.5 × 11 inches |
S041586 |
500 |
||
|
[216 × 279 mm]) |
|
|
||
|
|
|
|
||
EPSON Brochure & Flyer Paper Matte |
Letter (8.5 × 11 inches |
S042384 |
150 |
||
Double-sided |
[216 × 279 mm]) |
|
|
||
|
|
|
|
||
EPSON Ultra Premium Presentation |
Letter (8.5 × 11 inches |
S041341 |
50 |
||
Paper Matte |
[216 × 279 mm]) |
|
|
||
|
|
|
|
|
|
EPSON Premium Presentation Paper |
8 |
× 10 inches (203 × 254 mm) |
S041467 |
50 |
|
Matte |
|
|
|
|
|
Letter (8.5 × 11 inches |
S041257 |
50 |
|||
|
|||||
|
[216 × 279 mm]) |
S042180 |
100 |
||
|
|
|
|
|
|
4 Using Special Papers

|
|
Part |
Sheet |
Paper type |
Size |
number |
count |
EPSON Premium Presentation Paper |
Letter (8.5 × 11 inches |
S041568 |
50 |
Matte Double-sided |
[216 × 279 mm]) |
|
|
|
|
|
|
EPSON Presentation Paper Matte |
Letter (8.5 × 11 inches |
S041062 |
100 |
|
[216 × 279 mm]) |
|
|
|
|
|
|
|
Legal (8.5 × 14 inches |
S041067 |
100 |
|
[216 × 356 mm]) |
|
|
|
|
|
|
EPSON Photo Quality Self-adhesive |
A4 (8.3 × 11.7 inches |
S041106 |
10 |
Sheets |
[210 × 297 mm]) |
|
|
|
|
|
|
EPSON Iron-on Cool Peel Transfer |
Letter (8.5 × 11 inches |
S041153 |
10 |
paper |
[216 × 279 mm]) |
|
|
|
|
|
|
Note: Media availability varies by country.
For detailed paper loading instructions, see the Start Here sheet or online User’s Guide.
For best results:
■Fan and align the edges of the paper before loading.
■Do not use paper with binder holes.
■Load paper against the right edge guide and behind the tab with the glossy or printable side faceup. (Load letterhead or pre-printed paper top edge first.)
■Always load paper short edge first and make sure the left edge guide is against the paper as shown.
See your online User’s Guide for more information.
Using Special Papers 5

Copying a Document or Photo
Follow the instructions in this section to position your originals correctly on the scanner glass and make color or black-and-white copies. You can also restore color in old photos as you copy them; see the online User’s Guide for more information.
1.Make sure paper is loaded.
2.Raise the document cover and place your original facedown on the scanner glass, with the top facing into the front right corner.
3.Close the cover gently so you don’t move the original.
4.Press  if necessary, then use the arrows to select r Copy and press OK.
Note: If you want to restore color in an old photo, select More Functions and then Copy/Restore Photos. Then follow the instructions on the LCD screen.
5.To print more than 1 copy, press + or – to select the number (up to 99).
6.Press l or r to select Color or B&W copies.
7.To adjust any other settings, press d, then press OK to select Print Settings.
8.Press u or d to select different settings, and press l or r to make adjustments.
9.Press x to begin copying. To cancel copying, press y.
6 Copying a Document or Photo
Printing From a Memory Card
Your product lets you print photos directly from your digital camera’s memory card; just insert it into the memory card slot and you’re ready to print.
You can also print in various layouts to include several photos on one sheet of paper, or copy memory card files between your EPSON product and a computer. See the online User’s Guide for instructions and a list of compatible memory cards.
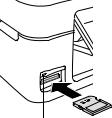
Inserting the Card
1.Make sure your product is turned on.
2.Insert your card as shown.
Caution: Do not force the card into the slot; it won’t go in all the way.
The memory card access light flashes, then stays lit. Now you can view your photos on the LCD screen and print them (see page 8).
Removing the Card
After you finish printing your photos, follow these steps to remove the card:
Memory card access light
1.Make sure the memory card access light is not flashing.
Caution: Do not remove the card or turn off your product while the memory card access light is flashing; you may lose data on the card.
2.If the product is connected to your computer with a USB cable, do one of the following before removing the memory card or turning off the product:
Windows®: Right-click the name of your card (removable disk) in Computer, My Computer, or Windows Explorer, and select Eject.
Mac OS X: Drag the  removable disk icon from your desktop into the trash, then remove the card.
3.Pull the card straight out of its slot.
Printing From a Memory Card 7
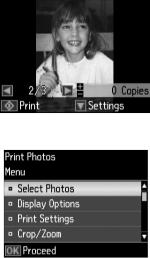
Printing Photos From the LCD Screen
You can select individual photos for printing as you view them on the LCD screen.
1.Load several sheets of 4 × 6-inch (102 × 152 mm) EPSON photo paper (various types available; see page 4).
2.Press  if necessary, then select Print photos and press OK. (If you want to print multiple photos on one sheet of paper, press
  if necessary, select More Functions, then Photo Layout Sheet.)
3.Press l or r to scroll through your photos and display one that you want to print.
4.Press + or – to select the number of copies you want of that photo.
5.Repeat steps 3 and 4 to select more photos.
6.To select settings, press d.
7.Select the setting you want to change, then press OK and change settings as necessary. You can select the following:
■Select Photos to view and select photos by date
■Display Options to view 9 small thumbnail images on the LCD screen
■Print Settings to change paper size, type, borders, or fix red-eye
■Crop/Zoom to zoom your photo and crop the printed image
For more information on these features, see your online User’s Guide
8.When you’re ready to print, press x. To cancel printing, press y .
8 Printing Photos From the LCD Screen
Printing From Your Computer
This section describes the basic steps for printing from a Windows or Mac® computer. For detailed instructions on printing, see the online User’s Guide.
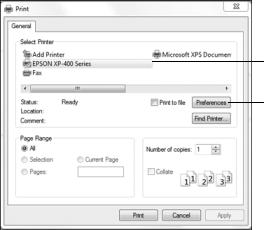
Printing in Windows
1.Select the print command in your application. You see a window like this one:
Select your EPSON product
Click here to open your product software
2.Make sure your EPSON product is selected, then click the Preferences or
Properties button.
(If you see a Setup, Printer, or Options button, click it. Then click Preferences or Properties on the next screen.)
Printing From Your Computer 9

3.On the Main tab, select the basic print settings. Make sure you choose the correct paper Type and Size settings for the paper you are using (see page 12 for details).
Select the type of document you’re printing (choose Photo or Best Photo for pictures)
Select your paper Type
Select your paper Size
Select your document
Orientation
Note: For quick access to the most common settings, click the Shortcuts tab and select one of the presets. You can create your own presets by clicking the Save Settings button on the Advanced tab.
4.If you want to reduce or enlarge your printout, or print double-sided, click the Page Layout tab and select settings as necessary.
5.For more printing options, click the Advanced tab.
Note: For more information about print settings, click Help or see your online
User’s Guide.
6.Click OK to save your settings.
7.Click OK or Print to start printing. A window appears and shows the progress of your print job.
10 Printing in Windows
Loading...