


Basic Guide
Contents
Contents
Introduction. . . . . . . . . . . . . . . . . . . . . . . . . 2
Where to Find Information. . . . . . . . . . . . . . . . . . . 2 Caution, Important and Note. . . . . . . . . . . . . . . . . 2 Using Epson Connect Service. . . . . . . . . . . . . . . . . 2
Safety Instructions. . . . . . . . . . . . . . . . . . . 2
Control Panel Overview. . . . . . . . . . . . . 3
Button and LCD. . . . . . . . . . . . . . . . . . . . . . . . . . . 4
Lights. . . . . . . . . . . . . . . . . . . . . . . . . . . . . . . . . . . 5
Paper and Media Handling. . . . . . . . . . 5
Selecting Paper. . . . . . . . . . . . . . . . . . . . . . . . . . . . 5
Loading Paper. . . . . . . . . . . . . . . . . . . . . . . . . . . . 5
Into the paper cassette. . . . . . . . . . . . . . . . . . . . . 5
Into the rear paper feed slot. . . . . . . . . . . . . . . . . 7
Loading a CD/DVD. . . . . . . . . . . . . . . . . . . . . . . . 8
Removing a CD/DVD. . . . . . . . . . . . . . . . . . . . . 9
Inserting a Memory Card. . . . . . . . . . . . . . . . . . . . 9
Placing Originals. . . . . . . . . . . . . . . . . . . . . . . . . . 10
Scanner glass. . . . . . . . . . . . . . . . . . . . . . . . . . 10
Copying. . . . . . . . . . . . . . . . . . . . . . . . . . . . 11
Printing Photos. . . . . . . . . . . . . . . . . . . . . 11
From a Memory Card (XP-700 Series). . . . . . . . . . 11 From a Memory Card (XP-600 Series) . . . . . . . . . . 12 From a Digital Camera. . . . . . . . . . . . . . . . . . . . . 12
Scanning. . . . . . . . . . . . . . . . . . . . . . . . . . . 13
More Functions. . . . . . . . . . . . . . . . . . . . . 13
Replacing Ink Cartridges. . . . . . . . . . . 15
Safety instructions. . . . . . . . . . . . . . . . . . . . . . . . . 15 Precautions. . . . . . . . . . . . . . . . . . . . . . . . . . . . . . 15 Replacing an ink cartridge. . . . . . . . . . . . . . . . . . . 16
Basic Troubleshooting. . . . . . . . . . . . . 17
Error Messages. . . . . . . . . . . . . . . . . . . . . . . . . . . 17
Paper Jams. . . . . . . . . . . . . . . . . . . . . . . . . . . . . . 18
Removing jammed paper from the rear cover
. . . . . . . . . . . . . . . . . . . . . . . . . . . . . . . . . . . . 18 Removing jammed paper from inside the
product. . . . . . . . . . . . . . . . . . . . . . . . . . . . . . 19 Removing jammed paper from the paper
cassette. . . . . . . . . . . . . . . . . . . . . . . . . . . . . . . 19 Print Quality Help. . . . . . . . . . . . . . . . . . . . . . . . . 20
Where To Get Help. . . . . . . . . . . . . . . . . . 20
Technical Support Web Site. . . . . . . . . . . . . . . . . . 20
English
1

Basic Guide
Introduction
Introduction
Where to Find
Information
The latest version of the following manuals are available on the Epson support website. http://www.epson.eu/Support (Europe) http://support.epson.net/ (outside Europe)
Start Here (paper):
Provides you with information on setting up the product and installing the software.
Basic Guide (paper):
Provides you with basic information when you are using the product without a computer.
User’s Guide (PDF):
Provides you with detailed operating, safety, and troubleshooting instructions. See this guide when using this product with a computer, or when using advanced features such as 2 sided copying.
To view the PDF manual, you need Adobe Acrobat Reader 5.0 or later, or Adobe Reader.
Network Guide (HTML):
Provides network administrators with information on both the printer driver and network settings.
Help (on the product display):
Provides basic operating and troubleshooting instructions on the product’s LCD screen. Select the Help menu on the control panel.
Caution, Important and
Note
Caution, Important and Note in this manual are indicated as below and have the following meaning.
!Caution
must be followed carefully to avoid bodily injury.
cImportant
must be observed to avoid damage to your equipment.
Note
contain useful tips and restrictions on product operation.
Using Epson Connect
Service
Using Epson Connect and other companies’ services, you can easily print directly from your smartphone, tablet PC or laptop, anytime and practically anywhere even across the globe! For more information about printing and other services, visit the following URL; https://www.epsonconnect.com/ (Epson Connect portal site)
http://www.epsonconnect.eu/ (Europe only)
You can view the Epson Connect guide by double-clicking the  shortcut icon on the desktop.
Safety Instructions
Read and follow these instructions to ensure safe use of this product. Make sure you keep this guide for future reference. Also, be sure to follow all warnings and instructions marked on the product.
2
Basic Guide
Control Panel Overview
Use only the power cord supplied with the product and do not use the cord with any other equipment. Use of other cords with this product or the use of the supplied power cord with other equipment may result in fire or electric shock.
Be sure your AC power cord meets the relevant local safety standard.
Never disassemble, modify, or attempt to repair the power cord, plug, printer unit, scanner unit, or options by yourself, except as specifically explained in the product’s guides.
Unplug the product and refer servicing to qualified service personnel under the following conditions: The power cord or plug is damaged; liquid has entered the product; the product has been dropped or the casing damaged; the product does not operate normally or exhibits a distinct change in performance. Do not adjust controls that are not covered by the operating instructions.
Place the product near a wall outlet where the plug can be easily unplugged.
Do not place or store the product outdoors, near excessive dirt or dust, water, heat sources, or in locations subject to shocks, vibrations, high temperature or humidity.
Take care not to spill liquid on the product and not to handle the product with wet hands.
Keep this product at least 22 cm away from cardiac pacemakers. Radio waves from this product may adversely affect the operation of cardiac pacemakers.
If the LCD screen is damaged, contact your dealer. If the liquid crystal solution gets on your hands, wash them thoroughly with soap and water. If the liquid crystal solution gets into your eyes, flush them immediately with water. If discomfort or vision problems remain after a thorough flushing, see a doctor immediately.
Note:
The following provides safety instructions for ink cartridges.
& “Replacing Ink Cartridges” on page 15
Control Panel Overview
Note:
Control panel design varies depending on location.
Although the control panel design and what displayed on the LCD screen such as menu names and option names may differ from your actual product, the method of operation is the same.
English
3
Basic Guide
Control Panel Overview
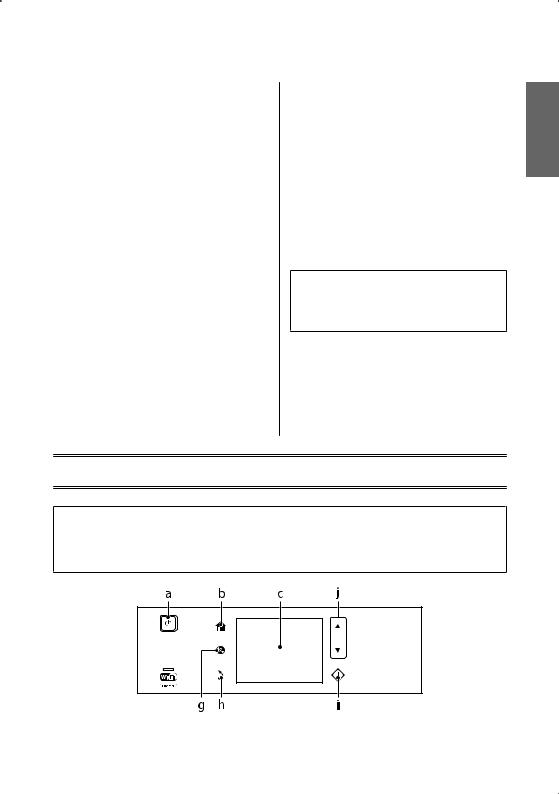
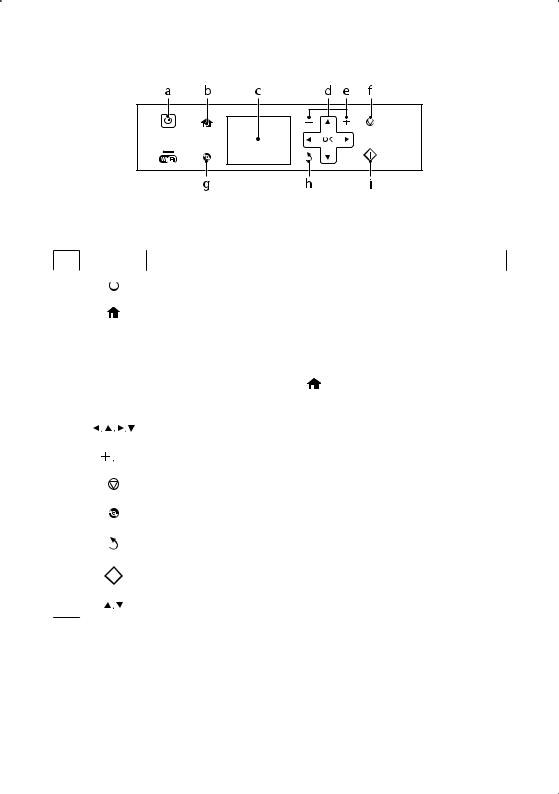
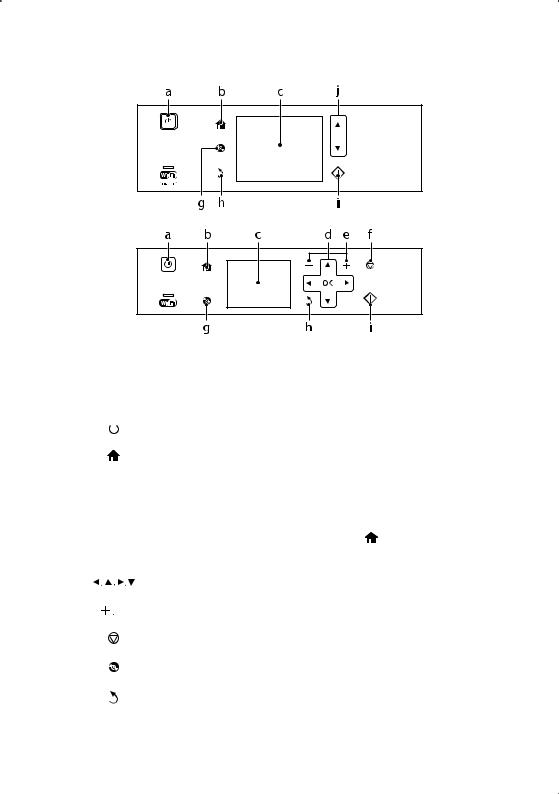
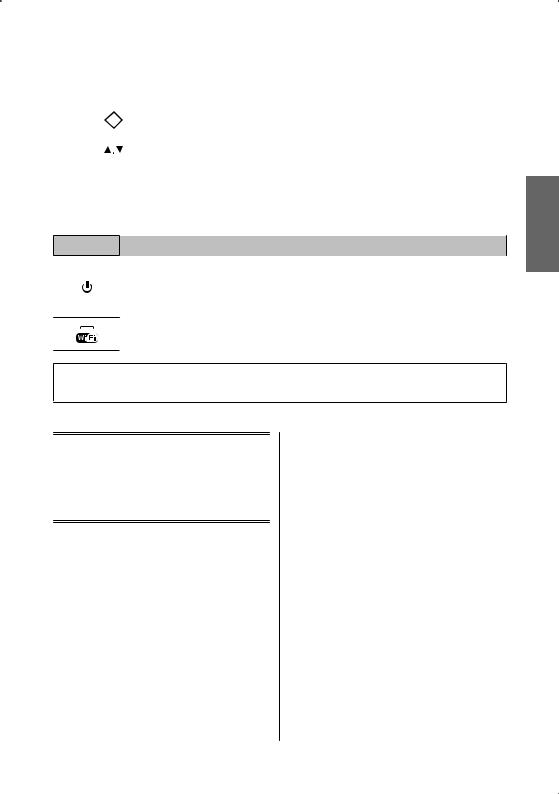
Button and LCD
|
Buttons |
Function |
||
a |
|
|
Turns the product on or off. |
|
|
||||
|
|
|||
b |
Displays the Home menu. |
|||
|
|
|||
c |
LCD screen displays menus. |
|||
|
|
|
|
If your product has a touch panel, you can scroll the screen by swiping the LCD screen. |
|
|
|
|
Try swiping a bit harder if the touch panel is slow to respond. |
-Menus are displayed depending on the action you perform, such as inserting a memory card.
|
|
|
If the menu you want is not displayed, press |
. To disable automatic menu selection, turn off each |
|
|
|
item in the Auto Selection Mode menu. |
|
|
|
|
Setup > Guide Functions > Auto Selection Mode* |
|
|
|
|
||
d |
|
Press l, u, r, d to select menus. Press OK to confirm the setting you have selected and go to next |
||
|
|
|
screen. |
|
|
|
|
|
|
e |
|
Sets the number of copies and prints. |
|
|
|
|
|
||
f |
|
Stops the current operation or initializes the current settings. |
||
|
|
|
|
|
g |
|
Press to display the CD/DVD label menu. |
|
|
|
|
|
The product prepares CD/DVD label printing. |
|
|
|
|
|
|
h |
|
Cancels/returns to the previous menu. |
|
|
|
|
|
|
|
i |
|
Starts copying/printing/scanning. |
|
|
|
|
|
|
|
|
|
|
|
|
j |
|
Scrolls the screen. |
|
|
* Auto Selection Mode is not available for the XP-600 Series.
4
Basic Guide
Paper and Media Handling
Lights
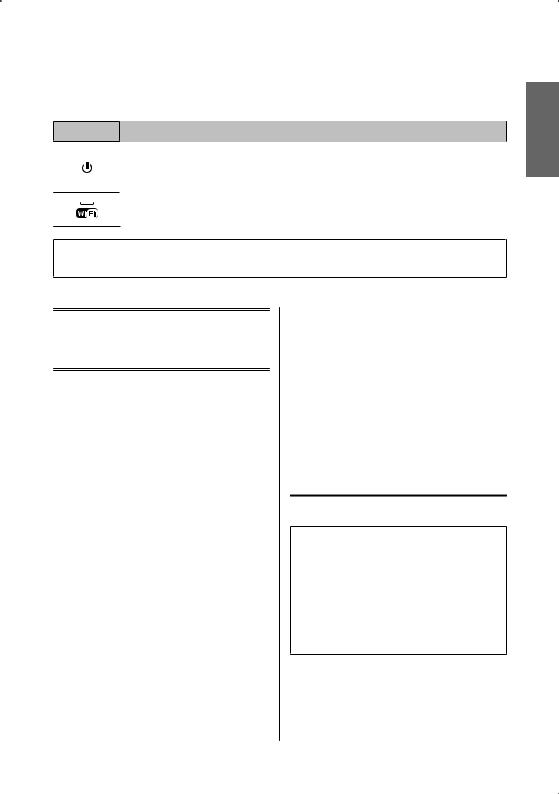
Lights Function
On when the product is on.
Flashes when the product is receiving data, printing/copying/scanning, replacing an ink cartridge, charging ink, or cleaning the print head.
Flashes slowly when the product is in sleep mode.
Stays on while the printer is connected to a network. Flashes while network settings are being adjusted (green: Wi-Fi/orange: Ethernet).
Note:
See the Help on the control panel for more information on the icons displayed on the LCD screen.
Paper and Media
Handling
Selecting Paper
The product automatically adjusts itself for the type of paper you select in your print settings. That is why the paper type setting is so important. It tells your product what kind of paper you are using and adjusts the ink coverage accordingly. The table below lists the settings you should choose for your paper.
For this paper |
LCD paper type |
|
|
Plain paper* |
Plain Paper |
|
|
Epson Bright White Ink Jet |
Plain Paper |
Paper* |
|
|
|
Epson Ultra Glossy Photo |
Ultra Glossy |
Paper |
|
|
|
Epson Premium Glossy Photo |
Prem. Glossy |
Paper |
|
|
|
Epson Premium Semigloss |
Prem. Glossy |
Photo Paper |
|
|
|
Epson Glossy Photo Paper |
Glossy |
|
|
Epson Photo Paper |
Photo Paper |
|
|
Epson Photo Quality Ink Jet |
Matte |
Paper |
|
|
|
Epson Matte Paper– |
Matte |
Heavyweight |
|
|
|
Epson Double-Sided Matte |
Matte |
Paper |
|
|
|
Epson Photo Stickers |
Photo Sticker |
|
|
* You can perform 2-sided printing with this paper.
Loading Paper
Into the paper cassette
Note:
Although the instructions in this section are based on cassette 2, the method of operation is the same for cassette 1.
The available paper type, size and loading capacity differs between cassette 1 and 2. See the PDF User’s Guide for more information.
For instructions on loading envelopes or a Photo Stickers sheet, see the User’s Guide PDF.
English
5
Basic Guide
Paper and Media Handling
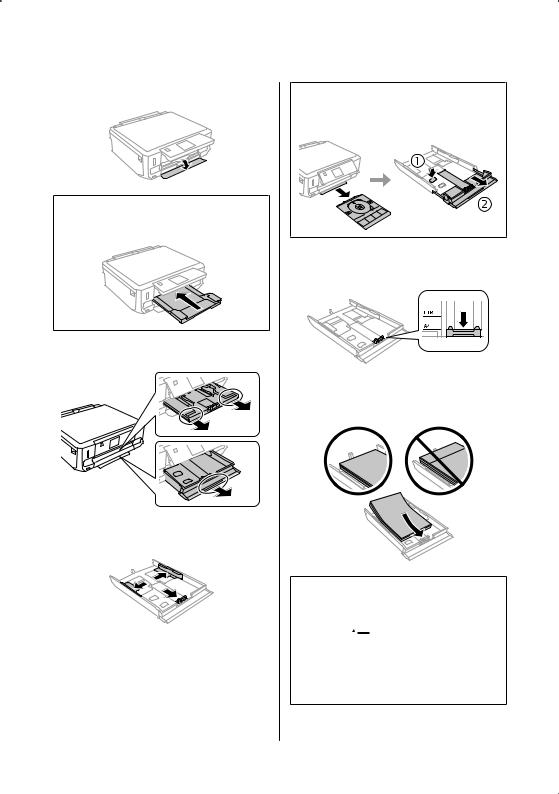
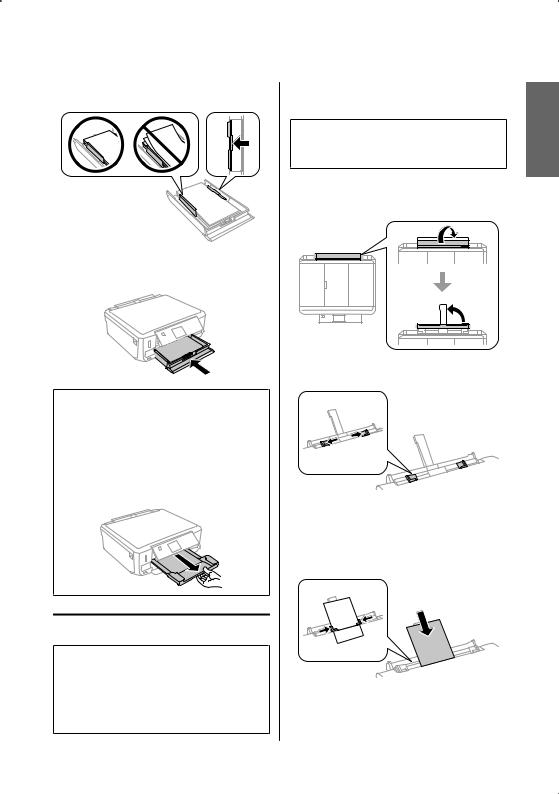
A Open the front cover.
Note:
If the output tray has been ejected, close it before pulling out the paper cassette.
B Pull out the paper cassette.
C Slidecassette.the edge guides to the sides of the paper
Note:
When using Legal-size paper, remove the CD/DVD tray, and then extend cassette 2 as shown in the illustration.
D Slidewill use.the edge guide to adjust to the paper size you
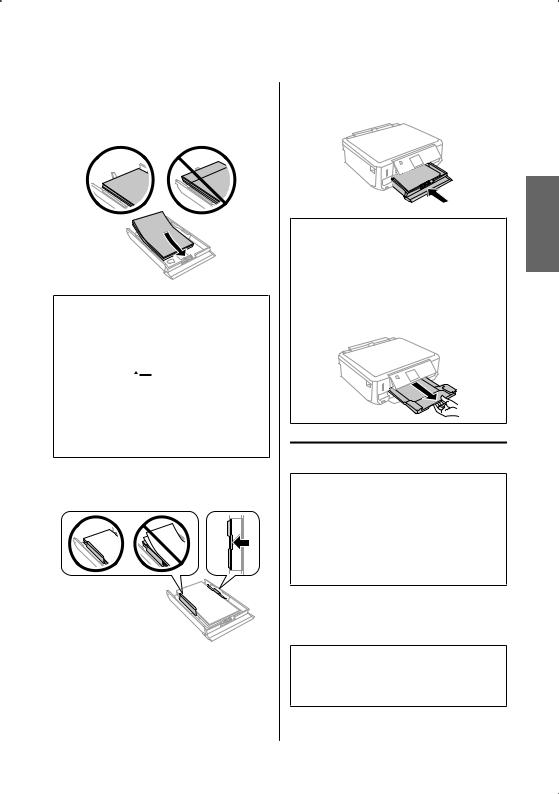
ELoad paper toward the edge guide with printable side face-down, and check that the paper is not sticking out from the end of the cassette.
Note:
Fan and align the edges of the paper before loading.
For plain paper, do not load paper above the line just under the  arrow mark inside the edge guide. For Epson special media, make sure the number of sheets is less than the limit specified for the media.
When you select Cassette 1>Cassette 2 as the Paper Source, load the same size and type of paper in both cassettes.
6
Basic Guide
Paper and Media Handling
F Slide the edge guides to the edges of the paper.
GKeep the cassette flat and insert it back into the product carefully and slowly.
Note:
Leave enough space in front of the product for the paper to be fully ejected.
Do not remove or insert the paper cassette while the product is operating.
For the XP-600 Series only, you need to pull out the output tray manually. Also make sure the control panel is raised.
Into the rear paper feed slot
Note:
The rear paper feed slot is not available for the XP-600 Series.
Even though you can print on paper with a thickness of 0.05 to 0.6 mm, some hard paper may not be fed correctly even if the thickness is within this range.
ASend your print job to the product (from your computer, or by using the control panel).
Note:
Before sending your print job, you cannot load paper into the rear paper feed slot.
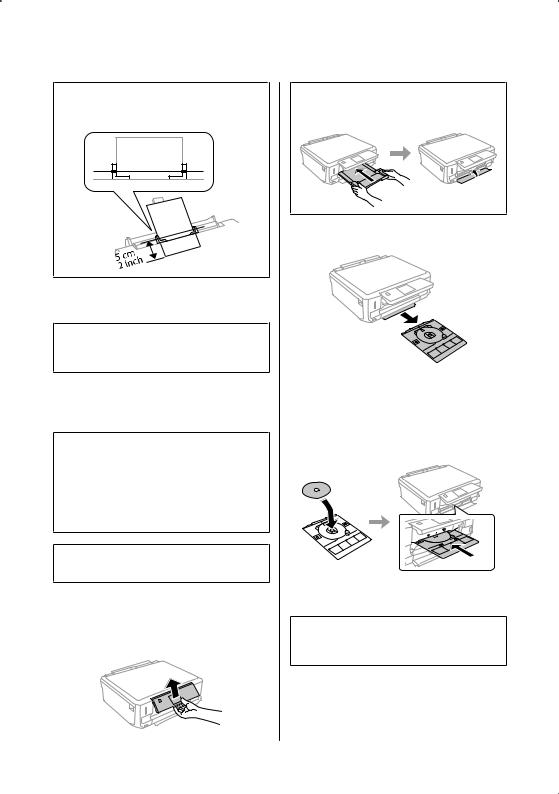
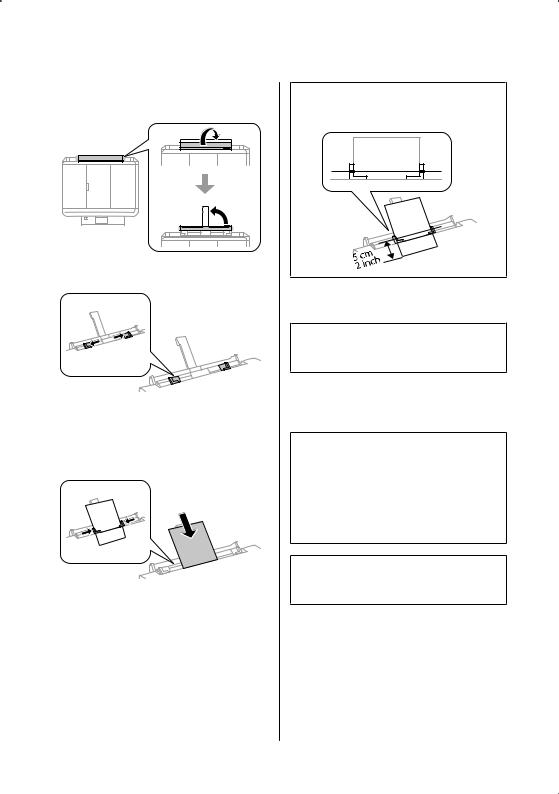
BOpen the rear paper feed slot cover and then pull out the paper support.
C Slide the edge guide.
DLoad a single sheet of paper with the printable side face-up at the center of the rear paper feed slot, and then set the edge guide. The printable side is often whiter or brighter than the other side.
English
7
Basic Guide
Paper and Media Handling
Note:
Insert the paper so that the leading edge is approximately 5 cm from the groove in the edge guides.
E Press x.
Note:
The paper ejects automatically after a certain period of time.
Loading a CD/DVD
cImportant:
Do not insert the CD/DVD tray while the product is operating. Otherwise, your product may be damaged or the surface of the CD/DVD may become dirty or scratched.
When ejecting/inserting the CD/DVD tray, make sure nothing is placed on the output tray.
Note:
You can also print on a Blu-ray Disc™.
APress  on the control panel, and then select
Load CD/DVD.
B Raise the panel as far as it will go.
Note:
If the output tray has been ejected, close the tray and the front cover.
C Remove the CD/DVD tray from the product.
DPlace a CD/DVD on the CD/DVD tray with the printable side face-up, and then insert the tray into the product. Make sure that the u marks on the tray and the d marks on the product match, so that the line on the tray aligns with the product.
E Press Done on the LCD screen.
Note:
The CD/DVD tray ejects automatically after a certain period of time.
8
Basic Guide
Paper and Media Handling
Removing a CD/DVD
ARemove the CD/DVD tray from the product, and then remove your CD/DVD from the tray.
!Caution:Be careful not to scratch the surface of the CD/DVD when removing it.
B Lower the control panel.
CInsert the CD/DVD tray back into the slot on the bottom of the product.
Inserting a Memory Card
You can print photos in a memory card or save a scanned data in a memory card. The following memory cards are supported.
SD, miniSD, microSD, SDHC, miniSDHC, microSDHC, SDXC, microSDXC, MultiMediaCard, MMCplus, MMCmobile, MMCmicro, Memory Stick Duo, Memory Stick PRO Duo, Memory Stick PRO-HG Duo, Memory Stick Micro, MagicGate Memory Stick Duo, CompactFlash*, Microdrive*
Note:
Cards marked with an asterisk (*) are not available for the XP-600 Series.
cImportant
The following memory cards require an adapter. Attach it before inserting the card into the slot, otherwise the card may get stuck.
miniSD, microSD, miniSDHC, microSDHC, microSDXC, MMCmicro
MMCmobile
Memory Stick Micro
A Open the cover, and insert one card at a time.
Note:
The cover may not be available depending on the product.
English
9
Basic Guide
Paper and Media Handling
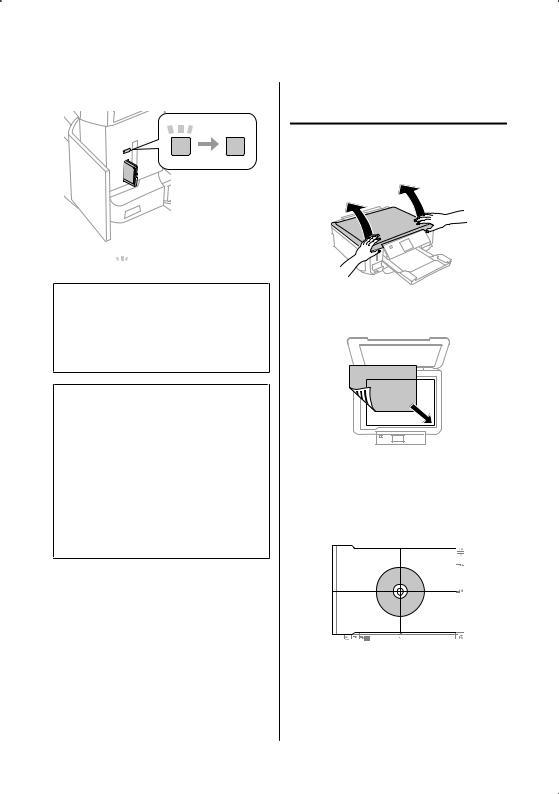
B Check the light stays on.
 = on,
= on,  = flashing
cImportant
Do not try to force the card all the way into the slot. It should not be fully inserted.
Do not remove the memory card while the light is flashing. The data in the memory card may be lost.
Note:
If you have more than 999 images on your memory card, images are automatically divided into groups and the group selection screen is displayed. Select the group that contains the image you want to print.
Images are sorted by the date they were taken.
To select another group for XP-700 Series, select Print Photos on the Home menu. Next, select
Options, Select Location, and then Select Folder or Select Group.
To select another group for XP-600 Series, remove and reinsert the memory card, and then select the group.
Placing Originals
Scanner glass
A Open the document cover.
BPlace your original face-down on the scanner glass, and slide it to the front-right corner.
C Close the cover gently.
Placing a CD
Place the CD in the center.
10

Basic Guide
Copying
Placing photos
Place photos 5 mm apart.
Note:
You can copy one photo or multiple photos of different sizes at the same time, as long as they are larger than 30 x 40 mm.
Copying
Follow the steps below to copy documents.
ALoad paper in the cassette 2.
& “Into the paper cassette” on page 5
BPlace original.
& “Placing Originals” on page 10
C Enter Copy mode from the Home menu.
D Press + or - to set the number of copies.
E Set the color.
F Press d to make the copy settings.
GSelect the appropriate copy settings such as paper size, paper type, and paper quality.
Note:
Depending on the model, you can make copy settings in Paper and Copy Settings.
You can preview the copy results before you start copying.
You can make various layout copies such as 2-sided copy, 2-up copy, and so on. Change the 2-sided or layout settings as necessary.
H Press x to start copying.
Note:
Refer to the PDF User’s Guide for other copying functions and the Copy mode menu list.
Printing Photos
From a Memory Card
(XP-700 Series)
ALoad photo paper in the paper cassette. & “Into the paper cassette” on page 5
BInsert a memory card.
& “Inserting a Memory Card” on page 9
Note:
You can also print photos from an external USB device.
C Enter Print Photos mode from the Home menu.
English
11

Basic Guide
Printing Photos
DSelect a photo and press + or - to set the number of copies.
Note:
You can crop and enlarge your photo. Press Edit and Crop/Zoom, and then make the settings.
To select more photos, press y and repeat step 4.
If you want to correct your images, press Edit and Photo Adjustments, and then make the settings. Scroll down if necessary.
EPress Settings, and then make the print settings. Scroll down if necessary.
F Press x to start printing.
Note
Refer to the PDF User’s Guide for other printing functions and the Print Photos mode menu list.
From a Memory Card
(XP-600 Series)
ALoad photo paper in the paper cassette. & “Into the paper cassette” on page 5
BInsert a memory card.
& “Inserting a Memory Card” on page 9
Note:
You can also print photos from an external USB device.
C Enter Print Photos mode from the Home menu.
DSelect a photo and press + or - to set the number of copies.
Note:
You can make print settings and crop/enlarge your photo. Press d and select Print Settings or Crop/ Zoom, and then make the settings.
To select more photos, repeat step 4.
If you want to correct your images, press d and select Photo Adjustments, and then make the settings.
E Press x to start printing.
Note
Refer to the PDF User’s Guide for other printing functions and the Print Photos mode menu list.
From a Digital Camera
ALoad photo paper in the paper cassette. & “Into the paper cassette” on page 5
B Remove a memory card.
C Enter Setup mode from the Home menu.
D Enternecessary.External Device Setup. Scroll down if
E Select Print Settings.
FMake the appropriate print settings. Scroll down if necessary.
12

Basic Guide
Scanning
GConnect the camera to the product with a USB cable, and then turn on the camera.
H See your camera’s guide to print.
Compatibility |
PictBridge |
|
|
File Format |
JPEG |
|
|
Image Size |
80 × 80 pixels to 9200 × 9200 pixels |
|
|
Note:
Depending on the settings on this printer and the digital camera, some combinations of paper type, size, and layout may not be supported.
Some of the settings on your digital camera may not be reflected in the output.
Scanning
You can scan documents and send the scanned image from the product to a memory card or a connected computer.
Note:
If you want to scan your data to a memory card, insert a memory card first.
& “Inserting a Memory Card” on page 9
If you want to use the Scan to Cloud service,
double-click the shortcut icon on your desktop and check the Epson Connect guide.
APlace your original(s).
& “Placing Originals” on page 10
B |
Enter Scan mode from the Home menu. |
C |
Select a scan menu item. |
DIf you select Scan to Memory Card, you can make scanning settings.
If you select Scan to PC, select your computer.
E Press x to start scanning.
Note:
See the PDF User’s Guide for other scanning functions and the Scan mode menu list.
Your scanned image is saved.
More Functions
More Functions provides you with many special menus that make printing easy and fun! For more details, select More Functions, select each menu, and then follow the instructions on the LCD screen.
English
13

Basic Guide
|
|
More Functions |
|||||||||
|
|
|
|
|
|
|
|
|
|
|
|
Menu |
|
|
|
|
|
|
|
|
|
|
Functions |
Copy/Restore Photos |
|
|
|
|
|
|
|
|
|
|
You can make faithful copies of your originals. |
|
|
|
|
|
|
|
|
|
|
||
|
|
|
|
|
|
|
|
|
|
|
If your original photo is faded, you can restore |
|
|
|
|
|
|
|
|
|
|
|
color to bring it back to life. |
|
|
|
|
|
|
|
|
|
|
|
|
|
|
|
|
|
|
|
|
|
|
|
|
|
|
|
|
|
|
|
|
|
|
|
|
Photo Layout Sheet |
You can print your photos on a memory card in |
|
various layouts. |
Greeting Card |
You can create custom cards with handwritten |
|
messages by using an A4 template. First print a |
|
template, write your message, and then scan |
|
the template to print your cards. |
Copy to CD/DVD |
|
|
|
You can copy your photo or CD/DVD label onto |
|
|
|
|
a CD/DVD label. The image is automatically |
|
|
|
|
cropped and resized to fit the CD/DVD label. |
|
|
|
|
|
Print on CD/DVD |
|
|
|
You can create CD/DVD labels from photos on |
|
|
|
|
a memory card without using a computer. |
|
|
|
|
|
|
|
|
|
|
|
|
|
|
|
Print Ruled Papers |
|
You can print ruled paper or graph paper with |
|
|
or without a photo set as the background. |
|
|
|
|
|
|
|
|
|
|
|
|
|
|
|
|
|
|
|
|
|
|
|
|
|
|
|
|
|
|
|
|
|
14

Basic Guide
|
Replacing Ink Cartridges |
|
|
|
|
Menu |
|
Functions |
Coloring Book* |
|
You can create a coloring sheet from your |
|
|
photos or line drawings. |
|
|
|
English
*Only use the Coloring Book function for drawings and pictures that you created yourself. When using copyrighted materials, make sure you stay within the range of laws governing printing for personal use.
Replacing Ink
Cartridges
Safety instructions
Keep ink cartridges out of the reach of children.
Be careful when you handle used ink cartridges, as there may be some ink around the ink supply port. If ink gets on your skin, wash the area thoroughly with soap and water.
If ink gets into your eyes, flush them immediately with water. If discomfort or vision problems continue after a thorough flushing, see a doctor immediately.
If ink gets into your mouth, spit it out immediately and see a doctor right away.
If you remove the cartridge from the product for later use or to dispose of it, make sure you put the cap back on the cartridge’s ink supply port to prevent ink from drying out or to prevent surrounding areas from getting smeared by ink.
Do not push hard or squeeze the ink cartridges, or be careful not to drop them. Doing so may cause ink leakage.
Precautions
Epson recommends the use of genuine Epson ink cartridges. Epson cannot guarantee the quality or reliability of non-genuine ink. The use of non-genuine ink may cause damage that is not covered by Epson’s warranties, and under certain circumstances, may cause erratic product behavior. Information about non-genuine ink levels may not be displayed.
To maintain optimum print head performance, some ink is consumed from all cartridges not only during printing but also during maintenance operations such as ink cartridge replacement and print head cleaning.
Be careful not to let dust or any objects get inside the ink cartridge holder. Anything inside the holder may adversely affect the printing results or result in an inability to print.
For maximum ink efficiency, only remove an ink cartridge when you are ready to replace it. Ink cartridges with low ink status may not be used when reinserted.
Do not open the ink cartridge package until you are ready to install it in the product. The cartridge is vacuum packed to maintain its reliability. If you leave a cartridge unpacked for a long time before using it, normal printing may not be possible.
Install all ink cartridges; otherwise, you cannot print.
15
Basic Guide
Replacing Ink Cartridges
Replacing an ink cartridge
Note:
Make sure that the CD/DVD tray is not inserted in the product and that the P light is on, but not flashing.
AFor best results, gently shake only the new Black ink cartridge four or five times before opening the package.
Note:
You do not need to shake the color ink cartridges and the Photo Black ink cartridge.
Do not shake cartridges after opening the package, as they may leak.
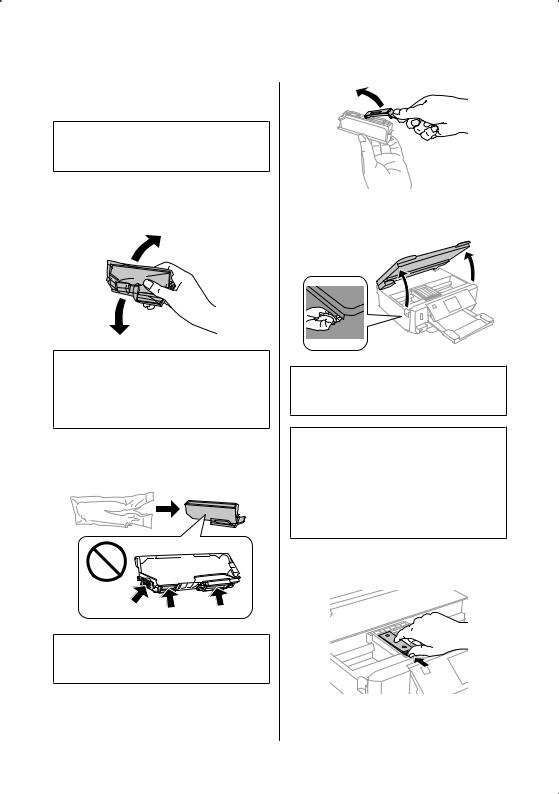
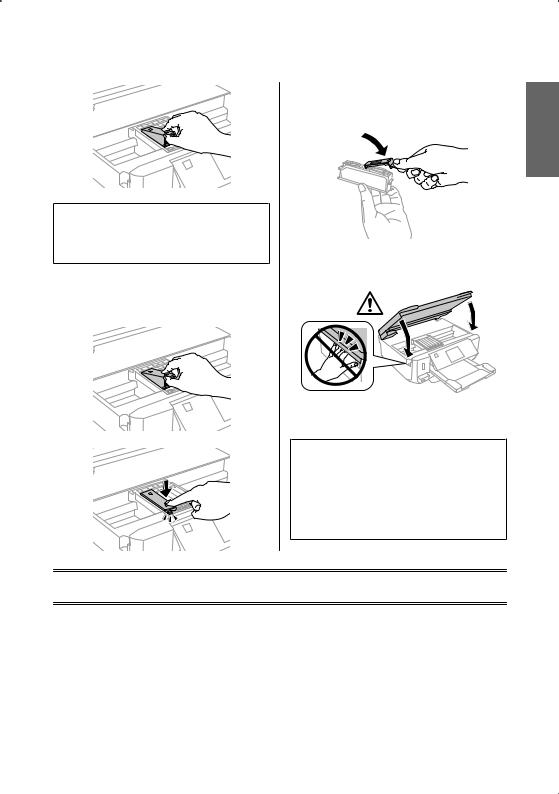
BRemove the ink cartridge from its package and then remove the cap from the bottom of the cartridge.
COpen the scanner unit. The ink cartridge holder moves to the ink cartridge replacement position.
cImportant:
Do not touch the flat white cable connected to the ink cartridge holder.
Note:
If the ink cartridge holder does not move to the ink cartridge replacement position, follow the instruction below.
Home > Setup > Maintenance > Ink Cartridge
Replacement
Do not move the ink cartridge holder by hand; otherwise, you may damage the product.
DPush the tab to unlock the ink cartridge holder and then remove the cartridge diagonally.
Note:
Do not touch the sections shown in the illustration. Doing so may prevent normal operation and printing.
16
Basic Guide
Basic Troubleshooting
Note:
The illustration shows replacement of the cartridge on the far left. Replace the cartridge appropriate to your situation.
EPut the ink cartridge head first into the ink cartridge holder. Then push the bottom of the cartridge down until it clicks into place.
FPut the cap back on to the removed cartridge’s ink supply port. Dispose of the used cartridge properly.
GClose the scanner unit. The ink cartridge holder returns to its home position.
H Follow the on-screen instruction.
Note:
The P light continues to flash while the product is charging ink. Do not turn off the product during ink charging. If the ink charging is incomplete, you may not be able to print.
Do not insert CD/DVD tray until ink charging complete.
Basic Troubleshooting
Error Messages
This section describes the meaning of messages displayed on the LCD screen.
Error Messages |
Solutions |
Paper jam |
& See “Paper Jams” on page 18 |
|
|
English
17
Basic Guide
Basic Troubleshooting
Error Messages |
Solutions |
Paper out |
& See “Loading Paper” on page 5 |
|
|
Photos not recognized. Place the photos correctly on the |
& See “Scanner glass” on page 10 |
scanner glass. |
|
|
|
Printer error. Turn the power off and on again. For details, |
Turn the product off and then back on. Make sure that no paper is |
see your documentation. |
still in the product. If the error message still appears, contact Epson |
|
support. |
|
|
Communication error. Check if a computer is connected. |
Make sure the computer is connected correctly. If the error |
|
messages still appears, make sure that scanning software is |
|
installed on your computer and that the software settings are |
|
correct. |
|
|
A printer’s ink pad is nearing the end of its service life. |
Press x to resume printing. The message will be displayed until |
Please contact Epson Support. |
the ink pad is replaced. Contact Epson support to replace ink pads |
|
before the end of their service life. When the ink pads are |
|
saturated, the printer stops and Epson support is required to |
|
continue printing. |
|
|
A printer’s ink pad is at the end of its service life. Please |
Contact Epson support to replace ink pads. |
contact Epson Support. |
|
|
|
Memory card or external device not recognized. |
Make sure memory card or external device has been inserted |
|
correctly. |
|
|
Combination of IP address and subnet mask is invalid. See |
Refer the online Network Guide. |
your documentation. |
|
|
|
Recovery Mode |
The firmware update has failed. You will need to re-attempt the |
|
firmware update. Ready a USB cable and visit your local Epson |
|
website for further instructions. |
|
|
Paper Jams
!Caution:
Never touch the buttons on the control panel while your hand is inside the product.
Note:
Cancel the print job if prompted by a message from the LCD screen or the printer driver.
After you have removed the jammed paper, press the button indicated in the LCD screen.
Removing jammed paper from the rear cover
APull out the rear cover and carefully remove the jammed paper.
18
Basic Guide
|
|
Basic Troubleshooting |
B |
Carefully remove the jammed paper. |
Open the scanner unit. Then remove all of the |
|
B paper inside, including any torn pieces. |
English
Open the rear cover and carefully remove the |
|
C jammed paper. |
c Important: |
|
|
|
Do not touch the flat white cable connected to the |
|
ink cartridge holder. |
|
C Close the scanner unit slowly. |
D Reattach the rear cover. |
|
Removing jammed paper from the paper cassette
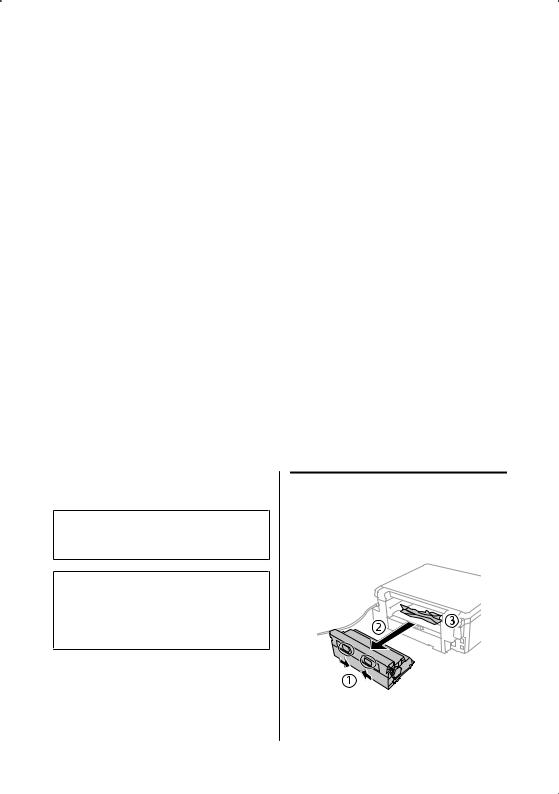
APull out the paper cassette. Then carefully remove the jammed paper.
Removing jammed paper from inside the product
A Carefully remove the jammed paper.
B Remove the jammed paper from the cassette.
19
Basic Guide
Where To Get Help
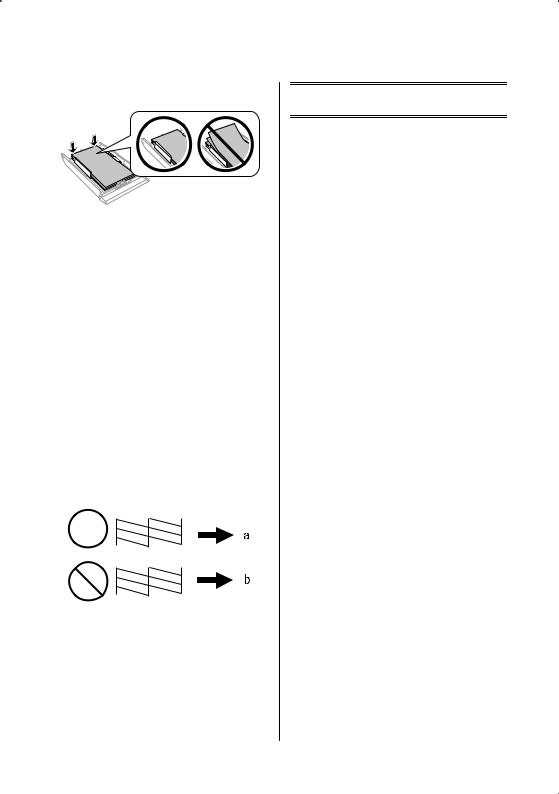
C Align the edges of the paper.
DKeep the cassette flat and slowly and carefully reinsert it all the way into the product.
Print Quality Help
If you see banding (light lines), missing colors, or any other quality problems in your printouts, try the following solutions.
Make sure you have loaded the paper and place your original correctly.
&“Loading Paper” on page 5
&“Placing Originals” on page 10
Check the paper size settings and the paper type settings.
&“Selecting Paper” on page 5
The print head may be clogged. Perform a nozzle check first and then clean the print head.
Setup > Maintenance > Nozzle Check
Where To Get Help
Technical Support Web
Site
Epson’s Technical Support Web Site provides help with problems that cannot be solved using the troubleshooting information in your product documentation. If you have a Web browser and can connect to the Internet, access the site at:
http://support.epson.net/
http://www.epson.eu/Support (Europe)
If you need the latest drivers, FAQs, manuals, or other downloadables, access the site at:
http://www.epson.com
http://www.epson.eu/Support (Europe)
Then, select the support section of your local Epson Web site.
(a)OK
(b)Needs a head cleaning
20

Guide de base
Table des matières
Table des matières
Introduction. . . . . . . . . . . . . . . . . . . . . . . . . 2
Sources d'informations. . . . . . . . . . . . . . . . . . . . . . 2 Attention, Important et Remarque. . . . . . . . . . . . . . 2 Utilisation du service Epson Connect. . . . . . . . . . . . 2
Consignes de sécurité. . . . . . . . . . . . . . . . 3
Vue d’ensemble du panneau de commande. . . . . . . . . . . . . . . . . . . . . . . . . . . 3
Touche et écran LCD. . . . . . . . . . . . . . . . . . . . . . . 4 Voyants. . . . . . . . . . . . . . . . . . . . . . . . . . . . . . . . . 5
Manipulationdupapieretdessupports
. . . . . . . . . . . . . . . . . . . . . . . . . . . . . . . . . . . . . . . 5
Sélection du papier. . . . . . . . . . . . . . . . . . . . . . . . . 5 Chargement du papier. . . . . . . . . . . . . . . . . . . . . . 6 Dans l'unité papier. . . . . . . . . . . . . . . . . . . . . . . 6 Dans la fente d’insertion arrière. . . . . . . . . . . . . . 7 Chargement d’un CD/DVD. . . . . . . . . . . . . . . . . . . 8 Retrait d’un CD/DVD. . . . . . . . . . . . . . . . . . . . . 9 Insertion d’une carte mémoire. . . . . . . . . . . . . . . . . 9 Mise en place de documents originaux. . . . . . . . . . 11 Vitre du scanner. . . . . . . . . . . . . . . . . . . . . . . . 11
Copie. . . . . . . . . . . . . . . . . . . . . . . . . . . . . . . 11 Impression de photos. . . . . . . . . . . . . . . 12
À partir d’une carte mémoire (sur le modèle
XP-700). . . . . . . . . . . . . . . . . . . . . . . . . . . . . . . . 12
À partir d’une carte mémoire (sur le modèle
XP-600) . . . . . . . . . . . . . . . . . . . . . . . . . . . . . . . . 12 À partir d’un appareil photo numérique. . . . . . . . . 13
Numérisation. . . . . . . . . . . . . . . . . . . . . . . 13 Fonctions suite. . . . . . . . . . . . . . . . . . . . . 14
Remplacement des cartouches d’encre
. . . . . . . . . . . . . . . . . . . . . . . . . . . . . . . . . . . . . 15
Consignes de sécurité. . . . . . . . . . . . . . . . . . . . . . 15 Précautions. . . . . . . . . . . . . . . . . . . . . . . . . . . . . . 16
Remplacement d'une cartouche d'encre. . . . . . . . . 16
Dépannage de base. . . . . . . . . . . . . . . . 18
Messages d'erreurs. . . . . . . . . . . . . . . . . . . . . . . . 18 Bourrages papier. . . . . . . . . . . . . . . . . . . . . . . . . . 19
Retrait du papier coincé à partir du capot
arrière. . . . . . . . . . . . . . . . . . . . . . . . . . . . . . . 19 Retrait du papier coincé à partir de l’intérieur
du produit. . . . . . . . . . . . . . . . . . . . . . . . . . . . 20 Retrait du papier coincé à partir du bac papier
. . . . . . . . . . . . . . . . . . . . . . . . . . . . . . . . . . . . 20 Aide pour les problèmes d’impression. . . . . . . . . . 21
Où trouver de l'aide. . . . . . . . . . . . . . . . 21
Site Web du support technique. . . . . . . . . . . . . . . 21
Français
1

Guide de base
Introduction
Introduction
Sources d'informations
La dernière version des manuels suivants est disponible sur le site Web d’assistance Epson. http://www.epson.eu/Support (Europe) http://support.epson.net/ (hors d’Europe)
Démarrez ici (version papier) :
Fournit des informations sur la configuration du produit et l'installation du logiciel.
Guide de base (version papier) :
Fournit des informations de base sur l’utilisation du produit sans l’aide d’un ordinateur.
Guide d'utilisation (fichier PDF) :
Fournit des consignes détaillées d’utilisation, de sécurité et de dépannage. Reportez-vous à ce guide lorsque vous utilisez le produit avec un ordinateur ou lorsque vous utilisez des fonctions avancées telles que la copie recto verso.
Pour afficher la version PDF du manuel, vous devez disposer de l’application Adobe Acrobat Reader version 5.0 ou plus récente ou de l’application Adobe Reader.
Guide réseau (fichier HTML) :
Fournit aux administrateurs du réseau des informations sur le pilote d'impression et les paramètres réseau.
Aide (sur l’écran du produit) :
Affiche des consignes de base concernant l’utilisation et le dépannage sur l’écran LCD du produit. Sélectionnez le menu Aide sur le panneau de commande.
Attention, Important et Remarque
Les indications Attention, Important et Remarque utilisées dans le présent manuel sont détaillées et expliquées ci-dessous.
!AttentionAvertissement à suivre à la lettre pour éviter des blessures corporelles.
cImportant
Mise en garde à respecter pour éviter d’endommager votre équipement.
Remarque
Conseils utiles et limitations portant sur le fonctionnement du produit.
Utilisation du service Epson Connect
Le service Epson Connect et les services d’autres entreprises vous permettent d’imprimer facilement de votre smartphone, votre tablette électronique ou votre ordinateur portable, à tout moment et de presque partout dans le monde ! Pour plus d’informations concernant l’impression et les autres services, consultez les sites suivants :
https://www.epsonconnect.com/ (site du portail Epson Connect)
http://www.epsonconnect.eu/ (Europe uniquement)
Vous pouvez afficher le guide Epson Connect en double-cliquant sur l’icône de raccourci située sur le bureau.
2

Guide de base
Consignes de sécurité
Consignes de sécurité
Lisez et respectez les consignes suivantes afin d’utiliser le produit en toute sécurité. Veillez à conserver ce guide pour pouvoir vous y reporter ultérieurement. Veillez également à suivre les avertissements et consignes repérés sur le produit.
Utilisez uniquement le cordon d’alimentation fourni avec le produit et n’utilisez jamais celui d’un autre équipement. L’utilisation d’autres cordons d’alimentation avec ce produit ou de ce cordon d’alimentation avec un autre équipement pourrait provoquer un incendie ou une décharge électrique.
Veillez à ce que votre cordon d’alimentation soit conforme aux normes de sécurité locales applicables.
Sauf mention contraire dans les guides du produit, ne procédez jamais à des travaux de démontage, de modification ou de réparation au niveau du cordon d’alimentation, de la prise, du module imprimante, du module scanner ou des accessoires.
Débranchez le produit et contactez le service qualifié dans les cas suivants : le cordon d’alimentation ou sa fiche est endommagé, du liquide a coulé dans le produit, le produit est tombé ou le boîtier a été endommagé, le produit ne fonctionne pas normalement ou ses performances ont changé de manière sensible. N'ajustez pas les commandes non traitées dans les instructions de fonctionnement.
Placez le produit à proximité d'une prise de courant permettant un débranchement facile du cordon d'alimentation.
Ne placez et ne rangez pas le produit à l'extérieur, dans des lieux particulièrement sales ou poussiéreux, à proximité de points d'eau ou de sources de chaleur, ou dans des lieux soumis à des chocs, des vibrations, des températures élevées ou de l'humidité.
Veillez à ne pas renverser de liquide sur le produit et à ne pas le manipuler si vous avez les mains mouillées.
Maintenez le produit à au moins 22 cm de distance des stimulateurs cardiaques. Les ondes radio générées par le produit peuvent affecter de manière négative le fonctionnement des stimulateurs cardiaques.
Si l'écran LCD est endommagé, contactez votre revendeur. En cas de contact de la solution à base de cristaux liquides avec vos mains, lavez-les soigneusement avec de l'eau et du savon. En cas de contact de la solution à base de cristaux liquides avec vos yeux, rincez-les abondamment avec de l’eau. Si une gêne ou des problèmes de vision subsistent après un nettoyage approfondi, consultez immédiatement un médecin.
Remarque :
La section suivante propose des consignes de sécurité concernant les cartouches d’encre :
& « Remplacement des cartouches d’encre » à la page 15
Vue d’ensemble du panneau de commande
Remarque :
La disposition du panneau de commande peut varier d’un pays à l’autre.
Malgré les différences de disposition du panneau et d’affichage de l’écran LCD (noms des menus et des options, par exemple) par rapport à votre produit, la méthode d’utilisation est la même.
Français
3
Guide de base
Vue d’ensemble du panneau de commande
Touche et écran LCD
|
Touches |
Fonction |
|
||||
a |
|
|
|
|
|
Permet de mettre le produit sous ou hors tension. |
|
|
|
||||||
|
|
|
|
||||
b |
|
|
|
|
|
Permet d’afficher le menu Accueil. |
|
|
|
|
|
||||
c |
|
|
|
|
|
L'écran LCD affiche les menus. |
|
|
|
|
|
|
|
Si votre produit dispose d’un écran tactile, vous pouvez faire défiler les options en passant votre doigt |
|
|
|
|
|
|
|
sur l’écran LCD. |
|
|
- |
|
|
Si l’écran tactile met du temps à répondre, appuyez un peu plus fort. |
|||
|
|
|
Les menus s’affichent en fonction des actions que vous réalisez, comme insérer une carte mémoire. |
||||
|
|
|
|
|
|
||
|
|
|
|
|
|
Si le menu que vous souhaitez ne s’affiche pas, appuyez sur |
. Pour désactiver la sélection |
|
|
|
|
|
|
automatique du menu, désélectionnez tous les éléments du menu Mode Sélection auto. |
|
|
|
|
|
|
|
Configuration > Fonctions Guide > Mode Sélection auto* |
|
|
|
|
|||||
d |
|
|
|
|
|
Appuyez sur l, u, r, d pour sélectionner les menus. Appuyez sur OK pour confirmer les paramètres |
|
|
|
|
|
|
|
sélectionnés et passer à l’écran suivant. |
|
|
|
|
|
|
|
||
e |
|
|
|
Permet de définir le nombre de copies et d’impressions. |
|
||
|
|
|
|||||
f |
|
|
|
|
|
Permet d’arrêter l’action en cours ou d’initialiser les paramètres définis. |
|
|
|
|
|||||
g |
|
|
|
|
|
Appuyez sur cette touche pour afficher le menu des étiquettes CD/DVD. |
|
|
|
|
|
|
|
Le produit prépare l’impression d’étiquettes de CD/DVD. |
|
|
|
|
|
||||
h |
|
|
|
|
|
Annule/renvoie au menu précédent. |
|
|
|
|
|
|
|
|
|
4
Guide de base
|
|
|
Manipulation du papier et des supports |
|
|
|
|
|
Touches |
Fonction |
|
i |
|
|
Permet de lancer la copie/l’impression/la numérisation. |
|
|
|
|
|
|
|
|
j |
|
|
Permet de faire défiler l’écran. |
|
|
|
|
* Le paramètre Mode Sélection auto n’est pas disponible pour le modèle XP-600.
Voyants
Voyants Fonction
Allumé lorsque le produit est sous tension.
Clignote lorsque le produit reçoit des données, pendant l’impression/la copie/la numérisation, pendant le remplacement d’une cartouche d’encre, pendant le chargement de l’encre ou pendant le nettoyage de la tête d’impression.
Clignote lentement lorsque le produit est en mode veille.
Reste allumé lorsque l’imprimante est connectée à un réseau. Clignote lorsque les paramètres du réseau sont en cours de modification (vert : Wi-Fi/orange : Ethernet).
Remarque :
Reportez-vous à l’Aide du panneau de commande pour plus d’informations sur les icônes affichées sur l’écran LCD.
Manipulation du papier et des supports
Sélection du papier
Le produit est automatiquement réglé en fonction du type de papier sélectionné dans les paramètres d’impression. C'est la raison pour laquelle le paramétrage du type de papier est aussi important. Il permet au produit de déterminer le type de papier utilisé et de régler la quantité d’encre nécessaire en conséquence. Le tableau suivant répertorie les paramètres que vous devez sélectionner en fonction du papier utilisé.
Pour ce papier |
Type de papier sur |
|
l’écran LCD |
|
|
Papier ordinaire* |
Pap. ordinaire |
|
|
Epson Bright White Ink Jet Pa- |
Pap. ordinaire |
per (Papier jet d'encre blanc |
|
brillant)* |
|
|
|
Epson Ultra Glossy Photo Pa- |
Ultra glacé |
per (Papier photo ultra-glacé) |
|
|
|
Epson Premium Glossy Photo |
Glacé Prem. |
Paper (Papier photo glacé Pre- |
|
mium) |
|
|
|
Epson Premium Semigloss |
Glacé Prem. |
Photo Paper (Papier photo se- |
|
mi-glacé Premium) |
|
|
|
Epson Glossy Photo Paper (Pa- |
Glacé |
pier photo glacé) |
|
|
|
Epson Photo Paper (Papier |
Pap photo |
photo) |
|
|
|
Epson Photo Quality Ink Jet Pa- |
Mat |
per (Papier couché qualité |
|
photo) |
|
|
|
Epson Matte Paper–Heavy- |
Mat |
weight (Papier mat épais) |
|
|
|
Français
5

Guide de base
Manipulation du papier et des supports
Epson Double-Sided Matte Pa- |
Mat |
per (Papier mat recto verso) |
|
|
|
Epson Photo Stickers (Autocol- |
Autocoll. photo |
lants photo) |
|
|
|
*Vous pouvez procéder à des impressions recto verso sur ce papier.
Chargement du papier
Dans l'unité papier
Remarque :
Bien que les consignes de cette section soient appliquées au bac 2, elles sont aussi valables pour le bac 1.
Le type, la taille et la capacité de chargement du papier disponibles varient en fonction du bac. Pour plus d’informations, consultez le Guide d'utilisation au format PDF.
Pour connaître la procédure de chargement d’enveloppes ou d’une feuille de Photo Stickers (Autocollants photo), consultez le Guide d'utilisation au format PDF.
A Ouvrez le capot avant.
B Sortez l'unité papier.
CFaites glisser les guides latéraux contre les bords de l'unité papier.
Remarque :
Lorsque vous utilisez du papier au format Legal, retirez le plateau CD/DVD, puis dépliez le bac 2, comme indiqué sur l’illustration.
Remarque : |
Faites glisser le guide latéral conformément à la |
|||||||||
Si le bac de sortie a été éjecté, fermez-le avant de retirer |
D taille de papier que vous souhaitez utiliser. |
|||||||||
l'unité papier. |
|
|
|
|
|
|
|
|
|
|
|
|
|
|
|
|
|
|
|
|
|
|
|
|
|
|
|
|
|
|
|
|
|
|
|
|
|
|
|
|
|
|
|
|
|
|
|
|
|
|
|
|
|
|
|
|
|
|
|
|
|
|
|
|
|
6
Guide de base
Manipulation du papier et des supports
EChargez le papier contre le guide latéral, en orientant le côté imprimable vers le bas, et vérifiez que le papier ne dépasse pas de l’extrémité du bac.
Remarque :
Aérez et alignez les bords du papier avant de le charger.
Si vous utilisez du papier ordinaire, ne chargez pas le papier au-delà de la ligne située sous le repère en forme de flèche  , situé à l'intérieur du guide latéral. Si vous utilisez des supports spéciaux Epson, veillez à ce que le nombre de feuilles soit inférieur à la limite définie pour le support.
Si vous sélectionnez Bac 1 > Bac 2 pour le paramètre Source du papier, chargez du papier de même taille et de même type dans les deux bacs.
F Faitesdu papier.glisser les guides latéraux contre les bords
GMaintenez l'unité à plat et réinsérez-la délicatement et doucement dans le produit.
Remarque :
Laissez suffisamment de place devant le produit pour que le papier puisse être éjecté sans problème.
Ne retirez et n'insérez pas l'unité papier lorsque le produit fonctionne.
Sur le modèle XP-600, vous devez sortir le bac de sortie manuellement Assurez-vous également que le panneau de commande est relevé.
Dans la fente d’insertion arrière
Remarque :
La fente d’insertion arrière n’est pas disponible sur le modèle XP-600.
Bien que vous puissiez imprimer sur un papier d’une épaisseur de 0,05 à 0,6 mm, il est possible que certains papiers rigides ne soient pas entraînés correctement, même si leur épaisseur est incluse dans cette plage.
AEnvoyez votre travail d’impression au produit (à partir de votre ordinateur ou en utilisant le panneau de commande).
Remarque :
Vous ne pouvez pas charger de papier dans la fente d’insertion arrière avant d’avoir envoyé votre travail d’impression.
Français
7
Guide de base
Manipulation du papier et des supports
BOuvrez le cache de la fente d’insertion arrière, puis tirez le guide papier.
C Faites glisser les guides latéraux.
DChargez une feuille de papier, côté imprimable orienté vers le haut, au centre de la fente d’insertion arrière, puis réglez les guides latéraux. La face imprimable est généralement plus blanche et plus brillante que l'autre face.
Remarque :
Insérez le papier de façon à ce que le bord d’attaque se trouve à environ 5 cm de la rainure des guides latéraux.
E Appuyez sur x.
Remarque :
Le papier est automatiquement éjecté après un certain temps.
Chargement d’un CD/DVD
c Important :
N’insérez pas le plateau CD/DVD lorsque le produit fonctionne, faute de quoi le produit pourrait être endommagé ou la surface du CD/ DVD pourrait être salie ou rayée.
Lorsque vous éjectez/insérez le plateau CD/ DVD, assurez-vous que rien n’est placé sur le bac de sortie.
Remarque :
Vous pouvez également imprimer sur des disques Blu-ray™.
AAppuyez sur  sur le panneau de commande et sélectionnez Charger CD/DVD.
8
 Loading...