


 Loading...
XP-810
Small-in-One® Printer
Quick Guide
This guide includes basic information about your product and troubleshooting tips. See the resources below for additional information.
User’s Guide
See the online User’s Guide for detailed information on using your product. Learn how to print, copy, scan, fax, print on a CD/DVD, and more.
Support
Visit epson.com/support (U.S.) or epson.ca/support (Canada) where you can download drivers, view manuals, get FAQs, or e-mail Epson.
Videos
View easy-to-follow videos on using your product, including videos on connecting the printer to your network.
Features & Highlights
■Print documents and photos from across the room or around the world with Epson Connect™ and Google Cloud Print™.
■Print photos from a USB flash drive, external hard drive, or CD/DVD drive.
■Process large documents with the 30-page capacity Automatic Document Feeder.
■Copy, scan, and fax directly from the control panel.
■Print creative projects on card stock using the rear paper feed slot.
■Save paper and power with ECO mode.
English
See your online User’s Guide for more information.
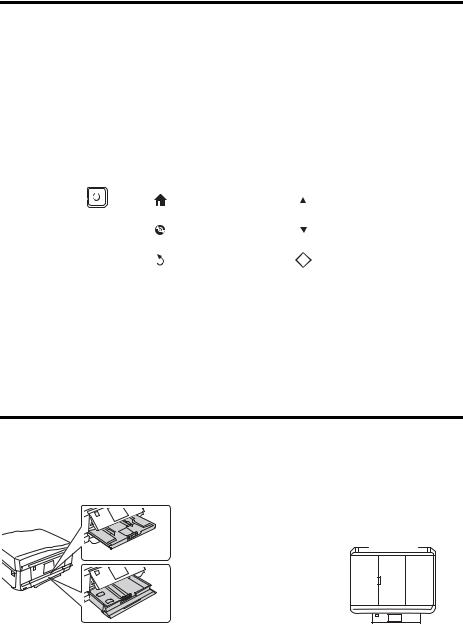
Using the Touch Screen
The touch screen makes it easy to use all the features of your product. To save energy, the screen goes dark after several minutes of inactivity. Touch the screen to wake it up.
The touch screen displays only the buttons that are available for the task you are working on.
Power on/off |
Home menu LCD screen Navigate menus |
|||||||||||||
|
|
|
|
|
|
|
|
|
|
|
|
|
|
|
|
|
|
|
|
|
|
|
|
|
|
|
|
|
|
|
|
|
|
|
|
|
|
|
|
|
|
|
|
|
|
|
|
|
|
|
|
|
|
|
|
|
|
|
|
|
|
|
|
|
|
|
|
|
|
|
|
|
|
|
|
|
|
|
|
|
|
|
|
|
|
|
|
|
|
|
|
|
|
|
|
|
|
|
|
|
|
|
|
|
|
|
|
|
|
|
|
|
|
|
|
|
|
|
|
|
|
|
|
|
|
|
|
|
|
|
|
|
|
|
|
|
|
|
|
|
|
|
|
|
|
|
|
|
|
|
|
|
|
|
|
|
|
|
|
|
|
|
|
|
|
|
|
|
|
|
|
|
|
|
|
|
|
|
|
CD/DVD menu |
Cancel/return to |
Start copying/printing/ |
|
previous menu |
scanning/faxing |
For more information on the icons displayed on the screen, press l or r, then select Help on the product’s touch screen.
Loading Paper
Your printer has two paper cassettes and a rear paper feed slot. You can load the following paper sizes:
Cassette 1 (Upper cassette): |
Rear paper feed slot: |
|||||
4 × 6- or 5 × 7-inch photo paper |
one sheet at a time |
|||||
|
|
|
|
|
|
|
|
|
|
|
|
|
|
|
|
|
|
|
|
|
|
|
|
|
|
|
|
Cassette 2 (Lower cassette): letter-size, A4, legal-size, 4 × 6-, 5 × 7-, or 8 × 10-inch photo paper
2 Using the Touch Screen
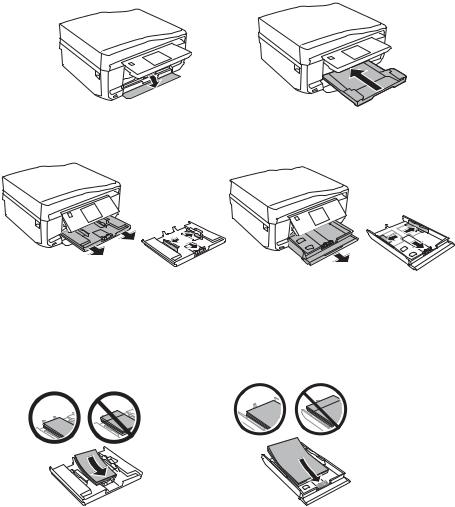
To load paper, follow the steps below.
1.Open the front cover. If the output tray is open, close it before going to the next step. (As you slide in the output tray, there may be slight resistance and noise. This is normal.)
2.Pull out the paper cassette and slide the edge guides outward.
Upper |
Lower |
cassette |
cassette |
Note: If you do not see the upper cassette, it may be pushed into the printer. Remove the lower cassette, then carefully pull out the upper cassette.
3.Set the front edge guide to the position for the paper size you are using. Insert paper with the glossy or printable side facedown, then slide the side edge guides against the paper, but not too tight.
Upper cassette |
Lower cassette |
Loading Paper 3
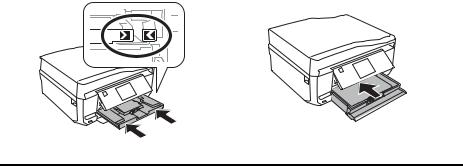
4.Keep the cassettes flat as you insert them. Insert the upper cassette until the arrows on the right side line up.
Lower cassette
Upper cassette
Solving Network Problems
If you have a problem with your Epson product, check the messages on the LCD screen to diagnose the cause of most problems. Press  if necessary, then press l or r and select Help. Select Troubleshooting, then scroll up or down to see all the help topics.
Note: For more detailed network instructions, see your online User’s Guide.
■Try connecting to the wireless router or access point with your computer or another device to confirm that it is working correctly.
■Try restarting the router (turn it off and then on), then try to connect to it again.
■Print a Network Status Sheet.
1.Press  if necessary, press l or r, then select Setup.
2.Scroll up or down and select Wi-Fi/Network Settings.
3.Scroll up or down and select Wi-Fi/Network Status.
4.Select Status Sheet, then press x.
Verify that the network settings are correct and check the signal strength. If it is poor, try moving the product closer to your router or access point. Avoid placing it next to a microwave oven, 2.4 GHz cordless phone, or large metal object such as a filing cabinet.
■If your wireless router has security enabled, make sure you entered the WEP key or WPA passphrase correctly.
■When using TCP/IP, make sure your network’s DHCP option is enabled (your router manufacturer will be able to assist you with this setting).
■Remove and reinstall your product software.
■Disable the firewall temporarily to see if that may be causing the problem. Contact your firewall manufacturer for assistance.
4 Solving Network Problems

Solving Paper Jam Problems
If paper has jammed, follow the steps on the LCD screen. If necessary, check the following areas:
Rear feed slot |
Scanner unit |
|
|
|
|
|
|
|
|
|
|
Paper cassettes
Remove the auto-duplexer from the back of the printer and remove any jammed paper.
Notices
Declaration of Conformity
According to 47CFR, Part 2 and 15 for: Class B Personal Computers and Peripherals; and/or CPU Boards and Power Supplies used with Class B Personal Computers:
We: |
Epson America, Inc. |
Located at: |
3840 Kilroy Airport Way, MS 3-13, Long Beach, CA 90806 |
Telephone: |
(562) 981-3840 |
Solving Paper Jam Problems 5
Loading...