


User’s Guide
– for use without a computer –
Introduction |
|
Important Safety Instructions .............................................................. |
3 |
Copyright Notice.................................................................................. |
4 |
Guide to Parts and Control Panel Functions |
|
Parts ....................................................................................................... |
5 |
Control Panel Functions ...................................................................... |
6 |
Handling Paper |
|
Selecting Paper.................................................................................... |
8 |
Loading Paper...................................................................................... |
8 |
Copying |
|
Placing Originals on the Document Table ...................................... |
10 |
Copying Documents ......................................................................... |
11 |
Copying Photos.................................................................................. |
11 |
Speeding Up Copying ....................................................................... |
11 |
Printing from a Memory Card |
|
Handling a Memory Card................................................................. |
12 |
Selecting and Printing Photos Using an Index Sheet...................... |
14 |
Printing All Photos or DPOF Photos ................................................... |
15 |
Printing from a Digital Camera |
|
Digital Camera Requirements.......................................................... |
16 |
Connecting and Printing................................................................... |
16 |
Maintenance |
|
Replacing Ink Cartridges................................................................... |
17 |
Checking and Cleaning the Print Head ......................................... |
20 |
Aligning the Print Head...................................................................... |
20 |
Cleaning This Product........................................................................ |
21 |
Transporting This Product................................................................... |
21 |
Solving Problems |
|
English
Error Indicators.................................................................................... |
22 |
Problems and Solutions ..................................................................... |
24 |
Contacting Customer Support ......................................................... |
26 |
Where to Find Information
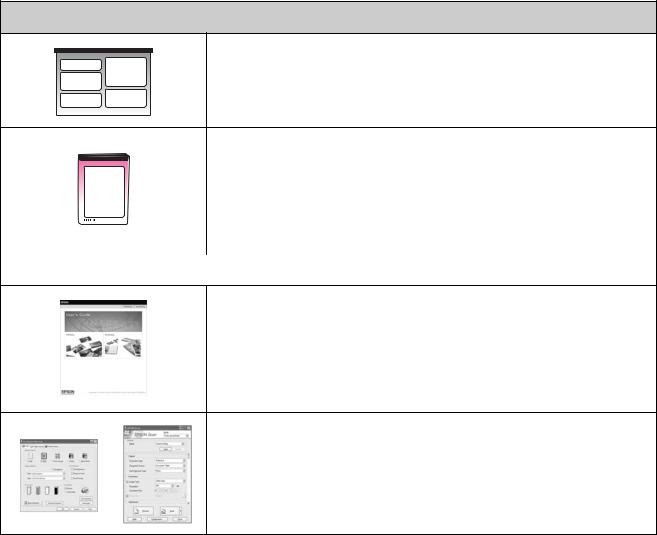
Paper manuals
Start Here
Be sure to read this sheet first.
This sheet tells you how to set up the product and install the software. It also includes instructions on loading paper and placing originals.
(this book) |
User's Guide -for use without a computer- |
||
|
|
|
This book contains information on how to use the product without |
|
|
|
connecting your computer, such as instructions on copying and printing |
|
|
|
from a memory card. |
|
|
|
If you have problems using the product, see the Solving Problems chapter |
|
|
|
in this book. |
|
|
|
|
Online manuals |
|
||
|
|
|
|
User's Guide
This guide provides instructions for printing and scanning from your computer and information on the software.
This guide is included on the software CD-ROM and installed automatically when you installed the software. To read this guide, double-click the icon on your desktop.
Online help
Online help is built in each application included on the software
CD-ROM. It provides detailed information on the application.

Introduction
Important Safety
Instructions
Before using this product, read and follow these safety instructions:
■Use only the power cord that comes with the product. Use of another cord may cause fire or shock. Do not use the cord with any other equipment.
■Make sure the power cord meets all relevant local safety standards.
■Use only the type of power source indicated on the label.
■Place the product near a wall outlet where the power cord can be easily unplugged.
■Do not let the power cord become damaged or frayed.
■If you use an extension cord with the product, make sure the total ampere rating of the devices plugged into the extension cord does not exceed the cord’s ampere rating. Also, make sure the total ampere rating of all devices plugged into the wall outlet does not exceed the wall outlet’s ampere rating.
■Avoid locations that are subject to rapid changes in heat or humidity, shocks or vibrations, or dust.
■Leave enough room around the product for sufficient ventilation. Do not block or cover openings in the case or insert objects through the slots.
■Do not place the product near a radiator or heating vent or in direct sunlight.
■Place the product on a flat, stable surface that extends beyond its base in all directions. It will not operate properly if it is tilted or at an angle.
■Make sure the back of the product is at least 10 cm away from the wall.
■Do not open the scanner unit while copying, printing, or scanning.
■Do not spill liquid on the product.
■Do not use aerosol products that contain flammable gases inside or around the product. Doing so may cause fire.
■Except as specifically explained in your documentation, do not attempt to service the product yourself.
■Unplug the product and refer servicing to qualified service personnel under the following conditions: if the power cord or plug is damaged; if liquid has entered the product; if the product has been dropped or the case damaged; if the product does not operate normally or exhibits a distinct change in performance. Adjust only those controls that are covered by the operating instructions.
■When storing or transporting the product, do not tilt it, stand it on its side, or turn it upside down; otherwise ink may leak from the cartridges.
■Be careful not to trap your fingers when closing the scanner unit.
Ink cartridge safety instructions
■Keep ink cartridges out of the reach of children and do not drink the ink.
■Be careful when you handle used ink cartridges; there may be ink remaining around the ink supply port. If ink gets on your skin, wash it off with soap and water. If it gets in your eyes, flush them immediately with water. If you still have discomfort or vision problems, see a doctor immediately.
■Do not put your hand inside the product or touch any cartridges during printing.
■Install a new ink cartridge immediately after you remove an expended cartridge. Leaving cartridges uninstalled can dehydrate the print head and may prevent the product from printing.
■If you remove an ink cartridge for later use, protect the ink supply area from dirt and dust and store it in the same environment as the product. Note that there is a valve in the ink supply port, making covers or plugs unnecessary, but care is needed to prevent the ink from staining items that the cartridge touches. Do not touch the ink cartridge, ink supply port, or surrounding area.
English
Introduction 3

Warnings, Cautions, and Notes
Follow these guidelines as you read your instructions:
w Warning:
Warnings must be followed carefully to avoid bodily injury.
c Caution:
Cautions must be observed to avoid damage to your equipment.
Note:
Notes contain important information about the product.
Tip:
Tips contain hints for using the product.
Copyright Notice
No part of this publication may be reproduced, stored in a retrieval system, or transmitted in any form or by any means, electronic, mechanical, photocopying, recording, or otherwise, without the prior written permission of Seiko Epson Corporation. The information contained herein is designed only for use with this product. Epson is not responsible for any use of this information as applied to other printers.
Neither Seiko Epson Corporation nor its affiliates shall be liable to the purchaser of this product or third parties for damages, losses, costs, or expenses incurred by the purchaser or third parties as a result of accident, misuse, or abuse of this product or unauthorized modifications, repairs, or alterations to this product, or (excluding the U.S.) failure to strictly comply with Seiko Epson Corporation's operating and maintenance instructions.
Seiko Epson Corporation shall not be liable for any damages or problems arising from the use of any options or any consumable products other than those designated as Original Epson Products or Epson Approved Products by Seiko Epson Corporation.
Seiko Epson Corporation shall not be held liable for any damage resulting from electromagnetic interference that occurs from the use of any interface cables other than those designated as Epson Approved Products by Seiko Epson Corporation.
EPSON® is a registered trademark and EPSON STYLUS™ and Exceed Your Vision are trademarks of Seiko Epson Corporation.
USB DIRECT-PRINT™ and the USB DIRECT-PRINT logo are trademarks of Seiko Epson Corporation. Copyright © 2002 Seiko Epson Corporation. All rights reserved.
DPOF™ is a trademark of CANON INC., Eastman Kodak Company, Fuji Photo Film Co., Ltd. and Matsushita Electric Industrial Co., Ltd.
SDHC™ is a trademark.
Memory Stick, Memory Stick Duo, Memory Stick PRO, and Memory Stick PRO Duo are trademarks of Sony Corporation.
xD-Picture Card™ is a trademark of Fuji Photo Film Co., Ltd.
General Notice: Other product names used herein are for identification purposes only and may be trademarks of their respective owners. Epson disclaims any and all rights in those marks.
Copyright © 2006 Seiko Epson Corporation. All rights reserved.
4 Introduction

Guide to Parts and Control Panel Functions
Parts
document cover
|
|
sheet feeder |
|
|
paper support extension |
control |
|
paper support |
panel |
|
|
|
feeder guard |
|
|
external interface |
|
|
|
|
memory cardslot |
USB port |
|
cover |
|
|
|
|
edge guide |
English
output tray |
output tray |
document table |
extension |
|
scanner unit |
cartridge cover
memory card slots
paper thickness lever
USB port
AC inlet
Guide to Parts and Control Panel Functions |
5 |

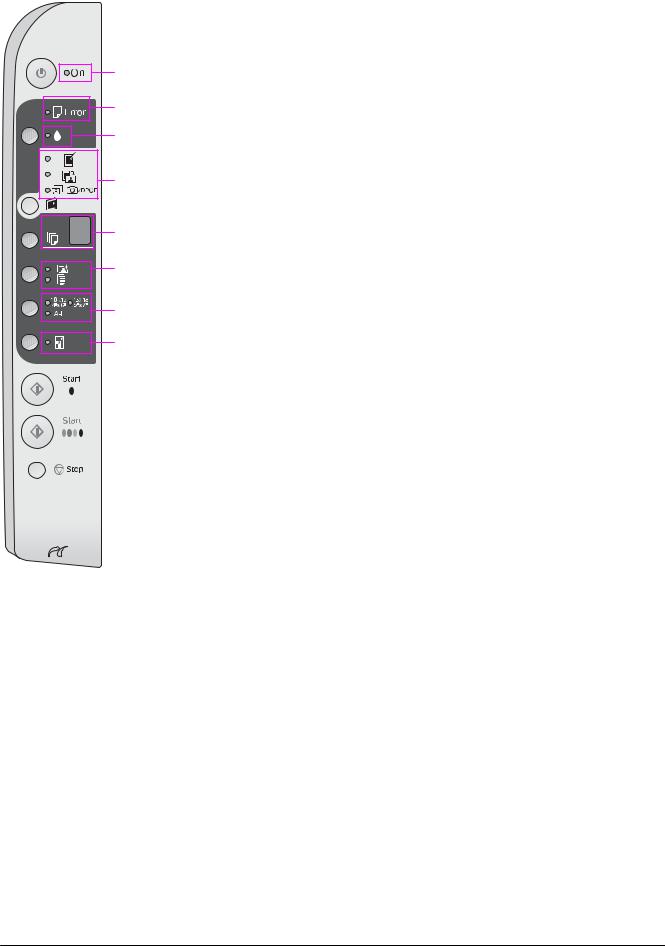
Control Panel Functions
Buttons
1
2
3
4
5
6
7
8
9
10
|
Button |
Function |
|
|
|
1 |
P On |
Press to turn the product on and off. |
|
|
|
2 |
B |
Press to replace ink cartridges. |
|
|
Press and hold for three seconds to clean the print head (when the B light is |
|
|
off). |
|
|
|
3 |
C |
Press to select a memory card print option. |
|
[Memory Card] |
m [Print Index Sheet -A4-] |
|
|
|
|
|
This is normally selected when you press the Memory Card button. |
|
|
i [Print From Index Sheet] |
|
|
This is selected automatically after printing the index sheets for a memory |
|
|
card. |
|
|
f/e/DPOF [Print All/DPOF/PictBridge] |
|
|
Select this option to print all the images on a memory card, to print images |
|
|
using the DPOF information stored on the memory card, or to print images |
|
|
directly from a digital camera. |
|
|
Note: |
|
|
DPOF mode is only available when the images on the memory card contain |
|
|
DPOF information. To print all images on the memory card, turn off DPOF |
|
|
mode on your camera. |
|
|
|
4 |
k |
Press to set the number of copies. The number in the window changes from |
|
[Copies] |
1 to 9, then -, and then the cycle repeats. |
|
|
|
5 |
g/l |
Press to select a paper type option. |
|
[Paper Type] |
Select g for Photo paper loaded in the sheet feeder. |
|
|
Select l for plain paper loaded in the sheet feeder. |
|
|
|
6 |
10 × 15 4" × 6" |
Press to select the size of the paper loaded in the sheet feeder. |
|
13 × 18 5" × 7" |
|
|
A4 |
|
|
[Paper Size] |
|
|
|
|
7 |
o [Fit to Page] |
Press to reduce or enlarge the copied image to fit the selected paper size. |
|
|
When copying photos, you can select whether to copy with or without borders |
|
|
(& “Copying Photos” on page 11). |
|
|
|
8 |
x Start D [B&W] |
Press to copy in black and white. |
|
|
|
9 |
x Start E |
Press to copy in color or to start memory card printing. |
|
[Color] |
|
|
|
|
10 |
y Stop |
Press to stop copying. The sheet being printed is ejected and the number of |
|
|
copies is reset. |
|
|
|
6 Guide to Parts and Control Panel Functions
Lights
1
2
3
4
5
6
7
8
O = on k = flashing |
|
|
|
|
|
|
|
|
English |
||
|
|
|
|
|
|
|
Light |
Pattern |
Status |
|
|
|
|
|
|
|
|
1 |
On |
O |
The product is on. |
|
|
|
|
||||
|
|
|
|
|
|
|
|
k (slow) |
The product is active. |
|
|
|
|
|
|
|
|
|
|
k (fast) |
The product is turning off. |
|
|
|
|
|
|
|
|
2 |
b Error |
O or k |
An error has occurred (& “Solving Problems” on |
|
|
|
|||||
|
|
|
page 22). |
|
|
|
|
|
|
|
|
3 |
B |
k |
An ink cartridge is low. You can continue |
|
|
|
|
|
copying until it is expended. |
|
|
|
|
|
|
|
|
|
|
O |
An ink cartridge is expended or missing. |
|
|
|
|
|
|
|
|
4 |
m [Print Index Sheet |
O |
One of the memory card printing options has |
|
|
|
-A4-] |
|
been selected. |
|
|
|
|
|
|
|
|
|
i [Print From Index |
k f/e/DPOF |
Memory card printing option is in DPOF mode. |
|
|
|
Sheet] |
|
|
|
|
|
f/e/DPOF [Print |
|
|
|
|
|
All/DPOF/PictBridge] |
|
|
|
|
|
|
|
|
|
|
5 |
k [Copies] |
1 to 9 |
Indicates the number of copies. |
|
|
|
(window) |
|
|
|
|
|
- |
Up to 100 copies will be made, depending on |
|
|
|
|
|
|
|
||
|
|
|
how much paper is loaded. |
|
|
|
|
|
|
|
|
|
|
E |
An error has occurred. |
|
|
|
|
|
|
|
|
|
|
H |
The paper thickness lever has been set to the |
|
|
|
|
|
^ (envelope) position. |
|
|
|
|
|
|
|
|
|
|
L |
The paper thickness lever has been set to the |
|
|
|
|
|
m (standard) position. |
|
|
|
|
|
|
|
|
|
|
P |
Flashes when a camera with PictBridge data is |
|
|
|
|
|
connected. When the connected device is not |
|
|
|
|
|
supported, the P double flashes and the b Error |
|
|
|
|
|
light and f/e/DPOF |
|
|
|
|
|
[Print All/DPOF/PictBridge] lights flash. |
|
|
|
|
|
|
|
|
|
|
. (dot) |
The product enters “sleep” mode when no |
|
|
|
|
|
buttons are pressed for 15 minutes. Press any |
|
|
|
|
|
button (except the P On button) to “wake” it. |
|
|
|
|
|
|
|
|
6 |
g [Photo Paper] |
O |
Indicates the selected paper type. |
|
|
|
l [Plain Paper] |
|
|
|
|
|
|
|
|
|
|
7 |
10 × 15 4" × 6" |
O |
Indicates the selected paper size. |
|
|
|
13 × 18 5" × 7" |
|
|
|
|
|
A4 |
|
|
|
|
|
|
|
|
|
|
8 |
o [Fit to Page] |
O |
When selecting l [Plain Paper] as the paper |
|
|
|
|
|
type, the copied image is reduced or enlarged to |
|
|
|
|
|
fit the selected paper size with borders. |
|
|
|
|
|
When selecting g [Photo Paper] as the paper |
|
|
|
|
|
type, the copied image is reduced or enlarged to |
|
|
|
|
|
fit the selected paper size without borders. |
|
|
|
|
|
|
|
|
Guide to Parts and Control Panel Functions |
7 |
Handling Paper
Epson offers an extensive line of special papers that provide outstanding results when used with Epson printers and ink. The type of paper you choose affects the way your printout looks, so be sure to select the correct paper for your job.
Selecting Paper
If you are just making a copy or printing a rough draft of an image, plain paper is fine. However, for the best results, you will want to use one of Epson’s special ink jet papers designed for the product.
Before printing, you need to select the correct Paper Type setting on the control panel. This important setting determines how the ink is applied to the paper.
Choose from these paper types and settings:
Paper type |
Size |
Paper type |
Loading |
|
|
setting |
capacity |
|
|
|
|
Plain paper* |
A4 |
l Plain paper |
12 mm |
|
|
|
|
EPSON |
A4 |
l Plain paper |
80 sheets |
Bright White |
|
|
|
Ink Jet Paper |
|
|
|
|
|
|
|
EPSON |
A4 |
l Plain paper |
100 sheets |
Premium |
|
|
|
Ink Jet Plain |
|
|
|
Paper |
|
|
|
|
|
|
|
EPSON |
10 × 15 |
g Photo paper |
20 sheets |
Premium |
(4 × 6 in.) |
|
|
Glossy Photo |
13 × 18 |
|
|
Paper |
(5 × 7 in.) |
|
|
|
A4 |
|
|
|
|
|
|
EPSON |
10 × 15 |
g Photo paper |
20 sheets |
Premium |
(4 × 6 in.) |
|
|
Semigloss |
A4 |
|
|
Photo Paper |
|
|
|
|
|
|
|
EPSON |
10 × 15 |
g Photo paper |
20 sheets |
Glossy Photo |
(4 × 6 in.) |
|
|
Paper |
13 × 18 |
|
|
|
(5 × 7 in.) |
|
|
|
A4 |
|
|
|
|
|
|
EPSON Ultra |
10 × 15 |
g Photo paper |
20 sheets |
Glossy Photo |
(4 × 6 in.) |
|
|
Paper |
13 × 18 |
|
|
|
(5 × 7 in.) |
|
|
|
A4 |
|
|
|
|
|
|
* You can use paper with a weight of 64 to 90 g/m2.
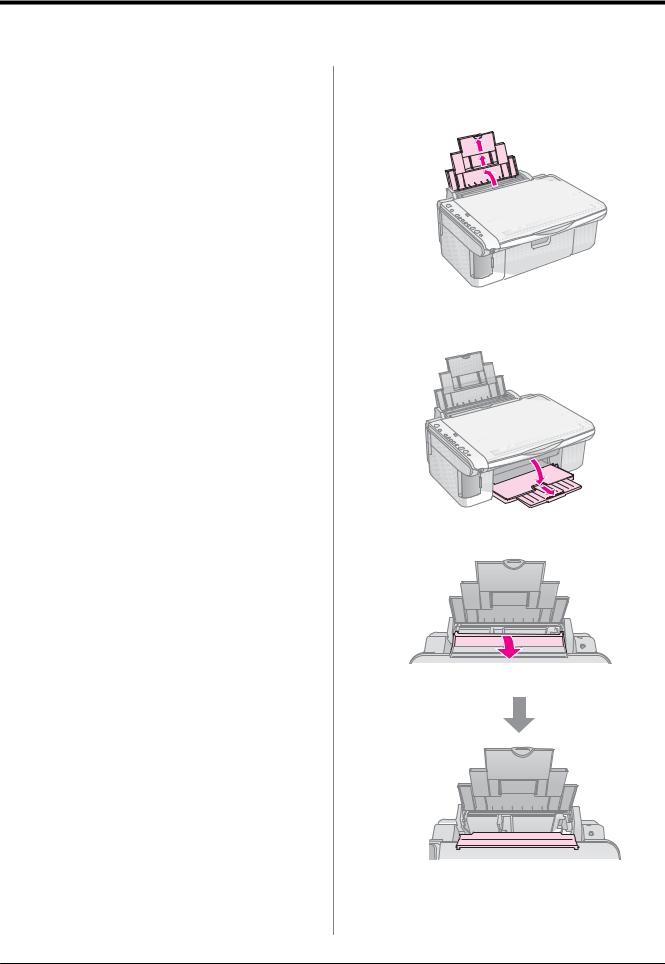
Loading Paper
1.Open and extend the paper support.
2.Open the output tray and slide out the extensions.
3.Flip the feeder guard forward.
8 Handling Paper
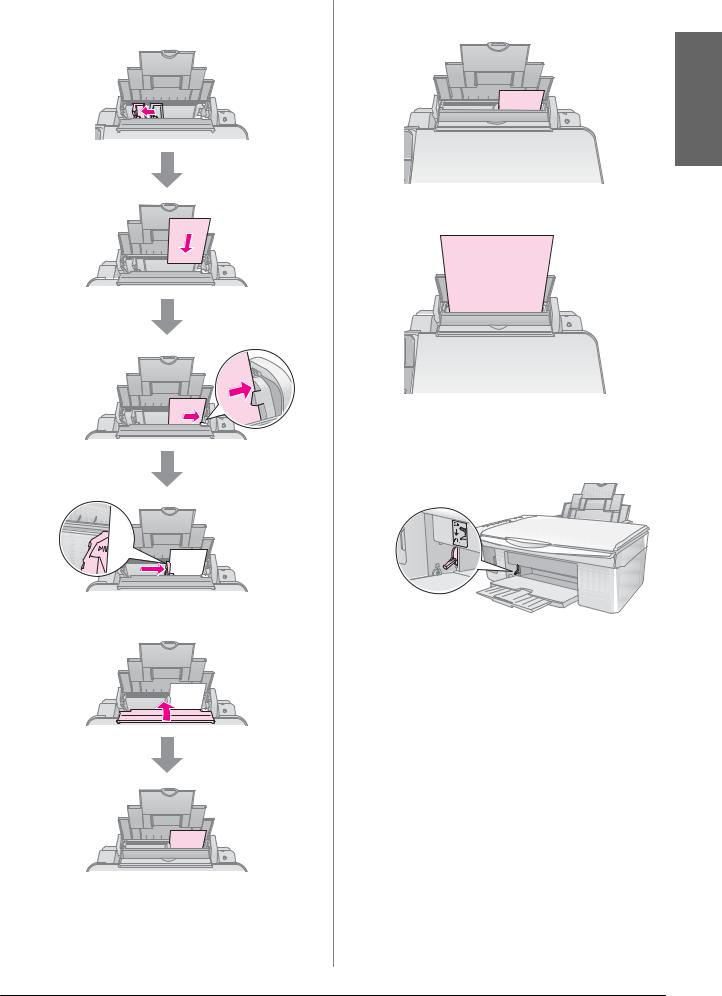
4.Set the paper as shown in the following illustrations.
The printable side is often whiter or brighterthanthe other side.
place behind the tabs
make sure it fits under the arrow inside the left edge guide
5.Flip the feeder guard back.
10 × 15 cm (4 × 6 in.) and 13 × 18 cm
(5 × 7 in.)
English
A4
Also make sure the paper thickness lever is set down to the m position.
The letter L appears briefly in the k [Copies] window on the control panel when you move the lever to the m position; the letter H appears when you move it to the ^ position.
Note:
Make sure you do not load more than the recommended number of sheets. Check the Paper Type setting before printing to make sure it matches the type of paper you have loaded (& “Selecting Paper” on page 8).
Handling Paper |
9 |
 Loading...