


 Loading...


 ® Photo!2


 ® Photo File Uploader
Digital Camera Utility Programs
All rights reserved. No part of this publication may be reproduced, stored in a retrieval system, or transmitted in any form or by any means, electronic, mechanical, photocopying, recording, or otherwise, without the prior written permission of SEIKO EPSON CORPORATION. No patent liability is assumed with respect to the use of the information contained herein. Neither is any liability assumed for damages resulting from the use of the information contained herein.
Neither SEIKO EPSON CORPORATION nor its affiliates shall be liable to the purchaser of this product or third parties for damages, losses, costs, or expenses incurred by purchaser or third parties as a result of: accident, misuse, or abuse of this product or unauthorized modifications, repairs, or alterations to this product.
SEIKO EPSON CORPORATION and its affiliates shall not be liable against any damages or problems arising from the use of any options or any consumable products other than those designated as Original EPSON Products or EPSON Approved Products by SEIKO EPSON CORPORATION.
EPSON is a registered trademark of SEIKO EPSON CORPORATION.
Microsoft and Windows are registered trademarks of Microsoft Corporation in the United States of America and other countries. IBM and PS/2 are registered trademarks of International Business Machines Corporation.
Macintosh is a registered trademark of Apple Computer, Inc.
General Notice: Other product names used herein are for identification purposes only and may be trademarks of their respective companies.
Copyright © 1998 by SEIKO EPSON CORPORATION, Nagano, Japan.
User’s Guide

ii

Contents
Introduction
. . . .Features |
. . . . . . . . . . . . . . . . . . . . . . . . |
0- |
1 |
About This Guide . . . . . . . . . . . . . . . . . . . . . . |
0- |
1 |
|
System Requirements . . . . . . . . . . . . . . . . . . . . |
0- |
2 |
|
PCs . . . . |
. . . . . . . . . . . . . . . . . . . . . . . . |
0- |
2 |
Macintosh Computers . . . . . . . . . . . . . . . . . |
0- |
2 |
|
Chapter 1 |
Installing the Software |
|
|
|
|
||
|
|
|
|
Installing the Software in Your PC . . . . . . . . . . . . |
1-1 |
||
Installing EPSON Photo!2 software . . . . . . . . . |
1-2 |
||
Installing EPSON Photo File Uploader . . . . . . . |
1-2 |
||
Installing other software . . . . . . . . . . . . . . . . |
1-3 |
||
Installing the Software in Your Macintosh . . . . . . . . |
1-3 |
||
Installing EPSON Photo!2 software . . . . . . . . . . |
1-4 |
||
Installing EPSON Photo File Uploader . . . . . . . |
1-4 |
||
Installing other software . . . . . . . . . . . . . . . . |
1-5 |
||
Chapter 2 |
Using EPSON Photo!2 |
|
|
|
|
|
|
Connecting the Camera to Your Computer . . . . . . . . |
2-1 |
||
Connecting to a PC . . . . . . . . . . . . . . . . . . . |
2-2 |
||
Connecting to a Macintosh . . . . . . . . . . . . . . . |
2-3 |
||
Accessing EPSON Photo!2 . . . . . . . . . . . . . . . . . |
2-4 |
||
For Windows users . . . . . . . . . . . . . . . . . . . |
2-5 |
||
For Macintosh users . . . . . . . . . . . . . . . . . . . |
2-5 |
||
Working with EPSON Photo!2 . . . . . . . . . . |
. . . . . 2-6 |
Getting help . . . . . . . . . . . . . . . . . . |
. . . . . 2-7 |
Closing EPSON Photo!2 . . . . . . . . . . . . |
. . . . . 2-7 |
Getting status and progress information . . . |
. . . . 2-7 |
Using the Camera Menu . . . . . . . . . . . . . . |
. . . . 2-7 |
Selecting photos . . . . . . . . . . . . . . . . . |
. . . . 2-8 |
Transferring photos . . . . . . . . . . . . . . . |
. . . . 2-9 |
Saving photos to a folder . . . . . . . . . . . . |
. . . . 2-9 |
Transferring pictures to your documents . . . |
. . . . 2-10 |
Erasing selected pictures from your camera |
. . . . . 2-12 |
Getting photo information . . . . . . . . . . . |
. . . . 2-13 |
Viewing your photos . . . . . . . . . . . . . . |
. . . . 2-13 |
Enhancing your photos . . . . . . . . . . . . . |
. . . . 2-13 |
Rotating your photos . . . . . . . . . . . . . . |
. . . . 2-14 |
Using the Folder Menu . . . . . . . . . . . . . . . |
. . . . 2-14 |
Selecting photos . . . . . . . . . . . . . . . . . |
. . . . 2-15 |
Transferring photos . . . . . . . . . . . . . . . |
. . . . 2-15 |
Transferring pictures to your documents . . . |
. . . . 2-16 |
Finding the folder containing your photos . . |
. . . . 2-16 |
Uploading and copying photos . . . . . . . . |
. . . . 2-16 |
Erasing files from a folder . . . . . . . . . . . |
. . . . 2-17 |
Getting photo information . . . . . . . . . . . |
. . . . 2-17 |
Viewing your photos . . . . . . . . . . . . . . |
. . . . 2-18 |
Enhancing your photos . . . . . . . . . . . . . |
. . . . 2-18 |
Rotating your photos . . . . . . . . . . . . . . |
. . . . 2-18 |
iii

Using the Controls Menu . . . . . . . . . . . . . . . . . . |
2-18 |
|
Controlling the camera from your computer . . . . . |
2-19 |
|
Taking pictures from your computer . . . . . . . . . |
2-20 |
|
Erasing photos . . . . . . . . . . . . . . . . . . . . . . |
2-21 |
|
Using the Setup Menu . . . . . . . . . . . . . . . . . . . . |
2-22 |
|
Changing the computer connection . . . . . . . . . . |
2-22 |
|
Changing camera settings . . . . . . . . . . . . . . . |
2-23 |
|
About button . . . . . . . . . . . . . . . . . . . . . . . |
2-24 |
|
Chapter 3 |
Using the Uploader Utilities |
|
|
|
|
Using EPSON Photo File Uploader . . . . . . . . . . . . |
3-1 |
|
Uploading images from your PC . . . . . . . . . . . |
3-2 |
|
Uploading images from your Macintosh . . . . . . . |
3-4 |
|
Making Screen Copies . . . . . . . . . . . . . . . . . |
3-6 |
|
Using EPSON Program Uploader . . . . . . . . . . . . . |
3-9 |
|
Connecting the camera . . . . . . . . . . . . . . . . . |
3-9 |
|
Uploading programs . . . . . . . . . . . . . . . . . . |
3-10 |
|
Removing programs . . . . . . . . . . . . . . . . . . . |
3-11 |
|
Chapter 4 |
Troubleshooting |
|
|
|
|
Software Problems . . . . . . . . . . . . . . . . . . . . . . |
4-1 |
|
Glossary
Index
iv

Introduction
Features
The EPSON digital camera software suite, including EPSON Photo!2 and EPSON Photo File Uploader, is the perfect companion for your EPSON digital camera. Using your digital camera and software, you can capture images in color, grayscale, or black and white, and save them to disk as files.
oThe software supports the following EPSON digital cameras: EPSON PhotoPC 700, PhotoPC 600
oEPSON Photo!2 directly controls all of the features of your EPSON digital camera, and is the standard cross-platform interface for other application programs.
oEPSON Photo File Uploader allows you to upload, save, and export images into other applications.
oEPSON Program Uploader allows you to upload or delete optional programs from the computer to the camera.
oYou can convert your files into various formats, such as JPEG and TIFF, for use with your favorite desktop publishing and image-editing software.
About This Guide
The information in this guide is divided into four chapters, with a glossary and index also provided for your reference.
oChapter 1 contains information on installing the software. Be sure to read this chapter first.
oChapter 2 provides you with a complete description of EPSON Photo!2.
oChapter 3 explains how to upload images and programs to your EPSON digital camera.
oChapter 4 explains how to solve problems you may have while using the software.
Notes contain important information and useful tips on operating your digital camera and software.
To set up and use the digital camera itself, see your User’s Guide. Online help can also provide you with information about settings in EPSON Photo!2.
Introduction 1

System Requirements
PCs
IBM®-compatible PC with 386 or higher processor (with Windows NT®, 486 or higher processor is required)
Serial port with standard RS-232C interface and a communication speed of 19200 bps or higher
8MB RAM (with Windows NT, at least 16MB is required)
Hard disk drive with at least 30MB free space
VGA monitor with at least 16-color display
Microsoft® Windows 3.1 or later, Microsoft Windows for Workgroups® 3.11 or later, Windows 95, Windows 98, or Windows NT Version 3.51 or later
Macintosh Computers
Macintosh with a Power PC processor
Serial port with a communication speed of 19200 bps or higher
16MB RAM
Hard disk drive with at least 30MB free space
Monitor with minimum resolution of 640 × 480
Macintosh System 7.1 or later (System 7.5 or later is required to access optional CompactFlash Card memory directly from the Macintosh)
2 Introduction

Chapter 1 |
1 |
|
Installing the Software
This chapter shows you to how to install the camera software in your computer. It covers the following:
Installing the Software in Your PC
Installing the Software in Your Macintosh
Installing the Software in Your PC
There are two CD-ROMs packed with your camera; one is for Windows and the other is for Macintosh. Each contains EPSON Photo!2, EPSON Photo File Uploader, and other optional software.
Depending on the country of purchase, your CD-ROM may come as the multiple-language version. If so, you can install the language appropriate for your system.
Be sure to use the CD for Windows when installing the software in your PC, and follow the steps in this section. For Macintosh installation, see page 1-3.
Note:
Be sure to install EPSON Photo!2 first. You cannot install other software before EPSON Photo!2 is installed.
Installing the Software |
1-1 |

Installing EPSON Photo!2 software
EPSON Photo!2 software lets you transfer your pictures from the camera to your computer, and place them into documents. You can also use this software to take pictures and change camera settings from your computer.
Note:
When you install EPSON Photo!2, the EPSON Program Uploader utility is also installed automatically.
Follow the steps in this section to install your EPSON Photo!2 software.
1.Turn on your computer, and insert the camera software CD shipped with your camera in the CD-ROM drive.
2.For Windows 95, Windows 98, or NT 4.0:
When you insert the CD, an introductory screen appears on your monitor automatically. Click the
Add Software icon.
For Windows 3.1 or NT 3.5x:
Click the File Manager icon in the Main menu. Then click the CD-ROM drive icon, and double-click CD Setup.exe.
3.You will see the list of software in the list box. Click to check or uncheck the names of the software you want to install. The checked software will be installed in your PC. You can see a description of the software in the online help or the User’s Guide that comes with your CD-ROM.
4.Click Setup icon. Then follow the instructions on the screen.
5.When you finish installing EPSON Photo!2, click the OK button.
After installing EPSON Photo!2, follow the instructions on the screen to install other software in your PC.
Installing EPSON Photo File Uploader
EPSON Photo File Uploader software lets you convert digital images to EPSON Photo file format and transfer them from the computer to your camera. You can then display the images on the camera’s LCD screen or on a television monitor.
Follow the steps in this section to install the EPSON Photo File Uploader software for Windows.
1-2 Installing the Software

1.Check “EPSON Photo File Uploader” in the list box you find at the start of EPSON Photo!2 installation; explained in step 3 of the previous section. EPSON Photo File Uploader setup program starts after installing EPSON Photo!2 in your PC.
If you are starting the installation from the beginning, see the previous section from step 1 through step 4, then click the Setup icon. Make sure EPSON Photo!2 is already installed.
2.Follow the instructions on the screen.
3.When you finish installing EPSON Photo File Uploader, click the OK button.
After installing EPSON Photo File Uploader, follow the instructions on the screen to install other software in your PC.
Installing other software
Your camera comes with other software allowing you to enhance the use of your camera. Follow the steps in this section.
1. Check the names of the other software you want to |
1 |
|
install in the list box which appears at the start of |
||
|
||
EPSON Photo!2 installation; explained in step 3 of |
|
|
“Installing EPSON Photo!2 software” on page 1-2. |
|
|
The setup program for other software starts after |
|
|
installing EPSON Photo!2 and/or EPSON Photo File |
|
|
Uploader in your PC. |
|
|
If you are starting the installation from the beginning, |
|
|
see the step 1 through step 4 in “Installing EPSON |
|
|
Photo!2 software”. Make sure EPSON Photo!2 is |
|
|
already installed. |
|
2.Follow the instructions on the screen.
3.When you finish installing the software, click the OK button.
Installing the Software in Your Macintosh
There are two CD-ROMs packed with your camera; one is for Windows and the other is for Macintosh. Each contains EPSON Photo!2, EPSON Photo File Uploader, and other software.
Be sure to use the CD for Macintosh when installing the software in your computer, and follow the steps in this section. For Windows installation, see page 1-1.
Installing the Software |
1-3 |
Note:
Be sure to install EPSON Photo!2 first. You cannot install other software before EPSON Photo!2 is installed.
Installing EPSON Photo!2 software
EPSON Photo!2 software lets you transfer your pictures from the camera to your computer, and place them into documents. You can also use this software to take pictures and change camera settings from your computer.
Follow the steps below to install EPSON Photo!2 software in your Macintosh.
1.Turn on the computer, and insert the camera software CD shipped with your camera in the CD-ROM drive.
2.Double-click the CD-ROM icon.
3.Double-click the EPSON Photo!2 folder. Depending on the country of purchase, the EPSON Photo!2 folder may contain multiple-language versions of the software. Double-click the folder of your preferred language.
4.Double-click the Photo!2 Installer - Part 1 icon to start the installation program. Follow the instructions on the screen.
Installing EPSON Photo File Uploader
EPSON Photo File Uploader software lets you convert digital images to EPSON Photo file format and transfer them from the computer to your camera. You can then display the images on the camera’s LCD screen or on a television monitor.
Follow the steps below to install EPSON Photo File Uploader software in your Macintosh.
1.Turn on the computer, and insert the camera software CD shipped with your camera in the CD-ROM drive.
2.Double-click the CD-ROM icon.
3.Double-click the File Uploader folder.
Depending on the country of purchase, the File Uploader folder may contain multiple-language versions of the software. Double-click the folder of your preferred language.
4.Drag the contents of the folder to the folder on your hard drive where you want to install the software.
1-4 Installing the Software

Installing other software |
1 |
|
Your camera comes with other software allowing you to enhance the use of your camera. For installation, follow these steps:
1.Turn on the computer, and insert the camera software CD shipped with your camera in the CD-ROM drive.
2.Double-click the CD-ROM icon.
3.Double-click the folder that contains the software you want to install.
Depending on the software, the Software folder may contain multiple-language versions of the software. Double-click the folder of your preferred language.
4.Double-click the Installer icon to start the installation program. Then follow the instructions on the screen.
Installing the Software |
1-5 |

1-6 Installing the Software

Chapter 2
Using EPSON Photo!2
After you have taken pictures, you can connect the camera to your computer and transfer the images. Then you can use them in your letters, presentations, or just about anything you create on your computer. This chapter tells you how, including:
Connecting the camera to your computer
Transferring pictures to your computer
Erasing pictures from the camera
Using pictures in your documents
Uploading EPSON Photo images to the camera
Connecting the Camera to Your |
2 |
Computer |
Before you start, make sure the camera is finished processing, and locate the serial cables that came with your camera. If you are connecting the camera to a PC, you will only need the long cable. If you are connecting the camera to a Macintosh, you will need both the long and short cables. Battery power can be saved using the optional AC adapter whenever you connect the camera to your computer.
Note:
When the camera is connected to your computer, you cannot use any of the control buttons or the shutter button on the camera. You can only operate the camera through your computer.
The camera’s automatic shut-off feature remains in effect when the camera is connected to your computer. Shut-off takes place after 5 minutes of inactivity. To turn the camera back on, close and reopen the lens cover, or use any of the software camera controls on your computer.
Using EPSON Photo!2 2-1

Connecting to a PC
Follow these steps to connect the camera to a PC:
1.Make sure the camera and your computer are turned off. Also make sure the LCD monitor is turned off.
2.Locate a serial port on the back of your computer. You may have two serial ports labelled COM1 and COM2, or with icons. If you have two serial ports available, use port 1 to connect your camera.
3.Line up the serial connector on the cable with one of the serial ports on your computer, and insert the connector. Then tighten the screws.
4. Open the connector cover on the side of the camera.
connector cover
5.Depending on the type of cable you have, line up either the arrow or the flat surface of the cable connector with the mark on the camera’s serial port. Then insert the connector.
serial port on computer |
serial cable |
|
(long cable) |
||
|
|
mark |
|
flat surface |
or |
arrow surface |
|
2-2 Using EPSON Photo!2
6. Turn on the camera and your computer system.
cCaution:
Keep the entire computer system away from potential sources of electromagnetic interference, such as loudspeakers or base units of cordless telephones.
Connecting to a Macintosh
Follow these steps to connect the camera to a Macintosh:
1.Make sure the camera and your computer are turned off. Also make sure the LCD monitor is turned off.
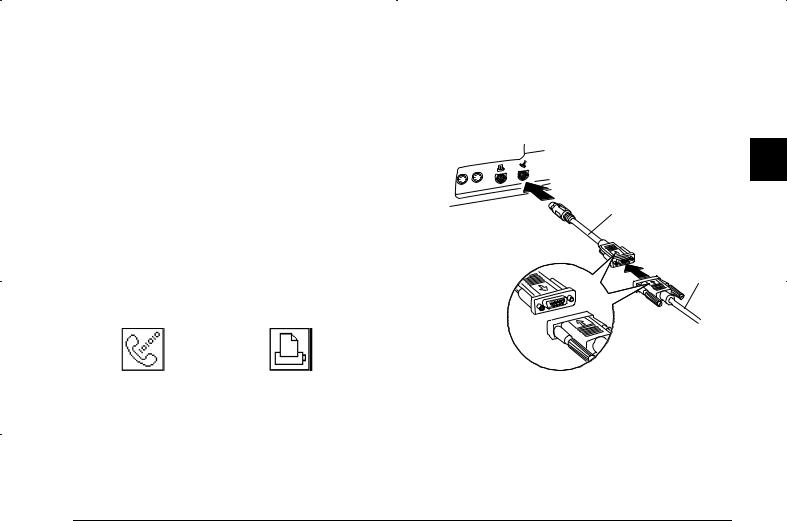
2.Locate the modem port and the printer port on the back of your computer. The ports should be labelled with icons.
modem port |
printer port |
3.Connect the long serial cable to the short Macintosh adapter cable, then tighten the screws. Line up the serial connector on the short cable with either the modem or the printer port on your computer, and insert the connector.
2
Macintosh adapter cable
serial cable
Using EPSON Photo!2 2-3
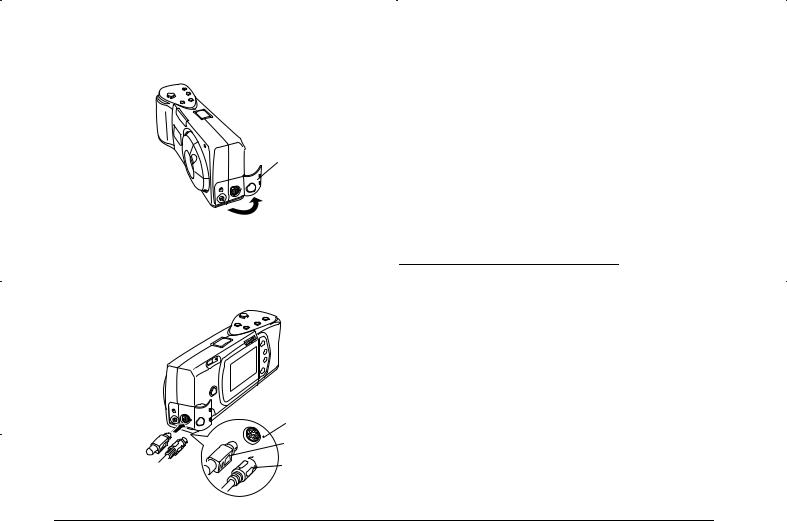
4. Open the connector cover on the side of the camera.
connector cover
5.Depending on the type of cable you have, line up either the arrow or the flat surface of the long cable connector with the mark on the camera’s serial port. Then insert the connector.
mark
flat surface


 arrow surface or
6. Turn on the camera and your computer system.
cCaution:
o If you connected the camera to a serial port that you use for another device and AppleTalk is turned on, turn off AppleTalk. The computer may not recognize the camera if AppleTalk is turned on.
oKeep the entire computer system away from potential sources of electromagnetic interference, such as loudspeakers or the base units of cordless telephones.
Accessing EPSON Photo!2
Once your camera and computer are connected and turned on, you are ready to start working with the EPSON Photo!2 software that came with your camera. This software allows you to download your photos to your computer so you can use them in your documents.
If you have not installed EPSON Photo!2 yet, do so now, following the instructions in Chapter 1. Then follow the instructions in this section to access the software.
2-4 Using EPSON Photo!2

Note:
If you do not set your camera’s clock before connecting it to the computer, the camera’s time and date will be set to that of the computer’s automatically after opening EPSON Photo!2.
For Windows users
To open EPSON Photo!2 directly, simply double-click its icon in the EPSON Photo!2 program group (for Windows 3.1x and NT 3.51) or click its icon in the EPSON Photo!2 folder (for Windows 95, Windows 98, and NT 4.0).
To access EPSON Photo!2 from an application program that supports the TWAIN image acquisition standard, choose EPSON PhotoPC 700/600 as the TWAIN data source on your application’s File menu, then acquire the image.
To access EPSON Photo!2 from an application that supports OLE2 (object linking and embedding), choose
EPSON PhotoPC 700/600 Object on the Insert Object menu and click OK.
For Macintosh users
To open EPSON Photo!2 directly, simply double-click its icon, located in the EPSON Photo!2 folder.
To access EPSON Photo!2 from an application program
that supports the TWAIN image acquisition standard, 2 choose PhotoPC 700/600 as the TWAIN data source
from your application’s File menu, then acquire the image.
Note:
The precise way to access EPSON Photo!2 from TWAINor OLE2-compliant applications varies depending on your software. Refer to your software manual for detailed instructions on selecting TWAIN data sources or inserting OLE objects.
Using EPSON Photo!2 2-5
Loading...